Jitterbug Dial User manual

How-To Guide
www.jitterbug.com
1-800-733-6632
Subject to Customer Agreement. Screen images simulated. Copyright ©2008 GreatCall, Inc. Jitterbug
is a registered trademark and GreatCall is a trademark of Great Call, Inc. Samsung is a registered
trademark of Samsung Electronics America, Inc. and its related entities.
800201_HTG_031308.qxp: ser g ide 3/13/08 1:05 PM Page 2

Welcome to the itterbug®Family!
We are pleased to share with you the only cell phone
experience that is simple, helpful and affordable. Soon
you’ll see how easy it is to stay in touch with family and
friends by using your new Jitterbug.
Please read this guide carefully, it will help you
understand:
• e basics about getting started.
• How your Jitterbug works.
• When and how to use the Jitterbug operator.
• e important health and safety information about
your phone.
The entire Jitterbug experience has been created for
your comfort, convenience and ease of use. As we
constantly want to improve our service, we welcome
your feedback anytime. If we can help, please call – you
can even use your Jitterbug.
Best regards,
Your friends at Jitterbug
800201_HTG_031308.qxp: ser g ide 3/13/08 1:05 PM Page 4

TABLE OF CONTENTS
Table of Contents I
TABLE OF CONTENTS
Table of Contents
Section 1: Getting Started ................................1
How to use this guide ..............................................2
Key items in the Jitterbug® box .................................3
Installing the battery.................................................4
Charging the battery.................................................5
Low battery indicator ...............................................6
Turning your Jitterbug on/off ...................................7
Getting more information ........................................8
Contacting Customer Service ...................................8
Jitterbug operator assistance .....................................9
Section 2: Phone Features ..............................11
Closed view of your phone – front .........................12
Closed view of your phone–back ..........................14
Open view of your phone .......................................16
Display screen ........................................................18
Start-up features .....................................................19
Moving between features ........................................20
Optional services ....................................................21
Adjusting the ringer volume ...................................23
Adjusting the ear piece volume ...............................24
Speakerphone .........................................................24
Emergency 911 service ...........................................25
800201_HTG_031308.qxp: ser g ide 3/13/08 1:05 PM Page I

II Table of Contents
TABLE OF CONTENTS
TABLE OF CONTENTS
Table of Contents III
TABLE OF CONTENTS
TABLE OF CONTENTS
Section 3: Placing and Receiving Calls ........29
Placing a call ..........................................................30
Receiving a call ......................................................33
Silencing a call .......................................................35
Section 4:Your Phone List .............................37
Adding, changing and deleting numbers ................38
Create a new member account ...............................39
inding numbers in your phone list .......................46
Section 5: Call History ....................................49
Using call history to see recent calls .......................50
Returning missed calls and redialing ......................51
Saving numbers from your call history ...................52
Section 6: Voicemail ........................................55
Using voicemail .....................................................56
• Setting up voicemail ........................................56
• Recording your voicemail greeting...................56
• Letting you know that you have voicemail
messages ..........................................................57
• Listening to voicemail messages .......................57
• Saving or deleting voicemail messages..............58
• Listening to saved voicemail messages..............58
• Changing your voicemail greeting ...................59
Section 7: Voice Dialing ...................................61
Setting up voice dialing ..........................................62
Voice dialing tips ....................................................63
Health and Safety Information .....................65
The Fine Print ..................................................97
Index .................................................................110
800201_HTG_031308.qxp: ser g ide 3/13/08 1:05 PM Page II

Getting Started 1
SECTION 1
SECTION 1
Section 1
Getting Started
is section explains how to start using your
Jitterbug®phone.
Topics
• How to use this guide.
• Key items in the Jitterbug box.
• Installing the battery.
• Charging the battery.
• Low battery indicator.
• Turning your phone on/off.
• Getting more information.
• Contacting Customer Service.
• Jitterbug operator assistance.
or more information about Jitterbug, visit us online
at www.jitterbug.com
800201_HTG_031308.qxp: ser g ide 3/13/08 1:05 PM Page IV

Getting Started 3
SECTION 1
2 Getting Started
SECTION 1
Key items in the itterbug box
The Jitterbug package you received includes everything
you need to get started:
1. Jitterbug Cell Phone.
2. Rechargeable Battery – slides into the back
of your phone.
3. AC Charger – to charge your battery.
How to use this guide
is How-To Guide is divided into seven sections that
describe the features of your Jitterbug®and how to use
them in a few simple steps. We recommend that you
read the entire guide and keep it handy for easy
reference.
You can also skip directly to the section you’re looking
for by using the Table of Contents on page I, the red
side tabs on each page, or the Index on page 110.
Throughout this guide we have included the following
illustrations, images and symbols to highlight useful
information.
A few features in this guide might be tricky for a first
time cell phone user. If you need assistance, please give
us a call anytime.
or more information, visit www.jitterbug.com or call
us at 1-800-733-6632.
2
3
1
800201_HTG_031308.qxp: ser g ide 3/13/08 1:05 PM Page 2

Installing the battery
To insert the battery:
1. Slide the rounded end of the
battery into the back of your
phone, lining up the gold contacts
on the battery with the gold contacts
inside the phone.
2. Press the top end of the battery
down until it snaps into place.
To remove the battery:
1. If the phone is on, turn it off by opening the phone and
holding down the button for two seconds until
the Jitterbug®tune plays.
2. Slide the battery release latch 1on
the back of the phone toward the
top end of the phone and hold.
3. Lift the battery 2up and away from
the phone, top end first, or simply
turn your phone over. The battery
will drop out.
Getting Started 5
SECTION 1
4 Getting Started
SECTION 1
Back Side
Charging the battery
To charge your itterbug:
1. An AC Charger is included in the
box with your Jitterbug phone.
2. Plug the large end of the charger into
a standard wall outlet (120/220 VAC).
3. Plug the smaller end into the
bottom of your phone. You’ll
see a “Charging” message in
the display window.
4. When the battery is fully charged,
you’ll see a “Completed” message in the
display window.
You must fully charge your battery before
using your phone for the first time. ailure to
do so may damage your battery.
800201_HTG_031308.qxp: ser g ide 3/13/08 1:05 PM Page 4

Getting Started 7
SECTION 1
6 Getting Started
SECTION 1
Low battery indicator
Jitterbug®phones remind you to charge your battery.
Reminders appear on the screen with the following
messages:
•“Charge Battery” appears when you have used
approximately 50% of your battery. Don’t be
alarmed and feel free to continue using your
Jitterbug normally. is notice merely reminds you
to charge the battery at your earliest convenience.
•“Battery Very Low” appears when you have
approximately ten minutes of battery life remaining.
•“Battery Critical” appears when you have
approximately two minutes of battery life remaining.
e message reappears every ten seconds until you
connect your phone to a charger.
You can also find your battery strength on
the phone info screen. See section 2 (pg 21)
of this guide for more details.
If you use your phone without charging
the battery, and it is critically low, it will turn
itself off.
Jitterbug accessories are designed to maximize
the battery’s life. Using other accessories could
damage your phone and may void your warranty.
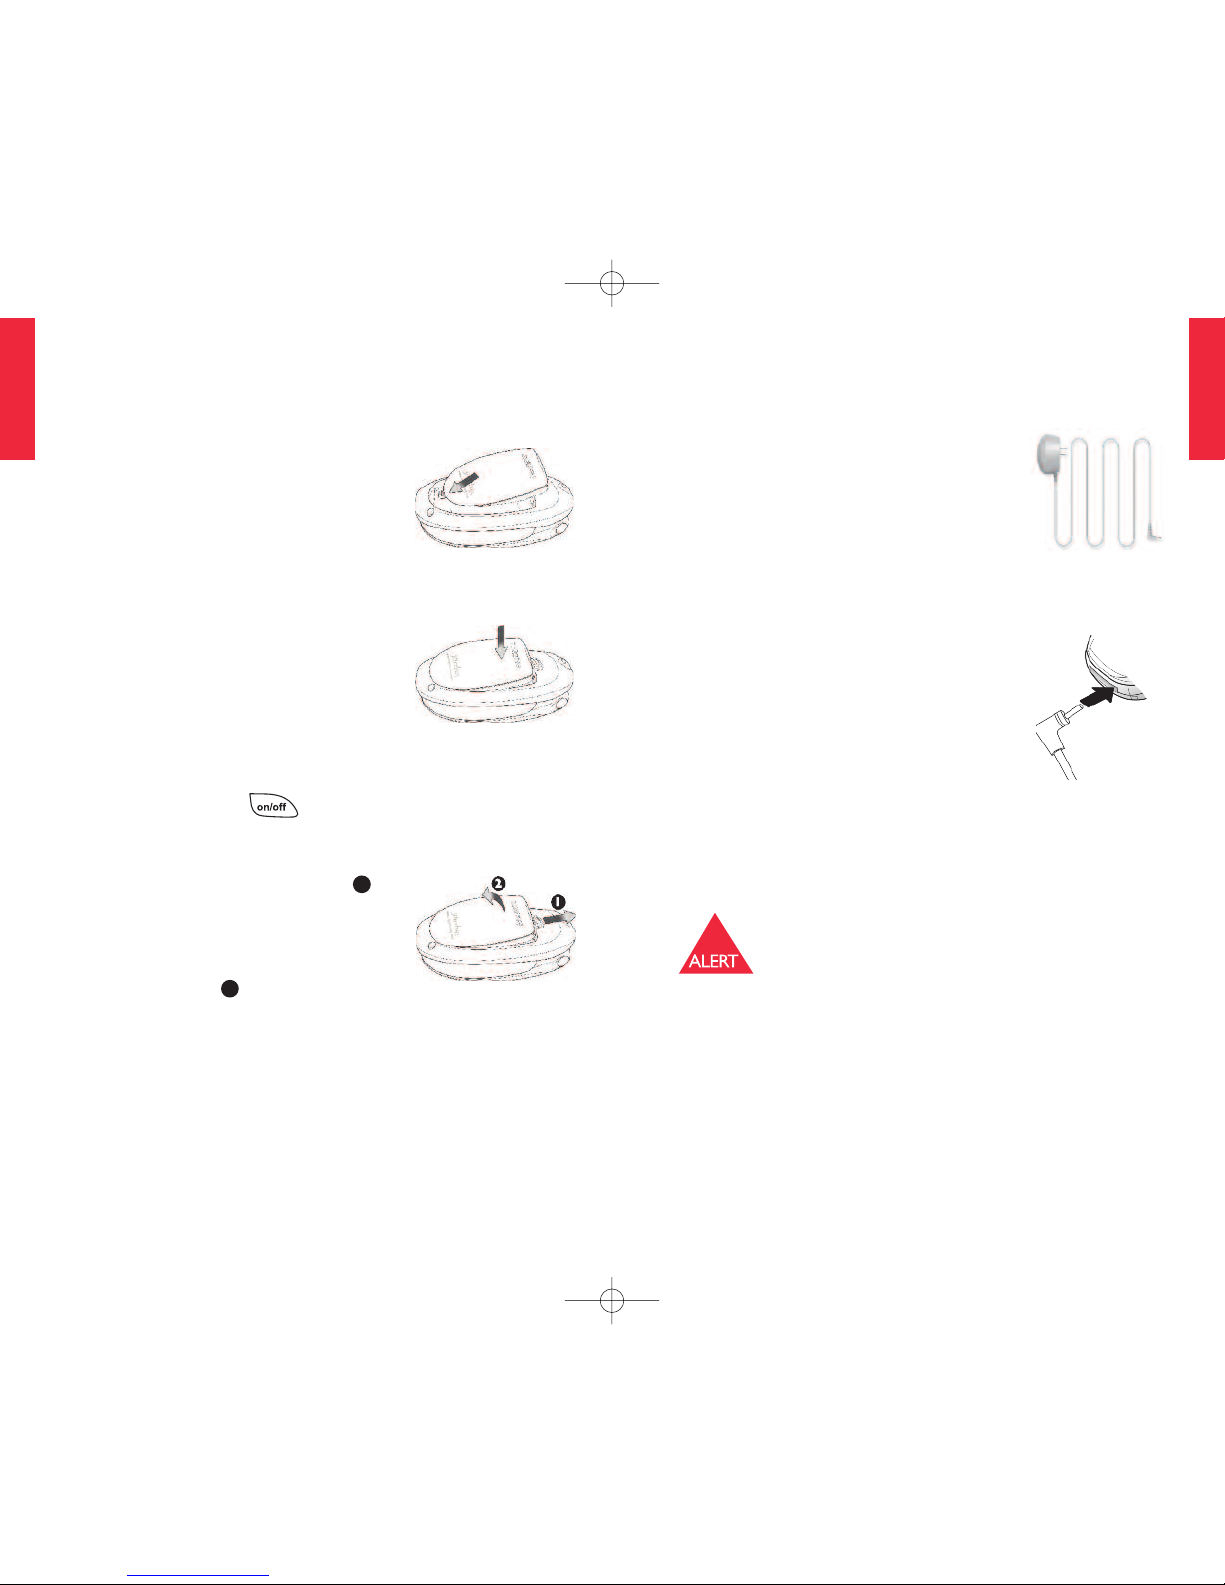
Turning your itterbug on/off
To turn your itterbug on:
1. Open the phone.
2. Press the button in the upper right corner of
the keypad until the screen lights up.
The “Jitterbug” logo will appear on the
screen before your phone is ready to use.
If a connection isn’t possible, you’ll see
“No Service” on the screen, and you won’t
get a dial tone.
3. When you hear a dial tone, your phone has service
and is ready to use.
If you are not able to place a call, please call
1-800-733-6632 from another phone so we
can help you.
To turn your itterbug off:
1. Open the phone.
2. Press and hold the button until the Jitterbug
tune plays. Your phone is off.
800201_HTG_031308.qxp: ser g ide 3/13/08 1:05 PM Page 6

Getting Started 9
SECTION 1
8 Getting Started
SECTION 1
Getting more information
Visit www.jitterbug.com to:
• Update your Phone List See section 4 (pg 38).
• Shop for the latest Jitterbug®phones and
accessories.
• Learn about new Jitterbug services.
• See answers to frequently asked questions.
Contacting Customer Service
Use any of these ways to contact us:
• Send us an e-mail at:
• Call us toll-free at: 1-800-733-6632
• Write to us at:
Jitterbug Customer Service
P.O. Box 4428
Carlsbad, CA 92018
itterbug operator assistance
Live Jitterbug operators are available 24 hours a day,
seven days a week, and can help you:
1. Update your Phone List.
2. Look up a residential, business or government phone
number.
3. Connect you to any number in the U.S. or Canada.
4. Place calls to anyone on your Phone List, which is
on file with the operator.
To call a itterbug operator:
Press the “0” button, then press the button. e
live operator will greet you by name and ask how they
may assist you.
Minutes are used normally while speaking
with the operator and for the length of any
call they connect to you. If the operator
performs one of the convenient four items
listed above, an additional five minutes will
be deducted from your account for the
service. Most wireless carriers charge over $1
in cash for services like 411; we keep it simple
by deducting only 5 minutes.
800201_HTG_031308.qxp: ser g ide 3/13/08 1:05 PM Page 8

Phone Features 1110 Phone Features
SECTION 2
SECTION 2
Section 2
Phone Features
is section describes the key features and services of
your Jitterbug®phone and how to use them.
Topics
• Closed view of your phone–front.
• Closed view of your phone–back.
• Open view of your phone.
• Display screen.
• Start-up features.
• Moving between features.
• Optional services.
• Adjusting ringer volume.
• Adjusting the ear piece volume.
• Speakerphone.
• Emergency 911 service.
or more information about Jitterbug, visit us online
at www.jitterbug.com
The first cellular phone wei hed 40
ounces.Your Jitterbu wei hs only 4.5
ounces.
800201_HTG_031308.qxp: ser g ide 3/13/08 1:05 PM Page 10

Phone Features 1312 Phone Features
SECTION 2
SECTION 2
1. Internal Antenna Connects with the cellular
network so you can use your phone.
2. Volume Button Adjusts the ringer volume or the
voice volume during a call. (To silence the ringer
during an incoming call, tap the volume button.)
3. Accessory Connector Links accessories to your
phone.
4. Power Connector Connects the AC Charger to
your phone.
5. Display Window Shows time, day and date (when
your phone is on). Indicates when you have an incoming
call or message.
6. Light Alert The area around the volume button will
light up for incoming calls or when the phone is fully
charged. The following list outlines the light alerts and
what each one means:
When your phone is plugged in:
•Light is on briefly means charging has begun.
•Light is on steady means charging is complete.
When your phone is unplugged:
•Light has a constant flash means your
phone needs recharging.
•Light has a short flash means you have an
incoming call or voice message.
Closed view of your phone – front
1 Internal Antenna 5 Display Window
3 Accessory Connector
4 Power Connector
2 Volume Button
6 Light Alert
800201_HTG_031308.qxp: ser g ide 3/13/08 1:05 PM Page 12

Phone Features 1514 Phone Features
SECTION 2
SECTION 2
1. Battery Delivers power to make your phone
function.
2. Lanyard Connector Makes it easy to attach a
lanyard or wrist-strap to carry your phone.
3. Battery Latch Slides to open for easy battery
removal.
To purchase a Jitterbug®lanyard or any
other Jitterbug accessory, visit us online at
www.jitterbug.com/accessories.
Closed view of your phone – back
1 Battery 2 Lanyard Connector
3 Battery Latch
800201_HTG_031308.qxp: ser g ide 3/13/08 1:05 PM Page 14

Phone Features 1716 Phone Features
SECTION 2
SECTION 2
1. Speaker Hear the caller loud and clear.
2. Display Screen Shows all the information you
need to operate your phone.
3. Up/Back Arrow Button Returns to previous
screen on your Phone List or Call History.
4. Button Allows you to respond “Yes” to
questions or commands on the display screen.
5. Down/More Arrow Button Advances to next
screen on your Phone List or Call History.
6. Accessory Connector Accessories such as our
Hands ree Car Kit connect into your phone.
7. Patented Ear Cushion its comfortably around
your ear while reducing unwanted noise.
8. Power Button Turns your phone on and off.
9. Button Allows you to respond “No” to
questions or commands on the display screen.
10. Microphone Picks up the sound of your voice
for calls and voice dialing.
11. Power Connector Both the AC Charger and
Car Charger connect here to recharge your phone.
Open view of your phone
1 Speaker
2 Display
Screen
3 p/Back
10 Microphone
6 Accessory
Connector
11 Power Connector
4 “Yes” Button
5 Down/More
9 “No” Button
8 Power Button
7 Patented
Ear Cushion
800201_HTG_031308.qxp: ser g ide 3/13/08 1:05 PM Page 16

Phone Features 1918 Phone Features
SECTION 2
SECTION 2
4. Additional Entries Indicates when entries are
available before or after the current page. Use the
Up/Down arrow buttons to scroll through entries.
•“Back” Entries available before the current page.
•“More” Entries available after the current page.
Start-up features
Your Jitterbug includes the following important start
up features:
•Phone List Up to 50 of the numbers you call
most often can be stored in your phone. Jitterbug
operators can even set up the Phone List for
you. See section 4 (pg 38) for more details.
•Call History An easy way to review your last
ten incoming, outgoing and missed calls.
•Phone Information gives you important
information about your phone and battery.
Display screen
This is what you may see on the screen while using
your Jitterbug®
.
1. Feature Area The top of the display screen is the
“Feature Area.” It identifies the feature you are using.
2. Detail Area The middle of the display screen
indicates the detailed entries from your Phone List,
phone call status, and received messages in adjustable
type size (shorter messages appear in larger type).
3. Command Area e bottom of the display screen
in the “Command Area” displays questions or
commands you can choose by pressing the
or buttons.
Remember to read the Command Area line
and respond by using the or buttons.
1
4
2
3
Feature Area
Detail
Area
Command
Area
Additional
Entries
800201_HTG_031308.qxp: ser g ide 3/13/08 1:05 PM Page 18

Phone Features 2120 Phone Features
SECTION 2
SECTION 2
When your phone is first turned on, it will be on the
“Phone List” feature.
Press the button to scroll through Phone List entries.
Press the button to call the entry showing on the screen.
Press the button to move to the next feature.
Keep pressing the button to cycle
through the features on your phone.
Optional services
The following optional services can be turned on or off
at your request by calling Jitterbug Customer Service at
1-800-733-6632.
Voicemail Allows callers to leave you a message if you
don’t answer (service fees and airtime may apply).
Battery isat
100%
Signal is
Strong
Approx Minutes
Used:
169 minutes
Moving between features
Everything about Jitterbug was designed to be easy. You
can move through all available features with three simple
buttons located at the top of the keypad.
1. Press the button to continue to the next feature
or item.
2. Press the button to choose the feature or item
displayed on your screen.
3. Press the button to move through a list within
a feature.
•itterbug®Operator Greets you by name,
makes calls for you, provides directory assistance
and can add names and numbers to your Phone
List (per minute charges for operator services may
apply).
•Emergency 911 service Just in case you ever
need it.
800201_HTG_031308.qxp: ser g ide 3/13/08 1:05 PM Page 20

Phone Features 2322 Phone Features
SECTION 2
SECTION 2
Adjusting the ringer volume
1. Open your Jitterbug and confirm it’s turned on.
2. Press the Up/Down volume button on the outside of
the phone below the display window. Press repeatedly
to cycle through the available options below:
• Ringer Volume Ring Max
• Ringer Volume High
• Ringer Volume Med
• Ringer Volume Low
• Ringer Volume Silent
The ringer and keypad can be silenced by
pressing the volume button down until
“Silent” appears on the screen. Your Jitterbug
will now only vibrate to alert you to incoming
calls (This can come in handy at a movie, a
library or any other location where a ringer
may be a distraction).
Voice Dialing Speak a name exactly as it appears in
your Phone List and your Jitterbug®will connect you
right away.
Built-in User Guide Provides simple instructions
about moving through Jitterbug features and works as
follows:
or help with any of the above optional features, please
call Jitterbug Customer Service.
If you have activated some or all of these features, you
will move between them in this order.
Battery is at
100%
Signal is
Strong
Approx Minutes
Used:
169 minutes
asks
Yes Yes Ye s
800201_HTG_031308.qxp: ser g ide 3/13/08 1:05 PM Page 22

SECTION 2
SECTION 2
Phone Features 2524 Phone Features
To exit speakerphone:
While you’re on a call, press the volume button down
to turn this feature off.
Your phone automatically exits the
Speakerphone setting when you end a call.
Emergency 911 service
When you dial 911, your phone automatically enters
Emergency Callback mode for 30 minutes. While in
this mode, you cannot make other calls.
To make an emergency call:
1. Dial the numbers 9-1-1. “Calling Emergency” will
appear on the screen.
2. When the 911 operator answers,
“Connected to Emergency” appears
on the screen, as shown.
To end an emergency call:
1. If the “No to Hang up” command is showing at the
bottom of the screen, press the button. Your
phone will now be in Emergency Callback mode.
While your phone is in Emergency Callback mode
you cannot make calls for 30 minutes in
case the 911 operator needs to call you back.
Adjusting the ear piece volume
When you’re on a call, press the volume button up or
down until the sound reaches a comfortable volume.
Speakerphone
Use the Speakerphone setting to conduct a call without
holding the phone to your ear (and allow others to
participate in your phone call).
Don’t hold the phone up to your ear when
it’s in Speakerphone mode. The volume may
be too loud.
You must be on a call to use this setting.
To use the speakerphone:
1. When you have placed or answered a call, you will
see a “Connected to…” message on the screen.
2. Press the Volume button up repeatedly until you see
“Press Yes for SPKR Phone”.
3. Press the button.
800201_HTG_031308.qxp: ser g ide 3/13/08 1:05 PM Page 24

Phone Features 27
SECTION 2
26 Phone Features
SECTION 2
2. To reconnect to the 911 operator, press the
button. You will know that you are in the
Emergency Callback mode when you open your
phone and see “Emergency Callback” on the
screen.
Why do I have an emergency callback setting?
If you dial 911, your mobile phone line is kept free so
that the 911 operator can call you back or stay on the line
with you.
If you mistakenly call 911, end the call as
soon as possible by pressing the button
to hang up or close your phone.
All 911 calls made from your Jitterbu ®
phone are free.
800201_HTG_031308.qxp: ser g ide 3/13/08 1:05 PM Page 26

28 Placing and Receiving Calls Placing and Receiving Calls 29
SECTION 3
SECTION 3
Section 3
Placing and Receiving Calls
is section explains how to use your phone’s calling
and answering features.
Topics
• Placing a call.
– Dialing manually.
– Placing a call via the Jitterbug®operator.
– Using your Phone List to make a call.
• Receiving a call.
– Indications of incoming calls when your
phone is open.
– Indications of incoming calls when your
phone is closed.
– Receiving a call when your phone is open.
– Receiving a call when your phone is closed.
– To end a call.
– To ignore a call when the phone is closed.
– To ignore a call when the phone is open.
• Silencing a call
or more information about Jitterbug, visit us online
at www.jitterbug.com
More than 196 million Americans
subscribe to a wireless service.
800201_HTG_031308.qxp: ser g ide 3/13/08 1:05 PM Page 28

30 Placing and Receiving Calls Placing and Receiving Calls 31
SECTION 3
SECTION 3
Placing a call via the itterbug®operator:
A live Jitterbug operator can connect you to anyone on
your Phone List or to any number in the U.S. or
Canada.
1. Press the “0” button.
2. Press the button when you see “Call?” at the
bottom of the screen. “Calling” will appear on the
screen.
3. When the operator answers, “Connected to” will
appear on the screen.
4. Tell the operator the name of the person in your
Phone List you want to call, or tell them the ten
digit number you want to be connected to.
You can end any call or exit any screen by
closing, then re-opening your phone.
Placing a call
Dialing manually:
You can dial a number directly from any screen on your
phone with 2 easy steps:
1. Dial the full ten digit number using your keypad.
You are not required to dial one (1) first before
placing a long distance call.
2. Press the button when you see “Call?” at the
bottom of your screen.
If you make a mistake while entering the number,
press the button to back up and delete your
entry.
A dial tone means service is available. If service
is not available you’ll see “No Service” on
the screen.
Always dial the full ten digit number including
area code even if it’s a local call (except 911).
You are not required to dial one (1) first
before placing a long distance call.
800201_HTG_031308.qxp: ser g ide 3/13/08 1:05 PM Page 30
Other Jitterbug Cell Phone manuals