Jiuzhou Claro Mounting instructions

1

2
Our set-top box ensures you access to the TV service with satellite signal
Claro TV digital and allows you to enjoy better sharpness in image and sound. In addition,
the service brings you benefits as a fast program switching feature,
automatic frequency search, lock password, all on one interface
user friendly and easy to use. With advanced demodulation 8PSK and QPSK and
decoding technologies, the team is able to receive and decode all
digital satellite television programmes compatible with DVB video standards, with
MPEG2 and MPEG4 modulation. DVB-S/S2.
● Compatible with DVB-S/S2 video standard
● Nagra Silicon Secret CAS Certificate
● User-friendly interface
● HI-FI digital stereo output
● USB port for personal digital recorder
● Programming Guide (EPG)
● OTA support
You Set-Top-Box and the following items:
1 STB Digital Satellite (Set-Top-Box)
1 Audio/video cable
1 Remote control unit (RCU)
2 Battery
1 User Manual
1 HDMI cable
1. Safety Instructions------------------------------------------------------------------------ 3
2. TV receiver--------------------------------------------------------------------------------------------- 4
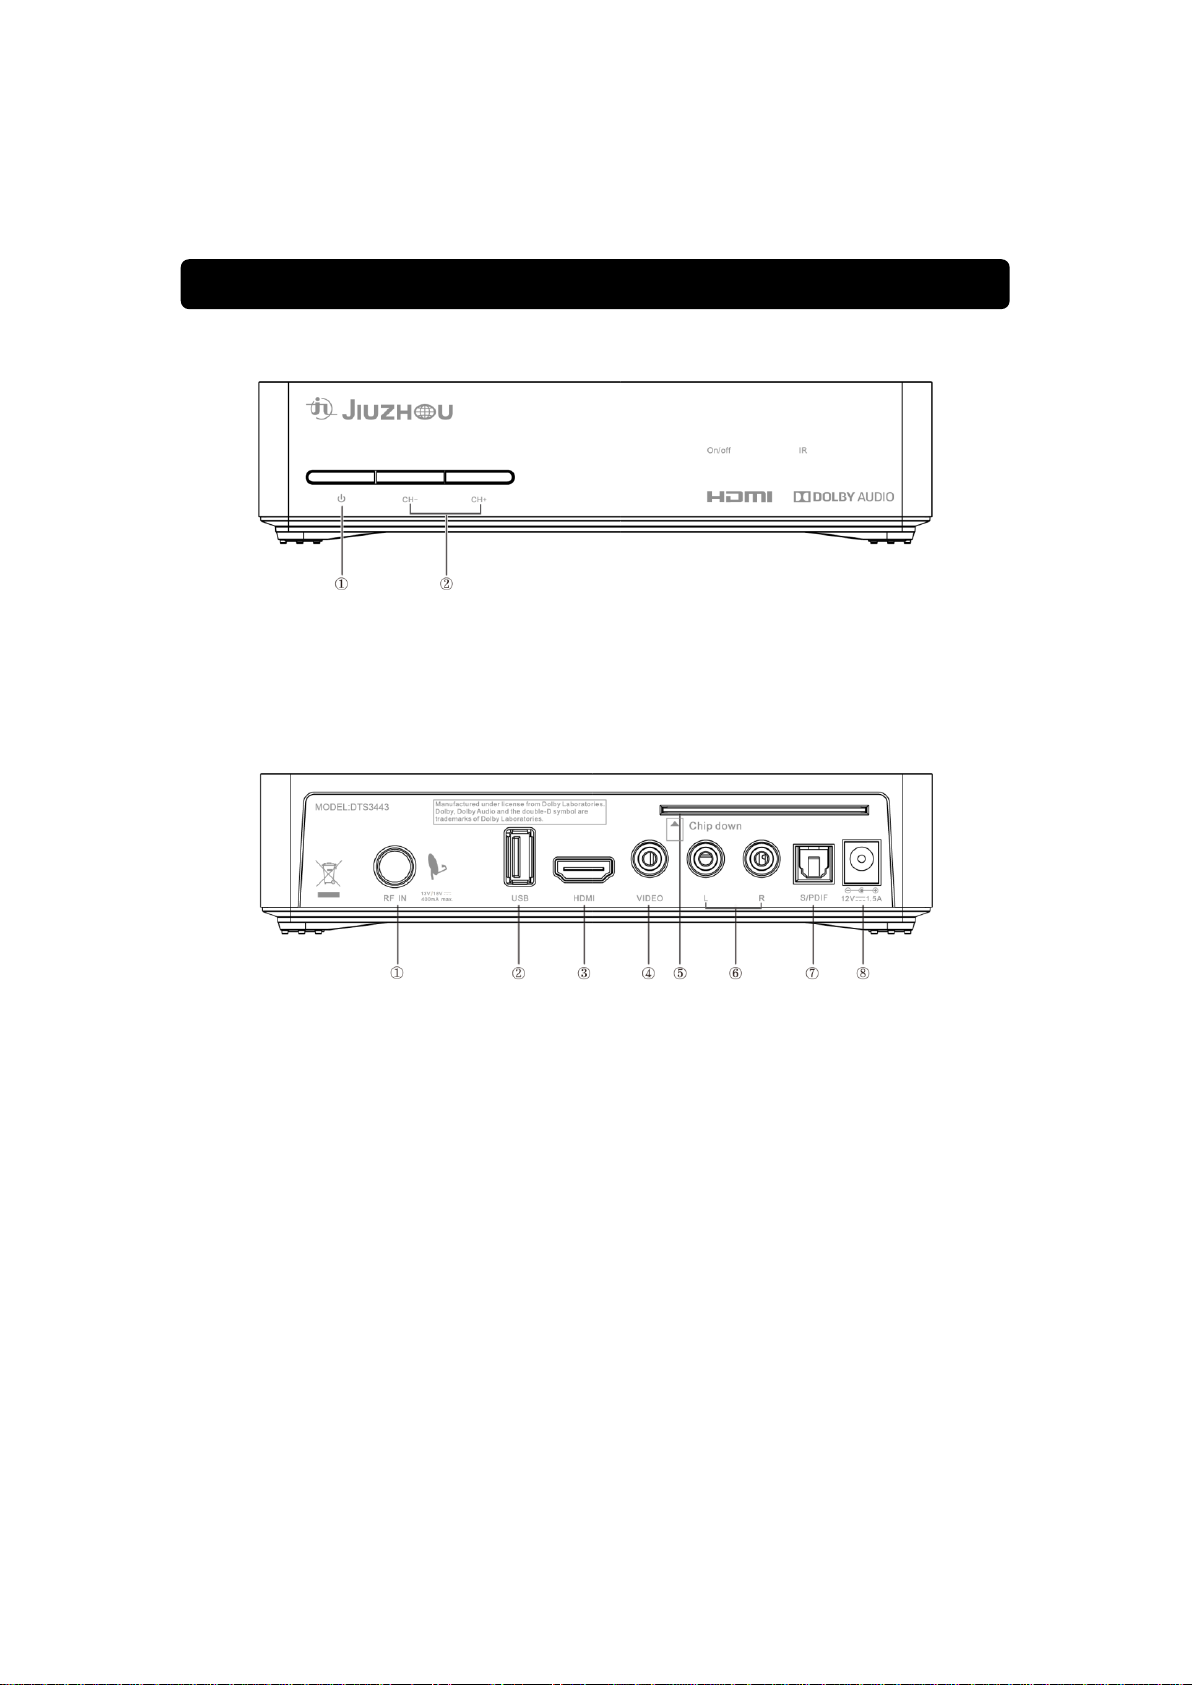
1) Front Panel --------------------------------------------------------------------------------------- 4
2) Rear Panel -------------------------------------------------------------------------------------- 4
3) Remote Control Unit --------------------------------------------------------------------- 5
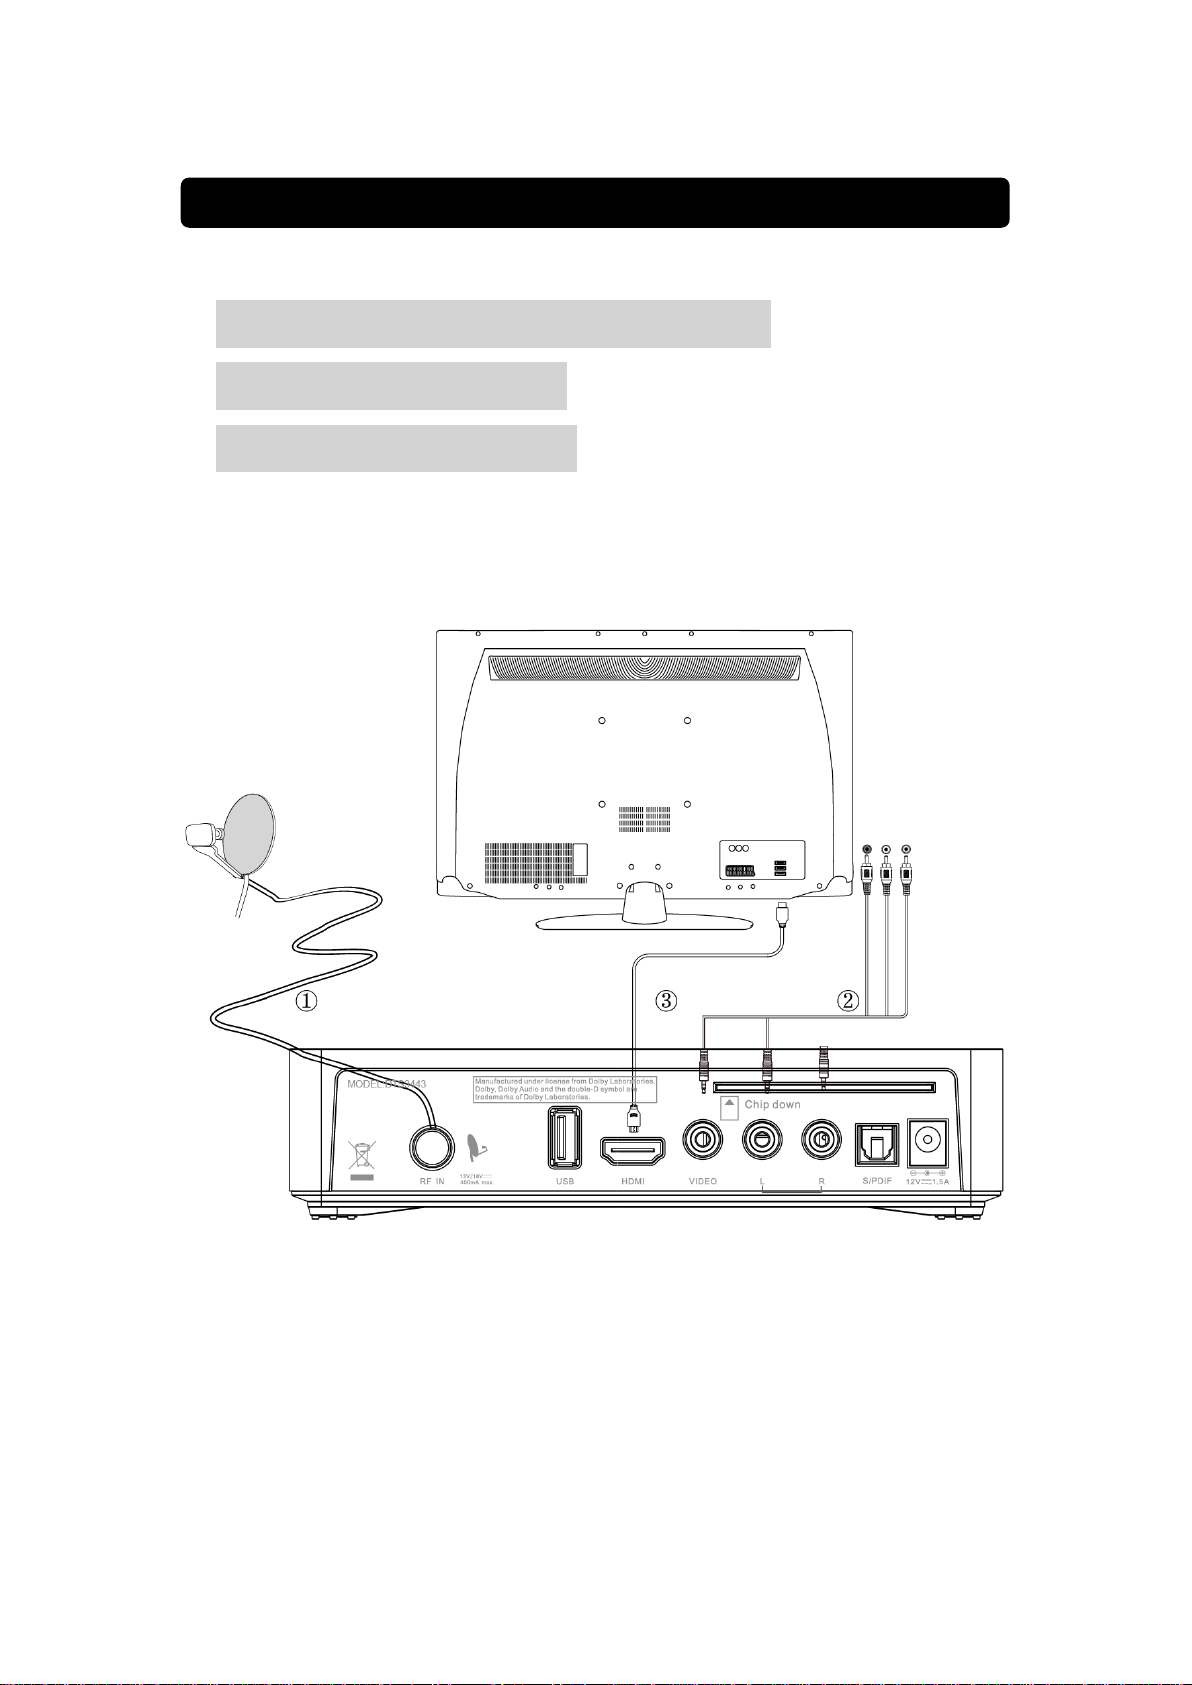
3. Connections-------------------------------------------------------------------------------------------- 6
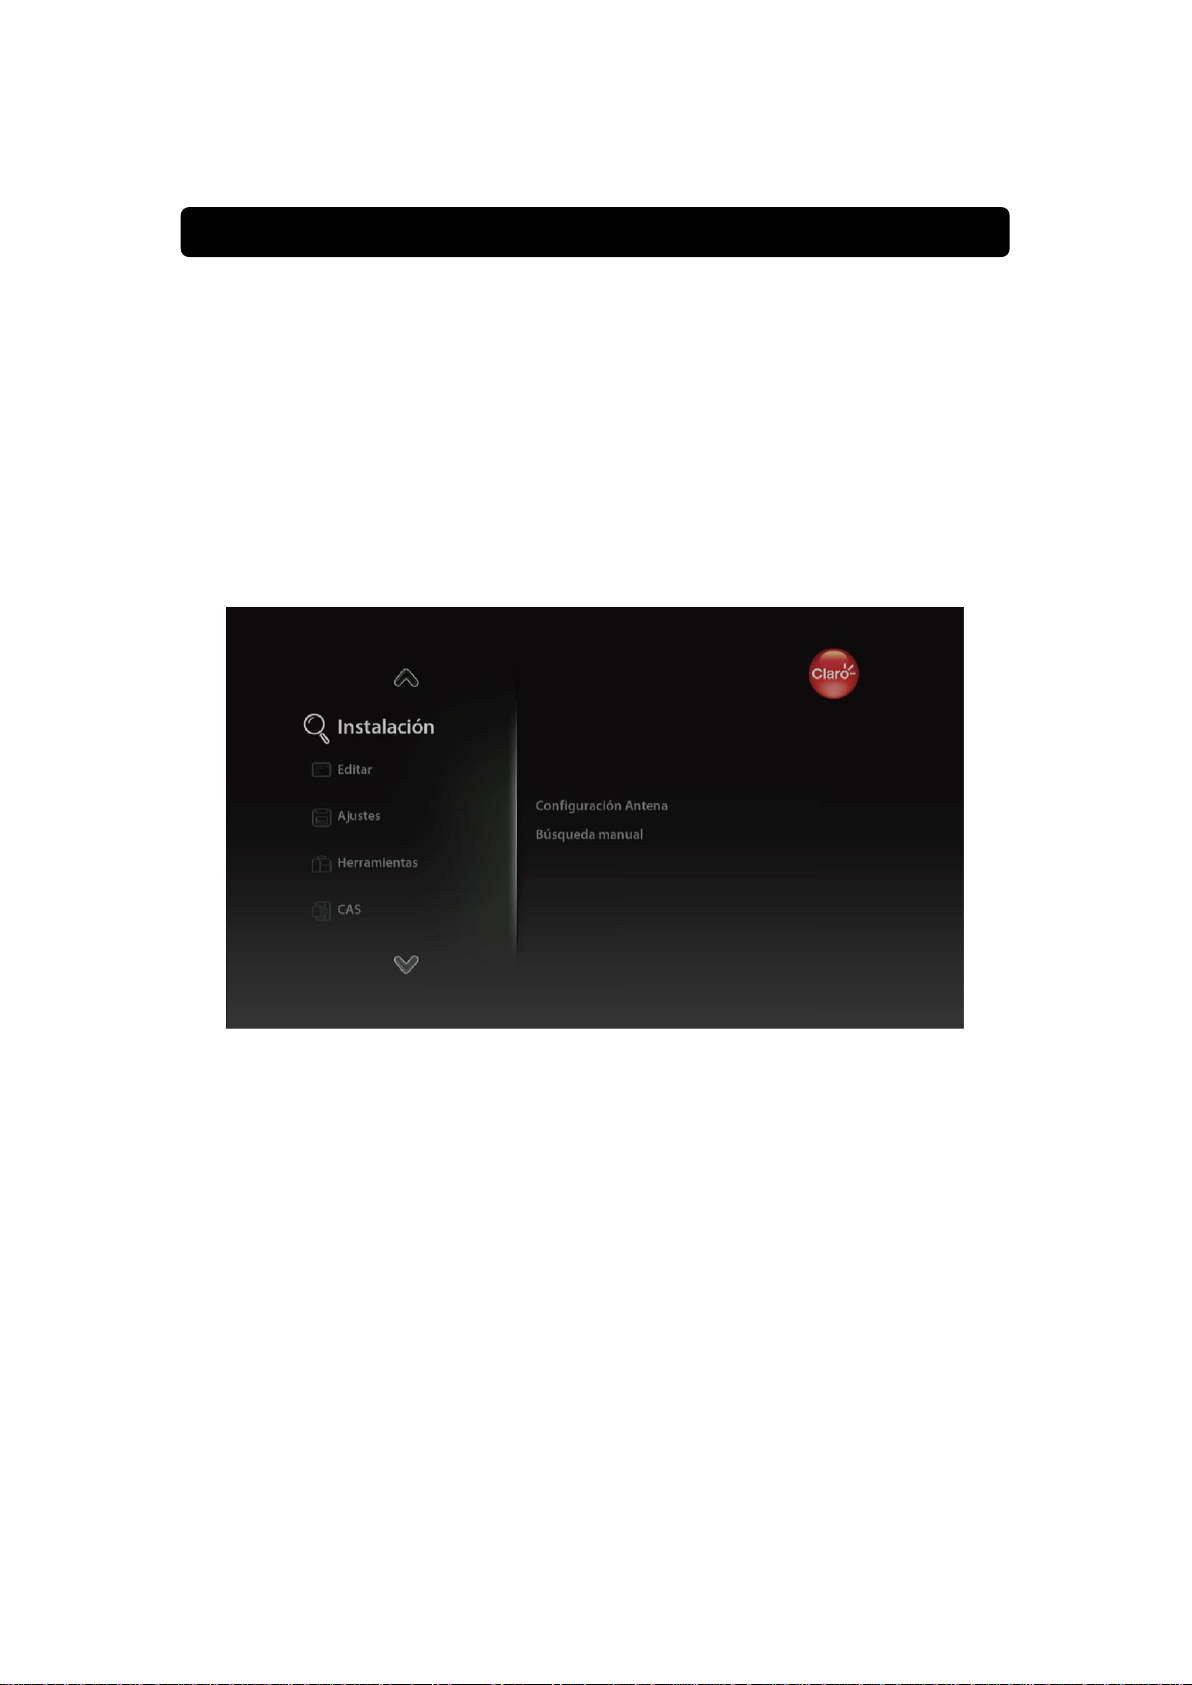
4. Introducing features------------------------------------------------------------------ 7
Key Features
Packing List
Content

3
Do not allow the receiver to be exposed to extreme heat, cold or moisture.
Do not remove the cover to prevent electric shock or damage.
Do not place heavy objects on the receiver.
If the receiver is not in use for a long time, disconnect the power cord to prevent fire or
electric shock (do not use a damaged power cord).
When the receiver moves to another place with a lot of temperature difference, please do
not turn it on immediately until 1-2 hours later.
Never allow liquids or other materials to enter the receiver.
Safety Instructions

4
1) Front Panel
1.Power button
Switch between power mode and standby mode.
2.CH- / CH+ button
Changes the current channel to the previous or next channel in the menuless state.
2) Rear Panel
1. RF IN
Digital signal input door coming in from the antenna.
2. USB
Use connector to connect the receiver to your external hard drive, for recording and
repring
3. HDMI
HDMI digital audio and video output.
4. VIDEO
This connector has a constant video signal for additional VCR connections.
5. Smartcard slot
Slot to insert the service card
2. TV Receiver

5
6. AUDIO Right and Left
These connectors give you the ability to connect the audio signal to the external amplifier
orAUDIO input from the TV.
7. S/PDIF
Uses electrical output to connect the receiver to the audio amplifier input. opposition
8. Power Input
Connection to the power adapter.

6
3) Remote Control Unit
All decoder features can be controlled with the remote
control.
: Turns on or off.
: Turns off the sound.
AUDIO: Displays the audio selection window.
INFO: Displays the current channel information.
TV/R: Switches between TV and Radio modes.
MENU: Displays the main menu.
EXIT: Return to the previous menu or exit.
OK: Confirm operation.
:Move the cursor up /down /left/ right, page
up/down, Volume + / -.
V +/V-: Volume up or down.
P+/P-: Page up or down in the menu list.
RCL: Switches to the last channel seen.
SUB: Displays the list of languages for subtitles.
TEXT: Display of current teletext service on the screen.
FAV : Displays the favorites list window.
EPG: Displays the programming guide.
Color buttons: Useful depends on information displayed
in the menu or Remote Control.
: Starts the Time Shift operation or pauses the
recording operation.
: Starts the recording operation manually.
:Enter the file list menu or start displaying Time Shift
files in the Non-menu state.
: Executes the forward or backward operation
for recording files.
: For the recording or Time Shift operation
Manually.

7
1. Connect the LNB satellite signal to the LNB IN connector..
2. Connect the TV using an AV cable.
3. Connect the TV using a HDMI cable.
3. Connector

8
1) Main menu
The main menu consists of five parts:
System Settings: This part allows the user to run satellite settings, automatic scanning of a given
satellite, manual scan of a specified TP, OTA update and reset all factory settings.
Channels: This part allows the user to check the menu of the Programming Guide and channel
information, editing and sorting of the program, and editing of Favorite Channels List.
Utilities: This part allows the user to check disc information and default settings of Digital
Recording, and list of scan recording files.
Information: This part allows the user to confirm information from CA, mail and basic system.
User Settings: This part allows the user to configure various user screen settings, Time Scheduler
settings, and parental control.
2) Time Scheduler setting
The user can select different options to start different time scheduler that can support playback,
recording and rest timer. Take the recording timer as an example.
4. Introducing features

9
The user can press the yellow key to add a recording time and press the red to cancel it

10
The user can select recording parameters from this list, such as the following:
Time Scheduler Cycle, Start Date, Start Time, Channel Time duration
.
Record from the Guide When the focus is on the right side, the user can set a new
recording timer or cancel it for the current event by pressing the yellow button.
Record directly The user can start a recording just by pressing the REC button when the
set-top box is connected to any storage device, for example, usb.

11
NOTE:
This device complies with part 15 of the FCC Rules. Operation is subject to the following
two conditions: (1) This device may not cause harmful interference, and (2) this device
must accept any interference received, including interference that may cause undesired
operation.
Changes or modifications not expressly approved by the party responsible for compliance
could void the user's authority to operate the equipment.
This equipment has been tested and found to comply with the limits for a Class B digital
device, pursuant to part 15 of the FCC Rules. These limits are designed to provide
reasonable protection against harmful interference in a residential installation. This
equipment generates, uses and can radiate radio frequency energy and, if not installed
and used in accordance with the instructions, may cause harmful interference to radio
communications. However, there is no guarantee that interference will not occur in a
particular installation. If this equipment does cause harmful interference to radio or
television reception, which can be determined by turning the equipment off and on, the
user is encouraged to try to correct the interference by one or more of the following
measures:
—Reorient or relocate the receiving antenna.
—Increase the separation between the equipment and receiver.
—Connect the equipment into an outlet on a circuit different from that to which the
receiver is connected.
—Consult the dealer or an experienced radio/TV technician for help.
This manual suits for next models
1
Table of contents