jobmate 234815 User manual

i
16L KNAPSACK SPRAYER
SKU: 234815
INSTRUCTION MANUAL

ii
INDEX
1. Attention ...................................................................................................................................1
2. Introduction and Special Safety Directions ...............................................................................2
2.1 Introduction ..................................................................................................................2
2.2 Safety Instructions.........................................................................................................2
3. Main Components.....................................................................................................................2
4. Assembley Instructions .............................................................................................................3
4.1 Fitting the Fiberglass Wand...........................................................................................3
4.2 Fitting the Multiple Sprayer Jet Adaptors .....................................................................4
4.3 Check the Support Strap is Attached.............................................................................5
5. Usage and Problem Solving.......................................................................................................5
5.1 Usage - How to Pump and Spray...................................................................................5
5.2 Problem Solving ............................................................................................................6
6. Cleaning and Storage ................................................................................................................6
7. Spare Parts ................................................................................................................................7

1
1. Attention
O-rings are needed to make the sprayer function correctly and they reduce leaks, please check
all O-rings are in place before use.

2
2. Introduction and Special Safety Directions
2.1 Introduction
To get the most out of your new backpack sprayer, please read through these
instructions before use.
There are handy tips in here for maintenance and safety. Please keep them on hand
for future reference.
2.2 Safety Instructions
If you are using this product for spraying weedkiller, insecticides or other chemicals that
can be hazardous or poisonous, use all of the precautions advised by manufacturer of the
chemical provider.
Be particulary careful when filling and emptying the tank. Always use the recommended
personal protection and check that the sprayer is undamaged before using it.
Check that the tank is empty and clean before filling it with a new fluid.
Before use, check that all couplings and covers are properly sealed. Otherwise, fluid may
leak out from the couplings and covers, which could be hazardous to your health.
If the tank is pressurised, the contents may escape when the tank lid is removed.
Discharge pressure from the tank using the trigger on the spray tube before removing the
lid, or open the lid carefully.
This product is not suitable for spraying paint of any type.
Do not store this product in a place where it can be accessed by children, even if it has
been cleaned thouroughly.
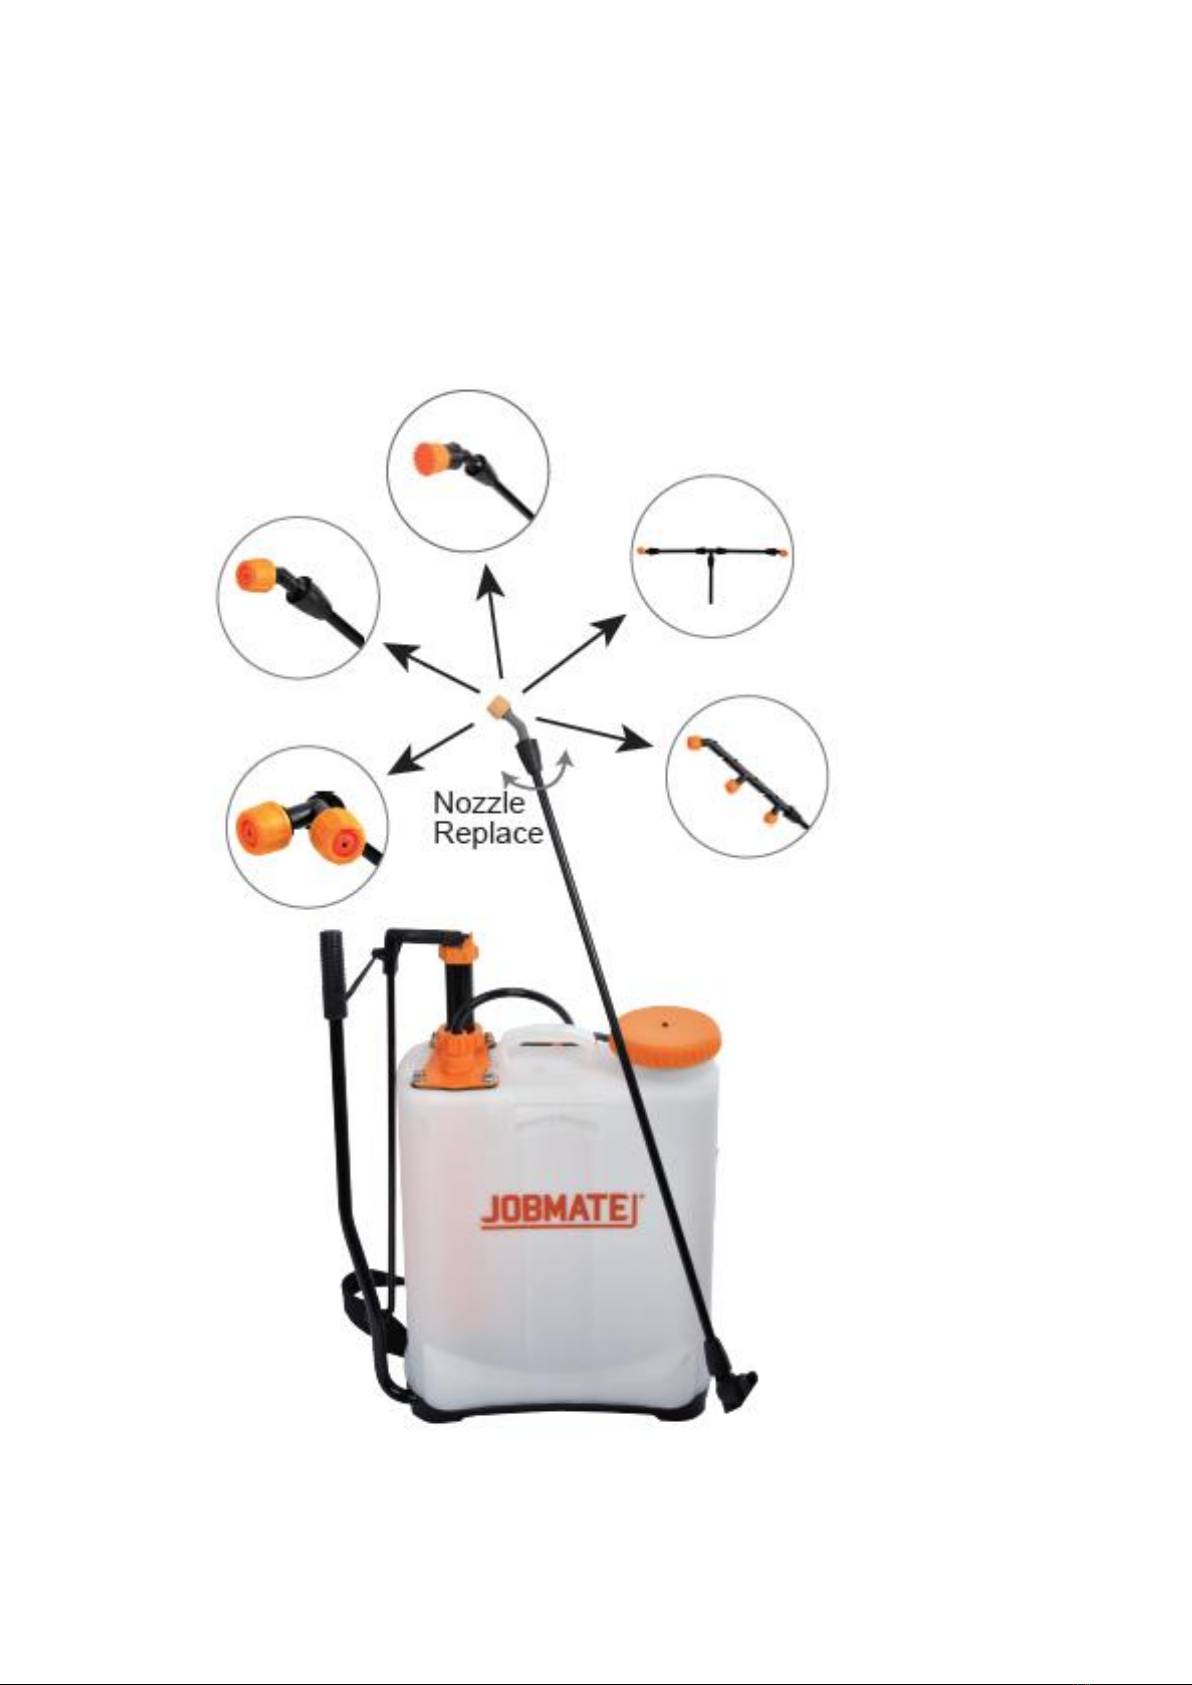
3. Main Components
1. Nozzle
2. Sprayer pole
3. Pump unit
4. Retaining screw handle
5. Pump handle
6. Trigger
7. Hose
8. Filler lid
9. Tank
The backpack sprayer is equipped with adjustable shoulder straps ( not shown ).

3
4. Assembley Instructions
4.1 Fitting the Fiberglass Wand
Please insert the fiberglass pole into the trigger mouth and screw down to secure.

4
4.2 Fitting the Multiple Sprayer Jet Adaptors
The fiberglass pole for the wand will already have simple point spray attached to it. For other
options, please unscrew and reattached as required.
Please check that washers are always in place to prevent unwanted leakage.

5
4.3 Check the Support Strap is Attached
Before you start using this sprayer, you need to check that the support strap is attached to the
left underside of the sprayer.
There is a simple clip system which is shown in the image below.
5. Usage and Problem Solving
5.1 Usage - How to Pump and Spray
Unscrew the tank lid (8) and pour the spray for use into the tank (9). Replace the lid.
Adjust the shoulder straps to a suitable length and put the tank on your back.
Pump the pump handle (5) up and down to create pressure in the pump unit (3).
Direct the sprayer pole (2) towards the area to be sprayed and press the trigger (6)
to start spraying.
Pump the pump handle again when the pressure drops and spraying stops.
The backpack sprayer’s nozzle (1) can be adjusted to produce different spray
patterns fan-shaped or a jet by turning it in a particular direction.

6
5.2 Problem Solving
Problem
Solution
Leakage and liquid blockage
Inspect the rubber washer at every seal and connection
part, then replace or screw tighter if they are broken or
loose.
Clean thoroughly after usage.
Feeling too much pressure
when shaking the operation
arm
Clean the filter net and the spray head if they are
blocked up add some lubricant
Clean thoroughly after usage.
Decrease in pressure
Change the leather bowl and add some lubricant
Change the sealing ball and remove any dirt
Clean thoroughly after usage.
No pressure when operating
the operation arm
Check the sealing ball is not missing or removed. Check
the tank is airtight.
Check all components are sealed before use.
6. Cleaning and Storage
Empty the tank after use. Always dispose of unused mixed spray chemicals in a safe
and responsible matter.
Clean the tank and the tank cap thoroughly inside and out after use. Read the
manufacturer’s instructions on your sprayed chemical for information on the type of
cleaning required. Do not use steel brushes, scouring pads or strong or acidic
cleaning agents.
The pump unit and spray pole can be cleaned internally by pouring some clean
water or detergent into the tank and spraying using the spray pole as described
above.
If the sprayer has been used for a particularly dangerous spray or for agents that
might produce a chemical reaction with other sprayers, it must always be taken
apart and each section must be cleaned thoroughly.
From time to time lubricate the pump handle and nozzle with lubricant.
Do not expose to high temperatures or leave in direct sunlight for extended period
of time.

7
7. Spare Parts
SKU234815 Spare parts
No.
Name
Quantity
Location
1
Adjustable spray head
1
In the tank
2
Y-type spray head
1
In the tank
3
Single spray head
1
In the tank
4
3-way spray head
1
In the tank
5
Switch splitter
1
In the tank
6
Fix Clip
1
In the tank
7
Leather Bowl
1
In the tank
8
Spring
1
In the tank
9
T-type spray head
1
In the tank
10
Spray pole
2
In the color box
11
Sealing ring
4
In the tank
12
Plastic clip-
2
In the tank
13
Black gasket
1
In the tank
14
Instruction manual
1
In the tank
Table of contents