Jole i-Base Encore User manual

ECE R129/03
ECE R129/03
i-Base™ Encore
i-Level
TM
enhanced child restraint
使用說明書
本產品符合安全標準CNS 11497
及歐盟標準ECE R129測 試 和認證
組裝及使用本產品前
請先閱讀說明書全文

2
恭喜您
恭喜您成為Joie家族的一員﹗很高興能與您的寶寶共度行車
旅程。乘坐本產品時,您的寶寶享受的是一台高品質和通過
歐盟安全標準檢測的兒童安全座椅。請仔細研讀並依照本說
明書的指示操作,如此才能保障並提供您的寶寶一個安全又
舒適的行車旅程。台灣區域使用請依照CNS標準規範。
請保存好本說明書,以利正確使用本產品。
底座
安裝和使用本產品前,請先閱讀說明書全文。
﹗重要︰請仔細閱讀並妥善保存本說明書,以便日後參考。
請依圖示將說明書存放在底座背面的說明書儲存槽內或存放
在座布內。
目錄
參照圖示
3-6
中文
警告7
緊急情況處理7
產品資訊7
產品組件及各部件名稱9
安裝注意事項10
安裝底座 10
保固 12
English 14-20

3 4
9
34
5
2
1
6
1
2
1
7
1
2
8
1
1
3
1
24
3
57
6
1
24
3
57
6
2
2
A
I
R
B
A
G

5 6
12
14 15
2
1
13
1
2
12
11
1
2
10

7 8
Allison Baby UK Ltd.
Venture Point, Towers Business Park,
Rugeley, Staffordshire, WS15 1UZ
www.joiebaby.com
產品名稱汽車用兒童保護裝置底座
產品型號D2104
適用範圍
搭配
i-Jemini
︰13kg(約1.5歲 ) 以下的寶寶
搭配
i-Harbour
︰18kg(約4歲 ) 以下的寶寶
主要材質塑 膠、五 金
淨 重 7.1kg
產品尺寸673mmx408mmx234mm
製造日期詳見產品上貼紙日期(年/月/日)
專利號碼專利申請中
原 產 地 中國
委 製 商 巧兒宜國際股份有限公司
進 口 商 巧兒宜國際股份有限公司
地 址台北市內湖區瑞光路431號2樓
電 話 02-27973000
統一編號52603333
代 理 商奇哥股份有限公司Chickabiddy Co., Ltd
地 址台北市南京東路四段186號5樓
服 務 專 線 0800-001-256 / 02-25781188
統一編號04222671
網 址www.chick.com.tw
警告
!
為獲得兒童保護裝置獲得完整的資訊和最好的保護,請務必認真遵
守說明書。
緊急情況處理
遇緊急事件或事故時,需迅速急救或送醫治療照顧您的寶寶是非常
重要的。
產品資訊
配合底座安裝
1.此為ISOFIX兒童保護裝置。符合安全標準CNS 11497。用於裝有
ISOFIX固定器系統之車輛座椅。
2.它安裝適用於車輛配有經認可之ISOFIX安裝位置。(請參照車輛
使用手冊)請依此兒童保護裝置之種類及ISOFIX尺度等級,安裝
於附有ISOFIX固定器之車輛座椅上。
3.此兒童保護裝置與底座組合構成“半通用型”兒童保護裝置,符
合安全標準CNS 11497。用於裝有ISOFIX固定器系統之車輛座椅
位置之安裝。
4.其他車輛型式亦有可能適用此兒童保護裝置。若有疑問,請洽兒
童保護裝置製造商或代理商。

910
安裝注意事項
見(圖1&圖2)
安裝底座
1.將ISOFIX導向器固定到ISOFIX固定點上(圖3),ISOFIX導向器既可防
止汽車座椅表面被刮破,又可為ISOFIX連接器導向。
2.展開底座支撐腳(圖4)
3.按壓ISOFIX調整按鈕拉出ISOFIX連接器(圖5)
4. 按壓ISOFIX調整按鈕調整ISOFIX導向器,將ISOFIX連接器與ISOFIX
導向器對齊後,將ISOFIX連接器插到ISOFIX固定點上(圖6)
!
請確定左右兩邊的ISOFIX連接器都已牢固固定到ISOFIX固定點
上。且兩個ISOFIX連接器上的指示器應顯示綠色(圖6.1)
!
同時往外拉兩邊的ISOFIX連接器,以確保ISOFIX連接器已固定。
5. 將支撐腳延伸到地面(圖7)。支撐腳正確安裝時,支撐腳指示器顯示
綠色,否則顯示紅色(圖7.2)
!
無論是否有小孩乘坐,支撐腳都應該與地面完全接觸保持鎖定狀態。
!
請支撐腳有多個調整段位,支撐腳指示器顯示紅色時,表示支撐腳
與汽車地面未完全接觸需重新調整使其與地面完全接觸為止。
!
請確保支撐腳與汽車地面完全接觸。
!
按壓支撐腳調整按鈕可將支撐腳向上調整(圖7.1)
6. 底座安裝好後如(圖8)所示。
!
ISOFIX連接器須鎖定在ISOFIX固定點上(圖8.1)
!
底座支撐腳須正確固定,並以綠色顯示(圖8.2)
!
請先將兒童保護裝置安裝到汽車後座椅上,再讓寶寶乘坐。
7. 將嬰兒提籃卡入底座內(圖9),如果提籃固定正確,提籃指示器將顯
示綠色,否則顯示紅色(圖10)
!
僅在後向模式時本體才可以安裝或釋鎖。
9
2
3
4
5
1
7
8
6
產品組件及各部件名稱
請確認產品組件是否有遺漏,如有遺漏,請聯繫代理商。
本產品無需工具進行組裝。
1旋轉按鈕
2ISOFIX 調整按鈕
3安全指示器
4支撐腳
5支撐腳調整按鈕
6說明書存放處
7ISOFIX 連接器
8本體釋鎖按鈕
9ISOFIX 導向器

11 12
8. 按壓旋轉按鈕可以旋轉本體,方便兒童從側面進出(圖11)
!
無論是否有小孩乘坐,本體應始終保持前向或後向鎖定狀態。
!
釋按壓旋轉按鈕,將本體旋轉至後向模式,指示器將顯示綠色(圖12)
9. 釋鎖兒童保護裝置時,先將寶寶抱出,按壓本體釋鎖按鈕(圖13.1),同
時將本體往上提即可(圖13.2)
10.移除底座時,按壓兩側ISOFIX連接器上的第二道安全鎖(圖14.1)與
釋鎖按鈕(圖14.2),然後將底座向外拉即可(圖14)
11.按壓ISOFIX調整按鈕可將ISOFIX連接器儲存在底座下方(圖15)
保固
延長保固服務
請於購買起一個月內至奇哥官網進行登錄,登錄成功後即享有商品延長
一年保固服務。

14
ECE R129/03
ECE R129/03
Instruction Manual
This child restraint is approved
to CNS 11497 and UN ECE R129
series of amendments.
Please read all the instructions
in this manual before installing
and using the product.
i-Base™ Encore

15 16
GB Welcome to Joie™
You have purchased a high quality, fully certified child safety child
restraint. This product is suitable for the use of your child with height
and weight based on the following:
Keep this instruction manual for future reference. Carefully read this
Instruction Manual and follow the installing steps because this is the
ONLY way to protect your child from serious injury or death in case
of an accident, and to provide comfort to your child while using this
product.
Please keep the instruction manual in the storage compartment at the
back of the base as the image on the right or inside of the seat covers.
Contents
Reference Figures 3 - 6
English
WARNINGS 17
Emergency 17
Product Information 17
Parts List 18
Concerns on Installation 19
Base Installation 19

17 18
Emergency
In case of emergency or accidents, it is most important to have your
child taken care of with first aid and medical treatment immediately.
Product Information
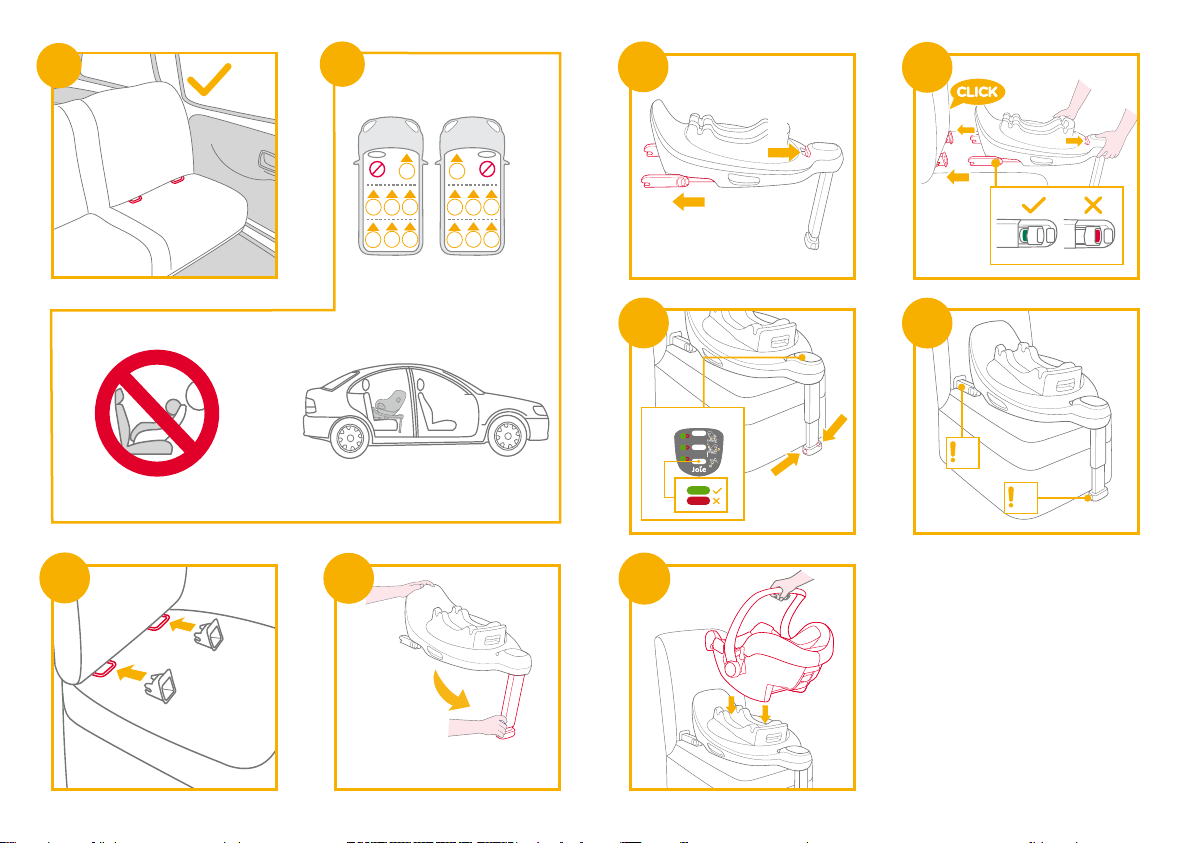
Installation with base
1. This is an i-Size Enhanced Child Restraint System. It is approved
according to UN Regulation No.129, for use in, i-Size compatible
vehicle seating positions as indicated by vehicle manufacturers in
the vehicle users’ manual.
2. If in doubt, consult either the Enhanced Child Restraint System
manufacturer or the retailer.
Materials Plastics, metal, fabrics
Patent No. Patents pending
WARNING
!For the complete information and best protection of using the
enhanced child restraints, you must follow their instruction manuals
carefully:
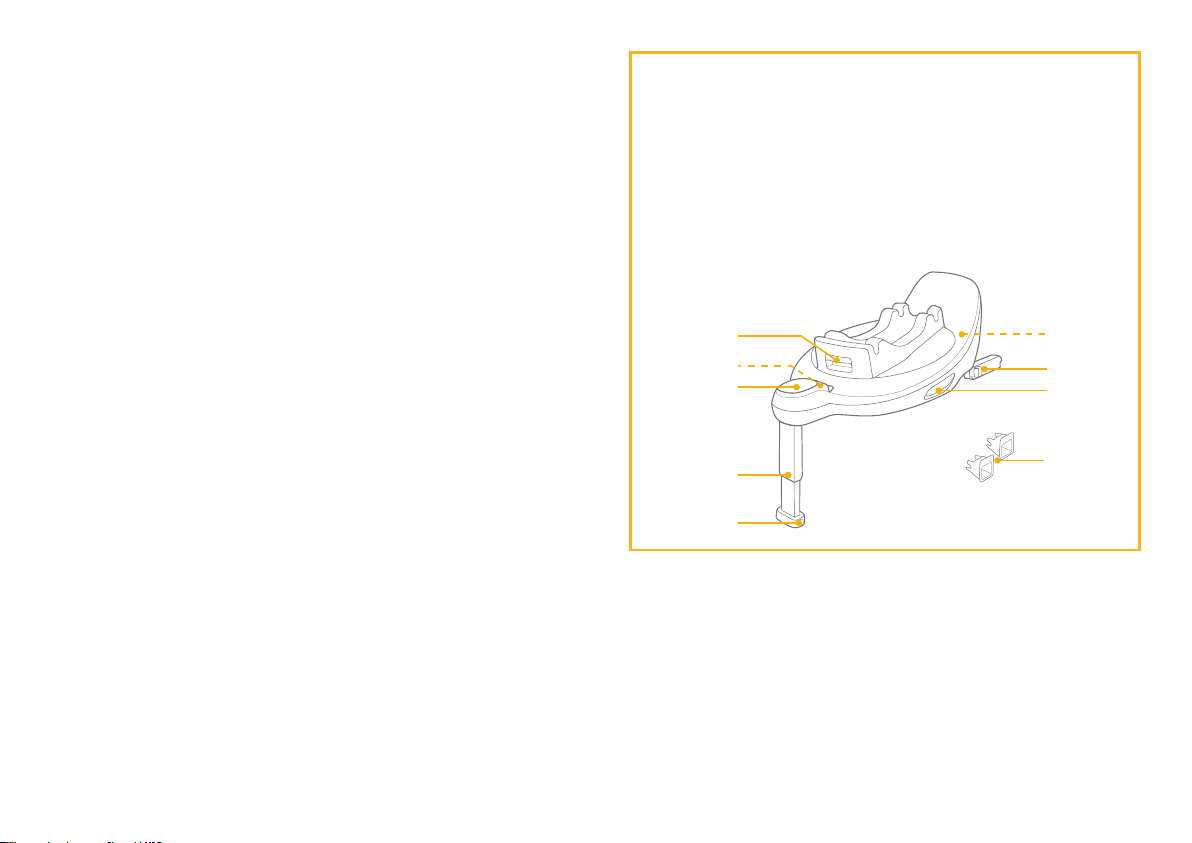
Please make sure there are no missing parts. Please contact the
retailer if anything is missing.
1 Infant Carrier Rotation
Button
2ISOFIX Adjustment Button
3 Safe use indicator
4 Load Leg
5 Load Leg Adjustment
Button
Parts List
6 Instruction Manual Storage
Compartment
7 ISOFIX Connector
8 Child Restraint Release
Button
9 ISOFIX Guides
9
2
3
4
5
1
7
8
6

19 20
Concerns on Installation
see
(Fig.1&Fig. 2)
Base Installation
1. Attach the ISOFIX guides to the vehicle's ISOFIX anchor points (see
vehicle owner's manual). (Fig. 3) The ISOFIX guides can protect the
surface of the vehicle seat from being torn. They can also guide the
ISOFIX connectors.
2. Unfold the load leg from storage compartment. (Fig. 4)
3. Extend the ISOFIX connectors by pressing the ISOFIX adjustment
button while pulling on the connector. (Fig. 5)
4. Press the ISOFIX adjustment button to adjust the ISOFIX
connectors. Line up the ISOFIX connectors with the ISOFIX guides,
and then click both ISOFIX connectors into the ISOFIX anchor
points. (Fig. 6)
!Make sure that both ISOFIX connectors are securely attached to the
vehicle’s ISOFIX anchor points. There should be two audible clicks
and the colors of the indicators on both ISOFIX connectors should
be completely green. (Fig. 6.1)
!Check to make sure the base is securely installed by pulling on both
ISOFIX connectors.
5. After placing the base on the vehicle seat, extend the load leg to
floor (Fig. 7) . When the load leg is installed correctly, the load leg
indicator will show green. Red will be shown when installed
incorrectly. (Fig. 7.2)
The load leg has multiple positions. When the load leg indicator
shows red this means the load leg is in the wrong position.
!Always make sure the support load leg has direct contact with the
floor and is in locked position even when the child is not in it.
!Make sure the load leg is in full contact with the vehicle floor pan.
!Squeeze the load leg adjustment button, then shorten the load leg
upwards. (Fig. 7.1)
6. The completely assembled base is shown as (Fig. 8)
!The ISOFIX connectors must be attached and locked onto the
ISOFIX anchor points. (Fig. 8.1)
!The load leg must be installed correctly with green indicator.
(Fig. 8.2)
!Please install the enhanced child restraint on the rear vehicle seat
and then put the child in the enhanced child restraint.
7. Push the enhanced child restraint down onto the base (Fig. 9). If the
enhanced child restraint is secure, the enhanced child restraint
indicator will show green. (Fig. 10)
!The enhanced child restraint can ONLY be installed and released
when in rearward facing mode.
8. Press the rotating button to rotate for easier side loading/unloading
of the child.(Fig. 11)
!Always make sure the seat is in locked position (rearward facing /
forward facing) even when the child is not in it.
!Rotate the enhanced child restraint to the rear facing position. The
enhanced child restraint indicator will show green. (Fig. 12)
9. To release the enhanced child restraint, first take the child out of the
child restraint. Pull the child restraint release button (Fig. 13.1), then
lift the child restraint up (Fig. 13.2).
10.To remove the base from the vehicle seat, push the secondary lock
buttons (Fig. 14.1) first and then press the ISOFIX releasing buttons
(Fig. 14.2) on the ISOFIX connectors before removing the base from
the vehicle seat. (Fig. 14)
11.For transporting, press ISOFIX adjustment button and move the
ISOFIX connectors back into the storage position. (Fig. 15)

21

IM-000991C
view all fine signature selections at
joiebaby.com/signature
Allison Baby UK Ltd,
Venture Point, Towers Business Park
Rugeley, Staffordshire, WS15 1UZ
Table of contents
Other Jole Baby Carrier manuals