Jolly LP-H400 User manual

USER MANUAL
LP-H400
Version:1.0


Table of content
1.Open-Package guidelines........................................................... .1
1.1Package............................................................................. ...1
2.Safety instructions................................................................... ...1
3.Operating determination....................................................... ......3
4.Rigging the fixture................................................................. .........4
4.1 Mounting.......................................................................... .........4
5.
6.
8.DMX protocol........................................................................... ..10
9.Maintance and cleaning................................................ .........10
10.Electric equipment specification........................................ .........10
10.1 Electrical paramters.......................................................... .10
10.2
10.3
...............
...............
...............
...............
............
............
4.2Installing the Clamps..............................................................................4
4.3 Power supply connection and cut off.....................................................5
4.4 Power Connection.................................................................................5
4.5 DMX-512 connection/connection between fixtures...............................6
..............
............
7.Display control .............
..............
.............
.................
............
...............
.....................................................................10
Channel Characteristics.....................................................................11
10.4 Menu Function...................................................................................11
10.5 light table.........................................................................................11
11.Electronic drawing.................................................................................12
Description of the device........................................................... ...7
Dimension.................................................................................... ..8
.............................................................................. 9
.........................................................................9
Menu Maps.............................................................................. 9
7.1 Navigation in the Menu
7.2
Weight and dimensions

Congratulations on choosing our products! Please carefully read this instruction manual in its
entirety and keep it well for using reference. This manual contained about the installation and
the relative using information of this products. Plese refere this manual's relative instruction
when using this equipment.

- 1 -
2.Safety instructions
1.Open-Package guidelines
1.1Package
Unpacking the fixture
1.Open the flight case cover
2.With one person on each side, lift the fixture out of the flight case.
Packing the fixture
1.Disconnect the fixture from power and allow it to cool.
2.Place the fix ture in the bottom of the flight case, and cover the case without forcing.
This equipment is made of new style,high intensity plastic.It fully shows the modem times light charac
teristic with beauty struture. And it is made accord to CE standard. Fully agree with the internation
512 agreement.
teris-
tic with
standard of DMX
1.Signal cable-1PC 2.Safty cable-3PC
3.User Manval-1PC 4.Omega holder-1PCS
5.Power cable-1PC 5.Service card-1PC
When receive the product,please be careful to take and put,check if the product has damage or not be-
cause of transportation, and check the following parts:
This device has been shipped with our premises in absolutely perfect condition. In order to maintain this
ensure a safe operation ,it is absolutely necessary for the user to follow the safety instruc -
notes written in this manual.
Important:
The manufacturer will not accept liability for any resulting damages caused by the nonobservance of this
manual or any unauthorized modification to the device.
Please consider that damages caused by manual modifications to the device are not subject to warranty.
condition and to ti
ons and warning
Every person involvd with installation and maintenance of this device to:
-Be qualilfied
-Follow the instructions of this manual.
Aviation box

Never let the power-cord come into contact with other cables! Handle the power cord and all connections
with particular caution!
Make sure that the available voltage is not higher than stated on the rearpanel.
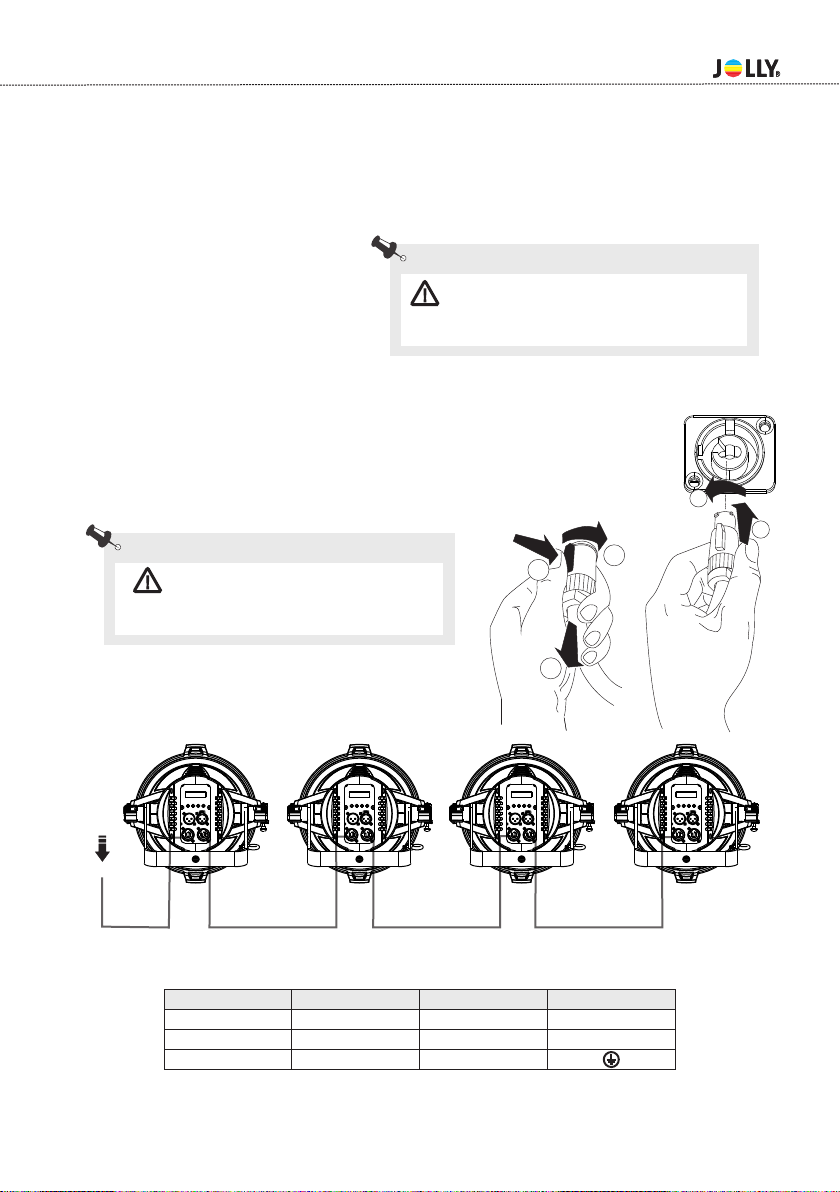
Always plug in the power plug least. Make suer that the power-switch is set to off-position before you con
ections with themains with particular caution!
Make sure that the power-cord is never crimped or damaged by sharp edges.Check the decice and the p-
ower-cord from time to time.
Always disconnect from the mains, when the device is not in use or before cleaning it.
Only handle the power-cord by the plug,Never pull out the plug by tugging the powercord.
This device falls under protection class I.Therefore it is essential to connect the yellow/green conductor
to earth.
The electric connection,repairs and servicing must be carried out by a qualified employee.
Do not connect this device to a dimmer pack.
Do not switch the fixture on and off in short intervals as this would reduce the lamp’s life.
Do not touch the device’s housing bare hands during its operation(housing becomes hot)!
For replacement use lamps and fuses of same type and rating only.
t 90
c°C
IP20
t 40
a°C
Risk Group 2
According to
En62471
Eye damage!
Avoid looking directly into the light source(meant especially for epileptics)!
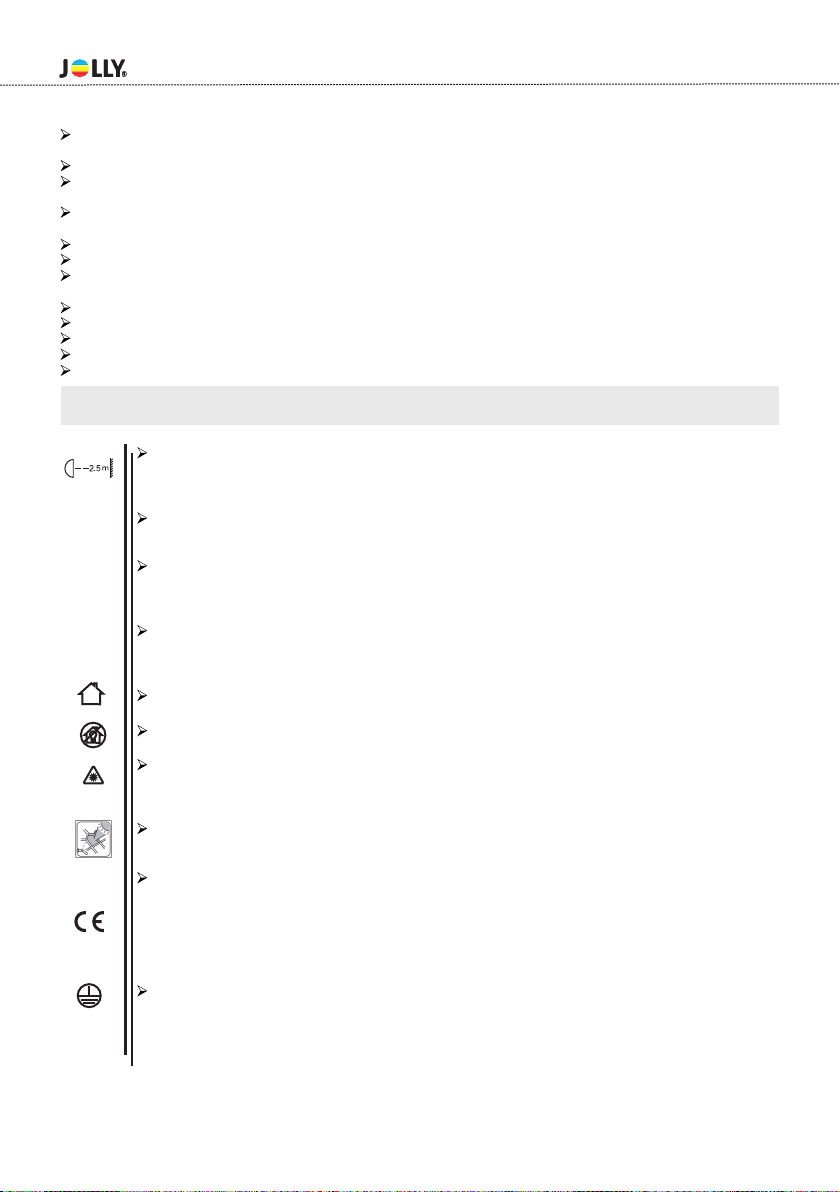
Minimum distance of illuminated objects
2.5 metres from the lens of the projector.
Maximum ambient temperature
Do not operate the fixture if the ambient temperatuer(Ta) exceeds 40°C (104°F).
Temperature of the external surface
The maximum temperature that can be reached on the external surface of the fitting,in a ther-
mally steadystate,is 90°C (194°F).
IP20 protection rating
The fitting is protected against penetration by solid of over 12mm (0.47”) in diameter (first
digit 2), but not against dripping water,rain,splashes or jets of water (second digit 0).
Indoor use only
Not suitable for household illumination
Photobiological Safety
CAUTION.Possibly hazardous optical radiation emitted from this product.Do not stare at
operating lamp.May be harmful to the eyes.
Light collimation system
This product contains internal light collimation system.Avoid intense light from any angle.
The products to which this manual refers comply with the European Directives purs-
uant to:
•2006/95/EC - Safety of electrical equipment supplied at low voltage ( LVD)
•2004/108/EC - Electromagnetic Compatibility (EMC)
•2011/65/EU - Restriction of the use of certain hazardous substances (RoHS)
•2009/125/EC - EcoDesign requirements for Energy-related Products (ErP)
Protection against electrical shock
Connection must be made to a power supply system fitted with efficient earthing (Class I app-
liance according to standard EN 60598-1) .It is, moreover, recommended to protect the supply
lines of the projectors from indirect contact and/orshorting to earth by using appropriately
sized residual current devices.
The projector needs to be positioned so that the objects hit by the beam of light are at least
- 2 -

Disposing
This product is supplied in compliance with European Directive 2012/19/EU-Waste Electrical
and Electronic Equipment (WEEE).To preserve the environment please dispose/recycde this
product at the end of its life according to the local regulation.
Battery
This product contains a rechargeable lead-acid or lithium iron tetraphosphate battery. To pre-
serve the environment,please dispose the battery at the end of its life according to the regul-
ation in force.
This device
If the device ha been exposed to drastic temperature fluctuation(e.g.after transportation).do not weitch it
on immediately.The arising condensation water might damage your device,Leave the device switched off
until it has reached room temperature.
Never run the device without lamp!
Do not shake the device,Avoid brute force when installing or operating the device.
Never life the fixture by holding it at the projectorhead, as the mechanics may be damaged. Always hold
the fixture at the transport handles.
When choosing the installation-spot,please make sure that the device is not exposed to heat,moisture or
dust.There should not be any cables lying around.You endanger your own and the safety of others!
The minimum distance between light output and the illuminated surface must be more than 0.2 meters.
Make sure that the area below the installation place is blocked when rigging,derigging or servicing the fi-
xture.
Always fix the fixture with an appropriate safety rope, Fix the safety rope at the correct holes only.
Operate the fixture after having checked that the housing is firmly closed and all screws are tightly faste-
nd.
The lamp must never be ignited if the objective-lens or any housing-cover is open, as discharge lamps
may explose and emit a hign ultraviolet radiat, which may cause burns.
The maximum ambient temperature 40°C must never be exceeded.
Operate the device only after having familiarized with its functions. Do not permit operation by persons
not qualified for operating the device. Most damages are the result of unprofessional operation!
Please use the original packaging if the device is to be transported.
Please consider that unauthorized modifications on the device are forbidden due to safety reasonsl.
If this device will be operated in any way different to the one described in this manual, the product may
suffer damages and the guarantee becomes void.Furthermore, any other operation may lead to dangers
like short-circuit,burns, electric shict,burns due to ultraviolet radiation,lamp explosion,crash etc.
for LED lighting,used to create the beam effect.
3.Operating determinations
- 3 -

4.1 Mounting
For the various mounting positions of the FIXTURE(standing on the floor, sideways or hanging different
accessories kits are available.
Through this a safe and firm installation is assured.
You’ll find special connectors on the bottom side of the system which are put to use here.
4.2 Installing the Clamps
Please consider the respective national norm s during the Installation!The installation must only be car-
ried out by an authorized dealer!
The installation of the projector has to be built and constructed in a way that it can hold 10 times the wei-
ght for 1 hour without any harming deformation.
The installation must always be secured with a secondary safety attachment, e.g.an appropriate catch
net.This secondary safety attachment must be constructed in a way that no part of the installation can
fall if the main attachment fails.
When servicing the fixture staying in the area below the installation place,on bridges,under high working
places and other endangered areas is forbidden.
The operator has to make sure that safety-relating and machine-technical installations are approved by
an expert before taking into operation for the first time and after changes before taking into operation an-
other time.
The operator has to make sure that safety-relating and machine-technical installations are approved by
an expert after every four year in the course of an acceptance test.
The operator has to make sure that safety-relating and machine-technical installations are approved by
a skilled person once a year.
The projector should be installed outside areas where persons m ay walk by or be seated.
Important!Overhead rigging requires extensive expering CE,including (but not limited to)calculating
working load limits, installation material being used, and periodic safety inspection of all installation ma-
terial and the projector. If you lack these qualifications, do not attempt the installation yourself, but inste-
ad use a professional structural rigger. Improper installation can result in bodilyinjury and or damage to
property.
The projector has to be installed out of the reach of people.
If the projector shall be lowered from the ceiling or high joists, professional trussing system s have
to be used. The projector must never be fixed swinging freely in the room .
Caution Projectors may cause severe injuries when crashing down! If you have doubts concerning the
safety of a possible installation, do not install the projector!
Before rigging make sure that the installation area can hold a minim um point load of 10 times the
projector s weight.
4.Rigging the fixture
Pay attention to the regulations of CE.
Installation by qualified staff to complete.
- 4 -

The projector can be placed directly on the stage floor or rigged in any orientation on atruss without alte-
ring its operation characteristics.
For overhead use,always install a safety-rope that can hold at least 10 times the weight of the fixture.You
must only use safety-ropes with screw on carabines.Pull the safety-rope through the two apertures on the
bottom of the base and over the trussing system etc.
1
2
12
3
Power in
- 5 -
Warning: it is necessary to make sure that
the installation location is perfectly appropriate,
and the installation location is safe and reliable.
Warning: The maximum connecting is
less than 4 pcs to make sure the normal life
time of the lighting fixture.
4.3 Power supply connection and cut off
Connect the light source to the main power source with the plug of the power cord, or cut off the power
supply:
Connection: according to procedures, the power plug and socket is inserted into
the groove one one alignment,rotation.
Cut off:according to procedures,press the button on the rotating plug,pull out.
L
N
CABLE(EU) CABLE(US) Pin
Brown Black Live
Yellow/Green Green Earth
Light blue White Neutral
INTERNATIONAL
4.4 Power Connection
mains with the enclosed power cable and plug.
If you wish to change the power supply settings, see the chapter appendix Connect the fixture to the

4.5 DMX-512 connection/connection between fixtures
Only use stereo shieded cable and 3-pin XLR-plugs and connectors in order to connect.
Caution
At the last fixture,the DMX-cable has to be terminated with a terminatou. solder a 120 resistor between
signal(-) and Signal (+) into a 3-pin XLR-plug and plug it in the DMX-output of the last fixture.
2 1
3
2 1
3
1:Ground
2:Signal(-)
3:Signal(+)
2 1
3
DMX iutput
3-pin XLR socket
DMX output
3-pin XLR socket
Warning: please verify the power of the power
supply equipment prior to the connection! Earth wire
must be grounded!
- 6 -
DMX Terminator Diagram
-For installations where the DMX cable has to run a long distance or
is In an electrically noisy environment it is recommended to use a
DMX terminator. This help in preventing corruption of the signal by
electrical noise. The DMX terminato r is simply an XLR plug witha
120 resistor connected between pins 2 and pins3, which is then
plugged into a the output XLR socket of the last ifxture in the chain.
Ω
1
2
3
12 0Ω
PIN2 PIN3
DMX512

5.Description of the device
- 7 -
1.Shade leaf
2.Head
3.Lamp tubes
4.Arm
5 Power in
6
7.MODE button
8.Display
9.UP button
10.DOWNR button
11.ENTER button
12
13 Power Out
.
.
.
.
3-pin XLR male
3-pin XLR female
6
57 8 9 10 11 12 13

6.Dimension
- 8 -
227
150
30
268
275
516
199
277

- 9 -
7.Display control
7.1 Navigation in the Menu
7.2 Menu Maps
Using the buttons or touch screen, and this can be simply and easily set the address code and
code. functions
If you view or modify the lighting feature set, then press ENTER button, the display will enter the menu
interface. Both there is sub menu corresponding to the functional operation of the main menu. Each of the
menus is representative of the specific features of the lamp. The specific contents shows as the table
menu below.
Set or browse lighting function, press UP or DOWN button.
Press ENTER to save your changes or enter the submenu.Press the UP or DOWN can change the nume-
rical (increase or decrease in value).
Press the MODE button to return to menu. Set a time 0 to 10 minutes automatically exit menu interface
and close the screen.
If there is a channel failure in the reset process, the LCD screen will display the corresponding fault
information,can be compared to the information content of the lamp to be amended,if in doubt,consult
the relevant technical personnel. -(Error List)
CODE #
ERRO INFO CHECK MEASURMENT NOTE
E01 SpiErr Check the communication signal 25Q16 flash chip & memory IC
E02 PrgErr 1 Display firmware loading failed, load it again。
E03 BD1Err
E04 McuBusErr
E05 BD1CrcErr LED driver firmware loading failed, load it again。
E06 Temp Err Check the welding of Temp IC
Check the communication signal& welding of communication chip RESET
ERROR
Remark
DMX Address 001~XXX
Fixture Id 0001~999
Mode 1 1-4
Mode 2 1-6
Auto Lamp ON ON/OFF Defaul ON
DMX Lamp ON/OFF Defaul ON
DSP.Sleep 0-10m
DSP.Contrast
Fixture Hours XXXXX h XX m Total working hours
Reset Times lnput Password XXXX
DMX Monitor
Temperature xxC
Error List Error details
DMX Diagnostic DMX Diagnostic
Manual Control Channel Chanel Testing
Advanced Factory ON/OFF Reset to orignal parameters
Set Up
Channel Mode Defaul 1
Information
Personality
Display

9.Maintance and cleaning
It is absolutely essential that the fixture is kept clean and that dust,dirt and smoke fluid residues must not
buildup on or within the fixture. Otherwise, the fixtures light-output will be significantly reduced. Regular
cleaning will not only ensure the maximum light-output, but will also allow the fixture to function reliably
through out its life. A soft lint-free cloth moistened with any good glass cleaning fluid is recommended,
under no circum stances should alcohol or solvents be used!
The front objective lens will require weekly cleaning as smoke-fluid tends to building up residues,reduc-
ing the light-output very quickly.The cooling-fans should be cleaned monthly.
The gobos may be cleaned with a soft brush,The interior of the fixture should be cleaned at least annua-
lly usinga vacuum-cleaner or an air-jet.
Maintenance and maintenance of the operation, please contact the manufacturer or distributor.
DANGER:Disconnect from the mains before starting any maintenance work.
- 10 -
8.DMX protocol
Mode 1 Mode 2 Fade Type Function Dmx Value
1 1
Dimmer Dimmer 0-100% 0-255
2 Dimmer Fine Dimmer Fine 0-100% 0-255
No function (shutter Close) 0
Strobe effect slow to fast 1-95
No function (shutter open) 96-127
Pulse-effect in sequences 128-159
No function (shutter open) 160-191
Random strobe effect slow to fast 192-223
No function (shutter open) 224-255
3 4 Linear CTO 5200-2500K 0-255
No function 0-15
5000 16-45
4500 46-75
4200 76-105
3900 106-135
3600 136-165
3300 166-195
3000 196-225
2700 226-255
No function 0-9
linear 10-19
gamma1.5 20-29
gamma1.0 30-39
curve s 40-49
No function 50-255
Strobe2 3
6 Dimming curve
4 5 Fixed CTO

10.5 light table
20°
4 8 12 16 20
20 (LUX)°4000
15900 1780 998
20°Flare diameter(m)Φ1.4 Φ2.7 Φ4.1 Φ5.5 Φ6.9
635
Flare diameter(m)
Projection distance(m)
- 11 -
10.3 Channel Characteristics
1.
2.37PCS LED
3.dimmer:Full range dimming.
4.Random strobe effect.
Channel:4/6 DMX-512.
10.4 Menu Function
1. LCD display graphic.
2.Each DMX value displayble.
3.Monitor could ON/OFF automatically.
Show fixture,lamp use time.
5.After the DMX signal is disconnected, the display will be bright and dark.
6.With DMX Software upgrade.
4.
7.With RDM function.
10.2 Weight and dimensions
Dimensions:
NET WEIGHT:6.8Kg
Dimensions
WEIGHT
Dimensions
(WXHXD):275X268X516mm
630X375X395mm
12
1193X555X853
(Carton Package): Kg
(Flight Case -6 lights): mm
(Carton Package):
10.1 Electrical paramters
10.Electric equipment specification
SOURCE:
POWER:400
VOLTAGE:
White LED-10W
W
AC100-240V 50/60HZ

11.Electronic drawing
- 12 -
Note: The above contents for reference only and is subject to change without prior notice, please
take specification you have on hand and our company reserves the final right of interpretation.
L
N
E
L
12V
GND
57V
D-DMX
D-DMX
J10
Y2
U1
L3
J18
U1
Y1
Fan-sens
V+
+12V
GND 5V BA
ADC
VCC
J2
JB1
LED-IN
J1
J6
+57V
DC-IN
LED-OUT
GND
CH-1
CH-2
CH-3
CH-4
LED-OUT
Switch Power
Supply
L
N
E
92*92FAN
FUSE N


Add:Building2,No.32,Changsha Street,Shachong Village,shiji Tow.Panyu District,Guangzhou,China
http: //www.jollylight ing. com
Guangzhou hongcai stage equipment Co.,Ltd
Tel:+862084558833 Fax:+862084559699
Email:info@jollylighting.com P.C:511450
Table of contents
Other Jolly Dj Equipment manuals

Jolly
Jolly D5-BS User manual

Jolly
Jolly X-Beam 440 User manual

Jolly
Jolly A-7 SPOT User manual

Jolly
Jolly X-7 Coupe User manual

Jolly
Jolly LL-300 Z User manual

Jolly
Jolly A-14 Coupe User manual

Jolly
Jolly LT-1516 User manual

Jolly
Jolly A-5 Spot User manual

Jolly
Jolly X-1000 Spot User manual

Jolly
Jolly LP-1512 Zoom User manual
Popular Dj Equipment manuals by other brands

Lightmaxx
Lightmaxx Vega PAR FX II user manual

American DJ
American DJ RotoPod 250 User instructions

Varytec
Varytec Hero Spot Wash 140 2in1 RGBW+W user manual

Equinox Systems
Equinox Systems TAURUS user manual

Chauvet Professional
Chauvet Professional OVATION ED-190WW Quick reference guide

TECshow
TECshow MUSHROOM 40W user manual