Joney JYF-3001 User manual

1
Contents
1Introduction of the fingerprint lock....................................3
1.1 Feactures....................................................................................3
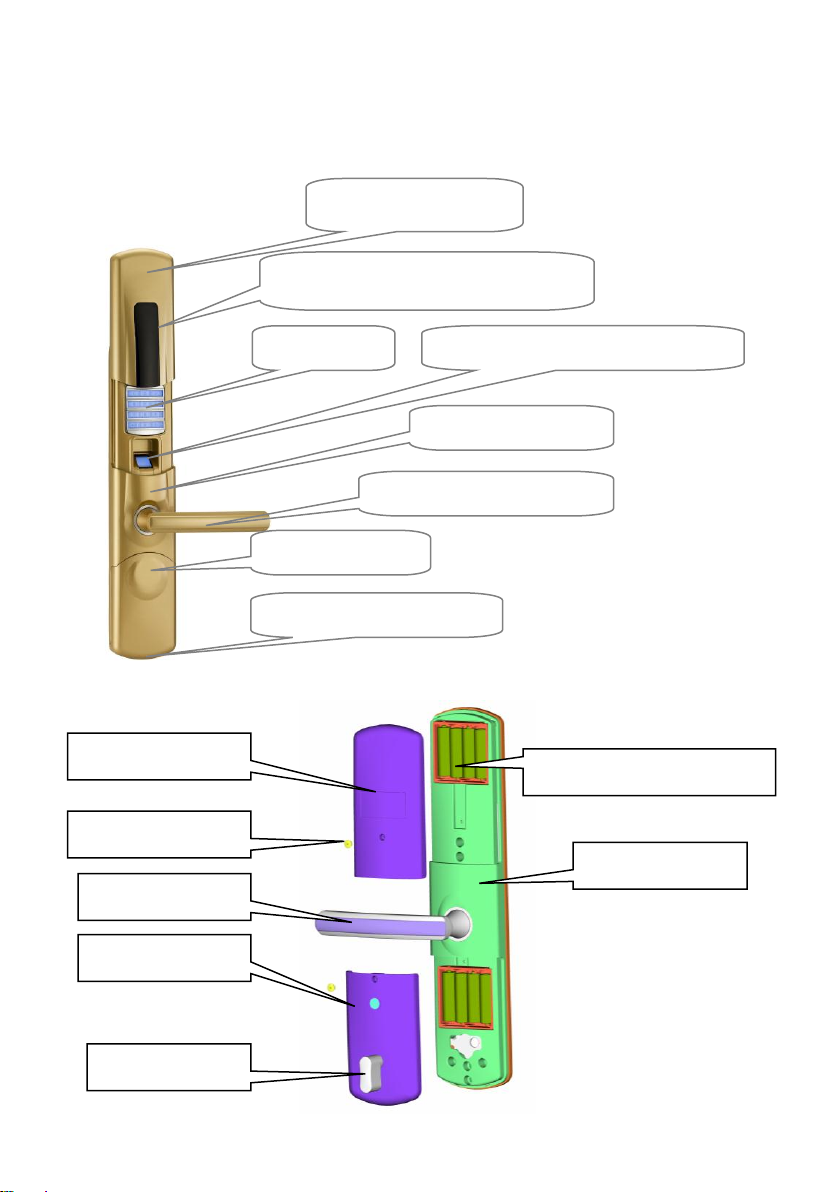
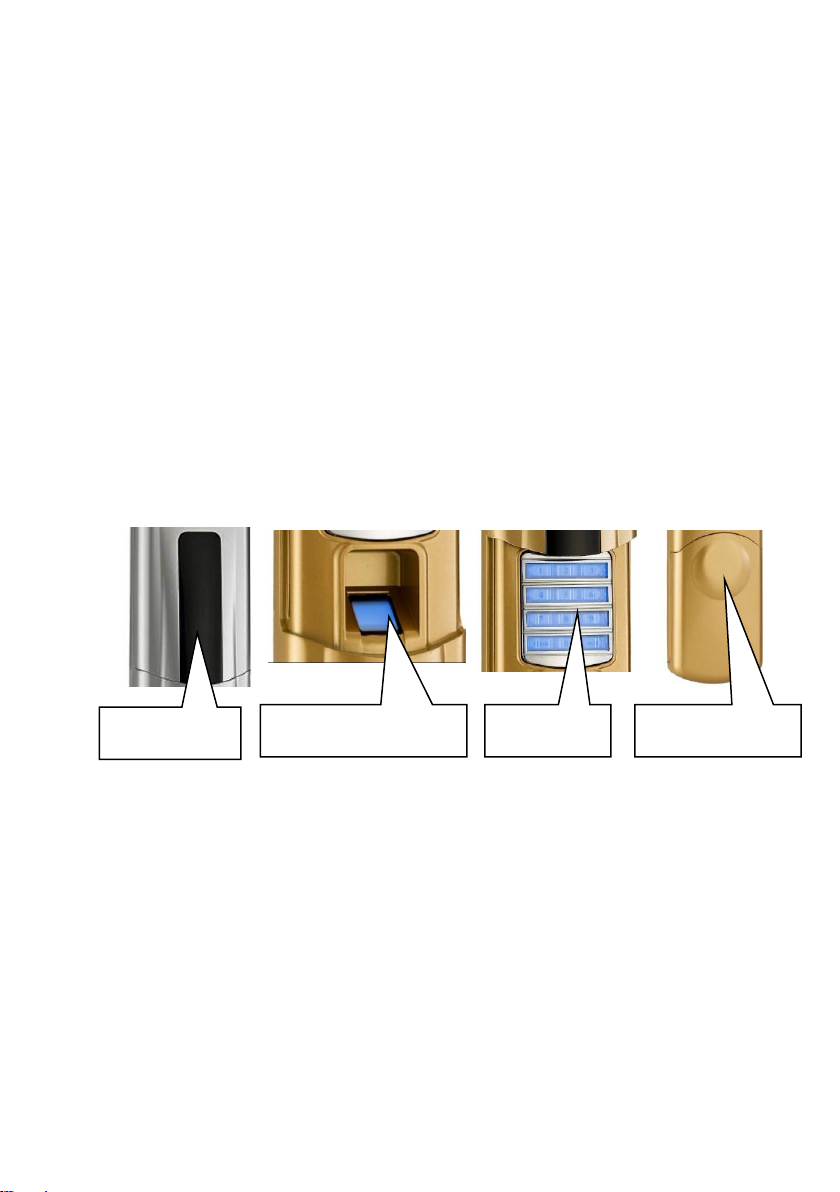
1.1.1 Brief Introduction.........................................................................4
1.1.2 Introduction of functions.............................................................4
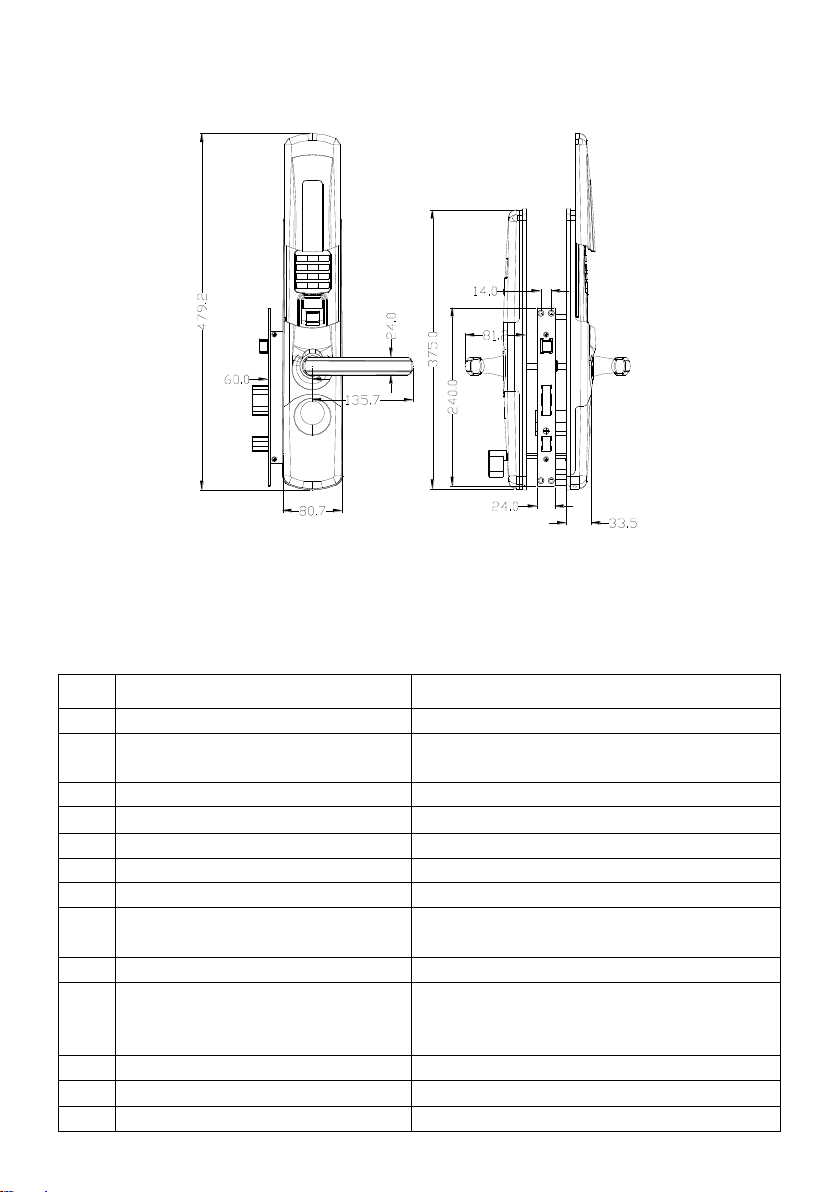
1.2 Diamensions...............................................................................5
1.3 Technical data.............................................................................5
2Operation..............................................................................7
2.1 Door opening pattern..................................................................7
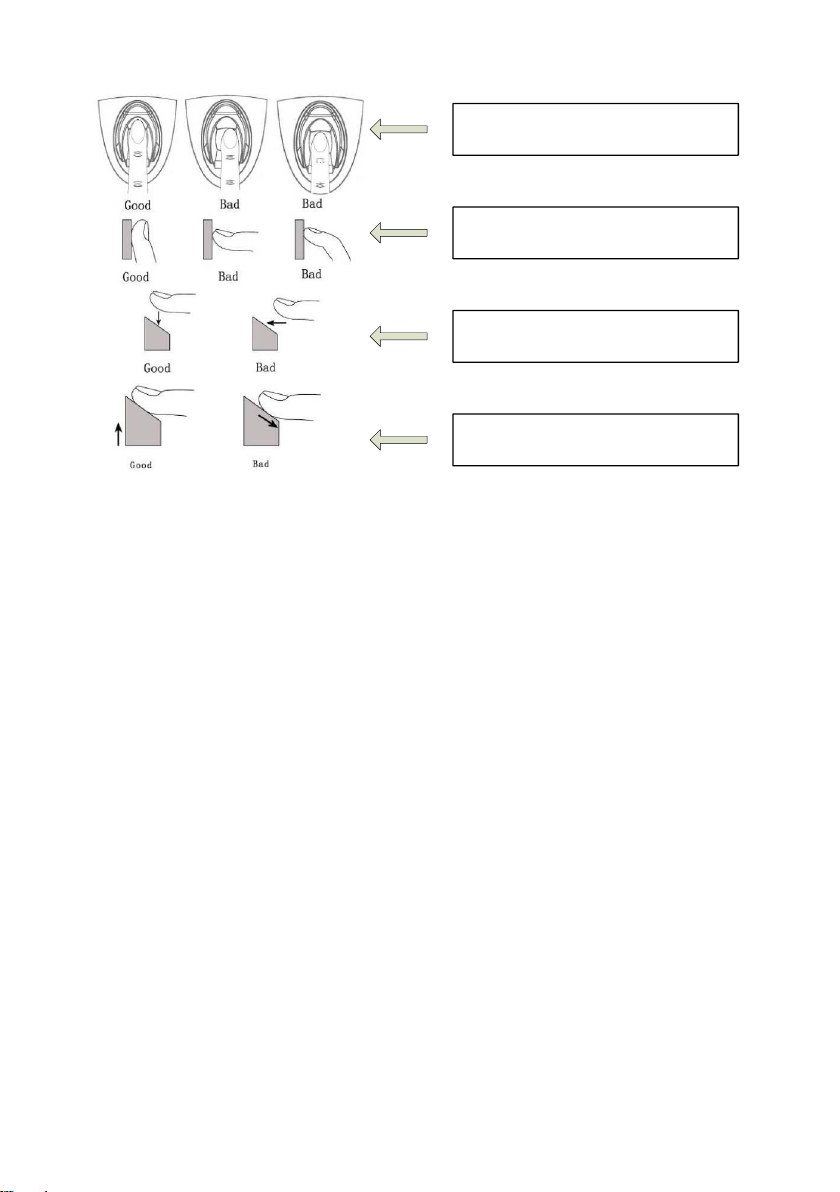
2.2 Ways to put the finger.................................................................7
2.3 Setting Card + password............................................................8
2.4 Setting fingerprint + password + card...........................................9
2.5 Alarming Function..........................................................................11
2.5.1 Low voltage alarm.....................................................................11
2.5.2 Preventing dismantling alarm..................................................11
2.6 Backup power................................................................................12
2.7 Installing / replacing batteries........................................................12
2.7.1 Installing batteries.....................................................................12
2.7.2 Replacing batteries...................................................................12
2.8 Remarks........................................................................................13
3Installation Procedures .....................................................13
3.1 Opening pores on the door.......................................................13
3.2 Opening pores on lock holder case..........................................14
3.3 Installation procedures .............................................................14
3.3.1 Installing lock cylinder.........................................................14
3.3.2 Installing the front and back lock body................................15
3.3.3 Installing buckle and frame in door case ............................16
4Maintenance and upkeep ..................................................17

2
4.1 Daily maintenance and upkeep ................................................17
4.2 Notice for use ...........................................................................18
5After-sale Service...............................................................20
5.1 Remarks about after-sale service.............................................20
5.2 Packing List ..............................................................................21
5.3 Accessories ..............................................................................22
A/2(2014 年1月)

1
Important Tips
1. Fingerprint lock is a kind of hi-technical product, and its normal
operation and life span are directly influenced by the installation.
Therefore, we kindly suggested you to call in a professional to install it.
Please open pores, supporting pits, buckle and buckle pores
according to the indication of opening pore in the door plank. Pores
should be opened accurately and the lock should be installed
according to the indication strictly. If the lock cannot be opened
(smoothly) after installation, please contact with the local distributors
or our after-sales department to solve the problem.
2. If your house is sprucing up, it is suggested to uninstall the lock after
you exanimate the locks and to reinstall them after the sprucing up.
The aims are: 1. To avoid the lock appearance being damaged by
corrosives, and the wet paint on the door will influence the gearing of
the lock. 2. Ethyl alcohol, paint and other chemicals will be used when
we sprucing up the house, which will be volatized to accelerate to
damage the lock appearance and shorten its life span.
3. Before installation, please switch on all of the connecting wire and
load the batteries, and then press the initialized button to initialize the
lock and restore factory defaults.
4. When installing the lock, please do take the mechanical keys with you
so as to unlock it if the door is close before you finish the installation.

2
Registration Form of Users
For convenience, we make this form for administrator to record
information of user registration. You can also make you form according to your
specific requirements.
No.
Department
Name
Fingerprint
No.
Date of
registration
signature
Remarks

3
1 Introduction of the fingerprint lock
1.1 Feactures
Nixie Tube and Induction
window
Keypad
Fingerprint Scanner
Front Lock Body
Front Handle
Sliding Cover
Eternal Power Interface
Back Cover 1
Back handle
Back Cover 2
Deadlock knob
Screw plug
Back Lock Body
8 pieces of AA batteries
Front Sliding Cover

4
1.1.1 Brief Introduction
Features : Delicate appearance design, Reasonable structure, Secure
fingerprint lock.
Applications: Government, Police station, Army, Bank, Law Court, Hospital,
Office building, Residential area, etc.
1.1.2 Introduction of functions
We adopt the international advance biotechnology to ensure its high quality;
8 peaces AA batteries; handles can prevent the wreaking havoc; ways to
open the door: 1. Fingerprint + Pin code + mechanical key; 2. Card + Pin
code + mechanical key.
Fingerprint Scanner
password
Mechanical key
Card Reader

5
1.2 Diamensions
1.3 Technical data
No.
Items
Technical parameters
1
Sensor resolution
Bright background, 500dpi
2
Sensor damage resistance
ability
1000 times of impact with 4H pencil
3
Starting time
<1 second
4
Way of contrast
1:N
5
False rejection rate
≤1%
6
Error rate
≤0.0001%
7
Finger point
360°
8
Fingerprint registration module
Create one fingerprint module at one
time
9
Fingerprint update mode
Auto update
10
Fingerprint information
The fingerprint information will not
lose when the battery is off or
changed
11
Fingerprint capacity
100 Pieces
12
Lights interfere
Avoid explosion under high light
13
Fingerprint collector
Hard glass, nanometer surface

6
treatment
14
Static Power Consumption
< 30 u A
15
Dynamic Power Consumption
The working current is under 200 mA
16
Control system
Dicaryon dual circuit and individual
control
17
The fingerprint battery life
Open door for 5000 times
18
The combination battery life
Open door for 6000 times
19
Working voltage
DC 6 V
20
Power supply mode
Battery powered
21
Combination capacity
100 Groups
22
backup power
DC 9 V
23
Low voltage alarm
4.9 V
24
Antistatic ability
Contact discharge 8KV,air discharge
15KV
25
Working temperature
-10℃to 55℃
26
Working humidity
10% to 90%
27
Storage temperature
-20℃to 7 0℃
28
Combination design
Random combination
29
Combination length
6-digit numbers
30
Door open method
Left open, right open
31
Card Capacity
100 Pieces
(Remark: We emphasize the technology updating, we keep the right to
notice you if parameters are changed)

7
2 Operation
2.1 Door opening pattern
Open Left Side Open Right Side
Open left side: If you stand outside the door, the fix butt hinge is in the left, so
you have to hold the handle with your left hand. And when you open the door,
the lock is opened from the left.
Open right side: If you stand outside the door, the fix butt hinge is in the right, so
you have to hold the handle with your right hand. And when you open the door,
the lock is opened from the right.
2.2 Ways to put the finger
Remarks: please notice to put your finger in the right position
Please put your finger on the fingerprint acquisition windows with moderate
force and keep flat because the central of the fingerprint contents most of the
information. Compare the right and wrong way of putting finger as below:

8
手指须放置在指纹采集窗中心
保持手指平放在指纹采集窗
轻轻地把手指按在指纹采集窗
保持平稳(不要向前或向后滑)
Lock-out function 反锁功能
Pull the handle upwards inside or outside the door can make it lock out and
realize the function of anti-theft bolt. Rotate the small knob in the back of the
lock 45 degrees, the door will be deadlock, and it cannot be opened outside in
any ways.
2.3 Setting Card + password
2.3.1 Initialization: long-press the switch of initialization on the circuit board
and the red light will be on. The initialization will be finished until you hear the
sound of “Di” and the green light on.
2.3.2 Setting the administrator card: the first card read after initialization is
the administration card, which also can open the lock.
2.3.3 Setting guest cards:read the administrator card, the elevator will rotate.
Then read the administrator card again, and the system will be in the state of
setting guest card. Next read a guest card and take it away. Repeat this with all
of the guest cards. Last, read the administrator card again, and the elevator will
rollback and exit the state of setting guest cards
2.3.4 Setting keep-open by a card: read the card to make the elevator rotate
and press the handle to keep opening the door until the red light twinkles 3

9
times. Next you will hear 3 long sounds and see the green light off, then you
can release the handle. Reading any administrator cards or guest cards can
cancel the keep-open state.
2.3.5 Setting administrator password: After initialization, put in 6 digits
numbers and then press the LOCK, this 6-digit number is the administrator
password.
2.3.6 Setting passwords to open the door: Put in the 6-digit administrator
password and press the LOCK, the elevator will rotate, then press 1, put in
6-digit number and press LOCK, put the same 6-digit number and press LOCK
again. When you hear the sound of “Di-Di”, press CLEAR to exit the setting
state, and the elevator will rollback. This 6-digit number is the password to open
the door. 49 group of passwords are available.
2.3.7 Clearing all the guest passwords: put in the 6-digit administrator
passwords and press LOCK, the elevator will rotate. Then press 2 and LOCK,
the elevator will rollback and all of the guest passwords will be cleared.
2.3.8 Setting keep-open by passwords: Put in the 6-digit administrator
password and press LOCK, the elevator will rotate. Then press 3 and after you
hear the sound of “Di-Di-Di”, press LOCK and the lock will be in keep-open
state. Putting in the passwords or reading the guest cards will cancel the state
of keep-open.
2.4 Setting fingerprint + password + card
Door open pattern:
1. Password:press the key of *, the screen will be lighted and powered. Then
put in the password and press . When you hear the music, the door
will be opened. The password capacity is 100 groups.
2. Fingerprint: open the slide cover, and put your finger on the fingerprint
reader. When you hear the music, the door will be opened. The fingerprint
capacity is 100 pieces.
3. Card: keep the opening card close to the card reader, when you hear the
music, the door will open. The card capacity is 100 pieces.
4. Mechanical keys.

10
Operation Instructions:
1. Initialization: long-press the switch of initialization on the circuit board and
do not loosen your finger until you hear the voice prompt of “……has
cleared”. And the initialization will be finished. At this moment there is not
any effective cards or fingerprints and the administrator password is
123456.
2. Changing the administrator password: the default administrator
password is 123456. Press “ * + + administrator password + ” to
enter the programming mode. Next, press 8 + and put in a new
administrator password ending with pressing . Then put in the
administrator password second time and end with pressing . The setting
will be finished when you hear a long sound. This administrator password
can also open the lock.
3. Adding a guest password: Press “* + + administrator password + ”
to enter the programming mode. Next, press 7 + and put in a 2-digit
user defined password number (from 01 to 99, should be registered in the
form). Then put in a guest password ending up with pressing the and
repeat this again. The setting will be finished when you hear a long sound.
4. Adding a guest fingerprint: Press “* + + administrator password +
” to enter the programming mode. Next, press 6 + and put in a
2-digit user defined number for the guest fingerprint (from 01 to 99, should
be registered in the form). Then put your finger on the fingerprint scanner
till you hear a long sound. The setting is complete.
5. Deleting all of the guest fingerprints and passwords: Press “* + +
administrator password + ” to enter the programming mode. Next, press
1 + and repeat it again. When the indicator light off, all of the guest
fingerprints and passwords are deleted without changing the administrator
password.
6. Deleting a guest fingerprint: Press “* + + administrator password +
” to enter the programming mode. Next, press 4 + and put in the
2-digit fingerprint number you want to delete and end up with pressing .
Repeat the 2-digit number + and the fingerprint is deleted.
7. Deleting a guest password: Press “* + + administrator password +

11
” to enter the programming mode. Next, press 5 + and put in the
2-digit password number you want to delete and end up with pressing .
Repeat the 2-digit number + LOCK and the password is deleted
8. Setting keep-open state: Opening the lock by fingerprint or password,
press the handle to keep opening the door for 6 seconds until you hear the
voice prompt of “the door is in the keep-open state”. The setting is finished.
Opening the door by fingerprint or password can cancel the keep-open
state.
9. Adding a card: Press “* + + administrator password + ” to enter the
programming mode. Next, press 9 + and hold the card to the card
reader. (Adding cards continuously is available)
10. Press “* + + administrator password + ” to enter the programming
mode. Next, press 3 + , and put in the number of the card + .
11. Volume adjustment: Press “* + + administrator password + ” to
enter the programming mode. Then press 2+ to adjust the volume. 1 is
to decrease to volume while 3 to increase.
12. Chinese & English shifting: Press “* + + administrator password +
” to enter the programming mode. Next, pressing 0 + can shift
language between Chinese and English.
2.5 Alarming Function
2.5.1 Low voltage alarm
If the battery is in low power, whenever you open the door by fingerprint,
password or card, the lock will alarm with the voice prompt of “power low,
please replace batteries”.
2.5.2 Preventing dismantling alarm
If it is dismantled or opened the outer shell by force, the lock will alarm with
the sound of “DiDi…”.
If the preventing dismantling alarm switch can not be shut completely
when installed or other reasons, it will be alarming.

12
2.6 Backup power
When the batteries is totally out of power and mechanical keys are not
available at the same time, please connect the 9V layer-built battery to the
power interface under the front lock body to power the combination, and
then put in password to open it.
2.7 Installing / replacing batteries
2.7.1 Installing batteries
Unscrew the battery cover, slide it upwards, take it away, and put in 8 pieces AA
batteries of 1.5V voltage. Then put the cover back and screw it.
2.7.2 Replacing batteries
A. Using the battery of wrong model will cause explosions.
B. Please use Carbon zinc / Alkaline manganese dioxide battery of brands
only.
C. Please follow the local environmental laws to handle the waste batteries.
D. If handled improperly, the waste batteries may cause explosions. Please
do not charged or decompose the waste batteries or put them into fire.
E. Please do follow the manual to use batteries.
F. Please install the batteries by correct positive and negative pole following
the instruction directions.
G. Please put the batteries in the places that children and pets cannot reach.
H. If the lock is not used for a long time, please take off the batteries.
I. Do not use the new batteries with the old ones together.
J. If your skin or clothes touch the liquor of the batteries, please flush with
water immediately. If your eyes touch it, immediate water flushing is
necessary and then go to a doctor.

13
2.8 Remarks
2.8.1 When you add a new user, please do record the user number for
administration.
2.8.2 instruction sound remarks: The voice prompt of “successful” means
successful operation, while voice prompt of “failed ” means failed operation.
3 Installation Procedures
3.1 Opening pores on the door
This product can be used in wooden doors and anti-theft doors with thickness
over 40MM.

14
3.2 Opening pores on lock holder case
Open pores as below. Make sure they keep accordance with the lock and
parallel with the door case when locking.
A-A
3
26
2
180
31
260.8
180
26
240.5
18
121
3.3 Installation procedures
Before installation, please put through all of the connecting wire, press the
initialization button on the circuit board to initialize the lock firstly, which will also
delete all of the passwords, cards and fingerprints to restore the factory setting.
3.3.1 installing lock cylinder
Following the picture below, take the lock cylinder with its connecting line on the
upper side to install in the cylinder pore on the door. Please do not make the 4P
line in the door. Use 4 flat countersunk head tapping screws to fix the cylinder.
Then take the mechanical lock with this key pore outwards to install in the
cylinder pore and use FM 5 * 65 Machine Screws to fix it. Then use the
mechanical key to exam whether it can be open or not.

15
锁芯固定螺丝FA4*25
天地拉杆根据需
要上下调动
机械锁头
锁头固定螺丝FM5*65
天地拉杆根据需要上下调动
3.3.2 Installing the front and back lock body
Before installing the lock body, please check if the handle springs fall off, and
put the handle square shafts into the lock cylinder. Please notice the directions
of opening left and opening right: the downwards arrow is for opening right and
upwards for left. As showing below, the 4P line of the front body connect the
cylinder, the 3P line connect the back body and the square shaft of deadbolt
should be put in the pore of cylinder. Then fix the body with 4 pieces FM 5 * 65
Machine Screws. And next load the batteries and fix the back cover 1 and back
cover 2.

16
取下外
盖,可
使用外
接电源
和机械
钥匙
前面板3P连接线插头
(与后板连接)
反锁旋钮
前后固定FM5*50(根
据门厚调整)*4
反锁旋钮方轴
胶塞-螺丝盖*2
圆头十字M3*8(*2)
后面板电池盖2
后面板电池盖1
后面板3P电源线
8节5号碱性电池
后把手弹簧
密码指纹锁后板
前把手弹簧
把手方轴
密码指纹锁前板
3.3.3 Installing buckle and frame in door case
Put the frame in door case, next cover the buckle, and then fix them with 4
screws. Last, please check whether the lock cylinder can work well. (use self
tapping screw on wooden door and metric screws on steel door.)

17
门扣板 门框盒
门框
4 Maintenance and upkeep
4.1 Daily maintenance and upkeep
1、keep the lock away from corrosives which can damage the
protection layer and the luster on the lock.
2、The handle is the key part to open and close the door, and its
flexibility will directly affect the use of the lock. Therefore, do not hang
objects on the handle.
3. If the door is out of shape, there would be more friction force and
even make the spring bolts cannot stretch when they get into the door
case. In such a case, the place of buckle should be adjust.
4. After using the fingerprint scanner for a long time, there may have
dirt that affect its normal use. Please wipe the dirt with soft cloth.
5. When the low voltage alarm rings out, please replace the batteries
to make sure the lock work well.
6. When replacing the batteries, please notice the positive and
negative poles.
7. Please make sure the mechanical keys are in safekeeping.
8. Do not scratch the fingerprint scanner with hard or sharp objects.

18
9. Do not use your fingernail to scratch the fingerprint reader.
10. Please use soft cloth to wipe the fingerprint scanner surface when
it is wet.
11. When acquiring the fingerprint, please put your fingerprint on the
scanner flatly.
12. If the lock cannot rotate smoothly or in the wrong place, please
ask a professional to add some machinery oil.
13. Please keep the rotating parts oiled to make sure their smooth
drive and longer life span. Examine once half year or one year is
suggested.
14. When using the lock, please put some graphite powder or pencil
core powder into the lock core groove regularly or when the
mechanical key cannot infix or pull out smoothly. Please do not add
any lubricant oil because that may paste on the mechanical spring
and hinder the lock running.
4.2 Notice for use
4.2.1 When put the finger on the fingerprint scanner and hear short sound
two times, but fail to open the door:
A. This fingerprint is invalid. Elimination: use a valid fingerprint or open
the door by password or mechanical key.
B. This fingerprint has been deleted. Elimination: use a valid fingerprint
or open the door by password or mechanical key.
C. fingerprinted in the wrong way. Elimination: put the finger on the
fingerprint scanner again. Please press the finger against the scanner and on
the central. Or open the door by password or mechanical key.
D. the finger is desquamated or hurt so that the fingerprint is damaged.
Elimination: 2 fingerprints of one person should be registered. Or open the
door by password or mechanical key.
E. The finger is wet, dirty or with sweat or colored some skin care
Table of contents
Other Joney Lock manuals
Popular Lock manuals by other brands

Careline
Careline BuddyButton 01553 616200 user guide

Midas Touch
Midas Touch MPL-1000 Quick operation guide

Assa Abloy
Assa Abloy Sargent KP Series Installation & programming instructions

Burg Wächter
Burg Wächter SECUTRONIC operating instructions

Häfele
Häfele miniLock installation manual

Sabre
Sabre DL700 user manual