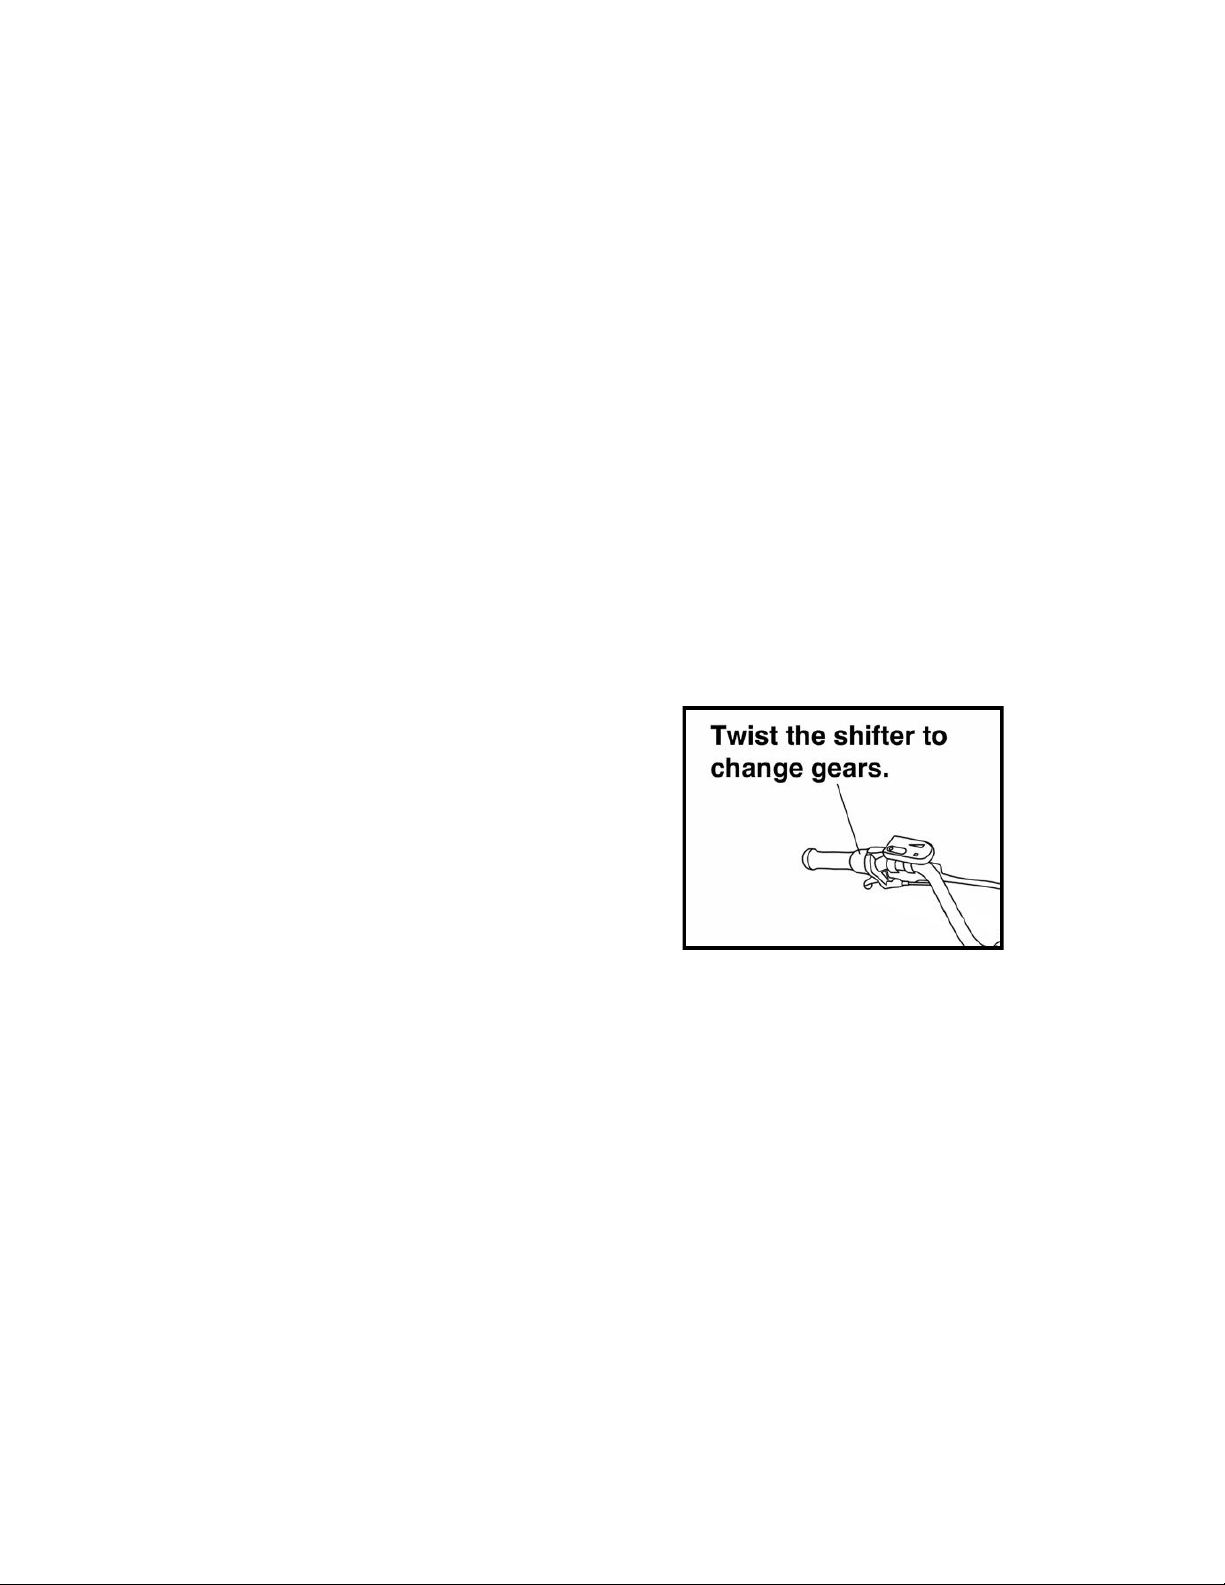
Juiced Bikes ODK U500 User manual


Charging the Battery
The Juiced U500 V3 features a high-capacity Lithium Ion
rechargeable battery. Charge the battery fully before your first
use. The charger that came with your U500 recognizes the
battery pack’s initial charge and will automatically cease charging
when the battery is fully charged; don’t be shy about topping off
your battery before a long trip!
•Be sure the bike is powered off.
•Plug the 4-pin plug into the charger port at the front of the battery
pack. It can only be inserted one way, so if it plugs in, you’ve
got it right.
•An amber light on the charger indicates that the battery is charging.
•Charging takes between 1 and 6 hours, depending on battery size
and initial charge level.
•When the pack is fully charged, the charger’s light will change from
amber to green and automatically stop charging.
Notice: The
charger can
become warm
during charging.
Do not place
anything over the
charger while it is
charging. Do not
use the charger
in wet areas.
1

Turning the bicycle ON and OFF
The electric bicycle can be ridden like a normal bicycle with the
power turned ON or OFF. However the throttle will be active only
if the power is turned on.
•Locate the power switch on the front face of the battery.
•Flip the power switch to the "ON" position.
•The power button will illuminate with a green light
•The lights on the display panel will illuminate, giving an indication of
the battery’s charge level.
•The bike can now ride on battery power alone.
•Power should be turned off after each ride to avoid draining the
battery.
2

Using the twist throttle
The motor speed is controlled with a twist throttle similar to a
motorcycle. The farther you twist the throttle backwards, the faster
the bike will travel.
•Sit with a comfortable position on the bicycle's seat.
•Slowly turn the throttle backwards towards you.
•The front wheel will began turning and the bike will move forward.
•You can pedal along with the motor to increase the riding range of the
battery. However pedaling will not directly charge the battery.
!
3

Using the Brakes
The bike comes equipped with front and rear Tektro Dorado
hydraulic disc brakes; the very best available for e-bikes. The
brakes’ main function is to slow down or to stop the bicycle.
•The brake on the front wheel is controlled by the lever on the left-
hand side of the handlebar
•The brake on the rear wheel is controlled by the lever on the right-
hand side of the handlebar
•The front brake provides the majority of the bicycle's stopping
capability
•When slowing down on slippery surfaces, use the rear brake first
before applying the front brake
•A signal wire from each brake lever automatically cuts power to the
motor when either brake is being used. This prevents undue wear to
the electric motor
4

Shifting the gears
Your U500 V3 comes equipped with a 3-speed internally geared
hub. 1st gear is useful for starting off from a stop or when riding
slowly or climbing steep hills. 3rd is most effective when riding at
speed. 2nd fits into the space between. The internally-geared hub
doesn’t require pedaling while changing gears; you can stop at a
red light in 3rd, switch to 1st while you’re waiting for the green, and
take off in 1st with no clickety-clack, no slow-at-first start, and no
fear of the chain falling off.
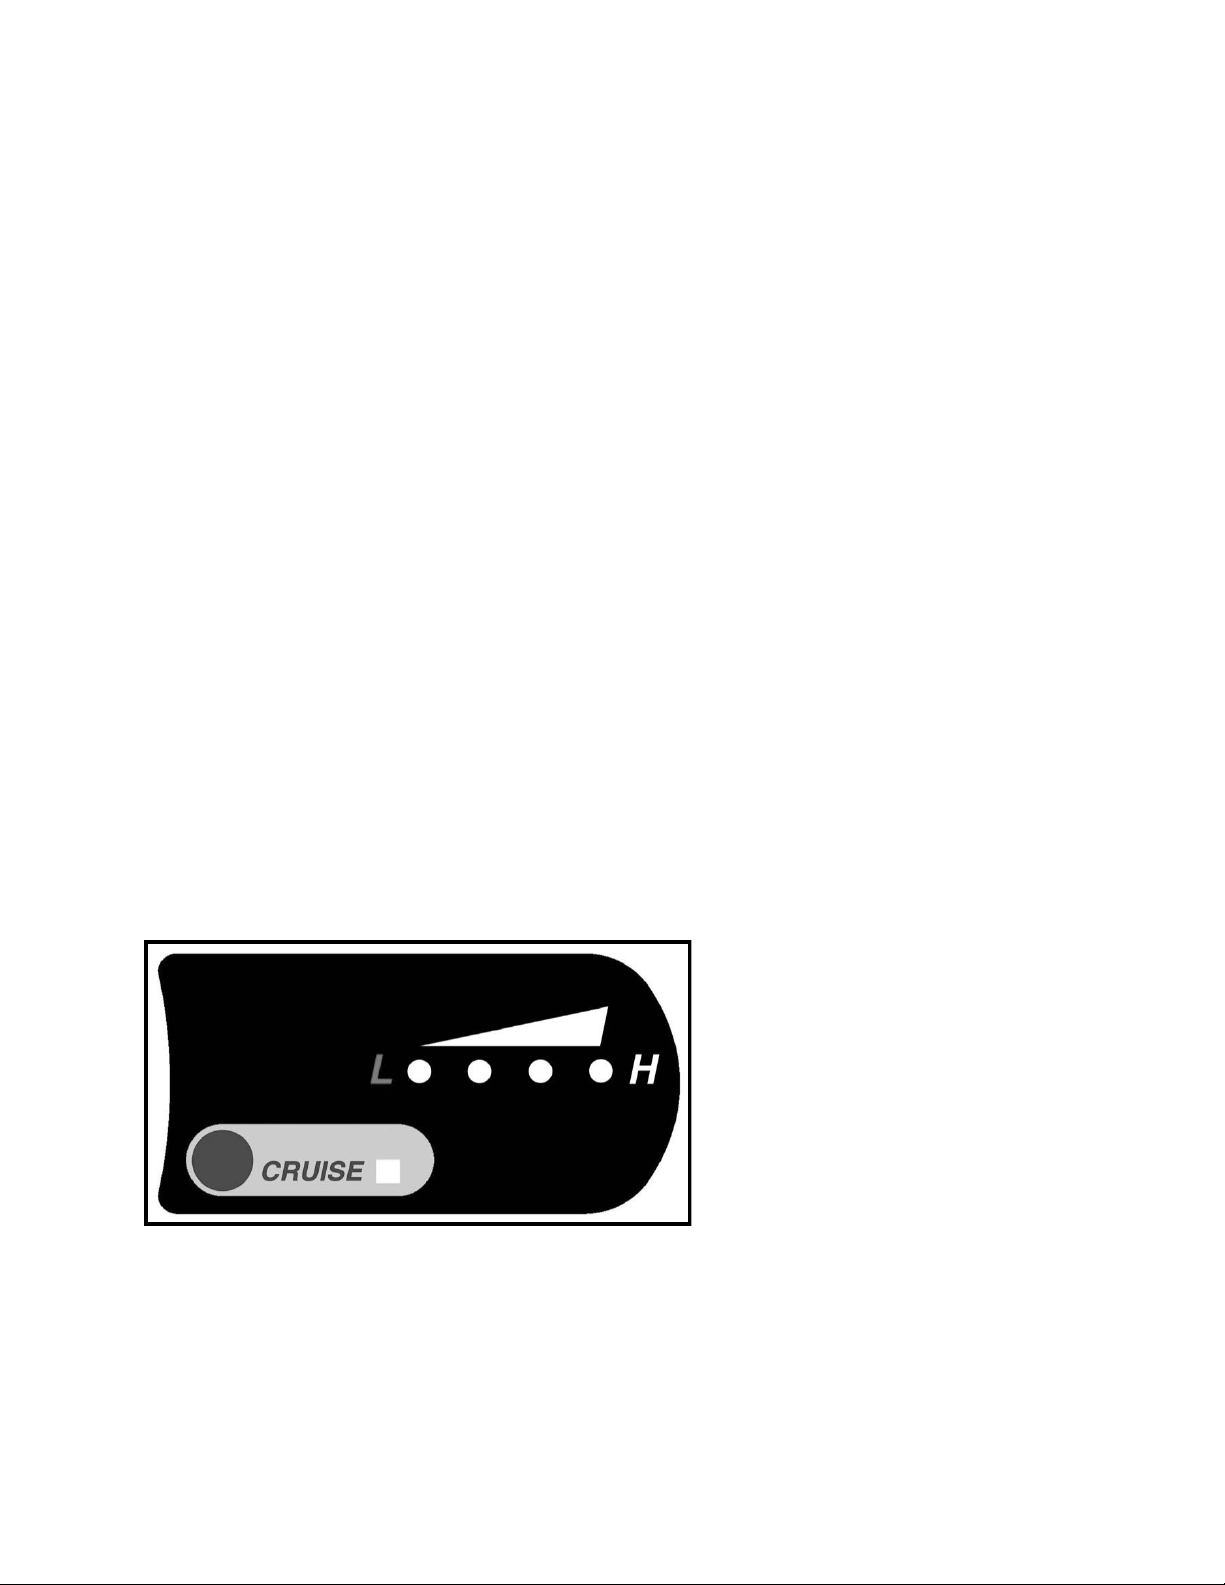
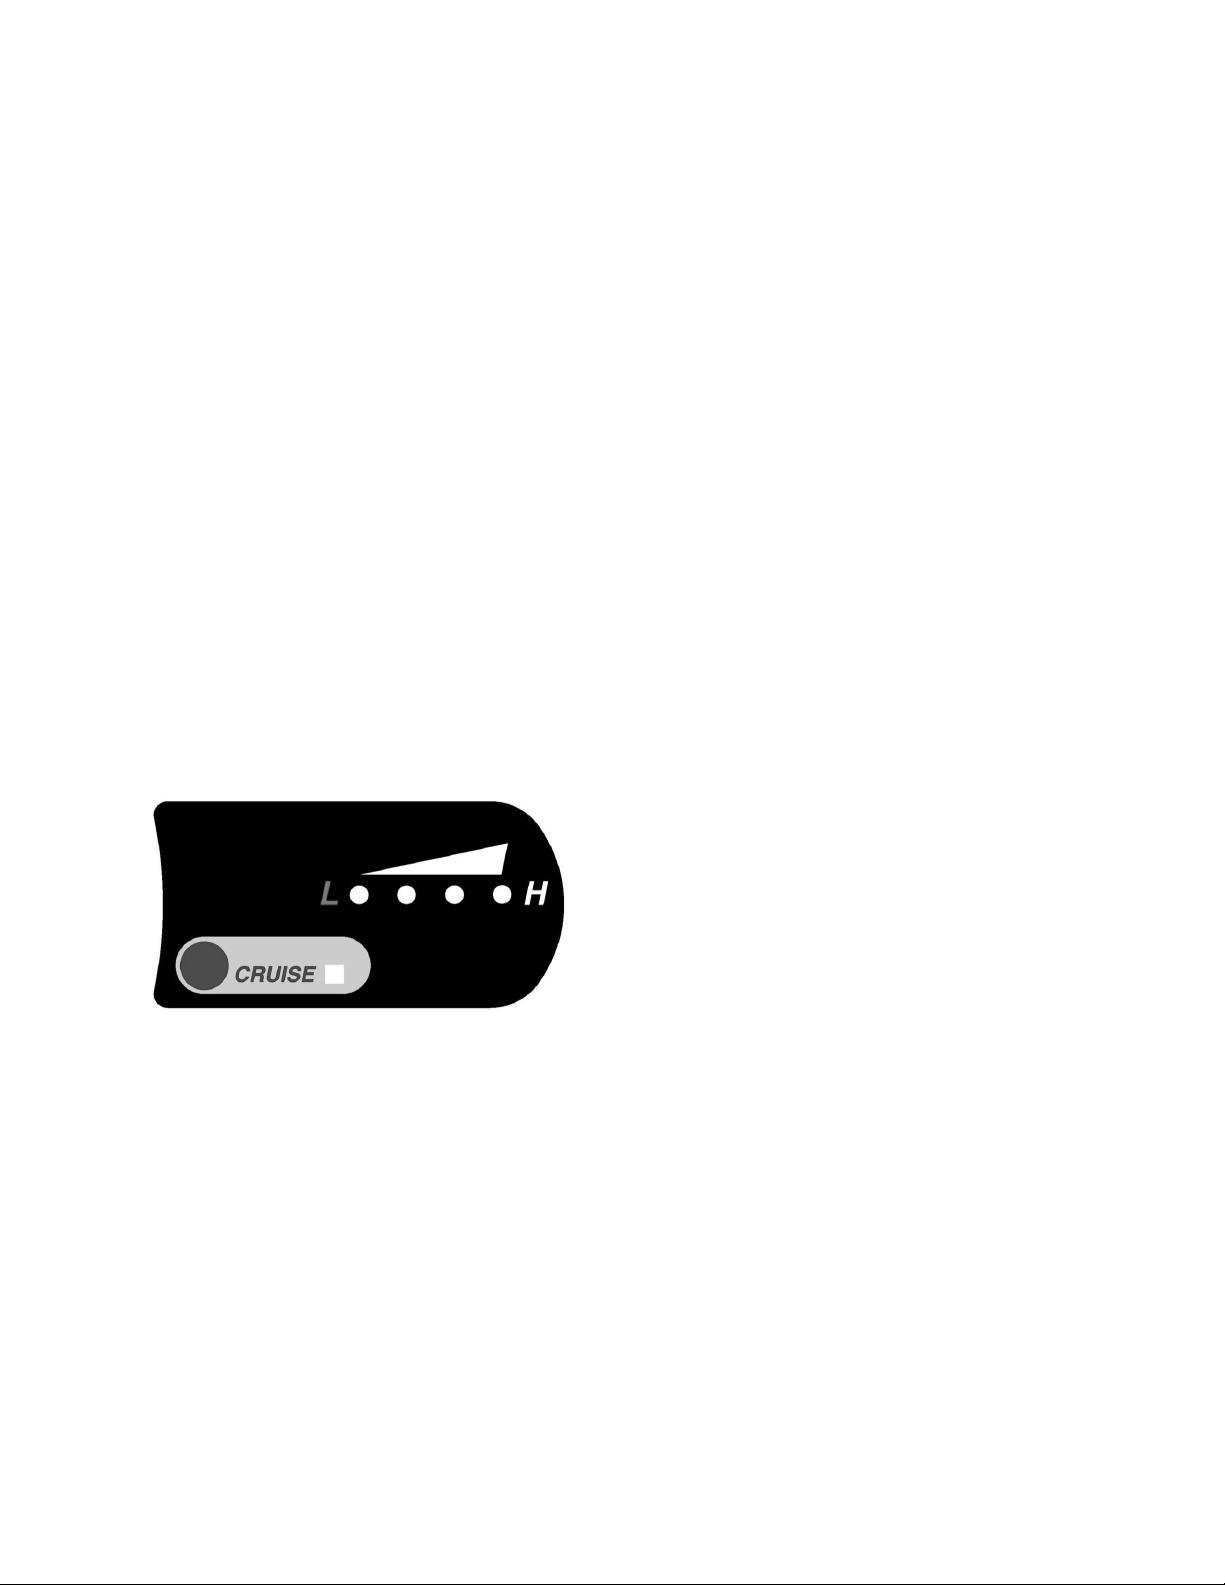
•The shifter is located on the left side of the handlebar.
•Twist the shifter completely back to enter the first gear.
•Twist the shifter forward to enter 2nd and 3rd gears.
When starting and going up hills, use the 1st gear.#
When pedaling at higher speeds, use the 2nd and 3rd gears.
Changing gears does not require that the bike be powered by the
battery. The gear shifting system and motor are entirely separate
and neither affects the other’s performance. Both work toward the
goal of propelling the bike, of course, and their contributions are
additive.
Notice: Twist shifters are normally mounted on the right side of the handlebars. On
electric bicycles with right-side twist throttles, the shifter must be mounted on the left
and the numbers may appear inverted. !
5

Using the cruise control
The cruise control system can be used to maintain a constant
speed. It works similar to a cruise control in an automobile. The
cruise control will deactivate if the brakes are applied, if the
throttle is moved, or if the CRUISE button pushed again. The
bicycle will return to normal operation.
How to use the cruise control feature:
•Use the throttle (with or without pedaling) to attain your desired speed
•Holding the throttle in a fixed position, push the “CRUISE" button
•The LED will illuminate to indicate that the bike is in cruise mode
•Let the throttle return to its initial position (i.e., let go of it)
•The bike will now maintain a constant speed until:
1. The brakes are applied, or
2. The throttle is applied anew, or
3. The CRUISE button is again pressed, or
4. The battery runs down completely
!
6

How to read the battery level
There are 4 LED lights on the display panel which will give you an
indication of the batteryʼs voltage. Because the battery gauge
measures voltage, only an approximate estimation of the battery's
state can be obtained. The battery’s voltage can vary greatly
depending on a variety of conditions.
The voltage will decrease temporarily when using the throttle. It may
drop to only 1 light when going uphill regardless of the charge state.
This is normal operation. The voltage will be lower if the battery has
been in a cold environment.
To more accurately read the batteryʼs charge state, let off the throttle.
The display lights will stabilize after 1 second to give an indication of
the battery’s level.
Use this guideline to estimate the battery's charge level:
Let off the throttle to read the Lights !!!! 4 Lights
The battery is between 80% and 100% charged.
!!!!3 Lights!
The battery is between 40% and 80% charged. Speed will feel reduced.
!!!! 2 Lights!
The battery level is low and should be recharged soon.
!!!! 1 Light!
Stop using the throttle, recharge the battery pack.
7

Understanding Battery Range
All electric bicycles have a riding range that can vary greatly
depending on how it is ridden, terrain, tire pressure, temperature,
payload and wind. After a few rides, you will get a sense of the
electric bicycle’s range capability.
Factors that will decrease your range:
•Rapid accelerations using the motor • Uphill riding
•Heavy payloads
•Headwinds
•Under-inflated tires
•Extreme hot or cold weather
How to increase your range:
•Start by pedaling instead of only using the motor
•Avoid rapidly accelerating using the throttle
•Pedaling to help the motor up steep hills
•Reduce your average speed and pedal along with the motor
•Reduce payload weight
•Properly inflating your tires between 40-50 psi
•Coast to a stop and avoid rapid decelerations
#
Notice: Riding downhill or pedaling when not using the throttle will not recharge
the battery pack. Do not over-inflate the tires.
8

Battery Information and Safety
About the Lithium battery
Your Lithium battery does not have a “memory effect” associated
with older battery technologies. It is highly recommended you
charge the battery after every ride even if the battery is only lightly
used.
An on-board circuit prevents the battery from over-charging. The
battery can achieve between 500 to 700 charge cycles. As the
battery receives more charge cycles, the capacity will become
decreased. Charging a partially flat battery is not considered a full
charge cycle.
Notice: The battery must be recharged at least once every
month. A battery left unused for several months may result in
permanent capacity loss.
The battery’s capacity will be temporarily reduced in cold
environments. Avoid using the electric bicycle in very hot weather.
Store the electric bicycle in a sheltered place.
Battery Safety Information
•Use only the charger supplied with the bicycle.
•Improper usage can cause explosion or fire.
•Do not short-circuit the battery’s terminals.
•Do not use if the temperature is over 60 C (140 F)
•Do not disassemble the battery pack.
•Do not submerge the battery in liquid.
•Do not set flame to the battery.
•Do not expose battery to sub-freezing temperatures for an extended
period.$
9

Key parts of the electric bicycle
An electric bicycle is a lot like a normal bicycle. The major difference is
the inclusion of a motor which provides a boost when desired. An
onboard rechargeable lithium battery supplies the motor with electric
power. The bicycle can be ridden using both pedal power and battery
power at the same time.
Controller
The controller regulates how much power is sent from the battery to the
motor.
Throttle
The throttle allows the rider to control the bike’s speed. It sends a signal to
the controller telling it how much power to send to the motor.
Battery
Electrical energy is stored in the battery pack. It is composed of many
smaller battery cells similar to that of a modern mobile phone.
Charger
The charger plugs into the electrical outlet and is used to pump energy
back into the battery pack when it becomes depleted. The more energy that
is discharged from the battery pack, the longer it will take to recharge.
Display
The display reads the battery’s voltage. This will give an approximation of
the battery’s charge state. The display may have other buttons to control
other functions.
Motor
The motor is built into the hub of the front wheel. When power is sent to
motor, it will began to spin, propelling the bike forward.
10

Key parts of the electric bicycle (continued)
Gear Shifter
The gear shifter changes the ratio between the pedals and the rear wheel.
It is used to find a more comfortable pedaling cadence under different
riding conditions. The low gear is used for pedaling during starts, uphill or
loaded riding. The higher gears are use when pedaling downhill or during
faster riding.
Brakes
The brakes use friction to slow the bike down. The levers on the
handlebars controls the braking. The brakes have an electrical switch
which cuts the power to the motor at the moment when the brakes are
used. This prevents accidental accelerations while braking.
Fuse
The battery has a fuse which is used to prevent excessive amounts of
power surging through the wires and damaging the electronics. When the
fuse is tripped, it will need to be replaced.
Cruise Control
The cruise control function can automatically maintain the bikes speed
without the need to constantly use the throttle.
Tire and Inner tube
The tire is made of rubber and provides traction for your bicycle. The Inner-
tube, is a rubber tube inside the tire retains the tire’s air.
PSI (Pounds per Square Inch)
The PSI is the pound’s per square inch of air pressure inside the tire. It can
be measured with a tire gauge. Pumping more air into the tire increases the
PSI and makes the tire harder. Releasing air from the tire decreases the
PSI and makes the tire softer. Both over and under inflating the tire can
have negative effects.
11

Adjusting the bicycle for riding comfort
1. Adjusting the seat height
Pull the seat clamp lever outward to loosen the seat post. Adjust the seat the
desired height. The maximum height should not extend beyond minimum
extension mark marked on the seat post. Tighten the seat clamp and close the
lever to lock in the seat’s height.
2. Adjusting the seat tilt and distance
Using a 6 mm Hex wrench, loosen the bolt under the seat. Adjust the seat tilt and
seat distance forward or backward. Tighten the bolt securely to lock in your
desired position.
3. Adjusting the stem height
Use a 6mm Hex wrench to loosen the stem. Move the stem up or down to the
desired height. The maximum height should not extend beyond minimum
extension mark marked on the stem. Check to be sure the handlebars are
pointing in the same direction as the wheels. Re-tighten the bolt to lock in the
stem’s position.
4. Adjusting the handlebar tilt angle
Use a a 5 mm Hex wrench to loosen the two screws near the center of the
handlebars. Tilt the handlebars to the desired position. Re-tighten the screws
securely to lock in the handlebars. Be sure both screws are tightened equally.
12

Important Safety Information
Basic Bicycle Safety
• Always wear a helmet.
• Use a light and wear reflective clothing when riding at night.
• Reduce speed when riding on a wet surface.
• Properly inflate tires.
• Apply the rear brake before using front brake in low traction conditions.
• Do not follow other vehicles too closely.
• Brake disk rotors can get extremely hot for brief periods after braking. #
13

Electric Bicycle Safety
• For maximum stability, avoid accelerating or braking while turning.
• Avoid riding in extremely wet conditions.
• Do not leave the electric bicycle in the rain.
• Discontinue the use of the electric bicycle if the battery pack is
damaged due to crash or a drop.
• Do not disassemble the battery pack.
• Do not use the charger outdoors in wet conditions.
• Do not ride up or down extremely steep inclines.
• Do not ride off-roads or jump the electric bicycle.
• Always use the kickstand or center stand when not on the bicycle.
• Do not exceed the carrying capacity.
• Do not ride on the sand.
• The motor can get hot, do not touch the body of the motor for at least
2 hours after riding.
• Do not race or taunt other cyclist.
14

Bicycle Specifications
15

16

Juiced Bikes Safety Statement
In e-biking, as in cycling, the user’s safety is paramount. It’s important to understand that
e-bikes tend to be ridden at greater speeds than traditional cycles and are therefore more
dangerous. Be sure to understand and follow all local laws & regulations and to have
maintenance/repairs done by an authorized Juiced dealer. Don’t use/ride any Juiced
Bikes product in ways unintended by the manufacturer and don’t exceed the weight limit
of any product.
Don’t use/ride our product in traffic or any other environment that
may present danger until you have built up some familiarity with the
product and all installed accessories. Baskets, lights, passenger
seats- EVERYTHING!
Use only parts/accessories approved by Juiced Bikes, and have all installation performed
by a Juiced-authorized mechanic. Installation of unauthorized parts/accessories may
void the product’s warranty. In addition, Improper installation of any parts/accessories as
well as improper performance of maintenance may void the product’s warranty.
NEVER DISASSEMBLE OR MODIFY ANY ELECTRONIC
COMPONENT OF THE BICYCLE. DOING SO IS EXTREMELY
DANGEROUS AND MAY RESULT IN DEATH, SERIOUS INJURY, OR
DAMAGE TO PROPERTY.
Always wear a helmet, whether the
law requires one or not!
17

Juiced Bikes Warranty"
At Juiced Bikes, we take great pride in the quality and durability of our products. We’re confident that you
will be impressed as well, and we stand behind all of our products.
Every bike/e-bike we sell is covered by a limited 2-year warranty against manufacturing defects subject to
the terms below:
Covered Products:
1. This warranty applies only to products, parts, & components (hereafter PRODUCTS) that have been
manufactured, assembled, or sold in new condition by Juiced Bikes/Juiced Riders, Inc (hereafter,
JUICED).
2. This warranty applies only to replacement/repair of PRODUCTS in case of a manufacturing flaw in
materials or workmanship, in accordance with the Scope of Warranty Service, and subject to any and all
exclusions, limitations, and procedures explained below.
3. This warranty is not transferable in any way and may not be exercised by anyone other than the original
retail buyer (hereafter BUYER) of the PRODUCTS, only if the BUYER has retained constant ownership of
the PRODUCTS since their original purchase of the PRODUCTS and only to PRODUCTS purchased in
new condition either:
A. directly from JUICED, or
B. from an authorized dealer of JUICED who in turn purchased or received the bike directly from
JUICED (e.g., this warranty does not apply to used or second-hand bikes, nor does it apply to
pre-owned PRODUCTS).
Warranty Period:
1. Battery packs are covered under warranty for a period of 2 years, or until the cumulative total lifetime battery charging
exceeds 1000 times the battery’s initial nominal charge capacity
2. For all other PRODUCTS, this warranty expires 2 years from the date the PRODUCTS were delivered to the BUYER,
unless excluded from warranty or otherwise voided from coverage under warranty
Warranty Exclusions:
The intent of this warranty is to ensure that the BUYER of any new PRODUCTS sold by JUICED or any
JUICED product sold by an authorized JUICED dealer will receive a quality product, free of manufacturing
flaws. This warranty should not be considered to be an insurance policy against any damage occurring after
the products are received, nor as explicit or implicit acceptance by JUICED of responsibility for the
consequences resulting from the failure of any PRODUCTS, irrespective of whether the failure itself is covered
by this warranty.
In addition, the following situations are excluded from this warranty or lead to exclusion from this warranty:
1. Warranty claims not made in accordance with Warranty Claims Process (explained below)
2. PRODUCTS with technical alterations that have been made without the approval of the manufacturer
3. PRODUCTS with alterations to or additions to which use incompatible or non-original parts
4. Damage to or failure of PRODUCTS resulting from weather or ordinary wear and tear.
5. Theft, robbery, vandalism, intentional damage, damage resulting from bumps and scrapes after
possession of the PRODUCTS has been transferred to the BUYER.
6. PRODUCTS that haven’t been manufactured or sold by JUICED
7. Incidental/consequential damage or injury
8. PRODUCTS that have been used or transported inappropriately or improperly (e.g., by loading a JUICED
bike above the maximum weight recommendation)
9. PRODUCTS with damage resulting from improper maintenance (e.g., storing battery fully discharged over
the winter)
10. Any electrical component that has been opened, altered, partially disassembled, or completely
disassembled except by JUICED or an authorized JUICED dealer.
11. Any PRODUCTS that have been disassembled in a manner not authorized by JUICED or that have had
repairs attempted by anyone not authorized by JUICED.
12. PRODUCTS that have been damaged due to improper adjustment or worn components
13. PRODUCTS with damage resulting from an accident
14. PRODUCTS that have been lent, leased, or rented commercially
15. Bicycles not registered with JUICED by the BUYER within 90 days of delivery/sale
16. Warranty shall not apply to PRODUCTS and/or situations in accordance with the terms of a specific sale
(e.g., scratches and dents to scratch & dent discounted merchandise)
17. Cleaning of any PRODUCTS
18. PRODUCTS that were not purchased by BUYER in new condition
18
This manual suits for next models
1
Table of contents
Other Juiced Bikes Bicycle manuals