Juiced Bikes RIPRACER User manual

RIPRACER
OWNER’S MANUAL
JBP-RR-MANUAL

i
JBP-RR-MANUAL | ©2022 JUICED BIKES
California
DISCLAIMERS:
TABLE OF CONTENTS
Introduction ............................ iii
Safety .................................. 4
Before Riding the E-Bike .................................. 5
While Riding the E-Bike ................................... 5
Off-Road Riding .......................................... 5
Wet-Weather Riding...................................... 6
Night Riding .............................................. 6
Extreme and Aggressive Riding............................ 6
Electric Bicycle Safety..................................... 7
10 Safety Topics from the U.S.
Government .............................................. 7
General Information .................... 8
Features .................................................. 8
Electronic Modules ...................................... 12
Specications............................................ 13
Assembly.............................. 14
Installing the Front Wheel................................ 14
Installing the Handlebars................................. 14
Installing the Pedals ..................................... 16
Operation Basic LCD ................. 17
Initial Ride ............................................... 17
Safety Check Before Each Ride ................................. 17
Using the Brakes ......................................... 17
Pedal Assist Control System.............................. 17
Throttle Operation....................................... 18
Reading the Battery Pack Level........................... 18
Understanding the Battery Pack Range ................... 18
Turning the E-Bike On and Off............................ 19
Adjusting the Assist Levels ............................... 20
Activating the LED Headlight and Display Backlight....... 20
Operation Advanced LCD............. 21
Initial Ride ............................................... 21
Safety Check Before Each Ride ................................. 21
Using the Brakes ......................................... 21
Pedal Assist Control System.............................. 21
Throttle Operation....................................... 23
Reading the Battery Pack Level........................... 24
Understanding the Battery Pack Range ................... 24
Main Display Screen Overview ........................... 24
Turning the E-Bike On and Off............................ 27
Adjusting the Assist Levels ............................... 28

ii iii
JBP-RR-MANUAL | ©2022 JUICED BIKESJBP-RR-MANUAL | ©2022 JUICED BIKES
Activating the LED Headlight and Display Backlight....... 28
Activating the Walk Mode ............................... 28
Activating the Cruise Control Function ................... 28
Resetting the Trip Counter ............................... 28
Activating the Advanced Display Screen.................. 29
Understanding the Advanced Display Mode .............. 29
Adjusting Parameters in the Setup Menu ................. 31
Error Codes.............................................. 34
Maintenance .......................... 35
Battery .................................................... 35
Hydraulic Brakes......................................... 37
Mineral Oil Cups ......................................... 37
Troubleshooting ....................... 38
Basic Troubleshooting ................................... 38
Juiced Bikes Warranty ................................... 38
INTRODUCTION
INTRODUCTION
THANK YOU FOR CHOOSING TO BE PART OF THE JUICED BIKES TEAM.
Owner’s Manual
Contact Information

5
JBP-RR-MANUAL | ©2022 JUICED BIKES
4JBP-RR-MANUAL | ©2022 JUICED BIKES
!
WARNING
Indicates a hazardous situation which, if not avoided, could result in
death or serious injury.
NOTICE
Indicates a situation which can cause damage to the e-bike, personal property, and/
or the environment, or cause the e-bike or equipment to operate improperly.
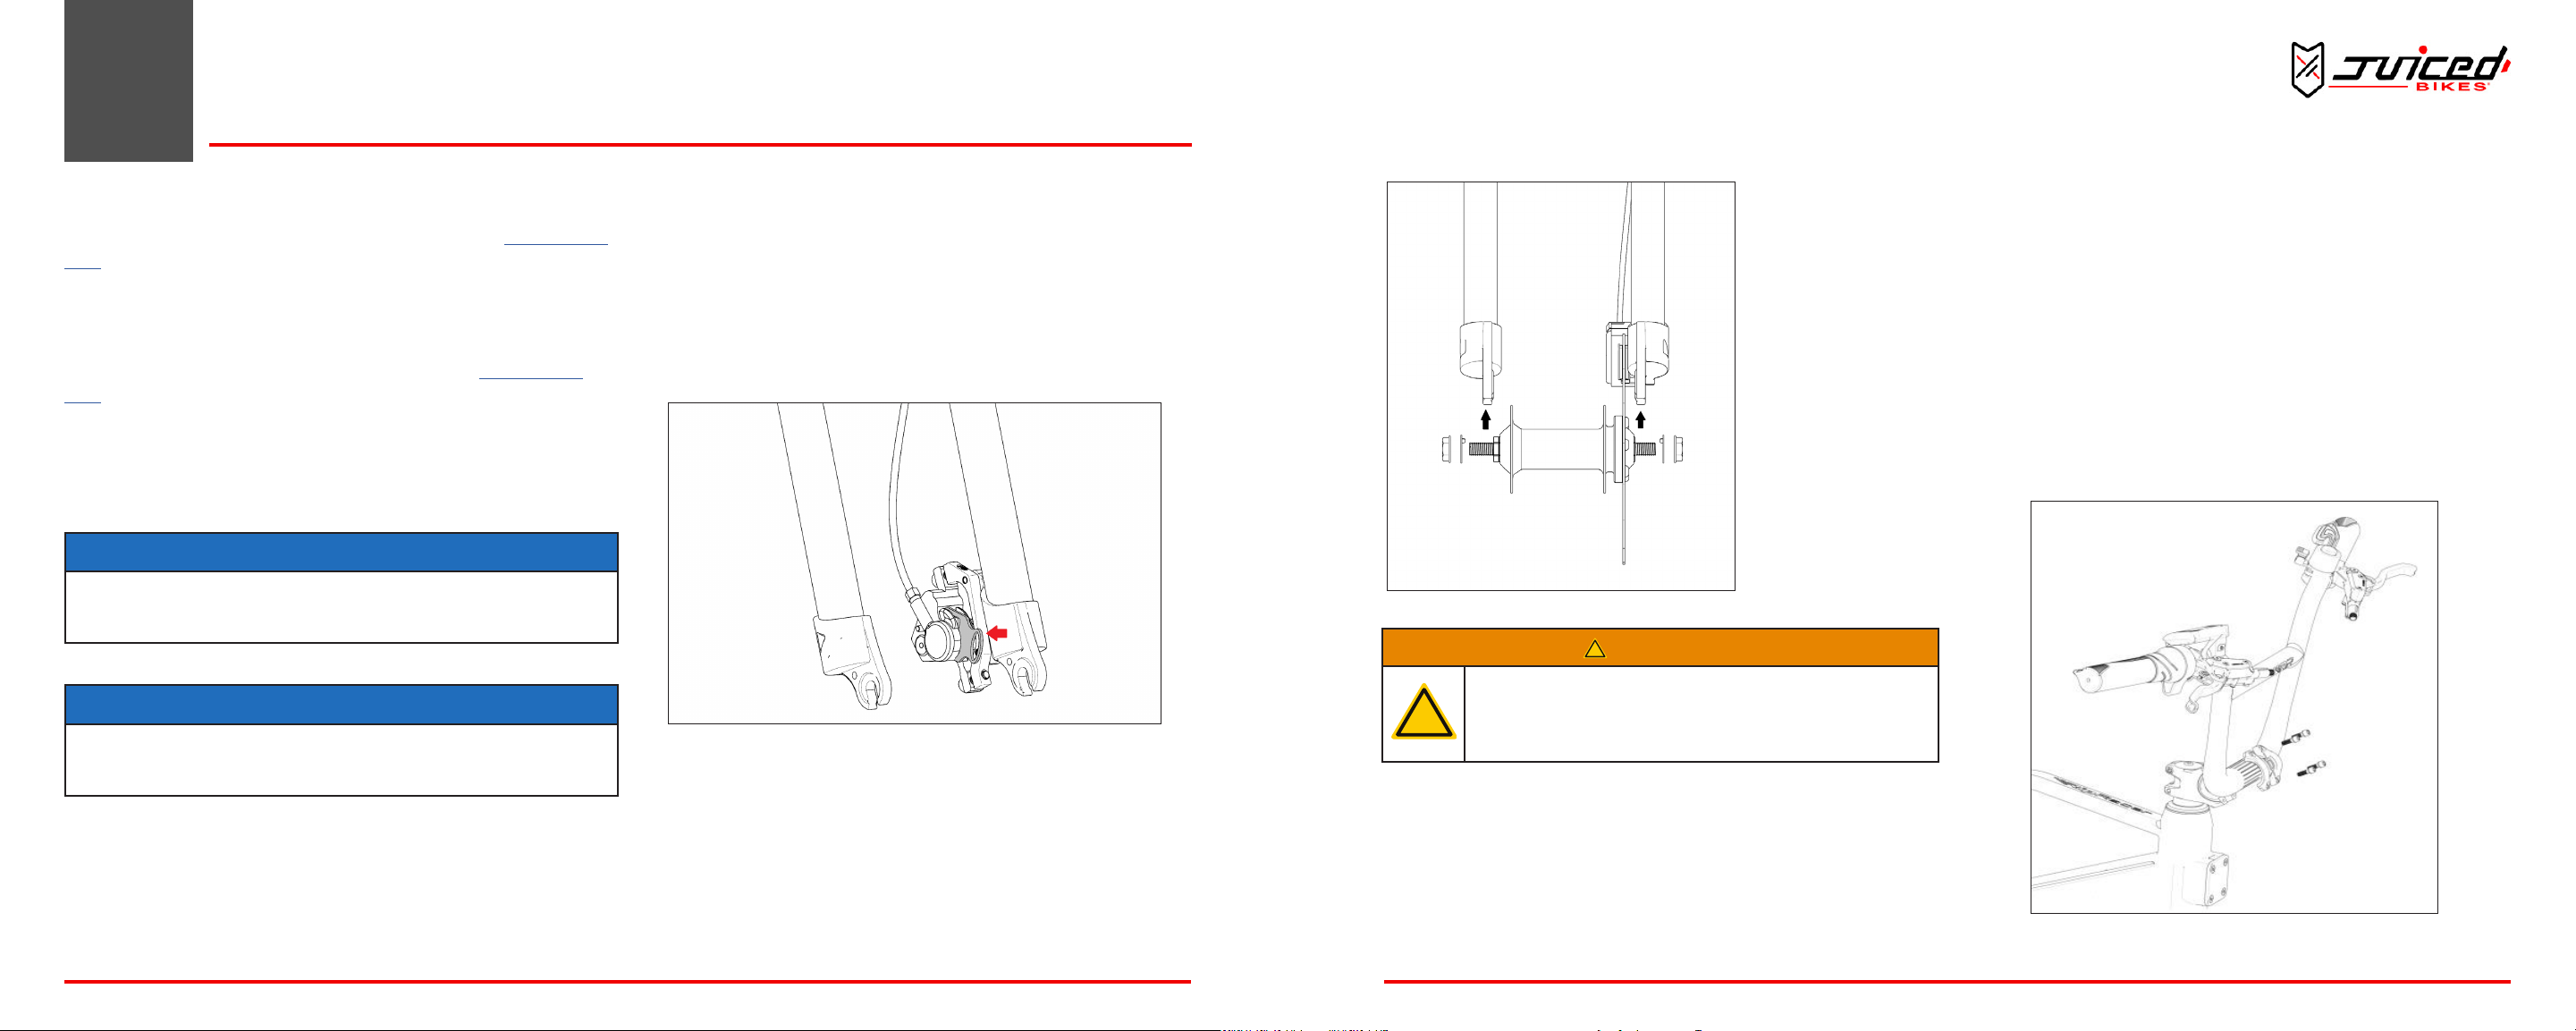
!
WARNING
!
Do not operate this product in trafc or any other
environment that may present danger until you are
condent with the product and all installed accessories
such as lights, passenger seat, etc. Failure to do so could
result in death or serious injury.
!
WARNING
!
Never disassemble or modify any electronic component
of the bicycle. Doing so is extremely dangerous and could
result in death, serious injury or void the warranty.
!
WARNING
Never ride your e-bike under the inuence of alcohol or
drugs.
Always wear a helmet, whether the law requires one or not!
BEFORE RIDING THE E-BIKE
1SAFETY
•
•
•
•
•
•
•
WHILE RIDING THE E-BIKE
•
•
•
•
•
•
•
•
OFF-ROAD RIDING

6 7
JBP-RR-MANUAL | ©2022 JUICED BIKESJBP-RR-MANUAL | ©2022 JUICED BIKES
WET-WEATHER RIDING
!
WARNING
!
Avoid riding in wet weather if possible. Reduce your
speed if necessary to ride in wet weather. Wet weather
impairs visibility, braking and traction of the e-bike and
affects others sharing the road. Accidents increase in wet
weather conditions.
NIGHT RIDING
!
WARNING
!
Be sure to use an adequate lighting system when riding at
night or at any other times of poor visibility. Riding at night
or at any other times of poor visibility without an adequate
lighting system and without reectors may result in death
or serious injury.
EXTREME AND AGGRESSIVE RIDING
!
WARNING
!
The e-bike design has limitations regarding strength
and integrity. Extreme, stunt and competition riding can
exceed those limitations. The manufacturer does not
recommend these types of riding. Also, extreme, stunt and
competition riding increases the risks of death and serious
injury.
•
•
•
•
•
•
ELECTRIC BICYCLE SAFETY
•
•
•
•
•
•
•
•
•
•
•
•
•
10 SAFETY TOPICS FROM THE U.S.
GOVERNMENT
•
•
•
•
•
•
•
•
•
•

9
JBP-RR-MANUAL | ©2022 JUICED BIKES
8JBP-RR-MANUAL | ©2022 JUICED BIKES
FEATURES
Fig. 1 - Controller
Throttle
Fig. 2 - Throle
2GENERAL INFORMATION
Battery Pack
Fig. 3 - Baery Pack
Advanced LCD Display
Fig. 4 - Advanced LCD Display (Class 3)

10 11
JBP-RR-MANUAL | ©2022 JUICED BIKESJBP-RR-MANUAL | ©2022 JUICED BIKES
Basic LED Display -
Fig. 5 - Basic LED Display (Class 2)
Electric Motor
Fig. 6 - Electric Motor
Brakes
Fig. 7 - Brake Lever

12 13
JBP-RR-MANUAL | ©2022 JUICED BIKESJBP-RR-MANUAL | ©2022 JUICED BIKES
ELECTRONIC MODULES
Basic block diagram
SPECIFICATIONS
Top Speed Up to 20mph (Class 2)
Up to 28 mph (Class 3)
Range 35+ miles* (Class 2)
55+ miles* (Class 3)
Weight 67 lbs with battery (54.5 lbs without battery)
Battery Pack 52V Battery/10Ah (Class 2)
52V Battery/15Ah (Class 3)
Charge Time 3-9 hours
Headlight 1,050 lumens
Tires 4” x 20” off-road tires
Inate to psi indicated on tire
Weight Capacity 275 lbs
* See “Understanding the Baery Pack Range” on page 21

15
JBP-RR-MANUAL | ©2022 JUICED BIKES
14 JBP-RR-MANUAL | ©2022 JUICED BIKES
“Charging the
Baery Pack” on page 35
NOTICE
Use caution when opening the bike box. Do not cut into the box as it can damage the
bike and cabling. When removing the bike from the box, be aware of moving or loose
pieces. Inspect your box for any remaining items and keep it for a couple of days.
NOTICE
The kickstand is designed to support the e-bike only. Do not sit on the e-bike with
the kickstand engaged. Sitting on the e-bike with the kickstand engaged could result
in damaged to the kickstand.
3ASSEMBLY
INSTALLING THE FRONT WHEEL
1.
Fig. 8 - Removing Shipping Spacer
2.
3.
INSTALLING THE HANDLEBARS
1.
2.
3.
4.
5.
Fig. 9 - Installing the Handlebars
!
WARNING
!
The front wheel must be inspected before every ride to
ensure it is securely attached to the bike. Failure to test
that the front wheel is properly secured could result in
signicant injury or even death.
5.
6.
7.

17
JBP-RR-MANUAL | ©2022 JUICED BIKES
16 JBP-RR-MANUAL | ©2022 JUICED BIKES
Fig. 11 - Installing Petals
ADJUSTING SEAT HEIGHT
Fig. 12 - Adjusng seat height
1.
INSTALLING THE PEDALS
NOTICE
It’s critical that the pedals are tightened rmly in the crank arm to prevent the pedals
from loosening while riding, which will result in signicant damage to the bike.
1.
•
•
Fig. 10 - Le and Right Idencaon Marks
NOTE: Both pedals ghten toward the front of the e-bike. Right
pedal is ghened to the right. Le pedal is ghtened to the le.
2.
3.
OPERATION - BASIC LED 4
NOTE: Be sure all the items you installed are properly torqued,
ghtened and connected. If you have any quesons, contact us.
INITIAL RIDE
NOTE: Users can ride the e-bike like a normal bicycle with the
power turned ON or OFF. However, the pedal assist and throle will
acvate only if the power is turned ON.
SAFETY CHECK BEFORE EACH RIDE
•
•
•
•
•
•
•
•
USING THE BRAKES
NOTE: Apply the rear brake before using the front brake in
low-tracon condions.
•
•
•
•
•
PEDAL ASSIST CONTROL SYSTEM
USING THE PEDAL ASSIST CONTROL SYSTEM
1.

18 19
JBP-RR-MANUAL | ©2022 JUICED BIKESJBP-RR-MANUAL | ©2022 JUICED BIKES
Fig. 14 - Baery Power Buon
2.
3.
Fig. 15 - Mode Buon
4.
5.
BASIC LED MODES
P0:
P1, P2, P3, P4:
Fig. 16 - Modes
THROTTLE OPERATION
1.
2.
3.
READING THE BATTERY PACK LEVEL
Fig. 17 - LED Guide
•
•
UNDERSTANDING THE BATTERY PACK RANGE
FACTORS THAT WILL DECREASE YOUR RANGE
•
•
•
•
•
•

21
JBP-RR-MANUAL | ©2022 JUICED BIKES
20 JBP-RR-MANUAL | ©2022 JUICED BIKES
5
HOW TO INCREASE YOUR RANGE
•
•
•
•
•
•
•
NOTICE
If the battery pack power is low, choose a lower level of pedal assist if going on
stops and hills. The sports mode will demand enough power to convince the battery
pack that it is depleted, but you may still use a lower level of pedal assist.
NOTICE
Riding downhill or pedaling when not using the throttle will not recharge the
battery pack.
TURNING THE E-BIKE ON AND OFF
HOW TO TURN THE E-BIKE ON
OPERATION - ADVANCED LCD
NOTE: Be sure all the items you installed are properly torqued,
ghtened and connected. If you have any quesons, contact us.
See ”Contact Informaon” on page 1.
INITIAL RIDE
NOTE: Users can ride the e-bike like a normal bicycle with the
power turned ON or OFF. However, the pedal assist and throle will
acvate only if the power is turned ON.
SAFETY CHECK BEFORE EACH RIDE
•
•
•
•
•
•
•
USING THE BRAKES
NOTE: Apply the rear brake before using the front brake in
low-tracon condions.
•
•
•
•
•
PEDAL ASSIST CONTROL SYSTEM
USING THE PEDAL ASSIST CONTROL SYSTEM
1.
HOW TO TURN THE E-BIKE OFF
AUTOMATIC SHUTOFF
ADJUSTING THE ASSIST LEVELS
HOW TO INCREASE THE ASSIST LEVELS
HOW TO DECREASE THE ASSIST LEVELS
ACTIVATING THE LED HEADLIGHT
TO TURN ON THE LED LIGHT
TO TURN OFF THE LED LIGHT

22 23
JBP-RR-MANUAL | ©2022 JUICED BIKESJBP-RR-MANUAL | ©2022 JUICED BIKES
Fig. 18 - Baery Power Buon
2.
Fig. 19 - LCD Display Power Buon
NOTICE
Before turrning on the bike, be sure your feet are off of the pedals to ensure the
torque sensor calibrates correctly.
3.
Fig. 21 - Selecng Pedal Assist Level
0 Throttle Operation Only
ECO Battery Efciency
1, 2, 3 Speed Ranges
S Sport
RRace Track Mode
(Refer to local laws & regulaons before using)
•
•
•
•
NOTE: If the baery pack level is low, we recommend selecng
a lower assist level. Keep in mind that the baery management
system can deacvate the pedal assist support to protect the
baery pack level from geng too low. Be sure to charge the
baery pack fully before each ride.
4.
5.
6.
THROTTLE OPERATION

24 25
JBP-RR-MANUAL | ©2022 JUICED BIKESJBP-RR-MANUAL | ©2022 JUICED BIKES
1. “Using the Pedal
Assist Control System” on page 21
2.
3.
READING THE BATTERY PACK LEVEL
Fig. 22 - Baery Level Indicator
•
•
UNDERSTANDING THE BATTERY PACK RANGE
FACTORS THAT WILL DECREASE YOUR RANGE
•
•
•
•
•
•
HOW TO INCREASE YOUR RANGE
•
•
•
•
•
•
•
NOTICE
If the battery pack power is low, choose a lower level of pedal assist if going on
stops and hills. The sports mode will demand enough power to convince the battery
pack that it is depleted, but you may still use a lower level of pedal assist.
NOTICE
Riding downhill or pedaling when not using the throttle will not recharge the
battery pack.
ADVANCED MATRIX DISPLAY OVERVIEW
BUTTON OVERVIEW
Fig. 23 - Buons on the Advanced Matrix Display
Power Button:
“Assist Up” Button:
“Assist Down” Button:

26 27
JBP-RR-MANUAL | ©2022 JUICED BIKESJBP-RR-MANUAL | ©2022 JUICED BIKES
MAIN SCREEN OVERVIEW
Fig. 24 - Advanced Matrix Display Screen
BATTERY VOLTAGE (VOLTS)
HEADLIGHT GRAPHIC
ASSIST LEVEL
ECO 1 2 3 SPORT
RACE
POWER (WATTS)
BATTERY LEVEL GRAPHIC
SPEED (MPH OR KM/H)
TRIP DISTANCE (MI OR KM)
TURNING THE E-BIKE ON AND OFF
Fig. 25 - Power Buon
HOW TO TURN THE E-BIKE ON
HOW TO TURN THE E-BIKE OFF
AUTOMATIC SHUTOFF
ADJUSTING THE ASSIST LEVELS
HOW TO INCREASE THE ASSIST LEVELS
HOW TO DECREASE THE ASSIST LEVELS
ACTIVATING THE LED HEADLIGHT AND DISPLAY
BACKLIGHT
Fig. 26 - Headlight Graphic on the Class 3 Display

28 29
JBP-RR-MANUAL | ©2022 JUICED BIKESJBP-RR-MANUAL | ©2022 JUICED BIKES
TO TURN ON THE LED LIGHT
TO TURN OFF THE LED LIGHT
ACTIVATING THE WALK MODE
TO ACTIVATE THE WALK MODE
TO STOP USING THE WALK MODE
ACTIVATING THE CRUISE CONTROL FUNCTION
TO ACTIVATE THE CRUISE CONTROL FUNCTION
1.
2.
3.
IMPORTANT NOTES ABOUT THE CRUISE CONTROL FUNCTION
•
•
•
•
•
•
RESETTING THE TRIP COUNTER
TO RESET THE TRIP, AH, AND WH COUNTER TO ZERO
ACTIVATING THE ADVANCED DISPLAY SCREEN
Fig. 27 - Data on the Advanced Display Screen
THIS DATA INCLUDES
TO TOGGLE BETWEEN THE MAIN SCREEN AND THE ADVANCED DISPLAY
SCREEN
NOTE: The default display is the standard screen. This is the rst
display that will appear when you turn on the e-bike.
UNDERSTANDING THE ADVANCED DISPLAY
MODE
VOLTAGE
NOTE: The voltage display is only accurate to about +/- 0.3 Volts
and should not be used for any scienc measurements.
AMPS

30 31
JBP-RR-MANUAL | ©2022 JUICED BIKESJBP-RR-MANUAL | ©2022 JUICED BIKES
ASSIST LEVEL
SPEED
CONTROLLER TEMPERATURE
TRIP DISTANCE
“Reseng the Trip Counter” on page 26
ADJUSTING PARAMETERS IN THE SETUP MENU
TO ENTER THE SETTINGS MENU
AVAILABLE MENU OPTIONS
Unit Power Off Delay
Speed Limit NDW
Backlight Torque
Wheel Size Low Volts
NAVIGATING AND ENTERING A MENU SETTING
UNIT
•
•
SPEED LIMIT
CLASSIFICATION SET POWER LIMIT SET PEDAL ASSIST THROTTLE
OPERATION
USA Class 1 /
750W Set NDW to 4 20 mph
(32 km/h) Not allowed
USA Class 2 /
750W* Set NDW to 4 20 mph
(32 km/h)
20 mph
(32 km/h)
USA Class 3 /
750W Set NDW to 4 28 mph
(45 km/h)
20 mph
(32 km/h)
Europe 250W / 25
km/h Set NDW to 1 15.5 mph
(25 km/h) Not Allowed
Europe S-Pedelec /
45 km/h Set NDW to 4 28 mph
(45 km/h) Not Allowed
Off-road mode** Set NDW to 5 28 mph
(45 km/h)
20 mph
(32 km/h)
*default conguration **please refer to local laws & regulations before using
NOTE: In all instances the throle is limited to 20 mph.
NOTE: The Amperage display is only accurate to about +/- 1 A and
should not be used for any scienc measurements.
POWER
AMP-HOURS
WATT-HOURS
NOTE: Because there is a small error rate in the Amp and Voltage
measurements, the Wa-hour value will also have some degree of
error. Use the measurement for informaonal purposes and not for
scienc measurements.

32 33
JBP-RR-MANUAL | ©2022 JUICED BIKESJBP-RR-MANUAL | ©2022 JUICED BIKES
BACKLIGHT
WHEEL SIZE
“POWER OFF” DELAY
NDW
NDW SETTING
•
•
•
•
•
TORQUE
ON:
OFF:
LOW VOLTS

35
JBP-RR-MANUAL | ©2022 JUICED BIKES
34 JBP-RR-MANUAL | ©2022 JUICED BIKES
ERROR CODES
MAINTENANCE
BATTERY
NOTICE
Failure to properly charge, store or use the battery will void the warranty. Use caution
when handeling the battery pack as it is heavy.
REMOVING THE BATTERY PACK
Fig. 28 - Removing Baery Pack
1.
2.
3.
4.
5.
6.
7.
CHARGING THE BATTERY PACK
!
WARNING
Read and understand all instructions. Failure to follow all
instructions listed below could result in death or serious
personal injury.
•
•
•
•
•
ADVANCED MATRIX DISPLAY - ERROR CODE CHART
Error
Code Error Notes
4Open Throttle
Fault
Throttle has not returned to the start position on start-up. Check to see if the throttle can return to the start position or if there
is something blocking the throttle unit.
5Throttle Fault Throttle may be damaged. Check the throttle or throttle cable for damage.
6Low Voltage
Protection
The battery voltage is too low to operate. Incorrect battery was used on the bike. The battery is in sleep mode or not
functioning correctly.
7Over Voltage
Protection
The battery voltage is too high to operate. Incorrect battery was used on the bike.
Check to be sure that the correct battery is being used on the bike.
8Motor Hall
Signal Fault
At least one of the motor’s hall sensor wires have been disconnected or damaged.
Disconnect and reconnect the motor cable.
9Motor Phase
Line Fault At least one of the motor’s phase wires has been disconnected or damaged.
10
High
Temperature
Fault
The controller has reached the highest allowable temperature.
Allow the controller to cool down before using the e-bike again.
11 Temperature
Sensor Fault The controller’s temperature sensor has become disconnected or damaged. Contact technical support.
12 Current Sensor
Fault The controller’s current sensor has become disconnected or damaged. Contact technical support.
21 Speed Sensor
Fault The speed sensor has become disconnected or damaged. Contact technical support.
30 Communication
Fault Poor connection between the controller and the display. Check all cable connectors. Check for corrosion damage.
6

36 37
JBP-RR-MANUAL | ©2022 JUICED BIKESJBP-RR-MANUAL | ©2022 JUICED BIKES
•
•
•
•
•
•
NOTICE
Recharge the battery pack at least once every month. A battery pack left unused for
several months may result in permanent capacity loss.
•
•
•
“Removing
the Baery Pack” on page 35
ONBOARD CHARGING
1.
2. Fig. 29 - Charge Port
3.
4.
5.
“Reading the Baery Pack Level” on page 24
6.
7.
HYDRAULIC BRAKES
MINERAL OIL CUPS
Table of contents
Other Juiced Bikes Bicycle manuals