JUKI AP-876 User manual

No.00
40119166
AP-876 用バーコード読み取り装置(オプション)
Bar code reader for AP-876 (optional)
AP-876 用条码阅读器(选购项目)
安全に使用していただくために使用前に、必ずこの取扱説明書をお読みください。
また、いつでもすぐに読めるように、この取扱説明書を保管してください。
注意 当製品を装着する際は、必ずミシンの電源スイッチを切ってください。
また、ミシンの取扱説明書をあわせてお読みください。
Be sure to read this instruction manual before using the product for safe use of the product.
Furthermore, keep this instruction manual close by so that it is available whenever needed.
WARNING :
• Do not look directly into the laser beam of the bar code reader. The laser beam can damage eyes.
• Do not emit laser beam toward human eyes. The laser beam can damage eyes.
• Do not look into the laser beam directly using an optical device. The laser beam can damage eyes.
警告
・バーコード読み取り装置のレーザ一光を直接覗かないでください。目に障害を及ぼす場合
があります。
・人の目に向けてレーザ光を射出させないでください。目に障害を及ぼす場合があります。
・光学機器で直接レーザ光を覗き込まないでください。目に障害を及ぼす場合があります。
CAUTION :
When installing this product, be sure to turn OFF the power of the sewing machine.
Furthermore, read the instruction manual of the sewing machine as well.
为了安全地使用,请您在使用之前一定阅读本使用说明书。
另外,请您注意保管本使用说明书,以便随时查阅。
注意 安装本产品时,请一定关掉缝纫机的电源开关。
另外,请同时参阅缝纫机的使用说明书。
警告 · 请不要直接用眼睛去看条码阅读器的激光光线。有可能伤害眼睛。
· 请不要对着人的眼睛放射激光。有可能伤害眼睛。
· 请不要用光学仪器直接窥看激光光线。有可能伤害眼睛。
取扱説明書
INSTRUCTION MANUAL
使用说明书


日本語
日本語

i
目 次
1.取り付け手順...........................................................................................................................1
2.バーコードの貼付け...............................................................................................................2
3.バーコード機能について........................................................................................................2
4.バーコード機能の設定...........................................................................................................3
5.使用方法...................................................................................................................................4
6.バーコード構成.......................................................................................................................5
7.バーコードリーダーの動作不良について.............................................................................6

– 1 –
日本語
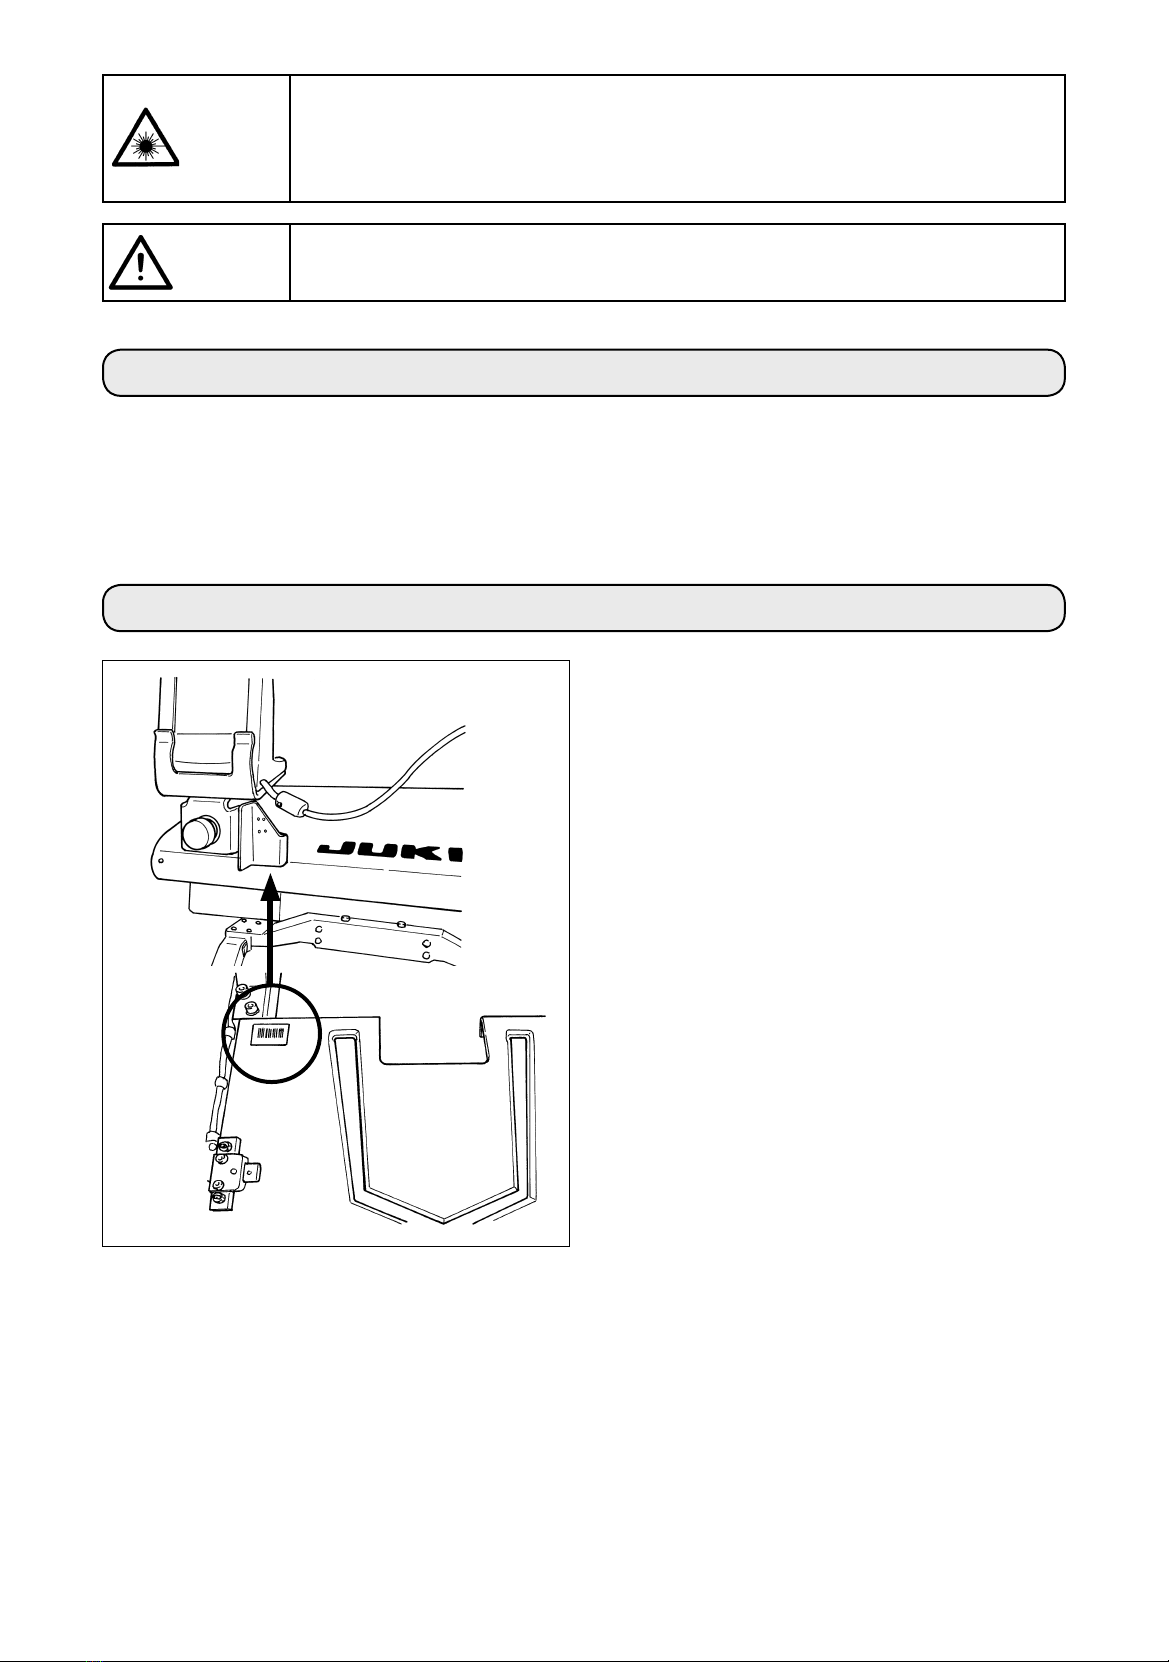
1.取り付け手順
注意 不意の起動による事故を防ぐため、必ず電源を切ってから行ってください。
1) バーコードリーダー 1を付属のねじ 2、座
金3で取付板 4に取り付けます。
(2 箇所)
2) 一時停止スイッチ 5に付属の取付板止めね
じ6で固定します。
4
23
1
6
5
3) 電装ボックスを開けて、
MAIN基板の CN507に中継ケーブル 8
を接続します。
7
8
CN509P白
– 2 –
警告
・バーコード読み取り装置のレーザ一光を直接覗かないでください。目に障害を及ぼす場合
があります。
・人の目に向けてレーザ光を射出させないでください。目に障害を及ぼす場合があります。
・光学機器で直接レーザ光を覗き込まないでください。目に障害を及ぼす場合があります。
2.バーコードの貼付け
バーコードは取扱説明書の巻末に添付されたものをコピーして使用してください。
3.バーコード機能について
バーコード機能とは、カセット識別等の用途で、
バーコードを読み取り、対応した縫製パターンに
切り替えて縫製できる機能です。
バーコードの読み取りにより、ミシンメモリ内に
保存されたユーザパターン 999 個、パターンボ
タンに登録されている縫製データ 50 個に切り替
えることが可能です。
使用するためには、AP-876 バーコードオプショ
ンが必要になります。
注意 ・ミシンの使用温度範囲内および使用温度湿度内で使用してください。
・電源を供給した状態でコネクタの抜き差しをしないでください。
バーコードリーダー仕様
クラス 2 レーザー製品
最大出力:1.0mW
波長:650nm
安全規格
JISC6802:2005
IEC60825-1+A2:2007

– 3 –
日本語
4.バーコード機能の設定
4-1.バーコード機能の設定
メモリスイッチ K130 では、バーコードモードを選択します。メモリスイッチ K130( レベル 2) の
選択方法は、サービスマニュアルを参照ください。
設定 内容 説明
標準モード バーコードを使用しません。
バーコードモード バーコードを使用します。
4-2.バーコード種別の選択
メモリスイッチ K142 では、バーコード種別を選択します。初期状態では Code39 のみ読み取ります。
付録のバーコードを印刷して使用する場合、K142 の変更は不要です。
設定 内容 説明
Code39 Code39 のみ読み取ります。
全規格 バーコードリーダーの対応する
全規格を読み取ります。
JAN、EAN、UPC-A/E、
EAN-8/13Add-on、UPC-A/
EAdd-on、Industrial2of5、
IATA、Interleaved2of5、
NW-7(Codabar)、Code39、
Code93、Code128、
EAN-128、S-Code、MSI/
Plessey、RSS、Tri-Optic、
CODE11、UK/Plessey、
Matrix2of5、ChinesePost
Matrix2of5、TELEPEN

– 4 –
バーコードによる縫製パターン No 読込み動作は「型交換モード時のみ有効です。」
5.使用方法
エラーコード一覧
エラーコード ピクト エラー内容 表示メッセージ 復帰方法 復帰場所
E010 バーコードで指定されたパターンが
登録されていない。
指定されたパ
ターンはあり
ません。
リセット
後再復帰
可能
前画面
E058 読み取り位置にバーコードがない。
バーコードのデコードに失敗した。
通信タイムアウト
バーコード読
取りエラー
リセット
後再復帰
可能
前画面
E921 バーコードリーダーがミシンに接続
されていない。
バーコードのフォーマット異常
バーコード
リーダー通信
エラー
電源 OFF
1) 型交換モードの起動
モードキー
を押すと、画面上に型交換モード
ボタン
Aが表示されます。このボタンを押すと、型交換モー
ド画面が表示されます。
2) バーコードモードの時は、バーコードモード表示
Bが画面に表示されます。
型交換モード画面を表示しているときのみ、バーコード
リーダから読み取りレーザが発光され、バーコードを読む
ことができます。
バーコードを正常に読み取るとバーコードリーダから読み
取りレーザが消えます。
A
型交換モード画面
B
– 5 –
日本語
6.バーコード構成
巻末の付録にあるバーコードシートを読み取ることで、対応する縫製パターンに切り替えることがで
きます。切り離してお使いください。バーコードシートは Code39 の規格に対応しています。
Code39 以外の規格でバーコードを作成する場合、下記フォーマットに従って作成してください。
・4 バイト ASCII コード
・" パターン種別 "、" 百の位 "、" 十の位 "、" 一の位 "
D001
パターン種別 パターン No.
パターン種別
U または 0:ユーザパターンに対応します。
D または 1:パターンボタンに登録されている縫製データに対応します。
パターン No.
ユーザパターン:No.001〜No.999
パターンボタンに登録されている縫製データ:No.001 〜 No.050
種別、No それぞれ、ASCII コードで記述してください。
上記 D001 の場合、0x440x300x300x31となります。
スタート / ストップキャラクタ等、使用するバーコード規格に従って作成してください。
バーコードは両側の余白が小さいと、読み取りエラーになる場合があります。そのため、両側の余白
はできる限り大きくしてください。巻末の付録にあるバーコードを使う場合には、コピーしてから切
り取り線で切り分けてください。
ex.
– 6 –
7.バーコードリーダーの動作不良について
バーコードリーダーが読み取りを行わない場合、バーコードリーダー側面にある SCAN ボタンを押し
て、レーザーが発光することを確認してください。
SCAN ボタンを押しても発光しない場合、バーコードリーダーが故障している恐れがあります。
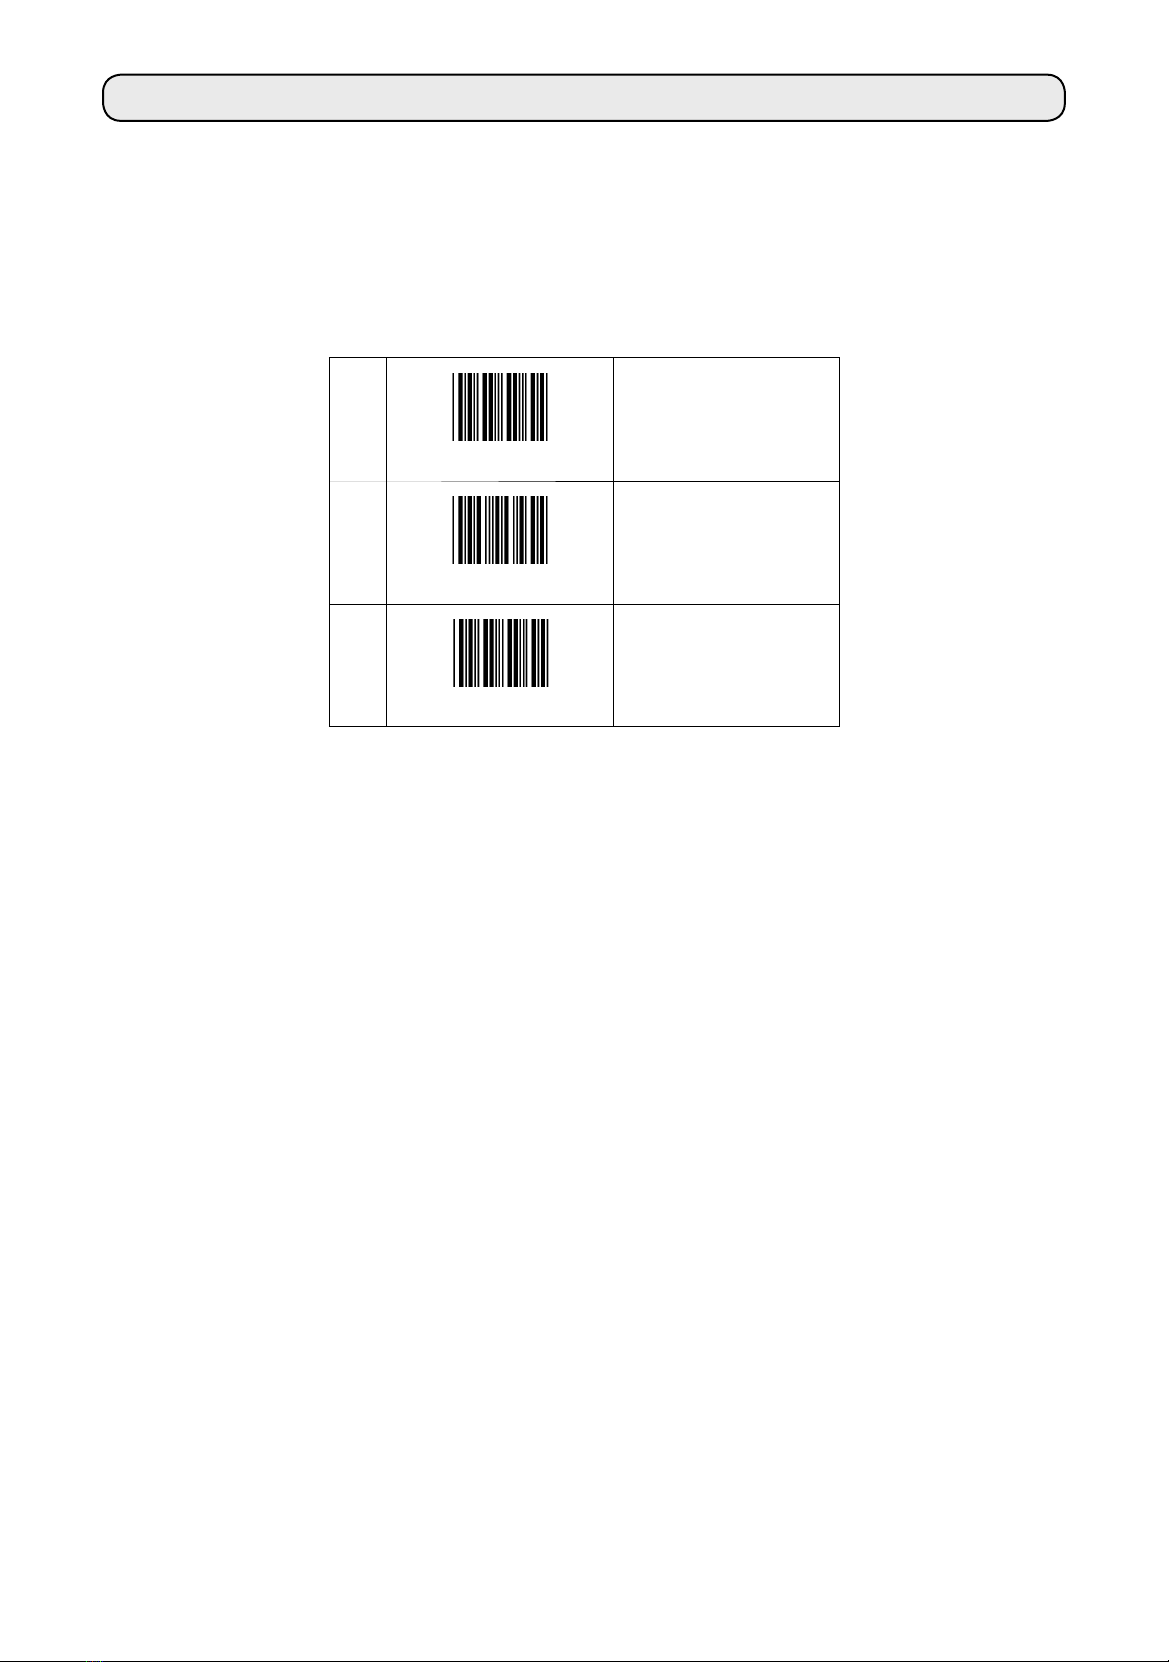
発光する場合には、下記のバーコードを1→2→3の順で読み取り、ミシンを再起動してください。
1
ZZ
設定開始
2
U2
初期化
3
ZZ
設定終了
Table of contents
Languages:
Other JUKI Barcode Reader manuals


