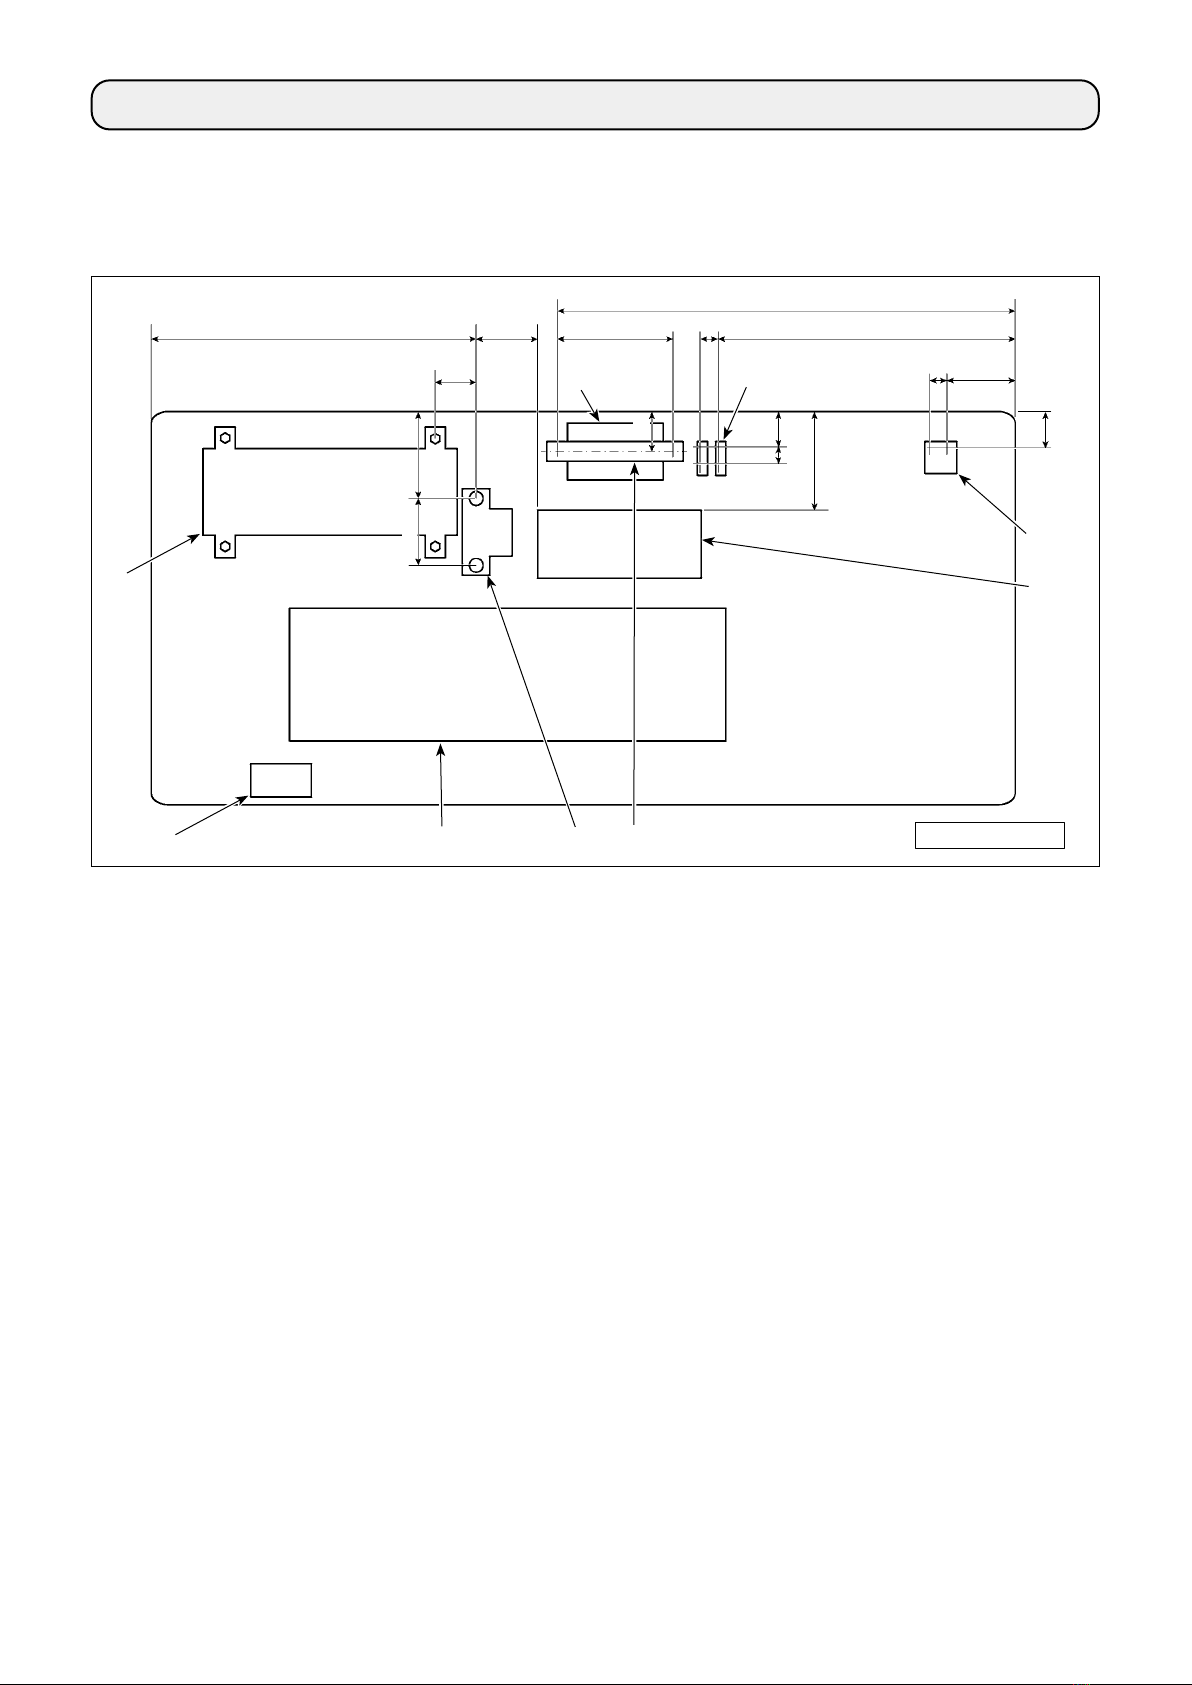
JUKI LU-2828V-7 User manual

LU-2828V-7
INSTRUCTION MANUAL

i
CONTENTS
1. SPECIFICATIONS................................................................................................. 1
1-1. Specications of the sewing machine head ............................................................................1
1-2. Specications of the control box..............................................................................................1
2. INSTALLATION.....................................................................................................2
2-1. Mounting positions of the devices and table...........................................................................2
2-2. Installation of the sewing machine...........................................................................................3
2-3. Installing the oil shield...............................................................................................................5
2-4. Pneumatic components (Only for the models provided with the stitch skipping
detecting device and bobbin-thread remaining amount detecting device).........................6
2-5. Installing the thread stand.........................................................................................................8
2-6. Installing the thread guide pin ..................................................................................................8
2-7. Installing the handwheel cover (only in the case the protection cover sensor is
provided)....................................................................................................................................9
2-8. Installing the electrical box .....................................................................................................10
2-8-1. Preparing for installation of the control box.................................................................... 10
2-8-2. Installing the electrical box................................................................................................ 10
2-9. Installing the pedal sensor ......................................................................................................10
2-10. Installing the reactor box (Only for the EU type models) ...................................................11
2-11. Installing the control box for stitch skipping detecting device (only for the models
provided with the stitch skipping detecting device and the bobbin-thread remaining
amount detecting device).......................................................................................................12
2-12. Installing the accessory ring core (Only for the EU type models).....................................12
2-12-1. Installing the accessory ring core supplied with the electrical box ............................ 12
2-13. Connecting the power switch cable .....................................................................................12
2-13-1. Installing the power switch.............................................................................................. 12
2-13-2. Connecting the power source cord ................................................................................ 13
2-14. Connecting the cords.............................................................................................................14
2-14-1. Connecting the cords coming from the sewing machine............................................. 14
2-14-2. Connection of the cords coming from the stitch skipping detecting device,
bobbin-thread remaining amount detecting device and cover sensor........................... 15
2-15 Handling the cords..................................................................................................................18
2-15-1. Handling the cords coming from the control box ......................................................... 18
2-15-2. Handling the cords coming from the control box for stitch skipping detecting
device....................................................................................................................................18
2-16. Attaching the connecting rod................................................................................................19
2-17. Adjustment of the pedal.........................................................................................................20
2-17-1. Installing the connecting rod........................................................................................... 20
2-17-2. Adjusting the pedal angle ................................................................................................20
2-18. Pedal operation.......................................................................................................................20
2-19. Lubrication..............................................................................................................................21
2-20. How to use the operation panel (Basic explanation) ..........................................................22
2-20-1. Selection of the language (operation to be done at rst) ............................................. 22
2-20-2. Names and functions of the panel keys ......................................................................... 24
2-20-3. Basic operation.................................................................................................................25
3. PREPARATION BEFORE SEWING ...................................................................26
3-1. Attaching the needle ................................................................................................................26

ii
3-2. Attaching and removing the bobbin .......................................................................................26
3-3. Threading the hook ..................................................................................................................27
3-4. Winding a bobbin .....................................................................................................................27
3-5. Threading the machine head...................................................................................................29
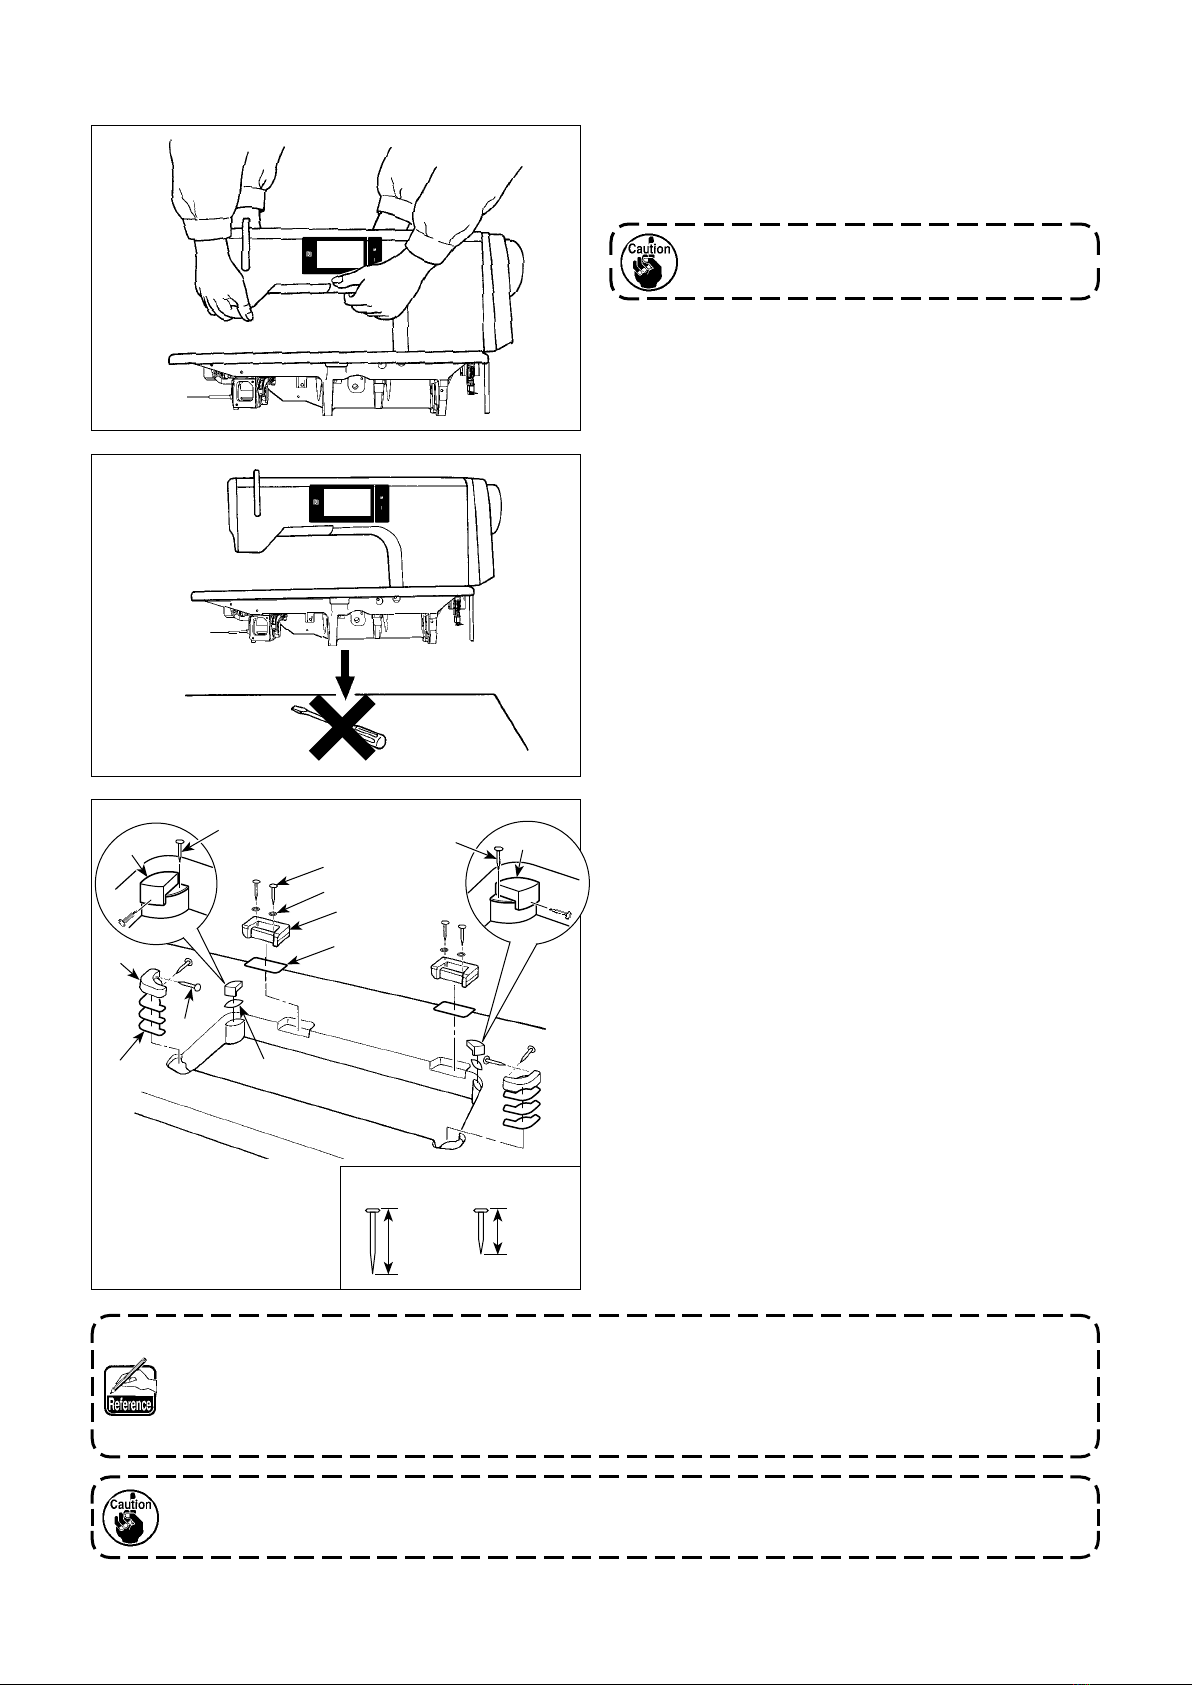
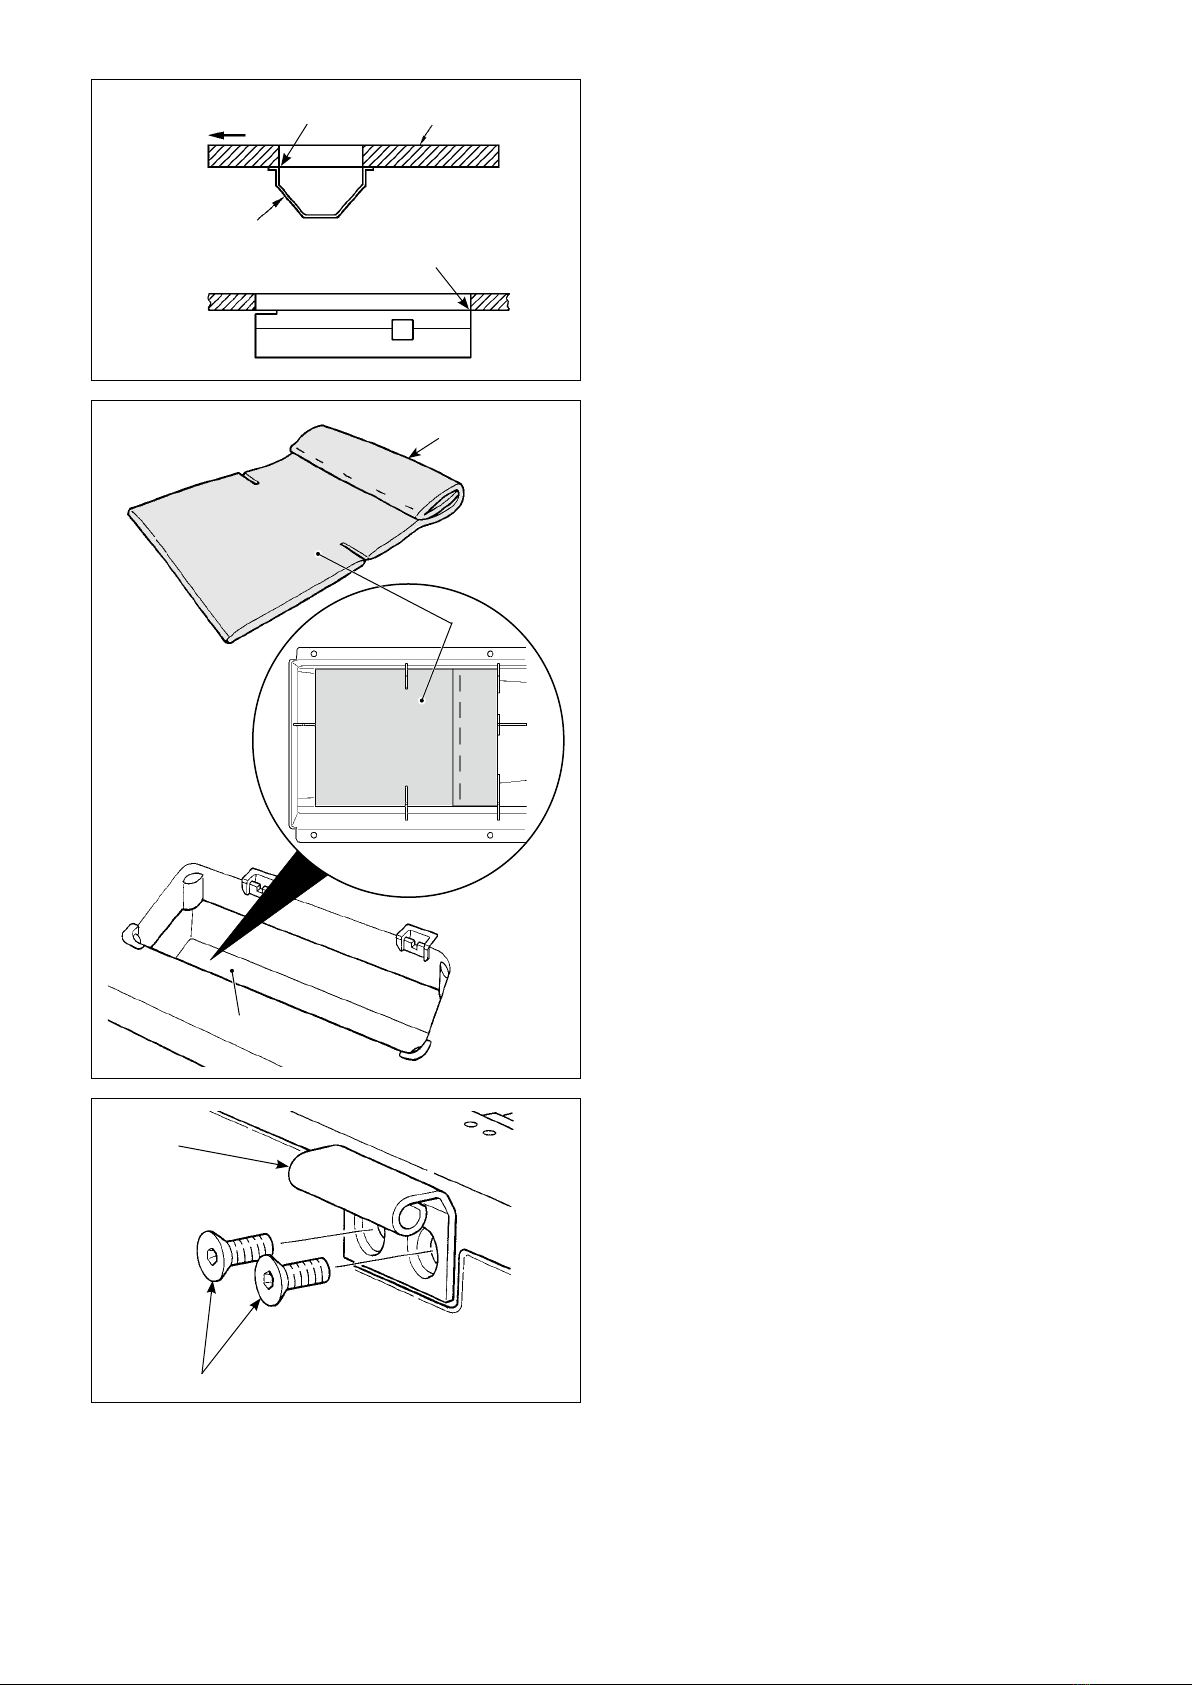
3-6. Installing the attachment .........................................................................................................30
4. ADJUSTING THE SEWING MACHINE ..............................................................31
4-1. Thread tension..........................................................................................................................31
4-1-1. Adjusting the tension of thread tension controller No. 1................................................ 31
4-1-2. Adjusting the needle thread tension (Active tension)..................................................... 31
4-1-3. Adjusting the bobbin thread tension ................................................................................ 31
4-2. Thread take-up spring..............................................................................................................32
4-2-1. When you want to change the stroke of the thread take-up spring............................... 32
4-2-2. When you want to change the tension of the thread take-up spring............................. 32
4-3. Presser foot (Active presser device) ......................................................................................33
4-3-1. Presser foot pressure......................................................................................................... 33
4-3-2. Micro-lifter function ............................................................................................................33
4-4. Adjusting the stitch length ......................................................................................................34
4-5. Changing the sewing speed....................................................................................................34
4-6. Adjusting the alternating vertical movement amount...........................................................35
4-7. Thread trimming and condensation stitching function ........................................................36
4-8. LED hand light ..........................................................................................................................38
4-9. Reverse feed stitching .............................................................................................................38
4-10. Jog dial....................................................................................................................................38
4-11. Custom switch ........................................................................................................................39
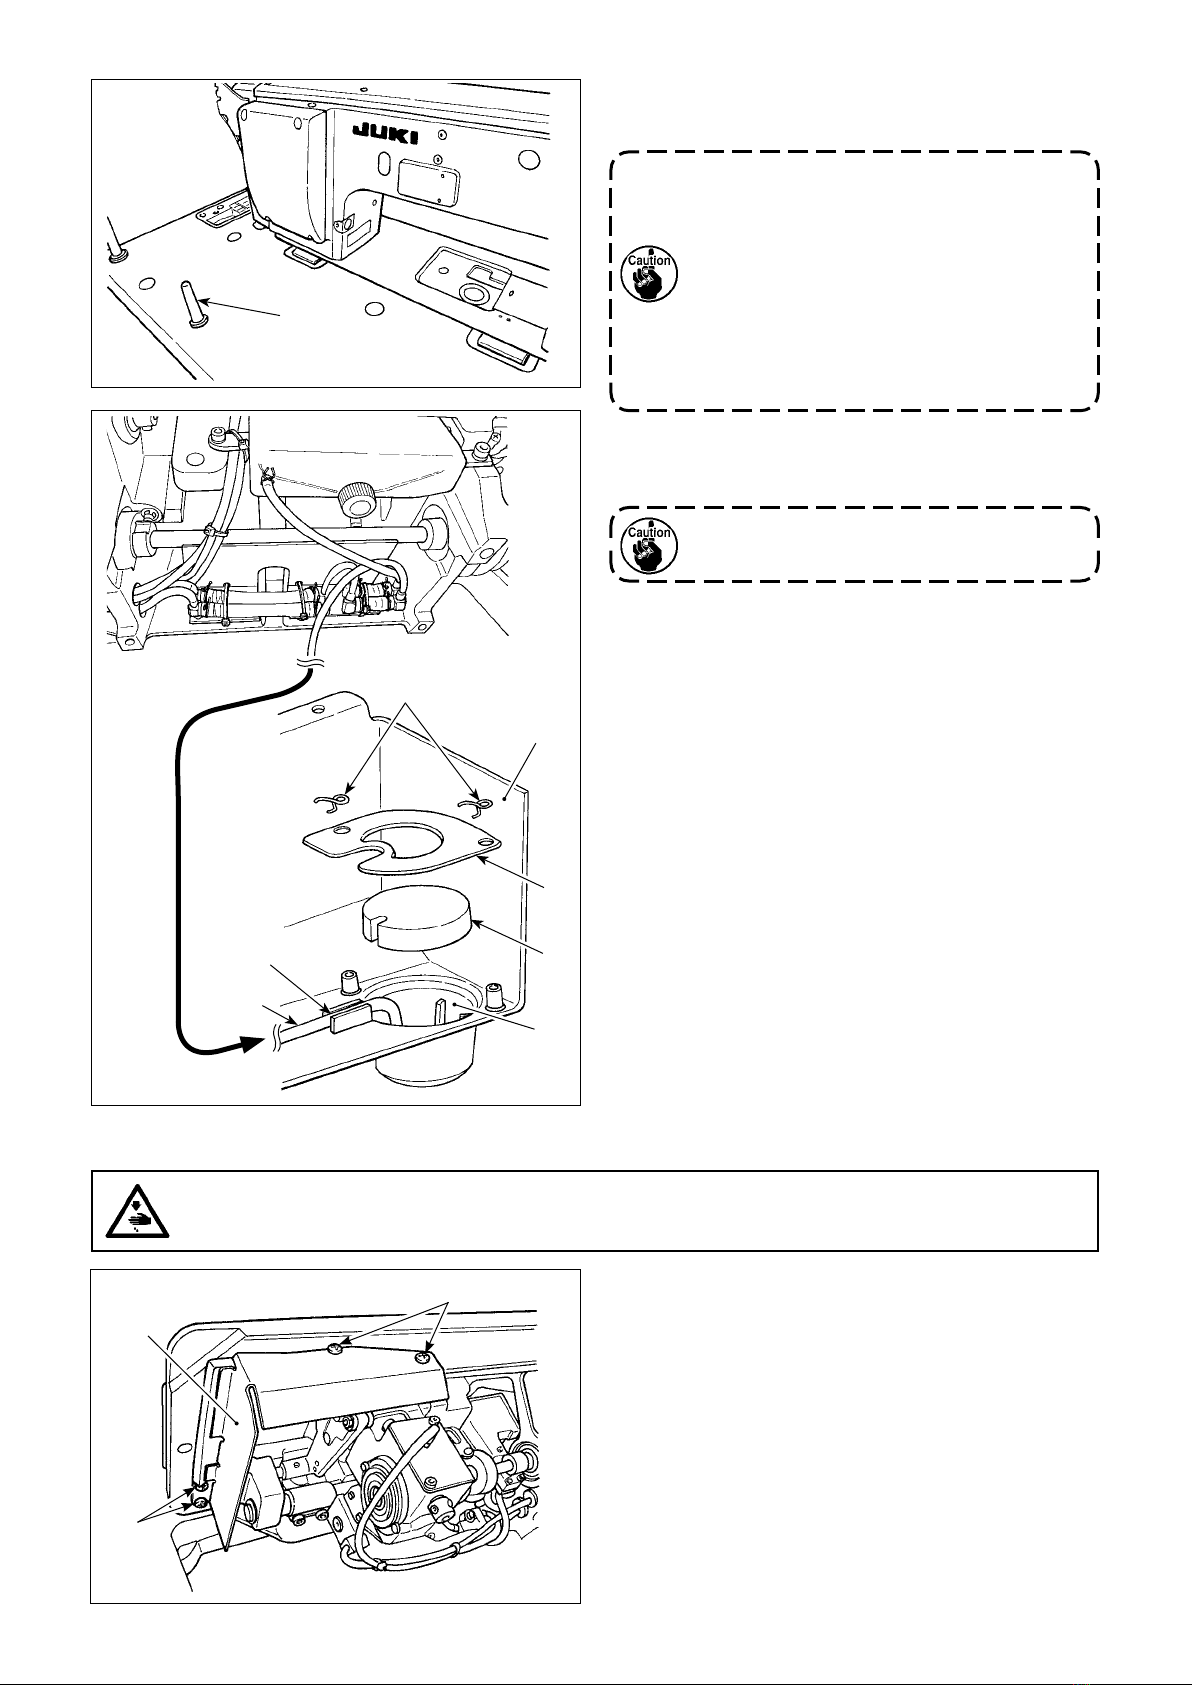
4-12. Adjusting the oil quantity in the hook ..................................................................................42
5. OPERATION OF THE SEWING MACHINE........................................................ 43
5-1. Resetting the safety clutch......................................................................................................43
5-2. Lifting the presser foot at an emergency...............................................................................43
5-3. Power lamp ...............................................................................................................................44
5-4. Knee switch...............................................................................................................................45
6. HOW TO USE THE OPERATION PANEL .......................................................... 46
6-1. Explanation of the sewing screen (when selecting a sewing pattern)................................46
6-2. Sewing patterns........................................................................................................................50
6-2-1. Sewing pattern conguration ............................................................................................50
6-2-2. List of sewing patterns....................................................................................................... 51
6-2-3. Reverse feed stitching (at start) pattern........................................................................... 53
6-2-4. Reverse feed stitching (at end) pattern ............................................................................ 60
6-2-5. Editing the sewing patterns...............................................................................................61
6-2-6. List of pattern functions..................................................................................................... 66
6-2-7. Teaching function ............................................................................................................... 73
6-2-8. One-touch utility changeover function............................................................................. 75
6-2-9. Registration of a new sewing pattern ............................................................................... 76
6-2-10. Copying a pattern .............................................................................................................78
6-2-11. Narrow-down function......................................................................................................79
6-3. Counter function.......................................................................................................................81
6-3-1. Displaying the sewing screen under the counter display mode.................................... 81
6-3-2. Types of the counter........................................................................................................... 81
6-3-3. How to set the counter .......................................................................................................82
6-3-4. How to reset the count-completion state ......................................................................... 85

iii
6-4. Simplied chart of panel displays ..........................................................................................86
6-5. List of memory switch data .....................................................................................................87
6-6. List of errors .............................................................................................................................92
6-7. Memory switch data .................................................................................................................96
7. CARE ..................................................................................................................98
7-1. Standby mode...........................................................................................................................98
7-2. Cleaning ....................................................................................................................................99
7-3. Applying grease........................................................................................................................99
7-4. Replacing the fuse..................................................................................................................100
7-5. Disposal of batteries ..............................................................................................................100
8. ADJUSTMENT OF THE MACHINE HEAD (APPLICATION) ...........................101
8-1. Needle-to-hook relation .........................................................................................................101
8-2. Adjusting the timing between the needle and the blade point of hook.............................102
8-3. Adjusting the hook needle guard..........................................................................................103
8-4. Adjusting the bobbin case opening lever ............................................................................103
8-5. Adjusting the moving knife, the counter knife and the bobbin thread clamp ..................104
8-6. Adjusting the thread trimming cam timing ..........................................................................106
8-7. Adjusting the thread clamp device .......................................................................................107
8-8. Active-presser multi-layered section detection function ...................................................110
8-8-1. Multi-layered section detection function........................................................................ 110
8-8-2. Turning OFF the multi-layered section changeover function by the number of
stitching .............................................................................................................................. 113
8-9. Grease shortage alarm ..........................................................................................................115
8-9-1. Regarding the grease shortage alarm ............................................................................ 115
8-9-2. E221 Grease-shortage error ............................................................................................ 115
8-9-3. Regarding K118 error resetting procedure .................................................................... 116
9. HOW TO USE THE OPERATION PANEL (APPLICATION)............................. 117
9-1. Management of sewing patterns...........................................................................................117
9-1-1. Creation of a new pattern................................................................................................. 117
9-1-2. Copying a pattern ............................................................................................................. 119
9-1-3. Deleting a pattern ............................................................................................................. 120
9-2. Setting up the polygonal-shape stitching............................................................................121
9-2-1. Editing a polygonal-shape stitching pattern.................................................................. 121
9-2-2. Creating a new polygonal-shape stitching pattern ....................................................... 127
9-2-3. Setting the step from which polygonal-shape stitching is started .............................. 127
9-3. Cycle pattern...........................................................................................................................128
9-3-1. Selecting the cycle pattern ..............................................................................................128
9-3-2. Editing cycle sewing data ............................................................................................... 129
9-3-3. Creating a new cycle pattern ........................................................................................... 130
9-3-4. Setting the step from which cycle sewing pattern is started ....................................... 132
9-4. Custom pitch...........................................................................................................................133
9-4-1. Selecting a custom pitch ................................................................................................. 133
9-4-2. Creating a new custom pitch...........................................................................................135
9-4-3. Custom pitch edit function ..............................................................................................138
9-4-4. Copying/deleting a custom pitch .................................................................................... 139
9-5. Condensation custom pattern...............................................................................................140
9-5-1. Selecting the condensation custom ............................................................................... 140
9-5-2. Creating a new condensation custom ............................................................................ 140
9-5-3. Condensation custom edit function ............................................................................... 143

iv
9-5-4. Copying/deleting a condensation custom ..................................................................... 144
9-6. Simple lock of the screen ......................................................................................................145
9-7. Version information................................................................................................................145
9-8. Adjustment of brightness of the LED panel.........................................................................146
9-9. Information..............................................................................................................................147
9-9-1. Data communication ........................................................................................................ 147
9-9-2. USB ....................................................................................................................................150
9-9-3. NFC ....................................................................................................................................151
9-10. Key customization................................................................................................................152
9-10-1. Assignable data .............................................................................................................. 152
9-10-2. How to assign a function to a key................................................................................. 153
9-11. Maintenance management function....................................................................................155
9-12. Setting the ancillary devices ...............................................................................................159
9-12-1. Setting the ON/OFF status of suspended ruler............................................................ 160
9-12-2. Setting the ON/OFF status of stitch skipping detecting device ................................. 160
9-12-3. Setting the ON/OFF status of bobbin-thread remaining amount detecting device .. 161
9-12-4. Setting the ON/OFF status of cover sensor device ..................................................... 161
10. SEWING SPEED TABLE ................................................................................163
11. TROUBLES IN SEWING AND CORRECTIVE MEASURES .......................... 164

– 1 –
Item Application
Model LU-2828V-7
Sewing speed Max. 3,500 sti/min
(See "10. SEWING SPEED TABLE" p.163.)
Stitch length Max. 9 mm
Needle SCHMETZ 134-35 (Nm 125 to Nm 180) (Standard : Nm 140)
Applicable thread size for sewing #30 to #5 (US: #46 to #138, Europe: 60/3 to 20/3)
Applicable thread size to be cut #30 to #5 (US: #46 to #138, Europe: 60/3 to 20/3)
Motor AC servo motor
Presser foot pressure control Electronic control
Horizontal feed control Electronic control
Alternate vertical feed control Electronic control
Lubricating oil JUKI New Defrix Oil No. 1 (equivalent to ISO standard VG7)
or JUKI MACHINE OIL No. 7
Number of patterns Sewing pattern ............................99 patterns (For the polygonal shape sewing,
as many as 10 patterns can be registered.)
Cycle sewing pattern ................... 9 patterns
Custom-pitch pattern ...................20 patterns
Condensation custom pattern .....9 patterns
Noise -Equivalent continuous emission sound pressure level (LpA) at the
workstation:
A-weighted value of 88.0 dB; (Includes KpA = 2.5 dB); according to ISO
10821- C.6.2 - ISO 11204 GR2 at 3,500 sti/min.
-Sound power level (LWA);
A-weighted value of 92.5 dB; (Includes KWA = 2.5 dB); according to ISO
10821- C.6.2 - ISO 3744 GR2 at 3,500 sti/min.
1. SPECIFICATIONS
1-1. Specications of the sewing machine head
1-2. Specications of the control box
Supply
voltage
Single phase
100 to 120V
3-phase
200 to 240V
Single phase
220 to 240V
Single phase
220 to 240V CE
Frequency 50Hz/60Hz 50Hz/60Hz 50Hz/60Hz 50Hz/60Hz
Operating
environment
Temperature : 0 to 35˚C
Humidity : 90% or less
Temperature : 0 to 35˚C
Humidity : 90% or less
Temperature : 0 to 35˚C
Humidity : 90% or less
Temperature : 0 to 35˚C
Humidity : 90% or less
Input 600VA 600VA 600VA 600VA
LU-2828V-7-NB-B-S-
Classication of options
Z Not provided
F Protective cover sensor
Stitch skipping detecting device
Bobbin-thread remaining amount detecting device

– 2 –
2. INSTALLATION
2-1. Mounting positions of the devices and table
The devices including the oil pan and electrical box are to be mounted to the positions as shown in the gure
below.
❶Control box
❷Power switch
❸Oil pan
❹Pedal sensor
❺*2 Control box for stitch skipping detecting device
❻*2 Solenoid valve
❼*2 Regulator
❽*1 Reactor box
❾*2 DIN rail
*1: Only for the EU type models
*2: Only for the models provided with the stitch skipping detecting device and bobbin-thread remaining amount
detecting device
* Dimensions are the reference values.
Dimension: mm
❶
❷❸❹
❺*2 ❻*2
❼*2
❽*1
40
38
30 220
105
145
352
80
175
650
62
513
58
94
110
55
❾*2

– 3 –
2-2. Installation of the sewing machine
1) To prevent possible accidents caused by the full
of the sewing machine, perform the work by two
persons or more when the machine is moved.
2) Place the sewing machine on a horizontal and
plane place when placing it and do not place
any protruding thing such as a screwdriver or
the like.
Never hold the handwheel since it rotates.
3) Attaching the hinge seats and the support rub-
bers of the machine head
Fix accessory hinge seat ❶supplied with the
unit on the table with wood screw ❼and wash-
er ❽while placing sheet plate ❻between the
hinge seat and the table as shown in the gure.
Fix machine head support rubbers ❷and ❸on
the table with nails while putting sheets A(stan-
dard: 3 pieces) and sheet B(standard: 1 piece)
under the machine head support rubbers.
Use nail ❺for sheet Band nail ❹for sheets A.
There are two dierent machine head support
rubbers ❸; i.e., the rubber for the right and that
for the left. Be sure to check the types of the
support rubbers before xing them.
Sheet A (eight pieces) and sheet B (four pieces) are supplied with the machine as accessories.
For the sheet A, three sheets are to be used as standard for each mounting position. For the sheet B,
one sheet is to be used as standard. (The state shown in the left gure)
The sheets A and B are used for adjusting the height of the top surface of the bed. Use one more
sheet to increase the height, or use only one sheet to decrease it.
Be sure to use a short nail ❺ for sheet B. If long nail ❹ is used, the nail tip can penetrate the table
giving rise to a risk of injury.
❹
25 mm
❺
19 mm
❷
❹
❸
❸
❺❺
❻
❼
❶
❽
Sheet B
Sheet A

– 4 –
6) Install hinge on the bed with screw . En-
gage the hinge with the rubber hinge of the
table. Then, place the machine head on the
machine head support rubber.
5) Attach a lter to the oil pan ❾as shown in
the gure.
Install lter so that its multi-layered part is
brought to the right side as observed from you.
Multi-layered part
❾
Top surface
4) Attaching the oil pan
Fix the oil pan ❾supplied with the machine on
the table by tightening ten wood screws.
Operator’s side Table
❾
Align
Align

– 5 –
8) Put reux pipe in the oil reservoir Aof oil
pan ❾. Secure the pipe in groove .
9) Fix lter and lter clamp with tting .
7) Securely attach head support rod until its rib
is closely pressed against the table.
When it is really necessary to conduct work
with the machine head supporting rod re-
moved for the purpose of maintenance and
repair, it is necessary to carry out the work
with two or more persons.
In the case the machine head is tilted more
than necessary, oil can leak from the oil in-
let of the oil tank. It is, therefore, necessary
to remove oil from the oil tank before tilting
the machine head.
Install oil shield ❶, supplied with the unit, on the
frame with screws ❷.
WARNING :
To protect against possible personal injury due to abrupt start of the machine, be sure to start the
following work after turning the power o and ascertaining that the motor is at rest.
❷
❶
❷
2-3. Installing the oil shield
Secure the reux pipe as illustrated in the
gure.
❾
A

– 6 –
WARNING :
To protect against possible personal injury due to abrupt start of the machine, be sure to start the
following work after turning the power o and ascertaining that the motor is at rest.
2-4. Pneumatic components (Only for the models provided with the stitch skipping
detecting device and bobbin-thread remaining amount detecting device)
(1) Installing the regulator
1) Install regulator (asm.) ❶on mounting plate
❺with screw ❷, spring washer ❸and nut ❹
which are supplied with the unit.
2) Attach joint ❻to inlet 1. Attach joint ❼to out-
let 2.
3) Attach mounting plate ❺on the undersurface of
the table with accessory screws ❽supplied with
the plate.
4) Connect branch Y union ❾to joint ❼.
* Screw ❷which is supplied with the unit:
Thread diameter M5; Length: 12 mm
(SM6051202TP)
* Branch Y union ❾(PJ308060004) which comes
with the air blower solenoid valve asm._SD
should be used.
❶
❷
A
(2) Adjusting the air pressure
1) The operating air pressure is 0.5 to 0.55 MPa.
Adjust the air pressure using air pressure regu-
lating knob ❶ of the lter regulator.
2) In the case uid accumulation is observed in A
section of the lter regulator, turn drain cock ❷
to drain the uid.
Decrease Increase
❷
❶
❺
❼
❻
❹
❸
❽
1
2
❾

– 7 –
(3) Exhaust tube
Pass ø8 exhaust air tube ❶through hole ❷in
the table stand and other relevant hole. Then,
route the air tube downward. If the humidity is
high, water may come out of the air tube.
❶
❷
2
13
ø4 tube
ø4 tube
Air blower solenoid valve asm._AE
(for the bobbin-thread remaining amount detecting device)
Air blower solenoid valve asm._SD
(for the stitch skipping detecting device)
(4) Attaching the solenoid valve
1) Attach air blower solenoid valve asm._SD ❷
and air blower solenoid valve asm. _AE ❸to
the undersurface of table with accessory screws
❶(SK3452001SE).
2) Connect ø6 tubes ❹and ❺to the branch Y
union of regulator.
Cut ø6 tubes ❹and ❺to an appropriate length
before use.
3) Connect ø4 air tube (wire mark 2) coming from
the stitch skipping detecting device to joint ❻.
Connect ø4 air tube (wire mark 13) coming from
the bobbin-thread remaining amount detecting
device to joint ❼.
13
❺
❼
❶
❸
2
❹
❻
❶
❷

– 8 –
Fix needle thread guide pin ❶on top cover ❸with
nut ❷.
2-5. Installing the thread stand
❶
❷
1) Assemble the thread stand unit, and insert it in
the hole in the machine table.
2) Tighten nut ❶.
3) For ceiling wiring, pass the power cord through
spool rest rod ❷.
2-6. Installing the thread guide pin
❶
❸
❷

– 9 –
Fix handwheel cover ❶with screw ❷.
At this time, check the following:
• The handwheel cover smoothly ts into ball catch
❸.
• The handwheel does not rub against handwheel
cover ❶.
If the handwheel rubs against the handwheel cover,
loosen screw ❷and adjust so that the former does
not rub against the latter.
Check whether or not the handwheel rubs against
the handwheel cover using the jog dial after the
completion of sewing machine setup.
2-7. Installing the handwheel cover (only in the case the protection cover sensor is
provided)
❶
❷
❸

– 10 –
2-8. Installing the electrical box
2-8-1. Preparing for installation of the control box
❶
❶
❷❷
a
a
❶
❷
1) Secure toothed washer ❷and vibration-proof rubber ❸to control box ❶. (At four locations)
* Tighten the toothed washer until it protrudes the control box surface by 0.8 mm.
2) Secure control box mounting plate ❹to the control box with plain washers ❺and nuts ❻. (At four loca-
tions)
* Secure the mounting plate by tting the screws against the U-groove in the mounting plate.
Secure pedal sensor ❶to the table with two plain
washers and two wood screws ❷both of which are
supplied with the electrical box.
2-9. Installing the pedal sensor
Install electrical box ❶ to the table by xing four ac-
cessory bolts ❷, which are supplied with the electri-
cal box, in holes ain the table.
2-8-2. Installing the electrical box
0.8 mm
❷
❸❹
❺
❻

– 11 –
2-10. Installing the reactor box (Only for the EU type models)
❽
1) Connect the terminals of power cord ❶of the
SC-952 to reactor-box PCB asm. ❷and to re-
actor box mounting plate ❸.
Connect brown wire A to the rst connector and
blue wire Bto the third connector respectively
from the top of terminal block on the reactor box
PCB asm. using screws. Connect green/yellow
wire Cto reactor box mounting plate ❸with
earth setscrew ❹.
2) Attach cable clip ❺to the power cord of SC-
952. Attach the power cord together with the
cable clip to reactor box mounting plate ❸with
cable clip setscrew ❻.
3) Attach cord bushes ❽to input/output cables ❶
and ❼of the reactor box. Attach both bushes in
the same manner.
4) Attach reactor box cover to reactor box
mounting plate ❸with four reactor-box cover
setscrews ❾.
At this time, x cord bushes ❽attached to input/
output cables ❶and ❼in the concave section
on reactor box cover to eliminate a gap be-
tween reactor box and cover .
5) Secure reactor box to the undersurface of
table with four accessory wood screws .
6) Secure two cables coming from reactor box
to the table with accessory cable clip and
wood screw .
In addition, for the models provided with the
stitch skipping detecting device and the bob-
bin-thread remaining amount detecting device,
cables coming from the stitch skipping device
control box should be secured together with the
aforementioned cables by means of the afore-
mentioned cable clip.
❼
❽
❽
❶
❾
❸
❾
❸
❶
A
B
❻
C
❷❹
❺

– 12 –
2-11. Installing the control box for stitch skipping detecting device (only for the models
provided with the stitch skipping detecting device and the bobbin-thread remaining
amount detecting device)
1) Fix DIN rail ❶supplied with the sewing machine
on the undersurface of table with two wood
screws ❷.
2) Attach control box ❸for the stitch skipping de-
tecting device to DIN rail ❶while orienting it in
the direction as illustrated in the gure. Fix sec-
tion Aof stitch skipping detecting device control
box ❸in DIN rail ❶. Fit section Bin DIN rail ❶
while pressing section Aagainst DIN rail ❶.
❶
❷
B
A
❸
Oil pan side
2-13. Connecting the power switch cable
Fix power switch ❶under the machine table with
wood screws ❷.
Fix the cable with staples ❸supplied with the ma-
chine as accessories in accordance with the forms of
use.
2-13-1. Installing the power switch
❶
❷
❸
Electrical box
(EU type models:
Reactor box)
2-12. Installing the accessory ring core (Only for the EU type models)
2-12-1. Installing the accessory ring core supplied with the electrical box
Refer to accessory manual for "SC-952 Installing the accessory ring core" supplied with the electrical box for
how to install the ring core.

– 13 –
Power indication tag
(For example : In the case of 200V)
2-13-2. Connecting the power source cord
Voltage specications at the time of delivery from the factory are indicated on the voltage indication seal.
Connect the cord in accordance with the specications.
• Connecting 3-phase 200 to 240V
• Connecting single phase 220 to 240V
• Connecting single phase 100 to 120V
AC200 to 240V
Light blue
Red
Green/Yellow
Green/Yellow
Green/Yellow
Green/Yellow
Table
Table
Control box
Control box
Power switch
Power switch
Brown
White
White
Green/Yellow — GND
White
Black
Red
Black
Green/Yellow
Green/Yellow
Power switch
Control box
Table
White
White
White
Black
Black
Green/Yellow — GND
AC220 to 240V
White
Black
Never use under the wrong voltage and phase.
Rating plate
Black Red
Red
Black

– 14 –
❼
❻
❺
CN34
Fig. 2
Fig. 1
2-14. Connecting the cords
1) Loosen four setscrews ❷of control box cover ❶.
Remove control box cover ❶.
2) Connect the cords to the respective connectors
on CTL PWB, PWR PWB. (Fig. 1)
Secure cord ❺of pedal sensor with setscrew ❻
and cord clamp ❼. (Fig. 2)
3) Fix green/yellow ground wire ❹at position Aof
the control box with a screw (Fig. 3). In addition,
for the EU type models, x the cable (Black) at
screw Bwith a screw.
DANGER :
1. To prevent personal injuries caused by electric shock hazards or abrupt start of the sewing machine,
carry out the work after turning OFF the power switch and a lapse of 5 minutes or more.
2. To prevent accidents caused by unaccustomed work or electric shock, request the electric expert or
engineer of our dealers when adjusting the electrical components.
Securely x the cords to be connected to
CN20, CN21 and CN22 with cable clamp ❸.
Check the connector markers of CN21 and
CN22 to prevent improper connection.
CN30
CN22
CN37
CN20
CN21CN38
CN32
CN34
CN36
Fig. 3
A
❹
B
❸
CN58
CN32
CN30
CN36
CN38
CN21
CN37
CN20
CN22
PWR PWB
CTL PWB 60P
9P
6P
6P
18P
4P
4P
15P
White
White
White
White
White
White
White
Brown
3P White
CN34
2-14-1. Connecting the cords coming from the sewing machine
❷
❶

– 15 –
9P
22P
22P
16P
9P
9P
2P
8P
2P
6P
9P
❹ Black (Bobbin-thread remaining amount
detecting sensor amplier cable)
❸ Gray (Protection cover sensor
cable)
❼ Gray (Encoder extension cable)
CN30
Black (Motor encoder cable)
❾ Black (Stitch skipping
detecting cable)
❶ Junction cable of the bobbin-thread remaining amount
detecting device and stitch skipping detecting device
❷ Gray (encoder junction cable)
CN30
CN51
CN58
CN1
CN2
CN3
CN4
CN5
Air blower solenoid
valve asm._AE
(for the bobbin-thread
remaining amount
detecting device)
Air blower solenoid
valve asm._SD
(for the stitch skipping
detecting device)
Control box for
the stitch skipping
detecting device
Electrical box
(CTL PCB)
[Fig. 1 Overall view]
2-14-2. Connection of the cords coming from the stitch skipping detecting device, bobbin-thread
remaining amount detecting device and cover sensor
❻
13
❽
2
CN105
CN4
❺ Black
(Handwheel
cover sensor
cable)
2P
CN*1
Table of contents
Other JUKI Sewing Machine manuals

JUKI
JUKI HZL-25Z User manual

JUKI
JUKI TL Series User manual

JUKI
JUKI ACF-172-1790 User manual

JUKI
JUKI DLU-5490N User manual

JUKI
JUKI LS-1340 User manual

JUKI
JUKI LK-1900S Series User manual

JUKI
JUKI MF-7900 Series User manual

JUKI
JUKI LZ-2290A/IP-110A/SC-915 User manual

JUKI
JUKI LBH-1790AN User manual

JUKI
JUKI PLC-2760NV User manual

JUKI
JUKI JTR-DDL9000B/PPA User manual

JUKI
JUKI AMS-210EN/IP-420 User manual

JUKI
JUKI DDL-552-2 User manual

JUKI
JUKI MO-1200QVP User manual

JUKI
JUKI HZL-E70 User manual

JUKI
JUKI APW-895 Quick start guide

JUKI
JUKI HZL-G Series User manual

JUKI
JUKI LBH-1790 Series User manual

JUKI
JUKI K-1E User manual

JUKI
JUKI DDL-8300N User manual