JUKI MO-1000 User manual

MO-1000
Instruction Manual
使用说明书
2-Needle, 2/3/4-Thread Overlock Sewing Machine
双针,2/3/4 线包缝机
IMPORTANT:
Read all safety regulations carefully and
understand them before using your sew-
ing machine.
Retain this instruction manual for future
reference.
注意 :
请阅读本服务手册的所有安全规定,并在
充分理解的基础上进行使用。
请保留本说明书以供日后参考。

1
“IMPORTANT SAFETY INSTRUCTIONS”
When using an electrical appliance, basic safety precautions should always be followed, including the following: Read all in-
structions before using this sewing machine.
“DANGER ____ To reduce the risk of electric shock:”
1. The appliance should never be left unattended when plugged in.
2. Always unplug this appliance from the electric outlet immediately after using and before cleaning.
“WARNING ____ To reduce the risk of burns, re, electric shock, or injury to persons:”
1. Do not use the appliance as a toy. Caution is advised when the appliance is used by children, or near children. This sew-
ing machine can be used by children aged from 8 years and above and persons with reduced physical, sensory or men-
tal capabilities or lack of experience and knowledge if they have been given supervision or instruction concerning use of
the sewing machine in a safe way and understand the hazards involved. Children shall not play with the sewing machine.
Cleaning and user maintenance shall not be made by children without supervision.
2. Use this appliance only for its intended use as described in this manual. Use only attachments recommended by the
manufacturer as contained in this manual.
3. Never operate this appliance if it has a damaged cord or plug, if it is not working properly, if it has been dropped or dam-
aged, or dropped into water. Return the appliance to the nearest authorized dealer or service center for examination,
repair, electrical or mechanical adjustment.
4. Never operate the appliance with any air openings blocked. Keep ventilation openings of the sewing machine and foot
control free from the accumulation of lint, dust, and loose cloth.
5. Keep ngers away from all moving parts. Special care is required around the sewing machine needle.
6. Always use the proper stitch plate. The wrong plate can cause the needle to break.
7. Do not use bent needles.
8. Do not pull or push fabric while stitching. It may deect the needle causing it to break.
9. Do not carry out sewing with a marking pin stuck in the material since doing so can cause knife/needle breakage.
In addition, do not attempt to cut anything other than fabric and thread with the upper/lower knives.
10. Switch the sewing machine off “O” when making any adjustments in the needle area, such as threading needle, chang-
ing needle, threading looper, or changing presser foot and the like.
11. Always unplug the machine from the electrical outlet when removing covers, when covers are opened to thread the loop-
ers, when lubricating or when making any other user servicing adjustments mentioned in the instruction manual.
12. Never drop or insert any object into any opening.
13. Do not use outdoors.
14. Do not operate where aerosol (spray) products are being used or where oxygen is being administered.
15. To disconnect, turn all controls to the off “O” position, then remove plug from outlet.
16. Do not unplug by pulling on cord. To unplug, grasp the plug, not the cord.
17. Basically, the machine should be disconnected from the electricity supply when not in use.
18. If the power cord of this appliance is damaged, it must be replaced with a special cord by your nearest authorized dealer
or service center.
19. (Except USA/Canada) This machine is provided with double insulation.
Use only identical replacement parts. See instructions for servicing Double-Insulated machine.
“SERVICING DOUBLE-INSULATED PRODUCTS
(Except USA / Canada)”
In a double-insulated product, two systems of insulation are provided instead of grounding. No grounding means is provided
on a double-insulated product nor should a means for grounding be added to the product. Servicing a double-insulated prod-
uct requires extreme care and knowledge of the system and should only be done by qualied service personnel. Replacement
parts for a double-insulated product must be identical to those parts in the product. A double-insulated product is marked with
the words DOUBLE INSULATION or DOUBLE INSULATED.
The symbol may also be marked on the product.
“SAVE THESE INSTRUCTIONS”
“This overlock sewing machine is intended for household use only.”

2
Danger warning
which is not
specied
There is a risk
of electrical
shock
There is a
risk of re
There is a risk
of injury to
hands, etc.
Prohibited
matter which is
not specied
Disassembly/
alteration is
prohibited
Do not place
ngers under
the needle
Do not pour
oil, etc.
Generally
required
behavior
Disconnect
the power
plug
Congratulations on your purchase of a JUKI sewing machine.
Please be sure to read safety precautions in “To use the sewing machine safely” in the Instruction Manual before use to
fully understand the functions and operating procedures of the sewing machine so as to use the sewing machine for a
long time.
After you have read the Instruction Manual, please be sure to keep it together with the warranty so that you can read it
whenever necessary.
To use the sewing machine safely
Marks and pictographs included in the Instruction Manual and shown on the sewing machine are used so as to ensure
safe operation of the sewing machine and to prevent possible risk of injury to the user and other people.
Warning marks are used for different purposes as described below.
WARNING Indicates that there is a possible risk of death or serious injury if this mark is ignored
and the sewing machine is used in a wrong manner.
CAUTION
Indicates the operation, etc. which can cause a possible risk of personal injury and/or physi-
cal damage if this mark is ignored and the sewing machine is used in a wrong manner.
Pictographs mean the following:

3
● Do not wipe the sewing machine with solvent such as
thinner.
When the sewing machine
is soiled, put a small quan-
tity of neutral detergent
on a piece of soft cloth
and carefully wipe off the
sewing machine with it.
● Be sure to use the sewing machine in the tempera-
ture range from 5ºC to 40ºC.
If the temperature is excessively low, the machine
can fail to operate normally.
WARNING
For the combination of the material and the thread and needle, in particular, refer to the explanation table in “Replacement
of the needle”.
If the needle or thread does not match the material used such as in the case that an extra heavy-weight material (e.g.,
denim) is sewn with a thin needle (#11 or higher), the needle can break resulting in an unexpected personal injury.
Other precautions
● Do not put the sewing machine under the direct sun-
light or in a humid place.
Be aware that the following state can take place since the sewing machine incorporates semi-conductor electronic
parts and precise electronic circuits.
* The operating temperature of the sewing machine is between 5ºC and 40ºC. Do not use the sewing machine under
the direct sunlight, near the burning things such as a stove and candle, or in a humid place. By so doing, the tempera-
ture in the interior portion of the sewing machine can rise or the coating of the power cord can melt, causing re or
electrical shock.

4
危险警告 有触电的危险 有发生火灾的
危险
有手受伤的危
险等。
禁止的事项 禁止拆卸 / 变
更
不要将手指放
到针下 不可倒油,等。
一般要求的行
为断开电源插头
感谢您购买重机缝纫机。
请务必阅读安全注意事项中的“安全使用缝纫机”的指导手册,使用前要充分了解功能和缝纫机操作程序以便能长期使
用缝纫机。
当你阅读本手册,请务必在保修期内保管好,以便在必要的时候可以找到。
安全使用缝纫机
标志和象形文字包含在说明书并在缝纫机上显示,是用以保证缝纫机安全运行,防止对使用者及他人造成伤害。
警告标志,用于不同的目的如下。
为正确和安全地使用缝纫机,请务必遵循以下安全指示。
象形文字的意思如下 :
警告 表明有死亡或严重伤害,这个标记是不容忽视的,如果缝纫机操作错误,会存在这种风险。
注意安全 如果这个标记被忽略,机器操作错误的话,指示操作等可引起危险的人身或物理伤害
警告 如果忽略下述指令的话,有可能会造成触电,火灾或机器故障。
1. 请不要在电压在 120V 时使用缝纫机。
2. 在下列情况下,请关闭电源开关,从墙上的电源插座上拔出电源插头。
●在离开缝纫机的情况下
●缝纫机使用结束后
●缝纫机在运转的情况下断电
●在维修缝纫机时
●在移动缝纫机时
●缝纫机无法正常运行,由于连接松动或断线。
●打雷时
安全注意事项 如果忽视下述指令,有可能会造成触电、火灾、人身伤害或是机械故障。
1. 不要把任何东西放在控制器上。
2. 不要拆卸或是变更缝纫机。

5
3.在操作缝纫机时,请务必关闭盖板并锁紧。
4.在缝纫机运转时注意机针,并让双手远离所有的运动部件如机针、手轮和挑线杆。
5.不要用弯曲的机针,否则会造成断针。
6.在缝制中请不要强行拉拽面料,否则的话会造成人身伤害或引起断针。
7.在缝制时请勿将珠针等留在面料里,以免造成机针或是切刀损坏。此外,也请不要用上下切刀
去剪切任何织物或是线以外的任何物品。
8.当孩童靠近或使用机器时,请务必加以关注。
9.在进行下述操作时,请务必关闭电源开关,并将插头从插座上拔下。
●更换机针、针板、压脚或附件
●设定针线或底线
●与维修手册中描述的一样
(如果在断电时在更换模式的过程中更换针或者是线的话,那么之前设定的将全部清空)
10.不要把缝纫机放在一个不稳定的地方如摇摇欲坠的架子或斜面上。缝纫机可能会因为失去平衡而掉落造成人身
伤害。不使用或存放缝纫机在某个地方,机器功能有可能会下降。”
11.当本机器或控制器发生故障时,请立即停止使用并与您的经销商联系进行检查、修理及维护。
●本机器或是控制器不能正常工作。
●本机器或是控制器被摔过或已损坏。
●本机器或是控制器已进过水。
●本机器或是控制器的电源线或插头已损坏。
●本机器或是控制器在运转时,产生异味或是不正常的噪音。
●有异物进入到本机器或是控制器内。
12.不要用湿手去插拔电源。否则易引起触电。
13.避免通过转接线连接多个电源插座。否则易导致火灾或是触电。
14.要将电源插座完全插入插座内。否则,会引起发热导致火灾或是触电。避免使用损坏的插头或是松动的插座。
15.在拔插头或是控制器时,请务必先关闭电源,然后,在完整拔出电源插头的插头部分。不要拉住电线拔插头或
控制器,拔插头应抓住插头,而不是电线,否则会造成损坏,导致火灾或是触电。
16.请不要损坏,涂改,用力拉,弯曲,扭曲电源线。放置重物或加热的话会损坏电源线,造成火灾或触电。
17.缝纫机在安装使用时,避免在房间中使用喷雾产品。喷气起火会造成烧伤。
18.当空气口被堵塞时,绝对不可以使用机器。应保持机器的通风,并且保持脚踏控速器的清洁,防止棉绒、灰尘
及零布的堆积。
19.不要把异物放入通风口或是缝纫机主体的内部。不要将螺丝刀插入进去,异物或是螺丝刀会触碰到高压部分从
而造成触电。

6
其他注意事项
注意,因本机内置有半导体电子元件或是精密的电子电路。因此一旦有以下情况发生,请随时关注。
※ 缝纫机的工作温度是 5ºC~40ºC. 不要在阳光直射下使用缝纫机,也不要靠近燃烧的东西如炉或蜡烛,或在潮湿
的地方。如果这样做的话,缝纫机内部的温度会上升或是电源线的涂层会融化,从而导致火灾或触电的发生。
警告
特别是面料与线与机针的组合,请务必遵循【机针的更换】说明表在选择了最匹配的组合后再进行使用。
一旦不匹配的话,特别是在缝制厚料(粗斜纹棉布)时采用了细针(#11 以下)的话很可能会造成机针断裂或者是意外
人身伤害。
20.手指应远离运动部件,机针周围应特别注意。
21.请务必使用本说明书中描述的原装配件。否则有可能会导致人身伤害或是机器故障。
22.请确保塑料袋或是缝纫机主体包装远离孩童或是丢弃它。以防止出现意外事故。
23.在搬运机器时,请务必握住机器上拎手。如果手插入到机器其他部位的话,有可能会造成人身伤害。
24.这款机器可以给 8 岁以上的孩子以及有智力上和行为能力上限制的人以及缺乏相关知识和经验的技能者,只要
他们接受过指导或看过使用说明指导安全的使用机器并指导其有危险即可。孩童不得将本机器当玩具使用。清
洁或是维修不得用无监管的孩童。
●不要用如稀释剂溶剂擦拭缝纫机。●不要把缝纫机放在阳光直射或潮湿的地方。
一旦缝纫机脏了,可用软布蘸
少量中性清洁剂仔细擦拭即可。
●请在 5ºC~40ºC 的温度范围内使用本机。
如果温度过低,机器将不能正常运转。

7
Contents / 目录
Safety regulations ··············································· 1-3
Contents ······························································ 7
Details of the machine ········································ 8-10
• Accessories ·····················································10
• Thread stand ··················································· 10
Preparing the machine / Using the machine ············ 11,12
• Attaching the foot control ···································· 11
• Waste collector ················································ 11
• Thread, cones, spools ········································ 12
Using the machine
• Main Power/ light switch ····································· 13
• Looper cover ··················································· 13
• Handwheel ······················································ 14
• Changing the presser foot ··································· 15
• Upper knife is deactivated ··································· 16
• How to use the presser foot ································· 17
• Inserting needles / Needles and Threads ··········· 18-21
Adjustments and settings
• Stitch length ···················································· 22
• Cutting width ···················································· 23
• Differential feed ··········································· 24, 25
• Gathering ······················································· 26
• Roll hemming ·················································· 27
• Presser foot pressure ········································ 28
Setting/ Practical sewing
• Preparation/Tips ··············································· 29
Stitch chart ························································· 30
Threading 4/3 Thread OL
• Lower looper ···················································· 32
• Upper looper ···················································· 33
• Right needle ···················································· 34
• Left needle ······················································ 35
• How to use the looper threader ···························· 36
Trial sewing ························································ 37
Thread tension ··············································· 38, 39
Practical Sewing-Overlock
• Sewing in tape ················································· 40
• Carrying out hemming and narrow overlocking ········ 41
• Wrapped overlocking with three threads ················· 42
• 2-/3-thread changeover attachment ······················ 42
• Cover stitch with three threads (atlock) ················· 43
• Thread breakage during sewing ··························· 44
• Unpicking seams ·············································· 44
Securing thread ends at the beginning and end of sewing ·· 45-47
Maintenance
• Cleaning and lubricating ································ 48, 49
• Replacing the knife ············································ 49
Trouble shooting guide ·········································· 50
Technical data ····················································· 52
Optional accessories ············································ 53
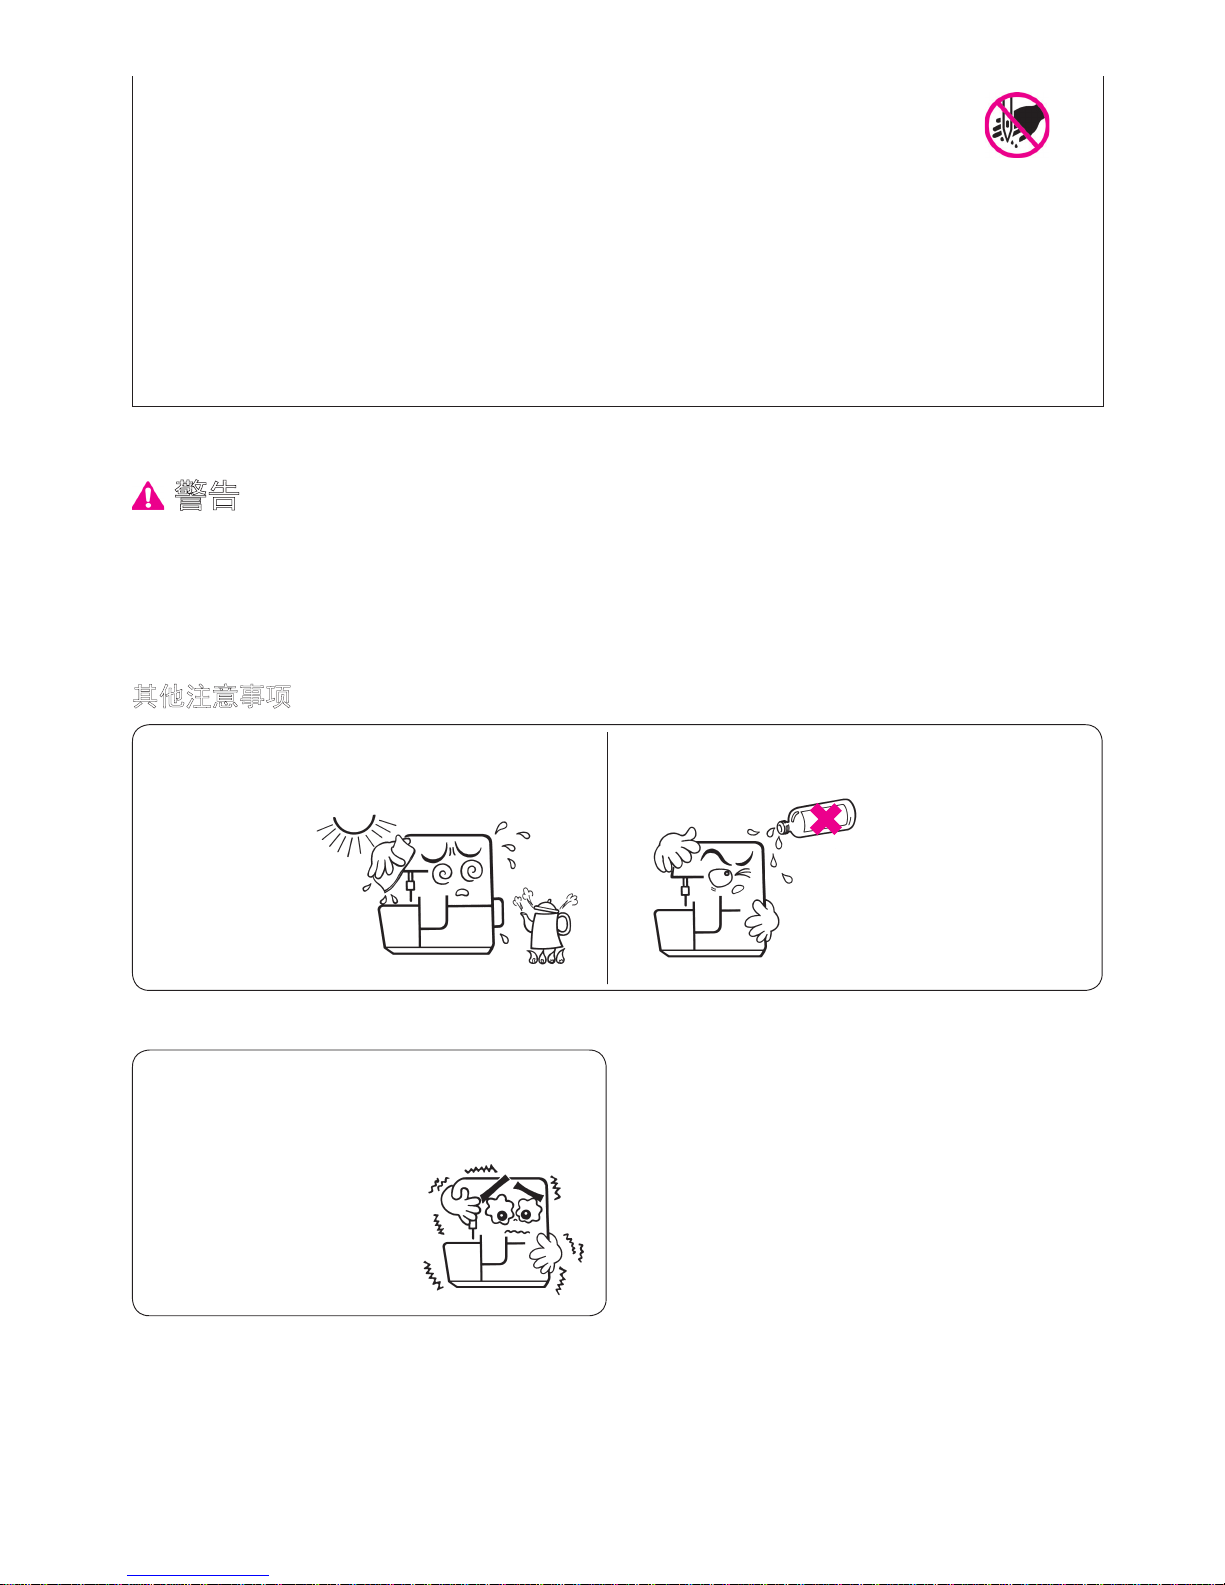
安全注意事项··················································· 4-6
目录··································································· 7
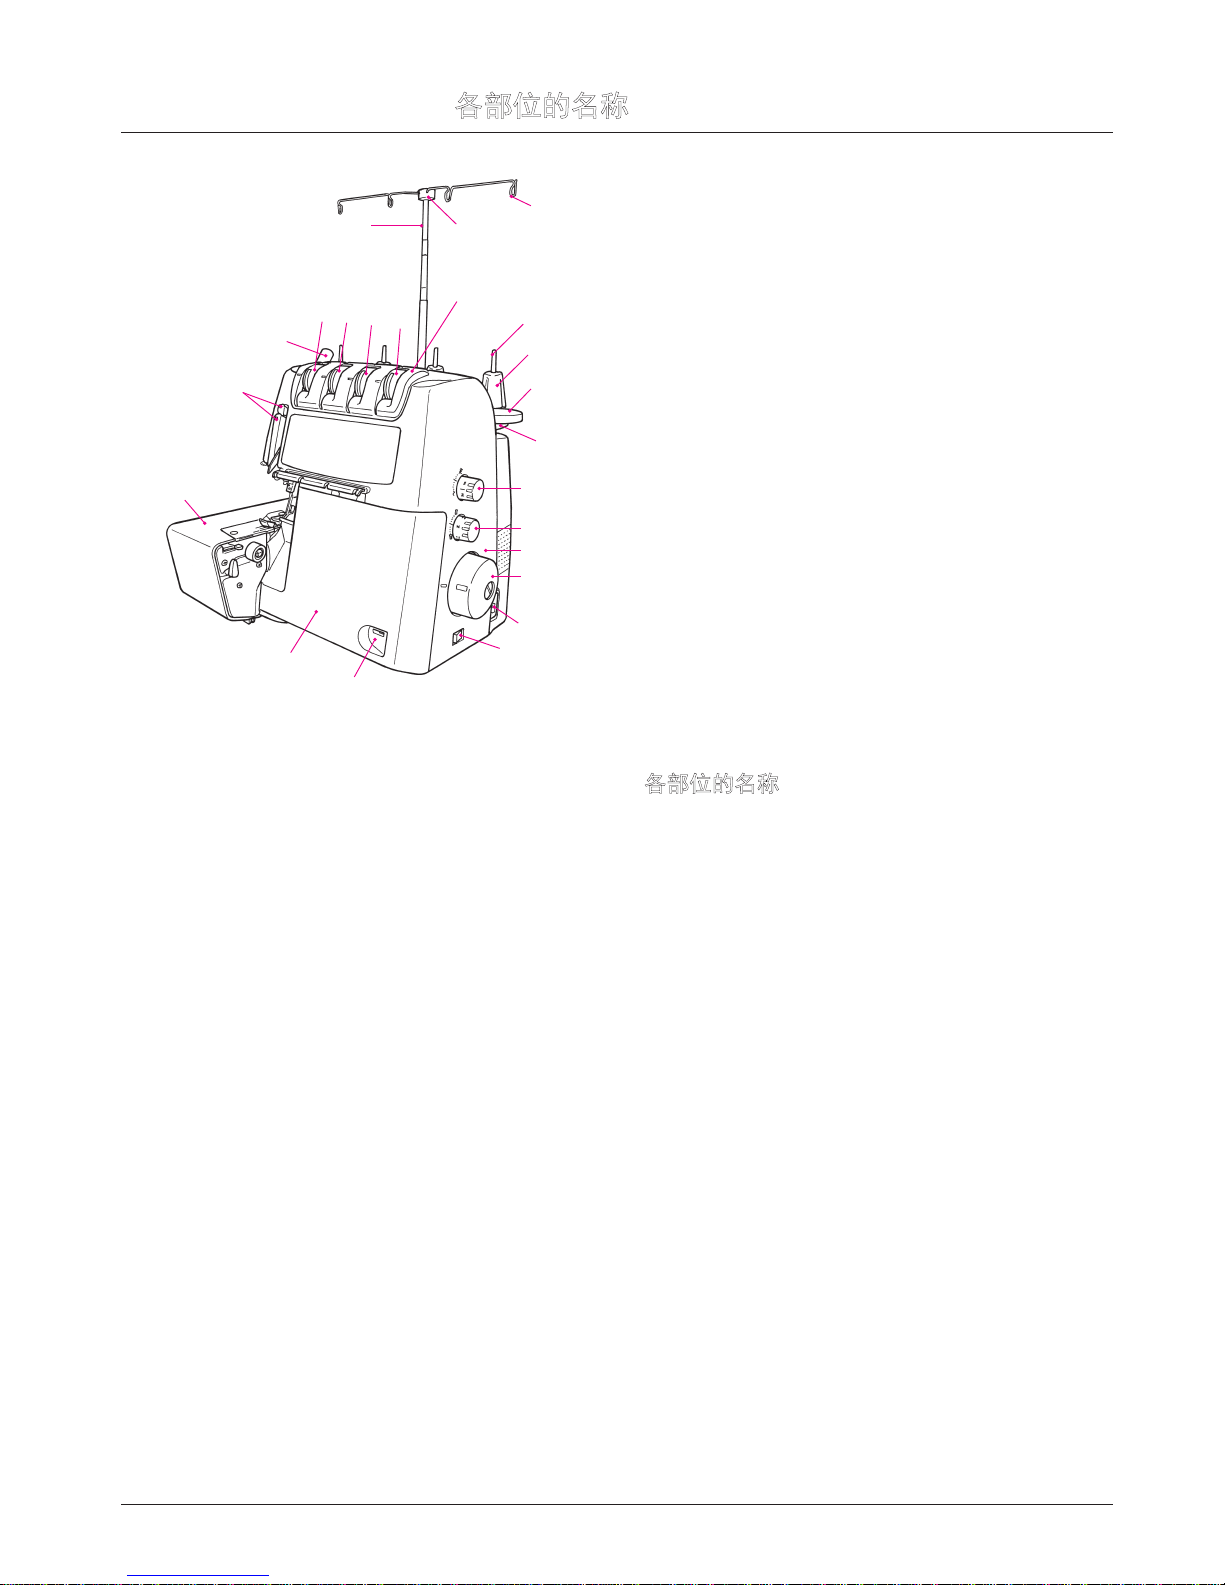
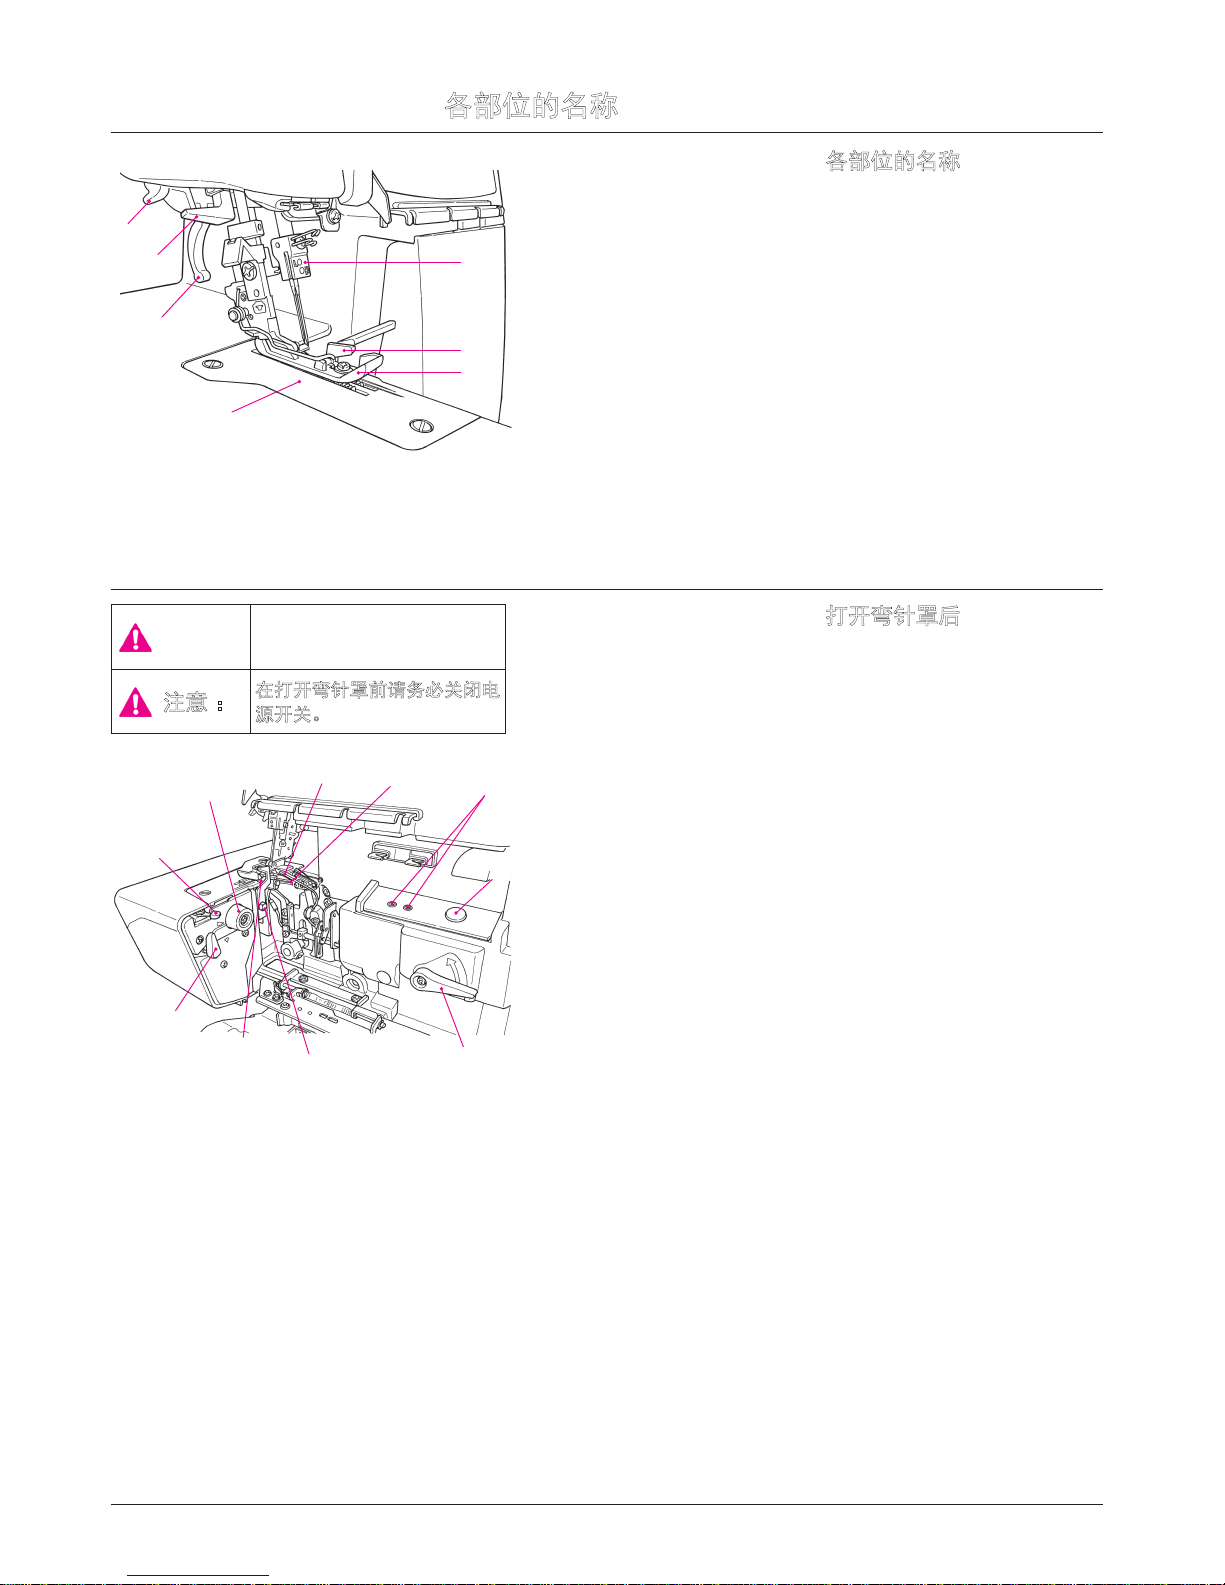
各部位的名称··················································8-10
•附件······························································10
•线架······························································10
运转前准备 / 使用机器·····································11,12
•安装脚踏控制器··············································· 11
•集尘装置························································ 11
•缝线,线圈,线团···············································12
使用机器
•电源 / 照明开关··············································· 13
•弯针罩板························································ 13
•手轮······························································ 14
•更换压脚························································ 15
•上刀的解除····················································· 16
•如何使用压脚·················································· 17
•安装机针 / 机针和线·····································18-21
调整与设置
•缝迹长度 ·················································· 22
•剪切宽度 ·················································· 23
•差动送布···················································24,25
•打裥······························································26
•卷边缝···························································27
•压脚压力························································28
安装 /实际缝制
•运转前的准备 / 建议·········································29
各个缝迹调节刻度的刻度标准································ 31
4/3 线穿线
•下弯针···························································32
•上弯针··························································· 33
•右针······························································ 34
•左针······························································ 35
•如何使用弯针穿线工具······································ 36
试缝································································· 37
线张力·························································· 38,39
实际缝制 - 包缝
•滚条导轨的使用方法·········································40
•进行卷边缝和窄边包缝······································ 41
•三线包边缝·····················································42
•2/3线转换器················································42
•3线装饰缝(开口缝)········································· 43
•在缝制途中断线时············································ 44
•拆除线迹的方法··············································· 44
缝制开始与结束时的线头加固··························· 45-47
维修保养
•清洁和润滑················································ 48,49
•更换切刀························································ 49
故障及处理方法·················································· 51
技术规格···························································52
可选配件··························································· 53

8
Details of the machine / 各部位的名称
Details of the machine
1. Looper cover with built in knife
guard
2. Looper cover opening indent
3. Cloth plate
4. Top cover
5. Thread take-up cover
6. Presser foot pressure regulating knob
7. Left needle thread tension dial
8. Right needle thread tension dial
9. Upper looper thread tension dial
10. Lower looper thread tension dial
11. Retractable support rod
12. Thread guide support
13. Open thread guide
14. Spool holder pin
15. Foam pad
16. Anti - vibration cone
17. Thread stand
18. Stitch length adjustment dial
19. Differential feed adjustment dial
20. Handwheel
21. Front cover
22. Machine socket
23. Main Power/Light switch
6
12
11
5
13
15
23
17
14
16
18
19
21
3
20
22
1
2
4
10
89
7
各部位的名称
1.弯针罩带定刀保护罩
2.弯针罩开闭手柄
3.缝台
4.顶罩
5.挑线杆护罩
6.压脚压力调节旋钮
7.左针夹线旋钮
8.右针夹线旋钮
9.上弯针夹线旋钮
10.下弯针夹线旋钮
11.可伸缩线架
12.线架帽
13.挂线导向
14.防摆动用线架插座
15.海绵垫
16.防摆动用线架
17.线架座
18.针距调节刻度盘
19.差动送布调节旋钮
20.手轮
21.前盖
22.电源插座
23.电源 / 照明开关

9
Details of the machine / 各部位的名称
Details of the machine
1. Thread cutter
2. Automatic needle threader
3. Presser foot lifter
4. Stitch plate
5. Presser foot
6. Upper knife
7. Needle clamp
各部位的名称
1. 切线刀
2. 自动穿针器
3. 抬压脚扳手
4. 针板
5. 压脚
6. 上刀
7. 针夹头
View with looper cover open
1. Selection lever for overlock-
ing or roll hemming
2. Cutting width adjusting dial
3. Upper looper
4. Lower looper
5. Threading hole
6. Air-control pushbutton
7. Threading changeover lever
8. Upper knife xing screw
9. Lower knife
10. Upper knife changeover knob
打开弯针罩后
1. 选择包缝或卷边缝扳手
2. 剪切宽度刻度调节盘
3. 上弯针
4. 下弯针
5. 穿线孔
6. 压力调节旋钮
7. 穿线转换扳手
8. 上刀固定螺丝
9. 下刀
10. 上刀转换扳手
Caution:
Be sure to turn off the power
switch before opening the
looper cover.
注意 : 在打开弯针罩前请务必关闭电
源开关。
1
3
4
7
6
5
2
10
1
9
34
8
2
6
5
7

10
Accessories
1. Needle set 130/705H
(SCHMETZ)
2. Screwdriver
3. Tweezers
4. Brush/needle inserter
5. Electronic foot control
6. Nets
7. Spool caps
8. Looper threader
9. Accessory bag
10. Dust cover
11. Waste collector
12. Oiler
附件
1.机针组件 130 / 705H(蓝狮)
2.螺丝刀
3.镊子
4.刷子 / 插针器
5.脚踏控制器
6.线团网
7.线团座
8.弯针线穿线钩
9.附件袋
10.防尘罩
11.集尘器
12.油壶
5
4
6
10
23
9
1
11
7
8
Details of the machine / 各部位的名称
Thread stand
Push the support rod rmly into the socket on the back of the ma-
chine.
Raise the support rod (A) fully, turning slightly until the position
catches engage. Position the thread guide (B) on the thread stand
so that the arrow is to the front.
线架
把线架杆完全插入在机器背后的槽内。
完全提升线架杆(A),慢慢将其转至位置。将线架帽(B)插入线架
杆顶部。注意线架帽上的箭头朝您。
AB
12

11
B
A
Preparing the machine / Using the machine
运转前准备 / 使用操作机器
Attaching the foot control
Plug foot control into the machine socket (A) and then into main
socket (B). The foot control regulates the sewing speed. The sewing
speed can be adjusted by increasing or decreasing the pressure on
the foot control.
“WARNING’’
This appliance has a polarized plug (one blade wider than the other).
To reduce the risk of electric shock, this plug is intended to t in a po-
larized main socket only one way.
If the plug does not t fully in the polarized main socket, reverse the
plug. If it still does not t, contact a qualied electrician to install the
proper polarized main socket. Do not modify the plug in any way. (for
USA, Canada only)
脚踏控制器的连接
将脚踏控制器的插头插入机器上的插座(A)并将其插入电源插座 (B)。
该脚踏控制器可控制缝制速度。用脚控制速度,踩浅为慢速,踩深为
快速。
Waste collector
Clip the waste collector into the opening on the looper cover. It catch-
es the cut-off fabric as you sew, keeping your working area neat and
tidy.
集尘器
将集尘器夹置在弯针罩板前。它可将你在缝制过程中产生的废料垃圾
收集起来,以保持你工作区域的整洁。

12
Preparing the machine / Using the machine
运转前准备 / 使用操作机器
Thread / cones / spools
The anti-vibration cone should be used
with the wider edge at the bottom on
the spool holder pin when sewing with
cones.
Thread net
If the threads slip and get twisted, cover
the looper spools with the net supplied in
the accessory bag.
Household spools
Remove the anti-vibration cones. Place
spools on spool holder pins and push
the spool caps on with the rounded side
downwards.
Large spools
If large industrial spools are used, posi-
tion the anti-vibration cone upside down
on the spool holder pin, i .e. with the wid-
er edge at the top.
缝线/线圈/线团
在缝制时,将线团放置到防摆动线架上。
大线团
如果要使用大号工业用线团,请将防摆动
用线架倒置插紧。
小号家庭用线团
请去掉防摆动用线架。将线团插入线架插
座,并装上线架帽使其凸起面向上。
线团网
如果缝线有滑动或扭曲,可将放置在附件
袋里的此线团网覆盖在弯针线团上。

13
Using the machine / 使用操作机器
Main Power/light switch
The main power/light switch is conve-
niently placed on the handwheel side of
the machine in front of the socket.
0 = Off
I = On with light
电源 / 照明开关
电源 / 照明开关被设置于机器侧面的手
轮下方,位于插座的前面,使用简便。
0= 关闭
I= 打开并灯亮
Looper cover
To open, press to the right with your thumb in the indent provided
and tilt the cover towards you. To close push it up and press lightly
to the right. The cover engages automatically.
Safety device: The sewing machine is equipped with a safety de-
vice in order to prevent malfunction. In any of the following cases,
the safety device works to prevent the sewing machine from run-
ning.
* When the looper cover is opened
* When the cloth plate is opened
* When the presser foot is raised
弯针罩板
打开 :将弯针罩板向右拉,并沿自己方向旋转。关闭 :将弯针罩板向
上翻,并轻轻向右一按,弯针罩板即自动关闭。
安全装置 :缝纫机上装有安全装置
为了防止故障的发生,在下列情况下,安全装置可以起到防止机器运
转而引发事故。
*当弯针罩板被打开时
*当缝台被打开时
*当压脚抬升时

14
Handwheel
The handwheel turns forward, i.e. in the same direction as on
a household sewing machine.
手轮
手轮要向前转动,家用缝纫机都是朝一个方向转。
Two step presser foot lifter with
integrated front foot lift
To raise the presser foot, lift the press-
er foot lever on the rear of the ma-
chine, until it engages (A). It can be
raised again to the maximum height
and held in this position to provide
more space between presser foot and
stitch plate (B).
When the foot is raised (A and B), the
front of the foot is automatically lifted.
Note: When the presser foot is raised,
all the tensions are released making it
easier to thread the machine.
压脚扳手的使用方法
通过压脚扳手即可使压脚抬升
通常情况下,压脚扳手抬升至 A 位置
在需要更换压脚或缝制厚料需要压脚与
针板之间释放出更多的空间时,可将压
脚扳手抬升至 B 位置。
注意 :一旦将扳手抬升至 A 位置时,夹
线片是处于打开状态,因此在穿线时请
务必抬升压脚。
* The needle is brought to its upper end by aligning the
“” marking on the side of the front cover with the “ ”
marking on the handwheel.
*将机罩侧面盖板上的” ”标记对准手轮上的“ “标
记后即可使机针处于最高位。
B
A
Using the machine / 使用操作机器

15
Using the machine / 使用操作机器
Changing the presser foot
•
Switch the machine off (power switch”0”) and deactivate the upper knife.
• Raise the presser foot.
• Turn handwheel towards you until needles are fully raised. Match the match-
ing up marks on handwheel and side cover.
Press the catch (C) to release the presser foot from the clamp. Raise the press-
er foot shank to the highest position (B) and remove the presser foot to the
left. To attach the presser foot, place it under the shaft. The groove in the shaft
should line up exactly with the presser foot pin (D). Lower the presser foot lift-
ing lever and check that the groove in the shank should line up exactly with the
presser foot pin (D). If it is not lined up, press the catch (C) to line up.
更换压脚
•关闭电源(电源开关“0”)
•抬升压脚
•朝自己的方向转动手轮,直至机针达到最高点。
按下 C 部,拆下压脚。
在安装压脚时,要将压脚扳手抬升至最高位(B),将压脚放置在其下方,将压脚
上的销对准压脚夹具的槽(D),一旦放下压脚扳手即可自动安装上去。
D
C

16
Using the machine / 使用操作机器
E
To carry out sewing without cutting the material
(the upper knife is deactivated)
Turn off the power switch before deactivating the upper knife.
1. Lower the upper knife changeover knob in the direction of the arrow.
2. Check to be sure that the knife is lowered.
Caution: To activate the upper knife, bring the upper knife changeover knob at
position E. Turn the handwheel by two revolutions by hand.
无需剪切面料进行缝制时(解除上切刀)
在解除上切刀时,请务必关闭电源。
1. 将上切刀切换旋钮往箭头方向下降。
2. 请确认上切刀是否已下降。
注 意 : 在使用上切刀时,将上切刀切换旋钮放置在 E 位置上,用手旋转手轮至少 2
圈以上进行确认。

17
Using the machine / 使用操作机器
8.5mm
10mm
How to use the presser foot
Use the marker on the presser foot as a guide when placing the material under
the presser foot.
(F) Left needle position
(G) Right needle position
(H) Knife position (when the lower knife adjusting knob is set at scale mark “1.5”)
The knife position represents the position at which the material is cut.
如何使用压脚
当面料放置在压脚下方时可使用有标记的压脚作为导向。
(F) 左针的位置
(G) 右针的位置
(H) 切刀位置(在下刀调节旋钮设置在刻度标记“1.5”处)
切刀的位置表示的是面料被切的位置。
F
G
H

18
Using the machine / 使用操作机器
Inserting the needles
Needles can be inserted quickly and easily with the practical needle inserter (A).
Switch the machine off (Power switch to “0”)
Disconnect machine from electricity supply.
Turn handwheel towards you until needles are fully raised. Match the match-
ing up marks on handwheel and side cover.
Lower the presser foot.
Using the small screwdriver, loosen the needle setscrews and remove the
needles (B).
Place the right-hand needle, at side towards the back, into the hole of the
needle inserter and insert the needle as far as possible into the needle clamp.
Tighten the setscrew lightly and then insert the left-hand needle in the same
way and tighten both setscrews (C).
更换机针
将机针插入插针器(A)处即可简便且迅速地安装完成。
关闭电源(电源开关到“0”)
朝着自己的方向转动手轮将机针提升到最高点。对准手轮及侧盖上的标记。
放下压脚。
用小螺丝刀松开固定螺丝并拆下机针(B)。
将右针平面朝后,将机针插到底碰到针夹头。
拧紧螺丝,然后轻轻插入左针以同样的方式并拧紧固定螺丝(C)。
A
B
C

19
Needle and thread / 机针和缝线
Needles
Needles must be in perfect condition.
Problems can occur if needles:
A are bent.
B are damaged or blunt.
C have hooked points.
A
BC
Needle and thread
The needle size used depends on the thread. The needles should be in accor-
dance with thread used.
When sewing, the thread is fed through the long groove in the needle. If the
needle is too ne, the thread does not t into the groove and stitches will be
skipped.
Use needles No. 70 - 90.
* It is recommended to use JLx2 needle, especially when sewing thick materi-
als, overlapped section, etc, with overlock machine.
机针和缝线
机针的型号取决于缝线。机针大小应该与缝线粗细相符。
在缝纫时,缝线会穿过机针上的针孔。如果机针太细的话,缝线将无法穿过针
孔或引发跳线。
机针型号为 Mo.70-90。
*推荐使用 JLx2 机针,特别是缝制厚料时,几层叠起的重叠部位以及包缝等
工序时较适宜。
机针
机针必须是完好无损。
机针如果发生如下问题则有可能会引
发故障 :
A弯曲。
B机针破损或是针尖磨损。
C有毛刺。
Other manuals for MO-1000
3
Table of contents
Other JUKI Sewing Machine manuals

JUKI
JUKI NA-11UT Series User manual

JUKI
JUKI MC37 User manual

JUKI
JUKI LK-1900AN Quick start guide

JUKI
JUKI DSC-244 User manual

JUKI
JUKI DDL-900B User manual

JUKI
JUKI HZL-35Z User manual

JUKI
JUKI AMB-289 User manual

JUKI
JUKI LU-1508N User manual

JUKI
JUKI DDL-9000C-F Series User manual

JUKI
JUKI MS-1261/V045 User manual