Jura F2300 User manual

en
fr
it
nl
es
pt
sv
no
pl
ru
cs
de
de JURA-Wasserfiltersystem
Bedienungsanleitung
en JURA water-filtering system
Instructions for use
fr Système de filtrage d’eau JURA
Mode d’emploi
it Sistema di filtraggio dell’acqua JURA
Istruzioni per l’uso
nl JURA waterfiltersysteem
Gebruiksaanwijzing
es Sistema de filtrado de agua de JURA
Modo de empleo
pt Sistema de filtragem de água JURA
Manual de instruções
sv JURA-vattenfiltersystem
Bruksanvisning
no JURA-vannfiltersystem
Instruksjonsbok
pl System filtrowania wody JURA
Instrukcja obsługi
ru Система фильтрации воды JURA
Руководство по эксплуатации
cs Systém vodních filtrů JURA
Návod kobsluze

2
JURA water-filtering system
Component overview
1 Filter head with wall mounting bracket
2 Filter cartridge (F2300/F3300/F5300)
3 Flush pipe connection
4 Flush valve
5 Bypass setting
6 Inlet
7 Outlet
8 Insertion marker
9 Filter cartridge marker
10 Operation marker
Contents
Component overview ................................................................. 2
1 General information / Use ..................................................... 3
2 Specific information .............................................................. 3
2.1 Personnel...................................................................................... 3
2.2 Disclaimer..................................................................................... 3
2.3 Safety information...................................................................... 3
3 Function................................................................................. 3
4 Installation / setting .............................................................. 3
4.1 Safety-related installation instructions................................... 3
4.2 Information on initial installation ............................................ 3
4.2.1 Installing the filter head with wall mounting bracket and
filter cartridge ..............................................................................4
4.2.2 Replacing a filter cartridge ........................................................4
4.2.3 Setting the bypass level.............................................................4
4.2.4 Determining the filter capacity ................................................4
5 Service / maintenance ...........................................................4
6 Technical data........................................................................5
7 Order data.............................................................................. 5
8 Capacities in litres .................................................................5
9 JURA contact details / legal information............................... 5
6
7
5
4
3
1
2
8 10
9

3
JURA water-filtering system
en
fr
it
nl
es
pt
sv
no
pl
ru
cs
de
1 General information / Use
The JURA water-filtering system was designed especially for JURA
coffee machines. It has a modular structure and comprises of an
innovative multi-functional filter head with a family of compatible
filter cartridges which offer various performance settings. The
system family was designed especially for specific applications in
the vending sector. Thanks to their compact design, the filter
systems can be installed and operated almost anywhere – be that
in a vertical or horizontal position, free-standing or mounted.
The filter cartridges are available in three sizes:
ZF2300
ZF3300
ZF5300
The filter head with wall mounting bracket can be used for all three
sizes.
2 Specific information
2.1 Personnel
The filter system may only be installed and serviced by trained and
authorised personnel.
2.2 Disclaimer
All rights reserved. The printed information is the latest informa-
tion at the time of publication and is not considered to be binding.
Although the utmost care was taken when writing these instruc-
tions for use, errors or incomplete information cannot be ruled out.
We do not accept any responsibility for the validity, correctness
and completeness of the information provided. The tables and
images contained in these instructions for use are to be used for
information purposes only.
JURA Elektroapparate AG does not accept liability for any damage
including secondary damage which may result from incorrect
installation or improper use of the products. JURA Elektroapparate
AG does not accept liability for damage resulting from the use of
components of other manufacturers.
2.3 Safety information
ZOnly supply the system with cold water of the same quality as
potable water.
ZStore the components in a dry place within a temperature range
of -15 to +45°C.
ZDo not use water that is microbiologically contaminated or that
is of unknown microbiological quality without prior sufficient
disinfection.
ZOnly use the system in a location which is protected from frost
and direct sunlight.
ZThe system must not come into contact with chemicals, solvents
and other vapours.
ZBefore commissioning the filter system, the automatic coffee
machine connected to the supply must be free of limescale.
ZThe filter cartridge must not be opened or display any signs of
mechanical damage.
ZReplace the filter cartridge after a very long period of downtime.
ZReplace the filter head with wall mounting bracket after 5 years
of operation and at the latest 6 years after its production date.
This also applies to pipes and seals. Pay attention to the date on
the production stamp in this case.
ZRinse the system thoroughly after a longer period of downtime
or after maintenance has been carried out – see the following
table:
Filter
cartridge
Quantity of rinse water
after 1 week of
downtime
Quantity of rinse water
after 4 weeks of
downtime
F2300 5 l 25 l
F3300 8 l 40 l
F5300 12 l 60 l
3 Function
The JURA water-filtering system uses an ion-selective filter medium
in the flow to reduce the carbonate hardness of potable water.
The DuoBlend® bypass valve in the filter head can be used to adapt
the hardness of the filtered water to the quality of the local potable
water and the automatic coffee machine used. We always recom-
mend bypass level 1.
The filter material also forms bonds with heavy metal ions such as
lead, copper and cadmium. The integrated active carbon block
reduces undesirable cloudiness, organic impurities, odour and
taste as well as chlorine residue in the filtrate and bypass water.
4 Installation / setting
4.1 Safety-related installation instructions
ZIf the system pressure is greater than 8 bar, a pressure reducer
must be connected upstream to the water-filtering system.
ZA shut-off valve must be installed upstream of the water-filtering
system.
ZNo copper pipes, galvanised or nickel-coated pipes or connect-
ors may be installed between the water-filtering system and the
automatic coffee machine.
ZAll components must be installed according to
country-specific guidelines.
ZThe standard ‘DIN 1988’ must be observed when installing and
operating the system.
ZOnly use original accessory pipes for the JURA water-filtering
system as these have a longer thread.
ZIf the filter cartridge is removed from the filter head without
being replaced by a new one, the water supply to the filter head
must be shut off.
ZDo not connect anything to the flush pipe or flush valve.
4.2 Information on initial installation
ZFirstly, identify a suitable place to install the filter system. Note
the information provided in chapter 2.
ZBefore you start installing the system, shut off the water supply
and disconnect the automatic coffee machine from the power
supply.
ZBefore installation, check the filter system and the
accessories for any damage. Particular attention must be paid
when inspecting the O-rings and seals.

4
JURA water-filtering system
ZIf the filter cartridge has been stored below 0 °C, it must be
stored at the ambient temperature of the installation location for
at least 24 hours before installation.
EThe pipes for the supply and discharge lines are not supplied as
standard but can be ordered as accessories. You will find more
information in chapter 7.
4.2.1 Installing the filter head with wall mounting
bracket and filter cartridge
EThe system can be operated in a free-standing position,
wall-mounted in a vertical position or horizontally.
TIf mounting to a wall: Securely fasten the wall mounting bracket
to the wall using suitable screws (not supplied as standard). The
dowels and screws must be selected in accordance with the con-
dition of the wall.
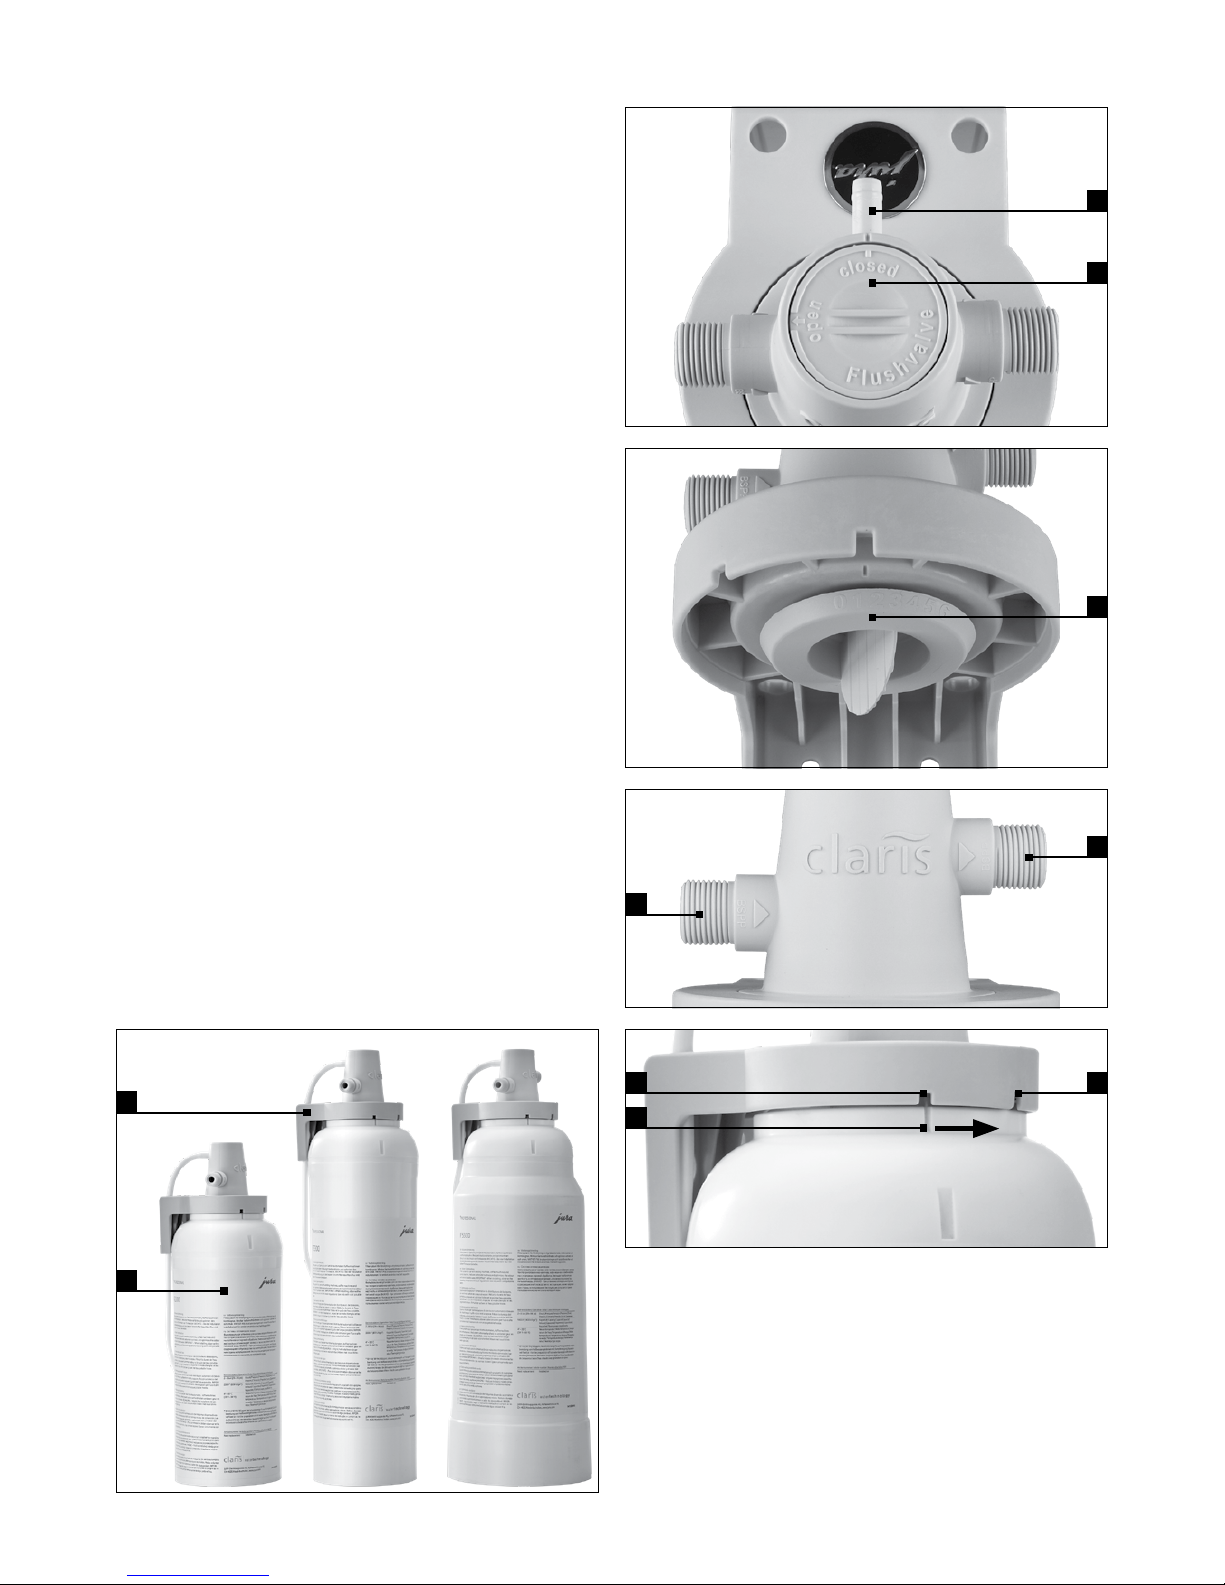
TInstall the water inlet and outlet pipes at the filter head. When
doing so, please note the following points:
ZNote the direction of flow (see markings on the filter head)
ZMax. torque when using genuine CLARIS connection pipes
(accessory): 10 Nm.
ZFilter heads with 3/8" threaded connections must only use
connectors with flat seals. Do not use pipes or adapters with
conical screw connections, as they damage the connections
and invalidate any warranty claims.
ZOnly use screw adapters of a suitable type and appropriate
length. When unscrewed, they must not rest axially on the
filter head. Unsuitable adapters can damage the connections
and invalidate any warranty claims.
TDirect the flush pipe into a suitable container (e.g. bucket) or
into a drain and open the flush valve (4).
TTurn on the water supply again.
TInsert the filter cartridge into the filter head. Take note of the
insertion marker (8) on the filter head and the marker on the fil-
ter cartridge (9).
TTwist the filter cartridge anti-clockwise until the end position is
reached. The marker on the filter cartridge should now be in line
with the operation marker (10) on the filter head. This vents the
system and flushes the filter cartridge (F2300/F3300 > 10 l,
F5300 > 15 l).
TClose the flush valve.
The water-filtering system is now ready for use.
TAfter installing the system and inserting or replacing a filter
cartridge, check all components for leaks. Water must not
escape from any point.
4.2.2 Replacing a filter cartridge
TPlace a container under the flush pipe.
While the filter cartridge is being replaced, the automatic coffee
machine and the water supply line are hydraulically disconnec-
ted from the filter head and the system depressurises.
Minimum quantities of water may therefore escape from the
flush pipe due to peaks in pressure.
TSlowly unscrew the used filter cartridge in an anti-clockwise
direction.
This will unlock it from the filter head and allow it to be removed.
TDirect the flush pipe into a suitable container (e.g. bucket) or
into a drain and open the flush valve (4).
TRemove the new filter cartridge from its packaging and check it
for damage.
TInsert the filter cartridge into the filter head. Take note of the
insertion marker (8) on the filter head and the marker on the fil-
ter cartridge (9).
TTwist the filter cartridge anti-clockwise until the end position is
reached. The marker on the filter cartridge should now be in line
with the operation marker (10) on the filter head. The flow in the
filter head is reopened and the system is vented and flushed via
the flush system (F2300/F3300 > 10 l, F5300 > 15 l).
EThe flush water will be milky or cloudy at first. This is due to the
dispersing air and will not take long to clear.
EPay attention to the position of the label when inserting the fil-
ter cartridge. The label should face forwards so that all of the
necessary information is visible.
TClose the flush valve.
The water-filtering system is now ready for use again.
TAfter replacing the filter cartridge, check all
components for leaks. Water must not escape from any point.
4.2.3 Setting the bypass level
EWhen using the water-filtering system, we always recommend
bypass level 1.
4.2.4 Determining the filter capacity
Based on the local carbonate hardness of the mains water and of
bypass level 1, use the tables in chapter 8 to identify the resultant
filter cartridge capacity.
Please enter the installation date and time of replacement in the
corresponding fields (on which it is possible to write in pen) on the
filter cartridge label.
5 Service / maintenance
The system will only function safely and reliably if the filter cart-
ridge is replaced on a regular basis. The replacement cycles depend
on the carbonate hardness of the potable water, the application
and the set bypass level (we always recommend bypass level 1).
We recommend replacing the filter cartridge after 6 months and
no later than after 12 months.
The operator must check the system for leaks everyday.
When replacing the filter cartridge, check all parts for impurities
and damage. Damaged parts must be replaced and impurities
removed.

5
JURA water-filtering system
en
fr
it
nl
es
pt
sv
no
pl
ru
cs
de
6 Technical data
Dimensions F2300 F3300 F5300
Total system height (in mm) 410 525 525
Filter cartridge height (in mm) 260 475 475
Filter cartridge diameter (in mm) 136 136 175
Minimum distance to ground
(in mm)
40 40 40
Weight (in kg) 3.2 4.3 6.5
Operating data
System pressure (without pressure surges) 2–8 bar
Water temperature / ambient temperature 4–30°C
7 Order data
Article numbers F2300 F3300 F5300
Filter cartridge 24099 24100 24101
Filter head le/ri 3/8" 24098
CLARIS connection pipe
3/8" × 3/8"
69539
8 Capacities in litres
ECapacities always refer to bypass level 1.
°KH (in °dH) F2300 F3300 F5300
4 5830 8330 13350
5 4665 6660 10650
6 3890 5550 8880
7 3335 4760 7620
8 2920 4170 6680
9 2590 3700 5950
10 2335 3330 5330
11 2120 3030 4850
12 1945 2780 4450
13 1795 2560 4100
14 1665 2380 3810
15 1555 2220 3550
16 1460 2080 3330
17 1370 1960 3130
19 1225 1750 2800
21 1110 1585 2535
23 1010 1445 2315
26 895 1280 2045
29 800 1145 1830
33 700 1000 1600
38 610 875 1400
9 JURA contact details / legal
information
JURA Elektroapparate AG
Kaffeeweltstrasse 10
CH-4626 Niederbuchsiten
Tel. +41 (0)62 38 98 233
www.jura.com
We reserve the right to make technical changes.
JURA-WFS/de-cs/201808
This manual suits for next models
2
Table of contents
Other Jura Water Filtration System manuals