Just Kampers Pop Up 365 User manual

0845 1204582
www.justkampers.com
JK part numbers:
J20264
Just Kampers, Unit 1 Stapeley Manor, Long Lane, Odiham, Hants. RG29 1JE
NB. Please note that whilst every attempt is made to ensure that these instructions are as
accurate and clear as possible, we cannot be held responsible for misinterpretation of these
instructions or for any subsequent accident or damage caused through mis-fitted parts.
Tech Sheet
Spot Colour Pantone 653
Spot Colour P653/P151
Spot Colour White out
4 Colour Blue
4 Colour White out
4 Colour Blue/Orange
Black
White
Spot Colours
Process Colours
Please Read Me!
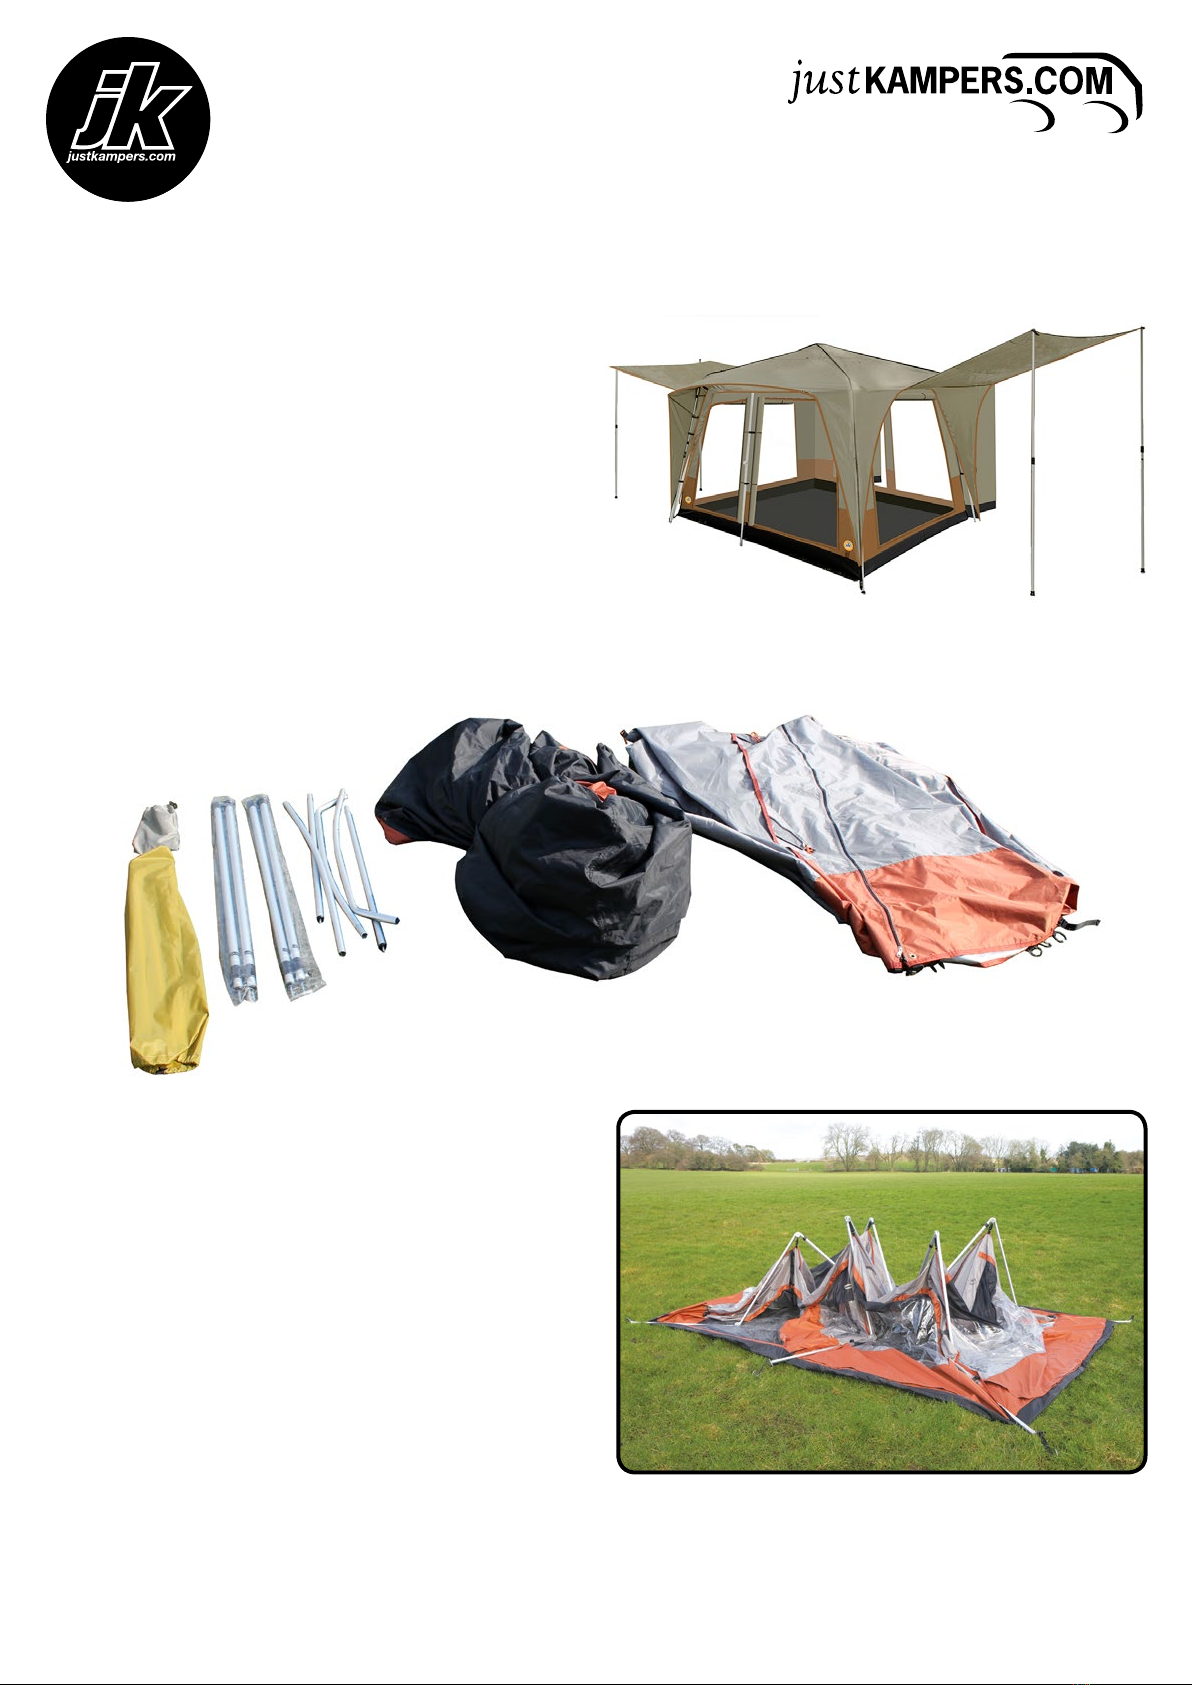
Congratulations on the purchase of your new Just Kampers Pop-Up 365 Awning.We are sure you will enjoy this great
new concept in camping.
As with any new purchase, there are important elements you will not be familiar with and some of these can actually
be critical to protecting your investment.We want to help you as much as possible to get to grips with how to erect
the Pop-Up 365 without damaging it or yourself. So please read the following as failure to do so will invalidate your
12 month warranty.
Here are 10 helpful tips to help you along the way.
1. Don’t listen to anyone who tells you that reading and following instructions is uncool. Listen to us as we want to help!
2. Always take care transporting your awning - never throw or drop it. Doing so can and probably will damage your awning.
3. It’s a good idea to practice pitching your awning in the garden a few times before actually heading off and using
it, as it will become quicker and easier each time you do it. An added bonus to this is that you will look like a true
professional when you set it up at a campsite.
4. We’d recommend packing your tent last in your camper van, so you can unpack it easily when you arrive at your
destination or back home.
5. Do not attempt to set up your JK Pop-Up 365 in high winds. The chances of causing severe damage are high. This
is an awning not a hang-glider!
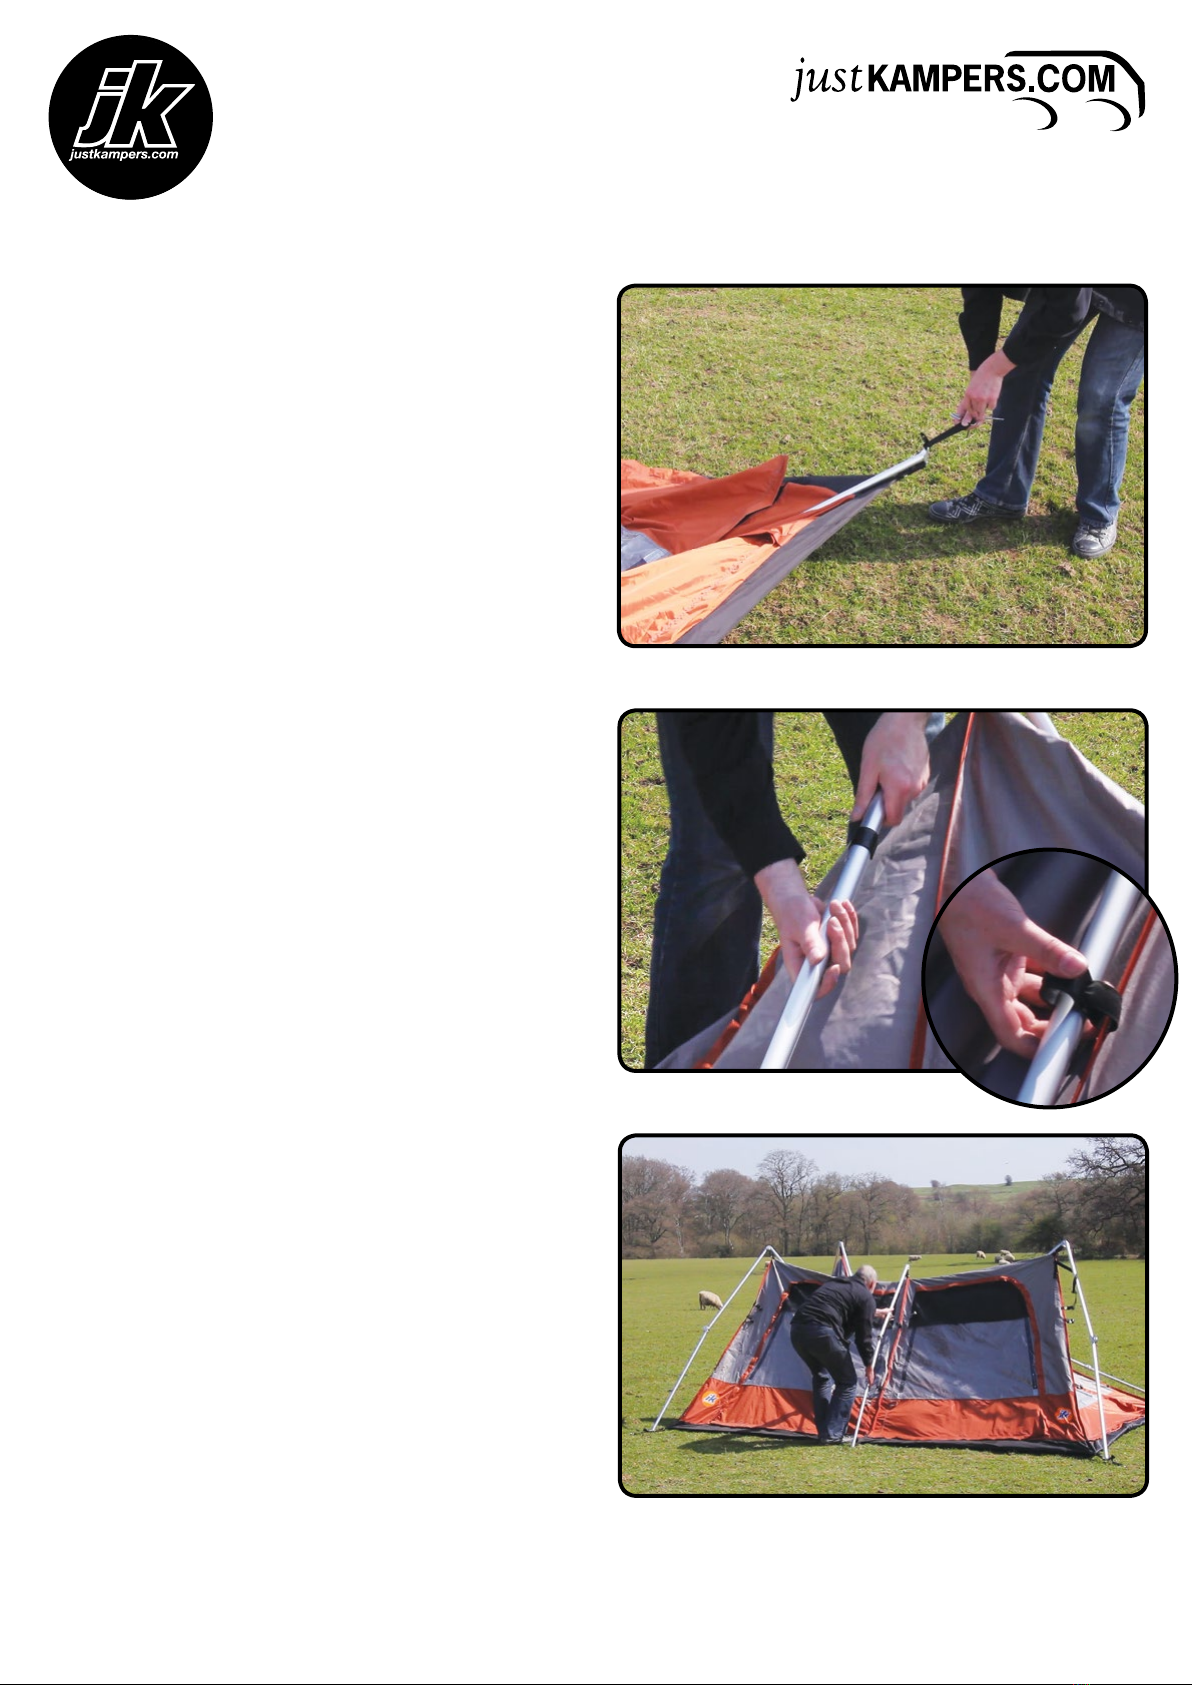
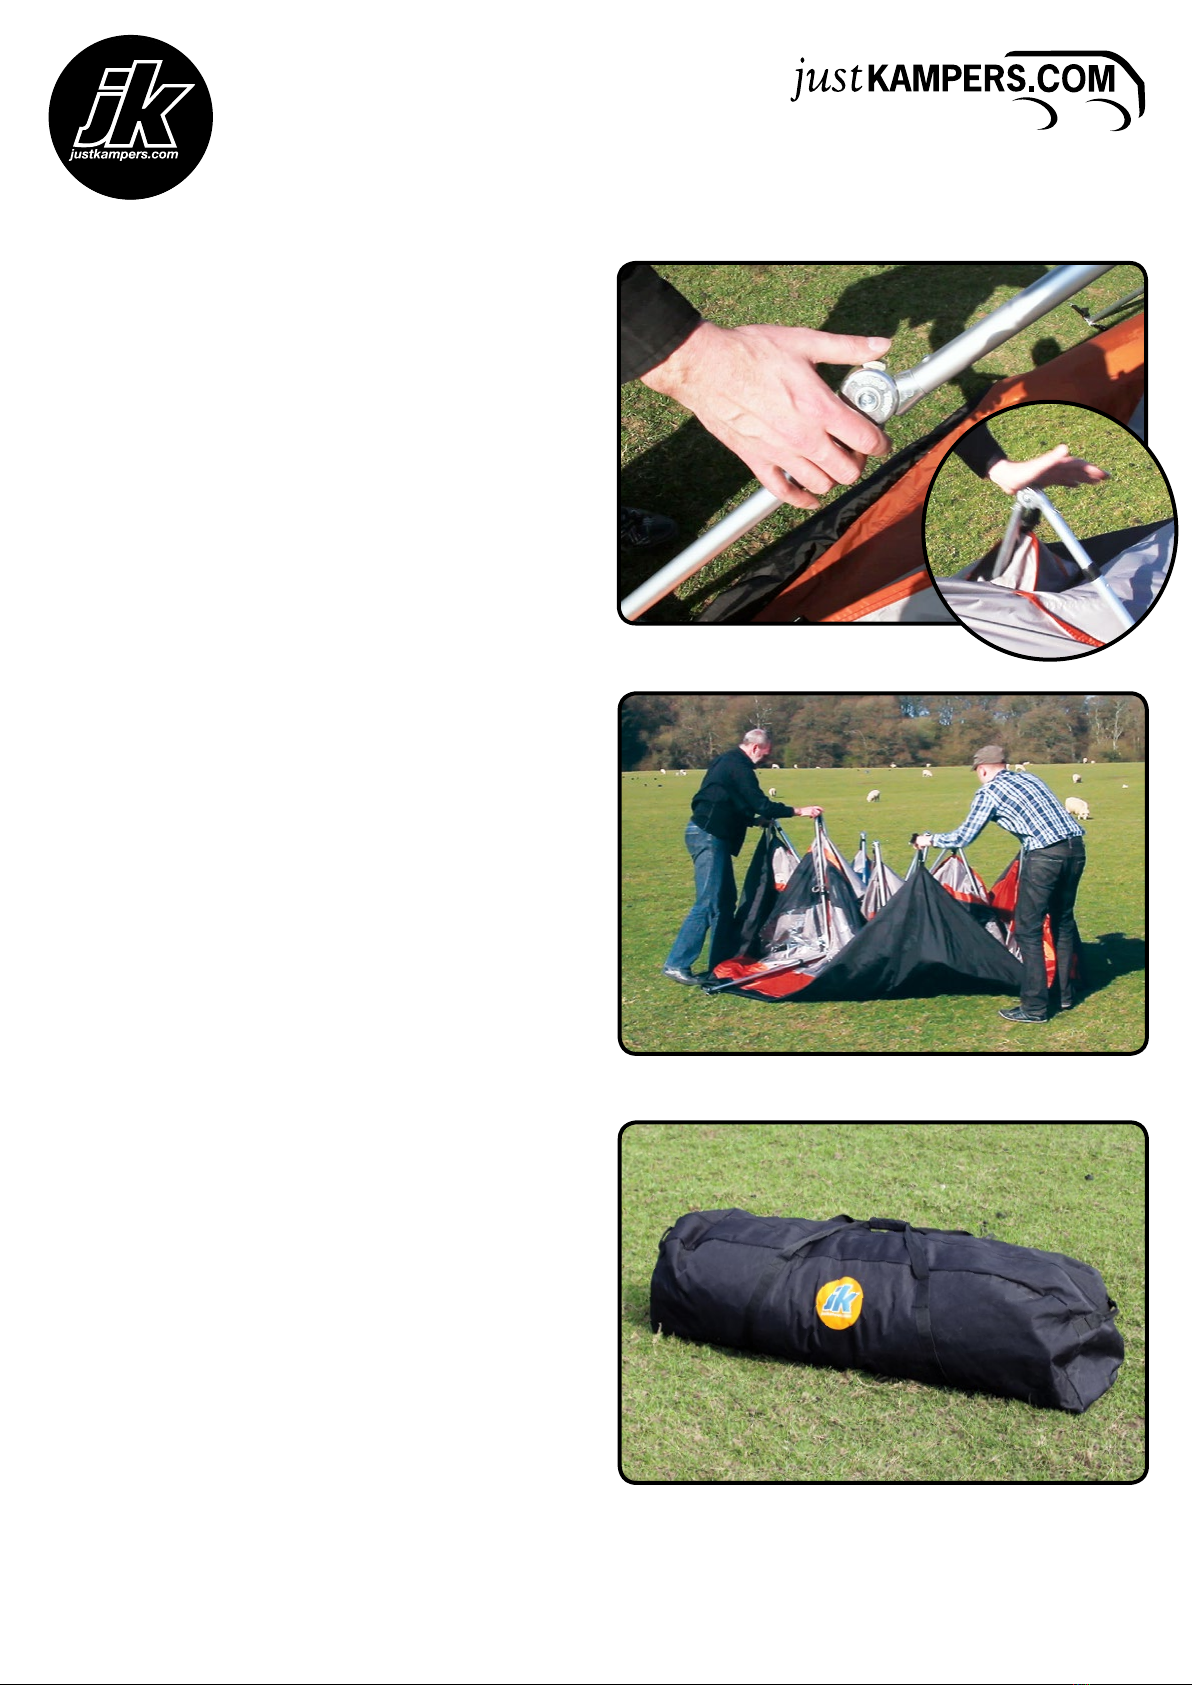
6.We highly recommend that two people carry out the erection of the awning - whilst we have designed it to be very
easy to use, it is a large awning and therefore the fly sheet will be easier to fit over the main tent with two people.
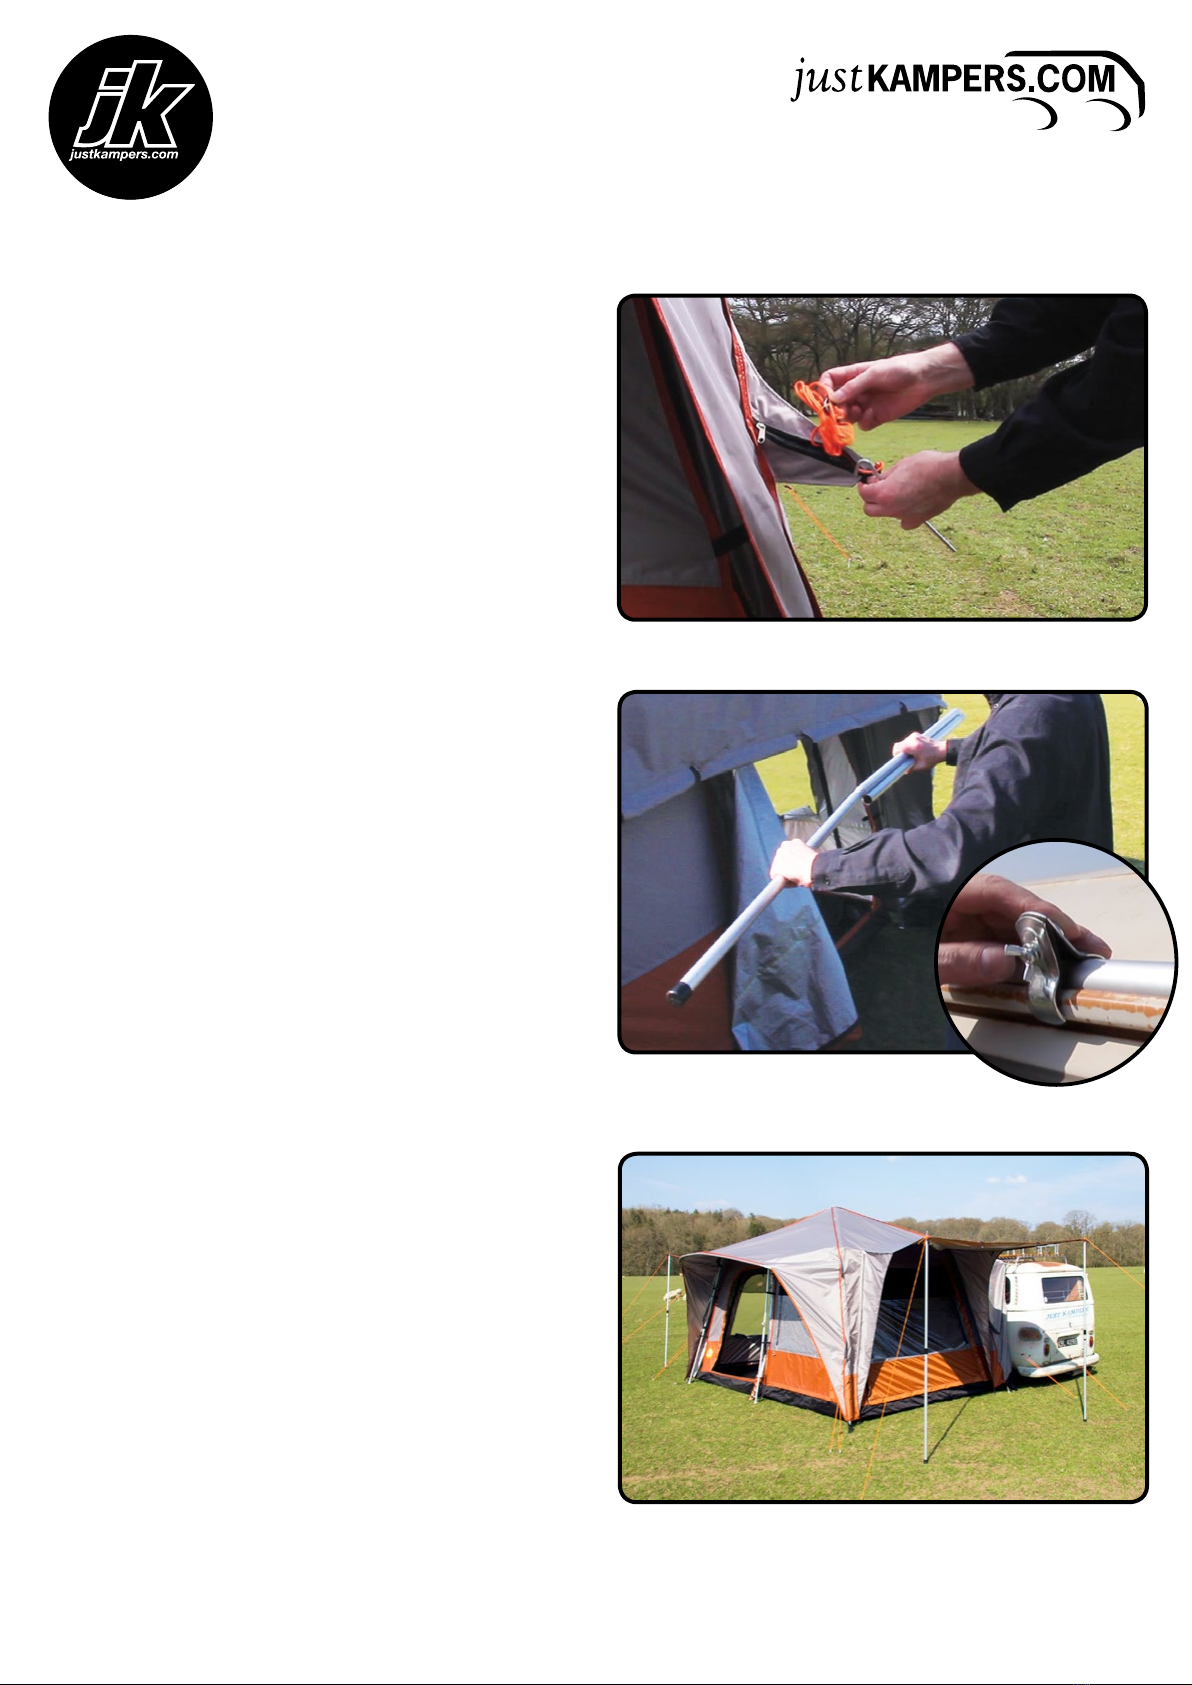
7.The flysheet must be fitted with the lower black skirts to the opposite side to the JK logos on the main tent.
8. Always be cautious with all fixtures and fittings, if you have to use force at any time - STOP! You should not have
to force anything and could be causing critical damage.You may find the spring clips on the extendable sliding poles
need patience rather than brute force.
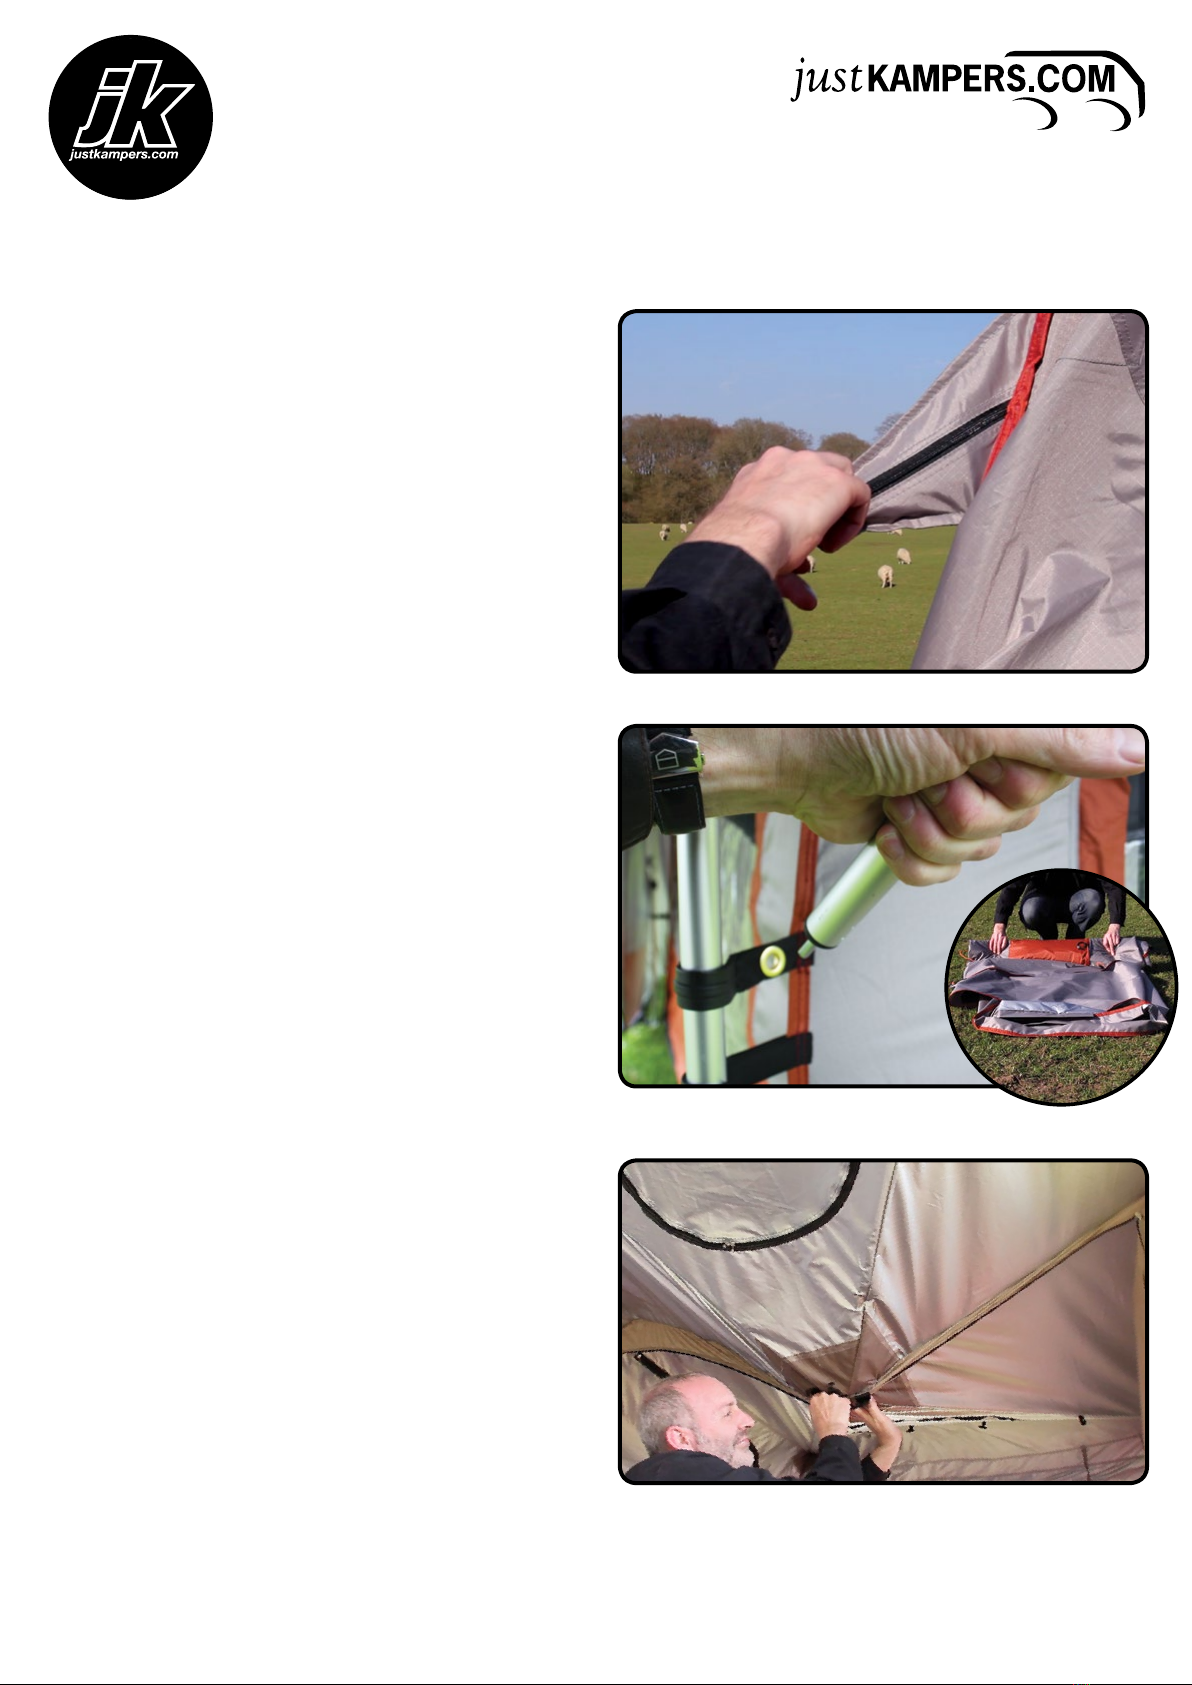
9. Never try to disassemble the porch frame until you have unclipped the flysheet and unpegged the flysheet - if you
do not adhere to this ruling you could easily rip the flysheet with the pin on the end of the straight arms of the five
piece porch frame due to the tension on the arms. The onus is on you to follow this instruction as failing to do so
could ruin your flysheet!
10. Always pack down and pack away your awning with care. Make sure it’s clean and dry before you pack it away as
failure to do so could mean the fabric will suffer from mildew. Finally when releasing the central Pop-Up mechanism
make certain you DO NOT stand with your head directly underneath it as when released, it will Pop-Down with
considerable force, so stand to one side.
Now, please refer to point one again and then turn over for the full instructions.
Happy Kamping!
Mark Reynolds and the JK team
JK Pop Up 365 Awning

0845 1204582
www.justkampers.com
JK part numbers:
J20264
OEM part number:
Not applicable
1. Choose an even flat surface free from debris
and sharp objects.
Remove the awning from its bag.
Un-clip the retaining strap from around the
frame and store the strap for packing down.
Place the awning end down with the poles
facing up.
1. Place awning end down with poles facing up
Just Kampers, Unit 1 Stapeley Manor, Long Lane, Odiham, Hants. RG29 1JE
NB. Please note that whilst every attempt is made to ensure that these instructions are as
accurate and clear as possible, we cannot be held responsible for misinterpretation of these
instructions or for any subsequent accident or damage caused through mis-fitted parts.
Tech Sheet
Spot Colour Pantone 653
Spot Colour P653/P151
Spot Colour White out
4 Colour Blue
4 Colour White out
4 Colour Blue/Orange
Black
White
Spot Colours
Process Colours
Thank you for purchasing our JK Pop Up 365 awning.
Please read these instructions to ensure a quick and easy
set up with your new awning.
Before you start
Before setting off on holiday we recommend erecting the
awning to familiarise yourself with the product.
BE CAUTIOUS OF ERECTINGTHE AWNING IN HIGHWINDS!
IMPORTANT: please read the packing down instructions as
failure to do so may result in damage to the awning.
Page 1 of 7
The awning kit contains:
(a)= awning rail; 3 pieces, (b)= tent pegs, (c)= 4x sun canopy poles , (d)= porch poles; 5 pieces, (e)= awning, (f)= flysheet
JK Pop Up 365 Awning
(a)
(b) (c) (d)
(e)
(f)

0845 1204582
www.justkampers.com
JK part numbers:
J20264
OEM part number:
Not applicable
Just Kampers, Unit 1 Stapeley Manor, Long Lane, Odiham, Hants. RG29 1JE
NB. Please note that whilst every attempt is made to ensure that these instructions are as
accurate and clear as possible, we cannot be held responsible for misinterpretation of these
instructions or for any subsequent accident or damage caused through mis-fitted parts.
Tech Sheet
Spot Colour Pantone 653
Spot Colour P653/P151
Spot Colour White out
4 Colour Blue
4 Colour White out
4 Colour Blue/Orange
Black
White
Spot Colours
Process Colours
Page 2 of 7
3. Extend roof poles, attach clips.
4. Straighten all six legs so lower knuckles lock in place.
3. On the four outer legs extend the roof bars
until they lock into position.
Attach the four black plastic clips on the roof
to the extended poles.
4. Straighten all six legs so the lower knuckles
lock into place.
2. Unfold the tent and pull the corners out to
position so the floor area is taut, peg out the
four corners and two centre rings at the base
of each leg.
2. Unfold awning and pull corners taut, then peg down.

0845 1204582
www.justkampers.com
JK part numbers:
J20264
OEM part number:
Not applicable
Just Kampers, Unit 1 Stapeley Manor, Long Lane, Odiham, Hants. RG29 1JE
NB. Please note that whilst every attempt is made to ensure that these instructions are as
accurate and clear as possible, we cannot be held responsible for misinterpretation of these
instructions or for any subsequent accident or damage caused through mis-fitted parts.
Tech Sheet
Spot Colour Pantone 653
Spot Colour P653/P151
Spot Colour White out
4 Colour Blue
4 Colour White out
4 Colour Blue/Orange
Black
White
Spot Colours
Process Colours
Page 3 of 7
6. Position flysheet over the awning.
7. Unpack the five porch poles and assemble.
6. Unfold the flysheet and position it over
the top of the awning (requires two people).
Make sure the awning tunnel (black skirts) is
positioned on the side WITHOUT the JK Logo.
At each corner attach the clip on the flysheet
to the corresponding clip at the base of each
leg and adjust to tension the flysheet.
Attach the two Velcro tabs found on the four
outer legs.
7. Unpack the five poles for the front porch.
Attach the two curved end pieces to the
centre span, creating a three piece porch pole.
5. Unzip the entrance door and step inside,
push the centre hub upwards from underneath,
this will ‘pop’ into position.
Zip shut the entrance door as you exit.
Attach the remaining clip straps found at each
leg.
5. Step inside, push up centre hub -
it will ‘pop’ into place. Attach leg clips.

0845 1204582
www.justkampers.com
JK part numbers:
J20264
OEM part number:
Not applicable
Just Kampers, Unit 1 Stapeley Manor, Long Lane, Odiham, Hants. RG29 1JE
NB. Please note that whilst every attempt is made to ensure that these instructions are as
accurate and clear as possible, we cannot be held responsible for misinterpretation of these
instructions or for any subsequent accident or damage caused through mis-fitted parts.
Tech Sheet
Spot Colour Pantone 653
Spot Colour P653/P151
Spot Colour White out
4 Colour Blue
4 Colour White out
4 Colour Blue/Orange
Black
White
Spot Colours
Process Colours
Page 4 of 7
9.The porch pole must be positioned centrally.
10. CAREFULLY insert the pins on the
end sections into the holes on both leg straps.
9. BEWARE! The porch pole assembly MUST
be positioned centrally in the pocket or there
will be uneven tension when inserting the end
pins, risking damage to the awning.
10. Attach the two end sections to the porch
pole and then CAREFULLY insert the pins on
the end sections into the holes on both leg
straps.
This requires two people and some care to
avoid damaging the awning.
8. CAREFULLY push the porch pole through
the pocket on the leading edge of the porch.
This requires some patience!
8. Push the porch pole through the porch pocket.

0845 1204582
www.justkampers.com
JK part numbers:
J20264
OEM part number:
Not applicable
Just Kampers, Unit 1 Stapeley Manor, Long Lane, Odiham, Hants. RG29 1JE
NB. Please note that whilst every attempt is made to ensure that these instructions are as
accurate and clear as possible, we cannot be held responsible for misinterpretation of these
instructions or for any subsequent accident or damage caused through mis-fitted parts.
Tech Sheet
Spot Colour Pantone 653
Spot Colour P653/P151
Spot Colour White out
4 Colour Blue
4 Colour White out
4 Colour Blue/Orange
Black
White
Spot Colours
Process Colours
Page 5 of 7
12. Assemble awning pole, push through
pocket on awning and clamp to vehicle gutter.
13.The completed awning with sun canopies extended!
12. To the rear of the awning position your
vehicle 2ft (60cms) from the edge of the legs.
Unpack the three small diameter poles that
make up the awning pole and assemble.
Push this through the pocket on the leading
edge of the awning tunnel and place in your
vehicle gutter using three gutter clamps to
secure this in place. (Alternatively use a figure
of 8 or awning rail).
Pull the two elasticated end panels into place
and peg down the elasticated loops on each
corner.
13. Finally, if you wish to make use of the sun
canopies, do the following;
Unzip the sides of the flysheet.
Extend the sun canopy poles and twist to lock.
Insert the pin ends of the poles through the
holes in the corners of the awning side panel.
Loop the guy ropes over the pins and tension
the guys diagonally so that the canopy is taut
and able to support itself.
11. Before proceeding, make sure the awning
doors are zipped shut.
Unzip from the storage pouch and peg out the
two guy ropes on each outer leg diagonally
from the awning corner.
Peg out the remaining elasticated pegging
hoops.
11. Place awning end down with poles facing up.

0845 1204582
www.justkampers.com
JK part numbers:
J20264
OEM part number:
Not applicable
Just Kampers, Unit 1 Stapeley Manor, Long Lane, Odiham, Hants. RG29 1JE
NB. Please note that whilst every attempt is made to ensure that these instructions are as
accurate and clear as possible, we cannot be held responsible for misinterpretation of these
instructions or for any subsequent accident or damage caused through mis-fitted parts.
Tech Sheet
Spot Colour Pantone 653
Spot Colour P653/P151
Spot Colour White out
4 Colour Blue
4 Colour White out
4 Colour Blue/Orange
Black
White
Spot Colours
Process Colours
Page 6 of 7
2. CAREFULLY remove end poles and
slide out porch pole. Remove and fold up flysheet.
3. Unfasten ‘C’ clips and Velcro from the frame, go inside
and pull down the handle to collapse the awning.
2. Before proceeding MAKE SURE ALL GUYS
HAVE BEEN RELEASE AND PACKED AWAY!
CAREFULLY remove the porch end pins, failure
to do so could result in tearing the awning
fabric.
Now remove the end sections and then remove
the porch pole from the porch and disassemble.
Remove the fly sheet and fold up ready to fit in
the carry bag.
3. Before proceeding MAKE SUREALLWINDOW
FLAPS AND DOORS ARE ZIPPED UP!
IMPORTANT: Unfasten the clips andVelcro tags
from the frame (failure to do this may result in
damage to the pop mechanism!)
Go inside the awning, grab the pull handle in
the centre of the roof and pull down - AVOID
STANDING DIRECTLY BENEATH THE CENTRE
HUB ASYOU PULL IT DOWN!
Once the roof is down, exit the awning and zip
up the door.
1. Before packing down make sure the awning
is dry, otherwise mildew may form.
Remove the gutter clamps from your vehicle,
extract the three part pole and disassemble.
If the sun canopies are in use release the guys,
remove the poles and zip up the awning sides.
Remove the pegs from the elasticated pegging
loops and from the guy ropes, but leave the
corner ground pegs in for now. Roll up and
return the guys to the zipped pockets.
Undo the four clips andVelcro tags on each leg. 1. Remove guys, undo four leg clips and Velcro tags.
Packing down

6. Pack poles and pegs into the bag first, followed by the
awning with the flysheet on top.
6. The awning poles and pegs should go in
the bag first followed by the awning with the
flysheet on top.
Make sure sharp parts such as pegs don’t cut
or rub the material during storage/transport.
5. Remove the six pegs from the ground sheet
and fold all six legs to the centre.
Neatly wrap the canvas around the legs and
secure with the retaining strap.
5. Fold legs to centre, wrap canvas around legs and
secure with retaining strap.
0845 1204582
www.justkampers.com
JK part numbers:
J20264
OEM part number:
Not applicable
Just Kampers, Unit 1 Stapeley Manor, Long Lane, Odiham, Hants. RG29 1JE
NB. Please note that whilst every attempt is made to ensure that these instructions are as
accurate and clear as possible, we cannot be held responsible for misinterpretation of these
instructions or for any subsequent accident or damage caused through mis-fitted parts.
Tech Sheet
Spot Colour Pantone 653
Spot Colour P653/P151
Spot Colour White out
4 Colour Blue
4 Colour White out
4 Colour Blue/Orange
Black
White
Spot Colours
Process Colours
Page 7 of 7
4. On the outside press the release buttons on
all six lower knuckles and fold the legs in.
On the four outer roof bars press in the release
buttons and push the poles back into the
closed position.
Remove roof clips.
4. Release lower knuckles, fold legs.
Release roof bar buttons and push in.
This manual suits for next models
1
Table of contents
Other Just Kampers Accessories manuals