JVC KW-AVX730 User manual

ENGLISH
DEUTSCHFRANÇAIS
NEDERLANDS
For canceling the display demonstration, see page 4.
Zum Abbrechen der Displaydemonstration siehe Seite 4.
Pour annuler la démonstration des affichages, référez-vous à la page 4.
Zie bladzijde 4 voor het annuleren van de displaydemonstratie.
KW-AVX830/KW-AVX730
For installation and connections, refer to the separate manual.
Für den Einbau und die Anschlüsse siehe das eigenständige Handbuch.
Pour l’installation et les raccordements, se référer au manuel séparé.
Bijzonderheden over de installatie en aansluiting van het apparaat vindt u in de desbetreffende handleiding.
INSTRUCTIONS
BEDIENUNGSANLEITUNG
MANUEL D’INSTRUCTIONS
GEBRUIKSAANWIJZING
LVT2086-003A
[E]
DVD RECEIVER WITH MONITOR
DVD-RECEIVER MIT MONITOR
RÉCEPTEUR DVD ET MONITEUR
DVD-RECEIVER MET MONITOR
• Only for KW-AVX830: To use the Bluetooth function, insert the Bluetooth adapter (KS-UBT1). (See page 36.)
•
Nur bei KD-AVX830: Zur Verwendung der Bluetooth-Funktion setzen Sie den Bluetooth-Adapter (KS-UBT1) ein. (Siehe Seite 36).
• Uniquement pour le KW-AVX830: Pour utiliser la fonction Bluetooth, insérez l’adaptateur Bluetooth (KS-UBT1). (Voir page 36.)
•
Alleen voor de KW-AVX830: Voor het gebruik van de Bluetooth functie, plaats de Bluetooth adapter (KS-UBT1). (Zie bladzijde 36.)
Dear Customer,
This apparatus is in conformance with the valid European
directives and standards regarding electromagnetic
compatibility and electrical safety.
European representative of Victor Company of Japan, Limited
is:
JVC Technical Services Europe GmbH
Postfach 10 05 04
61145 Friedberg
Germany
Cher(e) client(e),
Cet appareil est conforme aux directives et normes
européennes en vigueur concernant la compatibilité
électromagnétique et à la sécurité électrique.
Représentant européen de la société Victor Company of Japan,
Limited :
JVC Technical Services Europe GmbH
Postfach 10 05 04
61145 Friedberg
Allemagne
Sehr geehrter Kunde, sehr geehrte Kundin,
dieses Gerät stimmt mit den gültigen europäischen Richtlinien
und Normen bezüglich elektromagnetischer Verträglichkeit
und elektrischer Sicherheit überein.
Die europäische Vertretung für die Victor Company of Japan,
Limited ist:
JVC Technical Services Europe GmbH
Postfach 10 05 04
61145 Friedberg
Deutschland
Geachte klant,
Dit apparaat voldoet aan de geldende Europese normen en
richtlijnen inzake elektromagnetische compatibiliteit en
elektrische veiligheid.
De Europese vertegenwoordiger van Victor Company of Japan,
Limited is:
JVC Technical Services Europe GmbH
Postfach 10 05 04
61145 Friedberg
Duitsland
EN, GE, FR, NL
0110NYMMDWJEIN
Having TROUBLE with operation?
Please reset your unit
Refer to page of How to reset your unit
Haben Sie PROBLEME mit dem Betrieb?
Bitte setzen Sie Ihr Gerät zurück
Siehe Seite Zurücksetzen des Geräts
Vous avez des PROBLÈMES de fonctionnement?
Réinitialisez votre appareil
Référez-vous à la page intitulée Comment réinitialiser votre appareil
Hebt u PROBLEMEN met de bediening?
Stel het apparaat terug
Zie de pagina met de paragraaf Het apparaat terugstellen
© 2010 Victor Company of Japan, Limited
Instructions DVD RECEIVER WITH MONITOR KW-AVX830/KW-AVX730

2
ENGLISH
Information for Users on Disposal of Old Equipment and Batteries
[European Union only]
These symbols indicate that the product and the battery with this symbol should not be disposed as
general household waste at its end-of-life.
If you wish to dispose of this product and the battery, please do so in accordance with applicable
national legislation or other rules in your country and municipality.
By disposing of this product correctly, you will help to conserve natural resources and will help
prevent potential negative effects on the environment and human health.
Notice:
The sign Pb below the symbol for batteries indicates that this battery contains lead.
WARNINGS:
(To prevent accidents and damage)
• DO NOT install any unit or wire any cable in a location
where;
– it may obstruct the steering wheel and gearshift
lever operations.
– it may obstruct the operation of safety devices such
as air bags.
– it may obstruct visibility.
• DO NOT operate the unit while driving.
If you need to operate the unit while driving, be sure
to look around carefully.
• The driver must not watch the monitor while driving.
• The driver must not put on the headphones while
driving.
• Only for KW-AVX830:
Excessive sound pressure from earphones or
headphones can cause hearing loss when you listen
through earphones or headphones with using Dual
Zone.
Cautions on the monitor:
• The monitor built in this unit has been produced with
high precision, but it may have some ineffective dots.
This is inevitable and is not malfunction.
• Do not expose the monitor to direct sunlight.
• Do not operate the touch panel using a ball-point pen
or similar tool with the sharp tip.
Touch the buttons on the touch panel with your finger
directly (if you are wearing a glove, take it off).
• When the temperature is very cold or very hot...
– Chemical changes occur inside, causing
malfunction.
– Pictures may not appear clearly or may move
slowly. Pictures may not be synchronized with
the sound or picture quality may decline in such
environments.
• Afterimage may occur if displaying a certain image on
the monitor for a long time. This is not malfunction.
Turn off the unit or display another image.
Thank you for purchasing a JVC product.
Please read all instructions carefully before operation, to ensure your complete understanding and to obtain the best
possible performance from the unit.
IMPORTANT FOR LASER PRODUCTS
1. CLASS 1 LASER PRODUCT
2. CAUTION: Do not open the
top cover. There are no user
serviceable parts inside the unit;
leave all servicing to qualified
service personnel.
3. CAUTION:
Visible and/or invisible class 1M laser radiation when open. Do not view directly with optical instruments.
4. REPRODUCTION OF LABEL: CAUTION LABEL, PLACED OUTSIDE THE UNIT.
Products
Battery
EN_KW-AVX830[E].indb 2EN_KW-AVX830[E].indb 2 10.1.19 3:08:53 PM10.1.19 3:08:53 PM

3
ENGLISH
How to reset your unit
• Your preset adjustments will also be erased (except the
registered Bluetooth devices).
For safety...
• Do not raise the volume level too much, as this will
make driving dangerous by blocking outside sounds,
and may cause hearing loss.
• Stop the car before performing any complicated
operations.
Temperature inside the car...
If you have parked the car for a long time in hot or cold
weather, wait until the temperature in the car becomes
normal before operating the unit.
For security reasons, a numbered ID card is provided
with this unit, and the same ID number is imprinted on
the unit’s chassis. Keep the card in a safe place, as it will
help the authorities to identify your unit if stolen.
How to read this manual:
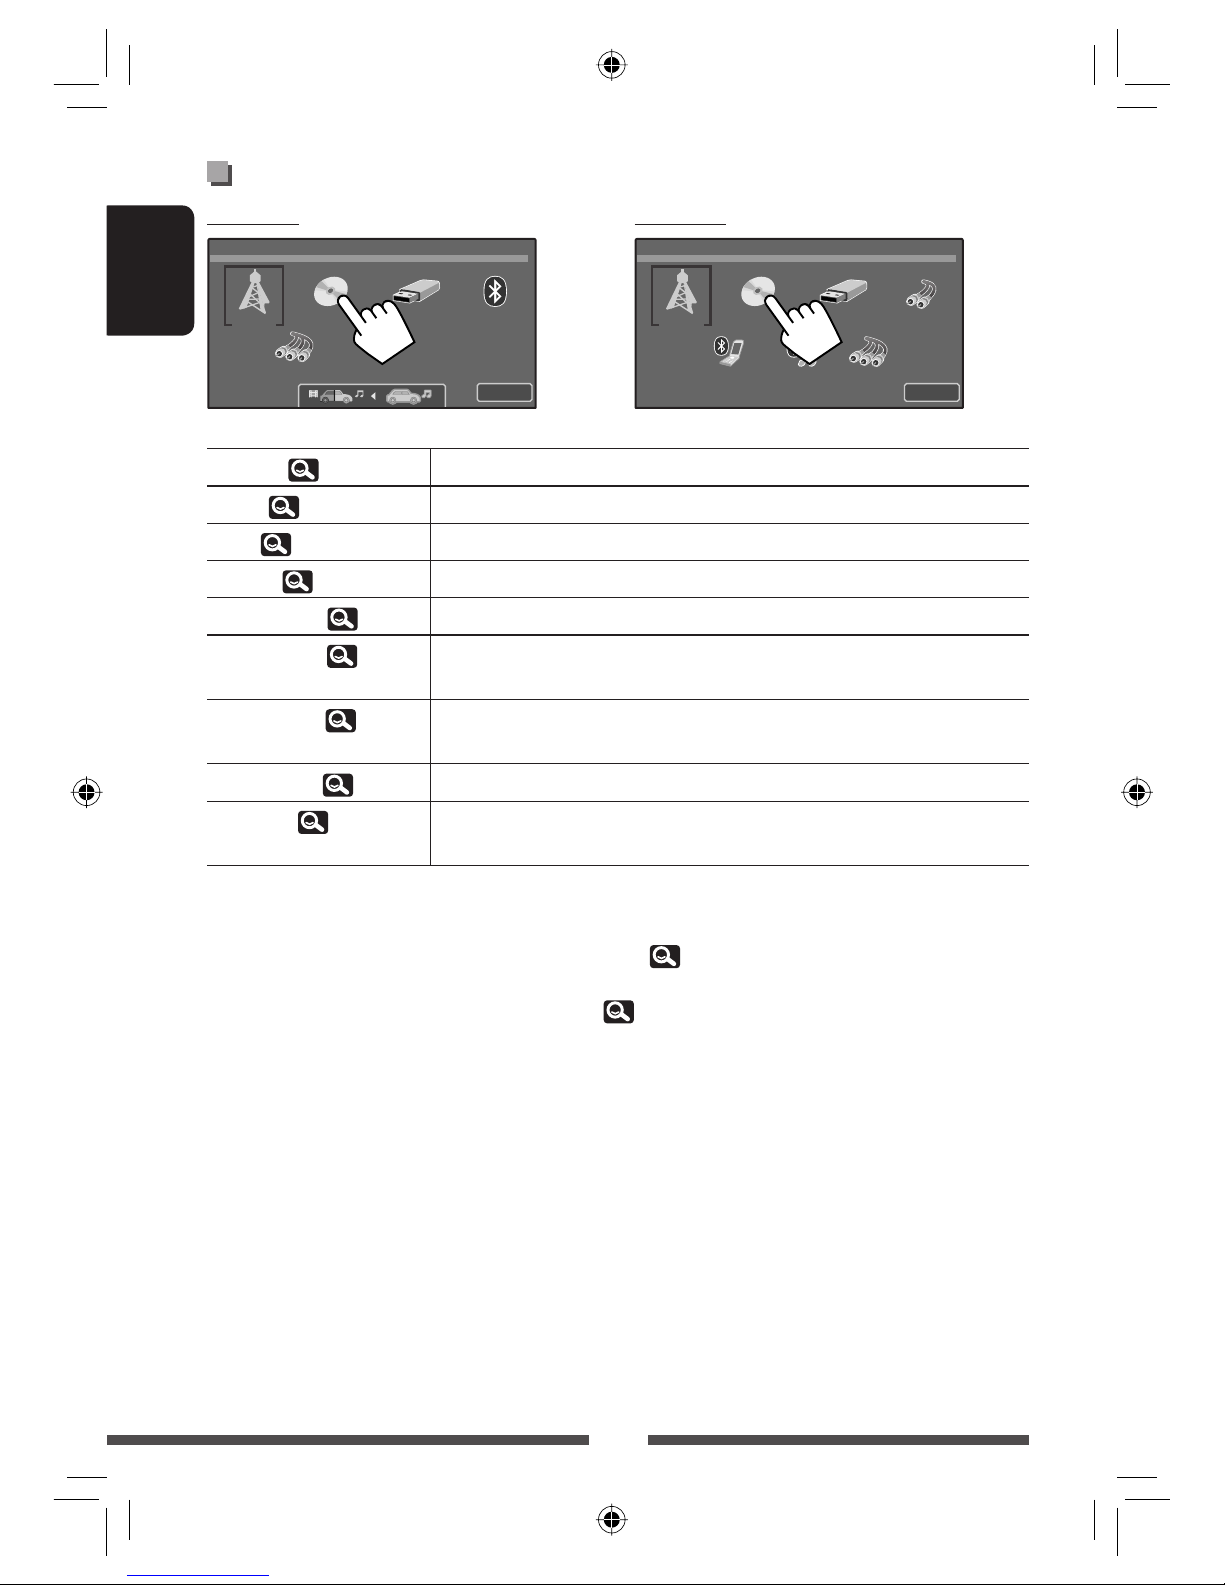
• Illustrations of KW-AVX830 are mainly used for
explanation.
• This manual mainly explains operations using the
buttons on the monitor panel and touch panel.
For operations using the remote controller (RM-
RK252: supplied only for KW-AVX830), 52.
• < > indicates the variable screens/menus/
operations/settings that appear on the touch
panel.
• [ ] indicates the buttons on the touch panel.
CONTENTS
How to reset your unit ............................................ 3
INTRODUCTIONS
Canceling the display demonstration and setting the
clock....................................................................4
Basic operations......................................................5
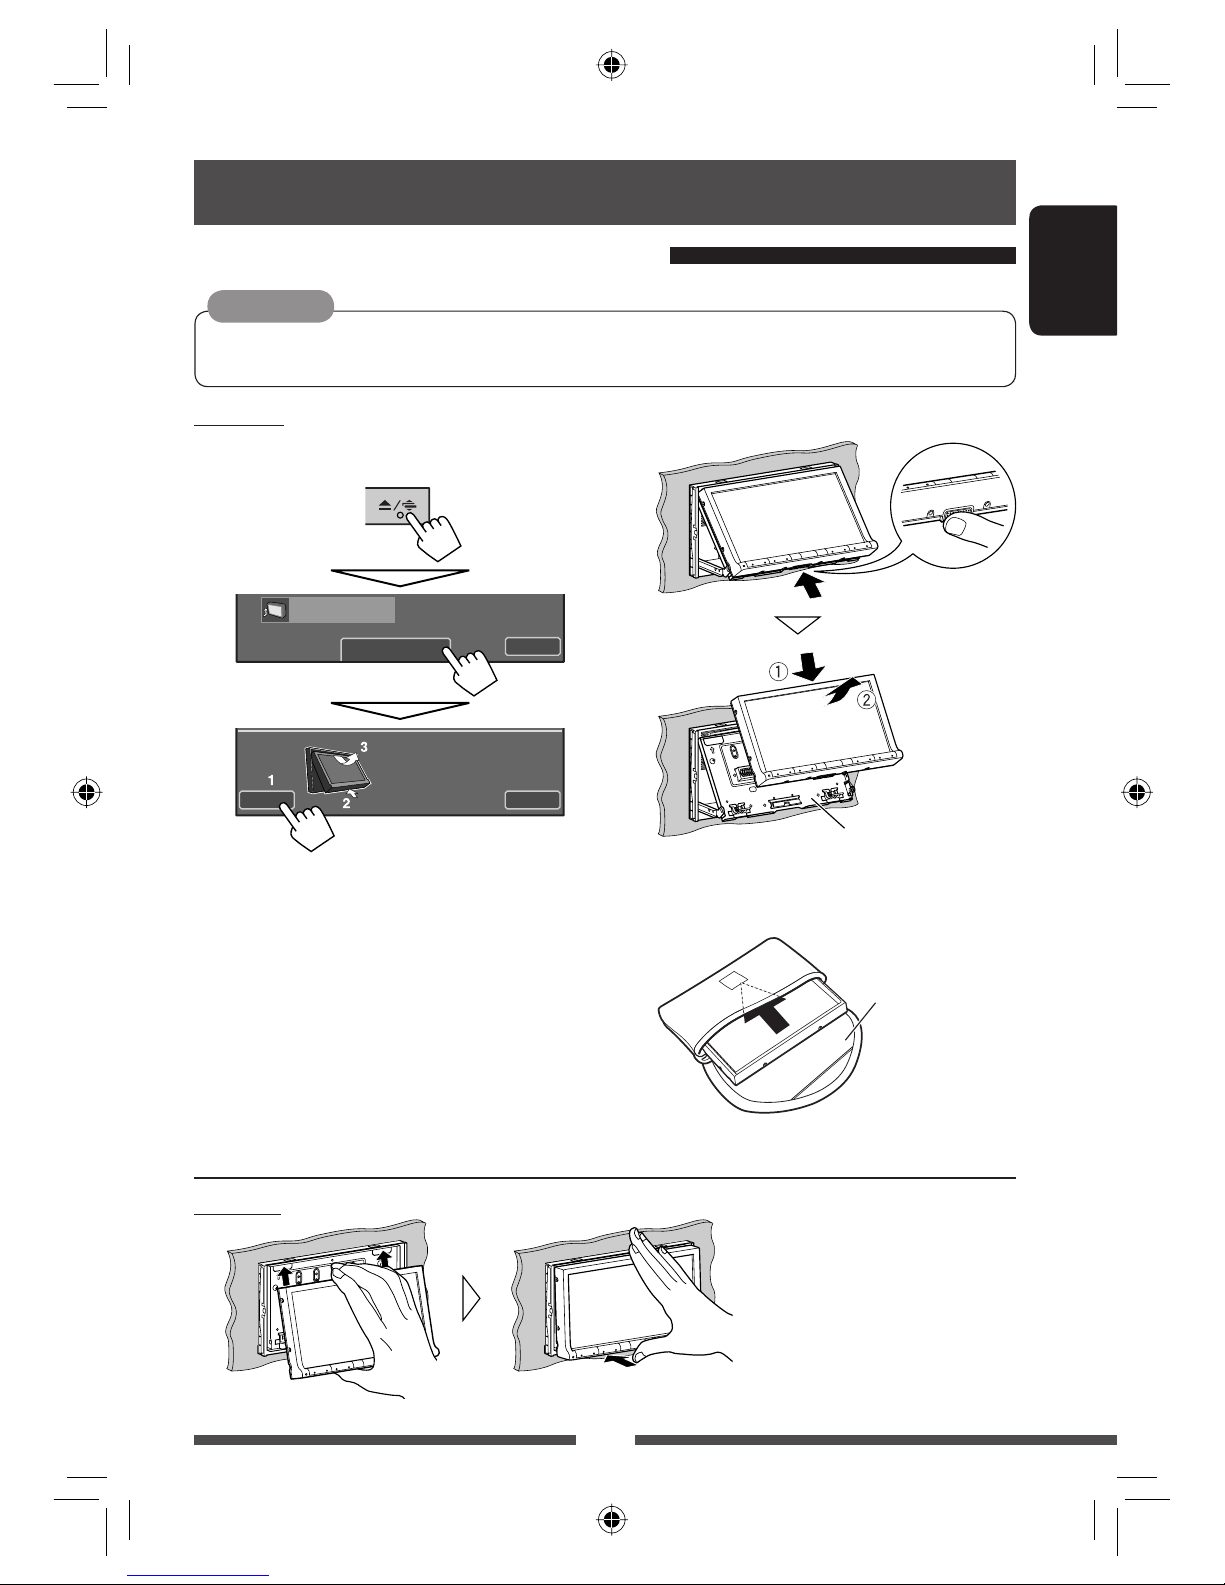
• Detaching/attaching the monitor panel ...................... 5
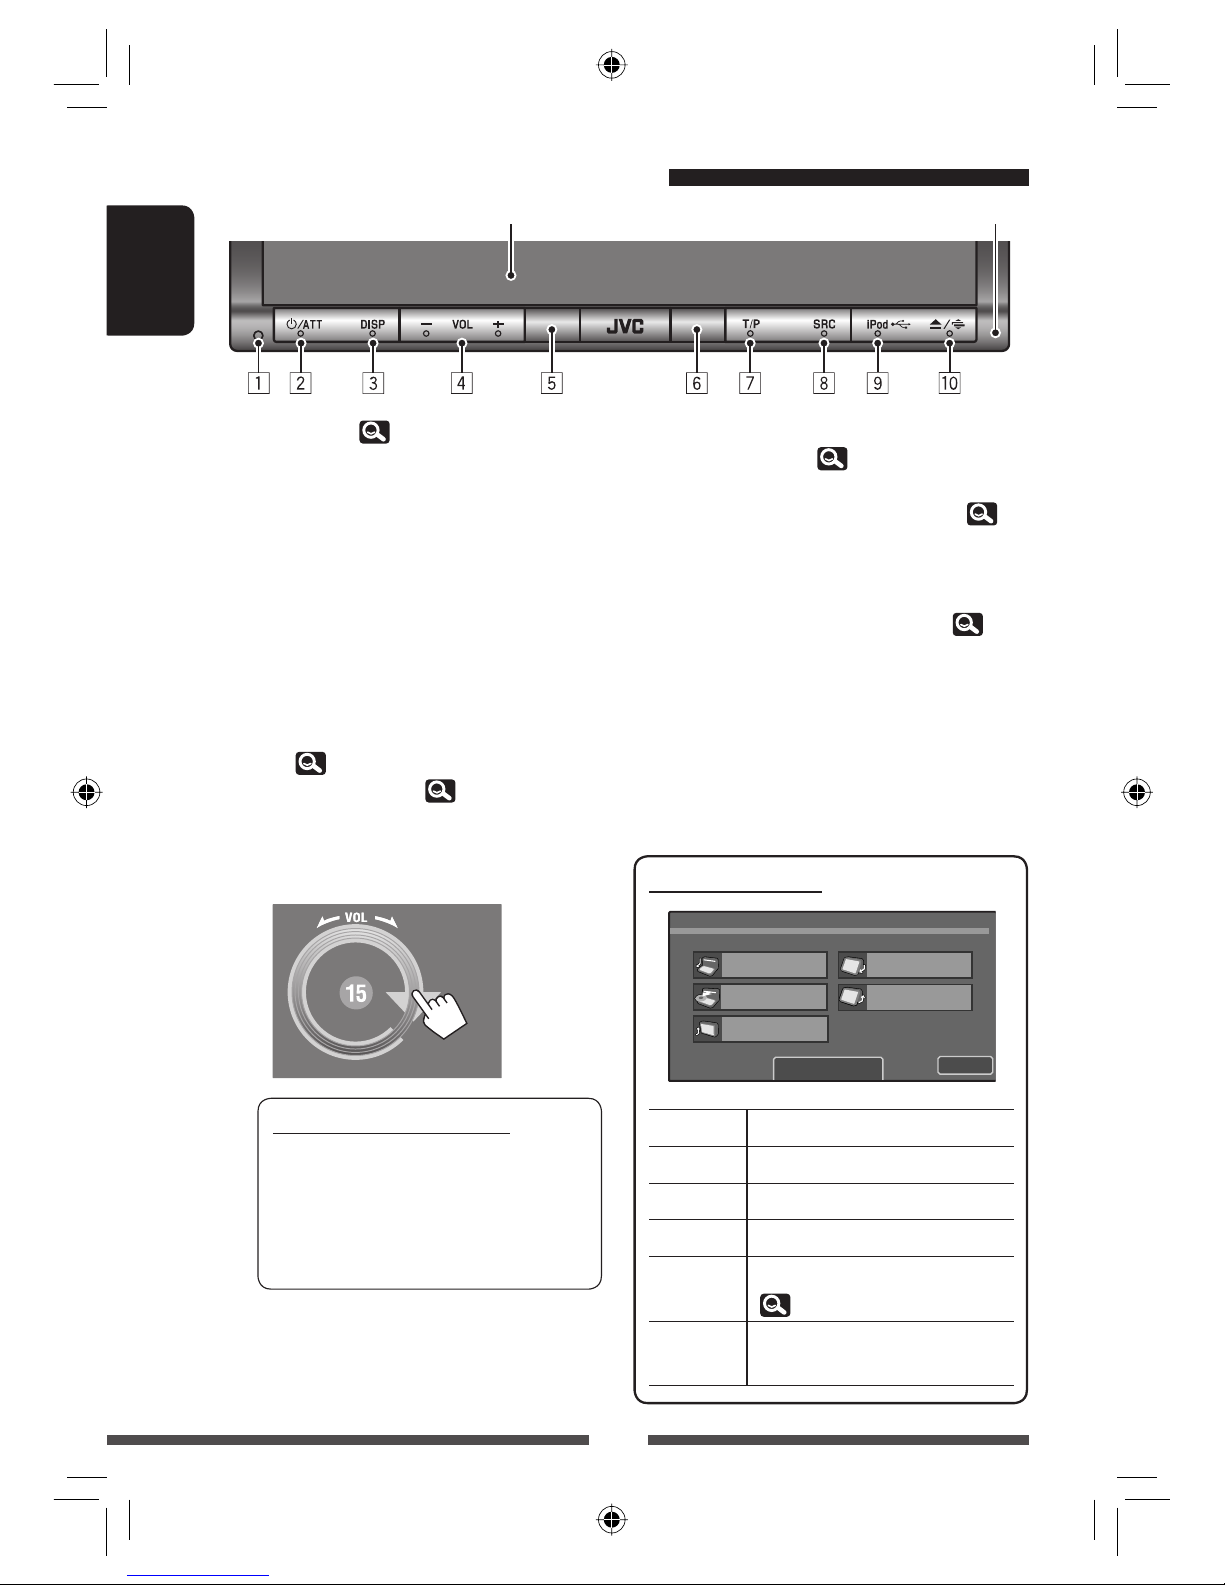
• Basic operations on the monitor panel......................... 6
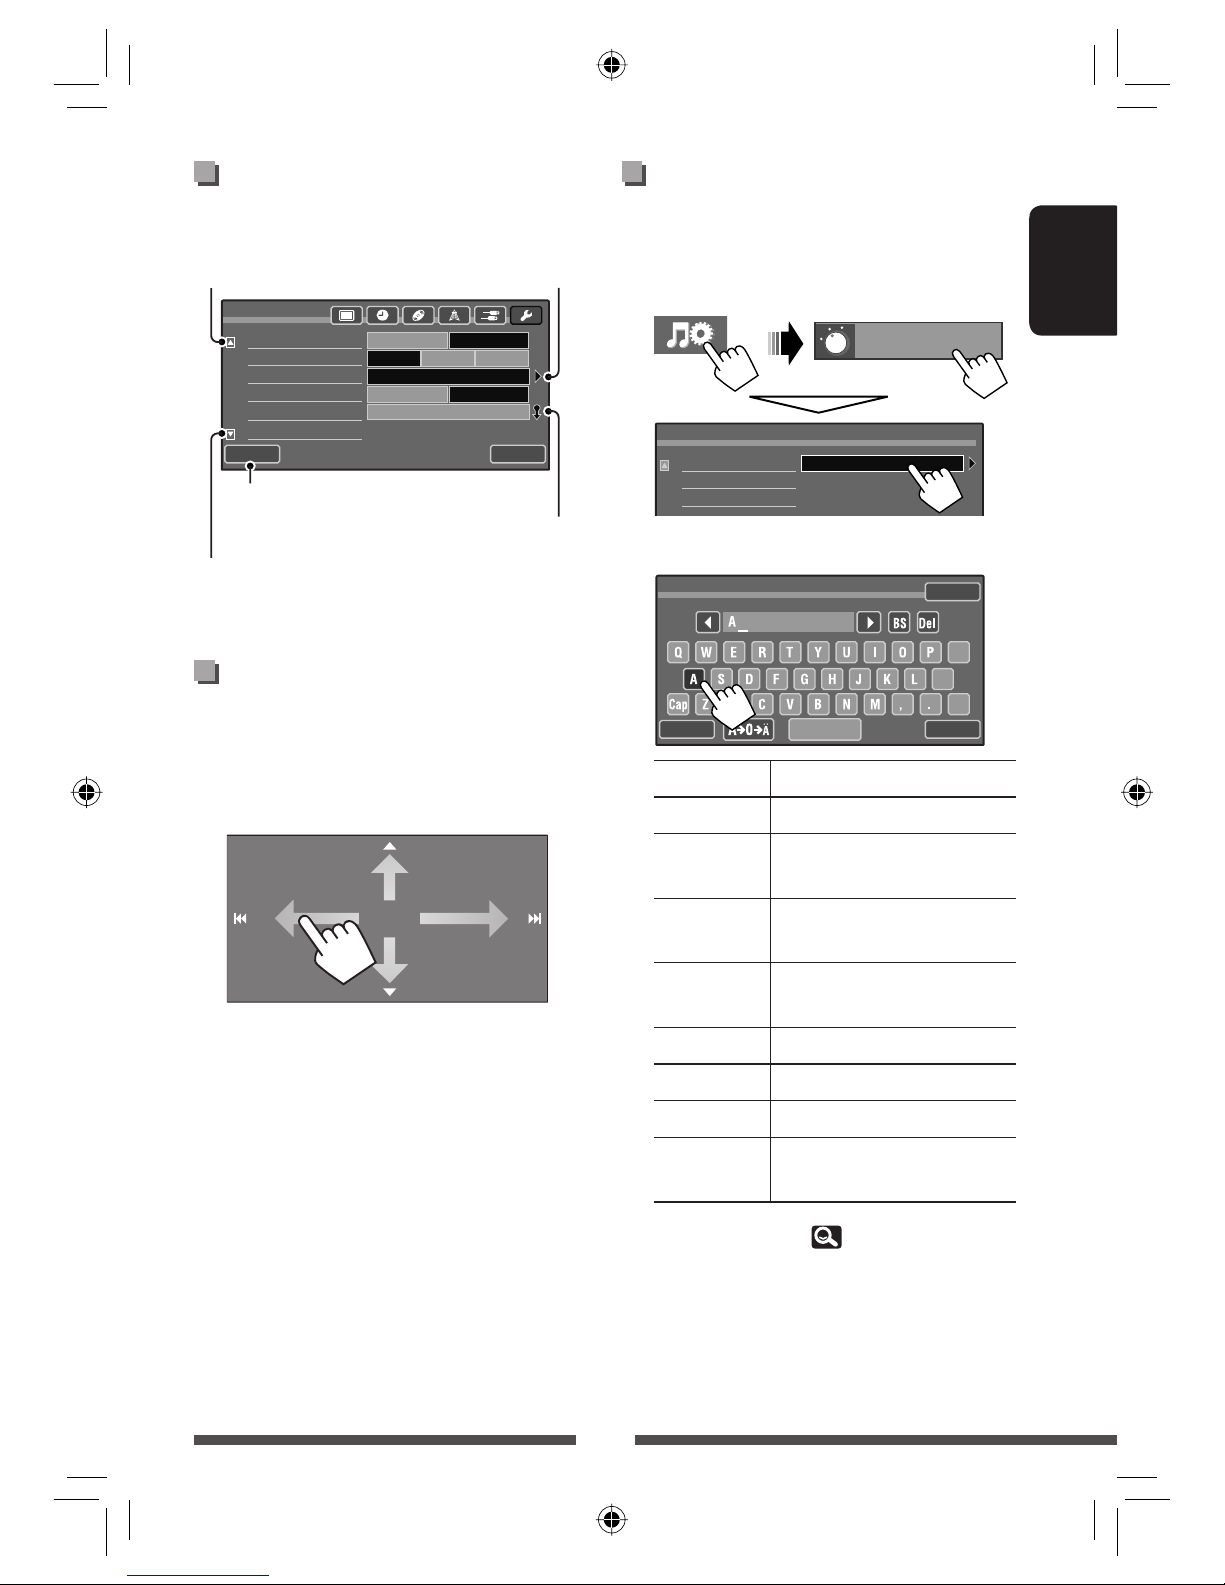
• Basic operations on the touch panel ........................... 7
AV SOURCE OPERATIONS
Listening to the radio............................................11
Disc/USB operations.............................................. 16
Listening to the iPod/iPhone device...................... 22
Using other external components......................... 25
• AV-INPUT ................................................................. 25
• EXT-INPUT (Only for KW-AVX730).............................. 26
Dual Zone operations
(Only for KW-AVX830).......................................27
Sound equalization ............................................... 28
Using a rear view camera...................................... 28
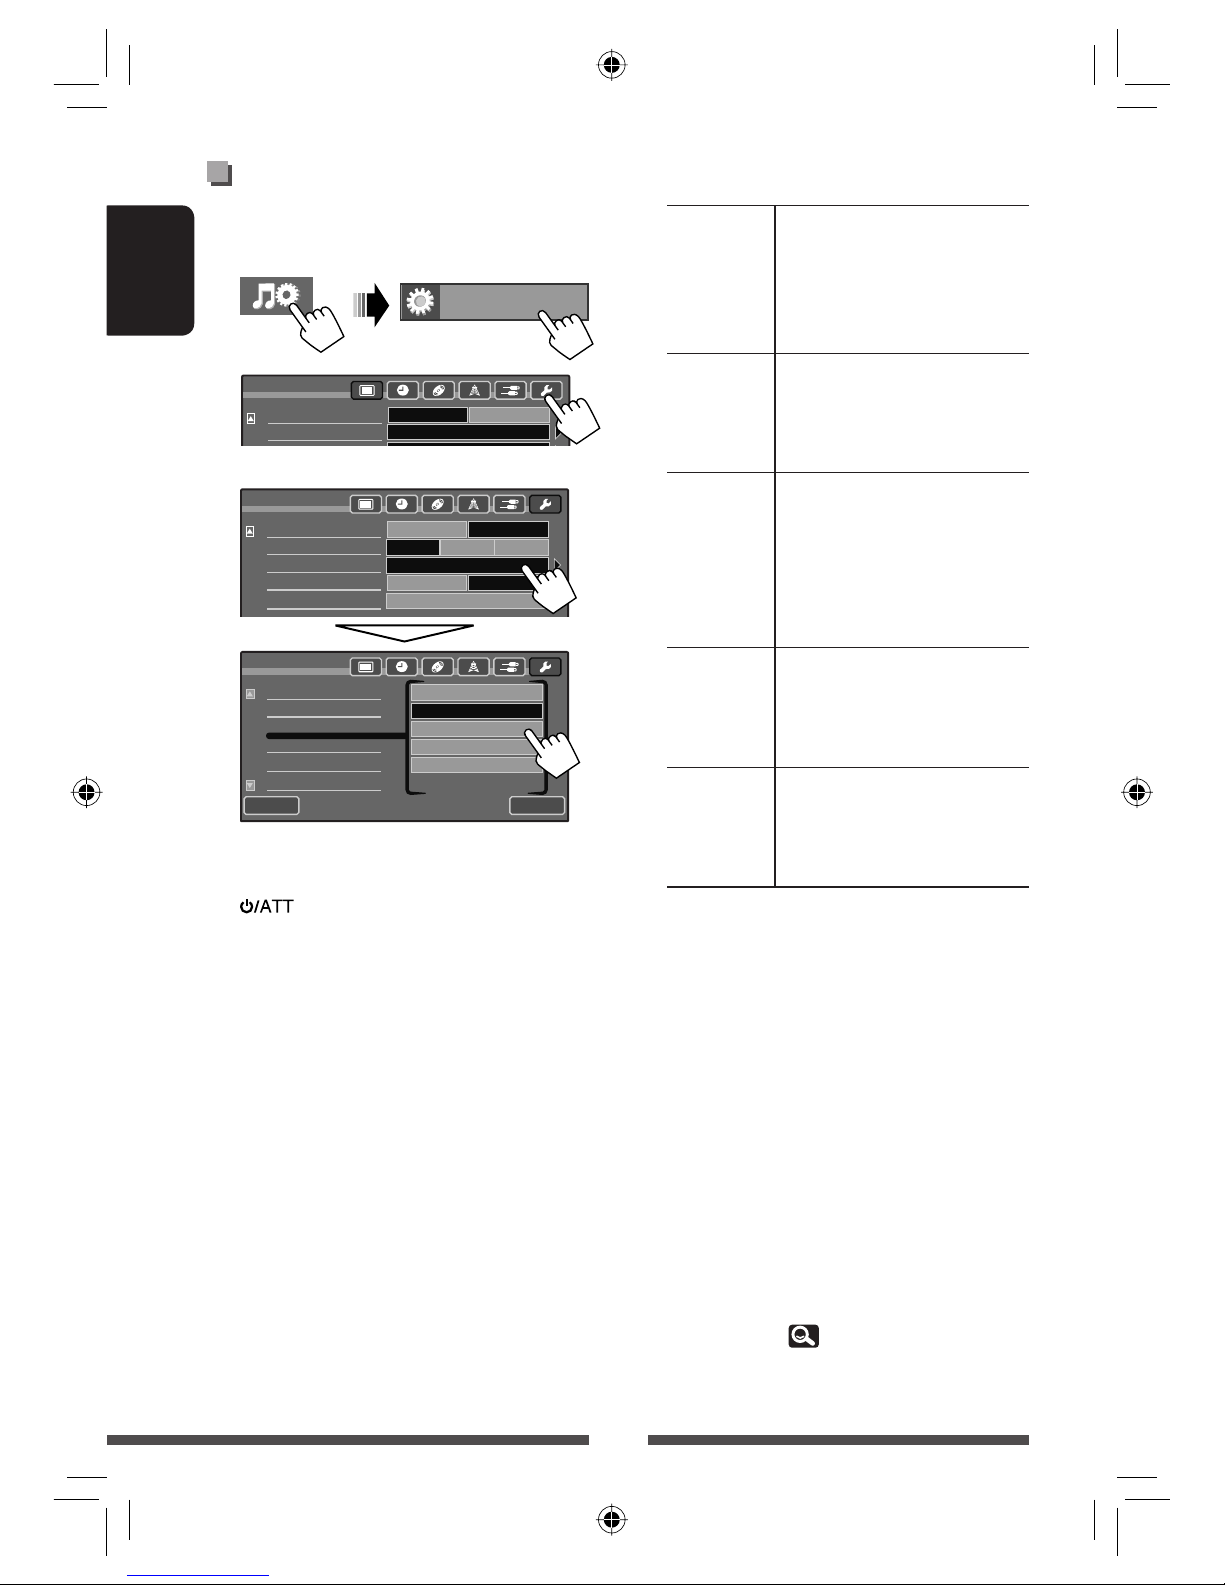
AV Setup/Sound/Equalizer menu items................ 29
BLUETOOTH OPERATIONS
Information for using Bluetooth® devices............. 35
Bluetooth operations for KW-AVX830...................35
• Connecting Bluetooth devices ................................... 36
• Using the Bluetooth mobile phone/audio player ....... 38
• Bluetooth device settings .......................................... 43
Bluetooth operations for KW-AVX730...................44
• Connecting Bluetooth devices ................................... 44
• Using the Bluetooth mobile phone ........................... 47
• Using the Bluetooth audio player .............................. 50
• Bluetooth device settings .......................................... 51
REFERENCE
Using the remote controller
(Only for KW-AVX830).......................................52
Maintenance......................................................... 57
More about this unit ............................................. 58
Troubleshooting.................................................... 62
Specifications........................................................ 67
To forcibly eject a disc, 16.
EN_KW-AVX830[E].indb 3EN_KW-AVX830[E].indb 3 10.1.19 3:08:58 PM10.1.19 3:08:58 PM

15:45
15:45
4
ENGLISH
AV Menu
Exit
AV Setup
Equalizer
Sound
Mode
List
Bluetooth
Back
Setup
Demonstration
Wall Paper
Color
Scroll
Dimmer
Dimmer Time Set
Blue
Auto
AutoOnce
718
Ambient
Off On
Off
Exit
Canceling the display demonstration and setting the clock
INTRODUCTIONS
Ambient
Setup
Demonstration
Wall Pa
p
er
Off On
0 : 00
12Hours 24Hours
Auto
On
Off
Off
Back
Setup
Exit
Time Set
Time Format
OSD Clock
Clock Adjust
Back
Setup
Exit
Time Set
Time Format
OSD Clock
Clock Adjust
15 : 45
Back Exit
Canceling the display
demonstration
1 Display <AV Menu> screen.
2 Display <Setup> screen.
3 Select <Off>.
4 Finish the procedure.
AV Menu
Exit
AV Setup
Equalizer
Sound
Mode
List
Bluetooth
Back Exit
Setting the clock
1 Display <AV Menu> screen.
2 Display <Setup> screen.
3
4 Adjust the hour (1), then the minute
(2).
5 Finish the procedure.
EN_KW-AVX830[E].indb 4EN_KW-AVX830[E].indb 4 10.1.19 3:08:59 PM10.1.19 3:08:59 PM

5
ENGLISH
Ÿ
• The attaching plate closes automatically about
10 seconds after the monitor panel is unlocked.
!
Detaching
~While the unit is turned on:
The monitor panel opens by about 50°.
• It closes automatically when no operation is
done for about a minute.
Remove the monitor panel before this happens.
Attaching plate
The monitor panel is
unlocked.
Basic operations
Soft case (supplied)
• Hold the monitor panel securely so as not to drop it accidentally.
• Fit the monitor panel onto the attaching plate until it is firmly locked.
Caution:
Exit
Detach
Close
Yes No
Detach?
Detaching/attaching the monitor panel
Attaching
EN_KW-AVX830[E].indb 5EN_KW-AVX830[E].indb 5 10.1.19 3:09:00 PM10.1.19 3:09:00 PM

6
ENGLISH
5Remote sensor
6Prox./Motion sensor( 8)
7• Activates/deactivates TA Standby Reception.
• Displays <PTy Search> screen. (Hold)( 12)
8• Selects the source.
• Turns on the power.
9• Change the source to “
USB
” or “
iPod
.”
• Selects the iPod control mode. (Hold)( 22)
p• Displays <Open/Tilt> screen.(See below.)
• Ejects the disc and display <Open/Tilt>
screen. (Hold)
• Closes the monitor panel if pressed when the
panel is open.
1Resets the unit. ( 3)
2• Turns on the power.
• Attenuates the sound.
• Turns off the power. (Hold)
3• Changes the display information.
– Each time you press DISP, the display changes
to show the various information.
• Available display information varies among
the playback sources.
– The following screens are displayed only when
they are ready:
• Dual play screen (only for KW-AVX830)
( 27)
• Navigation screen ( 26)
4• Adjusts the audio volume.
– You can also adjust the volume by moving
your finger on the touch panel as illustrated.
Basic operations on the monitor panel
Screen (touch panel) Monitor panel
Caution on volume setting:
Digital devices (CD/USB) produce very little
noise compared with other sources. Lower
the volume before playing these digital
sources to avoid damaging the speakers by
sudden increase of the output level.
<Open/Tilt> screen
[Open] Opens the monitor panel.
[Eject] Ejects the disc.
[Close] Closes the monitor panel.
[Tilt +/–] Tilts the monitor panel.
[Detach] To detach the monitor panel.
( 5)
[Exit] Goes back to the current source
screen.
Open
Eject
Close
Tilt +
Tilt –
Exit
Open/Tilt
Detach
EN_KW-AVX830[E].indb 6EN_KW-AVX830[E].indb 6 10.1.19 3:09:01 PM10.1.19 3:09:01 PM

15:45
SOURCE
TUNER
Bayern Radio
Pop Music
7
ENGLISH
Current source
Exit
Source Menu
TUNER DISC
AV-IN
USB Bluetooth
<Source Menu> ( 10)
Short cut menu
Displays <Lighting Sensor> menu in
<Setup>. ( 8)
Changes the sound mode. ( 28)
• Turns on or off Track/Chapter Repeat
during disc/file playback. ( 21)
• Changes the repeat mode during
iPod/iPhone playback. ( 24)
Displays <Aspect> menu in
<Setup>. ( 30)
Activates PTY Standby Reception.
( 14)
Displays <PTy Search> menu.
( 12)
Activates <Voice Dialing> function.
(KW-AVX830: 40/KW-AVX730:
48)
Displays <Redial> menu. (KW-
AVX830: 40/KW-AVX730: 48)
• To erase the short cut menu, perform the
same procedure.
SOURCE
TUNER
15:45
Short Cut icons
<AV Menu>
[AV Setup] Changes various settings of
the system, sources, etc.
( 29)
[Equalizer] Adjusts equalizer. ( 28)
[Sound] Adjusts the sound. ( 34)
[Mode] Changes various mode
settings for playback source.
[List] Displays the lists.
[Bluetooth] Displays the <Bluetooth>
menu. (KW-AVX830: 43/
KW-AVX730: 51)
[Exit] Goes back to the current
source screen.
AV Menu
Exit
AV Setup
Equalizer
Sound
Mode
List
Bluetooth
Only for KW-AVX830
SOURCE
TUNER
Basic operations on the touch panel
• The items shown on the screen differ depending
on the selected source and connected device.
• Non-available items will be shaded.
*
* Appears only when the Bluetooth adapter is attached.
( KW-AVX830: 36/KW-AVX730: 44)
*
15:45
EN_KW-AVX830[E].indb 7EN_KW-AVX830[E].indb 7 10.1.19 3:09:02 PM10.1.19 3:09:02 PM

8
ENGLISH
Prox./
Motion-LED
Monitor panel buttons are turned
off. They light up when your
finger touches the touch panel
or your hand moves closer to the
Prox./Motion sensor.
Touch
Panel-LED
Monitor panel buttons are turned
off. They light up when your
finger presses any button on the
touch panel.
Prox./
Motion-LCD
The screen and the lights of the
monitor panel buttons are turned
off. They turn on when your
finger touches the touch panel
or your hand moves closer to the
Prox./Motion sensor.
Touch
Panel-LCD
The screen and the lights of the
monitor panel buttons are turned
off. They turn on when your finger
touches the touch panel.
Off The screen and the lights of the
monitor panel buttons are always
turned on while the power is
turned on.
• Pressing any button on the monitor panel also
turns on the screen and/or the lights of the
buttons.
• In the following cases, the screen and/or the lights of
the monitor panel buttons are turned on regardless
of the <Lighting Sensor> setting:
– The buttons are lit up when <AV Menu>,
<Source Menu>, or <Open/Tilt> is displayed.
– The screen is turned on when a call/SMS comes in
(for Bluetooth mobile phone).
– The screen is turned on when the signal from the
rear view camera comes in.
To change the sensitivity of the sensor, see
“Motion Sensitiv.” ( 33)
You can change the condition for turning off/on the
screen and the lights of the monitor panel buttons.
1
2
3
When any setting other than <Off> is selected,
the screen and/or lights of the buttons (except
) are turned off when no operation is done
for about 10 seconds.
The screen and/or the lights of the buttons are
turned off/on as follows.
AV Setup
Setup
Demonstration
Wall Paper
Off On
Ambient
Setup
Beep
Telephone Muting
Lighting Sensor
Motion Sensitiv.
Initialize
Prox./Motion-LED
Enter
Muting2Muting1
Off On
Mid High
Off
Off
Prox./Motion-LED
Touch Panel-LED
Prox./Motion-LCD
Touch Panel-LCD
Back
Setup
Beep
Telephone Muting
Lighting Sensor
Motion Sensitiv.
Initialize
Exit
Setting the lighting sensor
EN_KW-AVX830[E].indb 8EN_KW-AVX830[E].indb 8 10.1.19 3:09:04 PM10.1.19 3:09:04 PM

9
ENGLISH
• Returns to the previous screen
• Closes the sub-setting screen
Moves to the succeeding
menu page
Moves to the preceding
menu page
Indicates the next hierarchy
level/setting item exists
Back
Setup
Beep
Telephone Muting
Lighting Sensor
Motion Sensitiv.
Initialize
Prox./Motion-LED
Enter
Muting2Muting1
Off On
Mid High
Off
Exit
Changing the settings on the
menu
Playback control on the touch
panel
When you drag your finger on the touch panel,
it functions in the same way as touching
[5/ ∞/ 4/ ¢].
Indicates to hold
for activating the
function
/
;
@
Back
Title Entry
ExitSpace
Store
Mode
Mode
Title Entry Enter
Assigning the titles to the
sources
You can assign titles (up to 16 characters) to “
AV-IN
”
and “
EXT-IN
”*.
1
2 Assign a title.
[Store] Confirm the entry.
[2/3]Move the cursor.
[BS] Erase the character before the
cursor.
[Del] Erase the character on the
cursor.
[Cap] Change the letter case (upper/
lower).
[A =0 =Ä] Change the character set.
[Space] Enter a space.
[Back] Returns to the previous screen.
[Exit] Goes back to the current source
screen.
• For available characters, 59.
*Only for KW-AVX730.
EN_KW-AVX830[E].indb 9EN_KW-AVX830[E].indb 9 10.1.19 3:09:05 PM10.1.19 3:09:05 PM

10
ENGLISH
Exit
Source Menu
TUNER DISC
AV-IN
USB Bluetooth
Exit
Source Menu
TUNER DISC
AV-IN
EXT-IN
USB
BT Phone BT Audio
TUNER
( 11) Switches to the radio broadcast.
DISC
( 19) Plays a disc.
USB
( 19) Plays files on a USB device.
iPod
*1( 23) Plays an iPod/iPhone.
EXT-IN
*2*3( 26) Switches to an external component connected to expansion port on the rear panel.
Bluetooth
*4( 38) • Displays information about the connected device.
• Plays a Bluetooth audio player.
BT Phone
*2( 47) • Makes the pairing between a mobile phone and the unit.
• Selects the registered device.
BT Audio
*2( 50) Plays a Bluetooth audio player.
AV-IN
*5( 25) Switches to an external component connected to LINE IN/VIDEO IN jacks on the rear
panel.
*1"
iPod
" is shown as the source instead of "
USB
" when an iPod/iPhone is connected.
*2Only for KW-AVX730.
*3Select an appropriate input setting on <External Input>.( 32)
*4Only for KW-AVX830.
*5Select an appropriate input setting on <AV Input>.( 32)
Selecting the playback source
KW-AVX830 KW-AVX730
EN_KW-AVX830[E].indb 10EN_KW-AVX830[E].indb 10 10.1.19 3:09:06 PM10.1.19 3:09:06 PM

11
ENGLISH
Listening to the radio
Preset number*
Band
Sound mode
( 28)
• The ST indicator lights up when receiving an FM stereo broadcast with sufficient signal strength.
* Touching the preset number also displays the preset list (see below).
15:45
SOURCE
TUNER
Bayern Radio
Pop Music
Standby Reception
indicators
PS (station name) for FM
Radio Data System
• If no PS signal is
coming in,“No Name”
appears.
PTY code for FM Radio
Data System
Tuner indicators
AV SOURCE OPERATIONS
[] Searches for a station.
– Auto search (Press)
– Manual search (Hold)
[5∞] • Selects a preset station.
• Displays the preset list. (Hold)
[BAND] Selects the band.
[SOURCE] Displays <Source Menu> screen.
[]Displays <AV Menu> screen.
Preset list operations
• You can also display the preset list by pressing [
List] on <AV Menu> screen ( 7).
When an FM stereo broadcast is hard to
receive...
Activate monaural mode for better reception.
1
2
On Activate monaural mode to improve
FM reception, but stereo effect will be
lost.The MONO indicator lights up.
Off Restore the stereo effect.
Mode
Off On
Off On
Start
News
Mode
Mono
SSM
PTy Standby
PTy Code
Back Exit
List
FM1
FM2
FM3
87.5
89.8
97.9
88.2
108.0
97.9
1
2
3
4
5
6
• Selects a preset station (Press)
• Stores the station currently received into memory (Hold)
Selects the band
EN_KW-AVX830[E].indb 11EN_KW-AVX830[E].indb 11 10.1.19 3:09:07 PM10.1.19 3:09:07 PM

12
ENGLISH
When the FM reception is interfered...
1
2
Auto Increases the tuner selectivity to
reduce interference noises between
adjacent stations. (Stereo effect may
be lost.)
Wide Subject to the interference from
adjacent stations, but sound quality
will not be degraded and the stereo
effect will remain.
Automatic presetting — SSM
(Storing-station Sequential
Memory) (for FM only)
You can automatically preset 6 stations for each FM
band.
1
2
Local FM stations with the strongest signals are
searched and stored automatically in the FM band.
Off On
Off On
Start
News
Mode
Mono
SSM
PTy Standby
PTy Code (Hold)
The following features are available only for FM
Radio Data System stations.
(Hold)
Mode
AV Setup
Ambient
Setup
Demonstration
Wall Paper
Off On
Setup
IF Band Width
AF Regional
TA Volume
Program Search
15
AFAF Re
g
.
Back
Auto
Off
Off On
Wide
Exit
PTy Search
Preset Enter
Enter
PTy Code
PTy Search
Preset Pop Music
Rock Music
Easy Listening
Serious Classics
Current Affairs
Varied Speech
PTy Code
Back Exit
Searching for FM Radio Data
System programme—PTY
Search
You can search for your favorite programmes being
broadcast by selecting the PTY code for your favorite
programmes.
1
2 Select a PTY code from preset list or PTY
codes.
PTY Search starts.
If there is a station broadcasting a programme
of the same PTY code as you have selected, that
station is tuned in.
• For storing PTY codes into the PTY Preset List, 13.
EN_KW-AVX830[E].indb 12EN_KW-AVX830[E].indb 12 10.1.19 3:09:08 PM10.1.19 3:09:08 PM

13
ENGLISH
Continued on the next page
Back Exit
Pop Music
Rock Music
Easy Listening
Serious Classics
Current Affairs
Varied Speech
PTy Memory
Preset 1
Preset 2
Preset 3
Preset 4
Preset 5
Preset 6
Preset 1
Preset 2
Preset 3
Preset 4
Preset 5
Preset 6
News
Current Affairs
Information
Sports
Education
Drama
Back Exit
PTy Memory
(Hold)
PTy Search
Preset Enter
Enter
PTy Code
AV Setup
Ambient
Setup
Demonstration
Wall Paper
Off On
Setup
IF Band Width
AF Regional
TA Volume
Program Search
15
AFAF Re
g
.
Auto
Off
Off On
Wide
Setup
IF Band Width
AF Regional
TA Volume
Program Search
Back Exit
15Volume
TP indicator TA Standby Reception
Lights up The unit will temporarily switch
to Traffic Announcement (TA) if
available.
• The volume changes to the preset
TA volume level if the current level
is lower than the preset level (see
below).
Flashes Not yet activated. Tune in to another
station providing the Radio Data
System signals.
Goes off Deactivated.
To adjust the TA volume
1
2
Adjust theTA volume level between 00 to 30 or 50*
(initial: 15).
* Depends on the amplifier gain control. ( See
“Amplifier Gain,” 34.)
Storing your favorite programme types
You can store your favorite PTY codes (up to 6) into the
PTY Preset List.
Ex.: Storing <Drama> into <Preset 1>
1
2
3
4
Activating/deactivating TA/
PTY Standby Reception
The following functions are not available when AM is
selected as the source.
TA Standby Reception
EN_KW-AVX830[E].indb 13EN_KW-AVX830[E].indb 13 10.1.19 3:09:09 PM10.1.19 3:09:09 PM

14
ENGLISH
Tracing the same programme
—Network-Tracking
Reception
When driving in an area where FM reception is not
sufficient enough, this unit automatically tunes in to
another FM Radio Data System station of the same
network, possibly broadcasting the same programme
with stronger signals.
When shipped from the factory, Network-Tracking
Reception is activated.
Programme A broadcasting on different frequency
areas (01 – 05)
Off On
Off On
Start
News
Back Exit
Mode
Mono
SSM
PTy Standby
PTy Code
PTY Standby Reception
1
2
3
PTY indicator PTY Standby Reception
Lights up The unit will temporarily
switch to your favorite PTY
programme.
Flashes Not yet activated. Tune in to
another station providing the
Radio Data System signals.
Goes off To deactivate, press [Off] in
step 2.
To change the PTY code for PTY Standby
Reception, repeat the above procedure.
Mode
Mono
SSM
PTy Standby
PTy Code
News
Current Affairs
Information
Sports
Education
Drama
Back Exit
Mode
EN_KW-AVX830[E].indb 14EN_KW-AVX830[E].indb 14 10.1.19 3:09:10 PM10.1.19 3:09:10 PM

15
ENGLISH
Automatic station
selection—Programme
Search
Usually when you select preset stations, the preset
station is tuned in.
If the signals from the preset FM Radio Data System
station are not sufficient for good reception, this
unit, using the AF data, tunes in to another station
broadcasting the same programme as the original
preset station is broadcasting.
To activate Programme Search
1
2
• The unit takes some time to tune in to another station
using programme search.
To deactivate, select <Off>.
To change the Network-Tracking Reception
setting
1
2
AF Switches to another station. The
programme may differ from the one
currently received (the AF indicator
lights up).
AF Reg. Switches to another station
broadcasting the same programme.
The REG indicator lights up.
Off Cancels.
AV Setup
Ambient
Setup
Demonstration
Wall Paper
Off On
Setup
IF Band Width
AF Regional
TA Volume
Program Search
15
AFAF Re
g
.
Auto
Off
Off On
Wide
AV Setup
Ambient
Setup
Demonstration
Wall Paper
Off On
Setup
IF Band Width
AF Regional
TA Volume
Program Search
15
AFAF Re
g
.
Back
Auto
Off
Off On
Wide
Exit
EN_KW-AVX830[E].indb 15EN_KW-AVX830[E].indb 15 10.1.19 3:09:10 PM10.1.19 3:09:10 PM

16
ENGLISH
Disc/USB operations
Playing a disc
• If a disc does not have any disc menu, all tracks on it will be played repeatedly until you change the source or eject
the disc.
~Open the monitor panel.
• You can also open the monitor panel from the
<Open/Tilt> screen. ( 6)
ŸInsert a disc.
Monitor panel closes automatically.
To eject a disc
The monitor panel opens and the disc is ejected.
• If the ejected disc is not removed within 15 seconds,
the disc is automatically inserted again into the
loading slot.
Label side
Caution:
Do not place your finger behind the monitor panel.
• If“ ”appears on the screen, the unit cannot accept the operation you have tried to do.
– In some cases, without showing“ ,”operations will not be accepted.
• When playing back a multi-channel encoded disc, the multi-channel signals are downmixed.
(Hold) (Hold)
How to forcibly eject a disc
• Be careful not to drop the disc when it ejects.
• If this does not work, reset your unit. ( 3)
Prohibiting disc ejection
You can lock a disc in the loading slot.
To cancel the prohibition, repeat the same procedure
to select <EJECT OK?>.
(Hold)(Hold)
Exit
ENTER
Back
NO EJECT?
EMERGENCY EJECT?
(Hold)(Hold)
ENTER
NO EJECT?
EMERGENCY EJECT?
EN_KW-AVX830[E].indb 16EN_KW-AVX830[E].indb 16 10.1.19 3:09:11 PM10.1.19 3:09:11 PM

17
ENGLISH
Playable disc type
Disc type Recording format, file type, etc Playable
DVD
• DTS sound cannot be
reproduced or emitted from this
unit.
DVD-Video *1
Region Code: 2
Ex.:
DVD-Audio/DVD-ROM
DVD Recordable/Rewritable
(DVD-R/-RW *2, +R/+RW *3)
• DVDVideo: UDF bridge
• DVD-VR
• DivX/MPEG1/MPEG2/JPEG/
MP3/WMA/WAV: ISO 9660 level
1, level 2, Romeo, Joliet
DVD-Video
DVD-VR
DivX/MPEG1/MPEG2
JPEG
MP3/WMA/WAV
MPEG4/AAC/DVD+VR/DVD-RAM
Dual Disc DVD side
Non-DVD side
CD/VCD Audio CD/CD Text (CD-DA)
VCD (Video CD)
DTS-CD/SVCD (Super Video CD)/CD-ROM/
CD-I (CD-I Ready)
CD Recordable/Rewritable
(CD-R/-RW)
• ISO 9660 level 1, level 2, Romeo,
Joliet
CD-DA
VCD (Video CD)
DivX/MPEG1/MPEG2
JPEG
MP3/WMA/WAV
MPEG4/AAC
*1 If you insert a DVD Video disc of an incorrect Region Code, “Region code error” appears on the screen.
*2 DVD-R recorded in multi-border format is also playable (except for dual layer discs). DVD-RW dual layer discs are not
playable.
*3 It is possible to play back finalized +R/+RW (Video format only) discs. “DVD” is selected as its disc type when a
+R/+RW disc is loaded. +RW double layer discs are not playable.
Caution for DualDisc playback
The Non-DVD side of a“DualDisc”does not comply with the“Compact Disc Digital Audio”standard.Therefore, the use
of Non-DVD side of a DualDisc on this product may not be recommended.
EN_KW-AVX830[E].indb 17EN_KW-AVX830[E].indb 17 10.1.19 3:09:12 PM10.1.19 3:09:12 PM

18
ENGLISH
Cautions:
• Avoid using the USB device if it might hinder your
safety driving.
• Do not pull out and attach the USB device repeatedly
while“Now Reading”is shown on the screen.
• Do not start the car engine if a USB device is
connected.
• Stop playback before disconnecting a USB device.
• Electrostatic shock at connecting a USB device may
cause abnormal playback of the device. In this case,
disconnect the USB device then reset this unit and the
USB device.
• This unit may not be able to play the files depending
on the type of USB device.
• Operation and power supply may not work as
intended for some USB devices.
• Do not leave a USB device in the car, expose to direct
sunlight, or high temperature to avoid deformation or
cause damages to the device.
• Some USB devices may not work immediately after
you turn on the power.
• For more details about USB operations, 58.
USB cable from the rear of
the unit
Playing a USB device
• This unit can play JPEG/MPEG1/MPEG2*/MP3/WMA/WAV files stored in USB mass storage class device.
• All tracks in the USB device will be played repeatedly until you change the source.
• Make sure all important data has been backed up to avoid losing the data.
*Except for MPEG2 files recorded by JVC Everio camcorder (extension code <.mod>).
You can connect a USB mass storage class device such as a USB memory, Digital Audio Player etc. to the unit.
• You cannot connect a computer or portable HDD to the USB cable from the rear of the unit.
The source changes to“
USB
”and playback starts.
EN_KW-AVX830[E].indb 18EN_KW-AVX830[E].indb 18 10.1.19 3:09:13 PM10.1.19 3:09:13 PM

FLAT
CHAP. RPT
SOURCE
VI
D
E
O
DIGITAL
DVD
48kHz
15:45
01 01
0:01:
2
0
24Bit 3/2.1
19
ENGLISH
Disc/file playback operations
Media type
Audio format
Sound mode
( 28)
Only for discs: Video format/playback mode—VIDEO, DivX,
MPEG, JPEG, VR-PRG (program), VR-PLAY (playlist), PBC
Playback mode
( 21)
• DVD Video: Title no./Chapter
no.
• DVD-VR: Program no. (or
Playlist no.)/Chapter no.
• DivX/MPEG1/MPEG2/MP3/
WMA/WAV: Folder no./Track
no.*1
• JPEG: Folder no./File no.*1
• VCD/CD: Track no.
Playback status — 3: play/8: pause/7: stop
Disc/track information (For CD Text/MP3/WMA/WAV, the track/file information)
• Touching an information bar scrolls the text if all the text is not shown. (See“Scroll,” 29.)
– For DVD Video/DVD-VR/DivX/MPEG1/MPEG2/JPEG/conventional CD, the information bar does not appear.
• “No Name”appears for conventional CDs or if not recorded.
• The buttons on the touch panel also work when they are not shown on the screen.
*1 Touching the folder no. or track/file no. also displays the Folder/Track List ( 21, step 2)
*2 To display the Original Program/Playlist screen, 20.
*3 Search speed varies depending on the type of disc or file.
[3/ 8] Starts playback/pauses.
[5∞] • DVDVideo/DVD-VR: Selects title/
program/playlist*2.
• DivX/MPEG1/MPEG2/JPEG/MP3/
WMA/WAV:
– Selects folder.
– Displays Folder/Track List.*1
(Hold) ( 21, step 2)
[4¢] • Selects chapter/track.
• Reverse/forward search.*3(Hold)
[7] Stops playback.
[SOURCE] Displays <Source Menu> screen.
[ ] Displays <AV Menu> screen.
Playing time
• When watching a playback picture, press DISP or touch the screen to display the operation buttons ( 6).
• DivX files are playable from discs only.
EN_KW-AVX830[E].indb 19EN_KW-AVX830[E].indb 19 10.1.19 3:09:14 PM10.1.19 3:09:14 PM

20
ENGLISH
Operation buttons on the screen
You can display the following operation buttons while watching the playback pictures on the screen.
• If no operation is done for about 15 seconds, the operation buttons disappear (except when a disc menu is
displayed).
A
For DVD-Video/VCD menu operation playback
[5∞23]Selects the menu items
[ENTER] Confirms the selection
[TOP MENU] Displays the disc menu
[MENU] Displays the disc menu
[RETURN] Returns to the previous menu or
displays the menu (only forVCD with
PBC)
For DVD-VR menu operation playback
[5∞23]Selects the menu items
[ENTER] Returns to the DVD-VR playback
[TOP MENU] Displays the Original Program
[MENU] Displays the Playlist
B
For entering the numbers
[Direct/CLR] =
[0]–[9]=[ENTER] Enters numbers
[Direct/CLR] • Switches between chapter/
track entry and title/folder
entry
• Erases the last entry when you
enter a wrong number
C
For advanced operations
[]Selects audio language
[]Selects subtitle language
[]Selects view angle
[1¡]• Reverse/forward search
• Plays back in slow motion (while
playback is paused)*
*For DVD-VR/VCD, reverse slow motion does not work.
To end the operations, touch the screen again.
Touch the screen (center portion).
FLAT
01
15:45
01
0:01:
2
0
KEY
KEYENTER
KEY
KEY
ENTER
123
456
7
0Direct/CLR
89
RETURN
M
ENU
T
O
P
MEN
U
M
ENU
T
O
P
MEN
U
SOURCE
DIGITAL
VI
D
E
O
DVD
SOURCE
VI
D
E
O
DVD
EN_KW-AVX830[E].indb 20EN_KW-AVX830[E].indb 20 10.1.19 3:09:16 PM10.1.19 3:09:16 PM
Other manuals for KW-AVX730
1
This manual suits for next models
1
Table of contents
Other JVC Car Receiver manuals