JVC KW-V340BTM User manual

KW-V340BT (Region 3 – DVD Region Code 3 Area)
KW-V340BT (Region 4 – DVD Region Code 4 Area)
KW-V340BTM (Region 2 – DVD Region Code 2 Area)
KW-V440BT (Region 3 – DVD Region Code 3 Area)
KW-V440BTM (Region 2 – DVD Region Code 2 Area)
MONITOR WITH DVD RECEIVER
INSTRUCTION MANUAL
This instruction manual is used to describe models listed above. Model availability and features (functions)
may differ depending on the country and sales area. B5A-2150-00 (M/M2/X/A9)
ENGLISH
00_KW-V2018ST_M_ENG.indb 100_KW-V2018ST_M_ENG.indb 1 17/6/2017 7:35:42 AM17/6/2017 7:35:42 AM

ENGLISHi
Important NoticeImportant Notice
To ensure proper use, please read through this
manual before using this product. It is especially
important that you read and observe WARNINGS
and CAUTIONS in this manual.
Please keep the manual in a safe and accessible
place for future reference.
WARNINGS
To prevent accidents and damages
• DO NOT install any unit or wire any cable in a
location where;
–it may obstruct the steering wheel and gearshift
lever operations.
–it may obstruct the operation of safety devices such
as air bags.
–it may obstruct visibility.
• DO NOT raise the volume level too much, as this will
make driving dangerous by blocking outside sounds,
and may cause hearing loss.
• DO NOT operate the unit while driving. If you need
to operate the unit while driving, be sure to look
around carefully.
• Stop the car before performing any complicated
operations.
• The driver must not watch the monitor while driving.
CAUTIONS
To care for the unit
• If you have parked the car for a long time in hot or
cold weather, wait until the temperature in the car
becomes normal before operating the unit.
To care for the monitor
• The monitor built into this unit has been produced
with high precision, but it may have some ineffective
dots. This is inevitable and is not considered
defective.
• Do not expose the monitor to direct sunlight.
• Do not operate the touch panel using a ball-point
pen or similar tool with a sharp tip.
Touch the keys on the touch panel with your finger
directly (if you are wearing a glove, take it off).
• When the temperature is very cold or very hot...
–Chemical changes occur inside, causing
malfunction.
–Pictures may not appear clearly or may move
slowly. Pictures may not be synchronized with
the sound or picture quality may decline in such
environments.
On the volume setting
• Digital devices produce very little noise compared
with other sources. Lower the volume before playing
these digital sources to avoid damaging the speakers
by sudden increase of the output level.
The marking of products using lasers
The label is attached to the chassis/case and says
that the component uses laser beams that have been
classified as Class 1. It means that the unit is utilizing
laser beams that are of a weaker class. There is no
danger of hazardous radiation outside the unit.
00_KW-V2018ST_M_ENG.indb i00_KW-V2018ST_M_ENG.indb i 17/6/2017 7:35:43 AM17/6/2017 7:35:43 AM

ENGLISH ii
Important NoticeImportant Notice
For KW-V340BTM Region 2/KW-V440BTM Region 2:
For Turkey
Bu ürün 28300 sayılı Resmi Gazete’de yayımlanan Atik
Elektrikli ve Elektronik Eşyalarin Kontrolü Yönetmeliğe
uygun olarak üretilmiştir.
Eski Elektrik ve Elektronik Ekipmanların İmha
Edilmesi Hakkında Bilgi (ayrı atık toplama
sistemlerini kullanan ülkeleri için uygulanabilir)
Sembollü (üzerinde çarpı işareti olan çöp
kutusu) ürünler ev atıkları olarak atılamaz.
Eski elektrik ve elektronik ekipmanlar,
bu ürünleri ve ürün atıklarını
geri dönüştürebilecek bir tesiste
değerlendirilmelidir. Yaşadığınız bölgeye
en yakın geri dönüşüm tesisinin yerini
öğrenmek için yerel makamlara müracaat
edin. Uygun geri dönüşüm ve atık
imha yöntemi sağlığımız ve çevremiz
üzerindeki zararlı etkileri önlerken
kaynakların korunmasına da yardımcı
olacaktır.
For KW-V340BTM Region 2/KW-V440BTM Region 2:
Declaration of Conformity with regard to the RE
Directive 2014/53/EU
Declaration of Conformity with regard to the RoHS
Directive 2011/65/EU
Manufacturer:
JVC KENWOOD Corporation
3-12, Moriya-cho, Kanagawa-ku, Yokohama-shi,
Kanagawa, 221-0022, Japan
EU Representative:
JVCKENWOOD Deutschland GmbH
Konrad-Adenauer-Allee 1-11, 61118 Bad Vilbel,
GERMANY
English
Hereby, JVCKENWOOD declares that the radio
equipment “KW-V340BTM/KW-V440BTM” is in
compliance with Directive 2014/53/EU.
The full text of the EU declaration of conformity is
available at the following internet address:
http://www.jvc.net/cs/car/eudoc/
RE 2014/53/EU Direktifi uyarınca Uygunluk Beyanı
RoHS Yönergesi 2011/65/EU’ya göre Uygunluk
Bildirimi
Üretici:
JVC KENWOOD Corporation
3-12, Moriya-cho, Kanagawa-ku, Yokohama-shi,
Kanagawa, 221-0022, Japan
AB Temsilcisi:
JVCKENWOOD Deutschland GmbH
Konrad-Adenauer-Allee 1-11, 61118 Bad Vilbel,
GERMANY
Turkish
Burada, JVCKENWOOD “KW-V340BTM/KW-V440BTM”
radyo ekipmanının 2014/53/AB Direktifine uygun
olduğunu bildirir.
AB uyumluluk deklarasyonunun tam metni aşağıdaki
internet adresinde mevcuttur.
http://www.jvc.net/cs/car/eudoc/
00_KW-V2018ST_M_ENG.indb ii00_KW-V2018ST_M_ENG.indb ii 17/6/2017 7:35:43 AM17/6/2017 7:35:43 AM

About this manual
The displays and panels shown in this manual are
examples used to provide clear explanations of the
operations. For this reason, they may be different
from the actual displays or panels.
Illustrations of KW-V440BT are mainly used for
explanation.
The region code of a particular model will only
be stated if only one of the regions supports the
particular feature with the same model name.
This manual mainly explains operations using the
buttons on the monitor panel and keys on the
touch panel. For operations using the remote
controller, see page 41.
< > indicates the various screens/menus/
operations/settings that appear on the touch
panel.
[ ] indicates the keys on the touch panel.
Indication language: English indications are used
for the purpose of explanation. You can select the
indication language from the <Settings> menu.
(Page 38)
ContentsContents
Component Names and Operations.............. 3
Basic Operations................................................ 3
How to reset your unit................................................... 3
Turning on the power.................................................... 3
Turning off the power.................................................... 3
Turning off the AV source............................................ 4
Turning off the screen.................................................... 4
Adjusting the volume .................................................... 4
Attenuating the sound............................................... 4
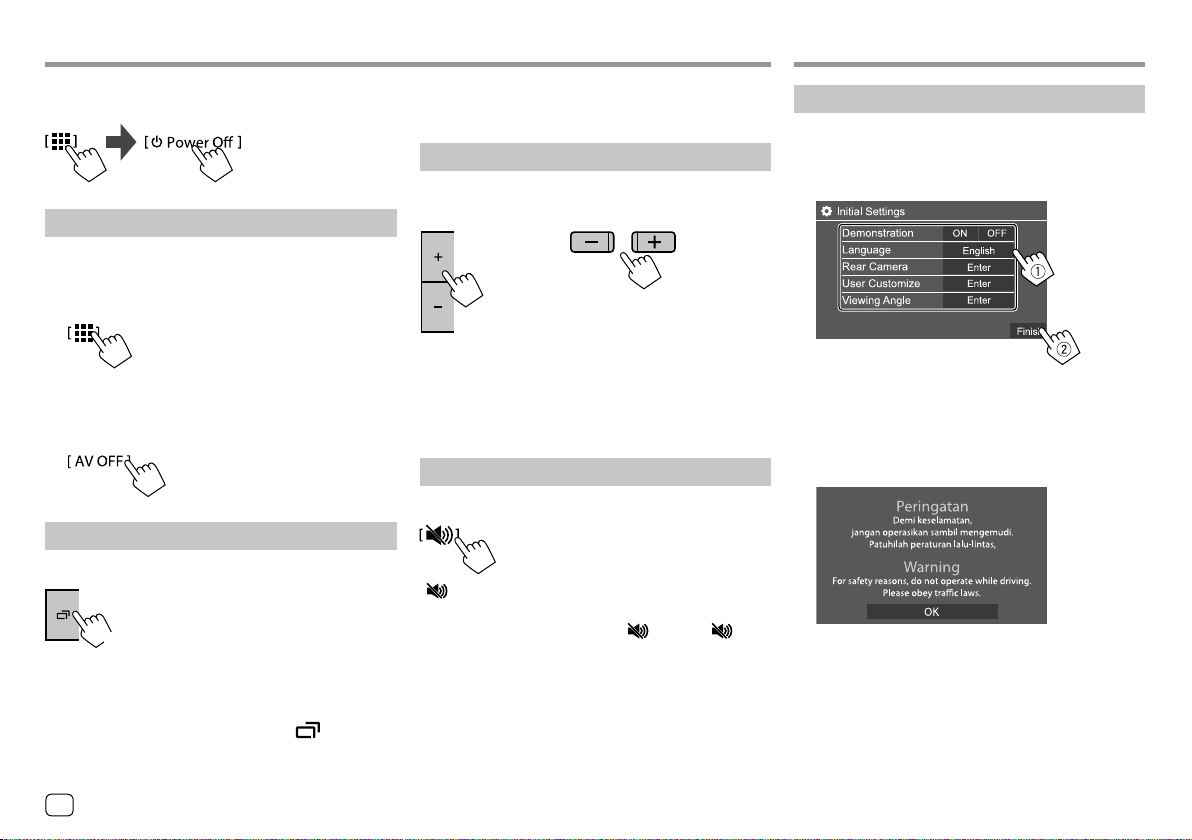
Getting Started .................................................. 4
Initial settings....................................................................... 4
Clock settings ...................................................................... 5
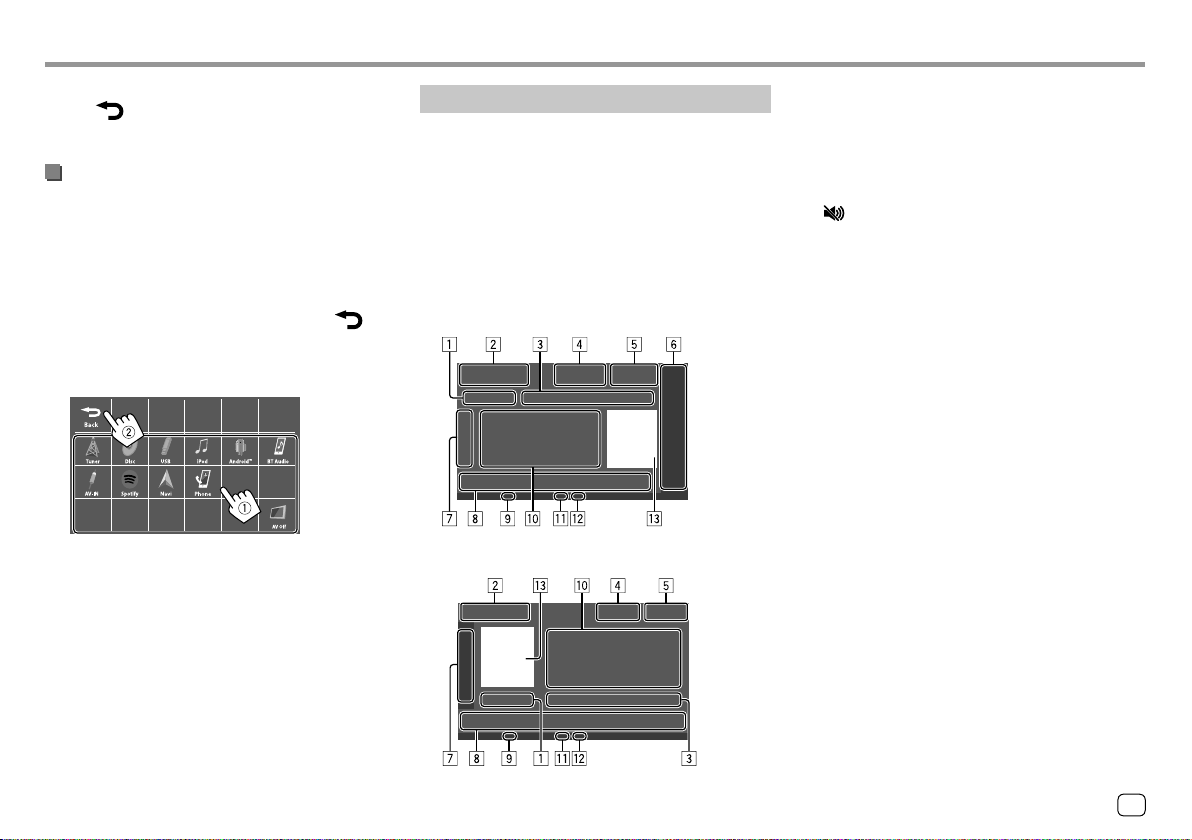
Various Screens and Operations .................... 6
Home screen........................................................................ 6
Source control screen .................................................... 7
List/setting screen............................................................ 9
Disc..................................................................... 10
Video.................................................................. 11
USB..................................................................... 13
Android.............................................................. 15
iPod/iPhone...................................................... 16
Tuner.................................................................. 17
Pandora® ........................................................... 20
Spotify ............................................................... 22
Other External Components ......................... 24
AV-IN ...................................................................................... 24
Rear view camera........................................................... 24
TV tuner box...................................................................... 25
External navigation unit............................................. 25
Bluetooth® ........................................................ 26
Information........................................................................ 26
Preparation......................................................................... 26
Connection........................................................................ 26
Bluetooth mobile phone........................................... 28
Bluetooth audio player............................................... 30
JVC Streaming DJ ....................................................... 30
Bluetooth settings......................................................... 31
Settings ............................................................. 31
Audio settings.................................................................. 31
Display settings ............................................................... 34
Input settings.................................................................... 37
System settings............................................................... 38
Remote Controller........................................... 41
Preparation......................................................................... 41
Basic operations.............................................................. 42
Searching for an item directly................................ 42
JVC Remote APP.......................................................... 42
Installation and Connection.......................... 43
Before installation.......................................................... 43
Installing the unit........................................................... 44
Installing the trim plate.............................................. 44
Wiring connection......................................................... 45
Connecting external components...................... 46
References ........................................................ 46
Maintenance..................................................................... 46
More information........................................................... 46
Troubleshooting.............................................. 50
Specifications................................................... 53
Trademarks and licenses ........................................... 56
2ENGLISH
00_KW-V2018ST_M_ENG.indb 200_KW-V2018ST_M_ENG.indb 2 17/6/2017 7:35:43 AM17/6/2017 7:35:43 AM

Component Names and OperationsComponent Names and Operations
KW-V440BT/KW-V440BTM
1Volume +/–buttons
2Loading slot
3FNC button
• (Press) Turns on the power.
• (Press) Pops up the short-cut menu while the
power is on.
• (Hold): Activates the voice dialing.
4Reset button
5Monitor panel
6Screen (touch panel)
To display the Home screen
KW-V340BT/KW-V340BTM
1button
• (Press) Turns on the power.
• (Hold) Turns off the power.
• (Press) Pops up the short-cut menu while the
power is on.
2Reset button
3Loading slot
4HOME/ button
• HOME (Press): Displays the Home screen.
• (Hold): Activates the voice dialing.
5button
• (Press) Displays the current source control screen.
For KW-V340BT Region3, KW-V340BTM
Region2, pressing switches the screen
between the current source control screen and
navigation screen. For details, see page 38.
• (Hold) Turns off/on the screen.
6Volume +/–buttons
7Monitor panel
8Screen (touch panel)
Basic OperationsBasic Operations
How to reset your unit
If the unit fails to operate properly, press the reset
button.
KW-V340BT/KW-V340BTM
KW-V440BT/KW-V440BTM
Turning on the power
KW-V340BT/
KW-V340BTM
KW-V440BT/
KW-V440BTM
Turning off the power
(Hold)
KW-V340BT/KW-V340BTM
3
ENGLISH
00_KW-V2018ST_M_ENG.indb 300_KW-V2018ST_M_ENG.indb 3 17/6/2017 7:35:43 AM17/6/2017 7:35:43 AM

Initial settings
When you power on the unit for the first time or reset
the unit, the <Initial Settings> screen appears.
Perform the initial settings.
E.g. Initial settings screen for KW-V440BT
Once completed, Home screen appears.
For KW-V440BT Region 3, Indonesian models, a
caution message will appear.
Touch [OK] to confirm the caution message.
• The caution message appears each time you turn on
the unit.
Getting StartedGetting Started
KW-V440BT/KW-V440BTM
On the Home screen, touch as follows:
Turning off the AV source
1 Display the source/option selection
screen.
On the Home screen, touch as follows:
2 Turn off the AV source.
On the source/option selection screen, touch as
follows:
Turning off the screen
KW-V340BT/KW-V340BTM
(Hold)
• The button illumination also lights off when you turn
off the screen.
To turn on the screen: Press and hold on the
monitor panel or touch the screen.
Basic OperationsBasic Operations
• For KW-V440BT/KW-V440BTM: See “Using the
pop-up short-cut menu” on page 8.
Adjusting the volume
KW-V340BT/
KW-V340BTM
KW-V440BT/
KW-V440BTM
You can adjust the volume (00 to 35) by pressing +to
increase and pressing –to decrease.
• Holding +increases the volume continuously to
level 15.
Attenuating the sound
On the source control screen, touch as follows:
[ ] becomes blue.
To cancel attenuation: Touch [ ] again. ([ ]
becomes white.)
4ENGLISH
00_KW-V2018ST_M_ENG.indb 400_KW-V2018ST_M_ENG.indb 4 17/6/2017 7:35:44 AM17/6/2017 7:35:44 AM

Getting StartedGetting Started
*1 For KW-V440BT Region 3, Indonesian models, <OFF> is
selected initially.
*2 For KW-V440BT Region 3, Indonesian models, <Bahasa
Indonesia> is selected initially.
Clock settings
1 Display the Home screen.
KW-V340BT/
KW-V340BTM
KW-V440BT/
KW-V440BTM
2 Display the <Clock> screen.
On the Home screen, touch as follows:
Then, on the <Settings> screen, touch as follows:
[System] <Clock> : [Enter]
• You can also display the <Clock> screen by
touching the clock area on the Home screen.
<Demonstration>
• ON (Initial)*1: Activates the display demonstration.
• OFF: Deactivates the display demonstration.
<Language>
Select the text language used for on-screen
information.
• English (Initial)*2/Español/Français/Deutsch/
Italiano/Nederlands/Ελληνικά/Português/Türkçe/
Čeština/Polski/Magyar/Руccĸий/ / /
/ / / /Bahasa
Malaysia/Bahasa Indonesia/
–For external monitors, only English/Spanish/
French/German/Italian/Dutch/Russian/Portuguese
are available. If another language has been
selected, the text language for external monitors
will be set to English.
• GUI Language (Local (the language selected
above)/English (Initial)*2): Selects the language used
for displaying operation keys and menu items.
“Please Power Off” appears when the setting is
changed. Turn off the power, then turn on to enable
the change.
<Rear Camera> (Page 37)
Make the settings to display the picture from the
connected rear view camera.
<User Customize> (Page 35)
Change the display design.
<Viewing Angle>
Select the viewing angle in relation to the monitor
panel to make the panel easier to see.
• Under 0° (Initial)/5°/10°/15°/20°
3 Set the clock time.
E.g. Clock settings screen for KW-V440BT
<Synchronize>
• Radio Data System: Synchronizes the clock time
with FM Radio Data System.
• Off: Sets the clock manually. Touch [J]/[K]to
adjust the hour, then minute.
–Touching [Reset] will set the minute to “00”.
5
ENGLISH
00_KW-V2018ST_M_ENG.indb 500_KW-V2018ST_M_ENG.indb 5 17/6/2017 7:35:44 AM17/6/2017 7:35:44 AM

Various Screens and OperationsVarious Screens and Operations
KW-V440BT/KW-V440BTM
• You can change the icon design. For details, see
page 36.
Touching the operation keys performs the following
actions:
1Displays the <Settings> screen.
2Ejects the disc.
3Displays the <Clock> screen.
4Displays the <User Customize> screen.
5Displays all playback sources and options.
6Selects or changes the playback source.
7Displays the phone control screen.
Available playback sources and options
Touch 5to display the source/option selection screen.
E.g. Source/option selection screen for KW-V440BT
Touching the operation keys performs the following
actions:
[Tuner] Switches to the radio broadcast.
[Disc] Plays a disc.
[USB] Plays files on a USB device.
[iPod] Plays an iPod/iPhone.
[Android™] Plays an Android device.
[BT Audio] Plays a Bluetooth audio player.
[AV-IN] Switches to an external component
connected to the AV-IN input
terminal.
[Spotify] Switches to the Spotify application.
[Pandora]*1 Switches to the Pandora Broadcast.
[Navi]*2 Displays the navigation screen.
[Phone] Displays the phone control screen.
[AV Off] Turns off the AV source.
[Home]*3 Displays the Home screen.
[Setup]*3 Displays the <Setting> screen.
[Power Off]*3 Turns off the power.
[Camera] Switches to the camera connected
to the rear view camera input.
[Now Playing]*3 Displays the source currently
played back.
*1 Only for KW-V340BT Region 4.
*2 Only for KW-V340BT Region 3, KW-V340BTM Region 2,
KW-V440BT Region 3 (except for Indonesian models),
KW-V440BTM Region 2. Selectable only when a navigation unit
is connected.
*3 Only for KW-V440BT/KW-V440BTM.
You can display or change to other screens at any time
to show information, change the AV source, change
the settings, etc.
Home screen
When you turn on the power for the first time, the
Home screen appears.
• You can customize the Home screen. (Pages 7
and 35)
• To display the Home screen from other screens:
For KW-V340BT/KW-V340BTM: Press HOME on the
monitor panel.
For KW-V440BT/KW-V440BTM: Press FNC on the
monitor panel, then touch [Home] on the pop-up
short-cut menu.
KW-V340BT/KW-V340BTM
• You can change Home screen design (icons and
layout). For details, see page 35.
6ENGLISH
03_KW_V340BT_M_Body01.indd 603_KW_V340BT_M_Body01.indd 6 18/7/2017 9:49:24 AM18/7/2017 9:49:24 AM

Various Screens and OperationsVarious Screens and Operations
Source control screen
You can perform the playback operation from the
source control screen during playback.
• The operation keys and information displayed vary
depending on the selected source/disc type/file type
being played.
• If the operation keys are not displayed on the screen,
touch the screen to show them.
E.g. Common audio playback source screen:
KW-V340BT/KW-V340BTM
KW-V440BT/KW-V440BTM
1Playing time/playback status
2Playback source or media type
3Current playback item information
(folder no./file no./track no./total track no./playback
file type)
4[M]: Ejects the disc.
[]: Attenuates/restores the sound.
5Clock display
6Only for KW-V340BT/KW-V340BTM: Playback
source items shown on the Home screen.
• Touching the playback source item changes the
playback source.
7Displays/hides other available operation keys*
8Operation keys*
9IN indicator (lights up while a disc is inserted)
pTrack/file/song/video information
• Touching [H]scrolls the text if not all of the text
is shown.
qPlayback mode indicator (Repeat/Random)
wFile type indicator
ePicture/artwork (shown if the file contains the
information)
* See “Common operation keys on source control screen” on
page8.
To return to the Home screen
Touch [ ] or [Home] on the source/option
selection screen.
Customizing the Home screen
1 Select an item to replace.
On the Home screen, touch and hold the icon you
want to replace.
The item selection screen is displayed.
2 Select an item (1) you want to display in
the selected position, then touch [ ]
(2).
Repeat the procedure to customize your Home
screen.
E.g. Home item selection screen for KW-V440BT
• Only selectable sources are shown.
• You cannot locate [Camera] on the Home
screen.
7
ENGLISH
03_KW_V340BT_M_Body01.indd 703_KW_V340BT_M_Body01.indd 7 18/7/2017 9:55:35 AM18/7/2017 9:55:35 AM

Various Screens and OperationsVarious Screens and Operations
Using gesture control
You can also control playback by moving your finger
on the touch panel as follows (for some sources, the
gesture control is not available).
• Sliding the finger up/down:
Selects a folder.
• Sliding the finger left/right:
Selects an item (chapter/track/audio file/video file).
• Moving your finger clockwise/counterclockwise:
Increases/decreases the volume.
Using the pop-up short-cut menu
While displaying the source control screen, you can
jump to another screen by touching the operation
keys on the pop-up short-cut menu.
1 Display the pop-up short-cut menu.
KW-V340BT/
KW-V340BTM
KW-V440BT/
KW-V440BTM
8
[FNC J]For KW-V340BT/KW-V340BTM:
Displays the pop-up short-cut menu.
• To close the menu, touch [K].
[ ] For KW-V440BT/KW-V440BTM:
Displays the Home screen.
[ ] Displays the folder list/track list/audio
menu/video menu.
[S]/[T]• (Touch) Selects an item (chapter/
folder/track/audio file/video file).
• (Hold) Reverses/forwards search.
• (Hold) Plays in slow-motion while
paused for video playback.
[IW]Starts/pauses playback.
[ ] Selects random playback mode.*
* About playback mode:
–Available playback mode differs depending on the source, disc
type, connected device, etc.
–You cannot activate repeat playback mode and random
playback mode at the same time.
–To cancel the playback mode, touch repeatedly until the
indicator disappears.
Common operation keys on source control screen
• The following explanations state the operation keys
for KW-V440BT, unless stated otherwise.
• The appearance of the operation keys may differ,
however the similar operation keys have the same
operations.
• Available operation keys differ depends on the
selected source or connected device.
Touching the operation keys performs the following
actions:
7
[ ] Displays other available operation keys
besides those shown on 8.
• To hide the window, touch [ ].
[ ][ ] Selects a folder.
[ ] Selects repeat playback mode.*
[o]Stops playback.
[MODE] Displays the setting screen of the current
playback source.
8ENGLISH
00_KW-V2018ST_M_ENG.indb 800_KW-V2018ST_M_ENG.indb 8 17/6/2017 7:35:45 AM17/6/2017 7:35:45 AM

2 Select an item to jump to by touching as
follows.
For KW-V340BT/KW-V340BTM:
[ ] Displays the phone control screen.
[ ] Activates the voice dialing.
[ ] Displays the <Equalizer> screen.
[ ] Displays the picture adjustment screen.
[ ] Displays the <User Customize> screen.
For KW-V440BT/KW-V440BTM:
[ ] (Touch) Switches the screen.
(Hold) Turns off the screen.
[ ] Displays the phone control screen.
[ ] Activates the voice dialing.
[ ] Displays the picture from the connected
rear view camera.
[ ] Displays the picture adjustment screen.
[ ] Displays the <Equalizer> screen.
[ ] Displays the Home screen.
[ ] Displays all playback sources and items.
• The playback source buttons/items displayed on
the Home screen are displayed on the pop-up
short-cut menu. Touching these operation keys
changes the playback source.
Various Screens and OperationsVarious Screens and Operations
To close the pop-up menu
• KW-V340BT/KW-V340BTM: Touch [K]or touch the
screen anywhere other than the pop-up short-cut
menu.
• KW-V440BT/KW-V440BTM: Press FNC on the
monitor panel.
Using touch screen operation during
playback
Touching the areas performs the following actions:
1Displays the video control menu while playing a
video.
2While playing a video: Displays the source control
screen.
While playing an audio file: Displays the playback
operation keys.
3Goes to the previous chapter/track.*
4Goes to the next chapter/track.*
* Not available for video from an external component (AV-IN).
List/setting screen
Below are the common operation keys which appear
on the list/setting screen..
• The appearance of the operation keys may differ,
however the similar operation keys have the same
operations.
• Available operation keys differ depends on the
setting screens. Not all these operation keys are
shown on every screen.
Touching the operation keys performs the following
actions:
1Enters alphabet search* to list the items in
alphabetical order. When a keypad appears, touch
the first letter you want to search for.
2Returns to the root folder.
3Returns to the upper layer.
4Closes the current screen.
5Exits from the current screen or returns to the
previous screen.
6Changes the page to display more items.
* Alphabet search is not available when the playlist is selected.
9ENGLISH
00_KW-V2018ST_M_ENG.indb 900_KW-V2018ST_M_ENG.indb 9 17/6/2017 7:35:45 AM17/6/2017 7:35:45 AM

DiscDisc
Selecting a folder/track on the list
1 Display the folder/track list.
On the source control screen, touch as follows:
2 Select the folder (1), then the item (2) in
the selected folder.
Select an item in each layer until you reach and
select the desired file.
Settings for disc playback
• Available items shown on the <DISC Mode> screen
differ depending on the type of disc/file being
played back.
1 Display the <DISC Mode> screen.
On the source control screen, touch as follows:
Ejecting a disc
On the Home screen or source control screen, touch
as follows:
• When removing a disc, pull it out horizontally.
• You can eject a disc while playing another AV source.
• If the ejected disc is not removed within 15 seconds,
the disc is automatically inserted again into the
loading slot to protect it from dust.
Playback operations
Audio playback information and key
operation
• For playback information, see “Source control screen”
on page7.
• For key operations on the touch panel, see “Common
operation keys on source control screen” on
page8.
• If a disc does not have a disc menu, all tracks on it will
be played repeatedly until you change the source or
eject the disc.
• For playable disc types, file types and other
information, see pages46 and 47.
• If “ ” appears on the screen, the unit cannot accept
the operation you have tried to do.
–In some cases, without showing “ ”, operations
will not be accepted.
• When playing back a multi-channel encoded disc,
the multi-channel signals are downmixed.
Inserting a disc
Label side up
E.g. Inserting a disc for KW-V440BT
The source changes to “DISC” and playback starts.
• The IN indicator lights up while a disc is inserted.
10 ENGLISH
00_KW-V2018ST_M_ENG.indb 1000_KW-V2018ST_M_ENG.indb 10 17/6/2017 7:35:45 AM17/6/2017 7:35:45 AM

DiscDisc
2 Make the settings.
<Menu language>*1
Select the initial disc menu language. (Initial:
English)
<Subtitle language>*1
Select the initial subtitle language or turn subtitles
off (Off). (Initial: English)
<Audio language>*1
Select the initial audio language. (Initial: English)
<Dynamic Range Control>
You can change the dynamic range while playing
Dolby Audio encoded discs.
• Wide: Reproduces powerful sound at a low
volume level with its full dynamic range.
• Normal: Reduces the dynamic range a little.
• Dialog (Initial): Reproduces movie dialog more
clearly.
<Down Mix>
When playing back a multi-channel disc, this
setting affects the signals reproduced through the
front and/or rear speakers.
• Dolby Surround: Reproduces multi-channel
surround sound by connecting an amplifier
compatible with Dolby Surround.
• Stereo (Initial): Reproduces stereo playback
sound.
<Screen Ratio>
Select the monitor type to watch a wide screen
picture on the external monitor.
16:9 (Initial) 4:3 LB 4:3 PS
<File Type>*2
Select the playback file type when a disc contains
different types of files.
• Audio: Plays back audio files.
• Still image: Plays back still picture files.
• Video: Plays back video files.
• Audio&Video (Initial): Plays back audio files and
video files.
*1 For list of language codes, see page48.
*2 For playable file types, see page46.
If the disc contains no files of the selected type, the existing
files are played in the following priority: audio, video, then still
picture. You can change these settings only while playback is
stopped.
VideoVideo
Playback operations
Video playback information on the source
control screen
E.g. Video playback source control screen for
KW-V440BT
1Media type
2Playback status
3Current playback item information
(title no./chapter no./folder no./file no./track no.)
4Playing time
5IN indicator (lights up while a disc is inserted)
6Playback mode indicator (Repeat/Random)
7File type indicator
11
ENGLISH
00_KW-V2018ST_M_ENG.indb 1100_KW-V2018ST_M_ENG.indb 11 17/6/2017 7:35:46 AM17/6/2017 7:35:46 AM

VideoVideo
Touching the operation keys performs the following
actions:
1
[ ]*1 Displays the picture size selection
screen.
1Touch [ Zoom] to change the
magnification level of the picture
(Zoom1, Zoom2, Zoom3, Full:
Initial).
2Touch [J] [K] [H] [I]to move the
zooming frame.
[ ] Displays the aspect ratio selection
screen.
Touch [ Aspect] to select the aspect
ratio.
<Full>*2: For 16:9 original pictures
4:3 signal 16:9 signal
<Just>: For viewing 4:3 pictures
naturally on the wide screen
4:3 signal 16:9 signal
<Normal>*2: For 4:3 original pictures
4:3 signal 16:9 signal
<Auto>: For “DISC” source and
“USB” source only: The aspect ratio is
automatically selected to match the
incoming signals.
[ ] Displays the picture adjustment screen.
1Touch [DIM ON] or [DIM OFF] to
turn on or off the dimmer.
2Touch [+]/[–] to adjust the other
items.
• <Bright>: Adjusts the brightness
(−15 to +15).
• <Contrast>: Adjusts the contrast
(−10 to +10).
• <Black>: Adjusts the blackness
(−10 to +10).
• <Color>: Adjusts the color
(−10 to +10).
• <Tint>: Adjusts the tint (−10 to +10).
• <Sharpness>: Adjusts the sharpness
(−2 to +2).
[ ] Selects the audio type.
[ ] Selects the subtitle type.
[ ] Selects the view angle.
*1 When [ ] is set to <Just> or <Auto>, the picture is
zoomed with the aspect ratio of the <Full> setting.
This feature may not be used for some video sources.
*2 While DivX is played back with <Screen Ratio> set to [16:9]
(Page11 for discs/Page14 for USB), the aspect ratio may
not be set correctly.
Video menu control operations
You can display the video menu control during video
playback.
• Available operation keys differ depend on the
selected disc type and file type.
Video playback except VCD
E.g. Video menu control screen for KW-V440BT
12 ENGLISH
00_KW-V2018ST_M_ENG.indb 1200_KW-V2018ST_M_ENG.indb 12 17/6/2017 7:35:46 AM17/6/2017 7:35:46 AM

2
[ MENU] Displays the disc menu (DVD).
[T MENU] Displays the disc menu (DVD).
[ ] Switches to the direct disc menu mode.
Touch the target item to select.
[ ] Displays the menu/scene selection
screen.
• [J] [K] [H] [I]: Selects an item.
• [Enter]: Confirms the selection.
• [Return]: Returns to the previous
screen.
Video playback for VCD
E.g. Video menu control screen for KW-V440BT
VideoVideo USBUSB
You can connect a USB mass storage class device such
as a USB memory, digital audio player, etc. to the unit.
• For playable file types and other information, see
pages46 and49.
• You cannot connect a PC or portable HDD to the
USB input terminal.
• You cannot connect a USB device via a USB hub.
Connecting a USB device
On the rear panel
USB device (commercially available)
The source changes to “USB” and playback starts.
• All tracks in the USB device will be played repeatedly
until you change the source or disconnect the USB
device.
Touching the operation keys performs the following
actions:
1
[ ]
Refer to “Video playback except VCD” on
page12.
[ ]
[ ]
2
[ MENU] Displays the disc menu.
[ ] Selects the audio channel
(ST: stereo, L: left, R: right).
[ ]*Displays or hides the direct selection
buttons.
1Touch [DIR/CLR] to select a track
directly on a VCD.
2Touch the numbers ([0], [1] to [9]) to
select the desired track.
3Touch [Enter] to confirm.
To delete the last entry, touch [DIR/
CLR].
[Return] Displays the previous screen or menu.
* You need to stop playback to deactivate the PBC function when
playing a VCD with PBC activated.
13ENGLISH
00_KW-V2018ST_M_ENG.indb 1300_KW-V2018ST_M_ENG.indb 13 17/6/2017 7:35:46 AM17/6/2017 7:35:46 AM

USBUSB
Selecting a folder/track on the list
1 Display the folder/track list.
On the source control screen, touch as follows:
2 Select the folder (1), then the item (2) in
the selected folder.
Select an item in each layer until you reach and
select the desired file.
Settings for USB playback
1 Display the <USB Mode> screen.
On the source control screen, touch as follows:
2 Make the settings.
<Screen Ratio>
Select the monitor type to watch a wide screen
picture on the external monitor.
16:9 (Initial) 4:3 LB 4:3 PS
<Drive Select>
• Next: Switch between internal memory and the
memory source of the connected device (such as
a mobile phone).
Playback operations
Playback information and key operation
• For playback information, see “Source control screen”
on page7.
• For key operations on the touch panel, see “Common
operation keys on source control screen” on
page8.
Selecting the file type to play
You can specify the file type to play.
E.g. USB source control screen for KW-V440BT
Select the file type as follows:
[Audio] Plays back audio files.
[Video] Plays back video files.
[Photo] Plays back still picture files.
If the USB contains no files of the selected type, the
existing files are played in the following priority: audio,
video, then still picture. You can change these settings
only while playback is stopped.
14 ENGLISH
00_KW-V2018ST_M_ENG.indb 1400_KW-V2018ST_M_ENG.indb 14 17/6/2017 7:35:46 AM17/6/2017 7:35:46 AM

AndroidAndroid
This unit supports the Android™ application, JVC
Music Play. When you use JVC Music Play via this unit,
you can search for audio files by genre, artist, album,
playlist and song.
• For more information about JVC Music Play, visit
<http://www.jvc.net/cs/car/>.
Preparation
Installing JVC Music Play
Install the Android™ application, JVC Music Play, on
your Android device beforehand.
• When a compatible Android device is connected,
“Press [VIEW] to install JVC MUSIC PLAY APP” is shown
on the Android device. Follow the instructions to
install the application.
• You can also install the latest version of JVC Music
Play on your Android device before connecting.
Connecting an Android device
This unit supports Android OS 4.1 and above.
• Some Android devices (with OS 4.1 and above) may
not fully support Android Open Accessory (AOA) 2.0.
• If the Android device supports both mass storage
class device and AOA 2.0, this unit always plays back
via AOA 2.0 as priority.
Android (commercially available)
On the rear panel
USB cable (commercially available)
Start playback
1 Turn on JVC Music Play on your Android
device.
2 Select “Android” as the source.
Playback operations
Playback information and key operation
• For playback information, see “Source control screen”
on page7.
• For key operations on the touch panel, see “Common
operation keys on source control screen” on
page8.
Selecting a track from the menu
1 Display the audio menu.
On the source control screen, touch as follows:
2 Select a category (1), then select a
desired item (2).
Select an item in each layer until you reach and
select the desired file.
15
ENGLISH
00_KW-V2018ST_M_ENG.indb 1500_KW-V2018ST_M_ENG.indb 15 17/6/2017 7:35:47 AM17/6/2017 7:35:47 AM

iPod/iPhoneiPod/iPhone
Connecting an iPod/iPhone
• For playable iPod/iPhone types and other
information, see page 49.
• You cannot watch video.
Wired connection
iPod/iPhone
Lightning model
(commercially available)
iPod/iPhone 30-pin
connector model
(commercially available)
On the rear panel
USB Audio cable
for iPod/iPhone:
KS-U62 (optional
accessory)
30-pin to USB cable
(accessory of iPod/
iPhone)
Bluetooth connection
Pair the iPod/iPhone with this unit via Bluetooth.
(Page26)
Selecting the playback device via the
connection method
See <Smartphone Setup> on page 38 for more
information.
Playback operations
Playback information and key operation
• For playback information, see “Source control screen”
on page7.
• For key operations on the touch panel, see “Common
operation keys on source control screen” on
page8.
Additional keys operations. Touching the operation
keys performs the following actions:
[ ] Switches the device on <Smartphone
Setup> screen. (Page38)
Selecting an audio file from the menu
1 Display the audio menu.
On the source control screen, touch as follows:
Settings for Android playback
1 Display the <Android MODE> screen.
On the source control screen, touch as follows:
2 Make the settings.
<Artwork>
• ON (Initial): Shows the artworks of the playing
files.
• OFF: Hides the artworks of the playing files.
<Android Setup>
• AUTO MODE (Initial): Controls from the unit
(using the JVC Music Play application).
• AUDIO MODE: Controls other media player
applications from the Android device (without
using the JVC Music Play application).
–You can play/pause or skip files from the unit.
AndroidAndroid
16 ENGLISH
00_KW-V2018ST_M_ENG.indb 1600_KW-V2018ST_M_ENG.indb 16 17/6/2017 7:35:47 AM17/6/2017 7:35:47 AM

iPod/iPhoneiPod/iPhone
2 Select a category (1), then select a
desired item (2).
Select an item in each layer until you reach and
select the desired file.
• Available categories differ depending on the type
of iPod/iPhone.
Settings for iPod/iPhone playback
1 Display the <iPod Mode> screen.
On the source control screen, touch as follows:
2 Make the settings.
<Artwork>
• ON (Initial): Shows the artworks of the playing
files.
• OFF: Hides the artworks of the playing files.
Listening to the radio
Playback information on the source control
screen
KW-V340BT/KW-V340BTM
KW-V440BT/KW-V440BTM
TunerTuner
1Displays/hides other available operation keys*
2Current station frequency
3Text information
• Touching [ ] scrolls the text if not all of the text
is shown.
• Touching [Radio Text] switches the information
between Radio Text, Radio Text Plus and PTY
code.
4Displays the preset stations window (Page19)
5[P1] – [P5]
• (Touch) Selects a preset station.
• (Hold) Presets the current station.
6NEWS indicator
7AF indicator
8TI indicator
9Operation keys*
pST/MONO indicator
The ST indicator lights up when receiving an FM
stereo broadcast with sufficient signal strength.
qSeek mode indicator
wLO.S indicator
eRDS indicator
rEON indicator
The EON indicator lights up when a Radio Data
System station is sending EON signals.
tSelects the band (AM/FM1/FM2/FM3)
yOnly for KW-V340BT/KW-V340BTM: Playback
source items shown on the Home screen.
• Touching the playback source item changes the
playback source.
* See “Operation keys on source control screen” on page18.
17ENGLISH
00_KW-V2018ST_M_ENG.indb 1700_KW-V2018ST_M_ENG.indb 17 17/6/2017 7:35:47 AM17/6/2017 7:35:47 AM

Operation keys on source control screen
• The following explanations state the operation keys
for KW-V440BT, unless stated otherwise.
• The appearance of the operation keys may differ,
however the similar operation keys have the same
operations.
• See also “Common operation keys on source control
screen” on page8.
Touching the operation keys performs the following
actions:
1
[SSM ]*1 (Hold) Presets stations automatically.
[MONO]*1 Activates monaural mode for better FM
reception (stereo effect will be lost).
• The MONO indicator lights up while
monaural mode is activated.
• To deactivate, touch [MONO] again.
[TI]*1 (For FM RDS features)
Activates TI standby reception mode.
• When TI is activated, the unit is ready
to switch to traffic information if
available. The TI indicator lights up in
white.
• If the TI indicator lights up in orange,
tune into another station providing
Radio Data System signals.
• The volume adjustment for Traffic
Information is automatically
memorized. The next time the unit
switches to Traffic Information, the
volume is set to the memorized level.
• To deactivate, touch [TI] again.
TunerTuner
Presetting stations in the memory
You can preset five stations for each band.
Automatic presetting — SSM (Strong-
station Sequential Memory) (for FM only)
On the source control screen, touch as follows:
(Hold)
The local stations with the strongest signals are found
and stored automatically.
Manual presetting
1 Tune in to a station you want to preset.
2 Select a preset number to store into.
(Hold)
E.g. Tuner source control screen for KW-V440BT
The station selected in step 1 is stored into the
preset number [P1] to [P5] you have selected.
[MODE]*1 Change the settings for the selected
tuner reception on <Tuner Mode>
screen. (Page 19)
9
[PTY]*1*2 (For FM RDS features)
Enters PTY search mode.
1Touch [PTY].
2Touch and hold a PTY code to search
for.
If there is a station broadcasting a
program of the same PTY code as you
have selected, that station is tuned in.
[SEEK] Changes the seek mode for [S]/[T].
• AUTO1 (Initial): Auto search
• AUTO2: Tunes in preset stations one
after another
• MANU: Manual search
[S]/[T]Searches for a station.
• The search method differs according
to the selected seek mode (see above).
*1 Appears only when FM is selected as the source.
*2 Only English/Spanish/French/German/Dutch/ Portuguese are
available for the text language here. If another language has
been selected in <Language> (Page 38), the text language
is set to English.
18 ENGLISH
00_KW-V2018ST_M_ENG.indb 1800_KW-V2018ST_M_ENG.indb 18 17/6/2017 7:35:47 AM17/6/2017 7:35:47 AM
This manual suits for next models
3
Table of contents
Other JVC Car Receiver manuals

JVC
JVC KW-AVX720 - DVD Player With LCD Guide

JVC
JVC KD-S687 Quick start guide

JVC
JVC KD-G200 User manual

JVC
JVC KS-F171G User manual

JVC
JVC KD-S577 User manual

JVC
JVC KD-AVX1 User manual

JVC
JVC KD-G615 User manual

JVC
JVC KW-R910BT User manual

JVC
JVC KD-BT11 - Radio / CD User manual

JVC
JVC KS-FX701 User manual
Popular Car Receiver manuals by other brands

GMC
GMC 2016 Intellilink How to use

Sony
Sony MEXBT2600 - Bluetooth CD Receiver operating instructions

Kenwood
Kenwood KRC-S100s instruction manual

Pioneer
Pioneer DEH-P65BT installation manual

Metra Electronics
Metra Electronics 95-7882B installation instructions

Soundstream
Soundstream VL-16PMP instruction manual