JVC KW-XC55 User manual

SERVICE MANUAL
COPYRIGHT © 2003 VICTOR COMPANY OF JAPAN, LIMITED No.49784
2003/10
CD/CASSETTE RECEIVER
49784200310 KW-XC55
TABLE OF CONTENTS
1 PRECAUTION. . . . . . . . . . . . . . . . . . . . . . . . . . . . . . . . . . . . . . . . . . . . . . . . . . . . . . . . . . . . . . . . . . . . . . . . . 1-2
2 SPECIFIC SERVICE INSTRUCTIONS. . . . . . . . . . . . . . . . . . . . . . . . . . . . . . . . . . . . . . . . . . . . . . . . . . . . . . 1-4
3 DISASSEMBLY . . . . . . . . . . . . . . . . . . . . . . . . . . . . . . . . . . . . . . . . . . . . . . . . . . . . . . . . . . . . . . . . . . . . . . . 1-5
4 ADJUSTMENT . . . . . . . . . . . . . . . . . . . . . . . . . . . . . . . . . . . . . . . . . . . . . . . . . . . . . . . . . . . . . . . . . . . . . . . 1-23
5 TROUBLESHOOTING . . . . . . . . . . . . . . . . . . . . . . . . . . . . . . . . . . . . . . . . . . . . . . . . . . . . . . . . . . . . . . . . . 1-27
Area suffix
UN ----------------------------Asean
w
w
w
.
x
i
a
o
y
u
1
6
3
.
c
o
m
Q
Q
3
7
6
3
1
5
1
5
0
9
9
2
8
9
4
2
9
8
T
E
L
1
3
9
4
2
2
9
6
5
1
3
9
9
2
8
9
4
2
9
8
0
5
1
5
1
3
6
7
3
Q
Q
TEL 13942296513 QQ 376315150 892498299
http://www.xiaoyu163.com

1-2 (No.49784)
SECTION 1
PRECAUTION
1.1 Safety Precautions
!Burrs formed during molding may be left over on some parts of the chassis. Therefore,
pay attention to such burrs in the case of preforming repair of this system.
!Please use enough caution not to see the beam directly or touch it in case of an
adjustment or operation check.
w
w
w
.
x
i
a
o
y
u
1
6
3
.
c
o
m
Q
Q
3
7
6
3
1
5
1
5
0
9
9
2
8
9
4
2
9
8
T
E
L
1
3
9
4
2
2
9
6
5
1
3
9
9
2
8
9
4
2
9
8
0
5
1
5
1
3
6
7
3
Q
Q
TEL 13942296513 QQ 376315150 892498299
http://www.xiaoyu163.com

(No.49784)1-3
1.2 Preventing static electricity
Electrostatic discharge (ESD), which occurs when static electricity stored in the body, fabric, etc. is discharged, can destroy the laser
diode in the traverse unit (optical pickup). Take care to prevent this when performing repairs.
1.2.1 Grounding to prevent damage by static electricity
Static electricity in the work area can destroy the optical pickup (laser diode) in devices such as CD players.
Be careful to use proper grounding in the area where repairs are being performed.
(1) Ground the workbench
Ground the workbench by laying conductive material (such as a conductive sheet) or an iron plate over it before placing the
traverse unit (optical pickup) on it.
(2) Ground yourself
Use an anti-static wrist strap to release any static electricity built up in your body.
(3) Handling the optical pickup
• In order to maintain quality during transport and before installation, both sides of the laser diode on the replacement optical
pickup are shorted. After replacement, return the shorted parts to their original condition.
(Refer to the text.)
• Do not use a tester to check the condition of the laser diode in the optical pickup. The tester's internal power source can easily
destroy the laser diode.
1.3 Handling the traverse unit (optical pickup)
(1) Do not subject the traverse unit (optical pickup) to strong shocks, as it is a sensitive, complex unit.
(2) Cut off the shorted part of the flexible cable using nippers, etc. after replacing the optical pickup. For specific details, refer to the
replacement procedure in the text. Remove the anti-static pin when replacing the traverse unit. Be careful not to take too long a
time when attaching it to the connector.
(3) Handle the flexible cable carefully as it may break when subjected to strong force.
(4) It is not possible to adjust the semi-fixed resistor that adjusts the laser power. Do not turn it.
1.4 Attention when traverse unit is decomposed
*Please refer to "Disassembly method" in the text for the CD pickup unit.
• Apply solder to the short land before the flexible wire is disconnected from the connector on the CD pickup unit.
(If the flexible wire is disconnected without applying solder, the CD pickup may be destroyed by static electricity.)
• In the assembly, be sure to remove solder from the short land after connecting the flexible wire.
1M
(caption)
Anti-static wrist strap
Conductive material
(conductive sheet) or iron plate
Short round
w
w
w
.
x
i
a
o
y
u
1
6
3
.
c
o
m
Q
Q
3
7
6
3
1
5
1
5
0
9
9
2
8
9
4
2
9
8
T
E
L
1
3
9
4
2
2
9
6
5
1
3
9
9
2
8
9
4
2
9
8
0
5
1
5
1
3
6
7
3
Q
Q
TEL 13942296513 QQ 376315150 892498299
http://www.xiaoyu163.com

1-4 (No.49784)
SECTION 2
SPECIFIC SERVICE INSTRUCTIONS
This service manual does not describe SPECIFIC SERVICE INSTRUCTIONS.
w
w
w
.
x
i
a
o
y
u
1
6
3
.
c
o
m
Q
Q
3
7
6
3
1
5
1
5
0
9
9
2
8
9
4
2
9
8
T
E
L
1
3
9
4
2
2
9
6
5
1
3
9
9
2
8
9
4
2
9
8
0
5
1
5
1
3
6
7
3
Q
Q
TEL 13942296513 QQ 376315150 892498299
http://www.xiaoyu163.com

(No.49784)1-5
SECTION 3
DISASSEMBLY
3.1 Main body
3.1.1 Removing the front panel assembly
(See Fig.1, 2)
(1) From the both side of the main body, remove the four
screws Aattaching the front panel assembly. (See Figs.1,
2)
(2) Release the four joints ausing a screwdriver, then remove
the front panel assembly toward the front. (See Figs.1, 2)
Fig.1
Fig.2
3.1.2 Removing the rear bracket
(See Figs.3)
• Prior to performing the following procedure, remove the front
panel assembly as required.
(1) From the back side of the main body, remove the ten
screws B, screw Cand screw Dattaching the rear bracket.
(2) Take out the rear bracket.
Fig.3
3.1.3 Removing the heat sink
(See Fig.4)
• Prior to performing the following procedure, remove the front
panel assembly as required.
(1) From the left side of the main body, remove the two screws
Eand three screws Fattaching the heat sink.
Fig.4
A
A
Front panel assembly
Joints a
A
A
Joints a
Front panel assembly
BD
B
B
Rear braket
BC
FFE
F
Heat sink
w
w
w
.
x
i
a
o
y
u
1
6
3
.
c
o
m
Q
Q
3
7
6
3
1
5
1
5
0
9
9
2
8
9
4
2
9
8
T
E
L
1
3
9
4
2
2
9
6
5
1
3
9
9
2
8
9
4
2
9
8
0
5
1
5
1
3
6
7
3
Q
Q
TEL 13942296513 QQ 376315150 892498299
http://www.xiaoyu163.com

1-6 (No.49784)
3.1.4 Removing the top chassis assembly and bottom chassis assembly
(See Fig.5 to 7)
• Prior to performing the following procedures, remove the front
panel assembly, rear bracket and heat sink.
(1) From the back side of the main body, disconnect the card
wire from the connector CN702 on the main board in the
top chassis assembly. (See Fig.5)
(2) From the both side of the main body, remove the three
screws Gattaching the bottom chassis assembly. (See
Figs.6, 7)
(3) Release the four joints busing a screwdriver, and then
remove the top chassis assembly upward from the bottom
chassis assembly. (See Figs.6, 7)
Fig.5
Fig.6
Fig.7
3.1.5 Removing the main board
(See Fig.8)
• Prior to performing the following procedures, remove the front
panel assembly, rear bracket, heat sink, top chassis assembly
and bottom chassis assembly.
(1) From the bottom side of the top chassis assembly, remove
the three screws Hattaching the main board.
(2) Disconnect the connector CN501 on the main board, and
take out the main board from the top chassis assembly.
Reference:
• When attaching the main board, joint the hole of the main
board in joint cof the top chassis assembly.
Fig.8
CN702
Card wire Main board
Top chassis assembly
Bottom chassis assembly
G
Joints b
G
Top chassis assembly
Bottom chassis assembly
Joints b
G
CN601
Main board
H
H
H
Top chassis assembly
Joints c
w
w
w
.
x
i
a
o
y
u
1
6
3
.
c
o
m
Q
Q
3
7
6
3
1
5
1
5
0
9
9
2
8
9
4
2
9
8
T
E
L
1
3
9
4
2
2
9
6
5
1
3
9
9
2
8
9
4
2
9
8
0
5
1
5
1
3
6
7
3
Q
Q
TEL 13942296513 QQ 376315150 892498299
http://www.xiaoyu163.com

(No.49784)1-7
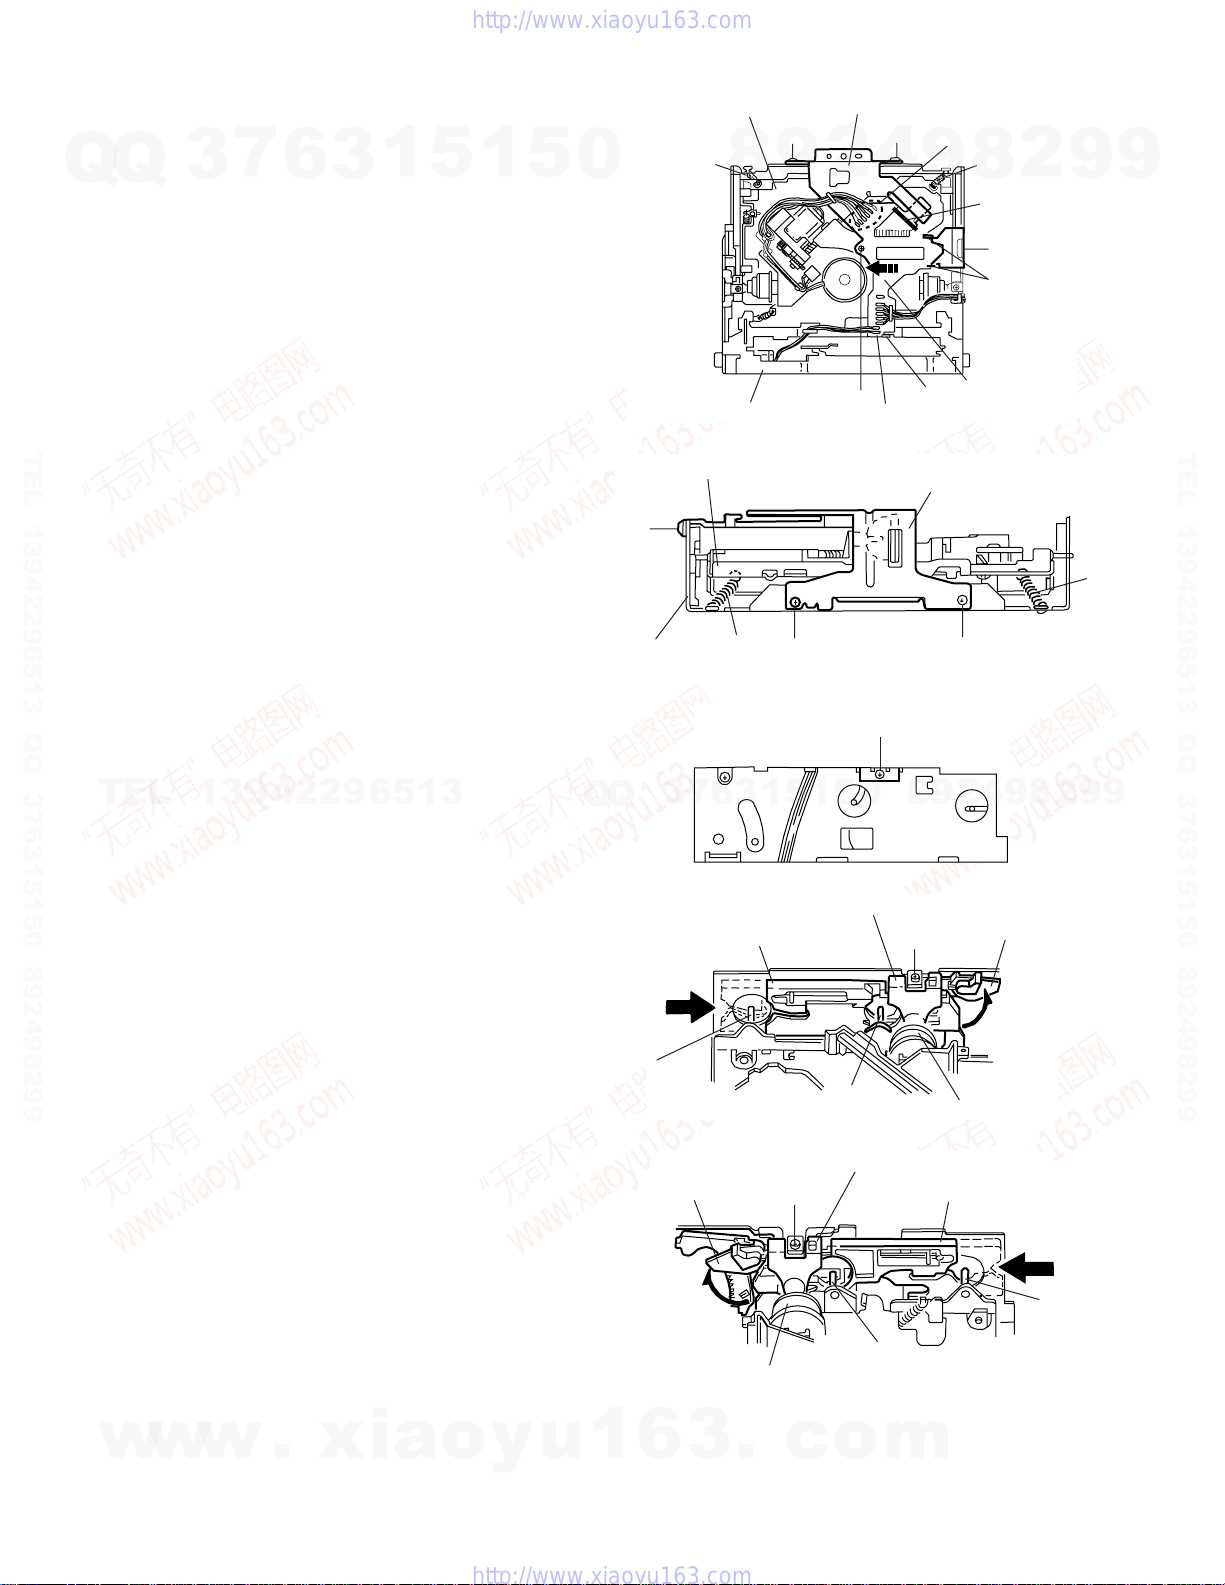
3.1.6 Removing the CD mechanism assembly
(See Fig.9)
• Prior to performing the following procedures, remove the front
panel assembly, rear bracket, heat sink, top chassis assembly,
main board and CD mecha control board.
(1) Remove the three screws Jattaching the CD mechanism
assembly to the top chassis assembly.
Reference:
• When attaching the CD mechanism assembly, joint the hole
of the CD mechanism assembly in boss dand boss eof the
top chassis assembly.
Fig.9
3.1.7 Removing the changer control board
(See Fig.10, 11)
• Prior to performing the following procedures, remove the front
panel assembly, rear bracket, heat sink, top chassis assembly
and bottom chassis assembly.
(1) From the back side of the bottom chassis assembly,
disconnect the card wire from the connector CN972 on the
changer control board. (See Fig.10)
(2) From the top side of the bottom chassis assembly, remove
the two screws Kattaching the changer control board. (See
Fig.11)
Reference:
• When attaching the changer control board, joint the hole of
the changer control board in joints fof the bottom chassis
assembly.
Fig.10
Fig.11
3.1.8 Removing the mecha control board
(See Fig.12)
• Prior to performing the following procedures, remove the front
panel assembly, rear bracket, heat sink, bottom chassis
assembly and changer control board.
(1) From the back side of the bottom chassis assembly,
remove the screw Lattaching the mecha control board,
and release the joints gfrom the bottom chassis assembly.
(2) Disconnect the wire from the connector CJ402 and the
card wire from the connector CN403 on the mecha control
board.
Reference:
• When attaching the mecha control board, joint the hole of
the mecha control board in joints iof the bottom chassis
assembly.
Fig.12
J
JJ
CD mechanism assembly
Boss e
Boss d
Top chassis assembly
CN972
Card wire
Changer control board
Bottom chassis assembly
K
Changer control board
Bottom chassis assembly
K
Joint f
Cassette mechanism assembly
L
Top chassis assembly Mecha control board
Joint g
CN403CJ402
w
w
w
.
x
i
a
o
y
u
1
6
3
.
c
o
m
Q
Q
3
7
6
3
1
5
1
5
0
9
9
2
8
9
4
2
9
8
T
E
L
1
3
9
4
2
2
9
6
5
1
3
9
9
2
8
9
4
2
9
8
0
5
1
5
1
3
6
7
3
Q
Q
TEL 13942296513 QQ 376315150 892498299
http://www.xiaoyu163.com

1-8 (No.49784)
3.1.9 Removing the cassette mechanism assembly
(See Fig.13)
• Prior to performing the following procedures, remove the front
panel assembly, rear bracket, heat sink, bottom chassis
assembly, changer control board and mecha control board.
(1) From the bottom side of the bottom chassis assembly,
remove the four screws Mattaching the cassette
mechanism assembly to the bottom chassis assembly.
Fig.13
3.1.10 Removing the LCD board
(See Fig.14)
• Prior to performing the following procedures, remove the front
panel assembly.
(1) From the back side of front panel assembly, remove the
twelve screws Nattaching the LCD board, and then turn
over the LCD board.
(2) From the reverse side of LCD board, remove the solders
from the soldered points hattaching the wire.
Fig.14
3.1.11 Removing the switch board
(See Fig.15)
• Prior to performing the following procedures, remove the front
panel assembly.
(1) From the back side of front panel assembly, remove the
five screws Pattaching the switch board.
(2) Release the claws i attaching the switch board, and then
turn over the switch board.
(3) From the reverse side of switch board, remove the solders
from the soldered points jattaching the wire.
Fig.15
M
Cassette mechanism assembly
Bottom chassis assembly
M
Front panel assembly
LCD board Solder points h
NN
NN
P
Front panel assembly
Switch board
P
Claws i
Solder points j
w
w
w
.
x
i
a
o
y
u
1
6
3
.
c
o
m
Q
Q
3
7
6
3
1
5
1
5
0
9
9
2
8
9
4
2
9
8
T
E
L
1
3
9
4
2
2
9
6
5
1
3
9
9
2
8
9
4
2
9
8
0
5
1
5
1
3
6
7
3
Q
Q
TEL 13942296513 QQ 376315150 892498299
http://www.xiaoyu163.com

(No.49784)1-9
3.2 CD mechanism assembly
3.2.1 Removing the CD mechanism control board
(See Fig.1 and 2)
(1) Unsolder the part aand bon the CD mechanism control
board.
(2) Remove the stator fixing the CD mechanism control board
and the damper bracket (To remove the stator smoothly,
pick up the center part).
(3) Remove the screw A attaching the CD mechanism control
board.
(4) Remove the CD mechanism control board in the direction
of the arrow while releasing it from the two damper bracket
slots dand the front bracket slot e.
(5) Disconnect the flexible wire from connector on the pickup
unit.
ATTENTION:
Turn the FD gear in the direction of the arrow to move the en-
tire pickup unit to the appropriate position where the flexible
wire of the CD mechanism unit can be disconnected easily.
(Refer to Fig.2)
Fig.1
Fig.2
3.2.2 Removing the loading motor
(See Fig.3 to 5)
• Prior to performing the following procedure, remove the CD
mechanism control board.
(1) Remove the two springs f attaching the CD mechanism as-
sembly and the front bracket.
(2) Remove the two screws Band the front bracket while pull-
ing the flame outward.
(3) Remove the belt and the screw C from the loading motor.
Fig.3
Fig.4
Fig.5
Front bracket CD mechanism
control board
Damper bracket
h
c
d
b
a
DD
D
CD mechanism assembly
A
e
h
Shift the lock
Flexible wire
Pickup unit
FD gear
CD mechanism control board
Loading motor Front bracket
f
B
Front bracket Pull outward
Pull outward
Flame
C
Loading motor
Belt
w
w
w
.
x
i
a
o
y
u
1
6
3
.
c
o
m
Q
Q
3
7
6
3
1
5
1
5
0
9
9
2
8
9
4
2
9
8
T
E
L
1
3
9
4
2
2
9
6
5
1
3
9
9
2
8
9
4
2
9
8
0
5
1
5
1
3
6
7
3
Q
Q
TEL 13942296513 QQ 376315150 892498299
http://www.xiaoyu163.com

1-10 (No.49784)
3.2.3 Removing the CD mechanism assembly
(See Fig.1, 6 to 9)
• Prior to performing the following procedure, remove the CD
mechanism control board and the front bracket (loading mo-
tor).
(1) Remove the three screws Dand the damper bracket.
(2) Raise the both sides fix arms and move the fix plates in the
direction of the arrow to place the four shafts gas shown in
Fig.8 and 9.
(3) Remove the CD mechanism assembly and the two springs
hattaching the flame.
(4) Remove the two screws Eand both sides rear damper
brackets from the dampers. Detach the CD mechanism as-
sembly from the left side to the right side.
ATTENTION:
The CD mechanism assembly can be removed if only the rear
damper bracket on the left side is removed. Fig.1
Fig.6
Fig.7
Fig.8
Fig.9
Front bracket CD mechanism
control board
Damper bracket
h
c
d
b
a
DD
D
CD mechanism assembly
A
e
h
DD
Damper bracket
CD mechanism assembly
Flame h
D
D
Fix plate (L)
g
g
Rear damper bracket Fix arm (L)
Damper
E
Rear damper bracket
Fix arm (R)
Damper
Fix plate(R)
E
g
g
w
w
w
.
x
i
a
o
y
u
1
6
3
.
c
o
m
Q
Q
3
7
6
3
1
5
1
5
0
9
9
2
8
9
4
2
9
8
T
E
L
1
3
9
4
2
2
9
6
5
1
3
9
9
2
8
9
4
2
9
8
0
5
1
5
1
3
6
7
3
Q
Q
TEL 13942296513 QQ 376315150 892498299
http://www.xiaoyu163.com

(No.49784)1-11
3.2.4 Removing the feed motor assembly
(See Fig.10)
• Prior to performing the following procedure, remove the CD
mechanism control board, the front bracket (loading motor)
and the CD mechanism assembly.
(1) Remove the two screws F and the feed motor assembly.
3.2.5 Removing the pickup unit
(See Fig.10 and 11)
• Prior to performing the following procedure, remove the CD
mechanism control board, the front bracket (loading motor),
the CD mechanism assembly and the feed motor assembly.
(1) Detach the FD gear part of the pickup unit upward. Then re-
move the pickup unit while pulling out the part i of the FD
screw.
ATTENTION:
When reattaching the pickup unit, reattach the part jof
the pickup unit, then the part iof the FD screw.
(2) Remove the screw Gattaching the nut push spring plate
and the pickup mount nut from the pickup unit. Pull out the
FD screw.
Fig.10
Fig.11
3.2.6 Removing the spindle motor
(See Fig.12 and 13)
• Prior to performing the following procedure, remove the CD
mechanism control board, the front bracket (loading motor),
the CD mechanism assembly and the feed motor assembly.
(1) Turn up the CD mechanism assembly and remove the two
springs kon both sides of the clamper arms. Open the
clamper arm upward.
(2) Turn the turn table, and remove the two screws Hand the
spindle motor.
Fig.12
Fig.13
Pickup unit
Part i
FD screw
Feed motor assembly
FD gear Pickup unit
Part j
Nut push spring plate
Pickup mount nut
Pickup unit
FD screw
G
kk
Spindle motor
H
H
w
w
w
.
x
i
a
o
y
u
1
6
3
.
c
o
m
Q
Q
3
7
6
3
1
5
1
5
0
9
9
2
8
9
4
2
9
8
T
E
L
1
3
9
4
2
2
9
6
5
1
3
9
9
2
8
9
4
2
9
8
0
5
1
5
1
3
6
7
3
Q
Q
TEL 13942296513 QQ 376315150 892498299
http://www.xiaoyu163.com

1-12 (No.49784)
3.3 Cassette mechanism assembly
REFERENCE:
Prior to performing the following procedures, turn the mode
gear on the bottom of the body until the respective part comes
to the EJECT position (Refer to Fig.1).
Fig.1
3.3.1 Removing the cassette guide
(See Fig.2)
(1) Turn the mode gear to set to RVS play or subsequent
mode.
(2) Remove the cassette guide from the main chassis while re-
leasing each two joint tabs ain the direction of the arrow.
Fig.2
3.3.2 Removing the load arm
(See Fig.3)
(1) Remove the E-washer attaching the load arm.
(2) Move the load arm in the direction of the arrow and release
the joint bon the cassette catch.
Fig.3
Mode gea
r
Cassette guide
Tab a
Tab a
Load arm
E-washer
Joint b
w
w
w
.
x
i
a
o
y
u
1
6
3
.
c
o
m
Q
Q
3
7
6
3
1
5
1
5
0
9
9
2
8
9
4
2
9
8
T
E
L
1
3
9
4
2
2
9
6
5
1
3
9
9
2
8
9
4
2
9
8
0
5
1
5
1
3
6
7
3
Q
Q
TEL 13942296513 QQ 376315150 892498299
http://www.xiaoyu163.com

(No.49784)1-13
3.3.3 Removing the cassette hanger assembly / cassette holder
(See Fig.4 to 7)
(1) Check the mode is set to EJECT. Push down the front part
of the cassette holder and move in the direction of the ar-
row to release the joint c.
(2) Move the rear part of the cassette hanger assembly in the
direction of the arrow to release it from the two joint bosses
d.
(3) Release the holder stabilizer spring from the hooks eand
f, then pull out from the cassette hanger assembly.
(4) Bring up the rear side of the cassette hanger assembly to
release the joint gand h.
(5) Pull out the cassette catch from the cassette hanger as-
sembly.
Fig.4
Fig.5
Fig.6
Fig.7
Cassette holder assembly
Side bracket
Joints c
Cassette holder assembly
Cassette hanger
assembly
Boss d
Boss d
Cassette hange
r
assembly
Cassette stabilizer spring
Hook f
Hook e
Cassette hanger
assembly
Hook h
Hook g
Cassette holder
assembly
Cassette holder assembly
Cassette hanger assembly
Cassette catch
w
w
w
.
x
i
a
o
y
u
1
6
3
.
c
o
m
Q
Q
3
7
6
3
1
5
1
5
0
9
9
2
8
9
4
2
9
8
T
E
L
1
3
9
4
2
2
9
6
5
1
3
9
9
2
8
9
4
2
9
8
0
5
1
5
1
3
6
7
3
Q
Q
TEL 13942296513 QQ 376315150 892498299
http://www.xiaoyu163.com

1-14 (No.49784)
3.3.4 Removing the side bracket assembly
(See Fig.8 to 10)
(1) Remove the screw Aattaching the side bracket assembly.
(2) Detach the front side of the side bracket assembly upward
and pull out forward to release the joint iand jin the rear.
CAUTION:
When reassembling, make sure that the boss kof the
main chassis is set in the notch of the load rack under the
side bracket assembly. Do not reattach the load rack on
the boss k.
CAUTION:
After reattaching the side bracket assembly, confirm op-
eration.
Fig.8
Fig.9
Fig.10
A
Side bracket assembly
Side bracket assembly Joint i
Joint j
Joint i
Joint j
Side bracket assembly
Boss k
Load rack
Boss k
Load rack
w
w
w
.
x
i
a
o
y
u
1
6
3
.
c
o
m
Q
Q
3
7
6
3
1
5
1
5
0
9
9
2
8
9
4
2
9
8
T
E
L
1
3
9
4
2
2
9
6
5
1
3
9
9
2
8
9
4
2
9
8
0
5
1
5
1
3
6
7
3
Q
Q
TEL 13942296513 QQ 376315150 892498299
http://www.xiaoyu163.com

(No.49784)1-15
3.3.5 Removing the pinch arm (F) assembly
(See Fig.11 and 12)
(1) Remove the polywasher and pull out the pinch arm (F) as-
sembly.
(2) Remove the compulsion spring.
3.3.6 Removing the pinch arm (R) assembly
(See Fig.11 and 12)
(1) Remove the polywasher and pull out the pinch arm (R) as-
sembly.
3.3.7 Removing the slide chassis assembly
(See Fig.13 and 14)
REFERENCE:
It is not necessary to remove the head and the tape guide.
(1) Move the slide chassis assembly in the direction of the ar-
row to release the two joints land remove from the main
chassis.
(2) Remove the rack link.
CAUTION:
When reassembling, first reattach the rack link, and next
fit the boss mand hook nof the slide chassis assembly
to the hole of the main chassis, and engage the two joints
l.
Fig.11
Fig.12
Fig.13
Fig.14
Polywashe
r
Polywasher Pinch arm
(F) assembly
Pinch arm
(R) assembly
Polywasher
Pinch arm (F) assembly
Compulsion
spring
Pinch arm
(R) assembly Polywasher
Slide chassis assembly
Joint l
Joint l
Boss m
Hook n
Rack link
Head
Tape guide
w
w
w
.
x
i
a
o
y
u
1
6
3
.
c
o
m
Q
Q
3
7
6
3
1
5
1
5
0
9
9
2
8
9
4
2
9
8
T
E
L
1
3
9
4
2
2
9
6
5
1
3
9
9
2
8
9
4
2
9
8
0
5
1
5
1
3
6
7
3
Q
Q
TEL 13942296513 QQ 376315150 892498299
http://www.xiaoyu163.com

1-16 (No.49784)
3.3.8 Removing the head / tape guide
(See Fig.16 and 17)
REFERENCE:
It is not necessary to remove the slide chassis assembly.
(1) Remove the band attaching the wire to the head.
(2) Remove the two screws B, the head and the head support
spring.
(3) Remove the pinch arm spring from the tape guide.
(4) Remove the tape guide and the pinch spring arm.
CAUTION:
When reattaching the pinch arm spring, set both end of
it to the pinch spring arm (remarked o).
CAUTION:
When reattaching the head, set the wires into the groove
of the tape guide (Fig.16).
3.3.9 Removing the flywheel assembly (F) & (R)
(See Fig.18 and 19)
REFERENCE:
It is not necessary to remove the slide chassis assembly.
(1) Remove the belt at the bottom.
(2) Remove the two polywashers on the upper side.
(3) Pull out each flywheel assembly downward.
Fig.15
Fig.16
Fig.17
Fig.18
B
Slide chassis assembly
Head Tape guide
B
Pinch arm spring
Head
Head support spring
Tape guide
Pinch spring arm
Slid chassis assembly
o
o
Flywheel assembly (F)
Flywheel assembly (R)
Belt
Polywasher
Polywasher
Flywheel assembly (F)
Flywheel assembly (R)
w
w
w
.
x
i
a
o
y
u
1
6
3
.
c
o
m
Q
Q
3
7
6
3
1
5
1
5
0
9
9
2
8
9
4
2
9
8
T
E
L
1
3
9
4
2
2
9
6
5
1
3
9
9
2
8
9
4
2
9
8
0
5
1
5
1
3
6
7
3
Q
Q
TEL 13942296513 QQ 376315150 892498299
http://www.xiaoyu163.com

(No.49784)1-17
3.3.10 Disassembling the flywheel assembly (F)
(See Fig.19 and 20)
(1) Push and turn counterclockwise the spring holder (F) to re-
lease the three joints pon the bottom of the flywheel.
(2) The spring holder (F), the TU spring and the friction gear
play come off.
(3) Remove the polywasher and felt.
3.3.11 Disassembling the flywheel assembly (R)
(See Fig.19 and 20)
(1) Push and turn clockwise the spring holder (R) to release
the three joints qon the bottom of the flywheel.
(2) The spring holder (R), the FF spring and the friction gear
FF come off.
(3) Remove the polywasher and the felt.
3.3.12 Removing the reel board
(See Fig.21 and 22)
(1) Remove the two screws Cattaching the reel board.
(2) Move the reel board in the direction of the arrow to release
the joint r.
(3) Unsolder the wires if necessary.
CAUTION:
When reattaching, confirm operation of the MODE
switch and the ST-BY switch.The mode position be-
tween EJECT and ST-BY is optimum for reattach-
ing.Connect the card wire extending from the reel board
to the FFC pad before reattaching the reel board.
Fig.19
Fig.20
Fig.21
Fig.22
Flywheel
assembly (F) Flywheel
assembly (R)
Joints p
Joint p
Joints q
Joint q
Polywasher
Spring holder (F)
TU spring
Polywasher
Spring holder (R)
FF spring
Friction gear play
Friction gear FF
Flywheel assembly (F) Flywheel assembly (R)
Felt Felt
FFC pad
Joint
r
Reel board
C
C
FFC pad
CT-1 switch
ST-BY switch
Soldering
MODE switch
w
w
w
.
x
i
a
o
y
u
1
6
3
.
c
o
m
Q
Q
3
7
6
3
1
5
1
5
0
9
9
2
8
9
4
2
9
8
T
E
L
1
3
9
4
2
2
9
6
5
1
3
9
9
2
8
9
4
2
9
8
0
5
1
5
1
3
6
7
3
Q
Q
TEL 13942296513 QQ 376315150 892498299
http://www.xiaoyu163.com

1-18 (No.49784)
3.3.13 Removing the gear base arm / gear base link assembly
(See Fig.23 to 25)
(1) Move the gear base arm in the direction of the arrow.
(2) Insert a slotted screwdriver to the gear base spring under
the gear base arm, and release the gear base arm upward
from the boss on the gear base assembly.
(3) Remove the gear base arm from the main chassis while re-
leasing the two joints s.
(4) Move the gear base link assemby in the direction of the ar-
row to release the two joints t.
REFERENCE:
When reattaching the gear base arm, make sure that the
boss on the gear base assembly is inside the gear base
spring.
3.3.14 Removing the FFC pad
(See Fig.25 and 27)
(1) Push each joint hook uof the FFC pad and remove toward
the bottom. Fig.23
Fig.24
Fig.25
Gear base
link assembly
Gear base arm
FFC pad
Joint t
Joint t
Joints s
Hook u
Hook u
Gear base arm
Screwdriver
Gear base spring
FFC pad
Gear base link
assembly Gear base arm
w
w
w
.
x
i
a
o
y
u
1
6
3
.
c
o
m
Q
Q
3
7
6
3
1
5
1
5
0
9
9
2
8
9
4
2
9
8
T
E
L
1
3
9
4
2
2
9
6
5
1
3
9
9
2
8
9
4
2
9
8
0
5
1
5
1
3
6
7
3
Q
Q
TEL 13942296513 QQ 376315150 892498299
http://www.xiaoyu163.com

(No.49784)1-19
3.3.15 Removing the mode gear
(See Fig.26 and 29)
(1) Remove the polywasher on the bottom and pull out the
mode gear.
3.3.16 Removing the mode switch actuator
(See Fig.26, 27 and 29)
(1) Pull out the mode switch actuator at the bottom.
REFERENCE:
When reattaching the mode switch actuator to the main
chassis, make sure to set on the shaft and insert vinto
the slot w.
3.3.17 Removing the direction link / direction plate
(See Fig.27 to 29)
(1) Remove the polywasher attaching the direction link.
(2) Bring up the direction link to release the three joints x, y
and zat a time.
(3) Move the direction plate in the direction of the arrow to re-
lease the two joints a’.
REFERENCE:
When reattaching the direction plate, engage the two
joints a’ and move in the direction of the arrow (Refer to
Fig.28).
REFERENCE:
When reattaching the direction link, move the direction
plate in the direction of the arrow and engage the three
joint x, yand zat a time (Refer to Fig.29).
3.3.18 Removing the mode rack assembly
(See Fig.27 and 28)
(1) Move the mode rack assembly in the direction of the arrow
to release the two joints b’ and the joint c’.
REFERENCE:
When reattaching, set the two b’ on the bottom of the
mode rack assembly into the slots of the main chassis
and move in the direction of the arrow (See Fig.28).
Fig.26
Fig.27
Fig.28
Fig.29
Polywashe
r
Mode switch actuator Mode gear
Direction plate Direction link
Mode rack assembly
Slot w
Direction plate
Joints a'
Joint z
Direction link Polywasher
Joint y Joint x
Direction plate Mode rack assembly
Joint c'
Joint b'
Joint b'
Joints a'
Polywasher
Mode gea
r
Mode switch actuator
Direction link
Direction plate
Mode rack assembly
v
w
w
w
.
x
i
a
o
y
u
1
6
3
.
c
o
m
Q
Q
3
7
6
3
1
5
1
5
0
9
9
2
8
9
4
2
9
8
T
E
L
1
3
9
4
2
2
9
6
5
1
3
9
9
2
8
9
4
2
9
8
0
5
1
5
1
3
6
7
3
Q
Q
TEL 13942296513 QQ 376315150 892498299
http://www.xiaoyu163.com

1-20 (No.49784)
3.3.19 Removing the gear base assembly / take up gear / reflector gear
(See Fig.30 to 32)
(1) Push in the pin d’ of the gear base assembly on the upper
side of the body and move the reflector gear toward the
bottom, then pull out.
(2) Remove the polywasher on the bottom and pull out the
take up gear.
(3) Move the gear base assembly in the direction of the arrow
to release it from the two slots e’ of the main chassis.
REFERENCE:
The parts are damaged when removed. Please replace
with new ones.
3.3.20 Removing the reel driver / reel spindle
(See Fig.32)
(1) Draw out the reel driver from the shaft on the main chassis
and remove the reel driver spring and the reel spindle re-
spectively.
CAUTION:
The reel driver is damaged when removed. Please re-
place with a new one.
Fig.30
Fig.31
Fig.32
Gear base assembly
Pin d'
Slot e'
Slot e'
Polywasher
Reflector gear
Take up gear
Reel driver spring
Reel driver spring
Reel driver
Reel driver
Reel spindle
Reel spindle
Gear base assembly
Slots e’
Main chassis
Reflector gear Polywasher
Take up gea
r
w
w
w
.
x
i
a
o
y
u
1
6
3
.
c
o
m
Q
Q
3
7
6
3
1
5
1
5
0
9
9
2
8
9
4
2
9
8
T
E
L
1
3
9
4
2
2
9
6
5
1
3
9
9
2
8
9
4
2
9
8
0
5
1
5
1
3
6
7
3
Q
Q
TEL 13942296513 QQ 376315150 892498299
http://www.xiaoyu163.com
Table of contents
Other JVC Car Receiver manuals