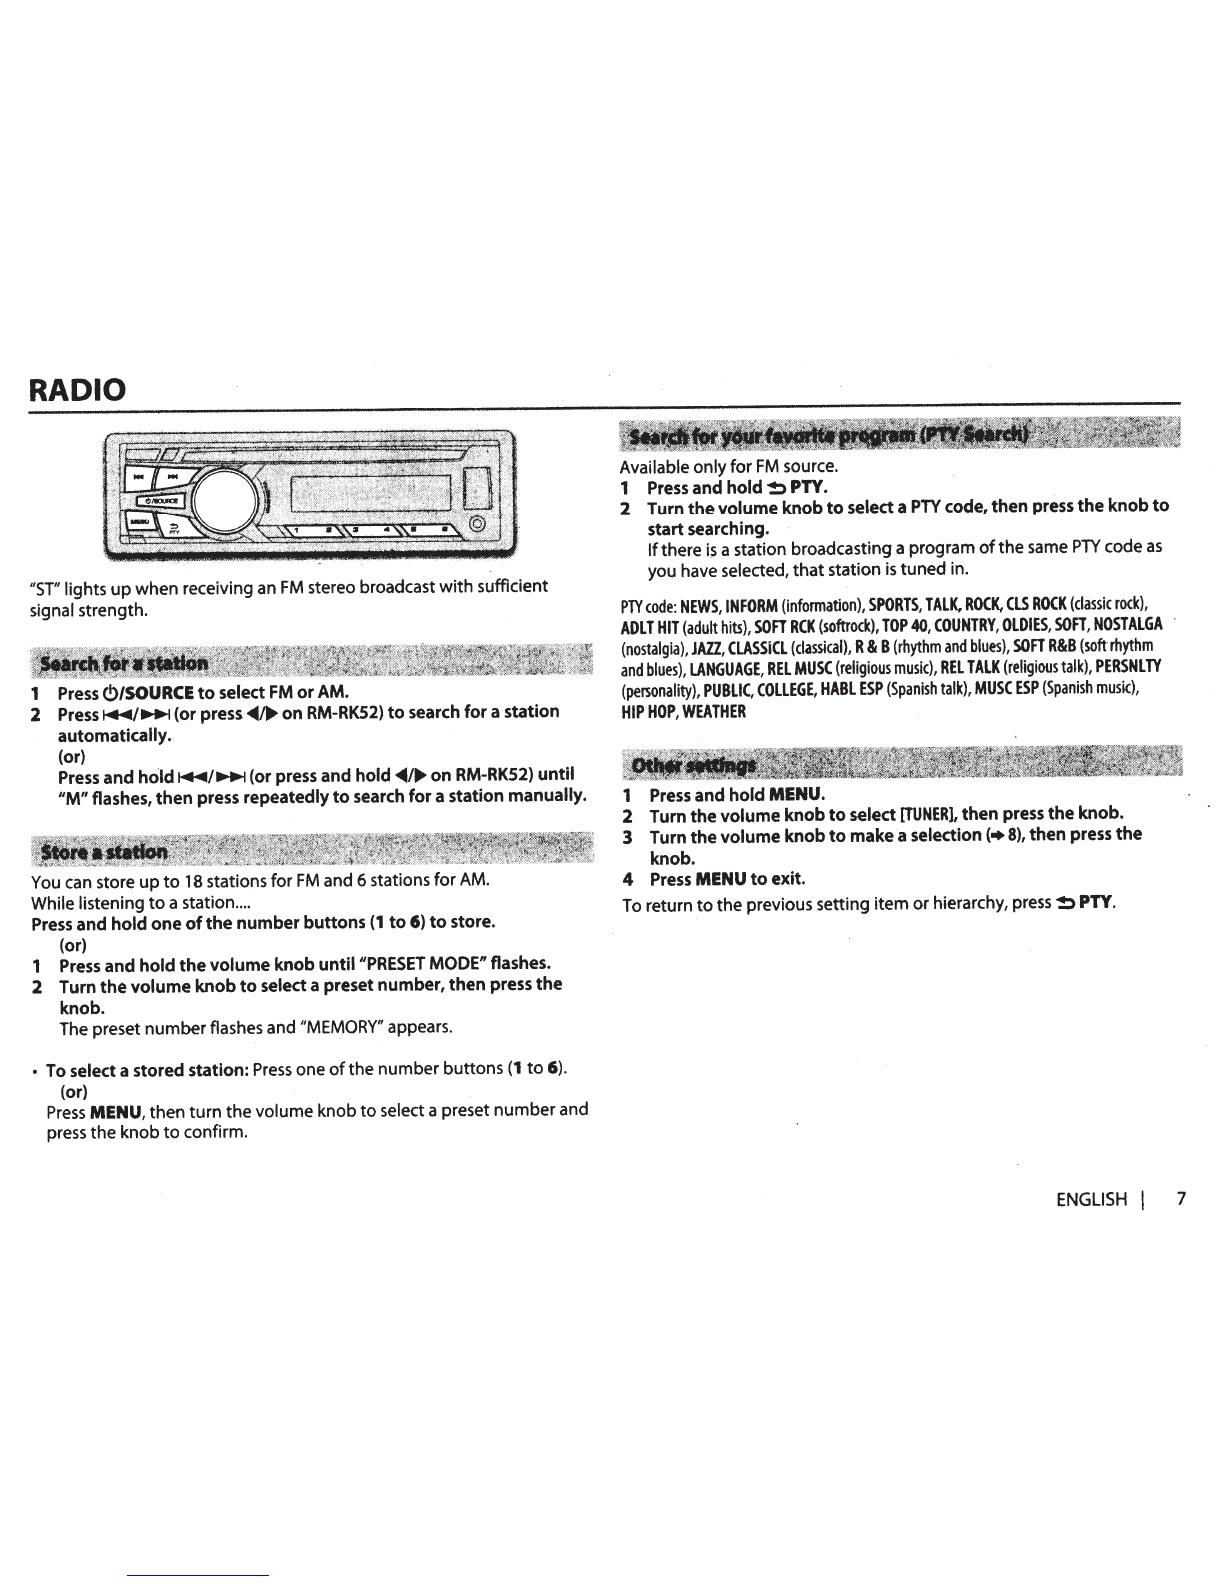
JVC KD-AR755 User manual

.JVC
\
ENGLISH
ESPANOL
FRAN<;AIS
KD-AR755
./
KD-R750 /.KD-ARSSS/ KD-R650 I KD-R450
CD
RECEIVER
INSTRUCTION
MANUAL
RECEPTOR
CON
CD
MANUAL
DE
INSTRUCCIONES
R~CEPTEUR
CD
MANUEL
D'INSTRUCTIONS
JVCKENWOOD Corporation
Made
for
Works With
~
iPod
D
iPhone.
.
PANDORA®
w
IHeart ·
RADIO
Please
read
all
instructions carefully before
operation to obtain the
best
possible
performance
from the.unit.
Por
favor
lea
detenidamente
este
manual
para
·
comprender afonda
todas
las
instrucciones
y
obtener
un
maximo dlsfrute
de
esta
unidad.
Veuillez
lires
les
instructions attentivementavant
d'utiliser
l~appare
.
il
afin d'obtenir
les
meilleures · ·
performances
possibles
de
l'appareil.
ForcustomerlJse:
Enterbelowthe Model
No.
and
Serial
No.
which
are
located on the top or bottom
of
the cabinet.
Retain
this
information for.future
reference.
Model
No.
Serial
No.
GET0941-00
1A
[J]

CONTENTS
BEFORE
USE
2
BASICS
3
GETTING
STARTED
4
CD
I
USB
I
iPod
5
RADIO
7
AUX
8
Pandora• (for
KD-AR755
I
KD-R750
I
KD-R650)
9
iHeartRadio• (for
KD-AR7SS
I
KD-R7SO
I
KD-R650)
10
AUDIO
SETTINGS
11
DISPLAY
SETTINGS
12
MORE
INFORMATION
14
TROUBLESHOOTING
15
SPECIFICATIONS
17
INSTALLATION
I
CONNECTION
18
How
to
read this manual
• Operations are explained mainly
using buttons on
the
faceplate
of
KD-R450.
•.
[XX]
indicates
the
selected items.
•
<•
XX)
indicates references are
available on
the
stated page.
2
BEFORE
USE
A Warning
Do
not
operate
any
function
that
takes
your
attention
away
from
safe
driving.
A
Caution
Volume
setting:
• Adjust
the
volume
so
that
you can hear sounds outside
the
car
to
prevent accidents.
• Lower
the
volume before playing digital sources
to
avoid damaging
the
speakers
by
the
sudden increase
of
the
output
level.
General:
• Avoid using
the
USB
device
or
iPodliPhone
if
it
might
hindersafe driving.
• Make sure all
important
data has been backed up.
We
shall bear no responsibility
for
any loss
of
recorded
data.
• Never
put
or
leave any metallic objects (such
as
coins
or
metal tools) inside
the
unit,
to
prevent a short
circuit.
•
If
adisc error occurs due
to
condensation on
the
laser lens, eject
the
disc and wait
for
the moisture
to
evaporate.
Remote
control
(RM-RK52):
• Do
not
leave
the
remote control in
hot
places such
as
on
the
dashboard.
• The Lithium battery
is
in danger
of
explosion
if
replaced incorrectly. Replace
it
only
with
the
same
or
equivalent type.
• The battery pack
or
batteries shall
not
be exposed
to
excessive heat such
as
sunshine, fire
or
the
like.
• Keep
the
battery
out
of
r~ach
of
children and in its original packaging when
not
in used. Dispose
of
used
batteries promptly.
If
swallowed, contact a physician immediately.
Maintenance
Cleaning
the
unit:
Wipe
off
dirt
on the faceplate
with
a
dry
silicone
or
soft cloth.
Cleaning
the
connector: Detach
the
faceplate and clean
the
connector
gently
with
a
cotton
swab, being careful
not
to
damage
the
connector.
Handling
discs:
• Do
not
touch
the
recording surface
of
the
disc.
• Do
not
stick tape etc. on
the
disc,
dr
use adisc
with
tape stuck on it.
• Do
not
use any accessories
for
the disc.
• Clean from
the
center
of
the
disc and move outward.
• Clean
the
disc
with
a
dry
silicone
or
soft cloth. Do
not
use any solvents.
• When removing discs from this unit, pull
them
out
horizontally.
• Remove burrs
from
the
center hole and disc edge before inserting adisc.
Connector (on
the
reverse
side
of
the
faceplate)

BASICS
Faceplate
KD-AR7SS
KD-R7SO
r;;l§l;;y
KD-R6SO
Detach
button
Turn
on
the
power
Volume knob
(turn/press)
Display
window
KD-AR7SS
•I[B!fB•"
·
z •
•
-~
f)
'"
X:c:.>
~~~:~~~5
~~----~~--~-~
,...,.
....
::<:
c:.J
IPodMOOE
KD-R6SO
'l
tifit:#
!!:rl~
'\fJ
iit~1ii
r~l;""'~
111
\lm
t
W
~
l
%!J~i;t,:IJII"!!I;i~
....
....
::<:
c:.J
KD-ARSSS
1
a
1
4
a •
\!
:
;::-
~~::
···
,·:
·:
.
:.
§j:
,;::
§h::fb
'
>
;
l:.~
~;.
:::
.;..
::-:
:~:=
:
~·~
{
:<
:
t+
.~
"
+'
,
.:
Jk
.
~::
}
:.
::.
:::!ihl
-;
:;::
:.
}~:}:;
:
;:=:-
\
Press
<!>/SOURCE.
•
Press
and hold
to
turn
off
the
power
.
Attach
Detach
How
to
reset
Your preset adjustments
will also be erased.
Remote
control
(RM-RKS2)
Remote sensor
(Do
not
expose
to
bright
sunlight.)
IB:·~
,
:JI
'•
.....
._"'
'•·
•••
,
v~ ~
oo.:..r
-",.,...
Pull
out
the insulation sheet
when using forthefirst time.
How
to
replace
the
battery
~
4\)
8 .
(
not
available )
.....
····--·
---~---·-
-········-
············~------·-········
··
-
·
·
····
-~----~----·-·-·····--
..
-··-------~---·-~~·
···········-···
····
...
··········-··
···--
·-········
·
·········
····--·-···---···-
..
-~
-"·
·-·
····--····-··-·····--·-·
~·
··
·-
..
·-
..
-···---
--~---·-
-·~·-·--------~···
··--------
·---
-
--·-
····
..
------"·~-
-
..
----·-
·-
--
-·-----
·
..
--
......
...
_______
~---~-----
....
-
....
--
..
--.--·
..
-----~----
...
..
.._.
..
_,
____
_
Adjust
the
volume
Turn the volume knob.
Press
the volume knob
to
mute
the soun_d
or
pause playback.
•
Press
again
to
cancel. ·
Press
VOL +
or
VOL-.
Press
~to
mutethe sound or pause playback.
•
Press
again
to
cancel.
···
--
·--~
...............
----·---~-A•--
,
•
·
-·-A-•-------
-
~
--
-----·-
-·-
---
-
----
·---
--·----~
-
-
·
···
--·-----~~-
--
··
-·
-··
··----------·--
--
-·
---
~--------~
--
--
--
---·-----·--
v
-
-
·
-
·
·
-------~-
-
--
---
-·-
·
·
·
-
-
--
---~-
--------·
-··-·
··--
-
-
-
-
~----~~--
--
-----
--
-
-
Select a source •
Press
<!>/SOURCE
repeatedly.
Press
SOURCE
repeatedly.
•
Press
<!>/SOURCE,
then
turn
the volume knob
within
2 seconds.
.................................................................................. ..............
.......
..............................
...............
.......................................................................................
..
................................................................................ .
....................... ....
. .
....................
........
........................................
..
..
.........
..
Change
the
display
information
Press
DISP
repeatedly.
(+15)
•
Press
and hold
to
scroll
the
current display information.
(not
available)
ENGLISH
I 3

GETTING STARTED
1
Press
and
hold
MENU.
2 Turn
the
volume
knob
to
select
[DEMO],
then
press
the
knob.
3 Turn
the
volume
knob
to
select
[DEMO
OFF],
then
press
the
knob.
4
Press
MENU
to
exit.
1
Press
and
hold
MENU.
2 Turn
the
volume
knob
to
select
[CLOCK],
then
press
the
knob.
3 Turn
the
volume
knob
to
select
[CLOCK
SET],
then
press-
the
knob. ·
4 Turn
the
volume
knob
to
make
the
settings,
then
press
the
knob.
Day+
Hour+
Minute
5 Turn
the
volume
knob
to
select
[24H/12H],
then
press
the
knob.
6 Turn
the
volume
knob
to
select
[12
HOUR)
or
[24
HOUR],
then
press
the
knob.
7
Press
MENU
to
exit.
1
Press
and
hold
MENU.
2 Turn
the
volume
knob
to
make a selection
(see
the
following
table),
then
press
the
knob.
3
Press
MENU
to
exit.
To
return
to
the previous setting item or hierarchy,
press~
PTY.
4
CLOCKADJ
CLOCK
DISP
BEEP
SRCSELEa
AM*
Default:
XX
AUTO:
The
clock
time
is
automatically
set
using
the
Clock
Time
(CT)
data
in
FM
Radio
Broadcast
Data
System
signal.;
OFF:
Cancels.
ON:
The
clock
time
is
shown
on
the
display
even
when
the
unit
is
turned
off.
;
OFF:
Cancels.
ON:
Activates
the
keypress
tone.;
OFF:
Deactivates.
QN:
Enables
AM
in
source
selection.;
OFF:
Disables.
·
PANDORA*
(For
KD-AR7SS
I
KD-R750
I
KD-R6SO)
ON:
Enables
PANDORA
in
source
selection.;
OFF:
Disables.
I
HEART*
(For
KD-AR7SS
I
KD-R7SO
I
KD-R6SO)
ON:
Enables
IHEARTRADIO
in
source
selection.;
OFF:
Disables.
AUX*
ON:
Enables
AUXin
source
selection.;
OFF:
Disables.;
BT
ADA.PTER:
Select
when
the
KS-BTA
100
Bluetooth
adapter
is
connected
to
the
auxiliary
input
jack
(+
8).
The
source
name
will
change
to
BT
AUDIO.
F/W
UPDATE
SYSTEM
F/Wxxxx
YES:
Starts
upgrading
the
firmware.;
NO:
Cancels
(upgrading
is
not
activated).
For
details
on
how
to
update
the
firmware,
see:
<http:llwww.jvc.netlcslcarl>.
* Not displayed when the corresponding source
is
selected.

CD I
USB
l iPod
The
source changes.automatically and
playback starts.
CD
~
Eject
disc
label
side
USB
USB
input
terminal
USB
l.O
cable*l
=
-··_
l
__
r_
·_
··
.•.
·.•.
·.·
.···
•.
•
.
•
._
•
.
··
.
~»
_.
•
...
·.
_··.
(commercially
available)
~~!mol®
Lsa
.
xl
l;tt
~
t
, .
iPod/iPhone
(for
KD-AR755
I
KD-R750
I
KD-R650)
.
USB
input
terminal
~-····
· ·
·
···.
·
.
..
..
·
!
~
~
Hf!oo~-----
~~
~
.
~
,
J!J
..
,.
.XL
·
(Accessory
of
the
iPod/iPhone)*1
•
You
can
also
change the source from the
other source
to
iPod by pressing IPod.
Press
5
iPod
MODE repeatedly to select the
control mode
([HEAD
MODE]
I
[I
PHONE
MODE]).
KD-AR755
I
KD-R750
KD-R650
iPod
MOOE
~
,
•••
:
.;
•.
,.;.·:ot··
>
Select atrack!
Press~~~
{or
press~/
....
on
RM~RK52).
file
Select afolder
*2
Press
1""
12.6.
(or
press
.A.l'ffon
RM-RK52).
Reverse/
Press
and
hold~~~
{or
press
and
hold~~
on
RM-RK52).
Fast-forward
Repeat play
*3
Press
4~
repeatedly
to
make aselection. ,
• Audio
CD
or
JVC
Playlist Creator
(JPC)
I
JVC
Music Control
(JMC)
file
(•14):
TRACK
RPT,
RPT
OFF
• MP3/WMA/W
AV
file:
TRACK
RPT,
FOLDER
RPT,
RPT
OFF
•
iPod:
ONE
RPT,
ALL
RPT,
RPT
OFF
Random play
*3
Press
3
:X:
repeatedly
to
make aselection.
• Audio
CD:
ALL
RND,
RND
OFF
•
MP3/WMAJWAV
file or
JPC
I
JMC
file:
FOLDER
RND,
ALL
RND,
RND
OFF
•
iPod:
SONG
RND,
ALL
RND,
RND
OFF
*1
Do
not leave the cable inside the
car
when not using.
*2
Only for MP3/WMA/WAV files.
This
does
not workfor iPod.
*3
For iPod: Applicable under
[HEAD
MODE]
only.
ENGLISH
I 5

For iPod: Applicable onlywhen
[HEAD
MODE]
is
selected.
(+
5)
1
Press
MENU
2 Turn
the
volume
knob
to
makea selection,
then
press
the
knob.
• MP3/WMA/WAVfile: Select the desired folder, then a
file~
• iPod
or
JPC
I
JMC
file: Select the desired file
from
the
list
(PLA
YLISTS,
ARTISTS,
ALBUMS,
SONGS,
PODCASTS*,
GENRES,
COMPOSERS*,
AUDIOBOOKS*).
* Only
for
iPod.
If
you have manyfiles
....
You can search
through
them quickly (on step
2
above)
by
turning
the
volume knob quickly.
•
Not
applicable
for
iPod.
(For
KD-AR755
I
KD-R750
I
KD-R650)
While listening
to
the iPod and
[HEAD
MODE]
is
selected(+
5)
....
If
you have manyfolders
or
tracks/files, you can search
through
them
.
quicklyaccording
to
the first character
(A
to
Z,
0
to
9 and
OTHERS).
•
''OTHERS"
appear
if
the first character
is
other
than A
to
Z,
0
to
9.
1
Press
MENU.
2 Turn
the
volume
knob
to
select
the
desired list,
then
press
the
knob.
3 Press 1
~
/2
.A.
o~
turn
the
volume
knob
quickly
to
select
the
desired
character.
4 Turn
the
volume
knob
to
select
the
desired
folder
or
track/file,
then
press
the
knob.
6
CD
I
USB
I iPod
When asmartphone
(Mass
Storage
Class)
is
connected
to
the
USB
input
terminal, you
can
select its internal memory or external memory (such
as
an
SO
card)
to
playback the stored
songs.
You
can also select the desired drive
to
playback when a
multiple
drives
device
is
connected.
Press
number
button
5
repeatedly
to
select
the
desired
drive.
(or)
1
Press
and
hold
MENU.
2
Turn
the
volume
knob
to
select
[USB/I
POD],
then
press
the
knob.
3
Turn
the
volume
knob
to
select
[USB],
then
press
the
knob.
4
Press
the
volume
knob
to
select
[DRIVECHANGE].
The nextdrive
is
selected automatically.
Repeat steps 1
to
4
to
select
the
following drives.
Selectable items:
[DRIVE
1]
to
[DRIVE
5]
(for
KD-AR755
I
KD-R750
I
KD-R650)
While listening
to
the
I
Pod and
[HEAD
MODE]
is
selected
(+
5)
....
1
Press
and
hold
MENU.
2
Turn
the
volume
knob
to
select
[USB/I
POD],
then
press
the
knob.
3
Turn
the
volume
knob
to
select
[I
POD],
then
press
the
knob.
4 Turn
the
volume
knob
to
makea selection,
then
press
the
knob.
BOOK
NORMAL
I
BOOK
FASTER
I
BOOK
SLOWER:
Select
the
desired playback
speed
of
the
Audiobooks sound file in your iPod/iPhone.
(Default: Depends on
your
iPod/iPhone setting.)
•
To
return
to
the previous setting item
or
hierarchy,
press~
PTY.
• To cancel, press
MENU.

RADIO
"ST"
lights upwhen receiving
an
FM
stereo broadcast with sufficient
signal strength.
1
Press
<!>/SOURCE
to
select
FM
or
AM.
2
Press,...,..,
(or
press~~
on
RM-RK52)
to
search forastation
automatically.
(or)
Press
and
hold,...,..,
(or press and
hold~~.-
on
RM-RK52)
until
"M"
flashes, then press repeatedly
to
search forastation manually.
You
can
store up to 18 stations for
FM
and 6 stations for
AM.
While listening toastation
....
Press
and holdone
of
the numberbuttons
(1
to
6)
to
store.
(or)
1
Press
and hold thevolume knob
untii
11
PRESET
MODE" flashes.
2
Turn the volume knob
to
select a preset number, then press the
knob.
The
preset number
flashes
and
"MEMORY"
appears.
•
To
select astored station:
Press
one
of
the number buttons
(1
to
6).
(or)
Press
MENU,
then turn the volume knob to select apreset number
and
press
the knob to confirm.
Available only for
FM
source.
1
Press
and hold
!::>
PTY.
2
Turn thevolume knob
to
select a
PTY
code, then press the knob
to
start searching.
Ifthere
is
astation broadcasting aprogram
of
the
same
PTY
code
as
you
have
selected, that station
is
tuned
in.
PTY
code:
NEWS,
INFORM
(information),
SPORTS,
TAL~
ROCK,
CLS
ROCK
(classic
rock),
ADLT
HIT
(adult
hits),
SOFT
RCK
(softrock),
TOP
40,
COUNTRY,
OLDIES,
SOFT,
NOSTALGA
(nostalgia),
JAZZ,
CLASSICL
(classical),
R&
B
(rhythm
and
blues),
SOFT
R&B
(soft
rhythm
and
blues),
LANGUAGE,
REL
MUSC
(religious
music),
REL
TALK
(religious
talk),
PERSNLTY
(personality),
PUBLIC,
COLLEGE,
HABL
ESP
(Spanish
talk),
MUSC
ESP
(Spanish
musk),
HIP
HOP,
WEATHER
1
Press
and hold
MENU.
2
Tum the volume knob
to
select
[TUNER},
then press the knob.
3
Turn the volume
knobto
make
a
selection
(•8),
then press the
knob.
4
Press
MENU
to
exit.
To
return tothe previous setting item orhierarchy, press!:)
PTY.
ENGLISH
I 7

RADIO
AUX
----------------------------------------------~
Default:
XX
RADIO
Turns
on
the
radio
at
a
specific
time
regardless
of
the
current
source.
TIMER
1
ONCE/
DAILY/
WEEKLY/
OFF:
Select
how
often
the
timer
will
be
turned
on.
2
FM/
AM:
Select
the
FM
or
AM
band.
3
01
to
18
(for
FM)/
01
to
06
(for
AM):
Select
the
preset
station.
4
Set
the
activation
day
and
time.
· "0"
lights
up
when
complete.
Radio
Timer
will
not
activate
for
the
following
cases.
•
The
unit
is
turned
off.
•
[OFF]
is
selected
for
[AM]
in
[SRC
SELEa]
after
Radio
Timer
for
AM
is
selected.(+
4)
SSM SSM
01-06
I
SSM
07-12
I
SSM
13
-18:
Automatically
presets
up
to
.
18
stations
for
FM.
"SSM"
stops
flashing
when
the
first
6
stations
are
stored.
Select
• • • u • • •
•••••••
~
-
~~
--
~
.
?.
..
:
.
~
..
~/
SSM
_1.3
~
-
1
~to
store
the
following
12
stat.~~
.
~
-
~
.
:
..
.
.
.......
..
....
u
••••
IF
BAND
AUTO:
Increases
the
tuner
selectivity
to
reduce
interference
noises
from
adjacent
FM
stations.
(Stereo
effect
may
be
lost.);
WIDE:
Subjects
to
interference
noises
from
adjacent
FM
stations,
but
sound
quality
will
not
be
degraded
and
the
stereo
effect
will
remain.
--
· -
-~
------------·-~-
-
~
-
--~----
-
------~--~-----------~--
-
-·-·
-
···
·
·-·--·-···-····-···
·
· ·
·--·-···-······-
--
----·-······----~--
MONO
Displayed
only
when
the
source
is
FM.
ON:
Improves
the
FM
reception,
but
the
stereo
effect
will
be
l~st.
;
Q.EE:
Cancels.
AREA
AREA
·
US:
For
North/Central/South
America,
AM/FM
intervals:
10kHz/200kHz.
·;
AREA
EU:
For
any
other
areas,
AM/FM
intervals:
9
kHz/50
kHz.
;
AREA
SA:
For
some
South
American
countries,
AM/FM
intervals:
10kHz/50
kHz.
8
1 Connect aportable audio player (commercially available).
3.5
mm
(1/8
11
)
stereo
mini
plug
with
"l"
shaped
connector
.
(commercially
available)
Auxiliary
input
jack
Porta~le
audio
player
2 Select
[ON]
for
[AUX]
in
[SRC
SELEa].
(+
4)
3
Press
<!>/SOURCE
to
select
AUX.
4 Turn on the portableaudio player and start playback.
:1._
Q Use a 3-core plug head stereo
mini
plug foroptim:m
aud:
l
__
,
~output.
· ' I
1 Connect the Bluetooth adapter,
KS-BTA
1
00 (separately purchased).
·--
---
-----
--
---
----
-----,
1
Wiring
harness
of
the
unit
:
I
Blue/white
: (+19) :
I I
gsJt
\..,..
~
-,;~:,
®....,-.
,
,..~---•l
Blue/white:
Remote
I
Black
I
....
----•
:
Black:Ground
Brovvn
:
.....,...,..
....
__
•:
Brown:
Tel
muting
I
I
I
I
-;-:
·.:
:ui
.
it::···
·-
..
··
z~
·
•!i!J
•
~----
-
-
-
------
-
----
--
---J
Auxiliary
input
jack
2 Register (pair) the Bluetooth device with
KS-BTA
lOO.
3 Select
[BT
ADAPTER]
for
[AUX]
in
[SRC
SELEa].
(+
4).
4
Press
(!)/SOURCE
to
select
BT
AUDIO.
5 Start using the Bluetooth device.
For
details, refer to the instruction manual of
KS-BTA
100.

Pandora® (for
KD-AR7ss/KD-R7so
1
KD-R6so)
Preparation: .
Install
the
latest version
of
the
Pandora application
onto
your device
(iPhone/ iPod touch),
then
create
an
account and log in
to
Pandora.
• Select
[ON]
for
[PANDORA]
in
..
[SRC
SELEa].
(+
4)
1 Open the Pandora application on yourdevice.
2 Connect yourdevice
to
the
USB
input
terminal.
Iii:.
[101[
~'~I
(__
•8
.
-=
(~~;;s;:fthe
iPod/iPhone)*
/1
-@
The source changes
to
PANDORA
and broadcast starts.
·* Do
not
leave
the
cable inside
the
car when
not
using.
Pause
or
resume..
Press
thevolume knob (or press
t(
on
RM-RK52).
playback
Thumbs upor
thumbs down
Skip atrack
Press
2
4.
I
1,.
(or press
AITon
RM-RK52).
•
If
thumbs
down
is
selected,
the
current track
is
skipped.
Press~
(or
press..,..
on
RM-RK52).
. 1
Press
MENU.
2 Turn thevolume knob
to
select
[NEW
STATION],
then press the knob.
3 Turn thevolume knob
to
select
[FROM
TRACK]
or
[FROM
ARTIST],
then
press the knob.
A new station
is
created based on the current song
or
artist.
1
Press
MENU.
2 Turn thevolume knob
to
make a selection, then press the knob.
[BY
DATE]:
According
to
the
registered date.
[A-Z]:
Alphabeticalorder.
3 Turn thevolume knob
to
thedesired station, then press the knob.
1
Press
and hold thevolume knob.
2 Turn thevolume knob
to
select
[THIS
TRACK]
or
[THIS
ARTIST],
then
press the knob. .
"BOOKMARKED" appears and
the
information
is
stored
to
your
device.
The bookmark
is
available
on
your
Pandora account
but
not
on this
unit.
ENGLISH
I 9

i
Heart
Ra
di0 ®
(for
KD-AR7SS
I
KD-R7SO
I
KD-R6SO)
Preparation:
Install
the
latest version
of
iHeart Link
for
JVC
application
onto
your
·device (iPhone/ iPod touch), then create an account and log in
to
iHeartRadio.
• Select
[ON]
for
[IHEARTRADIO]
in
[SRC
SELEO'].
(•
4)
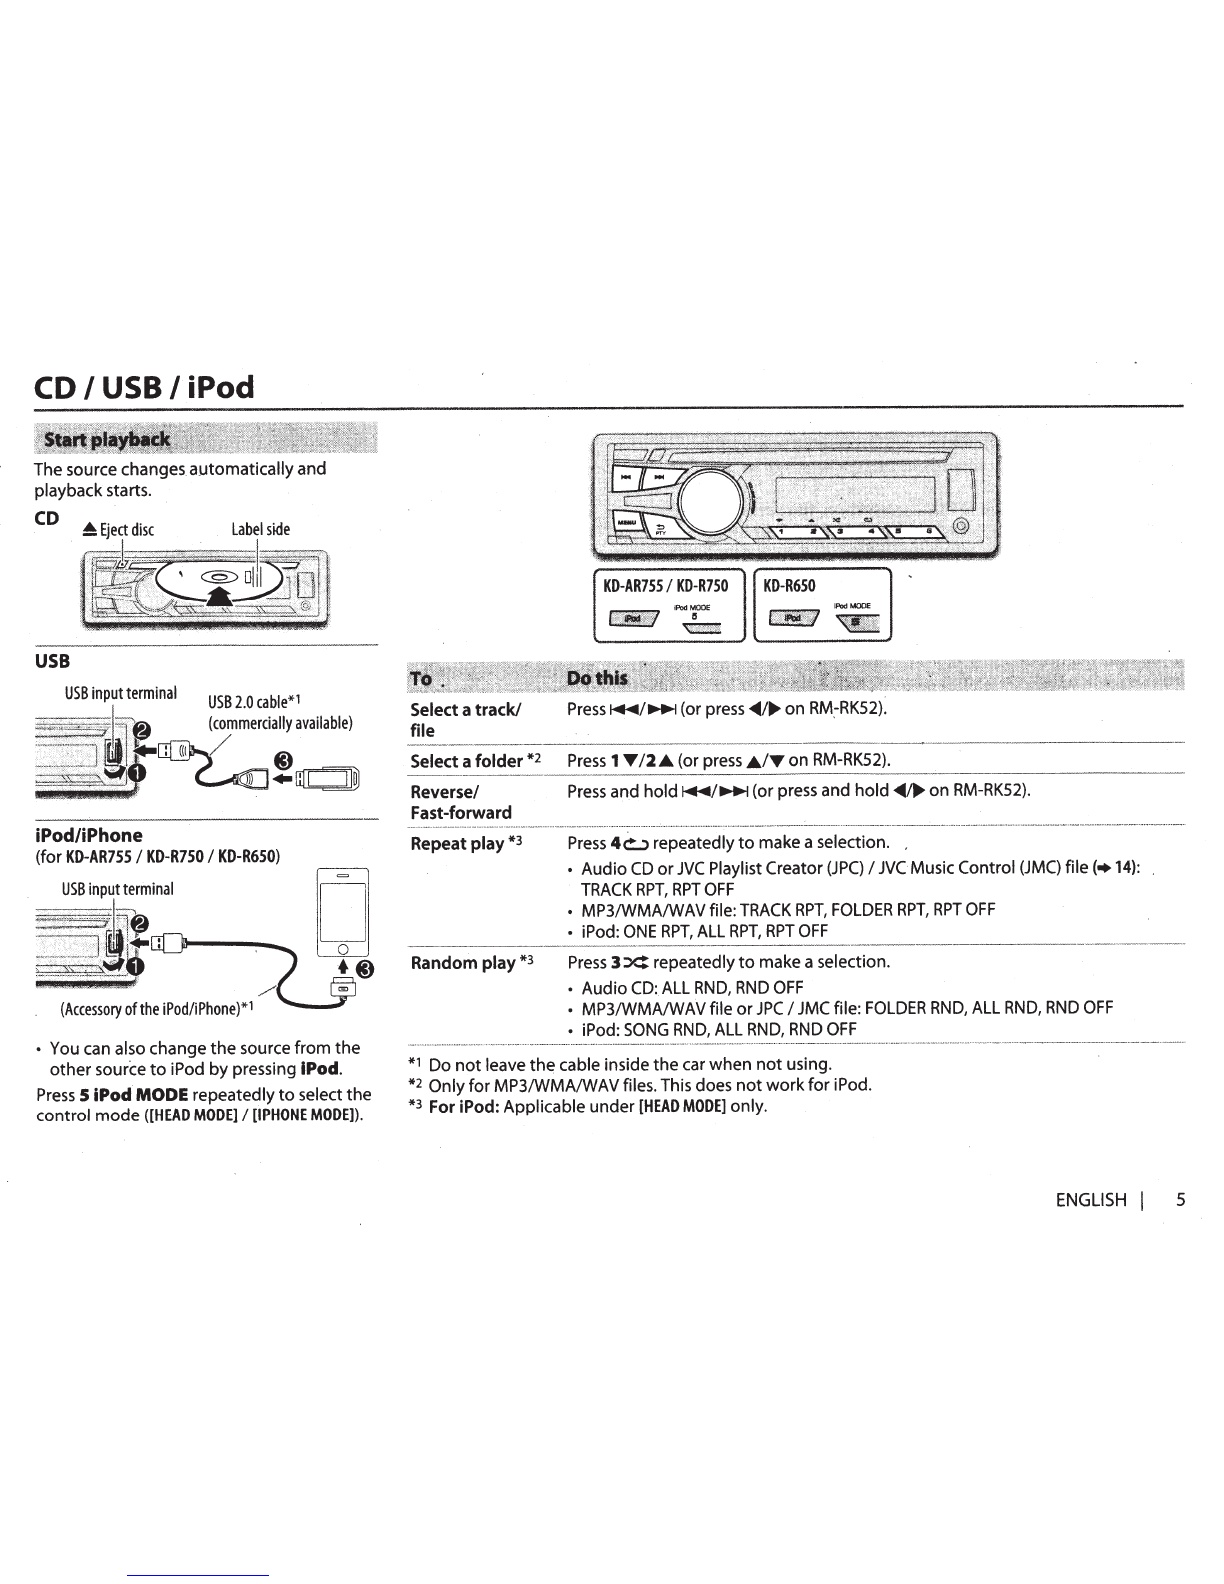
1 Open the iHeart Linkapplication on your device.
2 Connect your
deVice
to
the
USB
inpf
t
0
erlnal.
USB
input
terminal
0[),__--
........
/(
~-
(Accessory
of
the
iPod/iPhone)*
* Do
not
leave
the
cable inside
the
car when
not
using.
3
Press
<!>/SOURCE
to
select
IHEARTRADIO.
Broadcast starts automatically
10
Pause
or
resume playback
Press
thevolume knob (or press
t(
on
RM-RKS2).
,,,,_
............
_.
__
,.,
.....
..
.........
-
.........
-..
··········
········---·····
··········-··
·
·············-··-······-·
·
·····-···
·
··
···
···-···"······-·
··················
·
······
···-····
··
··
···-
-
.........
.
...
..
...
.
..........
.
Thumbs
up
orthumbs down
forcustom station
Press
2•
I
1
,.
(or press A./..,on
RM-RK52).
•
If
thumbs
down
is
selected,
the
currenttrack
is
skipped.
--····--·--·
---·----·······
···
·
-····
·
.
-·····-·-----···--
····
···-·
··
·········-·····-·---·-····-·····-----·-·
··
··
··
-·
····-···-····
·-
···-·~···--~·······-·-··-·
··
-··~·---~···-··--·---·-----···~····-~·-·······-
·
···-
··
···
...
···-·-
__
Skip atrackfor custom
~~~on--·-
Press~
(or press..- on
RM-R~S2).
_
Create anew/custom station
Press
and hold
the
volume knob.
Add
to
favorite stations for
Press
,and hold 3.
live station
-
·---
~~--
-----
...
-----
--~
---
-
-
--------
·~
--~-~
------·--
·-
~--~-
~---·
Scan
for
live station
Press
3.
1
Press
MENU.
2 Turn the volume knob
to
select acategory, then press the knob.
3 Turn thevolume knob
to
the desired station, then press the knob.
When a
city
list appears, you can skip cities in alphabeticalorder.
4
Press
MENU
to
exit.
While acity list appears
during
search
...
1 Turn thevolume knob quickly
to
enter character search.
You
can search
through
the list quicklyaccording
to
the
first character
(A
to
Z).
2 Turn thevolume knob or
press
2 •
I
1
,.
to
select the character
to
be
search for.
3
Press
the volume knob to start searching.

AUDIO
SETTINGS
(For
KD-ARSSS
I
KD-R4SO)
Select a preset
equalizer
Store
your
own
sound
settings
Default:OO
.Press EQ repeatedly.
(or)
Press
EQ,
then
turn
the
volume
knob
within
2 seconds.
FLAT
(default),
HARD
ROCK,
JAZZ,
POP,
R&B,
TALK,
USER1,
USER2,
VOCAL
BOOST,
BASS
BOOST,
CLASSICAL,
DANCE
1 Press and hold
EQ.
2 Turn
the
volume
knob
to
select
[EASY
EQ],
then
press
the
knob.
3 Turn
the
volume
knob
to
select
[USERl]
or
[USER2L
then
press
the
knob.
4 Turn
the
volume
knob
to
make a selection,
then
press
the
knob.
SUB.W
*:
-08
to
+08
BASS
LVL:
-06
to
+06
MID
LVL:
-06
to
+06
TRE
l
VL:
-06
to
+06
• To return
to
the previous setting item,
press~
PTY.
• To exit, press
EQ.
*
Displayed onlywhen
[UO
MODE]
is
set
to
[SUB.W]
and
[SUB.W]
is
set
to
[ON].
(•12)
1
Press
and
hold
MENU.
2 Turn
the
volume
knob
to
makea selection (see
the
following
table),
then
press
the
knob.
Repeat step 2 until the desired item
is
selected.
3
Press
MENU
to
exit.
To
return
to
the previous setting item
or
hierarchy,
press!:)
PTY.
EQPRESET
EASYEQ
Default:OO
PROEQ
Default:
XX
FLAT
I
HARD
ROCK
I
JAlll
POP
I
R&B
I
TALK
I
USERll
USER21
VOCAl
BOOST
I
BASS
BOOST
I
CLASSICAL
I
DANCE:
Selects
a
preset
equalizer.
1
USER11
USER2:
Select
a
preset
name.
2
Adjust
your
own
sound
settings.
SUB.W*
1:
-Q8
to
+081
BASS
LVL:
-o6
to
+061
MID
LVL:
-06
to
+061
TRE
LVL:
-06
to
+06
- - -
1
USER11
USER2:
Select
a
preset
name.
2
BASS
I
MIDDLE
I
TREBLE:
Select
a
sound
tone.
3
Adjust
the
sound
elements
of
the
selected
sound
tone.
BASS
Frequency:
60/80/1001200
Hz
Default:
(H.HI)
Level:
-06
to
+06
(Jm)
Q:
Q1.01
Q1.2SI
Ql.SI
Q2.0
(QLID
MIDDLE
Frequency:
0.51
1.011.51
2.5
kHz
Default:
(1.0
kHz)
Level:
-06
to
+06
(W)
Q:
Q0.751
Ql.O/
Q1.25
(Q1J2)
TREBLE
Frequency:
10.0/12.5115.0117.5
kHz
Default:
(10.0
kHz)
level:
-06
to
+06
«Kl)
Q:
Q
FIX
(01.00
BASS
BOOST*2
+011
+02:
Selects
your
preferred
bass
boost
level.;
OFF:
Cancels.
LOUD
011
02:
Boosts
low
or
high
frequencies
to
produce
a
well-balanced
sound
at
low
volume.
;
OFF:
Cancels.
SUB.W
LEVEL
*3
-08-
+08
(00):
Adjusts
the
subwoofer
output
level.
-------
SUB.W*4
O.ti
I
OFF:
Turns
on
or
off
the
subwoofer
output.
SUB.W
LPf*3*S
THROUGH:
All
signals
are
sent
to
the
subwoofer.;
LOW
SSHz
I
MID
85Hz
I
HIGH
120Hz:
Audio
signals
with
frequencies
lower
than
55
Hz/
85
Hz/
120
Hz
are
sent
to
the
subwoofer.
ENGLISH
J
11

AUDIO
SETTINGS
DISPLAY
.SETTINGS
HPF*
6
FADER*2*
7
OFF:
All
signals
are
sent
to
the
front/rear
speakers.
;
LOW
1OOHz
I
MID
120Hz
I
HIGH
150Hz:
Audio
signals
with
frequencies
lower
than
100
Hz/
120
Hz/
150
Hz
are
cut
off
from
the
fr.ont/rear
speakers.
R06-
F06
(00):
Adjusts
the
front
and
rear
speaker
outp~~
bal~nc
~
BALANCE*2*7
·
L06-
R06
(00):
Adjusts
the
left
and
right
speaker
output
balance.
VOL
ADJUST
AMP
GAIN
-
-05 -
+05
(00):
Presets
the
volume
adjustment
level
of
each
source
(compared
to
the
FM
volume
level)
.
Before
adjustment,
select
the
source
you
want
to
adjust.
("VOL
ADJ
FIX"
appears
if
FM
is
selected.)
·
LOW
POWER:
Limits
the
maximum
volume
level
to
30.
(Select
if
the
maximum
power
of
each
speaker
is
less
than
50
W
to
prevent
damaging
the
speakers.)
;
HIGH
POWER:
The
maximum
volume
level
is
50.
D.T.EXP
ON:
Creates
realistic
sound
by
compensating
the
high-frequency
(Digital
Track
components
·
and
restoring
the
rise-time
of
the
waveform
that
are
lost
Expander)
in
audio
data
compression.;
OFF:
Cancels.
-----
TEL
MUTING*S
ON:
Mutes
the
sounds
while
using
the
cellular
phone
(not
connected
through
KS-BTA
100).;
OFF:
Cancels.
-
-
~~-
-
-
~-·
--
~
-----
-
---
~
--
--
~
~
~
-
-
-
-
--
-
-
-
-
-
~
-
----
--
--
-·-
L/0
MODE*S
SUB.W
I
REAR:
Selects
whether
rear
speakers
or
a
subwoofer
are
connected
to
the
REAR/SW
line
out
terminals
on
the
rear
panel
(through
an
external
amplifier).
*1
Displayed onlywhen
(L/0
MODE]
is
set
to
[SUB.W]
and
[SUB.W]
is
set
to
[ON].
*2
This adjustmentwill
not
affect the.subwooferoutput.
*3
Displayed only when
[SUB.
W]
is
set
to
[ON].
*4
Displayed onlywhen
[L/0
MODE]
is
set
to
[SUB.W).
*S
Notapplicable for
KD-AR755.
*6
KD-AR755
only. .
*7
If
you are using atwo-speaker system, set
the
fader level
to
[00].
*8
Does
not
work
if
[BT
ADAPTER]
is
selected
for
[AUX]
in
[SRC
SELECT].
12
KO-AR75S
I
KO-R7SO
KO-ARSSS
KO-R6SO
I
KO-R450
1 Press
and
hold
MENU.
2 Turn
the
volume
knob
to
make a selection
(see
the
following
table),
then
press
the
knob.
Repeat step 2 until
the
desired item
is
selected.
•
To
return
to
the previous setting item
or
hierarchy,
press~
PTY.
•
To
cancel, press MENU. Default:
XX
DIMMER
Selects
the
display
and
button
illumination
adjusted
in
the
[BRIGHTNESS]
setting.
AUTO:
Changes
between
the
day
and
night
adjustments
when
you
turn
off
or
on
the
car
headlights.
*1
;
ON:
Selects
the
night
adjustments.;
OFF:
Selects
the
day
adjustments.
-
---
----
-··
--
····----·----
---
··
-
--
-
--
BRiG
.
HTNiss
---
S~t~
-
th
-
~
-
b~tt~~
-
: -
display
and
USB
input
terminal
brightness
for
day
and
night
separately.
1
DAY
I
NIGHT:
Select
day
or
night.
2
Select
a
zone
for
setting.
(+Illustration
above)
3
Set
the
brightness
level
(00
to
31
).
(Default:
DAY:
31
;
NIGHT:
15.)
·
scRoi~L~2
-
-
-
--
-
--oNce:
s~~~~~~th~d~pla"Y-i~t~~~~ti~~
--
~~~~
~-
;-Aur(i
-
R;p;t~-~~~
-
.;~li~
-
9~15
~
~;~~~d
intervals.
;
OFF:
Cancels.
•
--
*1
The
illumination
control
wire
connection
is
required.
(+19)
*2
Some
characters
or
symbols
will
not
be
shown
correctly
~or
will
be
blanked).

·
PRESET
DAY
COLOR
NIGHT
COLOR
Default
XX
You
can
select
a
color
for
[ALL
ZONE],
[ZONE
1],
[DISP
ZONE],
or
[ZONE
2]
separately.
For
[ALL
ZONE],
you
can
also
select
a
color
pattern.
Default
color:
ALL
ZONE:
[COLOR
06],
ZONE
1:
[COLOR
06],
DISP
ZONE:
[COLOR
01],
ZONE
2:
[COLOR
27]
1
Select
a
zone
for
setting.
(+
12)
2
Select
a
color
for
the
selected
zone.
•
COLOR
01
to
COLOR
29
•
USER:
The
color
you
have
created
for
[DAY
COLOR]
or
[NIGHT
COLOR]
is
shown.
•
COLOR
FLOW
01
to
COLOR
FLOW
03:
Color
changes
at
different
speeds.
•
SPEURUM/
GROOVE/
TECHNO/
EMOTION/
RELAX/
NIGHT
SWEEP:
The
selected
color
pattern
is
shown.*
(Selectable
only
when
[ALL
ZONE]
is
selected
in
step
1.)
·
*
If
one
of
these
color
pattern
is
selected,
the
[ZONE
1
],
[DISP
ZONE],
[ZONE
2]
illumination
color
will
change
to
the
default
color.
•••••••
•·-·n-·•
·•
·•••·-
•"-''''"''"
'''''''-··-·
•--•••--·
•··-•••••
•
•••
•••
••••••••
•·••••••
•••
•-
••-'•••••••·-··•
··•••••
••
••-
•••••••·-··
••'''
••··•
•
•·-
·•·•··•·-•·••
••
Store
your
own
day
and
night
colors
for
different
zone.
1
Select
a
zone
for
setting.
(+
12)
2
RED
I
GREEN
I
BLUE:
Select
a
primary
color.
3
00
to
31:
Select
the
level.
Repeat
steps
2
and
3
for
all
the
primary
colors.
•
Your
setting
is
stored
to
[USER]
in
[COLOR].
•
If
[00]
is
selected
for
all
primary
colors
for
[DISP
ZONE],
nothing
appears
on
the
display.
·
····················
······ ·······················································
COLOR
GUIDE
ON:
Changes
the
button,
display
and
USB
input
terminal
illumination
when
settings
are
performed
on
menu
and
list
search.
Display
zone
will
automatically
change
depending
on
volume
level.;
OFF:
Cancels.
-·.
--
....
--
~
--~
-----
---
-
.-.
--
.
._
______
_
' •
-··-
----
---
------
..
.
-
[NIGHT
COLOR]
or
[DAY
COLOR]
is
changed by turning on or
off
your
car's
headlight.
PRESET
DAY
COLOR
NIGHT
COLOR
MENU
COLOR
DISPLAY SETTINGS
Select
a
color
for
[BUTTON
ZONE].
Default:
[COLOR
061
•
COLOR
01
to
COLOR
29
Default:
XX
•
USER:
The
color
you
have
created
for
[DAY
COLOR]
or
(NIGHT
COLOR]
.
is
shown.
•
COLOR
FLOW
01
to
COLOR
FLOW
03:
Color
changes
at
different
speeds.
Store
your
own
day
and
night
colors.
1
RED
I
GREEN
I
BLUE:
Select
a
primary
color.
2
00
to
31:
Select
the
level.
Repeat
steps
1
and
2
for
all
the
primary
colors.
•
Your
setting
is
stored
to
[USER]
in
[COLOR].
ON:
Changes
the
button
illumination
to
white
color
when
settings
are
performed
on
menu
and
list
search.;
OFF:'Cancels.
ENGLISH
I
13

MORE INFORMATION
About
discs and
audio
files
•
This
unit
can
only
play
the
following
COs:
lillo~@
WJo~©
WJo~~
DIGITAL
AUDIO
DIGITAL
AUDIO
DIG
TAL
D
l:iljke!M1~®
ReWritable
•
This
unit
can
play
back
multi-session
discs;
however,
unclosed
sessions
will
be
skipped
during
playback.
•
Unplayable
discs:
-
Discs
that
are
not
round.
-
Discs
with
coloring
on
the
recording
surface
or
discs
that
are
dirty.
-
Recordable/ReWritable
discs
that
have
not
been
finalized.
- 8
em
CD.
Attempting
to
insert
using
an
adapter
may
cause
malfunction.
•
Dual
Disc
playback:
The
Non-DVD
side
of
a
"Dual
Disc''
does
not
comply
with
the
"Compact
Disc
Digital
Audio"
standard.
Therefore,
the
use
of
Non-DVD
side
of
a
Dual
Disc
on
this
product
cannot
be
recommended.
•
Playable
files:
-
File
extensions:
MP3
(.mp3),
WMA
(.wma)
-
Bit
rate:
MP3:
8
kbps-
320
kbps
WMA:
32
kbps
-
192
kbps
-
Sampling
frequency:
MP3:
48
kHz,
44.1
kHz,
32
kHz,
24kHz,
22.05
kHz,
16
kHz,
12
kHz,
11.025
kHz,
8
kHz
WMA:
8
kHz
-
48
kHz
-
Variable
bit
rate
(VBR)
files.
•
Maximum
number
of
characters
for file/folder
name:
It
depends
on
the
disc
format
used
(includes
4
extension
characters-<.mp3>
or
<.wma>.
-
ISO
9660
Levell
and
2:
32
characters
-
Romeo:
32
characters
-
Joliet:
32
characters
-
Windows
long
file
name:
32
characters
14
About
USB
devices
•
This
unit
can
play
MP3/WMA/WAV
files
stored
on
a
USB
mass
storage
class
device.
•
You
cannot
connect
a
USB
device
via
a
USB
hub.
•
Connecting
a
cable
whose
total
length
is
longer
than
5m
may
result
in
abnormal
pJayback.
•
The
maximum
number
of
characters
for:
-
Folder
names:
64
characters
-
File
names:
64
characters
-
MP3
Tag:
64
characters
-
WMA
Tag:
64
characters
-
WAV
Tag:
64
characters
•
This
unit
can
recognize
a
total
of
20
480
files,
999
folders
(999
files
per
folder
including
folder
without
unsupported
files),
and
of
8
hierarchies.
•
This
unit
cannot
recognize
a
USB
device
whose
rating
is
other
than
5V
and
exceeds
1
A.
About
iPod/iPhone
•
Made
for
-
iPod
touch
(1st,
2nd,
3rd,
4th,
and
5th
generation)
-
iPod
classic
-
iPod
nano
(3rd,
4th,
5th,
6th
and
7th
generation)
-
iPhone,
iPhone
3G,
3GS,
4,
4S,
5
•
It
is
not
possible
to
browse
video
files
on
the
"Videos"
menu
in
[HEAD
MODE].
•
The
song
order
displayed
on
the
selection
menu
of
this
unit
may
differ
from
that
ofthe
iPod/iPhone.
• If
some
operations
are
not
performed
correctly
or
as
intended,
·
visit:
<http://www.jvc.net/cs/car/>.
About
JVC
Playlist Creator and
JVC
Music
Control
•
This
unit
supports
the
PC
application
JVC
Playlist
Creator
and
Android™
application
JVC
Music
Control.
•
When
you
play
audio
file
with
song
data
added
using
the
JVC
Playlist
Creator
or
JVC
Music
Control,
you
can
search
for
audio
file
by
Genres,
Artists,
Albums,
Playlists,
and
Songs.
•
JVC
Playlist
Creator
and
JVC
Music
Control
are
available
from
the
following
web
site:
<http:/
/www.jvc.net/cs/car/>.
About
Pandora
•
Pandora
is
available
only
in
the
U.S.,
Australia
and
New
Zealand.
•
Because
Pandora
is
a
third-party
service,
the
specifications
..
are
subject
to
change
without
prior
notice.
Accordingly,
compatibility
may
be
impaired,
or
some
or
all
of
the
services
may
become
unavailable.
•
Some
functions
of
Pandora
cannot
be
operated
from
this
unit.
•
For
issues
using
the
application,
please
contact
Pandora
at
• If
the
version
of
the
OS
of
the
connected
iPhone
is
earlier
than
4.0,
start
the
Pandora
application
before
selecting
the
PANDORA
source.
About
iHeartRadio
•
iHeartRadio®
is
a
third-party
service,
therefore
the
specifications
are
subject
to
change
without
prior
notice.
Accordingly,
compatibility
may
be
impaired
or
some
or
all
of
the
services
may
become
unavailable.
•
Some
iHeartRadio®
functionality
cannot
be
operated
from
this
unit.

MORE INFORMATION
Change the display information
Press
DISP
repeatedly.
FM
or
AM
Station
name
(PS)*1
•
Frequency
•
Program
type
(PTY)*1
*2
•
Title*1
*2
•
..
...
..........
.......
...........
.
..
......
,
...
Day/Clock
•
(back
to
the
beginning)
*1
For
FM
Radio
Broadcast
Data
System
stations
only.
*2
If
unavailable,
"NO
PTY"
I
JINO
TEXT"
appears.
----···"'··-··
·--
----
-········--
·----
----·-·····
·--··
··--·-·-··
··-
Playing
time
•
Day/Clock
•
Disc
name*3
•
Album
title/Artist*4
•
Track
title*S
•
Folder/file
name*6
•
(back
to
the
beginning)
*3
Only
for
CD-DA:
If
not
recorded,
"NO
NAME"
appears.
*4
Only
for
MP3/WMA
files:
If
not
recorded,
"NO
NAME"
appears.
*S
If
not
recor~ed,
"NO
NAME"
appears.
*6
Only
for
MP3/WMA
files.
Playing
time
•
Day
/Clock
•
Album
title/
Artist
•
Track
title
•
(back
to
the
beginning)
Station
name
•
Album
title/Artist
•
Track
title
•
Playing
time
•
Day/Clock
•
(back
to
the
beginning)
.................
..
....
...
.....
.....
.
;-
...
......
I
HEART
BT
AUDIO
Station
name
•
Track
title*?
•
Track
Artist*?
•
Day/Clock
•
(back
to
the
beginning)
*7 If
unavailable
,
station
name
appears
.
·········
···························
AUX
+-+Day/Clock
BT
AUDIO+-+
Day/Clock
"
TROUBLESHOOTING
Soundcannotbeheard.
"MISWIRING
CHK
WIRING
THEN
RESET
UNIT"
I
JJWARNING
CHK
WIRING
THEN
RESET
UNIT"
appears
and
no
operations
can
be
done.
Source
cannot
be
selected
.
Radio
reception
is
poor./
Static
noise
while
listening
to
the
radio.
Correct
characters
are
not
displayed.
JJPLEASE"
and
"EJECT"
appear
alternately
.
JJIN
DISC"
appears.
•
Adjust
the
volume
to
the
optimum
level.
•
Check
the
cords
and
connections.
Check
to
be
sure
the
terminals
of
the
speaker
wires
are
insulated
properly,
then
reset
the
unit.
If
this
does
not
solve
the
problem,
consult
your
nearest
service
center
.
Check
the
[SRC
SELECT]
setting.
(+
4)
•
Connect
the
antenna
firmly.
•
Pull
the
antenna
out
all
the
way.
This
unit
can
only
display
uppercase
letters,
numbers,
and
a
limited
number
of
symbols.
Press~'
then
insert
the
disc
correctly
.
Make
sure
nothing
is
blocking
the
loading
slot
when
you
eject
the
disc.
·\
· ·
········-·
- -·
···
--~·
-···----
--·-····
··--··
·-
··-
---···
··
..
-- --
Disc
cannot
be
ejected.
Playback
order
is
not
as
intended.
Elapsed
playing
time
is
not
correct.
"NOT
SUPPORT"
appears
and
track
skips.
Press
and
hold~
to
forcibly
eject
the
disc.
Be
careful
not
to
drop
the
disc
when
it
is
ejected
.
..........
...
.......
................ ......... ......................................
...
The
playback
order
is
determined
by
the
file
name
(USB)
or
the
order
in
which
files
were
re
·
corded
(disc)
.
This
depends
on
the
recording
process
earlier.
Check
whether
the
track
is
a
playable
format.
(+14)
ENGLISH
I
15

"CANNOT
PLAY"
flashes
and/or
connected
deyice
cannot
be
detected.
· :
Check
whether
the
connected
device
is
compatible
with
this
unit
and
ensure
the
files
are
in
supported
formats.
(+14}
•
Reattach
the
device.
·
---
~~READING"
keeps
flashing.
•
Do
not
use
too
many
hierarchical
levels
and
folders.
•
Reload
the
disc
or
reattach
the
USB
device.
·
----------·----------------
The
iPod/iPhone
does
not
•
Check
the
connection
between
this
unit
and
iPod/iPhone
·.
turn
on
or
does
not
work.
•
Detach
and
reset
the
iPod/iPhone
using
hard
reset.
i
II
ADD
ERROR"
I
1/SEARCH
ERR"
New
station
creation
is
unsuccessful.
[
'_CH_K~D_E_VI
_
C_E
_
"
__
-,=·
===
C=h=ec=k
-
!~;-p~
--
~~-~r-a
_-
ap
_
pli~~t~~~
~
~_i.~rd
-
e
_
v-ic~~
-__._-_·-
_
-
....
=----·
!
"NO
SKIPS"
.
The
skip
limit
has
bee
·o
reached.
~
I
11
NO
STATIONS"
·
No
stations
are
found.
i
~
I
liST
ATION
LIM"
. T_
he
number
of
reg
,
istered
stations
has
reached
its
limit.
Retry
O !
"C
i
C i
~~
_________
a_ft_
.
er_d_el_et_ing
un~ecessary
stations
from
your
devic_e.
__
_
· I
I/UPGRADE
APP"
•
· I
"CONNEa
ERR"
!"RATING
ERR"
·'
·
"LICENSE
ERR"
.
! .
! .
16
·
Make
sure
you
,
have
installed
the
latest
version
of
the
Pandora
application
on
your
device.
Communication
is
unstable.
·
Registration
of
thumbs
up/thumbs
down
has
failed~
You
try
to
access
from
a
country
which
Pandora
is
not
deliverable.
·----
- \
Station
cannot
be
selected.
"CREATE
ERR"
"SAVE
ERROR"
"OISCONNITD"
"NO
SKIPS"
"NO
ST
AllONS"
0
"NOT
CONNCTD"
:c
~
1/UPDATE
APP"
0:::
t::
~
GJ
~
.
"PLS
LOGIN"
liST
ATION
NOT
AVAILABLE"
"STATION
NOT
SELEITED"
"STREAM
ERR"
"THUMBS
ERR"
'11MEDOUT"
·TROUBLESHOOTING
lf~'Explicit
Content"
in
[Account
Settings]
is
checked
in
the
web
version
ofiHeartRADIO,
custom
stations
become
unavailable;
.
Custom
station
name
creation
is
unsuccessful.
Addition
to
the
favorite
category
failed.
Check
the
connection
to
the
device.
The
skip
limit
has
been
reached.
Retry
later.
No
stations
are
found.
·
link
to
the
application
is
impossible.
Make
sure
you
have
installed
the
latest
version
of
the
tHeart
link .
for
JVC
application
on
your
device.
·
You
haven't
log
in:
log
in
again.
Broadcast
from
the
station
is
over.
No
station
is
selected.
Broadcast
data
is
interrupted~
Registration
of
Thumbs
Up/Down
has
failed.
The
request
has
resulted
in
tirne-out.
If
you have any troubles, trythe following:
. 1
Check TROUBLESHOOTING
2
Reset
the
unit(+
3)
3 Contact
(USA
only) ,
Call: 1-800-252-5722
(or)
visit: http://www.jvc.com .

SPECIFICATIONS
Frequency
Range
87.9
MHz
to
107.9
MHz
(200kHz
step)
87.5
MHz
to
108.0
MHz
(50
kHz
step)
·-----,---
'
C~annel
Space
Selection
50
kHz/200
kHz
·-----------
Usable
Sensitivity
.
8.2
dBf
(0.71
~V/75
0)
(SIN=
26
dB)
Quieting
Sensitivity
(DIN
SIN
=
46
dB)
17.2
dBf
(2.0
~V/75
0)
···
·
-··
······
··
····
·····
·············
··
·····
··
···-·
·
·;··
··
-·····
··
········
····
·······
··
..
······-·
..
··
·
·········
·
··
··
·
··
·
··
·
··
·
··
:
·······
··
··
···········
······-·
····
····
·· ·
··········
··
·····
··
···
···
··
·-·
··
..
···
···········
·
····
·
······
..
······
··
·······-········
..
···
··
·····
·
···
··
···
·
········
·
...
Frequency
Response
(±3
dB)
30Hz
to
15kHz
Signal-to-Noise
Ratio
(MONO)
64dB
Stereo
Separation
(1
kHz)
.
40dB
AM
Frequency
Range
530kHz
to
1
700kHz
(10kHz
step)
531
kHz
to
1
611
kHz
(9kHz
step)
Channel
Space
Selection
9kHz/10kHz
Usable
Sensitivity
29
dBp
(28.2
~V)
(S/N
=20
dB)
laser
Diode
GaAIAs
Digital
Filter
(0/
A)
8
times
over
sampling
Spindle
Speed
·
500
rpm
-
200
rpm
(Cl
V)
Wow
&
Flutter
Below
measurable
limit
·
Frequency
Response
(±1
dB)
20Hz-20kHz
Total
Harmonic
Distortion
(1
kHz)
0.01%
•,
Signal-to-Noise
Ratio
(1
kHz}
105
dB
Dynamic
Range
90dB
Channel
Separation
85
dB
MP3
Decode
Compliant
with
MPEG-1/2
Audio
layer-3
WMADecode
Compliant
with
Windows
Media
Audio
USB
Standard
Compatible
Devices
.
File
System
Maximum
Supply
Current
MP3
Decode
·
WMA
Decode
WAV
Decode
Frequency
Response
(±3
dB)
Input
Maximum
Voltage
Input
Impedance
Maximum
Output
Power
.
Full
Bandwidth
Power
(at
less
than
1
%THO)
Speaker
Impedance
Preout
Level/load
(CD)
Preout
Impedance
Operating
Voltage
(10.5
V
-.
16
V
allowable)
Maximum
Current
Consumption
Operating
Temperature
Range
Installation
Site
{W
x Hx
D)
Weight
Subject
to
change
·
without notice.
USB
.
1.1,
USB
2.0
(Full
speed)
Mass
storage
class
FAT12/16/32
DC5V===1
A.
Compliant
with
MPEG-1/2
Audio
layer-3
Compliant
with
Windows
Media
Audio
Linear-PCM
~
20
Hz-
·
20kHz
1200mV
30k0
50Wx4'
22Wx4
40-80
KD-AR75S:
4
800
mV/10
kO
load
KD-R7SO
I
KD~R6SO
I
KD-ARSSS
I
KD-R4SO:
2
500
mV/10
kO
load
~6000
14.4V
10A
182
mm
x
53
mm
x
158
mm
{7-3/16"
X
2-1/8"
X
6-1/4")
1.2
kg
{2.65
lbs)
ENGLISH
I
17

z
0
.....
1-
u
·w
z
z
0
u
...........
z
0
-
1-
c
....
....
c
1-
"'
z
-
18
A
Warning .
•
The
unit
can
only
be
used
with
a
12
V
DC
power
supply,
negative
ground.
•
Disconnect
the
battery's
negative
terminal
before
wiring
and
mounting
.
•
Do
not
connect
Battery
wire.
(yellow)
and
Ignition
wire
(red)
to
the
car
chassis
or
Ground
wire
(black)
to
prevent
a
short
circuit.
.
•
Insulate
unconnected
wires
with
vinyl
tape
to
prevent
a
short
circuit.
•
Be
sure
to
ground
this
unit
to
the
car's
chassis
again
after
installation.
A
Caution
•
For
s~fety's
sake,
leave
wiring
and
mounting
to
professionals.
Consult
the
car
audio
dealer
.
•
Install
this
unit
in
the
console
of
your
vehicle.
Do
not
touch
the
metal
parts
of
this
unit
during
and
shortly
after
use
of
the
unit.
Metal
parts
such
as
the
heat
sink
and
enclosure
become
hot.
•
Do
not
connect
the
8
wires
of
speakers
to
the
car
chassis
or
Ground
wire
(black),
or
connect
them
in
parallel.
•
Connect
speakers
with
a
maximum
power
of
more
than
50
W.
If
the
·
maximum
power
of
the
speakers
is
low~r
than
50
W,
change
the
[AMP
GAIN]
setting
to
avoid
damaging
the
speakers.
(+12)
•
Mount
the
unit
at
an
angle'of
less
than
30°.
• If
your
vehicle
wiring
harness
does
not
have
the
ignition
terminal,
connect
Ignition
wire
(red)
to
the
terminal
on
the
vehicle's
fuse
box
which
provides
12
V
DC
power
supply
and
is
turned
on
and
off
by
the
ignition
key.
•
After
the
unit
is
installed,
check
whether
the
brake
lamps,
blinkers,
wipers,
etc.
on
the
car
are
working
properly.
• If
the
fuse
blows,
first
make
sure
the
wires
are
not
touching
car's
chassis,
then
replace
the
old
fuse
with
one
th~t
has
the
same
rating.
·Basic procedure
1 Remove the key from the ignition switch, then
disconnectthe
8
terminal
of
thecar battery.
2 Connect the wires properly.
See
Wiring connection.
(+19)
·
3 Install the
unit
to
your
car.
See
Installing
the
unit
(in-dash mounting).
4 Connectthe
8
terminal
of
the car battery.
5·
Reset
the unit.
(+
3) ·
.1
2
When installing
without
the
mounting
1 sleeve .
A
Use
only
the
specified
screws.
Using
wrong
screws
might
damage
the
unit.
Flat
or
round
head
screws
(not
supplied)
M5
X
8
mm
(M5
X
3/8
11
)
\'<4>......_
.
14>......__
-
Pocket
8
mm
(3/8")
8
mm
(3/8
")
Bracket
(not
supplied)
' .
Do
the
required
wiring.
(+19)
Dashboard
of
your
car
Bend
the
appropriate
tabs
to
hold
the
sleeve
firmly
in
place.
How
to
remove
the
unit

I
I
I
!
I
I
I
I
:
Jffi'C:OSc:::ut::·
I
I
I
!
For
more
information:
f
Metra
Electronics:
:
www
.metraoniine.com
I •
:
Scosche
lndustnes:
I
:
www
;scosche.com
I
I
I
I
!
I
Yellow:
Ba
Red:
Ignition
12
V
Black:
Ground
White:
Front
speaker
(left)
White/black
Green:
Rear
speaker
(left)
Green/black
0
Remote
wire
(not
supplied)
-----+----- ----------------,
I
I
I
I
I
I
I
!
I
I
I
I
I
r----~-~-------~~--------~:
Make
this
connection
if
your
vehicle
factory
wiring
harnessdoesnothave
"12
V
ignition
switch"
wire.
I
I
I
I
I
I
I
I
I
I
I
f ,
__
;
Purp
~--------------------------------------------------------------------------------------------------------------------------------------~
Part list for
installation
(A)
Faceplate
(B)
Trim
plate
(C)
Mounting
sleeve
(D)
Wiring
harness
(E)
Extraction
key
(
xl
)
(
xl
)
(
xl
)
~(x2)
ENGLISH
I
19

I
CAUTION
Use
of
controls
or
adjustments
or
performance
of
procedures
other
than
those
specified
herein
may
result
in
hazardous
radiation
exposure.
In
compliance
with
Federal
Regulations,
following
are
reproductions
of
labels
on,
or
inside
the
product
relating
to
laser
product
safety.
I
JVC
KENWOOD
Corporation
2967-3,
ISHIKAWA-MACHI,
HACHIOJI-SHI,
TOKYO,
JAPAN
-
·----
THIS
PRODUCT
COMPLIES
WITH
DHHS
RULES
21CFR
SUBCHAPTER
J
IN
EFFECT
AT
DATE
OF
MANUFACTURE.
Location
:
Bottom
Plate
FCC
WARNING
This
equipment
may
generate
or
use
radio
frequency
energy.
Changes
or
·
modifications
to
this
equipment
may
cause
harmful
interference
unless
the
modifications
are
expressly
approved
in
the
instruction
manual.
The
user
could
lose
the
authority
to
operate
this
equipment
if
an
unauthorized
change
or
modification
is
made.
FCC
NOTE
This
equipment
has
been
tested
and
found
to
comply
with
the
limits
for
a
Class
B
digital
device,
pursuant
to
Part
15
of
the
FCC
Rules.
These
limits
are
designed
to
provide
reasonable
protection
against
harmful
interference
in
a
residential
installation.
This
equipment
may
cause
harmful
interference
to
radio
communications,
ifit
is
not
installed
and
used
in
accordance
with
the
instructions.
However,
there
is
no
guarantee
that
interference
will
not
occur
in
a
particular
installation.
If
this
equipment
does
cause
harmful
interference
to
radio
or
television
reception,
which
can
be
determined
by
turning
the
equipment
off
and
on,
the
user
is
encouraged
to
try
to
correct
the
interference
by
one
or
more
of
the
following
measures:
•
Reorient
or
relocate
the
receiving
antenna.
•
Increase
the
separation
between
the
equipment
and
receiver.
J
•
Connect
the
equipment
into
an
outlet
on
a
circuit
different
from
that
to
which
the
receiver
is
connected.
•
Consult
the
dealer
or
an
experienced
radio/TV
technician
for
help.
-
-
·
·-----
-
----·
·
--
·
-
-
----
-
--~
-
-
~
-···--
·
-
··
·
-
·-
..
---
--
© 2013
JVC
KENWOOD
Corporation
•
Microsoft
and
Windows
Media
are
either
registered
trademarks
or
trademarks
of
Microsoft
Corporation
in
the
United
States
and/or
other
countries.
•
II
Made
for
iPod,"
and
II
Made
for
iPhone"
mean
that
an
electronic
accessory
has
been
designed
to
connect
specifically
to
iPod,
or
iPhone,
respectively,
and
has
been
certified
by
the
developer
to
meet
Apple
performance
standards.
Apple
is
not
responsible
for
the
operation
of
this
device
or
its
compliance
with
safety
and
regulatory
standards.
Please
note
that
the
use
of
this
accessory
with
iPod
or
iPhone
may
affect
wireless
performance.
•
iPhone,
iPod,
iPod
classic,
iPod
nano,
and
iPod
touch
are
trademarks
of
Apple
Inc.,
registered
in
the
U.S.
and
other
countries.
•
Lightntng
is
a
trademark
of
Apple
Inc.
·
•
Pandora,
the
Pandora
logo,
and
the
Pandora
trade
dress
are
trademarks
or
registered
trademarks
of
Pandora
Media,
Inc.,
used
with
permission.
·
•
iHeartRadioe
is
a
registered
mark
of
Clear
Channel
Broadc~sting,
Inc.
in
the
United
States
and
J
other
countries.
Such
marks
ar'e
used
under
license.
•
Android
is
trademark
of
Google
Inc.
·
Informacion
acerca
de
Ia
eliminaci6n
de
equipos
eh!ctricos
y
electr6nicos
al
final
de
Ia
vida
util
(aplicable
a
los
paises
que
hay
an
.adoptado
sistemas
independientes
de
recogida
de
residuos)
Los
productos
con
el
sfmbolo
de
un
contenedor
con
ruedas
tach
ado
no
pod
ran
ser
desechados
como
residuos
domesticos.
Los
equipo"s
electricos
y
electr6nicos
al
final
de
Ia
vida
util,
.
deberan
ser
reciclados
en
instalaciones
que
puedan
dar
el
tratamiento
adecuado
a
estos
productos
ya
sus
subproductos
residuales
correspondientes.
P6ngase
en
contacto
con
su
administraci6n
local
para
obtener
informacion
sobre
el
punto
de
recogida
mas
cercano.
Un
tratamiento
correcto
del
reciclaje
y
Ia
eliminaci6n
de
residuos
ayuda
a
conservar
los
recursos
y
evita
al
mismo
tiempo
efectos
perjudiciales
en
Ia
salud
y
el
medio
ambiente.
CALIFORNIA,
USA
ONLY
This
product
contains
a
CR
Coin
Cell
Lithium
Battery
which
contains
Perchlorate
Material-special
handling
may
apply.
See
www.dtsc.ca.gov/hazardouswaste/perchlorate
llnforma~ao
sobre
a
elimina~ao
de
pilhas
Este
produto
nao
deve
ser
eliminado
como
lixo
domestico
geral.
Devolva
a
pith
a
usada
ao
revendedor
ou
entidade
autorizada
para
que
a
mesma
seja
devol
vida
ao
fabricante
ou
importador.
A
reciclagem
ea
elimina~ao
de
lixo
de
maneira
apropriada
ajudarao
a
conservar
os
recursos
natura
is
ao
mesmo
tempo
que
prevenirao
os
efeitos
prejudicais
a
nossa
saude
e
ao
meio
ambiente.
1
013DTSMDT
JEIN
Other manuals for KD-AR755
1
This manual suits for next models
4
Table of contents
Other JVC Car Stereo System manuals