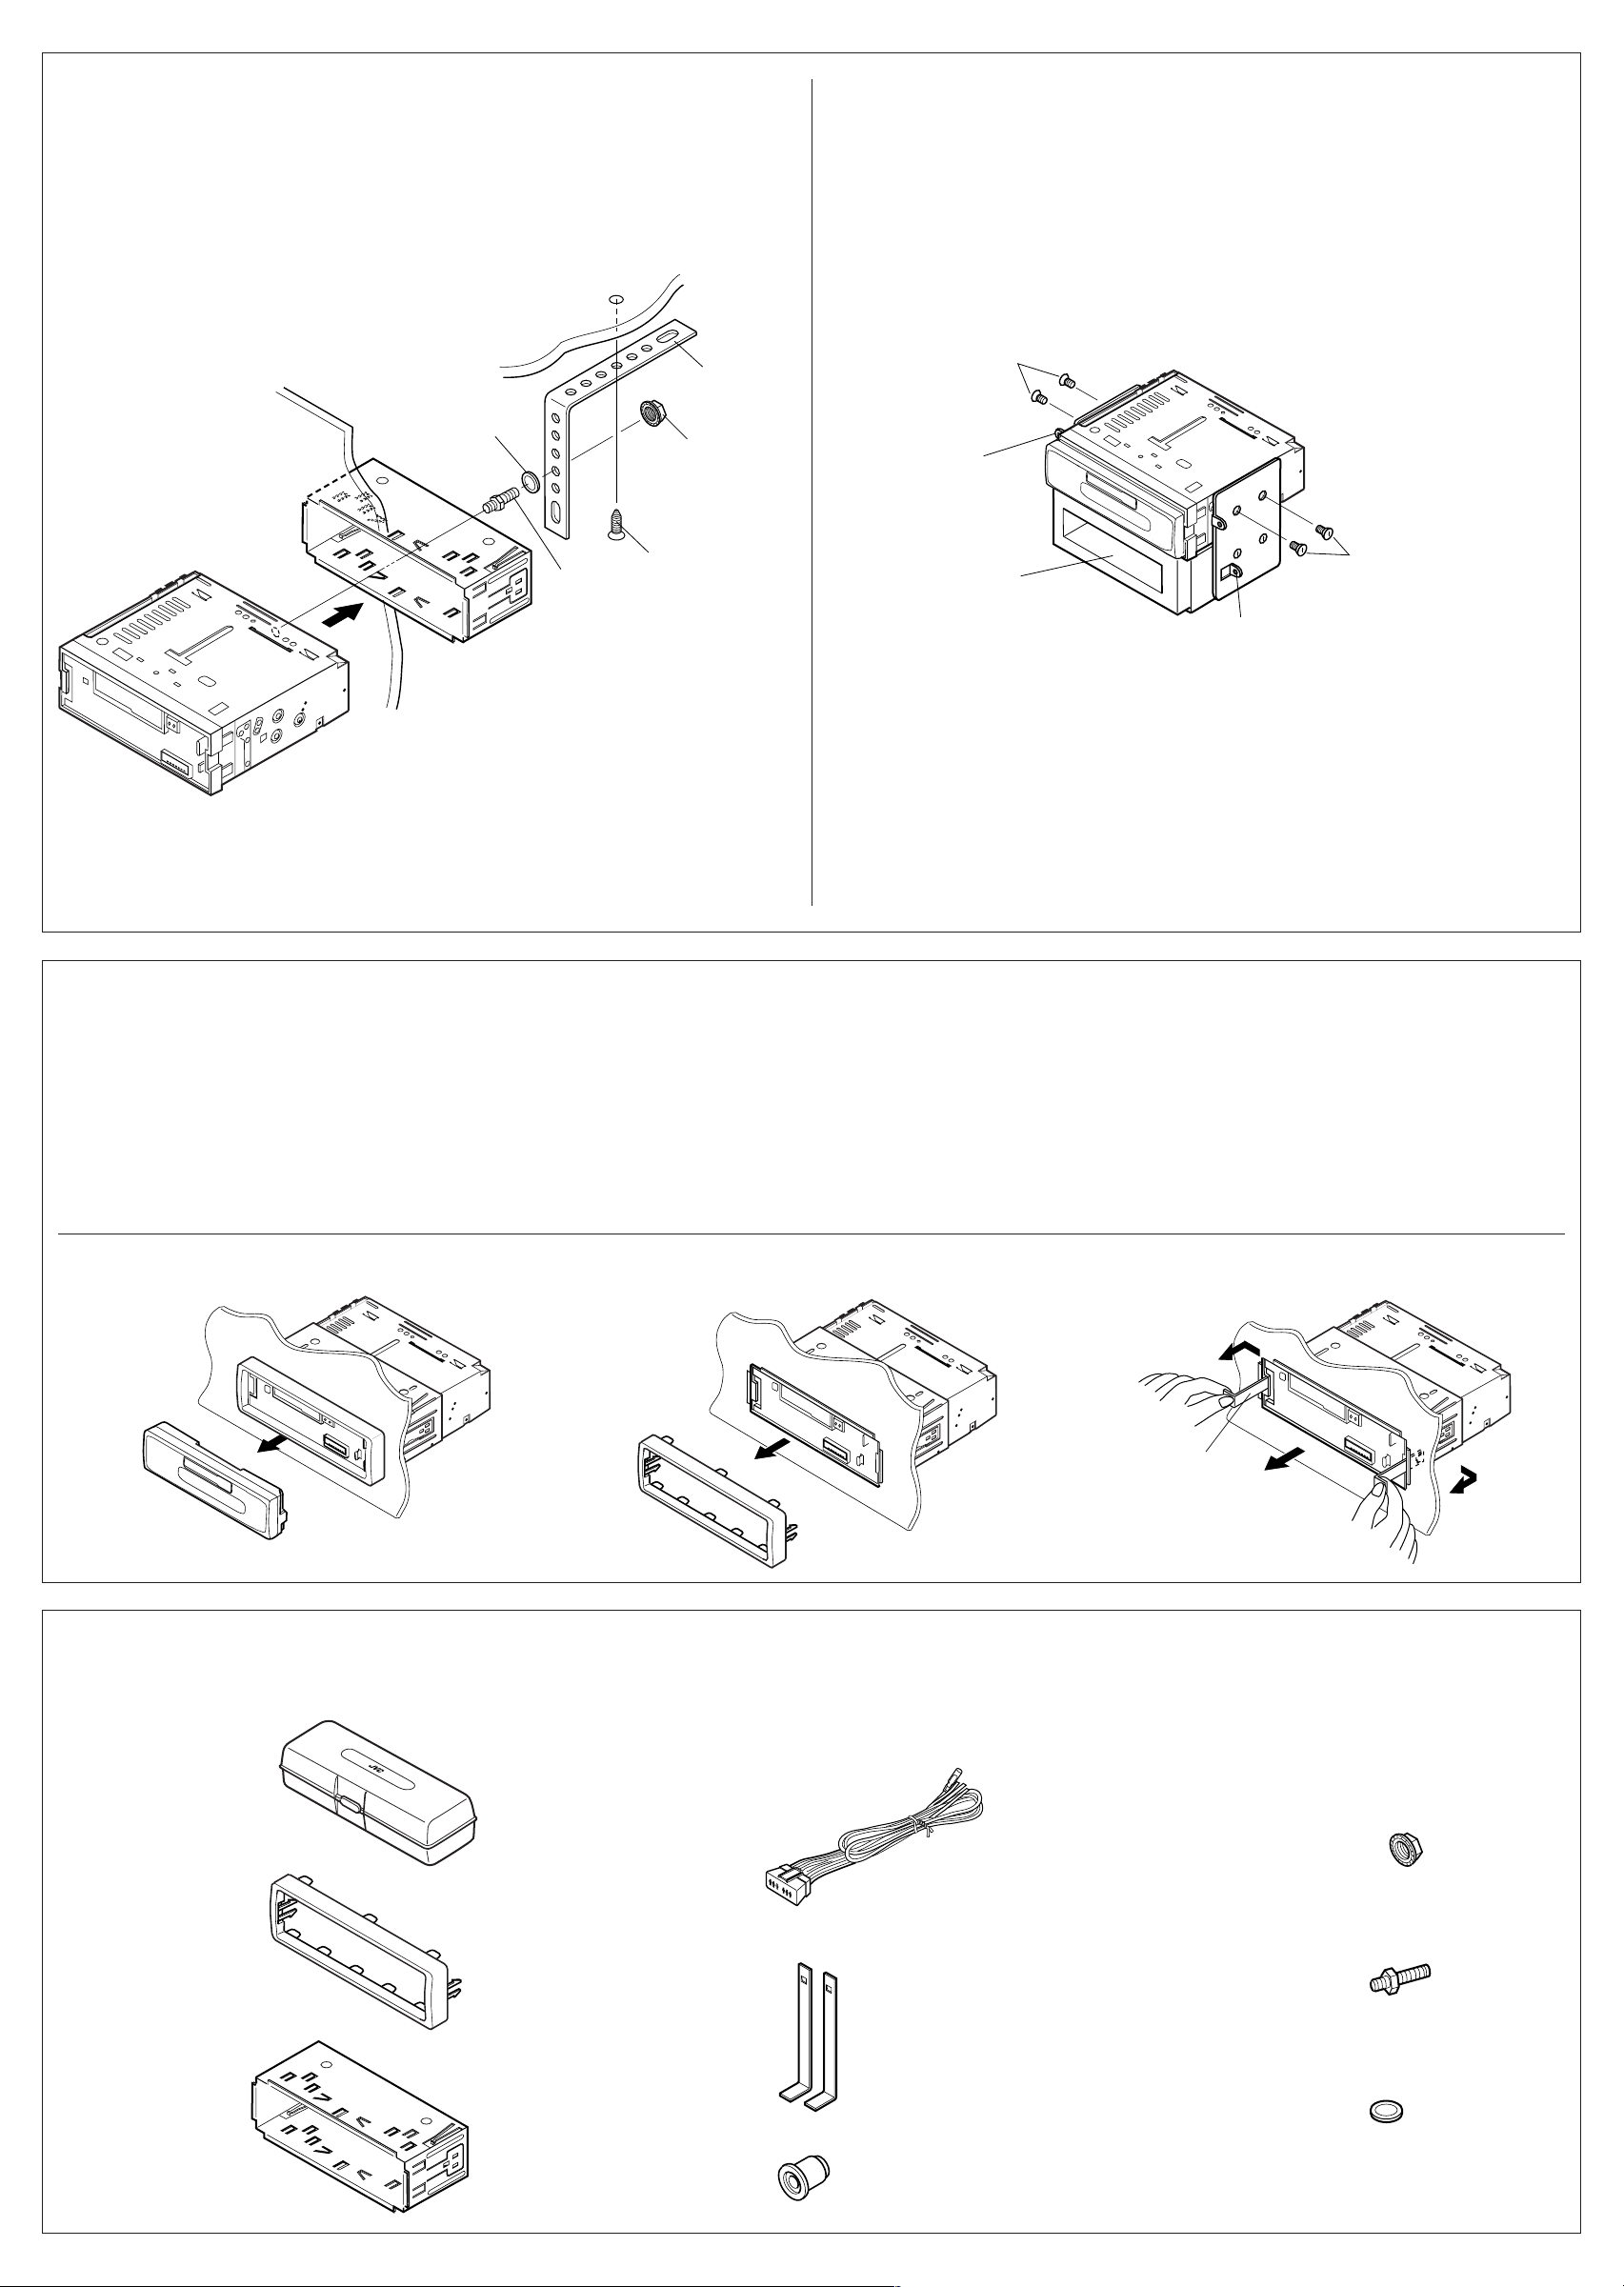
PRECAUTIONS on power supply and speaker
connections:
• DO NOT connect the speaker leads of the power cord to the
car battery; otherwise, the unit will be seriously damaged.
• Connect the black lead (ground), yellow lead (to car battery,
constant 12V), and red lead (to an accessory terminal) correctly.
• BEFORE connecting the speaker leads of the power cord to
the speakers, check the speaker wiring in your car.
–If the speaker wiring in your car is as illustrated in Fig. 1
and Fig. 2 below, DO NOT connect the unit using that original
speaker wiring. If you do, the unit will be seriously damaged.
Redo the speaker wiring so that you can connect the unit to
the speakers as illustrated in Fig. 3.
–If the speaker wiring in your car is as illustrated in Fig. 3,
you can connect the unit using the original speaker wiring in
your car.
– If you are not sure of the speaker wiring of your car, consult
your car dealer.
W??O?zU?Ðd?N?J?« W?U?D?« b?¹Ëe?ð ‰u?Š U?N?O?³?M?ðW??O?zU?Ðd?N?J?« W?U?D?« b?¹Ëe?ð ‰u?Š U?N?O?³?M?ð
W??O?zU?Ðd?N?J?« W?U?D?« b?¹Ëe?ð ‰u?Š U?N?O?³?M?ðW??O?zU?Ðd?N?J?« W?U?D?« b?¹Ëe?ð ‰u?Š U?N?O?³?M?ð
W??O?zU?Ðd?N?J?« W?U?D?« b?¹Ëe?ð ‰u?Š U?N?O?³?M?ð
∫UŽUL« qOuðË∫UŽUL« qOuðË
∫UŽUL« qOuðË∫UŽUL« qOuðË
∫UŽUL« qOuðË
•uð Ò¨…—UO« W¹—UDÐ l UŽUL« WUÞ b¹Ëeð „öÝ« q
ÆUŽULK —d{ ‰uBŠ v« ÍœR¹ p– Ê
•W¹—UDÐ l® dH « pK«Ë ¨©w{— «® œuÝ « pK« qË«
·d??D??« l??® d??L??Š « p??K????«Ë ¨©X??u?? ±≤ X??ÐU?Ł ¨…—U?O??«
Æ`O× qJAÐ ©wU{ «
•¨U?ŽU?L??« l? U?ŽUL« WUÞ b¹Ëeð „öÝ« qOuð q³
Æpð—UOÝ qš«œ UŽUL« „öÝ« WJ³ý h׫
≠
w?¼ U?L? p?ð—U?OÝ qš«œ UŽUL« „öÝ« WJ³ý X½U «–«w?¼ U?L? p?ð—U?OÝ qš«œ UŽUL« „öÝ« WJ³ý X½U «–«
w?¼ U?L? p?ð—U?OÝ qš«œ UŽUL« „öÝ« WJ³ý X½U «–«w?¼ U?L? p?ð—U?OÝ qš«œ UŽUL« „öÝ« WJ³ý X½U «–«
w?¼ U?L? p?ð—U?OÝ qš«œ UŽUL« „öÝ« WJ³ý X½U «–«
¨qHÝ « w …œułu*« ≤ qJA«Ë ± qJA« w WMO³ ¨qHÝ « w …œułu*« ≤ qJA«Ë ± qJA« w WMO³
¨qHÝ « w …œułu*« ≤ qJA«Ë ± qJA« w WMO³ ¨qHÝ « w …œułu*« ≤ qJA«Ë ± qJA« w WMO³
¨qHÝ « w …œułu*« ≤ qJA«Ë ± qJA« w WMO³uð Òq
ÆWOK « UŽUL« „öÝ« WJ³ý «b²Ý« WDÝ«uÐ “UN'«
‰uBŠ v« p– ÍœROÝ ¨WI¹dD« ÁcNÐ “UN'« qOuð - «–«
p??M??J??1 Y?O?×?Ð U?ŽU?L??« „ö?Ý« W?J?³?ý q?L?Ž b?Ž« Æ—d?{
O³ u¼ UL UŽUL« l “UN'« qOuðÒÆ≥ qJA« w s ≠
w?¼ U?L? p?ð—U?OÝ qš«œ UŽUL« „öÝ« WJ³ý X½U «–«w?¼ U?L? p?ð—U?OÝ qš«œ UŽUL« „öÝ« WJ³ý X½U «–«
w?¼ U?L? p?ð—U?OÝ qš«œ UŽUL« „öÝ« WJ³ý X½U «–«w?¼ U?L? p?ð—U?OÝ qš«œ UŽUL« „öÝ« WJ³ý X½U «–«
w?¼ U?L? p?ð—U?OÝ qš«œ UŽUL« „öÝ« WJ³ý X½U «–«
¨≥ qJA« w WMO³ ¨≥ qJA« w WMO³
¨≥ qJA« w WMO³ ¨≥ qJA« w WMO³
¨≥ qJA« w WMO³Â«b²Ý« WDÝ«uÐ “UN'« qOuð pMJ1
Æpð—UOÝ qš«œ WOK « UŽUL« „öÝ« WJ³ý ≠q??š«œ U??ŽU??L???« „ö?Ý« W?J?³?A?Ð p?²?d?F? Âb?Ž W?U?Š w?
Æ’uB)« «cNÐ …d³)« ÍË– Ë« qOu« dA²Ý« ¨pð—UOÝ
TROUBLESHOOTING
•The fuse blows.
* Are the red and black leads connected correctly?
•Power cannot be turned on.
* Is the yellow lead connected?
•No sound from the speakers.
* Is the speaker output lead short-circuited?
•Sound is distorted.
* Is the speaker output lead grounded?
* Are the “–” terminals of L and R speakers grounded in common?
•Unit becomes hot.
* Is the speaker output lead grounded?
* Are the “–” terminals of L and R speakers grounded in common?
Õö «Ë ‰UDŽ « sŽ Y׳«Õö «Ë ‰UDŽ « sŽ Y׳«
Õö «Ë ‰UDŽ « sŽ Y׳«Õö «Ë ‰UDŽ « sŽ Y׳«
Õö «Ë ‰UDŽ « sŽ Y׳«
•
Æ“uOH« ‚d²×¹Æ“uOH« ‚d²×¹
Æ“uOH« ‚d²×¹Æ“uOH« ‚d²×¹
Æ“uOH« ‚d²×¹ *ø`O× qJAÐ Wuu œuÝ «Ë dLŠ « pK« q¼
•
ÆWOzUÐdNJ« WUD« qOuð sJ1 ÆWOzUÐdNJ« WUD« qOuð sJ1
ÆWOzUÐdNJ« WUD« qOuð sJ1 ÆWOzUÐdNJ« WUD« qOuð sJ1
ÆWOzUÐdNJ« WUD« qOuð sJ1 *ø uu dH « pK« q¼
•
ÆUŽUL« s u —bB¹ ÆUŽUL« s u —bB¹
ÆUŽUL« s u —bB¹ ÆUŽUL« s u —bB¹
ÆUŽUL« s u —bB¹ *øWŽUL« Ãdš pKÝ …dz«œ w dOBIð pUM¼ q¼
•
ÆÁuA uB«ÆÁuA uB«
ÆÁuA uB«ÆÁuA uB«
ÆÁuA uB« *ø÷— UÐ uu WŽUL« Ãdš pKÝ q¼ * Èd??O?« W?ŽU?L??K? å≠ò W?³?U??« ·«d?Þ « q¼L v?M?L?O?«Ë R
øiFÐ l ÷— UÐ Wuu
•
Æ“UN'« s¹Æ“UN'« s¹
Æ“UN'« s¹Æ“UN'« s¹
Æ“UN'« s¹ *ø÷— UÐ uu WŽUL« Ãdš pKÝ q¼ * Èd??O?« W?ŽU?L??K? å≠ò W?³?U??« ·«d?Þ « q¼L v?M?L?O?«Ë R
øiFÐ l ÷— UÐ Wuu
Fig. 3
L
R+
-
+
-
+
-
+
-
Fig. 2
L
R+
-
+
-
+
-
+
-
Fig. 1
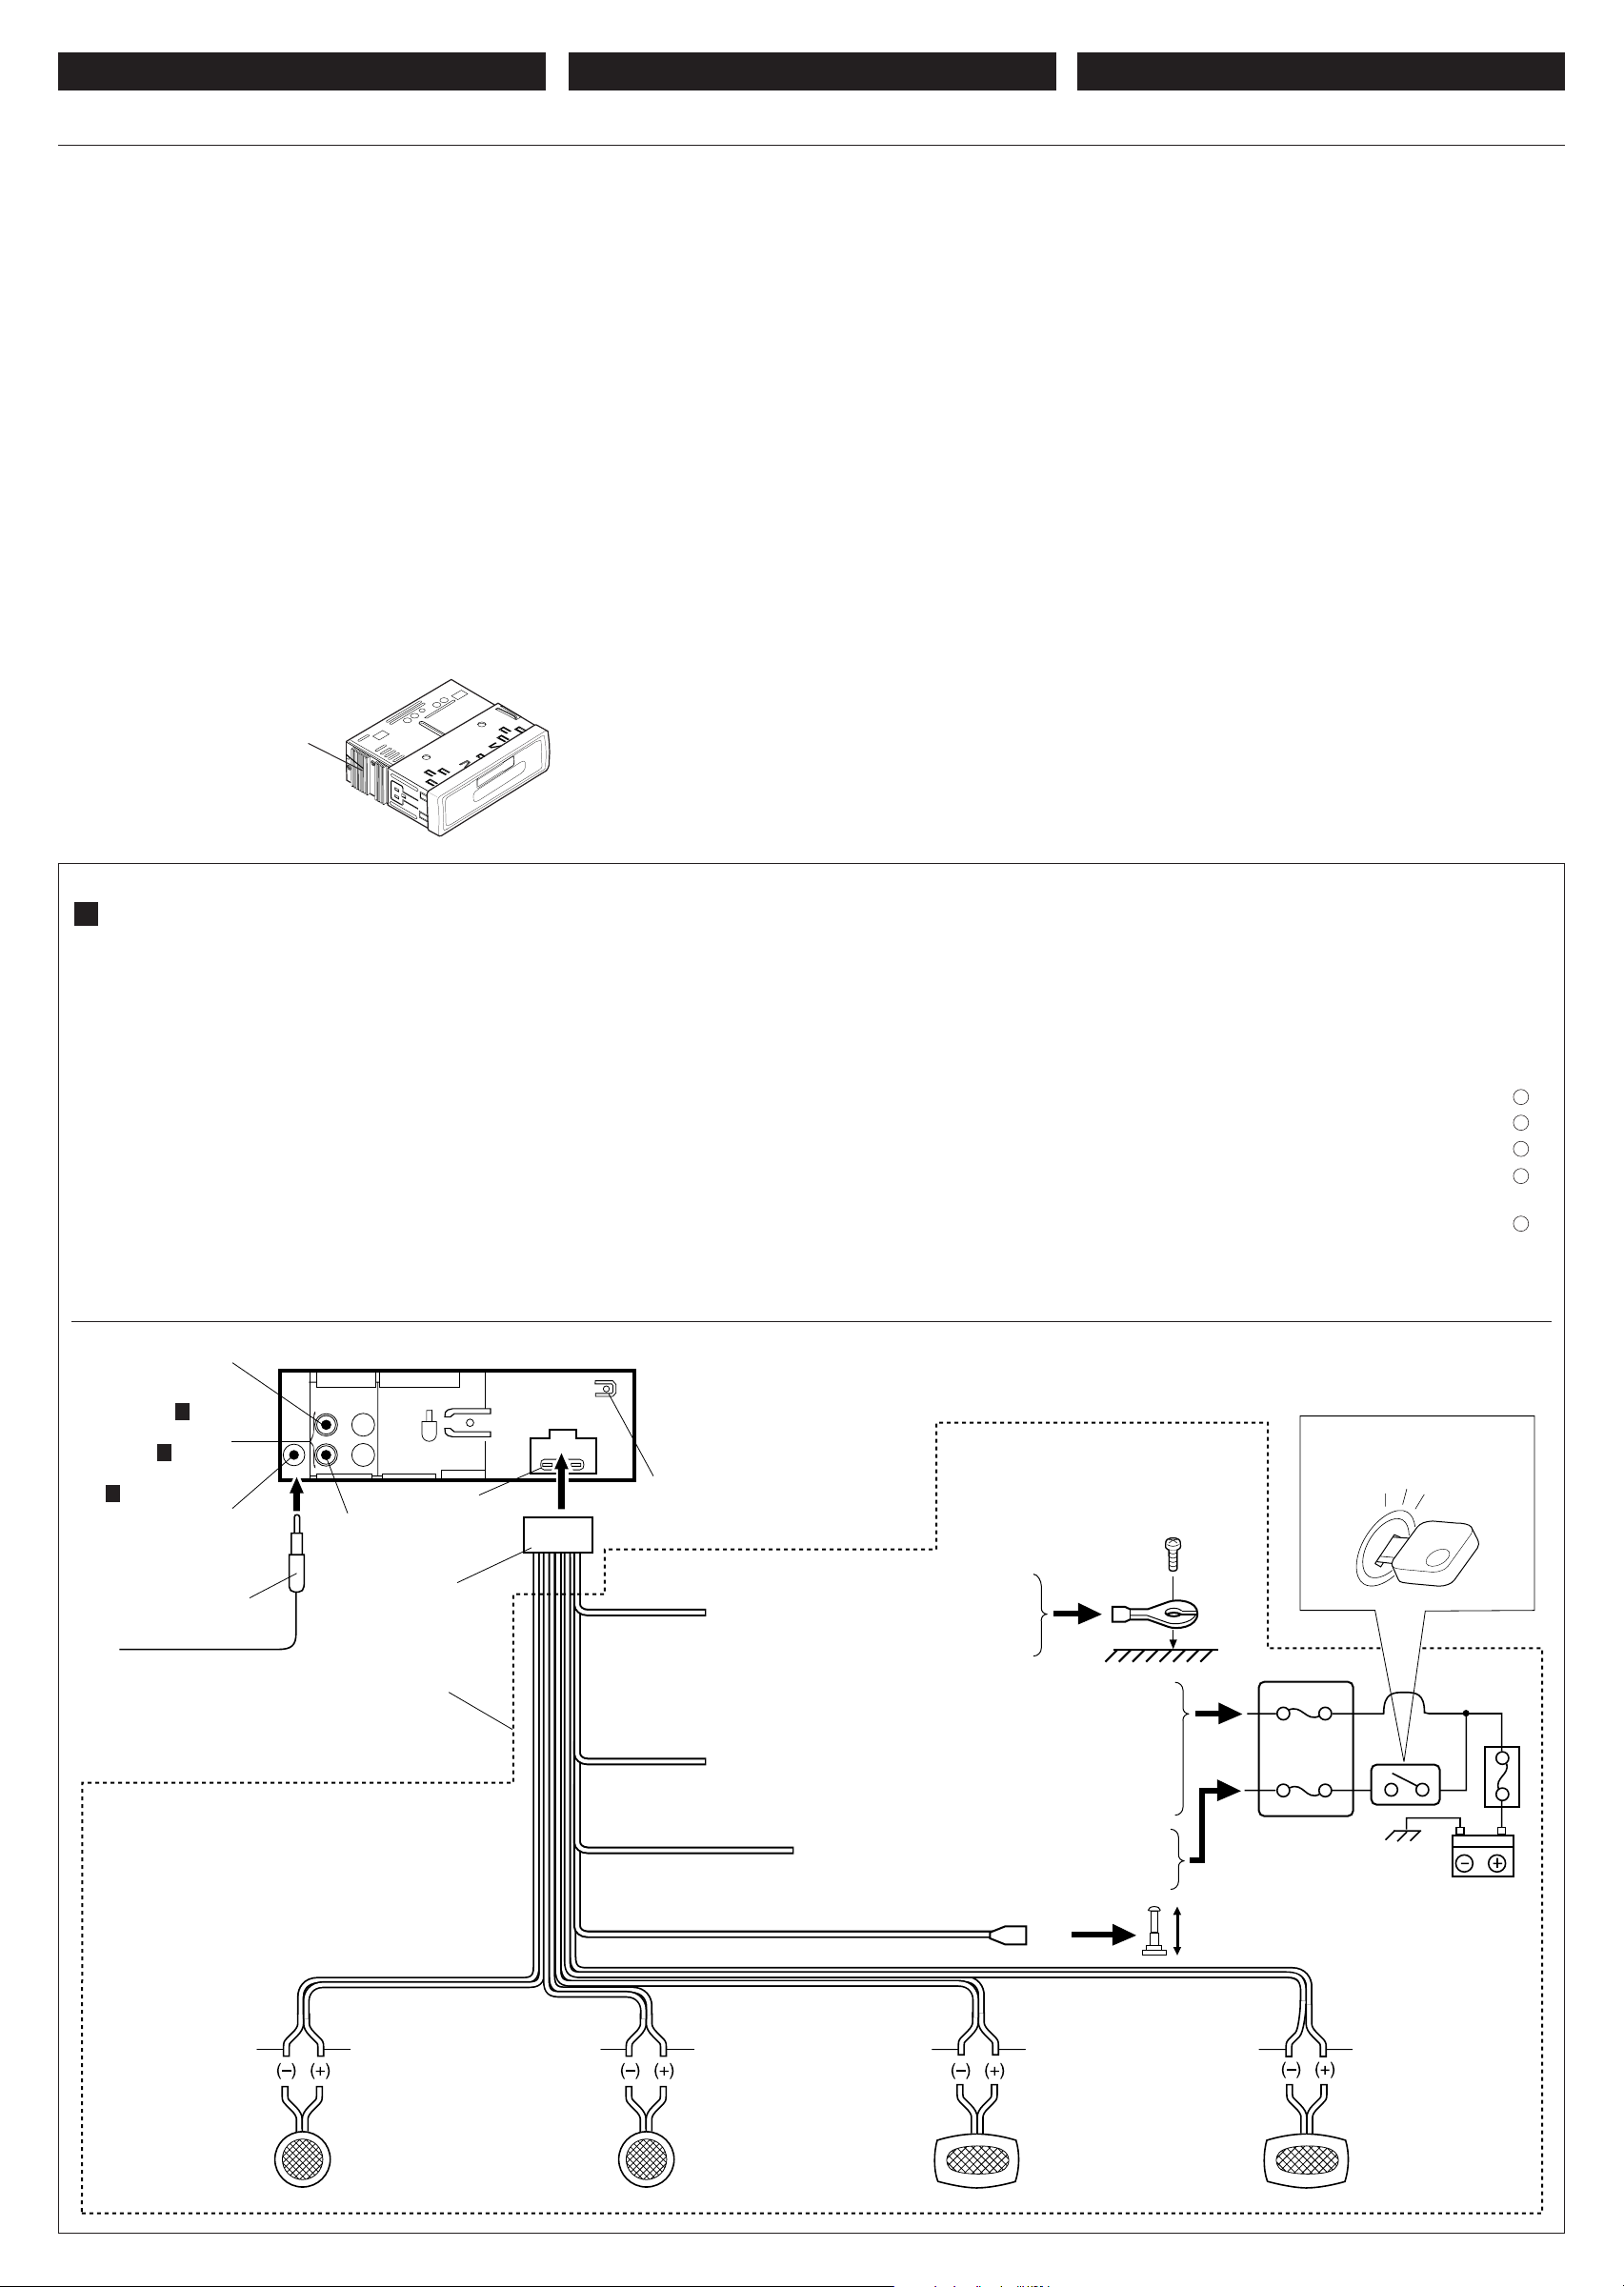
Connecting the leads / / „öÝ « qOuð„öÝ « qOuð
„öÝ « qOuð„öÝ « qOuð
„öÝ « qOuð
Solder the core wires to
connect them securely.
`??O??×?? q??J??A??Ð „ö??Ý « r??(«
ÆqOu²« bFÐ rJ×Ë
Twist the core wires when connecting.
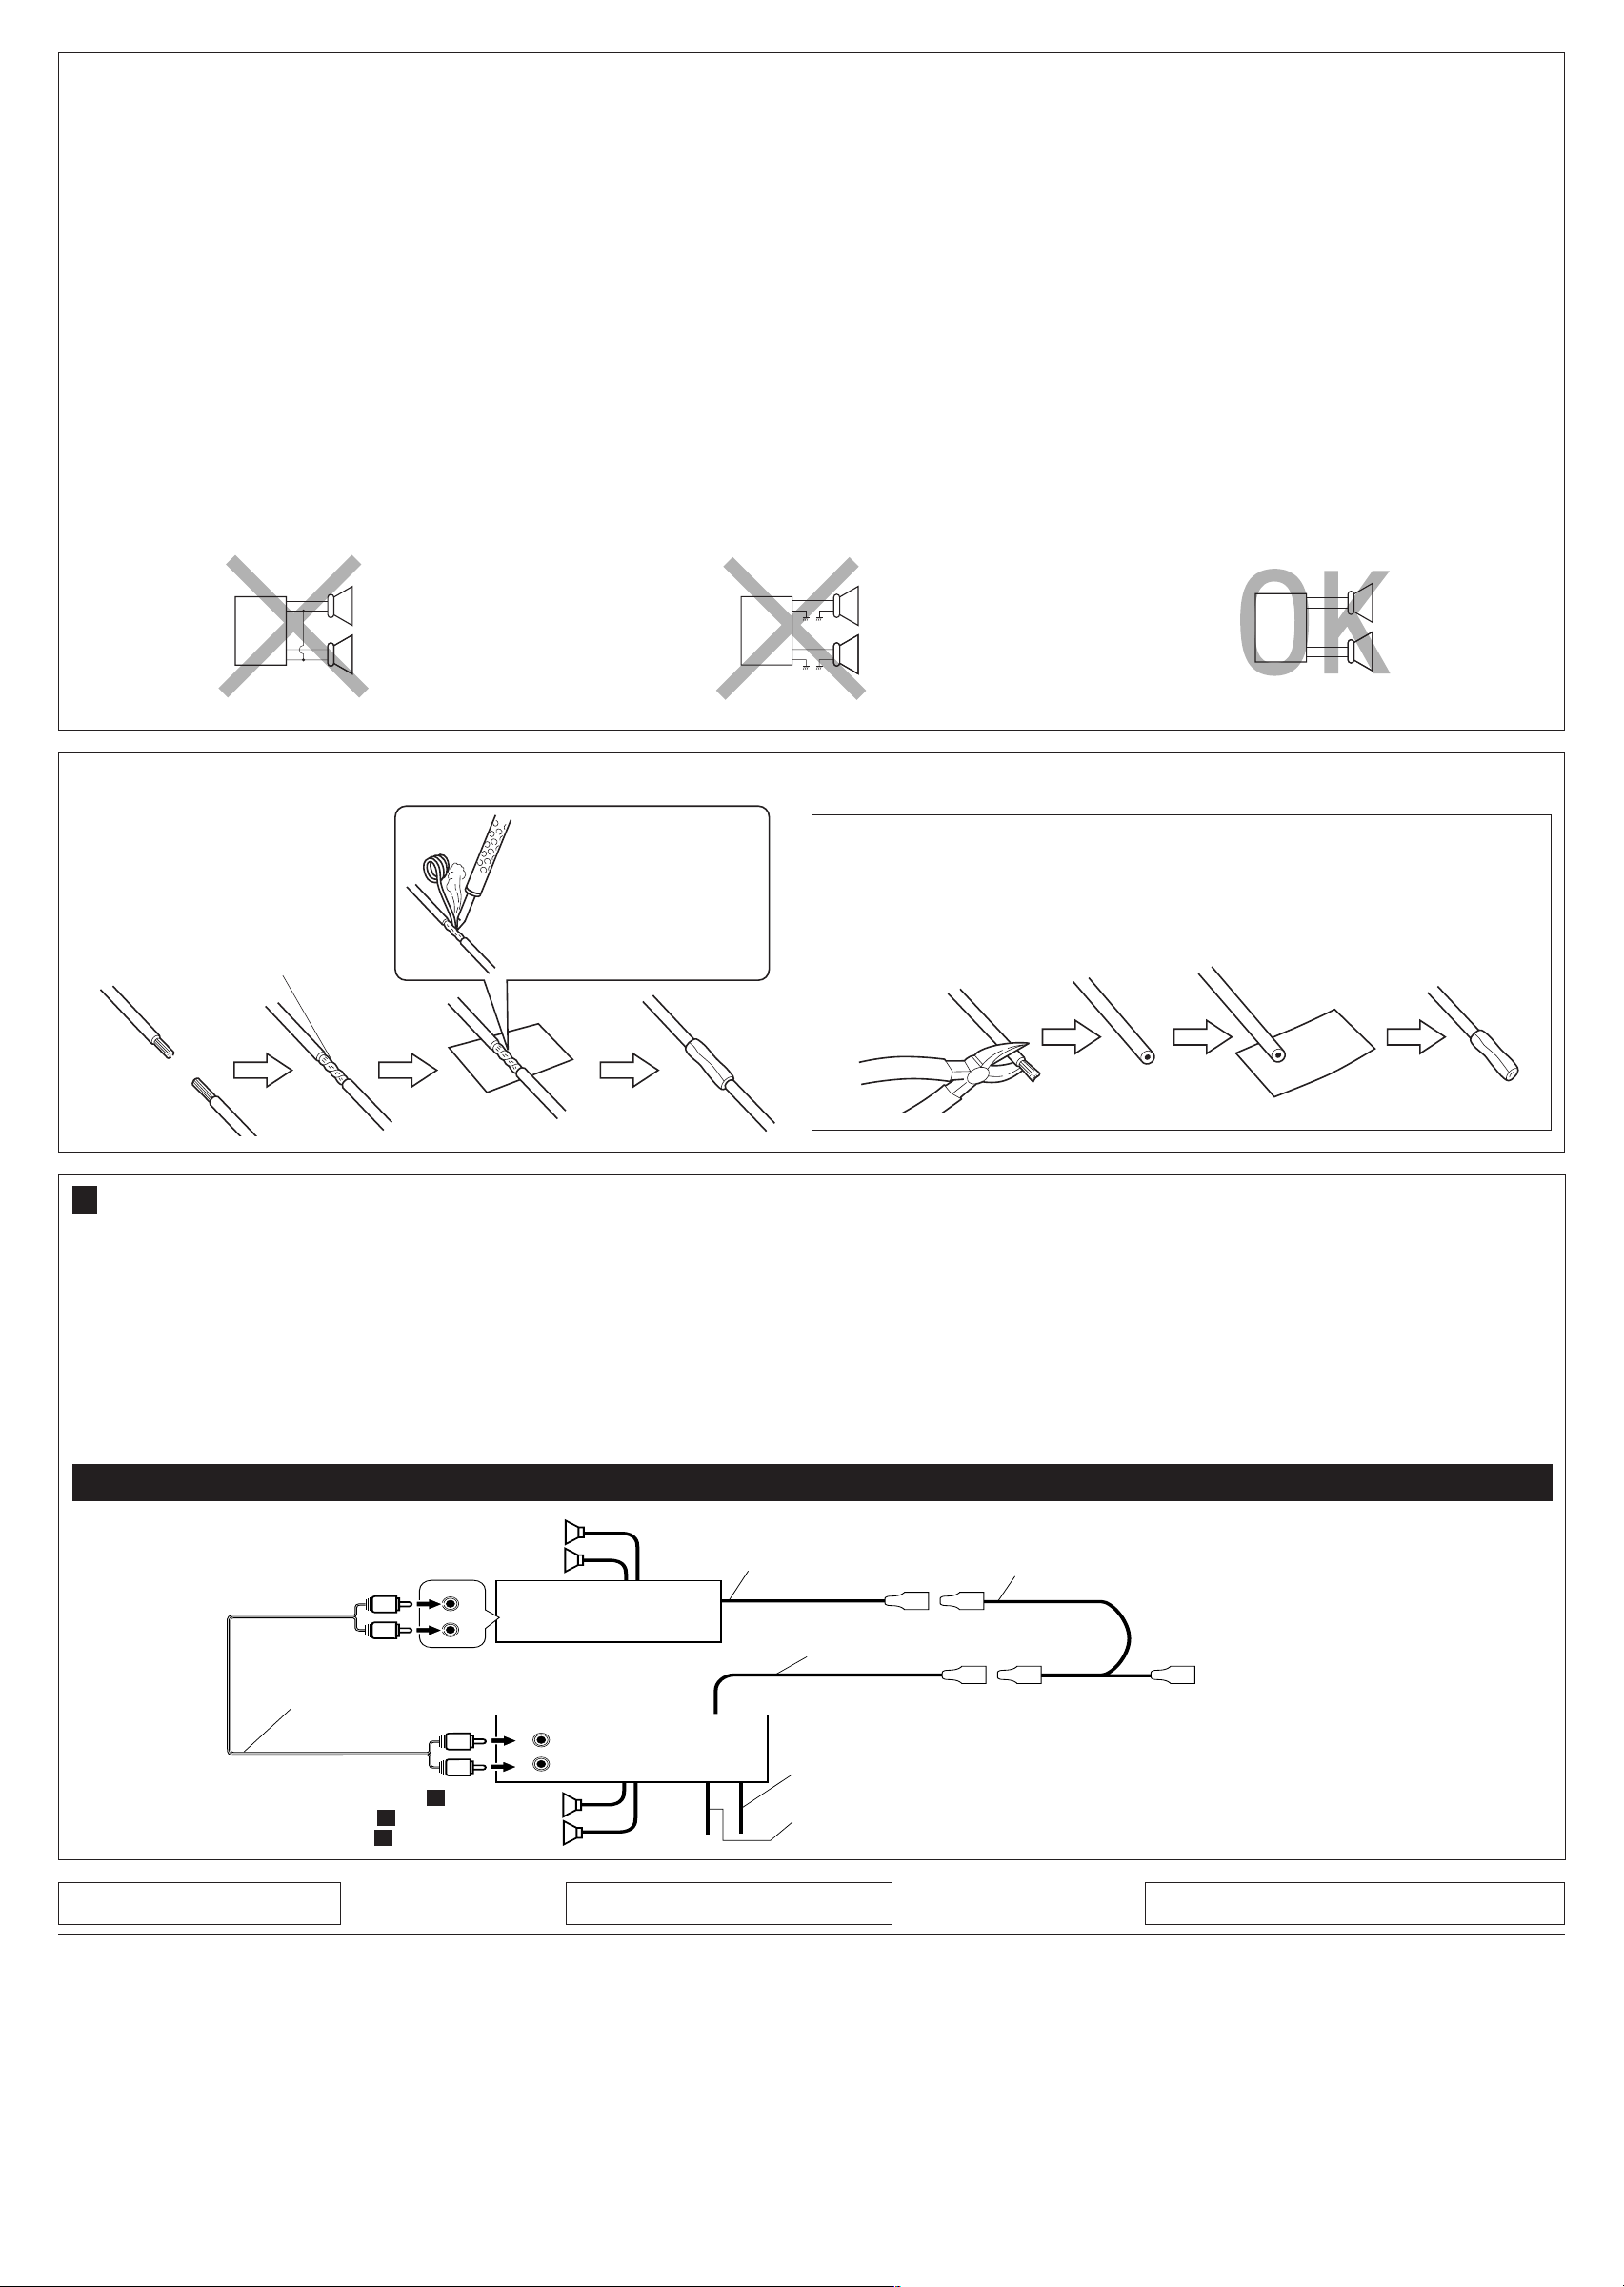
B Connections Adding Other Equipment / / WOU{ « Èdš « …eNł « qOuðWOU{ « Èdš « …eNł « qOuð
WOU{ « Èdš « …eNł « qOuðWOU{ « Èdš « …eNł « qOuð
WOU{ « Èdš « …eNł « qOuð
You can connect an amplifier and other equipment to upgrade
your car stereo system.
•Connect the remote lead (blue with white stripe) to the remote
lead of the other equipment so that it can be controlled through
this unit.
•For amplifier only:
–Connect this unit’s line-out terminals to the amplifier’s line-in
terminals.
–Disconnect the speakers from this unit, connect them to
the amplifier. Leave the speaker leads of this unit unused.
(Cover the terminals of the these unused leads with
insulating tape, as illustrated above.)
u¹dO²Ý “UNł ¡«œ« 5ײ dš« “UNłË u rC qOuð pMJ1
Æ…—UO«
¿p?K?Ý l? ©i?O?Ð U?Ð j?D?<« ‚—“ «® b?F?Ð s?Ž r?J?×?²?« pKÝ qË«
‰öš s “UN'UÐ rJײ« r²¹ YO×Ð dš « “UN−K bFÐ sŽ rJײ«
Æ“UN'« «c¼ ¿∫uB« rC* jI
‡‡j)« ‡ qšœ ·«dÞ« l “UN'« «cN j)« ‡ Ãdš ·«dÞ« qË«
ÆuB« rC* ‡‡Æu?B« rC l rNKË« ¨“UN'« «c¼ s UŽUL« qB«
wDž® ƉULF²Ý« ÊËbÐ “UN'« «c¼ UŽULÝ „öÝ« „dð«
`{u u¼ UL ¨‰“UŽ j¹dAÐ WKLF²*« dOž „öÝ « Ác¼ ·«dÞ«
©ÆvKŽ « w
Amplifier / / uB« rC
INPUT
R
L
R
L
LINE OUT
REAR
L
R
L
R
KS-F150
Rear speakers
WOHK)« UŽUL«
Blue with white stripe
iOÐ UÐ jD ‚—“« pKÝ
(see diagram A) Front speakers
wDOD²« rÝd« dE½«®AWOU « UŽUL« ©
Remote lead
bFÐ sŽ rJײ« pKÝ
Y-connector (not supplied with this unit)
‡ quY©“UN'« «c¼ l od dOž®
To automatic antenna if any
błË Ê« wJOðUuðË « wz«uN« v«
JVC amplifier
lM u rCJVC
!"#$%&'()*
• !"#$%&'&()*+,-./0123456
• !"#$%&"' ! !"#$ !"
! 12V !"#$ !"#$%&'()
• !"#$%&%' !"()*+,-./01 !"
– !"#$%&'()*12 !"#$%&'
!"#$%&'()*+,-./#0-123
!"# 3 !"#$%&'()*+
– !"#$%&'()*3 !"#$%&'()
!"#$%
– !"#$ %&'()*+,-./ 0%&123
• !"#$%&'()*+,%-./012
!"#
!"#$%&'(
!"#$%&'()
!"
!"#$%&'(
!"#$%&'()* +,-./0123456
• ! !"# !"#$%&'()*+,-.
!"#$%&'(
• !"#$%
– !"#$%&'()"*$%+,-./
– !"#$%&'()*+,!-#$. !)/
!" !"#$%&'()*+,-.)%/0
!"
!"#$
!"
Y !" !"#$%
!"#$%
!"
JVC
! !"#$%
!
• !"#
* !"#$%&'!"#$%()*$+?
• !"#$
* !"#$%&'$?
• !"#$
* !"#$%&'()*+?
• !"
* !"#$%&'()?
* !"#$LR !"– !"?
• !"
* !"#$%&'()?
* !"#$LR !"– !"?
!"
! / !
! / !
q³ `O× qJAÐ „öÝ « ÂdЫ
ÆqOu²«
A
CAUTION / / tO³MðtO³Mð
tO³MðtO³Mð
tO³Mð
•To prevent short-circuit, cover the terminals of the UNUSED leads with insulating
tape.
•
·«dÞ« vKŽ o Ë ‰“UŽ j¹dý l{ ¨WOzUÐdNJ« ‡‡ dz«Ëb« w dOBI²« lM qł« s·«dÞ« vKŽ o Ë ‰“UŽ j¹dý l{ ¨WOzUÐdNJ« ‡‡ dz«Ëb« w dOBI²« lM qł« s
·«dÞ« vKŽ o Ë ‰“UŽ j¹dý l{ ¨WOzUÐdNJ« ‡‡ dz«Ëb« w dOBI²« lM qł« s·«dÞ« vKŽ o Ë ‰“UŽ j¹dý l{ ¨WOzUÐdNJ« ‡‡ dz«Ëb« w dOBI²« lM qł« s
·«dÞ« vKŽ o Ë ‰“UŽ j¹dý l{ ¨WOzUÐdNJ« ‡‡ dz«Ëb« w dOBI²« lM qł« s
WKLF²*« dOž „öÝ «WKLF²*« dOž „öÝ «
WKLF²*« dOž „öÝ «WKLF²*« dOž „öÝ «
WKLF²*« dOž „öÝ «Æ
Signal cord (not supplied with this unit
©“UN'« «c¼ l od dOž® …—Uý « pKÝ
Green with black stripe / Green (Not used)
©qLF² dOž® dCš «ØœuÝ UÐ jD dCš« pKÝ
Purple with black stripe / Purple (Not used)
©qLF² dOž® w½«uł— «ØœuÝ UÐ jD w½«uł—« pKÝ
•
•
•
•
•
•
Install.KS-F150[U]/1 02/15/2000, 1:04 PM4