manuals.online logo
Brands
  1. Home
  2. •
  3. Brands
  4. •
  5. JVC
  6. •
  7. DVD Player
  8. •
  9. JVC LT-22C540 User manual

JVC LT-22C540 User manual

Other manuals for LT-22C540

1

Other JVC DVD Player manuals

JVC XV-M52SL User manual

JVC

JVC XV-M52SL User manual

JVC XV-E100SL User manual

JVC

JVC XV-E100SL User manual

JVC XV-S332SL User manual

JVC

JVC XV-S332SL User manual

JVC 2006 User manual

JVC

JVC 2006 User manual

JVC XV-M52SL User manual

JVC

JVC XV-M52SL User manual

JVC XV-N310B User manual

JVC

JVC XV-N310B User manual

JVC XV-515GD User manual

JVC

JVC XV-515GD User manual

JVC XV-SA70BK User manual

JVC

JVC XV-SA70BK User manual

JVC XV-N5SL User manual

JVC

JVC XV-N5SL User manual

JVC XV-E100SLB User manual

JVC

JVC XV-E100SLB User manual

JVC XV-NK58SL User manual

JVC

JVC XV-NK58SL User manual

JVC XV-S60BK User manual

JVC

JVC XV-S60BK User manual

JVC XV-N420B User manual

JVC

JVC XV-N420B User manual

JVC XV-421BK User manual

JVC

JVC XV-421BK User manual

JVC LV42740-001A User manual

JVC

JVC LV42740-001A User manual

JVC XV-N382S User manual

JVC

JVC XV-N382S User manual

JVC XV-N320BEK2 User manual

JVC

JVC XV-N320BEK2 User manual

JVC XV-N410B Administrator Guide

JVC

JVC XV-N410B Administrator Guide

JVC XV-N320B User manual

JVC

JVC XV-N320B User manual

JVC XV-N5SL User manual

JVC

JVC XV-N5SL User manual

JVC XV-N3SL User manual

JVC

JVC XV-N3SL User manual

JVC XV-N350B User manual

JVC

JVC XV-N350B User manual

JVC KV-DV7 User manual

JVC

JVC KV-DV7 User manual

JVC XV-D721BK User manual

JVC

JVC XV-D721BK User manual

Popular DVD Player manuals by other brands

Yamaha DVD S540 - Progressive Scan DVD Player Service manual

Yamaha

Yamaha DVD S540 - Progressive Scan DVD Player Service manual

Yamakawa DVD-MP12i user manual

Yamakawa

Yamakawa DVD-MP12i user manual

Philips DVP3042/12 user manual

Philips

Philips DVP3042/12 user manual

Philips DVP5900/37B Quick use guide

Philips

Philips DVP5900/37B Quick use guide

Roadstar DVD-2020H Service manual

Roadstar

Roadstar DVD-2020H Service manual

Beko DVD 2006 user manual

Beko

Beko DVD 2006 user manual

Atak DVDA2015 instruction manual

Atak

Atak DVDA2015 instruction manual

LG DV257K owner's manual

LG

LG DV257K owner's manual

auna 10005069 manual

auna

auna 10005069 manual

Philips MCD700/61 user manual

Philips

Philips MCD700/61 user manual

Sony DVP-F11 Service manual

Sony

Sony DVP-F11 Service manual

Toshiba SD-2300U owner's manual

Toshiba

Toshiba SD-2300U owner's manual

LENCO DVP-740 X2 user manual

LENCO

LENCO DVP-740 X2 user manual

Tevion 44330 user guide

Tevion

Tevion 44330 user guide

Aiwa XD-DV370 operating instructions

Aiwa

Aiwa XD-DV370 operating instructions

Sony DVP S530D operating instructions

Sony

Sony DVP S530D operating instructions

Denon DVM-1805 - DVD Changer operating instructions

Denon

Denon DVM-1805 - DVD Changer operating instructions

Toshiba SD-3815 owner's manual

Toshiba

Toshiba SD-3815 owner's manual

manuals.online logo
manuals.online logoBrands
  • About & Mission
  • Contact us
  • Privacy Policy
  • Terms and Conditions

Copyright 2025 Manuals.Online. All Rights Reserved.

• Do not connect the TV to the mains supply until you have completed all the connections.
• If you watch TV using a set-top box, simply connect your TV and set-top box via a HDMI cable and select HDMI in the Input Source menu.
Unpacking
1Connecting the Aerial and the Mains Socket
4
Operating Your Remote Control
2
If items are missing, or damaged please contact Partmaster (UK only).
Tel: 0344 800 3456 for assistance.
Installing the Base Stand
3
Quick Start Guide
22” LED TV WITH DVD PLAYER
LT-22C540
Thank you for purchasing your new JVC TV.
Your new TV incorporates the latest technology to enhance your viewing
experience. We would suggest that you allow about 20 mins for initial setup.
Please follow this guide for a successful first time installation.
Remove all packaging from the TV. Retain the packaging. If you
dispose of it please do so according to any local regulations.
1. Lay the TV down on a flat surface with the back side facing up, and ideally at the edge of a table so that the base of the TV slightly overhangs on it. Please
make sure a soft cushioned material (such as a pillow or thick piece of foam) is placed beneath the screen.
2. To install the TV stand, first attach the stand support to the TV by using screw A. Align with the screw hole then use screws to fix the stand support to the
TV.
3. To install the base stand, align the screw holes, then secure with a screw driver (not included) using the 4 screw B provided.
Installing Batteries
1. Press and lift the back
cover to open the
battery compartment of
the remote control.
2. Insert two AAA size
batteries. Close the
battery compartment
cover.
Operation Range
Point the remote control
at the TV no more than 5
metres from the remote
control sensor on the TV and
within 60° in front of the
TV. The operating distance
may vary depending on the
brightness of the room.
1. Connect one end of the RF coaxial cable to the aerial socket on the wall and the other end of the cable to the RF (75Ω) socket at the rear right side of your
TV.
2. Connect the mains cable to the mains socket after you have completed all the connections.
3. At this stage, the TV switches to standby mode. The red LED indicator will illuminate on the front panel of the TV.
4. In standby mode, press the button on the right side panel or on the remote control to turn the TV on. The red LED indicator will turn off.
The latest eco-friendly power-saving technology will switch off the TV if device is left
on and idle for 4 hours. Please refer to “Auto Standby” under the “Time Settings” section
of the instruction manual for more detail.
For Help and Support Call
UK: 0344 561 1234
Ireland: 1890 818 575
1
2
USB
5V 500mA
HDMI2 HDMI1(ARC) PC IN RF
COMMON INTERFACE (CI)
HEADPHONE PC AUDIO
RF coaxial cable
(not included)
OR
To the mains socket
SETUP
ANGLE
ZOOM STEP
MENU
TEXT
CANCEL
AUDIO
MIX
OK
SIZE
ASPECT S.MODE P.MODE GUIDE
LIST
PROG
MENU INPUT
BACK EXIT
OK
S
TITLE
TV.RD
FAV
HOLD REVEALSUBPAGE INDEX
GOTO SLOW REPEAT A-B
TV
Remote Control
Screw A x 1
(4 x 20PWB)
Quick Start Guide
TV Stand Support
AAA Batteries x 2
Screw B x 4
(3 x 10FB)
TV Base
Rear Spacers x 4
Instruction Manual
SETUP
ANGLE
ZOOM STEP
MENU
TEXT
CANCEL
AUDIO
MIX
OK
SIZE
ASPECT S.MODE P.MODE GUIDE
LIST
PROG
MENU INPUT
BACK EXIT
OK
S
TITLE
TV.RD
FAV
HOLD REVEAL SUBPAGE INDEX
GOTO SLOW REPEAT A-B
30° 30°
5M
Install the batteries correctly by following the polarity (+ and –) indications in the
battery compartment.
Screw A x 1
screw in
Screw B x 4
TV Front
Base Stand
Front
screw in
Turning the TV On for the First Time
5
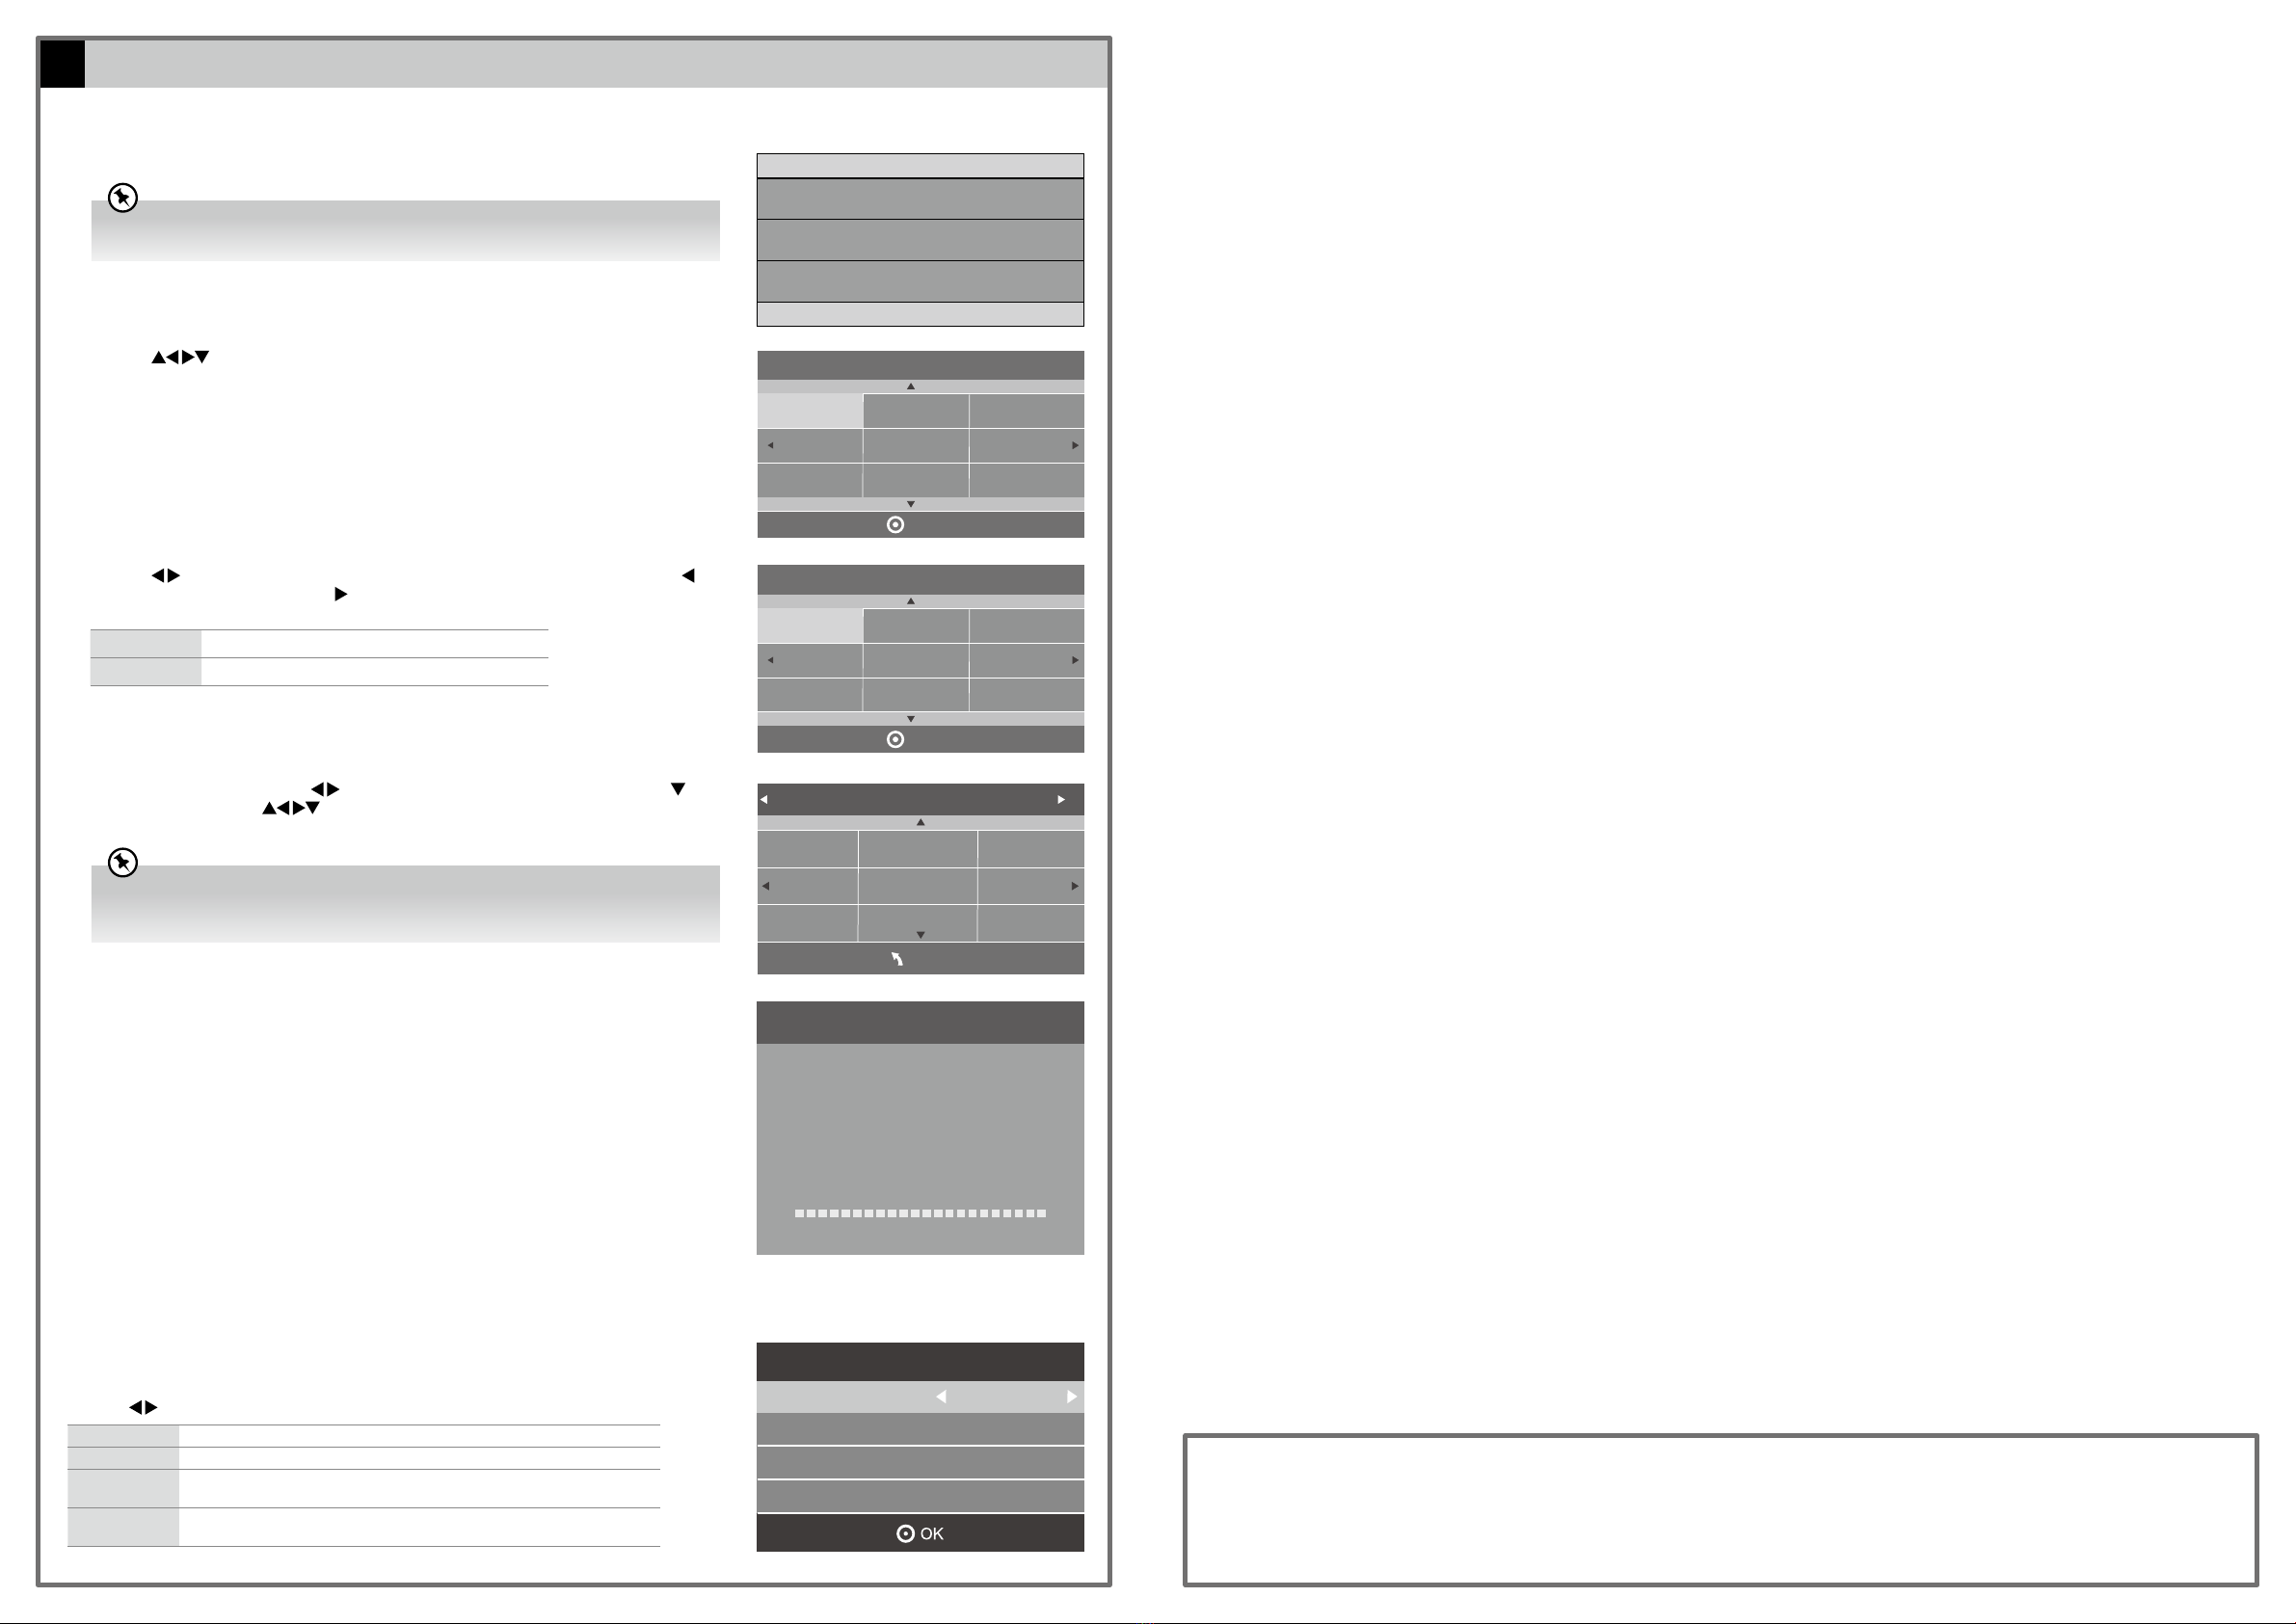
Target Region Setting (UK only)
During tuning your TV may have received signals from more than one transmitter. If this has occurred
the Target Region Setting screen will be displayed. This will enable you to select the correct regional
transmission for the local news service that you require.
Press the buttons to select each option’s setting and then press the OK button to confirm.
Country Code This will be shown as GBR for the UK.
Primary Region This will show the regional country (e.g. England, Wales, Scotland, NI).
Secondary
Region
This will allow you to set the region for your local news service on BBC and ITV (e.g.
London, Beds and Cambs etc).
Tertiary Region You may receive signals from more than one transmitter within the Secondary
Region, (e.g Beds and Cambs may have Luton or Sandy Heath).
The first time you turn the TV on, it will go straight into the First Time Installation menu.
Channel Tuning
DTV : 3 Channel(s)
Radio : 0 Channel(s)
Data : 0 Channel(s)
36% UHF CH
Press [MENU] to skip.
(DTV)
Target Region Setting
Country Code GBR
Primary Region England
Secondary Region
Tertiary Region
London
1. Please ensure the aerial is plugged in and then press the OK button.
5. DTV Channel tuning will commence. This operation may take a few minutes. The display will show
the progress of the tuning and the number of channels found.
2. Press the buttons to select your desired language to be displayed on the menu. The
default on-screen menu language is set as English. Press the OK button to confirm.
3. Press the buttons to select your desired mode and then press the OK button. Press the
button to select Yes to confirm or the button to select No to cancel and return to the Mode
Select menu.
Home Mode Intended for use in home environment.
Shop Mode Intended for use in shop environment.
If you select Ireland as the country where you will operate the TV, a pop-up screen will be display. You will
need a 4-digit activation code for Irish tuning. This code can be found in-store, on the back of your receipt
(if bought in Ireland), or call the customer service team / KNOWHOW.
If you are going to watch TV using a set-top box, press the EXIT button on the remote control then skip
this section. Then press the INPUT button on the remote control to select HDMI mode.
4. In the Tune Type menu, press the buttons to select DTV / AT V / DTV+ATV. Press the
button and then press the buttons to select the country where you will operate the TV.
Press the OK button to confirm.
First Time Installation
Please ensure aerial is plugged in!
Then press OK button.
OK
English
Svenska
Dansk
Česky
Slovak
Norsk
Suomi
Please select an OSD Language
OK
Home Mode
Shop Mode
Mode Select
Tune Type DTV
MENU
UK
Sweden
France
Ireland
Finland
Spain
Denmark
Portugal
Norway
Well done, your new TV is now ready to use. You will find that there are many exciting features available. To get to know all these features, please
take some time to read the instruction manual provided with your TV.
If after reading the instruction manual you have additional questions related to the use of your TV please call:
• UK Call Centre on 0344 561 1234. • Ireland Call Center on 1 890 818 575.
(QSG-LT-22C540-(D)150825V4)