JVC InteriArt LT-20DA6SSP User manual

INSTRUCTIONS
ENGLISH
LT-20DA6SSP
INTEGRATED DIGITAL WIDE LCD PANEL TV
Digital ideo
roadcasting
V
B
DV
B
Trade Mark of the DVB Digital Video Broadcasting
Project (1991 to 1996) Number: 4138
©2006 Victor Company of Japan, Limited 0506TKH-VT-VT
5008 315
TV CON PANEL LCD PANORÁMICA MANUAL DE INSTRUCCIONES
CASTELLANO
D:\IB Guncel\JVC IDTV 20710 (RM-C1897S UK)\LT-20DA6SSP-17MB16P-10042117\COVER-ENG-ESP-20710W-17MB16P-C1897S UK-(LT-20DA6SSP)-(TVAVOK)-IDTV-10042117-5008XXXX.cdr
15 Haziran 2006 Perşembe 17:40:44
Color profile: Disabled
Composite Default screen
All manuals and user guides at all-guides.com
all-guides.com

- 1 -
i
Contents
PC Picture Position Menu ................... 34
PC Picture Menu ................................. 34
Sound Menu ........................................ 35
PIP Picture ........................................... 35
Source Menu ....................................... 35
Sound in PC mode ............................. 35
Analogue Teletext .................................. 36
To operate Teletext .............................. 36
To select a page of Teletext ................. 36
To Select Index Page .......................... 36
Searc ing for a teletext page w ile
watc ing TV ......................................... 36
To Select Double Heig t Text .............. 36
To Reveal concealed Information ..... 36
To Stop Automatic Page C ange ........ 36
To Select a Subcode Page ................. 36
To exit Teletext ..................................... 37
Fastext and Toptext ............................. 37
Peripheral Equipment Connections ..... 37
Via t e Euroconnector ......................... 37
T-V LINK compatible VCR ................... 37
RGB mode .......................................... 37
EXT-2 S Mode ...................................... 37
Via t e RCA jacks ................................ 37
Via t e ANT (aerial) socket .................. 38
Decoder............................................... 38
TV and Video Recorder (VCR) ............ 38
NTSC Playback ................................... 38
Camera and Camcorder .................... 38
Connect t e decoder to t e video
recorder ............................................... 38
Connecting Headp ones ................... 38
Connecting t e PC .............................. 38
To connect to S-Video input ................ 38
Peripheral Equipment Connections ..... 39
Peripheral Equipment Connections ..... 40
Antenna Connections ............................ 40
PC Input T pical Displa Modes ......... 41
Tips ......................................................... 42
Specifications ........................................ 43
For our safet ......................................... 2
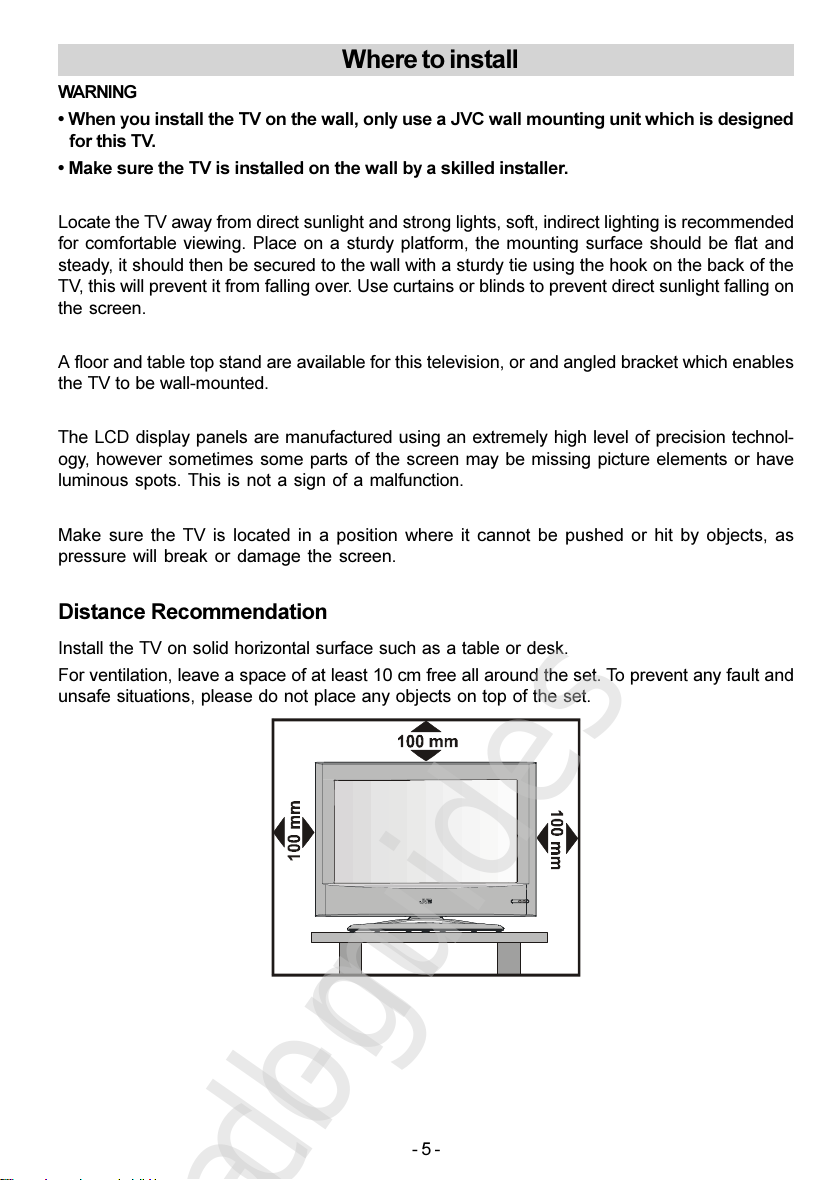
Where to install ....................................... 5
Important Information ............................. 6
Control Panel Buttons ............................. 7
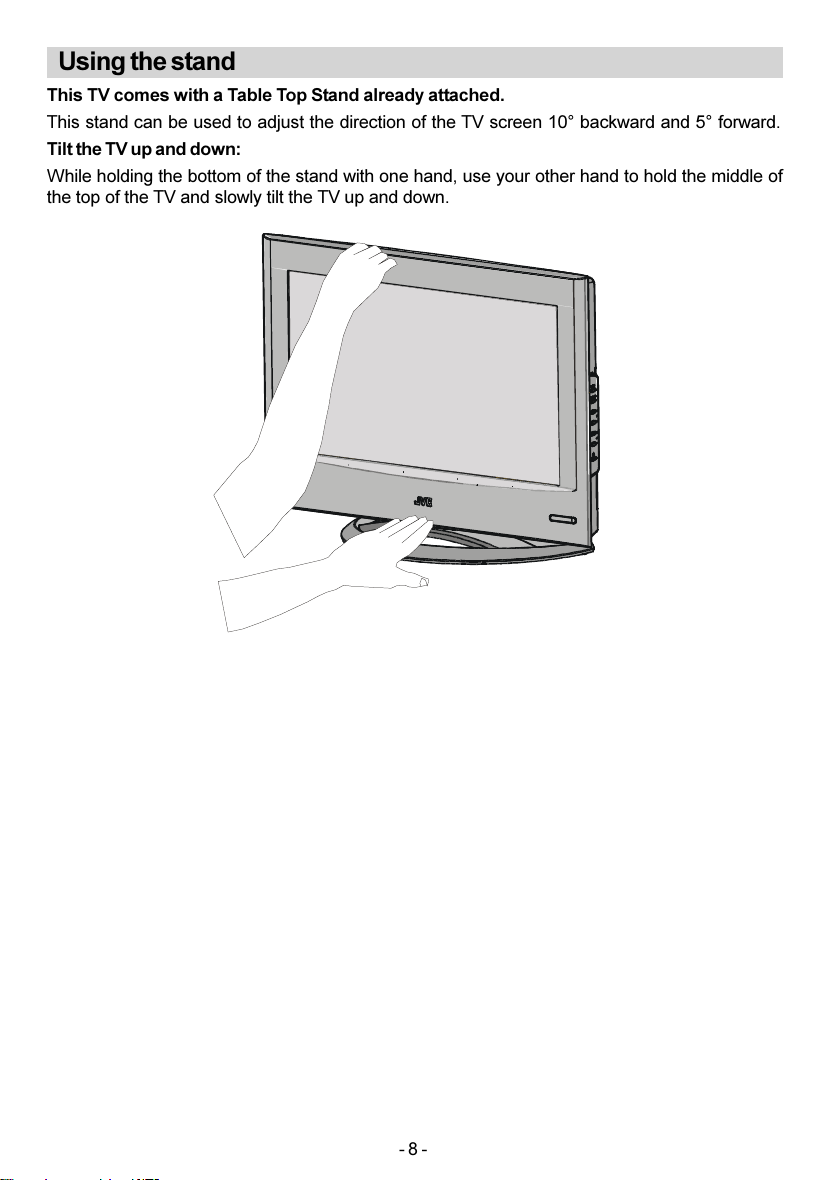
Using the stand ........................................ 8
Remote Control Buttons .......................... 9
Features ................................................. 10
Getting Started ........................................11
T-V LINK ............................................... 15
Basic Operations ................................... 16
Operating while watching IDTV ............ 17
Everyday Operation ............................. 17
Digital Teletext ..................................... 18
DTV Menus ............................................. 18
Timers (DTV Timer Recording) .......... 19
Configuration ...................................... 21
MENU .................................................. 21
Edit PR List ......................................... 22
Installation ........................................... 24
Common Interface .............................. 25
Setting The TV ....................................... 26
Menu System ...................................... 26
Picture Menu ....................................... 26
Sound Menu ........................................ 28
Feature Menu ...................................... 29
Install Menu ......................................... 29
Program Menu .................................... 30
Source Menu ....................................... 31
Other Features ....................................... 32
TV Status ............................................. 32
Sound Indicator ................................... 32
Hyper Sound ....................................... 32
Mute Indicator ...................................... 32
No-Signal Detection (TV mode) .......... 32
Volume Bar .......................................... 32
EXT Modes .......................................... 32
Zoom Modes ....................................... 33
PC Mode ................................................. 33
Installation ........................................... 33
Main Menu in PC mode ....................... 34
01-ENG-20710W-17MB16P-C1897S UK-(LT-20DA6SSP)-(TVAVOK)-IDTV-10042117-5008XXXX.p6515.06.2006, 17:391
All manuals and user guides at all-guides.com

- 2 -
For your safety
T is equipment as been designed and
manufactured to meet international safety stan-
dards but, like any electrical equipment, care
must be taken if you are to obtain t e best
results and safety is to be assured. So, please
read t e points below for your own safety. T ey
are of a general nature, intended to elp you
wit all your electronic consumer products and
some points may not apply to t e goods you
ave just purc ased.
Some DOs and DONTs for you
Air Circulation
Leave at least 10cm clearance around t e tele-
vision to allow adequate ventilation. T is will
prevent t e TV from over eating and conse-
quential possible damage to t e TV. Dusty
places s ould also be avoided.
Heat Damage
Damage may occur if you leave t e TV in di-
rect sunlig t or near a eater. Avoid places
subject to extremely ig temperatures or u-
midity, or locations w ere t e temperature is
likely to fall below 5ºC (41ºF).
Mains Suppl
T e mains supply required for t is equipment
is 100 -240 AC, 50 Hz. Never connect to a DC
supply or any ot er power source. DO ensure
t at t e TV is not standing on t e mains lead.
DO NOT cut off t e mains plug from t is equip-
ment, t is incorporates a special Radio Inter-
ference Filter, t e removal of w ic will impair
its performance.
Hot / Moderate Climate Conditions
T is device is suitable for working in ot and
moderate climate conditions.
IF IN DOUBT PLEASE CONSULT A
COMPETENT ELECTRICIAN.
DO
DO read t e operating instructions before you
attempt to use t e equipment.
DO ensure t at all electrical connections (in-
cluding t e mains plug, extension leads and
inter-connections between pieces of equip-
ment) are properly made and in accordance
wit t e manufacturers instructions.
Switc off and wit draw t e mains plug be-
fore making or c anging connections.
DO consult your dealer if you are ever in doubt
about t e installation, operation or safety of
your equipment.
DO be careful wit glass panels or doors on
equipment.
DO NOT
DONT remove any fixed cover as t is may
expose dangerous voltages.
DONT obstruct t e ventilation openings of t e
equipment wit items suc as newspapers,
table-clot s, curtains etc. Over eating will
cause damage and s orten t e life of t e
equipment.
DONT allow electrical equipment to be ex-
posed to dripping or splas ing or objects filled
wit liquids, suc as vases, to be placed on
t e equipment.
DONT place ot objects or naked flame
sources, suc as lig ted candles or nig t-
lig ts on, or close to t e equipment. Hig tem-
peratures can melt plastic and lead to fires.
DONT use makes ift stands and NEVER fix
legs wit wood screws. To ensure complete
safety, always fit t e manufacturers approved
stand or legs wit t e fixings provided accord-
ing to t e instructions.
DONT listen to eadp ones at ig volume,
as suc use can permanently damage your
earing.
DONT leave equipment switc ed on w en it
is unattended, unless it is specifically stated
t at it is designed for unattended operation or
as a standby mode. Switc off using t e
switc on t e equipment and make sure your
family know ow to do t is. Special arrange-
ments may need to be made for infirm or
andicapped people.
01-ENG-20710W-17MB16P-C1897S UK-(LT-20DA6SSP)-(TVAVOK)-IDTV-10042117-5008XXXX.p6515.06.2006, 17:392
All manuals and user guides at all-guides.com

- 3 -
DONT continue to operate t e equipment if
you are in any doubt about it working normally,
or it is damaged in any way switc off, wit -
draw t e mains plug and consult your dealer.
DONT put t e empty batteries into garbage
instead of recycle bin to reduce armfull ef-
fects to t e environment.
ABOVE ALL NEVER let an one, especiall
children, push an thing into holes, slots or
an other openings in the case this could
result in a fatal electric shock.
NEVER guess or take c ances wit electrical
equipment of any kind it is better to be safe
t an sorry.
To full disconnect the TV, switch off the
mains socket and remove the Power plug.
Safet Precautions for Power adapter
Be careful! May become ot.
For indoor and dry location use only.
Risk of electric s ock.
S ock azard, do not open.
Keep all power adapters away from any
ot er eat source.
Always use power adapter(s) well-ventilated
area.
** Cold cathode fluoresant lamp in LCD
PANEL contains a small amount of mer-
cury, please follow local ordinates or regula-
tions for disposal.
"The LCD panel is ver high technolog prod-
uct with about a million thin film transistors,
giving ou fine picture details. Occasionall ,
a few non-active pixels ma appear on the
screen as a fixed point of blue, green or red.
Please note that this does not affect the per-
formance of our product." Please note that
certain light guns used with games consoles
ma not work on this product.
Warning:
This is a Class A product. In a domestic envi-
ronment this product ma cause radio inter-
ference in which case the user ma be re-
quired to take adequate measures.
01-ENG-20710W-17MB16P-C1897S UK-(LT-20DA6SSP)-(TVAVOK)-IDTV-10042117-5008XXXX.p6515.06.2006, 17:393
All manuals and user guides at all-guides.com

- 4 -
WARNING
Fingers may be trapped under t e TV causing injuries.
Hold t e TV at t e bottom in t e middle, and do not al-
low it to tilt up or down.
T e TV may fall causing injuries. Hold t e bottom of t e
stand wit your and and tilt t e TV up and down.
Do not allow c ildren to ang from t e TV, place t eir
elbows on t e TV or lean against t e TV. Doing so may
cause t e TV to fall over and lead to injuries.
CAUTION:
To avoid electric s ock or damage to t e unit, first firmly
insert t e small end of t e power cord into t e AC
Adapter unit it is no longer wobbly, and t en plug t e
larger end of power cord into an AC outlet.
01-ENG-20710W-17MB16P-C1897S UK-(LT-20DA6SSP)-(TVAVOK)-IDTV-10042117-5008XXXX.p6515.06.2006, 17:394
All manuals and user guides at all-guides.com

- 5 -
Where to install
WARNING
When ou install the TV on the wall, onl use a JVC wall mounting unit which is designed
for this TV.
Make sure the TV is installed on the wall b a skilled installer.
Locate t e TV away from direct sunlig t and strong lig ts, soft, indirect lig ting is recommended
for comfortable viewing. Place on a sturdy platform, t e mounting surface s ould be flat and
steady, it s ould t en be secured to t e wall wit a sturdy tie using t e ook on t e back of t e
TV, t is will prevent it from falling over. Use curtains or blinds to prevent direct sunlig t falling on
t e screen.
A floor and table top stand are available for t is television, or and angled bracket w ic enables
t e TV to be wall-mounted.
T e LCD display panels are manufactured using an extremely ig level of precision tec nol-
ogy, owever sometimes some parts of t e screen may be missing picture elements or ave
luminous spots. T is is not a sign of a malfunction.
Make sure t e TV is located in a position w ere it cannot be pus ed or it by objects, as
pressure will break or damage t e screen.
Distance Recommendation
Install t e TV on solid orizontal surface suc as a table or desk.
For ventilation, leave a space of at least 10 cm free all around t e set. To prevent any fault and
unsafe situations, please do not place any objects on top of t e set.
01-ENG-20710W-17MB16P-C1897S UK-(LT-20DA6SSP)-(TVAVOK)-IDTV-10042117-5008XXXX.p6515.06.2006, 17:395
All manuals and user guides at all-guides.com
all-guides.com

- 6 -
Important Information
Please take note
EXCLUSION CLAUSE
JVC s all under no circumstances be liable for loss and/or damage to t e product caused
by:
fire;
eart quake;
accidental damage;
intentional misuse of t e product;
use of t e product in improper conditions;
loss and/or damage caused to t e product w ilst in t e possession of a t ird party;
any damage or loss caused as a result of t e owner s failure and/or neglect to follow t e
instructions set out in t e owners manual;
any loss or damage caused directly as a result of misuse or malfunction of t e product
w en used simultaneously wit associated equipment;
Furt ermore, under no circumstances s all JVC be liable for any consequential loss and/
or damage including but not limited to t e following, loss of profit, interruption of business,
t e loss of recorded data w et er caused during normal operation or misuse of t e
product.
ARNING! NEVER LEAVE A
STATIONARY IMAGE ON THE
SCREEN
If stationary images generated by TELETEXT,
CHANNEL IDENTIFICATION LOGOS, COM-
PUTER DISPLAYS, VIDEO GAMES, ON
SCREEN MENUS, etc. are left on t e TV
screen for any lengt of time, t ey could be-
come permanently ingrained.
If you use your television to display completely
still images, or moving pictures w ic ave a
permanent still image superimposed e.g.
broadcast network logos, it is always advis-
able to reduce BOTH t e brig tness and con-
trast settings.
Care and disposal
Cleaning the screen and cabinet...
Turn off t e power, clean t e screen and cabi-
net wit a soft, dry clot . We recommend t at
you do not use any proprietary polis es or
solvents on t e screen or cabinet as t is may
cause damage.
Disposal...
W en t e set reac es t e end of its useful
life please dispose of it in accordance wit
Local Government Regulations or at a recy-
cling centre.
01-ENG-20710W-17MB16P-C1897S UK-(LT-20DA6SSP)-(TVAVOK)-IDTV-10042117-5008XXXX.p6515.06.2006, 17:396
All manuals and user guides at all-guides.com

- 7 -
Control Panel Buttons
Wit certain combinations of connectors and leads t e back cover may not be easily fitted. If t e
cover is left off, t is in no way infringes safety requirements.
32:(5/$03
,1)5$5('5(&(,9(5
63($.(5 63($.(
5
01-ENG-20710W-17MB16P-C1897S UK-(LT-20DA6SSP)-(TVAVOK)-IDTV-10042117-5008XXXX.p6515.06.2006, 17:397
All manuals and user guides at all-guides.com

- 8 -
Using the stand
This TV comes with a Table Top Stand alread attached.
T is stand can be used to adjust t e direction of t e TV screen 10° backward and 5° forward.
Tilt the TV up and down:
W ile olding t e bottom of t e stand wit one and, use your ot er and to old t e middle of
t e top of t e TV and slowly tilt t e TV up and down.
01-ENG-20710W-17MB16P-C1897S UK-(LT-20DA6SSP)-(TVAVOK)-IDTV-10042117-5008XXXX.p6515.06.2006, 17:398
All manuals and user guides at all-guides.com

- 9 -
Remote Control Buttons
3
0(18
%$&.
7230(18
3&
79
9
&
5
'
9
'
7
9
$9
2.
79'79
=220
/ I = (Stand By) button
TV / VCR / DVD Switc
Number buttons
AV button
(EXT-1, EXT-2, EXT-2S, EXT-3,
EXT-4, EXT-4S, PC, DIGITAL TV)
Colour button
MENU = Menu button
= Cursor Up button
OK button
= Cursor Rig t button
BACK = Back button
= Volume - /+ buttons
GUIDE button
TV/RADIO = No Function
= SUBTITLE button
I/II = Audio Language
PC Control buttons
= Hyper Sound On/Off button
ZOOM = Zoom button
buttons
IDTV/ VCR/ DVD/ Teletext Control buttons
P buttons
= Cursor Down button
= Teletext button
= Cursor Left button
TV / DTV button
= Information Button / T-V Link in
Program Menu
= Mute button
01-ENG-20710W-17MB16P-C1897S UK-(LT-20DA6SSP)-(TVAVOK)-IDTV-10042117-5008XXXX.p6515.06.2006, 17:399
All manuals and user guides at all-guides.com

- 10 -
Features
It is a remote controlled Integrated Digital colour television and PC monitor.
100 programmes from VHF, UHF bands or cable c annels can be preset.
It can tune cable c annels.
Controlling t e TV is very easy by its menu driven system.
It as 2 pieces of Euroconnector socket for external devices (suc as video, video games, au-
dio set, etc.)
S-Video and AV inputs are available.
Optional stereo sound systems (German or German+Nicam) are available.
Multilanguage OSD.
Teletext (FLOF (Fastext), TOP, WST (World Standard System)).
It is possible to connect eadp one.
A.P.S. (Automatic programming system).
PLL (Frequency Searc ).
All programmes can be named.
Forward or backward automatic tuning.
Sleep timer.
C ild lock.
Auto, Full, Regular, Panoramic, 14:9 Zoom, 16:9 Zoom,16:9 Zoom Subtitle modes.
Automatic sound mute w en no transmission.
W en no valid signal is detected, after 5 minutes t e TV switc es itself automatically to stand-
by mode.
NTSC Playback.
TV Picture in PC (if PC input available).
PC input (Support Up to 1360 x 768).
Plug&Play for Windows 9X, ME, 2000, XP.
PC Audio input.
01-ENG-20710W-17MB16P-C1897S UK-(LT-20DA6SSP)-(TVAVOK)-IDTV-10042117-5008XXXX.p6515.06.2006, 17:3910
All manuals and user guides at all-guides.com
all-guides.com

- 11 -
Getting Started
Follow Step 1 to 7 to set up our TV:
Step 1: Checking the accessories supplie
Remote control unit x 1
AA/R6 battery x 2
AC adapter x 1
Power cord x 1
Step 2: Inserting batteries
Remove t e battery cover located on t e back of t e remote control by gently pulling upwards
from t e indicated part.
Insert two AA/R6 dry cell or equivalent type of batteries inside.
Replace t e battery cover.
NOTE: emove the batteries from remote control when it is not to be used for a long
period.Otherwise it can be damaged due to any leakage of battery.
Old batteries must be disposed in a designated area. If performance of the remote control
reduces, replace the batteries with the correct type. Do not combine a used, old battery or a new
one or mixed battery types. emove dead batteries immediately to prevent acid from leaking
into the battery compartment.
Step 3: Removing the terminal cover
T ere are connection terminals and a card socket be ind t e covers of t e rear of t e TV.
Remove t e cover before connecting an antenna, VCR, DVD and ot er devices.
Remove t e covers by removing t e ooks. W en replacing t e covers, place t e side or bottom
of t e covers against t e TV and insert t e ooks.
Leave t e covers off if t ey do not fit properly. DO NOT force to replace t e covers. Doing so may
cause damages of t e connection cables and t e covers.
Leave t ese covers off w en mounting t e TV on a wall.
01-ENG-20710W-17MB16P-C1897S UK-(LT-20DA6SSP)-(TVAVOK)-IDTV-10042117-5008XXXX.p6515.06.2006, 17:3911
All manuals and user guides at all-guides.com

- 12 -
WHUPLQDOV
FDUGVRFNHW
100 mm mount based on VESA regulation is equipped.
T e andle and t e stand can be left by loosing t e screws wit a screwdriver w en mounting
t e TV on a wall.
Spread a soft clot on a flat table and t en place t e TV on t e clot wit t e screen facing
downwards w en you leave t e andle and t e stand.
Step 4: Connecting an aerial VCR an mains
Please read t e user manual of eac device before connecting, to ensure a correct setup.
It is necessary to connect aerial to watc TV.
Please see Peripheral Equipment Connections on page 37 for connections to ot er devices.
$&DGDSWHU
$(5,$/
&RQQHFWWKHDHULDO
WR'&,1
01-ENG-20710W-17MB16P-C1897S UK-(LT-20DA6SSP)-(TVAVOK)-IDTV-10042117-5008XXXX.p6515.06.2006, 17:3912
All manuals and user guides at all-guides.com

- 13 -
IMPORTANT:
Only use t e adaptor supplied wit t is TV.
T e TV set is designed to operate on 24 V DC. For t is, an adaptor is used w ic gives 24 V
DC voltage. Connect t is adaptor to a system t at supplies 100-240 V AC, 50 Hz.
Step 5: Using the cable hol er
A cable older w ic is used to keep t e connection cables tidy is supplied. Attac t e cable
older to t e ole on t e back of t e stand, t en gat er toget er t e connection cables and put
t em inside t e older.
7R'&,1
$&DGDSWHU
$(5,$/
&RQQHFWDYLGHRGHYLFH
9&5
(;7 (;7
01-ENG-20710W-17MB16P-C1897S UK-(LT-20DA6SSP)-(TVAVOK)-IDTV-10042117-5008XXXX.p6515.06.2006, 17:3913
All manuals and user guides at all-guides.com

- 14 -
Step 6: Switching the TV ON/OFF
To switch the TV on
Your TV will switc on by two steps:
1- Connect t e power supply cord to t e sys-
tem. T en t e TV switc es itself to stand-
by mode and t e power lamp becomes
red located on t e front of t e TV.
2- To switc on t e TV from stand-by mode
eit er:
Press t e
,
button on t e remote control
or on t e rig t side of t e TV
or.
press a digit button on t e remote control so
t at a programme number is selected,
or,
Press or buttons on t e rig t
side of t e TV or on t e remote control, so t at
last switc ed off programme is selected.
By eit er ways t e TV will switc on and t e
power lamp will become green.
To switch the TV off
Press t e
,
button on t e remote con-
trol or on t e rig t side of t e TV, so t e TV
will switc to stand-by mode and t e power
lamp will become red.
NOTE: To switc t e TV off completely remove
t e mains plug from t e socket.
Step 7: Initial settings
W en t e TV is first turned on, it goes into t e
initial settings mode. Follow t e instructions
on t e screen display to make t e initial set-
tings.
Note: If the TV does not go into the initial settings mode this
is because your TV has already been turned on for the first
time. (Perform the initial settings with INSTALLATI N (see
page 24) in the DTV menu and AUT ST RE (Analogue)
(see page 31) in the PR GRAM menu.)
Because t is is t e first time t at IDTV as
been used, t ere are no c annels stored in
t e memory and below information will be dis-
played on t e screen.
1. Press the OK button to start the automatic
search.
35/LVW(PSW\6WDUWDXWRPDWLFVHDUFK
2.
T e IDTV will automatically tune to t e UHF
transmission c annels 21 to 68 looking for
digital terrestrial TV broadcasts and display-
ing t e names of c annels found. T is pro-
cess will take about five minutes. To cancel
searc ing, you can press MENU button at any
time during t e process.
HINT: Depending on t e reception conditions
in your particular area, you may find t at t e
list of c annels found includes one or more
repeated names. T is is because t e receiver
may detect and store some c annels, includ-
ing t ose it cannot receive clearly, from adja-
cent areas alongside t e strong c annels from
a transmitter nearby. T is is not a problem
and t e weaker c annels can be deleted from
t e receiver later, as described in - Edit PR
List on page 22.
2. When the automatic search has finished,
the EDIT PR LIST menu appears.
If you want to, you can now edit t e
programme numbers (PR) using t e EDIT
PR LIST function. For details, see Edit PR
List on page 22.
If you do not want to edit programme num-
bers (PR), go to t e next step.
3. Press the MENU button.
T e EDIT PR LIST menu disappears and t e
following message appears.
'R\RXZDQWWRVHDUFKIRU
DQDORJXHFKDQQHOV"
<HV
1R
If you select Yes, Analogue terrestrial broad-
casting AUTOMATIC PROGRAMMING SYSTEM
(A.P.S.) window is displayed.
$XWR3URJUDP
3OHDVH&KHFN$QWHQQD&DEOH
$XWR3URJUDPPLQJ6\VWHP
/DQJXDJH (QJOLVK
&RXQWU\ "
2.&DQFHO
01-ENG-20710W-17MB16P-C1897S UK-(LT-20DA6SSP)-(TVAVOK)-IDTV-10042117-5008XXXX.p6515.06.2006, 17:3914
All manuals and user guides at all-guides.com

- 15 -
To cancel APS before starting, press BLUE
button.
First of all c oose t e Language w ic t e
menus of t e analogue part of t e TV will ap-
pear. As soon as you c ange t e language,
t e menu items will be displayed in t e se-
lected language. By pressing t e or
button, come to t e Countr item and select
t e country. T is will affect t e sort process in
APS. Press RED button to start A.P.S.
After APS is finalized, a programme list will
appear on t e screen. In t e programme list
you will see t e programme numbers and
names assigned to t e programmes.
If you press t e BLUE button at any time w ile
t e A.P.S. is running, t e A.P.S. will be ended.
If you do not accept t e locations and / or t e
programme names of programmes, you can
c ange t em in Program menu. For details
see PROGRAM menu on page 30.
If you do not ave a T-V LINK compatible VCR,
press MENU button to exit t e menu.
If you ave a T-V LINK compatible VCR con-
nected to t e EXT-2 terminal, press but-
ton to display T-V LINK menu. T en follow t e
operating procedure Downloading data to
VCR in t e following T-V LINK section.
T-V LINK
W en a T-V LINK compatible VCR connected
to t e EXT-2 terminal on t e TV, it is easier to
set up t e VCR and to view videos. T-V LINK
uses t e following features:
To use T-V LINK functions
A T-V LINK compatible VCR means a JVC
video cassette recorder wit t e T-V LINK logo,
or wit one of t e following logos. For details
see your VCR instruction manual.
Q-LINK (A trademark of Panasonic Corpora-
tion)
Data Logic (A trademark of Metz Corpora-
tion)
Eas Link (A trademark of P ilips Corpora-
tion)
Megalogic (A trademark of Grundig Corpo-
ration)
SMARTLINK (A trademark of Sony Corpora-
tion)
Downloading data to VCR:
T e VCR will automatically download t e reg-
istered data on t e TV c annels from t e TV.
T is means you do not need to set up t e
programme c annels on your VCR manually.
T e T-V LINK menu will be displayed w en
you press t e button w ile PROGRAM
menu is displayed.
If you do not ave a T-V LINK compatible VCR,
select Cancel and press or OK button to
exit t e menu.
Press or OK button to start downloading
data to VCR. TRANSFER is displayed in t e
menu.
If FEATURE NOT AVAILABLE is displayed,
download was not performed correctly. Before
trying to download again, c eck t at:
T e VCR power is turned on.
T e VCR is T-V LINK compatible.
T e VCR is connected to EXT-2.
T e scart cable is fully wired.
Direct REC:
You can easily record to VCR t e images t at
you are watc ing on t e TV. For details, read
t e manual for your VCR. Use your VCR con-
trols you can not carry out Direct REC using
your TV control.
W en t e VCR is not ready (For example w en
t ere is no tape inserted), NO RECORDING
is displayed.
W en you press t e following buttons ( / I,
, TV / DTV, ZOOM, , , AV, MENU,
(SUBTITLE), GUIDE, , BACK, / ,
01-ENG-20710W-17MB16P-C1897S UK-(LT-20DA6SSP)-(TVAVOK)-IDTV-10042117-5008XXXX.p6515.06.2006, 17:3915
All manuals and user guides at all-guides.com
all-guides.com

- 16 -
number buttons) during recording, a message
appears asking if you want to stop recording
or not. Press OK button to stop recording or
BLUE button to continue recording.
Do not turn the TV off in the following cases:
W en recording images from an external
device connected to TV (For example
camcorder).
W en recording a TV c annel after it as
been unscrambled on a decoder.
W en recording a TV c annel by using t e
TVs output because t e VCRs own tuner
can not properly receive t at c annel.
W en recording Digital terrestrial broadcast-
ing (DVB-T).
TV autopower on/VCR image view:
W en t e VCR starts playing, t e TV automati-
cally turns on and images from EXT-2 appear
on t e screen.
T is function does not appen if your TVs main
power is turned off. Set your TVs main power
to on (StandBy Mode).
Basic Operations
You can operate your TV using both the re-
mote control an TV buttons.
Operation with the buttons on the TV
Volume Setting
Press - button to decrease volume or
+ button to increase volume, so a vol-
ume level scale (slider) will be displayed at
t e middle of t e bottom on t e screen.
Programme Selection
Press button to select t e next pro-
gramme or button to select t e previ-
ous programme.
Switching input mode
Pressing TV/AV/OK button will c ange t e
input mode.
Entering Main Menu
Press MENU button to enter Main menu. In
t e Main menu select submenu using
or button and enter t e sub-
menu using - / + or TV/AV/OK or
MENU button. To learn t e usage of t e
menus, refer to t e Menu System sections.
Operation with Remote Control
T e remote control of your TV is designed to
control all t e functions of t e model you se-
lected. T e functions will be described in ac-
cordance wit t e menu system of your TV.
Functions of t e menu system are described
in following sections.
Volume Setting
Press + button to increase volume.
Press - button to decrease volume. A
volume level scale (slider) will be displayed in
t e middle at t e bottom of t e screen.
Programme Selection (Previous or next
programme)
Press button to select t e previous
programme.
Press button to select t e next
programme.
Programme Selection (direct access):
Press digit buttons on t e remote control to
select programmes between 0 and 9. TV will
switc to t e selected programme. To select
programmes between 10 - 99, press t e digit
buttons consecutively w ic programme you
want to select (eg. for programme 27, first
press 2 and t en 7). W en it is late to press
second digit button only t e first digit
programme will be displayed. T e limit of t e
delay time is 3 seconds.
Example: PR6 press 6, PR12 press 1
and 2.
Press directly t e programme number to
reselect single digit programmes.
Hint: The channel list numbers are assigned by the broad-
casters. Because not all channels are broadcast free-to-air
and stored by the receiver, the channel list numbers do not
run continuously. The fifteenth channel in the list, for ex-
ample, may not be channel number 15 but channel number
17.
Hint: If you enter a number which does not correspond to a
stored channel, the next valid channel number is selected
instead. If you enter a number greater than the highest
numbered channel in the channel list, the IDTV will select
the last channel in the list.
01-ENG-20710W-17MB16P-C1897S UK-(LT-20DA6SSP)-(TVAVOK)-IDTV-10042117-5008XXXX.p6515.06.2006, 17:3916
All manuals and user guides at all-guides.com

- 17 -
Operating while watching
I TV
Pressing t e TV/DTV button at any time w ile
watc ing television programmes will switc
t e TV set between displaying t e digital ter-
restrial television broadcasting and its nor-
mal analogue broadcasting.
It is also used to switc to t e last watc ed
mode (TV or DIGITAL TV) from t e EXT mode.
For example; if a DVD player is connected
wit a SCART cable and powered on, t en t e
IDTV will automatically switc to EXT mode.
T e IDTV will switc to t e last watc ed mode
(TV or DIGITAL TV) if DVD player is switc ed
off or TV/DTV button is pressed.
EVERYDAY OPERATION
W ile using t e IDTV to t e full, t ere are great
many buttons to use in different situations.
Many of t e menu screens displayed by t e
IDTV ave reminders as to w ic button do
w at, at t e base of t e screen. In addition,
many screens ave furt er elp available w ic
is displayed w en t e button is pressed,
as prompted at t e bottom rig t of t e screen.
INFORMATION BANNER
W enever you c ange c annel, using t e
/ buttons or t e number buttons,
an information banner is displayed at t e bot-
tom of t e screen. T is will remain on t e
screen for approximately t ree seconds. T e
information banner can also be displayed at
any time w ile watc ing TV by pressing t e
button on t e remote control. Pressing t e
button again removes t e banner.
Hint: Not all channels broadcast the programme
data. If the name and times of the programme is not
available then No Information is displayed in the
information banner.
T e information banner gives a number of facts
on t e c annel selected and t e programmes
on it. T e name of t e c annel is displayed,
along wit its c annel list number and an in-
dication of t e strengt of t e signal received
on t is tuning c annel.
T e name and t e start and finis time of t e
programme currently s owing on t e selected
c annel are given, and t e current time.
Icons are also displayed in t e information
banner and if t is c annel is a favourite c an-
nel.
favorite c annel icon
If t e selected c annel is locked, you must
enter t e correct four digit code to view t e
c annel.
ELECTRONIC PROGRAMME GUIDE (EPG)
Anot er way of selecting a c annel is wit t e
electronic programme guide, or EPG. Like t e
C annel List, t e EPG screen displays a list
of t e stored c annels along wit information
on w at programmes are being broadcast.
Using the Electronic Programme Gui e
EPG can display 7 days programme guide,
but in some areas only current and next
programme guide is displayed.
By using EPG, you can select t e c annel and
set t e reminder for t e programme w ic you
do not want to miss.
To display t e EPG screen, press t e GUIDE
button w ile watc ing Digital terrestrial broad-
casting.
You can exit t e EPG screen by pressing t e
GUIDE button again or t e MENU button.
M
N
O
P
Q
01-ENG-20710W-17MB16P-C1897S UK-(LT-20DA6SSP)-(TVAVOK)-IDTV-10042117-5008XXXX.p6515.06.2006, 17:3917
All manuals and user guides at all-guides.com

- 18 -
M
Current date and time
N
C annel listings
O
Selected date and time
P
Programme name and broadcast time
Q
Brief description of t e programme
T e programme name, broadcast time and
a brief description of t e programme are
displayed for t e programme c osen from
t e c annel listings.
Choosing Channel
1. Press or buttons to choose the
channel.
2. Press OK button.
T e selected c annel is displayed.
Programme Reminders
You can easily set t e reminder so t at you
will not miss t e programme you want to watc .
1. Press or buttons to choose the
channel.
2. Press the Red and Green buttons to
change the time and Yellow and Blue but-
tons to change the date.
3. Press or buttons and then
or buttons to choose the
programme ou want to watch.
4. Press the OK button.
T e reminder icon will be displayed on t e
rig t side of t e c osen programme name
and t e setting is completed.
W en t e TV is being watc ed, it automati-
cally c anges to t e c annel of t e reminded
programme w en t e start time of t e sc ed-
uled programme is reac ed.
T is function does not work w en t e TV is
turned off.
To cancel the reminder setting
Display t e EPG screen, c oose a
programme w ic as t e reminder icon, and
press t e OK button.
Note:
Reminder events are ignored if any timer
event is active at t at time.
You can not set t e reminder for t e
programme w ic as already started.
No Information is displayed for t e
programme or c annel w ic does not
ave any information. You can not set t e
reminder for t ese programmes.
DISPLAYING THE SUBTITLES
Wit Digital terrestrial broadcasting (DVB-T),
some programmes are broadcast wit sub-
titles. Subtitles can be displayed w en watc -
ing t ese programmes.
Press t e (SUBTITLE) button w en
watc ing Digital terrestrial broadcasting
(DVB-T).
Subtitle ON appears at t e top-left of t e
screen and, if programme as subtitles, t e
subtitles are displayed.
W en t e (SUBTITLE) button is pressed
again, Subtitle OFF appears and t e sub-
titles disappear.
6XEWLWOH21
6XEWLWOH2))
DIGITAL TELETEXT
Use of teletext and and its functions are iden-
tical to t e analogue text system. Please do
refer to t e Analogue teletext explanations.
TV Menus
T e DTV menu can only be s own w en
watc ing Digital terrestrial broadcasting. To
display t e DTV menu, do t e following:
1. Press MENU button.
T e menu appears.
0HQX
3LFWXUH
6RXQG
)HDWXUH
',*,7$/
6RXUFH
2. Choose DIGITAL and press the OK button.
T e DTV menu appears.
01-ENG-20710W-17MB16P-C1897S UK-(LT-20DA6SSP)-(TVAVOK)-IDTV-10042117-5008XXXX.p6515.06.2006, 17:3918
All manuals and user guides at all-guides.com

- 19 -
'79
7LPHUV
&RQILJXUDWLRQ
(GLW35/LVW
,QVWDOODWLRQ
&RPPRQ,QWHUIDFH
Timers (DTV Timer Recording)
By setting t e timer, you can record a Digital
terrestrial broadcasting (DVB-T) programme
wit a VCR connected to EXT-2 w ile you are
out.
Before using DTV timer recording, t e VCR
and TV must be connected correctly. For
details, see T-V LINK on page 15.
W en you ave a T-V LINK compatible VCR
connected to Ext-2, all you need to do is set
t e TV timer settings and t e programme
will be recorded.
By using Direct Rec of t e T-V LINK func-
tion, t e Direct Rec commands are sent
from t e TV to t e VCR to automatically start
and end t e recording. It is not necessary to
set t e timer on t e VCR.
W en your VCR is not T-V LINK compatible,
you also need to set t e VCR timer settings
to matc t e TV timer settings.
T e recording may not start and stop at ex-
actly t e rig t times for some programmes.
It is recommended t at you allow some lee-
way w en setting t e recording times.
Provided t at t e days and times are not t e
same, you can set up to ten timer settings.
W en subtitles are ON, t e subtitles dis-
played wit t e broadcast will be recorded.
W en you do not want to record t e sub-
titles, you need to turn OFF t e subtitles set-
tings before and ( See Displa ing the sub-
titles on Page18).
During DTV timer recording, you are unable
to view t e DTV menu.
1. Choose Timers and press the OK button.
T e TIMER MENU appears.
7+5((
W en t e BACK button is pressed, t e previ-
ous screen is returned to.
2. Press / buttons to choose the
timer number, and then press the OK but-
ton.
T e timer setting window appears.
7+5((
7+5((
3. Use the / buttons, number but-
tons and OK button to set the timer.
W en setting t e start time and end time, in-
put 1200 for 12:00 PM, 1500 for 3:00 PM
and 0000 for 12:00 AM.
Name:
Use t e / buttons to c oose t e c an-
nel for w ic t e timer is to be set.
Press t e button.
Start:
Set t e timer start time wit t e number but-
tons.
W en t e / buttons are pressed, t e
input position moves.
01-ENG-20710W-17MB16P-C1897S UK-(LT-20DA6SSP)-(TVAVOK)-IDTV-10042117-5008XXXX.p6515.06.2006, 17:3919
All manuals and user guides at all-guides.com
Other manuals for InteriArt LT-20DA6SSP
2
Table of contents
Other JVC LCD TV manuals

JVC
JVC InteriArt 0205MKH-VT-VT User manual

JVC
JVC WIDE LCD PANEL TV LT-26A61BJ User manual

JVC
JVC LT-37DM7BJ User manual

JVC
JVC LCT2403-002A-A User manual

JVC
JVC LT-32DF7BC User manual

JVC
JVC LT42X688 - 42" LCD TV Owner's manual

JVC
JVC InteriArt AV-21VT16/P User manual

JVC
JVC LT-40A320 User manual

JVC
JVC LT-32A4 User manual

JVC
JVC LT-32FXD7 User manual

JVC
JVC LT-40C540 User manual

JVC
JVC InteriArt LT-26A60BU User manual

JVC
JVC LT-65MAW595 User manual

JVC
JVC LT-26A60SJ User manual

JVC
JVC LT-22EM72 User manual

JVC
JVC InteriArt LT-20DA7SK User manual

JVC
JVC LT-19E621 User manual

JVC
JVC LT-37DV1BJ User manual

JVC
JVC LT-Z32S2/A User manual

JVC
JVC InteriArt LT-23B60SU User manual