JVC CA-MXDVA5 User manual

COMPACT COMPONENT SYSTEM
CA-MXDVA5
For Customer Use:
Enter below the Model No. and Serial
No. which are located either on the rear,
bottom or side of the cabinet. Retain this
information for future reference.
Model No.
Serial No.
LVT0748-001A
[UG]
INSTRUCTIONS
PlayBack
Control
VIDEO CD
CLOCK
/
TIMER DISPLAY
PHONES
REPEAT
REC START
/STOP CD
REC START DUBBING
TUNING
TAPE B
DISC CHANGE
SOUND
MODE
SUBWOOFER
LEVEL
TAPE A
STANDBY/ON
STANDBY
/
CA-MXDVA5[UG]COVER_f 01.3.23, 1:36 PM1

Caution –– switch!
Disconnect the mains plug to shut the power off com-
pletely. The switch in any position does not discon-
nect the mains line. The power can be remote controlled.
Warnings, Cautions and Others
– G-1 –
CA-MXDVA5[UG]SAFETY_f 01.3.23, 1:37 PM1

CAUTION
To reduce the risk of electrical shocks, fire, etc.:
1. Do not remove screws, covers or cabinet.
2. Do not expose this appliance to rain or moisture.
– G-2 –
CAUTION
• Do not block the ventilation openings or holes.
(If the ventilation openings or holes are blocked by a
newspaper or cloth, etc., the heat may not be able to
get out.)
• Do not place any naked flame sources, such as
lighted candles, on the apparatus.
• When discarding batteries, environmental problems
must be considered and local rules or laws governing
the disposal of these batteries must be followed
strictly.
• Do not use this apparatus in a bathroom or places
with water.Also do not place any containers filled with
water or liquids (such as cosmetics or medicines,
flower vases, potted plants, cups, etc.) on top of this
apparatus.
CA-MXDVA5[UG]SAFETY_f 01.3.23, 1:37 PM2

Caution: Proper Ventilation
To avoid risk of electric shock and fire, and to prevent damage, locate the apparatus as follows:
1 Front: No obstructions and open spacing.
2 Sides/ Top/ Back: No obstructions should be placed in the areas shown by the dimensions below.
3 Bottom: Place on the level surface. Maintain an adequate air path for ventilation by placing on a stand
with a height of 10 cm or more.
CA-MXDVA5CA-MXDVA5
15 cm 1 cm 15 cm 15 cm
15 cm 15 cm
1 cm
10 cm
– G-3 –
CA-MXDVA5[UG]SAFETY_f 01.3.23, 1:37 PM3

IMPORTANT FOR LASER PRODUCTS /
REPRODUCTION OF LABELS /
1 CLASSIFICATION LABEL, PLACED ON REAR ENCLO-
SURE 2 WARNING LABEL, PLACED INSIDE THE UNIT
CLASS 1
LASER PRODUCT
1. CLASS 1 LASER PRODUCT
2. DANGER: Invisible laser radiation when open and interlock
failed or defeated. Avoid direct exposure to beam.
3. CAUTION: Do not open the top cover. There are no user
serviceable parts inside the Unit; leave all servicing to quali-
fied service personnel.
– G-4 –
DANGER: Invisible laser
radiation when open and
interlock failed or defeated.
AVOID DIRECT EXPOSURE
TO BEAM. (e)
ADVARSEL: Usynlig laser-
stråling ved åbning, når
sikkerhedsafbrydere er ude
af funktion. Undgå udsæt-
telse for stråling (d)
VARNING: Osynlig laser-
strålning när denna del är
öppnad och spärren är
urkopplad. Betrakta ej
strålen. (s)
VARO: Avattaessa ja suo-
jalukitus ohitettaessa olet
alttiina näkymättömälle
lasersäteilylle. Älä katso
säteeseen. (f)
CA-MXDVA5[UG]SAFETY_f 01.3.23, 1:37 PM4

– 1 –
English
Introduction
About This Manual
This manual is organized as follows:
•The manual mainly explains operations using the
buttons and controls on the unit.You can also use the
buttons on the remote control if they have the same or
similar names (or marks) as those on the unit.
If operation using the remote control is different from
that using the unit, it is then explained.
• Basic and common information that is the same for many
functions is grouped in one place, and is not repeated in
each procedure. For instance, we do not repeat the
information about turning on/off the unit, setting the
volume, changing the sound effects, and others, which are
explained in the section “Common Operations” on pages
10 to 12.
• The following marks are used in this manual:
Gives you warnings and cautions to prevent
damage or risk of fire/electric shock.
Also gives you information which is not good
for obtaining the best possible performance
from the unit.
Gives you information and hints you had better
know.
Precautions
Installation
• Install in a place which is level, dry and neither too hot nor
too cold — between 5˚C (41˚F) and 35˚C (95˚F).
• Install the unit in a location with adequate ventilation to
prevent internal heat built-up in the unit.
• Leave sufficient distance between the unit and the TV.
• Keep the speakers away from the TV to avoid interference
with TV.
DO NOT install the unit in a location near heat
sources, or in a place subject to direct sunlight,
excessive dust or vibration.
We would like to thank you for purchasing one of our JVC products.
Before operating this unit, read this manual carefully and thoroughly to
obtain the best possible performance from your unit, and retain this manual
for future reference.
Power sources
• When unplugging from the wall outlet, always pull the
plug, not the AC power cord.
DO NOT handle the AC power cord with wet
hands.
Moisture condensation
Moisture may condense on the lens inside the unit in the
following cases:
• After starting heating in the room
• In a damp room
• If the unit is brought directly from a cold to a warm place
Should this occur, the unit may malfunction. In this case,
leave the unit turned on for a few hours until the moisture
evaporates, unplug the AC power cord, and then plug it in
again.
Others
• Should any metallic object or liquid fall into the unit,
unplug the unit and consult your dealer before operating
any further.
• If you are not going to operate the unit for an extended
period of time, unplug the AC power cord from the wall
outlet.
DO NOT disassemble the unit since there are no
user serviceable parts inside.
If anything goes wrong, unplug theAC power cord and
consult your dealer.
EN01-13.CA-MXDVA5[UG]_f 01.3.23, 1:42 PM1

– 2 –
English
Contents
Location of the Buttons and Controls....................... 3
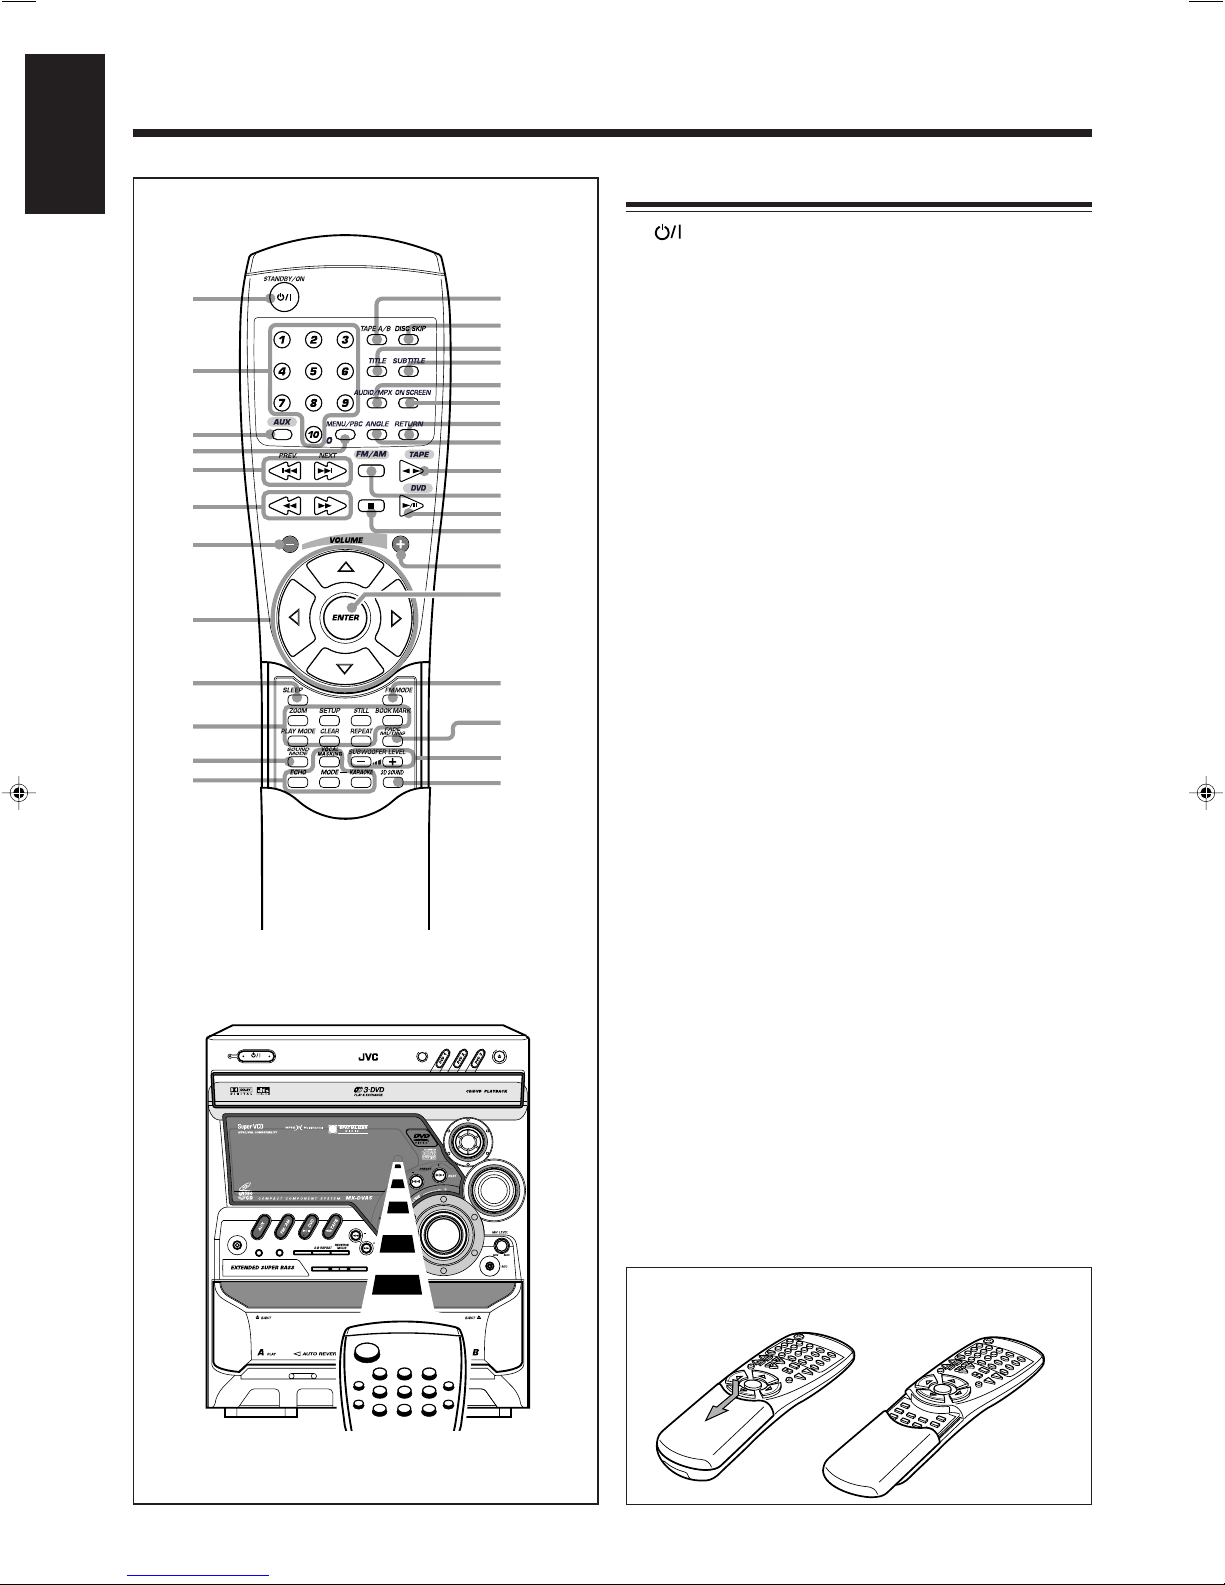
Front Panel ................................................................. 3
Remote Control .......................................................... 5
Getting Started............................................................ 6
Unpacking .................................................................. 6
Putting the Batteries into the Remote Control ........... 6
Connecting Antennas ................................................. 6
Connecting Speakers .................................................. 7
Connecting Other Equipment..................................... 8
Adjusting the Voltage Selector ................................... 9
Cancelling the Display Demonstration ...................... 9
Common Operations ................................................ 10
Turning On or Off the Power ..................................... 10
Setting the Clock ...................................................... 10
Selecting the Sources................................................. 10
Adjusting the Volume ............................................... 11
Reinforcing the Bass Sound ..................................... 11
Selecting the Sound Modes ...................................... 12
Creating a Being-There Feeling ............................... 12
Setting the AM Tuner Interval Spacing.................... 12
Listening to FM and AM Broadcasts...................... 13
Tuning in a Station ................................................... 13
Presetting Stations .................................................... 13
Tuning in a Preset Station ........................................ 13
DVD Introduction ..................................................... 14
Basic Disc Playback .................................................. 15
Loading Discs........................................................... 15
Playing Back the Entire Discs
— Continuous Play............................................. 15
Basic Disc Operations .............................................. 16
Showing the On-Screen Display .............................. 16
Searching for a Particular Point ............................... 18
Prohibiting Disc Ejection — Tray Lock................... 18
DVD Playback........................................................... 19
Selecting the Subtitles .............................................. 19
Selecting the Audio Language ................................. 19
Selecting the Multi-Angle Views ............................. 19
Menu-Driven Playback ............................................ 20
Menu Operations ...................................................... 20
Selecting Playback Modes........................................ 21
Programming the Playing Order of the Chapters or
Tracks — Program Play ..................................... 21
Playing at Random — Random Play ....................... 23
Repeating Playback .................................................. 24
• Repeat Play ...................................................... 24
• A-B Repeat ...................................................... 24
Special Effect Playback ............................................ 25
Still Picture/Frame-by-frame Playback.................... 25
Slow Motion Playback ............................................. 25
Zoom ........................................................................ 25
Locating Your Favorite Scenes ................................ 26
Marking the ScenesYou Want — Bookmark ........... 26
Viewing tracks of a VCD ......................................... 27
Operating Setup Menu............................................. 28
Setting the Setup Menu Language ........................... 28
Setting the Initial Disc Language ............................. 28
Setting the Initial Audio Language .......................... 29
Setting the Initial Subtitle Language........................ 29
Setting the Parental Level......................................... 30
Setting the Digital Audio Output.............................. 31
Setting the DTS Signal Output................................. 31
Setting the Dynamic Compression........................... 32
Setting the Audio Output during 2X Speed Search.. 32
Setting the TV Aspect .............................................. 33
Setting the Angle Mark ............................................ 34
Setting the Still Picture Quality................................ 34
Setting the Screen Messages .................................... 35
Setting the Brightness .............................................. 35
Playing Back Tapes ................................................... 36
Playing Back a Tape ................................................. 36
Recording .................................................................. 37
Recording a Tape on Deck B.................................... 37
Dubbing Tapes.......................................................... 38
CD Synchronized Recording ..................................... 38
Enjoying Karaoke Plaly ........................................... 39
Singing Along (Karaoke) — Basic Procedure ......... 39
Singing Along Using Multipex Karaoke Discs ........ 39
• Request (Karaoke Program Play) .................... 39
• Vocal Fader ...................................................... 40
• Guide Melody .................................................. 40
• Key Control...................................................... 41
Singing Along Using Multiplex Tapes — Multiplex
Sound (MPX)...................................................... 41
Singing Along Using the Conventional Stereo
Sources — Vocal Masking.................................. 41
Using the Timers ....................................................... 42
Using Daily Timer.................................................... 42
Using Recording Timer ............................................ 43
Using Sleep Timer.................................................... 44
Timer Priority ........................................................... 44
Maintenance .............................................................. 45
Glossary ..................................................................... 46
Troubleshooting ........................................................ 47
Specifications............................................................. 48
EN01-13.CA-MXDVA5[UG]_f 01.3.23, 1:42 PM2

– 3 –
English
Location of the Buttons and Controls
Become familiar with the buttons and controls on your unit.
Front Panel
CLOCK
/
TIMER DISPLAY
PHONES
REPEAT
REC START
/STOP CD
REC START DUBBING
TUNING
TAPE B
DISC CHANGE
SOUND
MODE
SUBWOOFER
LEVEL
TAPE A
STANDBY/ON
STANDBY
1
6
7
8
9
q
w
y
r
t
5
f
d
a
l
k
i
u
o
s
j
h
g
;
2
3
4
e
p
EN01-13.CA-MXDVA5[UG]_f 01.3.23, 1:42 PM3

– 4 –
English
See pages in the parentheses for details.
Front Panel
1Carrousel
2STANDBY/ON button and STANDBY lamp (10, 12)
37(stop) button (15, 18, 21, 23, 36 – 38)
4SET button (10, 13, 42 – 44)
5CANCEL button (10, 42 – 44)
DEMO button (9)
6Display window
7TAPE 23button and lamp (10, 36 – 38)
•Pressing this button also turns on the unit.
8DVD 6(play/pause) button and lamp
(10, 15, 16, 21, 23, 25, 26, 39)
•Pressing this button also turns on the unit.
9FM/AM button and lamp (10, 13)
•Pressing this button also turns on the unit.
pDISPLAY button (10)
qAUX button and lamp (10)
•Pressing this button also turns on the unit.
wPHONES jack (11)
eCLOCK/TIMER button (10, 42 – 44)
rREPEAT button (24)
A-B REPEAT button (24)
REVERSE MODE button (36 – 38)
tDeck A cassette holder (36, 38)
• Pressing the 0EJECT portion opens the holder.
y0(Carrousel open/close) button (15, 16, 18)
•Pressing this button also turns on the unit.
uDisc number buttons and lamps (DVD1, DVD2, and
DVD3) (15, 16, 21 – 23, 38)
• Pressing one of these buttons also turns on the unit.
iDISC CHANGE button (15, 16)
oRemote sensor
;SOUND MODE control (12)
aPRESET + / – buttons (13)
4/ ¢(reverse search/forward search) buttons
(10, 16, 42 – 44)
PREV. (previous) / NEXT button (20, 27)
Continued
sSUBWOOFER LEVEL control (11)
dVOLUME control (11, 39)
fTUNING + / – buttons (13)
1/ ¡(fast rewind/fast forward) buttons
(12, 18, 25, 36)
gMIC LEVEL button (39)
hMIC jack (39)
jTAPE A button (15, 36)
TAPE B button (36)
kREC START/STOP button (37, 39)
CD REC START button (38)
DUBBING button (30, 38)
lDeck B cassette holder (36 – 38)
• Pressing the EJECT 0portion opens the holder.
Display window
1Timer indicators
• DAILY (daily timer), REC (recording timer), SLEEP
(sleep timer), and (timer) indicators
2Tape operation indicators
• A/B (operating deck), REC (recording), 23(tape
direction) and (reverse mode) indicators
3Disc play mode indicators
• REPEAT (1, 1 DISC), TITLE, PRGM (program),
RANDOM, and CHAP.TRACK indicators
4Tuner operation indicators
• MONO and ST (stereo) indicators
5PBC indicator
6SOUND MODE indicator
7Disc indicators
8Volume level, Subwoofer level, and Sound Mode pattern
indicators
9Karaoke ( ) and echo ( ) indicators
pSUBWOOFER LEVEL indicator
qMain display
• Shows the source name, frequency, etc.
wDisc track number indicators
Display Window
127
4
8
pq
35
w
6
9
EN01-13.CA-MXDVA5[UG]_f 01.3.23, 1:42 PM4

– 5 –
English
Remote Control Remote Control
1STANDBY/ON button (10)
2Number buttons (13, 16, 17, 20 – 22, 39)
3AUX button (10)
•Pressing this button also turns on the unit.
4MENU/PBC button (20)
54/ ¢buttons (16)
PREV.(previous) / NEXT buttons (20)
61/ ¡buttons (13, 18, 25, 36)
7VOLUME – button (11)
8Cursor (5∞2 3 ) buttons
9SLEEP button (44)
pDisc operation buttons
ZOOM button (25)
SETUP button (28 – 35)
STILL button (16, 25)
BOOK MARK button (26)
PLAY MODE button (21 – 23)
CLEAR button (17, 21, 23, 26)
REPEAT button (24)
qSOUND MODE button (12)
wKaraoke operating buttons
VOCAL MASKING button (41)
ECHO button (39)
MODE button (40, 41)
KARAOKE button (39 – 41)
eTAPE A/B button (36)
rDISC SKIP button (15, 16)
tTITLE button (20)
ySUBTITLE button (19)
uAUDIO/MPX button (19, 41)
iON SCREEN button (16, 17)
oRETURN button (20, 21, 23, 28 –35)
;ANGLE button (19)
aTAPE 23button (10, 36)
•Pressing this button also turns on the unit.
sFM/AM button (10, 13)
•Pressing this button also turns on the unit.
dDVD 6button (10, 15, 16, 21, 23, 25, 26, 39)
•Pressing this button also turns on the unit.
f7(stop) button (15, 21, 23, 36)
gVOLUME + button (11)
hENTER button (17, 20 – 23, 25 – 35)
jFM MODE button (13)
kFADE MUTING button (11)
lSUBWOOFER LEVEL + / – buttons (11)
/3D SOUND button (12)
CLOCK
/
TIMER DISPLAY
PHONES
REPEAT
REC START
/STOP CD
REC START DUBBING
TUNING
TAPEB
DISC CHANGE
SOUND
MODE
SUBWOOFER
LEVEL
TAPEA
STANDBY/ON
STANDBY
PLAY
When using the remote control, point it at
the remote sensor on the front panel.
3
4
5
6
2
/
r
t
y
u
i
o
a
s
d
f
g
l
k
/
;
7
8
9
p
q
w
e
j
h
VOCAL
MASKING
1
«
The front lid opens
in the arrow
direction.
How to open the front lid
Press center part of the lid and pull down.
EN01-13.CA-MXDVA5[UG]_f 01.3.23, 1:42 PM5

– 6 –
English
Getting Started
Unpacking
After unpacking, check to be sure that you have all the
following items.
The number in the parentheses indicates the quantity of the
pieces supplied.
• AM loop antenna (1)
• FM antenna (1)
• Remote control (1)
• Batteries (2)
• Composite video cord (1)
• AC plug adaptor (1)
If any is missing, consult your dealer immediately.
Putting the Batteries into the Remote Control
Insert the batteries — UM-4/AAA/IEC R03 — into the
remote control, by matching the polarity (+ and –) on the
batteries with the + and – markings on the battery
compartment.
When the remote control can no longer operate the unit,
replace both batteries at the same time.
1
3
• DO NOT use an old battery together with a new one.
• DO NOT use different types of batteries together.
• DO NOT expose batteries to heat or flame.
• DO NOT leave the batteries in the battery
compartment when you are not going to use the
remote control for an extended period of time.
Otherwise, it will be damaged from battery leakage.
UM-4/AAA/IEC R03
Continued
2
Connecting Antennas
FM antenna
1Attach the FM antenna to the FM [75 Ω]
coaxial terminal.
2Extend the FM antenna.
3Fasten it up in the position which gives you
the best reception, then fix it on the wall, etc.
About the supplied FM antenna
The FM antenna supplied with this unit can be used as temporary
measure. If reception is poor, you can connect an outdoor FM
antenna.
To connect an outdoor FM antenna
Before connecting it, disconnect the supplied FM antenna.
FM antenna (supplied)
Outdoor FM antenna
(not supplied)
A 75 Ωantenna with coaxial type connector should be
used.
-
+
-
+
FM [75 ]
ANTENNA
AM
FM [75 ]
ANTENNA
AM
EN01-13.CA-MXDVA5[UG]_f 01.3.23, 1:42 PM6

– 7 –
English
MAIN SPEAKER SUBWOOFER
4-8
[ ] 6-16
[ ]
RR
LL
1Press and hold the clamp of the AM
terminals on the rear of the unit.
2Insert the end of theAM loop antenna cord
into the terminal.
3Release the finger from the clamp.
4Turn theAM loop antenna until you have the
best reception.
To connect an outdoor AM antenna
When reception is poor, connect a single vinyl-covered wire
to the AM terminal and extend it horizontally. (The AM loop
antenna must remain connected.)
For better reception of both FM andAM
• Make sure the antenna conductors do not touch any other
terminals and connecting cords.
• Keep the antennas away from metallic parts of the unit,
connecting cords, and theAC power cord.
AM antenna
Vinyl-covered wire
(not supplied)
AM loop antenna
(supplied)
Connecting Speakers
Speaker
cord
(red/black)
2
From left
main
speaker’s
terminals
Speaker cord
(red/black)
Speaker cord
(blue/black)
1Press and hold the clamp of the speaker
terminal on the rear of the unit.
2Insert the end of the speaker cord into the
terminal.
Match the polarity (colors): Blue (+) to blue (+) and black
(–) to black (–); Red (+) to red (+) and black (–) to black
(–).
3Release the finger from the clamp.
IMPORTANT: Use only speakers with the same speaker
impedance as indicated by the speaker terminals on the
rear of the unit.
From right
main
speaker’s
terminals
From left
subwoofer’s
terminals
From right
subwoofer’s
terminals
1
Speaker cord
(blue/black)
Black
Blue Red
Black
ANTENNA
FM 75 AM
[ ]
2
1
EN01-13.CA-MXDVA5[UG]_f 01.3.23, 1:42 PM7

– 8 –
English
DIGITAL OUT
OPTICAL
[ ]
For playing the other equipment through this unit,
connect between the audio output jacks on the other
equipment and the AUX IN jacks by using an audio cord (not
supplied).
To audio output
To connect audio equipment with an optical digital
input terminal — such as digital decoder
You can connect a digital decoder or MD recorder by using
an optical digital cord (not supplied).
• See “About sounds reproduced through the rear terminals”
below.
To optical
digital input
Before connecting
the other equipment,
remove the
protective plug from
the terminal.
Audio equipment
with an optical digital
input
Protective
plug
AUX IN
Audio equipment
Connecting Other Equipment
You can connect both analog and digital equipment.
• DO NOT connect any equipment while the power
is on.
• DO NOT plug in any equipment until all
connections are complete.
To connect analog components
Be sure that the plugs of the audio cords are color coded:
White plugs and jacks are for left audio signals, and red ones
for right audio signals.
LINE OUT
Audio equipment
About sounds reproduced through the rear
terminals
•Through the LINE OUT (L/R) jacks and MAIN
SPEAKERS/SUBWOOFER terminals:
Analog stereo signals are output.
When playing a source encoded with Dolby Digital*
() or with MPEG Multichannel, multichannel
signals are mixed to the left and right front channel
signals, then output.
– You cannot reproduce the sound encoded DTS Digital
Surround** ( ).
•Through the DIGITAL OUT (OPTICAL) terminal:
Digital signals (Linear PCM, Dolby Digital, DTS
Digital Surround, MPEG Multichannel) are output
through this terminal.
To reproduce the multichannel sounds such as Dolby
Digital, MPEG Multichannel, and DTS Digital
Surround, connect an amplifier or a decoder compatible
with these multichannel sources to this terminal, and set
“DIGITAL OUTPUT” and “DTS” settings correctly.
(See page 31.)
* Manufactured under license from Dolby Laboratories.
“Dolby” and the double-D symbol are trademarks of Dolby
Laboratories. Confidential Unpublished Works. ©1992–1997
Dolby Laboratories. All rights reserved.
** Manufactured under license from Digital Theater Systems,
Inc. US Pat. No. 5,451,942 and other world-wide patents
issued and pending. “DTS” is a registered trademark of
Digital Theater Systems, Inc. Copyright 1996, 2000 Digital
Theater Systems, Inc. All Rights Reserved.
For recording sounds through this unit on the other
equipment, connect between the audio input jacks on the
other equipment and the LINE OUT jacks by using an audio
cord (not supplied).
• See “About sounds reproduced through the rear terminals”
on the right column.
To audio input
Continued
EN01-13.CA-MXDVA5[UG]_f 01.3.23, 1:42 PM8

– 9 –
English
Cancelling the Display Demonstration
On the unit ONLY:
To cancel the display demonstration, press
DEMO.
When you press other buttons
The display demonstration stops temporarily. It will start
automatically again (if no operation is done for 2 minutes) until you
cancel it by pressing DEMO.
To start the display demonstration manually
Press and hold DEMO again for more than 2 seconds.
CANCEL
/DEMO
Adjusting the Voltage Selector
Before plugging in the unit, set the correct voltage for your
area with the voltage selector on the rear of the unit.
• DO NOT plug in before setting the voltage
selector on the rear of the unit and all connection
procedures are complete.
To connect the TV
Connect your TV and this unit using the composite video
cord (supplied) or an S-video cord (not supplied).
• Using an S-video cord gives you a better quality pictures.
TV
Composite video cord
(supplied) S-video cord
(not supplied)
MAIN SPEAKER SUBWOOFER
[ ]
RR
LL
[ ]
4-8 6-16
LINE OUT
S-VIDEO
OUT
VIDEO
OUT
220
VOLTAGE
SETTING
127
240
110
230-
NOW, you can plug in the unit and other
connected equipment FINALLY!
When connecting the AC power cord into a wall outlet, the
unit automatically starts display demonstration.
When the wall outlet does not match theAC plug, use the
supplied AC plug adaptor.
S-VIDEO
OUT
VIDEO
OUT
To composite
video input To S-video
input
Using a screwdriver, set the voltage selector so that the arrow
printed on the rear points the correct voltage where you use
this unit. (See also the back cover page.)
MAIN SPEAKER SUBWOOFER
[ ]
RR
LL
[ ]
4-8 6-16
LINE OUT
S-VIDEO
OUT
VIDEO
OUT
220
VOLTAGE
SETTING
127
240
110
230-
220
127
110
VOLTAGE
SETTING
230-
240
EN01-13.CA-MXDVA5[UG]_f 01.3.23, 1:42 PM9

– 10 –
English
Common Operations
Turning On or Off the Power
To turn on the unit, press
STANDBY/ON so that the STANDBY
lamp goes off.
To turn off the unit (on standby), press
STANDBY/ON again so that the
STANDBY lamp lights up.
A little power is always consumed even while the unit is on
standby.
To switch off the power supply completely, unplug the AC
power cord from the AC outlet.
When you unplug theAC power cord or if a power
failure occurs
The clock is reset to “– – : – –,” while the tuner preset stations (see
page 13) will be erased in a few days.
Setting the Clock
Before operating the unit any further, first set the clock built
in this unit.You can set the clock whether the unit is on or
off.
On the unit ONLY:
1
Press CLOCK/TIMER.
The hour digits start flashing on the display.
2
Press 4or ¢to adjust the
hour, then press SET.
• If you want to correct the hour after pressing SET,
press CANCEL. The hour digits start flashing
again.
3
Press 4or ¢to adjust the
minute, then press SET.
To check the clock time
Press DISPLAY while playing any source.
• Each time you press the button, the source
indication and the clock time alternate on the
display.
To adjust the clock again
If you have adjusted the clock before, you need to press
CLOCK/TIMER repeatedly until “CLOCK” is selected.
• Each time you press the button, the clock/timer setting
modes change as follows:
If there is a power failure
The clock loses the setting and is reset to “– – : – –.”You need to set
the clock again.
Selecting the Sources
To listen to the FM/AM broadcasts, press FM/AM. (See
page 13.)
To play back discs, press DVD 6. (See pages 14 – 35.)
To play back tapes, press TAPE 23. (See page 36.)
To select the external equipment as the source, press AUX.
When you press the play button for a particular source (AUX,
FM/AM, DVD 6, and TAPE 23), the unit turns on and
the unit starts playing the source if it is ready.
STANDBY/ON
STANDBY
STANDBY/ON
STANDBY
PRESET
SET
DISPLAY
CLOCK
/
TIMER
PRESET
SET
Continued
DAILY
Canceled
ON TIME
ON TIME
CLOCK
REC
EN01-13.CA-MXDVA5[UG]_f 01.3.23, 1:42 PM10

– 11 –
English
Adjusting the Volume
You can adjust the volume level only while the unit is turned
on.
Turn the VOLUME control
clockwise to increase the volume or
counterclockwise to decrease it.
• The volume level can be adjusted in
32 steps (VOL MIN, VOL 1 —
VOL 30, and VOL MAX).
When using the remote control, press VOLUME + to
increase the volume or pressVOLUME – to decrease it.
For private listening
Connect a pair of headphones to the PHONES jack. No sound
comes out of the speakers. Be sure to turn down the volume before
connecting or putting on headphones.
DO NOT turn off (on standby) the unit with the
volume set to an extremely high level;otherwise, a
sudden blast of sound can damage your hearing,
speakers and/or headphones when you turn on
the unit or start playing any source next time.
REMEMBER you cannot adjust the volume level
while the unit is on standby.
SUBWOOFER LEVEL indicator always
lights up when the unit is on.
SUBWOOFER
LEVEL
Reinforcing the Bass Sound
This function only affects the playback sound, but does not
affect your recording.
Turn the SUBWOOFER LEVEL control
clockwise to increase the subwoofer
sound or counterclockwise to decrease it.
• The subwoofer level can be adjusted in 4
steps (LEVEL 1 — LEVEL 4.)
If you turn the control clockwise up to the
subwoofer LEVEL 4, “MAX” flashes on
the display for a few seconds.
When using the remote control, press SUBWOOFER LEVEL
to adjust the subwoofer level. The subwoofer level changes as
LEVEL 1 = LEVEL 2 = LEVEL 3 = LEVEL 4 =
(back to the beginning).
To turn down the volume level temporarily
Press FADE MUTING on the remote control.
The volume level gradually decreases to
“VOL MIN.”
To restore the sound, press the button again.
EN01-13.CA-MXDVA5[UG]_f 01.3.23, 1:42 PM11

– 12 –
English
Selecting the Sound Modes
This function only affects the playback sound, but does not
affect your recording.
You can select one of the 6 preset sound modes (3 surround
modes and 3 SEA — Sound Effect Amplifier — modes).
To select the sound modes, turn the
SOUND MODE control until the sound
mode you want appears on the display.
• As you turn the control, the sound modes change as
follows:
SOUND
MODE
Surround modes*:
D.CLUB: Increases resonance and bass.
HALL: Adds depth and brilliance to the sound.
STADIUM: Adds clarity and spreads the sound, like in an
outdoor stadium.
SEA (Sound Effect Amplifier) modes:
ROCK: Boosts low and high frequency. Good for
acoustic music.
POP: Good for vocal music.
CLASSIC: Good for classical music.
OFF: Cancels the sound mode.
* Surround elements are added to the SEA elements to create a
being-there feeling in your room.
When one of these modes is selected, the SOUND MODE
indicator lights up as —
While one of the SEA modes (SEA elements without surround
elements) is selected, the SOUND MODE indicator lights up as
—
When using the remote control, press SOUND MODE to
adjust the sound mode.
• Each time you press the button, the sound modes change as
follows:
D.CLUB
(Dance CLUB)
OFF
(Canceled)
HALL STADIUM ROCK
POP
CLASSIC
SOUND MODE indicator
also lights up on the display
D.CLUB
(Dance CLUB)
OFF
(Canceled)
HALL STADIUM ROCK
POP
CLASSIC
Creating a Being-There Feeling
By adding breadth and depth the reproduced sounds, this
function (3D Sound) can create a being-there feeling while
playing back software encoded with Dolby Digital or with
MPEG Audio.
• When the Digital Output setting is set to Bitstream on the
Setup Menu (see page 31), this function does not work.
On the remote control ONLY:
1
Press 3D SOUND during play.
The current 3D Sound setting appears on the
TV screen.
• If “3-D SOUND : ON” appears on the TV screen, now
3D Sound function is in use, press 3D SOUND again to
erase the indication.
2
Press Cursor 3(or 2) to
turn on 3D Sound function.
3
Press 3D SOUND again to erase the
indication.
To turn off 3D Sound, repeat the above
procedure and in step 2, select “OFF.”
Setting the AM Tuner Interval Spacing
Some countries space AM stations 9 kHz apart, and some
countries use 10 kHz spacing.
On the unit ONLY:
When shipped, the unit is set to 10 kHz spacing.
To select 9 kHz, press while holding down 1when the
unit is in standby mode. “AM -- 9” appears on the display.
To change back to 10 kHz interval, press while holding
down ¡when the unit is in standby mode. “AM -- 10”
appears on the display.
STANDBY/ON
STANDBY
+
+
TUNING
STANDBY/ON
STANDBY
TUNING
3-D SOUND : ON
3-D SOUND : OFF
EN01-13.CA-MXDVA5[UG]_f 01.3.23, 1:42 PM12

– 13 –
English
Listening to FM and AM Broadcasts
Before operating the tuner, make sure you have selected the
correct AM spacing intervals (see page 12).
Tuning in a Station
1
Press FM/AM.
The unit automatically turns on and tunes
in the previously tuned station (either FM
or AM).
• Each time you press the button, the
band alternates between FM and AM.
2
Start searching for stations.
On the unit:
Press and hold TUNING + or
TUNING – for more than 1
second.
On the remote control:
Press and hold 1or
¡for more than 1 second.
The unit starts searching for stations and
stops when a station of sufficient signal
strength is tuned in.
If a program is broadcast in stereo, the ST (stereo)
indicator lights up.
To stop during searching, press TUNING + or TUNING –
(or 1or ¡on the remote control).
When you press TUNING + or TUNING – (or
1or ¡
on the remote control) briefly and repeatedly
The frequency changes step by step.
To change the FM reception mode
When an FM stereo broadcast is hard to receive or
noisy, press FM MODE on the remote control so
that “MONO” appears and the MONO indicator
also lights up on the display. Reception improves.
To restore the stereo effect, press FM MODE again so that
“STEREO” appears on the display and the MONO indicator
goes off from the display.
In this stereo mode, you can hear stereo sounds when a
program is broadcast in stereo.
Presetting Stations
You can preset 30 FM and 15AM stations.
In some cases, test frequencies have been already memorized
for the tuner since the factory examined the tuner preset
function before shipment. This is not a malfunction.You can
preset the stations you want into memory by following the
presetting method.
•
There is a time limit in doing the following steps. If the setting
is canceled before you finish, start from step 1 again.
On the unit ONLY:
1
Tune in the station you want to preset.
• See “Tuning in a Station” on the left column.
2
Press SET.
3
Press PRESET + or PRESET –
to select a preset number.
4
Press SET again.
The tuned station in step 1 is stored in the preset number
selected in step 3.
• Storing a new station on a used number erases the
previously stored one.
When you unplug theAC power cord or if a power
failure occurs
The preset stations will be erased in a few days. If this happens,
preset the stations again.
Tuning in a Preset Station
1
Press FM/AM.
The unit automatically turns on and
tunes in the previously tuned station
(either FM or AM).
• Each time you press the button, the
band alternates between FM and AM.
2
Select a preset number.
On the unit:
Press PRESET + or PRESET –.
On the remote control:
Press the number buttons.
Ex.: For preset number 5, press 5.
For preset number 15, press 10,
then 5.
For preset number 20, press 10
twice (and wait for a few seconds.)
For preset number 30, press 10
three times (and wait for a few
seconds.)
TUNING
SET
PRESET
SET
PRESET
/
EN01-13.CA-MXDVA5[UG]_f 01.3.23, 1:42 PM13

– 14 –
English
DVD Introduction
• On some discs, their actual operations may be different
from what is explained in this manual.
• The following discs cannot be played back;
– DVD-Audio, DVD-ROM, DVD-RAM, DVD-R,
DVD-RW, CD-ROM, CD-R, CD-RW, CD-I, (CD-I
Ready), Photo CD, etc.
Playing back these discs will generate noise and damage
the speakers.
* Note on Region Code
DVD players and DVD Video discs have their own Region Code
numbers. This unit only can play back DVD discs whose Region
Code numbers include “3.”
Disc Mark Video Region Code
Type (Logo) Format Number*
COMPACT
DIGITAL AUDIO
DVD
Video
NTSC
or
PAL
3
ALL
Video
CD
Audio
CD
This unit has been designed to playback the following discs:
DVD, Video CD, and Audio CD.
Discs you can play:
Example 1: DVD disc
Example 2 :Video CD/Audio CD
Examples:
Disc structure — DVD, Video CD (VCD) and Audio CD
(CD)
A DVD disc consists of Titles, and each title may be divided
into some Chapters. (See Example 1.)
For example, if a DVD disc contains some movies, each
movie may have its own title number, and it may be further
divided into some chapters.
On the other hand, a VCD or CD consists of Tracks. (See
Example 2.)
In general, each song has its own track number. (On some
discs, each track may also be divided by Indexes.)
When playing back a VCD with Playback Control (PBC)
function, you can select what to view using the menu shown
on the TV screen. (While operating aVideo CD using the
menu, some of the functions such as Repeat and Track Search
may not work.)
IMPORTANT: Before performing any operations, make
sure of the following....
• Check the connection with the TV.
• Turn on the TV and select the correct input on the TV to
view the pictures or on-screen indications on the TV screen.
• For DVD playback, you can change the Setup menu setting
to your preference. (See pages 28 – 35.)
If “ ”appears on the screen when pressing a button,
the disc cannot accept an operation you have tried to do.
S-Video
CD
EN14-20.CA-MXDVA5[UG]_f 01.3.23, 1:40 PM14

– 15 –
English
Basic Disc Playback
Loading Discs
1
Press 0.
The unit automatically turns on and the
carrousel comes out.
2
Place one or two discs correctly on the front
slots of the carrousel, with its label side up.
• When using a CD single (8 cm), place it on the inner
circle of the disc tray.
• Continued use of irregular shape CDs (heart-shape,
octagonal, etc.) can damage the unit.
3
If you wish to load a third disc,
press DISC CHANGE on the unit
or DISC SKIP on the remote
control.
The carrousel rotates by 120˚.
4
Press 0again.
The carrousel closes.
About the disc indicators
Each disc indicator corresponds to the disc tray of the same number.
• The disc marker lights up for the disc number you have selected.
• The disc indicator rotates while the corresponding disc is being
played.
• The disc indicator goes off when the unit has detected that there is
no disc on the corresponding disc tray.
Playing Back the Entire Discs — Continuous
Play
You can play discs continuously.
• While playing a DVD orVCD with the PBC function
loaded on the disc trays, the continuous play will stop when
a disc menu appears. If a menu appears while playing a
DVD or VCD with PBC function, see “Menu-Driven
Playback” on page 20.
1
Load discs.
2
Press one of the disc number
buttons (DVD1, DVD2, and
DVD3) for the disc you want to
play.
Disc play starts from the first chapter or
track of the selected disc.
• Pressing DVD 6instead of the disc number buttons
starts playing back if a disc is on the trays.
To stop during play, press 7.
• If you are playing back a disc, this unit can memorize the
end point even when you turn off the unit, and when you
start playback again by pressing DVD 6, playback
begins from where it has been stopped. (Resume play)
• To stop completely, press 7twice.
To remove the disc, press 0.
Disc playback sequence during Continuous play
When 3 discs are loaded on the disc trays, they are played in one of
the following sequences.
• When DVD1 is pressed : DVD1 ]DVD2 ]DVD3 (then stops)
• When DVD2 is pressed : DVD2 ]DVD3 ]DVD1 (then stops)
• When DVD3 is pressed : DVD3 ]DVD1 ]DVD2 (then stops)
* When only 2 discs are loaded, they are played in the same order,
but the disc tray without a disc is skipped.
CORRECT INCORRECT
Disc number
Disc indicator Disc marker
DISC CHANGE
Chapter (or title) number (DVD)
Track number (VCD, CD) Elapsed playing time
Chapter (or track) number of the currently
playing disc is flashing.(Numbers exceeding
16 are not displayed.)
Before playing a DVD or VCD, select the color system as
indicated on the disc.
On the unit only:
Press TAPE A while the unit is in standby mode.
Each time you press the button, “PAL,”
“NTSC,” and “SECAM” appear on the display
in sequence.
About the color system
When wrong color system is selected, picture on TV
screen will lose the color.
TAPE A
EN14-20.CA-MXDVA5[UG]_f 01.3.23, 1:40 PM15
This manual suits for next models
5
Table of contents
Other JVC Speakers System manuals