manuals.online logo
Brands
  1. Home
  2. •
  3. Brands
  4. •
  5. JVC
  6. •
  7. Subwoofer
  8. •
  9. JVC LVT0673-001A User manual

JVC LVT0673-001A User manual

This manual suits for next models

1

Other JVC Subwoofer manuals

JVC SX-DW303 User manual

JVC

JVC SX-DW303 User manual

JVC SC-DW55 User manual

JVC

JVC SC-DW55 User manual

JVC SP-DW103 User manual

JVC

JVC SP-DW103 User manual

JVC SP-PW3000 User manual

JVC

JVC SP-PW3000 User manual

JVC RV-NB20B User manual

JVC

JVC RV-NB20B User manual

JVC SP-DWF10 User manual

JVC

JVC SP-DWF10 User manual

JVC SP-PWE5 User manual

JVC

JVC SP-PWE5 User manual

JVC CS-BB2J User manual

JVC

JVC CS-BB2J User manual

JVC SP-PW100 User manual

JVC

JVC SP-PW100 User manual

JVC SX-DW303 User manual

JVC

JVC SX-DW303 User manual

JVC CS-GW1200 User manual

JVC

JVC CS-GW1200 User manual

JVC CS-BGS5120 User manual

JVC

JVC CS-BGS5120 User manual

JVC SP-PW100 User manual

JVC

JVC SP-PW100 User manual

JVC SP-DWF31 User manual

JVC

JVC SP-DWF31 User manual

JVC CS-AW8520 - Arsenal 15" Subwoofer User manual

JVC

JVC CS-AW8520 - Arsenal 15" Subwoofer User manual

JVC CSDA1 - Car 170 Watt Max Compact Powered Subwoofer... User manual

JVC

JVC CSDA1 - Car 170 Watt Max Compact Powered Subwoofer... User manual

JVC CS-AW8520 - Arsenal 15" Subwoofer User manual

JVC

JVC CS-AW8520 - Arsenal 15" Subwoofer User manual

JVC RV-NB10B User manual

JVC

JVC RV-NB10B User manual

JVC SX-DW303 User manual

JVC

JVC SX-DW303 User manual

JVC CS-G1210 User manual

JVC

JVC CS-G1210 User manual

JVC CS-AW7020 - 10 DVC 2OHM 1000W MAX User manual

JVC

JVC CS-AW7020 - 10 DVC 2OHM 1000W MAX User manual

JVC CW-DRA8 User manual

JVC

JVC CW-DRA8 User manual

JVC SP-DW103 User manual

JVC

JVC SP-DW103 User manual

JVC SX-DW303 User manual

JVC

JVC SX-DW303 User manual

Popular Subwoofer manuals by other brands

Extron electronics SF 8CT SUB user guide

Extron electronics

Extron electronics SF 8CT SUB user guide

SVS PB-4000 quick start guide

SVS

SVS PB-4000 quick start guide

Pioneer S-DVR9SW Service manual

Pioneer

Pioneer S-DVR9SW Service manual

Yamaha YST-SW515 Service manual

Yamaha

Yamaha YST-SW515 Service manual

Velodyne SPL-800 ULTRA - REV B datasheet

Velodyne

Velodyne SPL-800 ULTRA - REV B datasheet

Teufel US 2110/1 SW operating instructions

Teufel

Teufel US 2110/1 SW operating instructions

Wet Sounds SS-65 user manual

Wet Sounds

Wet Sounds SS-65 user manual

Pyle PLQB10 Specifications

Pyle

Pyle PLQB10 Specifications

Sony XS-L1536 Product guide

Sony

Sony XS-L1536 Product guide

Sony XS-AW8 operating instructions

Sony

Sony XS-AW8 operating instructions

B&C Speakers 15 HPL 76W Specifications

B&C Speakers

B&C Speakers 15 HPL 76W Specifications

Velodyne DD-18+ Specifications

Velodyne

Velodyne DD-18+ Specifications

Sonance Cinema Series SUB 10-150 Specifications

Sonance

Sonance Cinema Series SUB 10-150 Specifications

Hifonics HW-12 Owners & installation manual

Hifonics

Hifonics HW-12 Owners & installation manual

Yamaha 64263 owner's manual

Yamaha

Yamaha 64263 owner's manual

Magnat Audio ADR 130 BP user manual

Magnat Audio

Magnat Audio ADR 130 BP user manual

Technics SB-AS500 Operaing instructions

Technics

Technics SB-AS500 Operaing instructions

Lyngdorf BW-2 owner's manual

Lyngdorf

Lyngdorf BW-2 owner's manual

manuals.online logo
manuals.online logoBrands
  • About & Mission
  • Contact us
  • Privacy Policy
  • Terms and Conditions

Copyright 2025 Manuals.Online. All Rights Reserved.

For Customer Use:
Enter below the Model No. and Serial
No. which are located either on the rear,
bottom or side of the cabinet. Retain this
information for future reference.
Model No.
Serial No.
LVT067 -001A
[ B, E, EN ]
COMPACT COMPONENT SYSTEM
Enter below the Model No. and Serial No.
which are located on the rear, bottom or
side of the cabinet. Retain this information
for future reference.
SP-PW100
POWERED SUBWOOFER
SUBWOOFER MIT STROMVERSORGUNG
CAISSON DE GRAVE ACTIF
SUBWOOFER MET INGEBOUWDE VERSTERKER
SUBWOOFER MOTRIZ
SUBWOOFER (ALTOPARLANTE PER TONI BASSI) ALIMENTATO
NÄTDRIVEN LÅGBASHÖGTALARE
SUBWOOFER MED INDBYGGET FORSTÆRKER
TEHOSTETTU APUBASSOKAIUTIN
STAND BY/ON
SP-PW100 POWERED SUBWOOFER
INSTRUCTIONS
BEDIENUNGSANLEITUNG
MANUEL D’INSTRUCTIONS
GEBRUIKSAANWIJ ING
MANUAL DE INSTRUCCIONES
ISTRU IONI
BRUKSANVISNING
VEJLEDNING
KÄYTTÖOHJE
– G1 –
Warnings, Cautions and Others
CAUTION
To reduce the risk of electrical shocks, fire, etc.:
1. Do not remove screws, covers or cabinet.
2. Do not expose this appliance to rain or moisture.
Caution –– POWER switch
This apparatus is provided with a PO ER switch to be able to minimize
power consumption for safe use. Therefore,
1. hen doing initial setting, complete all the connections required, connect
the mains plug into the wall outlet, and set the PO ER switch
to ON.
2. hen not in use, set the PO ER switch to OFF.
3. Disconnect the mains plug to shut the power off completely. The PO ER
switch in any position do not disconnect the mains line.
Caution: Proper Ventilation
To avoid risk of electric shock and fire, and to prevent damage, locate the
apparatus as follows:
1 Front:
No obstructions and open spacing.
2 Sides/ Top/ Back:
No obstructions should be placed in the areas shown by the
dimensions below.
3 Bottom:
Place on the level surface. Maintain an adequate air path for
ventilation by placing on a stand with a height of 10 cm or more.
CAUTION
• Do not block the ventilation openings or holes.
(If the ventilation openings or holes are blocked by a
newspaper or cloth, etc., the heat may not be able to get out.)
• Do not place any naked flame sources, such as lighted candles, on the
apparatus.
• hen discarding batteries, environmental problems must be considered
and local rules or laws governing the disposal of these batteries must be
followed strictly.
• Do not use this apparatus in a bathroom or places with water. Also do not
place any containers filled with water or liquids (such as cosmetics or
medicines, flower vases, potted plants, cups, etc.) on top of this apparatus.
Achtung
Zur Verringerung des Risikos von elektrischem Schlag, Feuer usw.:
1. Entfernen Sie nicht Schrauben, Abdeckungen oder das Gehäuse.
2. Setzen Sie dieses Gerät nicht Regen oder Feuchtigkeit aus.
Achtung - Einschaltknopf (POWER)
Dieser Apparat hat einen Einschaltknopf (PO ER), um den Stromverbrauch
für sichere Verwendung auf einem Minimum zu halten. Beachten Sie deshalb
die folgenden Punkte:
1. Stellen Sie beim ersten Einrichten alle erforderlichen Anschlüsse her,
schließen Sie den Stecker des Netzkabels an eine andsteckdose an, und
stellen Sie dann den Einschaltknopf (PO ER) auf ON (An).
2. Stellen Sie den Einschaltknopf (PO ER) auf OFF (Aus), wenn das Gerät
nicht verwendet wird.
3. Ziehen Sie den Stecker aus der Steckdose, um die Stromversorgung
vollkommen auszuschalten. Der Einschaltknopf (PO ER) führt in keiner
Stellung Trennung vom Netz durch.
Achtung: Angemessene Ventilation
Stellen Sie das Gerät wie folgt auf, um das Risiko von elektrischem Schlag und
Feuer zu vermeiden und Beschädigung zu verhüten:
1. Vorderseite:
Keine Hindernisse und offener Raum.
2. Seiten, Oberseite und Rückseite:
In dem Bereich mit den folgenden Abmessungen sollten sich keine
Hindernisse befinden.
3. Unterseite:
Stellen Sie das Gerät auf eine ebene Oberfläche. Stellen Sie das Gerät
auf einen Stand mit einer Höhe von mindestens 10 cm, um einen
angemessenen Luftpfad für Ventilation zu erhalten.
ACHTUNG
• Blockieren Sie keine Belüftungsschlitze oder -bohrungen.
( enn die Belüftungsöffnungen oder -löcher durch eine Zeitung oder ein
Tuch etc. blockiert werden, kann die entstehende Hitze nicht abgeführt
werden.)
• Stellen Sie keine offenen Flammen, beispielsweise angezündete Kerzen,
auf das Gerät.
• enn Sie Batterien entsorgen, denken Sie an den Umweltschutz.
Batterien müssen entsprechend den geltenden örtlichen Vorschriften oder
Gesetzen entsorgt werden.
• Setzen Sie die Anlage nicht in einem Badezimmer oder an Orten ein, an
denen asser verwendet wird. Stellen Sie auch keine Behälter, die mit
asser oder anderen Flüssigkeiten gefüllt sind (beispielsweise
Kosmetik- oder Medikamentenbehälter, Blumenvasen, Topfpflanzen,
Tassen etc) auf diese Anlage.
Warnungen, Vorsichtshinweise usw.
15 cm15 cm
20 cm
10 cm
20 cm
20 cm
Front view
Vorderansicht Side view
Seitenansicht
Thank you for purchasing JVC speakers.
Before you begin using them, please read the instructions carefully to be
sure you get the best possible performance. If you have any questions,
consult your JVC dealer.
Vielen Dank für den Kauf dieser JVC-Lautsprecher.
Lesen Sie bitte diese Bedienungsanleitung vor Ingebrauchnahme sorgfältig
durch, um stets optimale Ergebnisse zu erzielen. Wenden Sie sich bei
etwaigen Fragen bitte an Ihren JVC Händler.
– G2 –
Avertissements, précautions et autres
PRECAUTION
Pour réduire tout risque de choc électrique, feu, etc. :
1. Ne pas retirer les vis, les couvercles ni le coffret.
2. Ne pas exposer l’appareil à la pluie ni à l’humidité.
Précaution - Interrupteur POWER
Cet appareil est doté d’un interrupteur PO ER qui permet de réduire la
consommation d’énergie à des fins de sécurité. En conséquence,
1. Lors des réglages initiaux, effectuer tous les raccordements, brancher la
fiche secteur dans la prise secteur, puis mettre l’interrupteur PO ER sur
ON.
2. Lorsqu’on ne se sert pas de l’appareil, mettre l’interrupteur PO ER sur
OFF.
3. Débrancher l’appareil de la prise secteur pour couper complètement
l’alimentation. L’interrupteur PO ER ne coupe pas l’appareil du secteur,
quelle que soit la position sur laquelle il est réglé.
Précaution : Ventilation
Pour réduire tout risque de choc électrique et de feu, et pour éviter
d’endommager l’appareil, le disposer comme suit :
1. Avant :
Pas d’obstacles, et espace dégagé.
2. Côté/dessus/dos :
Il ne devra pas y avoir d’obstacles dans les zones représentées par les
dimensions ci-dessous.
3. Dessous :
Le placer sur une surface de niveau. Garantir un trajet d’air adéquat pour
la ventilation en le plaçant sur un socle d’une hauteur de 10 cm
minimum.
ATTENTION
• Ne bloquez pas les orifices ou les trous de ventilation.
(Si les orifices ou les trous de ventilation sont bloqués par un journal un
tissu, etc., la chaleur peut ne pas être évacuée correctement de
l’appareil.)
• Ne placez aucune source de flamme nue, telle qu’une bougie, sur
l’appareil.
• Lors de la mise au rebut des piles, veuillez prendre en considération les
problèmes de l’environnement et suivre strictement les règles et les lois
locales sur la mise au rebut des piles.
• N’utilisez pas cet appareil dans une salle de bain ou un autre endroit avec
de l’eau. Ne placez aucun récipient contenant de l’eau (tel que des
cosmétiques ou des médicaments, un vase de fleurs, un pot de fleurs, une
tasse, etc.) sur cet appareil.
LET OP
Verminder het risico van elektrische schokken, brand enz.:
1. Verwijder geen schroeven, afdekkingen of andere onderdelen van de
behuizing.
2. Stel dit toestel niet bloot aan regen of vocht.
Let op - Aan/uit (POWER) schakelaar
Dit toestel is uitgerust met een aan/uit schakelaar bedoeld om het
stroomverbruik te verminderen en het toestel veilig te kunnen gebruiken. Dus,
1. Bij het opstellen van het toestel dient u eerst alle vereiste aansluitingen te
maken, vervolgens de stekker in het stopcontact te steken en dan pas de
aan/uit schakelaar op ON (aan) te zetten.
2. Zet de aan/uit schakelaar uit (OFF) wanneer u het toestel niet gebruikt.
3. Haal de stekker uit het stopcontact om de stroomvoorziening volledig af te
sluiten. De aan/uit schakelaar koppelt het toestel in geen enkele stand los
van het elektriciteitsnet.
Let op: Voldoende ventilatie
Om het risico van een elektrische schok of brand te vermijden en om schade te
voorkomen, dient u het toestel als volgt op te stellen:
1. Voorkant:
Geen belemmeringen en open ruimte.
2. Zijkanten/bovenkant/achterkant:
Er mogen geen belemmeringen geplaatst worden binnen de hieronder
aangegeven grenzen.
3. Onderkant:
Zet het toestel op een horizontaal oppervlak. Zorg voor vrije
luchtcirculatie en voldoende ventilatie door het toestel op een standaard
van tenminste 10 cm hoogte te zetten.
VOOR ICHTIG
• Zorg dat u de ventilatieopeningen en -gaten niet afsluit.
(Als de ventilatieopeningen en -gaten worden afgesloten door
bijvoorbeeld papier of een doek, kan er hitte in het apparaat worden
opgebouwd.)
• Zet geen bronnen met open vuur, zoals brandende kaarsen, op het
apparaat.
• ees milieubewust en gooi lege batterijen niet bij het huishoudelijk
afval. Lege batterijen dient u in te leveren met het KCA of bij een
innamepunt voor batterijen.
• Gebruik dit apparaat niet in een badkamer of in andere natte ruimten.
Zet ook geen voorwerpen op het apparaat die zijn gevuld met water of
andere vloeistoffen (zoals cosmetica, medicijnen, bloemenvazen,
bloempotten, kopjes enz.).
Waarschuwingen en andere aandachtspunten
15 cm15 cm
20 cm
10 cm
20 cm
20 cm
Vue de face
Voor-aanzicht Vue de côté
ij-aanzicht
Nous vous remercions pour l’achat de ces enceintes JVC.
Avant de les utiliser, lire ces instructions avec attention pour en obtenir les
meilleures performances possibles. En cas de questions, consulter votre
revendeur JVC.
Dank u voor de aanschaf van deze luidsprekers.
Lees alvorens over te gaan tot aansluiten, deze gebruiksaanwijzing door
zodat u de best mogelijke prestaties zult verkrijgen. Neem contact op met
de JVC dealer indien u vragen heeft.
– G –
Avvertenze, Precauzioni e Altro
ATTEN IONE
Per ridurre il rischio di scosse elettriche, incendio, ecc.
1. Non rimuovere viti, coperchi o il mobiletto esterno.
2. Non esporre quest’apparecchio agli effetti deleteri di elementi quali pioggia
e umidità.
Attenzione - Interruttore POWER
Quest’apparecchio è dotato di un interruttore PO ER che serve a ridurre il
consumo di energia elettrica e per sicurezza. Si raccomanda quindi di
osservare quanto sotto.
1. Per l’impostazione iniziale, completare tutti i collegamenti necessari,
inserire la spina del cavo di alimentazione nella presa a muro della rete
elettrica e mettere l’interruttore PO ER in posizione ON (accensione).
2. Se l’apparecchio non deve essere usato, mettere l’interruttore PO ER in
posizione OFF (spegnimento).
3. Per togliere completamente l’alimentazione di corrente, disinserire la spina
del cavo di alimentazione dalla presa a muro della rete elettrica. Altrimenti
l’alimentazione di corrente elettrica permane a prescindere
dall’impostazione dell’interruttore PO ER.
Attenzione: Ventilazione Appropriata
Per evitare i rischi di scosse elettriche e incendio, e prevenire eventuali
danneggiamenti, collocare l’apparecchio osservando quanto sotto.
1. Davanti:
Spazio libero e nessun ostacolo.
2. Lati/sopra/dietro:
Nessun ostacolo entro i limiti indicati in figura.
3. Base:
Collocare su superficie a livello. Mantenere le condizioni idonee a un
buon flusso d’aria di ventilazione collocando l’apparecchio su una base
di appoggio di altezza non inferiore a 10 cm.
ATTEN IONE
• Evitare di ostruire le aperture o i fori di ventilazione con giornali,
indumenti etc., in quanto s’impedirebbe al calore di fuoriuscire.
• Non collocare fiamme libere (es. candele accese) sull’apparecchio.
• Le batterie devono essere smaltite nel rispetto dell’ambiente, attenendosi
ai regolamenti locali in materia.
• Non usare l’apparecchio in bagno o in locali dove sia presente l’acqua.
Evitare assolutamente di collocare contenitori contenenti acqua o liquidi
(flaconi di cosmetici o medicinali, vasi di fiori, piante in vaso , tazze etc.)
sull’apparecchio.
PRECAUCIÓN
Para reducir el riesgo de incendios, descargas eléctricas, etc.:
1. No retire los tornillos, las cubiertas o la caja.
2. No exponga este aparato a la lluvia o la humedad.
Precaución – Conmutador POWER
Este aparato está provisto de un conmutador PO ER capaz de reducir el
consumo de energía al mínimo para un uso seguro. Por consiguiente,
1. Cuando realice los ajustes iniciales, efectúe todas las conexiones requeridas,
conecte el enchufe de la red en el tomacorriente de pared, y ajuste el
conmutador PO ER a ON.
2. Cuando no esté en uso, ajuste el conmutador PO ER a OFF.
3. Extraiga el enchufe del tomacorriente para desconectar la alimentación por
completo. La línea de la red no se desconecta en ninguna de las posiciones
del conmutador PO ER.
Precaución: Ventilación apropiada
Para evitar riesgos de incendios o de descargas eléctricas u otros daños, coloque
el aparato de la siguiente manera:
1. Parte delantera:
Sin obstrucciones y con espacio abierto.
2. Laterales/parte superior/parte trasera:
No debe haber ninguna obstrucción dentro de las áreas indicadas por las
dimensiones de abajo.
3. Parte inferior:
Debe instalarse sobre una superficie nivelada. Para una ventilación
adecuada, colóquelo sobre un soporte de 10 cm o más de altura para
permitir el paso de aire.
PRECAUCIÓN
• No obstruya las rendijas o los orificios de ventilación.
(Si las rendijas o los orificios de ventilación quedan tapados con un
periódico, un trozo de tela, etc., no se podrá disipar el calor).
• No ponga sobre el aparato ninguna llama al descubierto, como velas
encendidas.
• Cuando tenga que descartar las pilas, tenga en cuenta los problemas
ambientales y observe estrictamente los reglamentos o las leyes locales
sobre disposición de las pilas.
• No utilice este aparato en el cuarto de baño o en lugares donde hay agua.
Tampoco coloque ningún recipiente que contenga agua u otros líquidos
(frascos de cosméticos o medicinas, floreros, macetas, vasos, etc.) encima
de este aparato.
Advertencias, precauciones y notas
15 cm15 cm
20 cm
10 cm
20 cm
20 cm
Vista delantera
Vista anteriore Vista lateral
Vista laterale
Le estamos muy agradecidos por haber adquirido estos altavoces de JVC.
Antes de utilizarlos, sirvase leer las instrucciones detenidamente a fin de
obtener el mejor rendimiento posible. Si tienenaluna pregunta, acuda a su
agente de JVC.
Grazie per aver acquistato questi altoparlanti della JVC.
Prima di cominciare l’uso degli altoparlanti, leggete attentamente le istruzioni
per assicurare le migliori prestazioni. Qualora sorgessero dei dubbi,
rivolgetevi al vostro rivenditore JVC.
– G4 –
Advarsler, forsigtighedsregler og andet
FORSIGTIG
For at reducere risikoen for elektrisk stød, brand, osv:
1. Fjern ikke skruer, afskærmninger eller kabinettet.
2. Udsæt ikke dette apparat for regn eller fugt.
Forsigtig! POWER afbryder
Dette apparat er forsynet med en PO ER afbryder for at gøre det muligt at
minimere strømforbruget og give sikker anvendelse. Derfor skal følgende
overholdes:
1. Når den indledende opstilling skal foretages, skal alle tilslutninger først
udføres, før netledningen sættes i en vægstikkontakt, hvorefter PO ER
afbryderen sættes til ON.
2. Når apparatet ikke er i anvendelse, sættes PO ER afbryderen til OFF.
3. Tag netledningen ud af stikkontakten for at slukke helt for strømmen.
Ligegyldigt hvad position PO ER afbryderen er i, så afbryder den ikke
forbindelsen til lysnettet.
Forsigtig: Korrekt ventilation
For at undgå risikoen for elektrisk stød og brand, og forebygge beskadigelse, skal
apparatet placeres som følger:
1. Front:
Ingen forhindringer og frit rum til stede.
2. Sider/top/bag:
Der må ikke være nogen forhindringer placeret i de områder, der er
defineret af nedenstående dimensioner.
3. Bund
Anbring på en plan overflade. Sørg for at der er tilstrækkelig luftpassage
til ventilationsformål, idet apparatet anbringes på et underlag, der er 10
cm eller højere.
ADVARSEL
• Undgå at tilstoppe ventilationsåbningerne.
(Hvis de tilstoppes af avispapir, en klud el.lign., vil varmen muligvis ikke
kunne komme ud).
• Undlad at anbringe åben ild (f.eks. tændte stearinlys) oven på apparatet.
• Ved bortskaffelse af batterier bør de miljømæssige konsekvenser tages i
betragtning, ligesom de relevante lokale bestemmelser nøje skal
overholdes.
• Apparatet må ikke bruges i et badeværelse eller i nærheden af vand. Der
bør heller ikke anbringes beholdere med vand eller anden væske
(kosmetik, medicin, blomstervaser, potteplanter, kopper osv.) oven på
apparatet.
FÖRSIKTIGT!
För att minska risken för elektriska stötar, eldsvåda etc.:
1. Lösgör inga skruvar, skydd eller höljet.
2. Utsätt inte högtalaren för regn eller fukt.
Försiktigt! - Strömbrytaren POWER
Högtalaren är försedd med en strömbrytare (PO ER). Följ nedanstående råd
för att minimera strömförbrukningen och garantera säker användning.
1. Slutför först alla andra nödvändiga anslutningar, innan nätkabeln ansluts till
ett nätuttag och strömbrytaren PO ER ställs i tillslaget läge (ON). Påbörja
därefter de grundläggande inställningarna.
2. Ställ strömbrytaren PO ER i frånslaget läge (OFF), när högtalaren inte ska
användas.
3. Koppla loss nätkabeln från nätuttaget för att stoppa strömtillförseln helt.
Strömtillförseln fortsätter oberoende av i vilket läge strömbrytaren PO ER
ställs.
Försiktigt! - Tillbörlig ventilation
Placera högtalaren enligt följande anvisningar för att undvika risken för
elektriska stötar eller eldsvåda och för att förebygga skador.
1. Framför högtalaren:
Se till att inga hinder förekommer och att ett öppet utrymme lämnas.
2. Ovanför, bakom och på sidorna om högtalaren:
Inga hinder får förekomma inom de avstånd som anges på illustrationen
nedan.
3. Under högtalaren:
Placera högtalaren på ett plant underlag. Sörj för tillräckligt god
ventilationsmöjlighet genom att placera högtalaren på ett minst 10
centimeter högt ställ.
VIKTIGT
• Blockera inte ventilationsöppningarna på apparaten.
(Om ventilationsöppningarna blockeras av en tidning, en duk eller
liknande kan värme i apparaten eventuellt inte komma ut.)
• Placera ingenting med öppen låga, exempelvis ett tänt ljus, på apparaten.
• Använda batterier måste handhas på ett miljömässigt korrekt sätt och de
lagar och förordningar som gäller på platsen för begagnade batterier
måste följas noga.
• Använd inte apparaten i badrum eller på annan plats med vatten. Placera
inte heller behållare fyllda med vatten eller annan vätska (såsom
kosmetika, mediciner, blomvaser, blomkrukor, koppar med mera) ovanpå
apparaten.
Varningar, f rsiktighetsåtgärder m.m.
15 cm15 cm
20 cm
10 cm
20 cm
20 cm
Sett framifrån
Set forfra Sett från sidan
Set fra siden
Tack för ditt val av dessa JVC-högtalare.
Innan du kopplar in högtalarna i din ljudanläggning bör du för att få maximala
prestanda från högtalarna läsa igenom bruksanvisningen noggrant. Kontakta
din JVC-återförsäljare om du har frågor eller känner dig osäker.
Tak for købet af denne JVC-højttaler.
Gennemlæs venligst vejledningen omhyggeligt før højttaleren tages i brug,
så De kan opnå den bedst mulige ydelse. Forhør hos Deres JVC forhandler
hvis De har nogen spørgsmål.
– G5 –
Varoituksia, huomautuksia ym.
Huomautus
Sähköiskujen, tulipalon ym. vaaran välttämiseksi:
1. Älä irrota ruuveja, kansia tai koteloa.
2. Älä saata tätä laitetta alttiiksi sateelle tai kosteudelle.
Huomautus - Virtapainike (POWER)
Tässä laitteessa on virtapainike, jotta virrankulutus saadaan vähennettyä
minimiin. Siksi
1. Kun teet alkusäätöjä, tee kaikki tarvittavat liitännät, liitä verkkopistoke
verkkoulosottoon ja aseta virtapainike (PO ER) kytkettyyn asentoon ON.
2. Kun laitetta ei käytetä, aseta virtapainike (PO ER) katkaistuun asentoon
OFF.
3. Virta katkaistaan kokonaan irrottamalla verkkopistoke. Virtapainike
(PO ER) ei katkaise missään asennossa verkkolinjaa kokonaan.
Huomautus: Kunnollinen ilmanvaihto
Sähköiskujen ja tulipalon syttymisvaaran välttämiseksi ja vaurioiden estämiseksi
laite on sijoitettava seuraavalla tavalla:
1. Edessä:
Ei esteitä ja avoin tila
2. Sivuillapäällä/takana:
Mitään esteitä ei saa asettaa alla näkyvien mittojen osoittamaan tilaan.
3. Alapuolella:
Aseta tasaiselle pinnalle. Jotta ilma pääsee vaihtumaan riittävästi, aseta
10 cm tai korkeamman tuen päälle.
VAROITUS
• Tuuletusrakoja tai -aukkoja ei saa tukkia.
(Jos tuuletusraot tai -aukot tukitaan sanomalehdellä tai vaatteella yms.,
lämpö ei mahdollisesti pääse ulos.)
• Laitteen päälle ei saa asettaa avotulen lähteitä, kuten palavia kynttilöitä.
• Paristoja hävitettäessä on huomioitava ympäristöongelmat. Näiden
paristojen hävitystä koskevia paikallisia määräyksiä ja lakeja on
noudatettava ehdottomasti.
• Tätä laitetta ei saa käyttää kylpyhuoneessa tai kosteissa tiloissa. Tämän
laitteen päälle ei saa asettaa myöskään vedellä tai nesteillä täytettyjä
astioita (kuten kosmetiikkaa tai lääkkeitä, kukkavaaseja, ruukkukukkia,
kuppeja yms.).
IMPORTANT for the U.K.
DO NOT cut off the mains plug from this equipment. If the plug fitted is
not suitable for the power points in your home or the cable is too short
to reach a power point, then obtain an appropriate safety approved
extension lead or consult your dealer.
BE SURE to replace the fuse only with an identical approved type, as
originally fitted.
If nontheless the mains plug is cut off ensure to remove the fuse and
dispose of the plug immediately, to avoid a possible shock hazard by
inadvertent connection to the mains supply.
If this product is not supplied fitted with a mains plug then follow the
instructions given below:
IMPORTANT:
DO NOT make any connection to the terminal which is marked with the
letter E or by the safety earth symbol or coloured green or green-and-
yellow.
The wires in the mains lead on this product are coloured in accordance
with the following code:
Blue : Neutral
Brown : Live
As these colours may not correspond with the coloured markings
identifying the terminals in your plug proceed as follows:
The wire which is coloured blue must be connected to the terminal which
is marked with the letter N or coloured black.
The wire which is coloured brown must be connected to the terminal
which is marked with the letter L or coloured red.
IF IN DOUBT - CONSULT A COMPETENT ELECTRICIAN.
Sivulta katsottunaEdestä katsottuna
Kiitos siitä että päädyit valinnassasi JVC-kaiuttimiin.
Ennen kuin alat käyttää niitä, lue käyttöohje huolellisesti, jotta ne toimisivat
parhaalla mahdollisella tavalla. Jos Sinulla on kysyttävää ota yhteys JVC-
edustajaan.
15 cm15 cm
20 cm
10 cm
20 cm
20 cm
– G6 –
This equipment has been designed and manufactured to meet
international safety standards but, like any electrical equipment, care
must be taken if you are to obtain the best results and safety is to be
assured.
Do read the operating instructions before you attempt to use the
equipment.
Do ensure that all electrical connections (including the mains plug,
extension leads and interconnections between pieces of equipment)
are properly made and in accordance with the manufacturer’s
instructions. Switch off and withdraw the mains plug when making or
changing connections.
Do consult your dealer if you are ever in doubt about the installation,
operation or safety of your equipment.
Do be careful with glass panels or doors on equipment.
DON’T continue to operate the equipment if you are in any doubt
about it working normally, or if it is damaged in any way — switch off,
withdraw the mains plug and consult your dealer.
DON’T remove any fixed cover as this may expose dangerous
voltages.
DON’T leave equipment switched on when it is unattended unless it is
specifically stated that it is designed for unattended operation or has a
standby mode.
Switch off using the switch on the equipment and make sure that your
family know how to do this.
Special arrangements may need to be made for infirm of handicapped
people.
DON’T use equipment such as personal stereos or radios so that you
are distracted from the requirements of traffic safety. It is illegal to
watch television whilst driving.
DON’T listen to headphones at high volume as such use can
permanently damage your hearing.
DON’T obstruct the ventilation of the equipment, for example with
curtains or soft furnishing.
Overheating will cause damage and shorten the life of the equipment.
DON’T use makeshift stands and NEVER fix legs with wood screws —
to ensure complete safety always fit the manufacturer’s approved
stand or legs with the fixings provided according to the instructions.
DON’T allow electrical equipment to be exposed to rain or moisture.
ABOVE ALL.
– NEVER let anyone, especially children, push anything into holes,
slots or any other opening in the case.
– this could result in a fatal electrical shock;
– NEVER guess or take chances with electrical equipment of any
kind.
– it is better to be safe than sorry!
— SAFETY INSTRUCTIONS —
“SOME DOS AND DON’TS ON THE SAFE USE OF EQUIPMENT”
Contents English
Confirming Supplied Accessories ............................................................ 1
Precautions for Use.................................................................................. 1
Precautions for Installation....................................................................... 1
Names of Parts and Functions................................................................ 2
Connections .............................................................................................
Operation ................................................................................................. 5
Troubleshooting........................................................................................ 6
Specifications ........................................................................................... 6
InhaltDeutesch
Überprüfen des mitgelieferten Zubehörs ................................................. 1
Vorsichtsmaßnahmen für den Gebrauch ................................................. 1
Vorsichtsmaßnahmen für die Installation ................................................. 1
Namen von Teilen und Funktionen .......................................................... 2
Verbindungen ...........................................................................................
Bedienung ................................................................................................ 5
Störungsbehebung................................................................................... 6
Spezifizierungen ...................................................................................... 6
ContenusFrançais
Confirmation des accessoires fournis ..................................................... 7
Précautions pour l’emploi......................................................................... 7
Précautions pour l’installation .................................................................. 7
Nomenclature des différents éléments et fonctions ................................. 8
Connexions .............................................................................................. 9
Fonctionnement ..................................................................................... 11
Dépannage ............................................................................................ 12
Spécifications ......................................................................................... 12
InhoudNederlands
Controleren toebehoren ........................................................................... 7
Voorzorgen voor het gebruik .................................................................... 7
Voorzorgen voor de installatie.................................................................. 7
Namen van onderdelen en functies ......................................................... 8
Aansluitingen ........................................................................................... 9
Bediening ............................................................................................... 11
Oplossen van problemen ....................................................................... 12
Technische gegevens............................................................................. 12
ContenidoEspañpl
Confirmación de los accesorios suministrados ...................................... 1
Precauciones sobre el uso..................................................................... 1
Precauciones sobre la instalación ......................................................... 1
Nombres de las partes y funciones........................................................ 14
Conexiones ............................................................................................ 15
Funcionamiento ..................................................................................... 17
Solución de problemas........................................................................... 18
Especificaciones .................................................................................... 18
IndiceItaliano
Verifica degli accessori in dotazione ...................................................... 1
Precauzioni per l’uso.............................................................................. 1
Precauzioni per l’installazione................................................................ 1
Nome delle parti e funzioni ................................................................... 14
Collegamenti .......................................................................................... 15
Funzionamento ...................................................................................... 17
Guida e rimedi in caso di problemi di funzionamento ............................ 18
Dati caratteristici .................................................................................... 18
InnehållSvenska
Kontroll av medföljande tillbehör ........................................................... 19
Säkerhetsföreskrifter för användning .................................................... 19
Säkerhetsföreskrifter för installation....................................................... 19
Namn på delar och funktioner ................................................................ 20
Anslutningar ........................................................................................... 21
Drift ....................................................................................................... 2
Felsökning.............................................................................................. 24
Tekniska data ......................................................................................... 24
IndholdDansk
Tjek af medfølgende tilbehør.................................................................. 19
Sikkerhedsregler for brug....................................................................... 19
Sikkerhedsregler for installation ............................................................. 19
Delenes navne og funktioner ................................................................. 20
Tilslutninger............................................................................................ 21
Betjening ................................................................................................ 2
Fejlfinding............................................................................................... 24
Specifikationer ....................................................................................... 24
SisältöSuomi
Vakiovarusteiden tarkastaminen ............................................................ 25
Huomautuksia käytöstä.......................................................................... 25
Huomautuksia asennuksesta ................................................................. 25
Osien nimet ja toiminnot ........................................................................ 26
Liitännät ................................................................................................. 27
Käyttö ..................................................................................................... 29
Vianmääritys .......................................................................................... 0
Tekniset tiedot ........................................................................................ 0
– 1 –
Confirming Supplied Accessories
Überprüfen des mitgelieferten Zubeh rs
Before use, check that you have received all of the following items, which are
supplied with the unit.
Überprüfen Sie vor dem Gebrauch, dass Sie alle der folgenden Teile, die mit der
Anlage mitgeliefert werden, erhalten haben.
• Signal Cord (1)
• Signalkabel (1)
• Speaker Cord (2)
• Lautsprecherkabel (2)
Precautions for Installation
Vorsichtsmaßnahmen für die Installation
To maintain the look of the unit
ipe with a dry, soft cloth if the cabinet or control panel should become dirty.
If very dirty, apply a small amount of water or neutral detergent to the cloth and
wipe clean. Then wipe with a dry cloth.
um Erhalten des Aussehens der Anlage
ischen Sie die Box oder das Bedienungsfeld mit einem trockenen, weichen
Tuch ab, wenn sie schmutzig geworden sind.
enn sie sehr schmutzig geworden sind, dann geben Sie etwas asser oder eine
kleine Menge eines neutralen Reinigungsmittels auf das Tuch und reiben sie
sauber. Dann wischen Sie mit einem trockenen Tuch ab.
Good manners when listening to stereo
hen you are listening to music on a stereo system, please
listen at volume that will not disturb your neighbors. At night,
in particular, even soft sounds spread easily to the surround-
ings. Please shown consideration and close windows, or listen
using headphones, etc. in order to maintain a pleasant living
environment.
The symbol shown here is the Sound Etiquette symbol mark.
Angepasstes Verhalten beim Hören in Stereo
enn Sie Musik auf einem Stereosystem hören, dann achten sie bitte bei der
Lautstärke darauf, dass die Nachbarn nicht gestört werden. Besonders nachts
verbreiten sich selbst leise Töne in der Umgebung. Bitte nehmen Sie Rücksicht
und schließen Sie die Fenster oder benutzen Kopfhörer usw., um eine angenehme
ohnatmosphäre zu erhalten.
Das hier gezeigte Symbol ist das Symbolzeichen des Klangetikettes (Sound
Etiquette).
Improving the sound field
•If the speakers are facing a solid wall or glass door, etc., it is
recommended to furnish the wall with materials that absorb
sound, for example by hanging up heavy curtains, to prevent
generation of reflections and standing waves.
Verbessern des Klangfeldes
•Ein ohnzimmer, in dem leicht Reflexionen und Resonanzen erzeugt werden
können, sollte mit schweren Vorhängen oder Teppichböden usw. ausgestattet
werden.
enn die Lautsprecher auf eine feste and oder eine Glastür usw. gerichtet
sind, ist es empfehlenswert, die and mit klangabsorbierenden Materialien
auszustatten, z. B. durch das Aufhängen von schweren Vorhängen, um die
Erzeugung von Reflexionen und stehenden ellen zu verhindern.
Precautions for Use
Vorsichtsmaßnahmen für den Gebrauch
Sound etiquette
• Foot (4)
• Fuß (4)
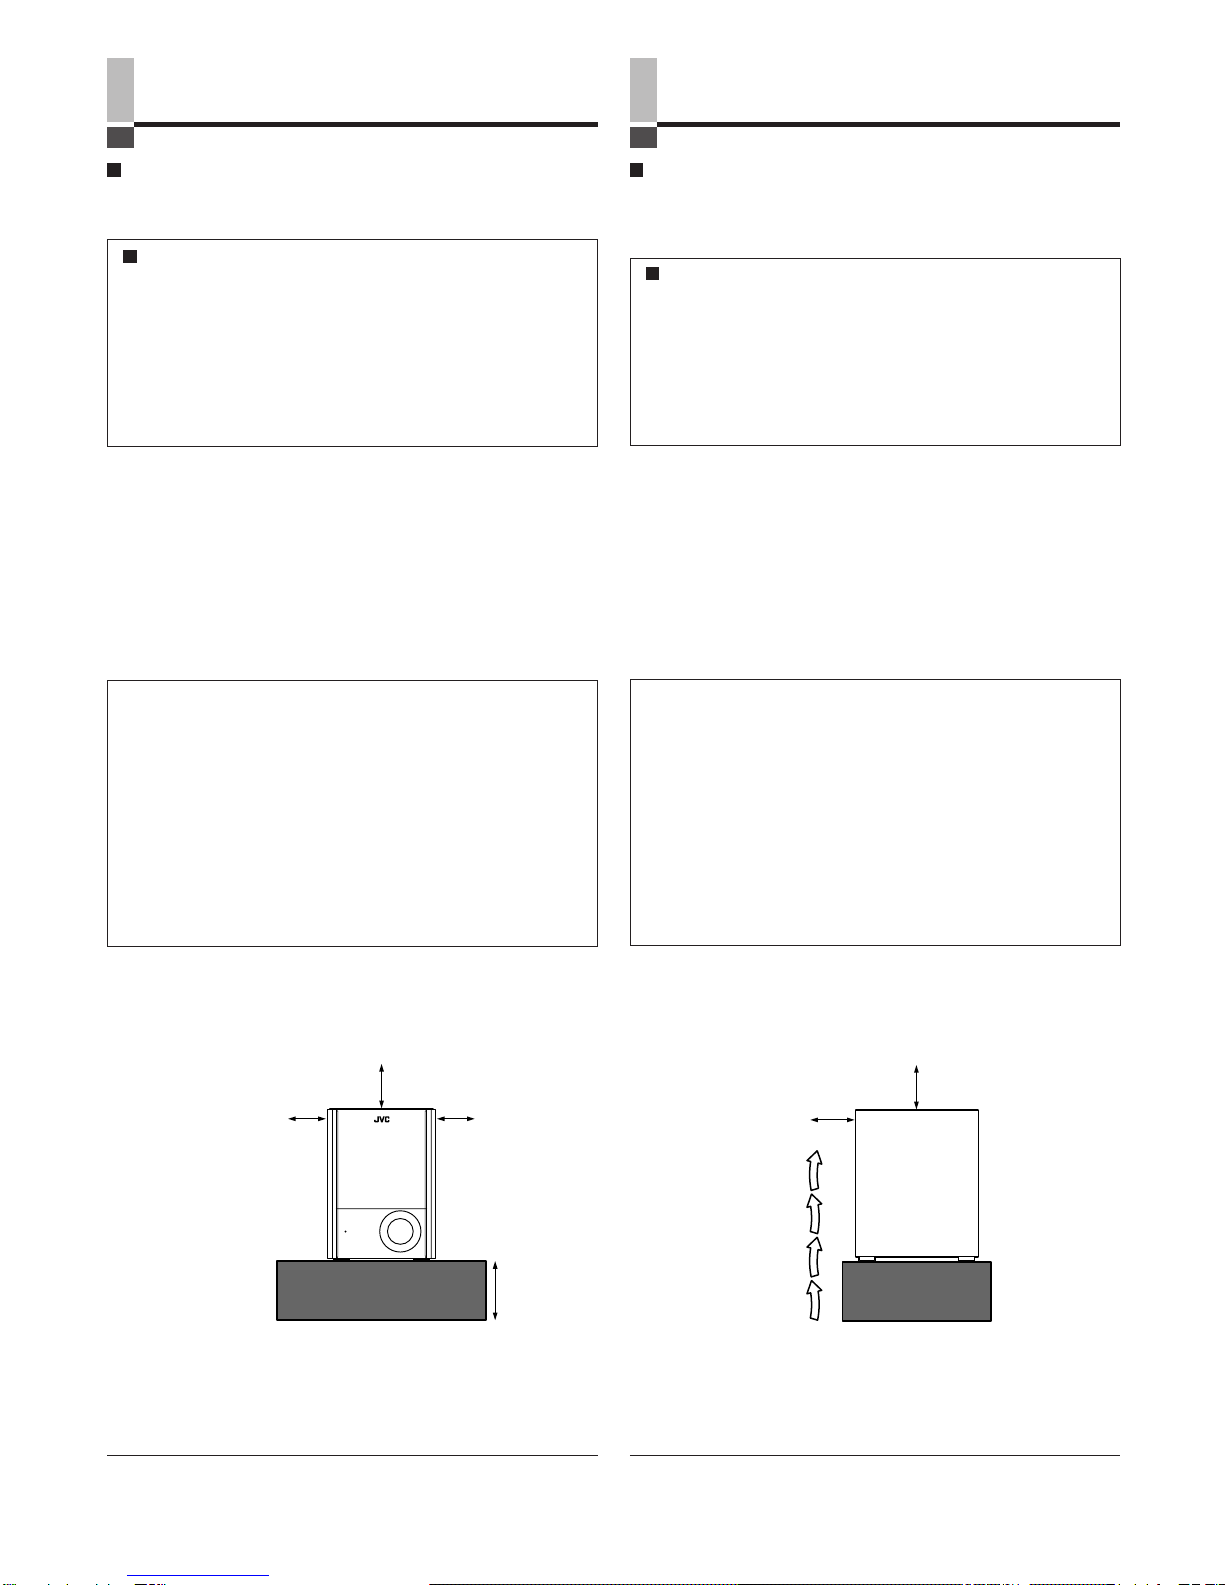
Precautions for installation
•Leave much space in the front.
•Leave at least 15 cm of space on the sides.
•Leave at least 20 cm of space on top.
•Leave at least 20 cm of space in the rear.
Vorsichthinweise für die Installierung
•Viel Platz auf der Vorderseite frei lassen.
•Mindestens 15 cm an den Seiten frei lassen.
•Mindestens 20 cm an der Oberseite frei lassen.
•Mindestens 20 cm an der Rückseite frei lassen.
STAND BY/ON
SP-PW100 POWERED SUBWOOFER
•To prevent deformation or discoloration of the cabinet, do not
install the unit where it is exposed to direct sunlight or high
humidity, and avoid installation near air conditioning outlets.
•
Um Deformierung oder Verfärbung der Box zu vermeiden, stellen
Sie die Anlage nicht an einem Ort auf, wo sie direktem Sonnenlicht
oder großer Feuchtigkeit ausgesetzt ist und vermeiden Sie die
Installation nahe an Ausgängen von Klimaanlagen.
•Speaker vibrations may cause howling. Place the unit as far
away from the player as possible.
•Lautsprechervibrationen können Rückkopplungen verursachen.
Stellen Sie die Anlage so weit wie möglich entfernt von dem
Spieler auf.
•Take the occurrence of earthquakes or other physical shocks into
consideration when selecting the installation place, and secure
the unit thoroughly.
•
Ziehen Sie das Auftreten von Erdbeben oder anderen
physikalischen Erschütterungen in Betracht, wenn Sie den Ort für
die Installation auswählen und sichern Sie die Anlage sorgfältig.
•
This unit is magnetically shielded so as not to cause color distortions on color
television sets. However, depending on the installation method, color distortions
may occur. Please pay attention to the following points when installing the unit.
1. hen placing these speakers near a TV set, turn off the TV’s main power
switch or unplug it before installing the speakers.
ait at least 30 minutes after the system is installed before turning on the
TV’s power.
2. If another speaker system has been set up near the TV set, that system may
cause color unevenness in the TV’s picture.
3. In spite of the shielded design of these speakers, some types of TV’s may
be affected by them. If this happens, move the speakers a short distance
form the TV set.
•Die Anlage ist magnetisch abgeschirmt, so dass sie keine Farbverzerrungen
auf Farbfernsehern verursachen kann. Jedoch können in Abhängigkeit der
Installationsmethode Farbverzerrungen auftreten. Beachten Sie bitte die
folgenden Punkte bei der Installation der Anlage.
1. Bei Aufstellung dieser Boxen in der Nähe eines Fernsehers den
Netzschalter des Fernsehers ausschalten oder seinen Netzstecker aus der
Steckdose ziehen, bevor die Boxen installiert werden.
Mindestens 30 Minuten nach der Installation des Systems warten, bis der
Fernseher eingeschaltet wird.
2. enn ein anderes Lautsprechersystem in der Nähe des Fernsehers
aufgestellt ist, kann das andere System Farbverfälschungen hervorrufen.
3. Trotz der abgeschirmten Konstruktion dieser Boxen können manche
Fernseher von ihnen beeinflußt werden. enn dies der Fal ist, müssen die
Boxen etwas weiter entfemt vom Fernseher aufgestellt werden.
•hen setting the speaker system, affixing the feet to the cabinet base is
recommended in order to cope with unsteadiness, etc.
The setting surface may slightly discolor depending on the material when
setting the unit using the supplied feet for an extensive period.
•Beim Aufstellen des Lautsprechersystems wird empfohlen, die Füße an der
Gehäusebasis zu befestigen, um Herunterfallen usw. zu verhüten.
Abhängig vom Material kann sich die Aufstellungsoberfläche etwas verfärben,
wenn das Gerät längere Zeit mit den mitgelieferten Füßen aufgestellt wird.
Leave at least 20 cm of space
Mindestens 20 cm frei lassen.
Leave at least 15 cm of space
Mindestens 15 cm frei lassen.
Base
Basis
Leave at least 20 cm of space
Mindestens 20 cm frei lassen.
Foot
Fuß
– 2 –
Names of Parts and Functions
Namen von Teilen und Funktionen
RIGHT
RIGHT
RIGHT
LEFT/MONO
LEFT
RIGHT LEFT
TO MAIN
SPEAKERS
RIGHT
RIGHT
RIGHT
LEFT/MONO
LEFT
RIGHT LEFT
TO MAIN
SPEAKERS
Front Panel
Vorderseitenteil Rear Panel
Rückseitenteil
This lights when the power is ON, and when the unit is in the standby mode.
Red: Standby mode
Green: ON mode
Stromversorgungslampe Diese Lampe leuchtet, wenn die Stromversorgung auf EIN (ON)
geschaltet ist und die Anlage in der Betriebsart Standby läuft.
Rot: Betriebsart Standby
Grün: Betriebsart EIN (ON)
Amp Section
Verstärkerteil
INPUT (LOW-LEVEL)
You can connect the subwoofer output
terminal, MONO output terminal, or line
output terminals of the amplifier, etc., here.
(For details, see “Connections” on the next
page.)
INPUT (LOW-LEVEL)
Sie können den Subwoofer-
Ausgangsanschluss, den MONO-
Ausgangsanschluss oder die
Leitungsausgangsanschlüsse des
Verstärkers usw. hier anschließen. (Siehe
„Verbindungen” auf der nächsten Seite für
weitere Einzelheiten.)
POWER button
Turns the unit ON/OFF.
EINSCHALTknopf (POWER)
Schaltet die Anlage auf EIN/AUS (ON/OFF).
VOLUME knob
Used to adjust the volume.
LAUTSTÄRKEregler (VOLUME)
Dient zum Einstellen der Lautstärke.
AC power cord
AC- Stromkabel
PHASE button
Used to obtain a rich bass sound.
: NORMAL
: REVERSE
PHASENregler (PHASE)
Dient zum Erhalten eines reichen Bassklanges.
: NORMAL
: UMGEKEHRT (REVERSE)
CROSSOVER FREQUENCY knob
This adjusts tonal linkage with the main speaker system.
(For details, refer to [Operation] in Page 5.)
Knopf CROSSOVER FREQUENCY
(Überlappungsfrequenz)
Hiermit wird die tonale Verknüpfung mit dem
Hauptlautsprechersystem eingestellt. (Beziehen Sie sich
für Einzelheiten auf “Betrieb” auf Seite 5.)
INPUT (HIGH-LEVEL)
This is connected to the speaker output terminals
of the amplifier, etc. when there is no subwoofer
output terminal on the connecting amplifier, etc.
INPUT (HIGH-LEVEL)
Dieser Anschluß wird an die Lautsprecher-
Ausgangsklemmen des Verstärkers usw.
angeschlossen, wenn am angeschlossenen
Verstärker usw. kein Subwoofer-Ausgang
vorhanden ist.
TO MAIN SPEAKERS
When an amplifier without subwoofer output
terminal is connected to the INPUT (HIGH-
LEVEL), this is connected to the main speaker
system. (For details, see “Connections” on the
next page.)
TO MAIN SPEAKERS
Wenn ein Verstärker ohne Subwoofer-
Ausgangsanschluß an den INPUT (HIGH-LEVEL)
angeschlossen wird, so erfolgt Anschluß an das
Hauptlautsprechersystem. (Beziehen Sie sich für
Einzelheiten auf “Anschlüsse” auf der nächsten
Seite.)
– –
Connections
Verbindungen
Make all the connections before plugging the AC power cord into an AC outlet.
Stellen Sie alle Verbindungen her, bevor Sie die AC- Stromkabel in einen AC- Ausgang stecken.
CAUTION
MEMO
Connecting to an amplifier with subwoofer output terminal
or an amplifier with MONO output terminal
Connect to the LEFT/MONO terminal of INPUT (LO -LEVEL).
•Use the supplied signal cord.
Anschließen an einen Verstärker mit Subwoofer-
Ausgangsanschluss oder an einen mit MONO-
Ausgangsanschluss.
Anschließen an den LEFT/MONO- Anschluss des INPUT (LO -LEVEL).
•Benutzen Sie das mitgelieferte Signalkabel.
Connecting to the speaker output terminals of an amplifier
Connect the speaker cords in parallel to the speaker output terminals on the
amplifier.
Be sure to confirm and match the RIGHT and LEFT speaker terminals with
the + and - polarities when connecting.
•Use the supplied speaker cords for the connection.
Anschließen an die Lautsprecherausgangsanschlüsse
eines Verstärkers
Schließen Sie die Lautsprecherkabel parallel an den
Lautsprecherausgangsanschlüssen an dem Verstärker an.
Stellen Sie sicher, dass die RIGHT und LEFT Lautsprecheranschlüsse mit den
+ und - Polaritäten zusammenpassen, wenn Sie sie verbinden.
•Verwenden Sie die mitgelieferten Lautsprecherkabel für den Anschluß.
•
Stellen Sie vor dem Anschließen eines Verstärkers sicher, dass
die Stromversorgung auf der Verstärkerseite auf AUS gestellt ist.
• INPUT (LOW-LEVEL) und INPUT (HIGH-LEVEL) können an
dieser Anlage nicht gleichzeitig benutzt werden. Wird dies
getan, so steigt der Lärmpegel und es kann zur Beschädigung
führen.
• Schließen sie nicht den INPUT (LOW-LEVEL) an der Anlage an
den REC OUT- Anschlüssen eines Verstärkers usw. an.
• Before connecting to an amplifier, be sure that the power is
turned OFF on the amplifier side.
• INPUT (LOW-LEVEL) and INPUT (HIGH-LEVEL) on this unit
cannot be used simultaneously. Doing so will increase noise
and could result in damage.
• Do not connect INPUT (LOW-LEVEL) on this unit to the REC
OUT terminals of an amplifier, etc.
Ist der Verstärker usw., der angeschlossen werden soll, sowohl mit
Subwoofer- Ausgangsanschlüssen als auch mit
Leitungsausgangsanschlüssen ausgestattet, wird empfohlen, ihn an dem
Subwoofer- Ausgangsanschluss anzuschließen.
Sind keine dieser Ausgangsanschlüsse vorhanden, dann schließen Sie ihn
bitte an den Lautsprecherausgangsanschlüssen an.
If the amplifier, etc. to be connected to is equipped with both subwoofer
output terminal and line output terminals, it is recommended to connect to
the subwoofer output terminal.
Also, if neither of these output terminals is provided, please connect to the
speaker output terminals.
VORSICHT
MEMO
RIGHT
RIGHT
RIGHT
LEFT/MONO
LEFT
RIGHT LEFT
TO MAIN
SPEAKERS
Subwoofer output terminal
(MONO output terminal)
Subwoofer- Ausgangsanschluss
(MONO- Ausgangsanschluss)
INPUT (LOW-LEVEL)
LEFT/MONO terminal
INPUT (LOW-LEVEL)
LEFT/MONO- Anschluss
RIGHT
RIGHT
RIGHT
LEFT/MONO
LEFT
RIGHT LEFT
TO MAIN
SPEAKERS
Speaker output terminals
Lautsprecherausgangsanschlüsse
INPUT (HIGH-LEVEL)
RIGHT
INPUT (HIGH-LEVEL)
RIGHT INPUT (HIGH-LEVEL)
LEFT
INPUT (HIGH-LEVEL)
LEFT
• PRECAUTIONS TO BE TAKEN BEFORE USING THE
SPEAKER TERMINAL (TO MAIN SPEAKERS) OF THIS UNIT
• When you connect a speaker to the speaker terminal of this
unit (TO MAIN SPEAKERS), be absolutely sure to connect
the speaker that is within the indicated range of speaker
impedance of the amplifier to be connected to the (INPUT
[HIGH-LEVEL]) terminal.
• If any speaker other than those within the indicated range
should be connected, the amplifier connected to the (INPUT
[HIGH-LEVEL]) terminal can result in malfunction
• Vor Verwendung des Lautsprecheranschlusses (für die
Hauptlautsprecher) dieses Gerätes zu beachtende
Vorsichtsmaßnahmen
• Wenn Sie einen Lautsprecher an den Lautsprecheranschluß
dieses Gerätes (TO MAIN SPEAKERS (zu den
Hauptlautsprechern)) anschließen, so stellen Sie unbedingt
sicher, daß die Lautsprecherimpedanz im angezeigten
Bereich für den Verstärker liegt, der am Eingangsanschluß
(INPUT [HIGH LEVEL] (Eingang [hoher Pegel]))
angeschlossen wird.
• Bei Anschluß eines Lautsprechers, der nicht im angezeigten
Bereich liegt, kann es zu einer Fehlfunktion des am
Eingangsanschluß (INPUT [HIGH LEVEL] (Eingang [hoher
Pegel])) angeschlossenen Verstärkers kommen.
CAUTION
VORSICHT