manuals.online logo
Brands
  1. Home
  2. •
  3. Brands
  4. •
  5. JVC
  6. •
  7. TV
  8. •
  9. JVC AV-28GT20U User manual

JVC AV-28GT20U User manual

50053856
VICTOR COMPANY OF JAPAN, LIMITED
0504-JVC
©2004 VICTOR COMPANY OF JAPAN, LIMITED
DANSK
SUOMI
NORSK
SVENSKA
FARGEFJERNSYN BRUKSANVISNING
FÄRG- TV
VÄRITELEVISIO
BRUKSANVISNING
KÄYTTÖOHJE
FARVEFJERNSYN INSTRUKTIONSBOG
AV-28GT20U
COLOUR TELEVISION INSTRUCTIONS
ENGLISH
POLSKI
ÈESKY
MAGYAR
BAREVNY TELEVIZOR PØ ÍRUÈKA K OBSLUZE
KOLOROWY ODBIORNIK TELEWIZYJNY INSTRUKCJA OBSLUGI
SZÍNES TELEVÍZIÓ HASZNÁLATI UTASÍTÁSA
ENGLISH - 113 -
Contents
Safety Precautions .............................................. 113
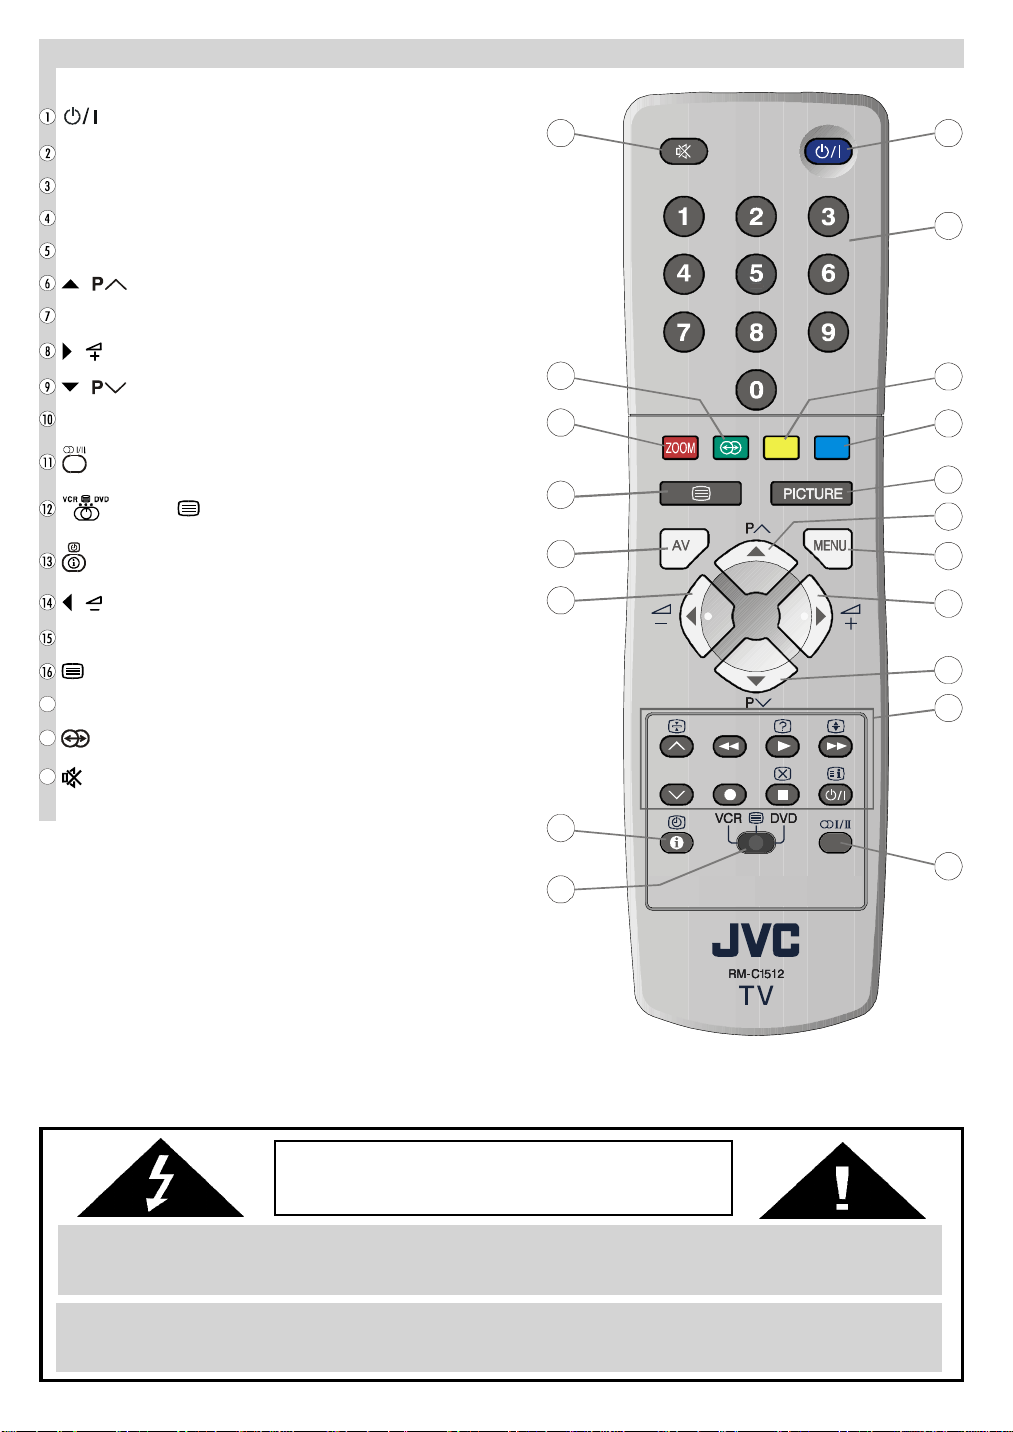
Remote Control Buttons ..................................... 114
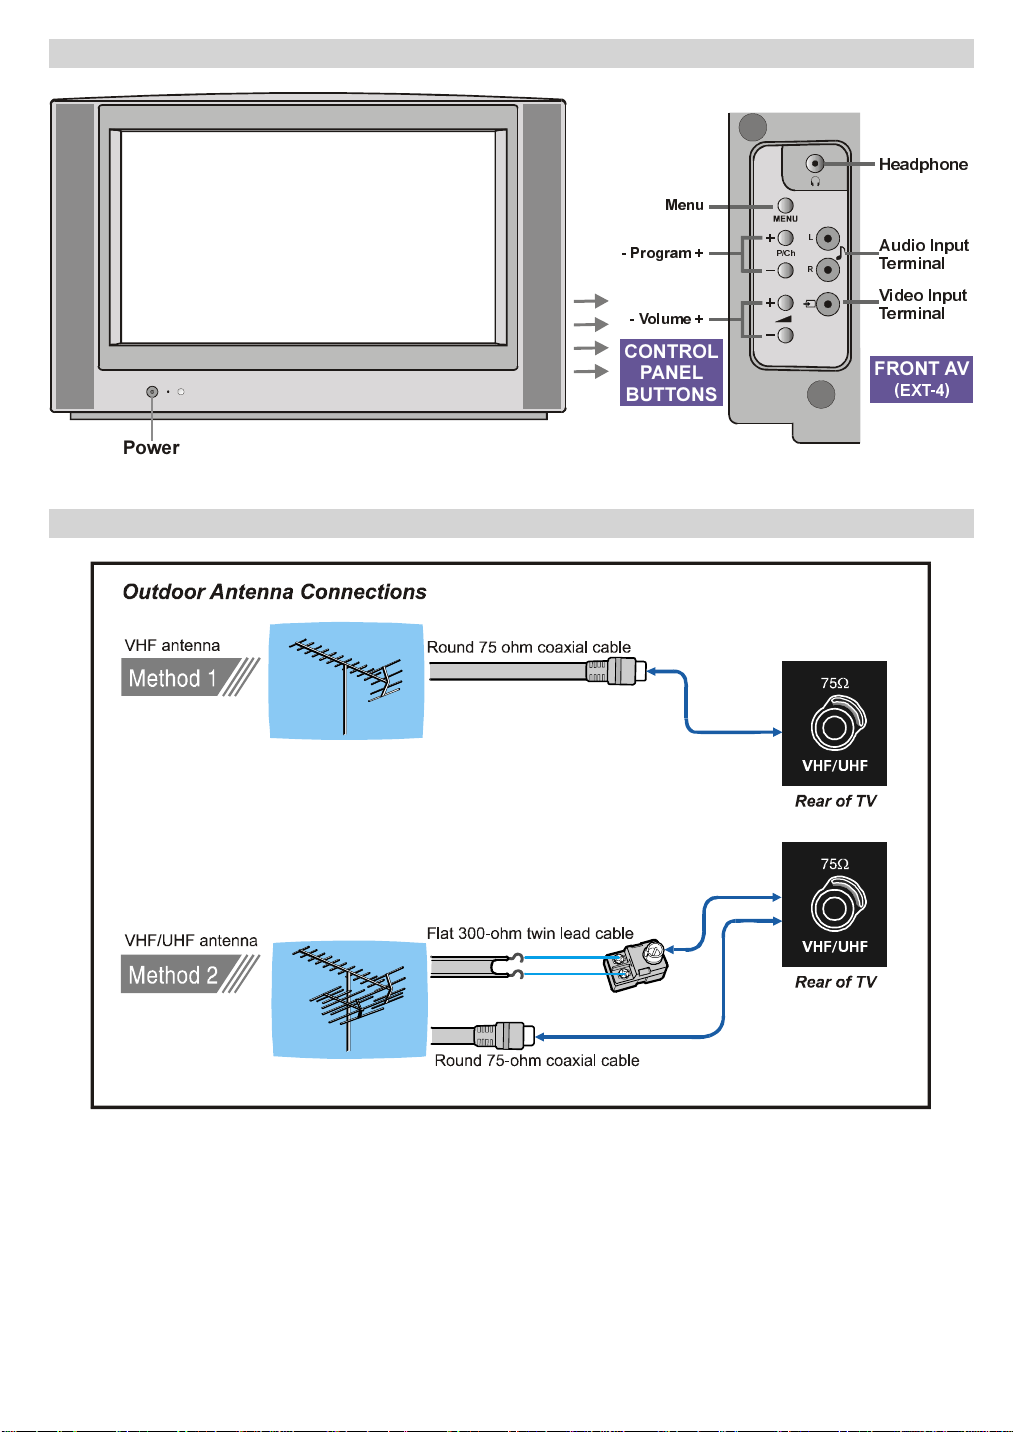
Control Panel Buttons......................................... 115
Antenna Connections .......................................... 115
Preparation ........................................................... 116
Features ...................................................................... 116
Before Switching on your V ............................. 116
Power connection......................................................... 116
Aerial Connections ....................................................... 116
How to connect the external equipments ...................... 116
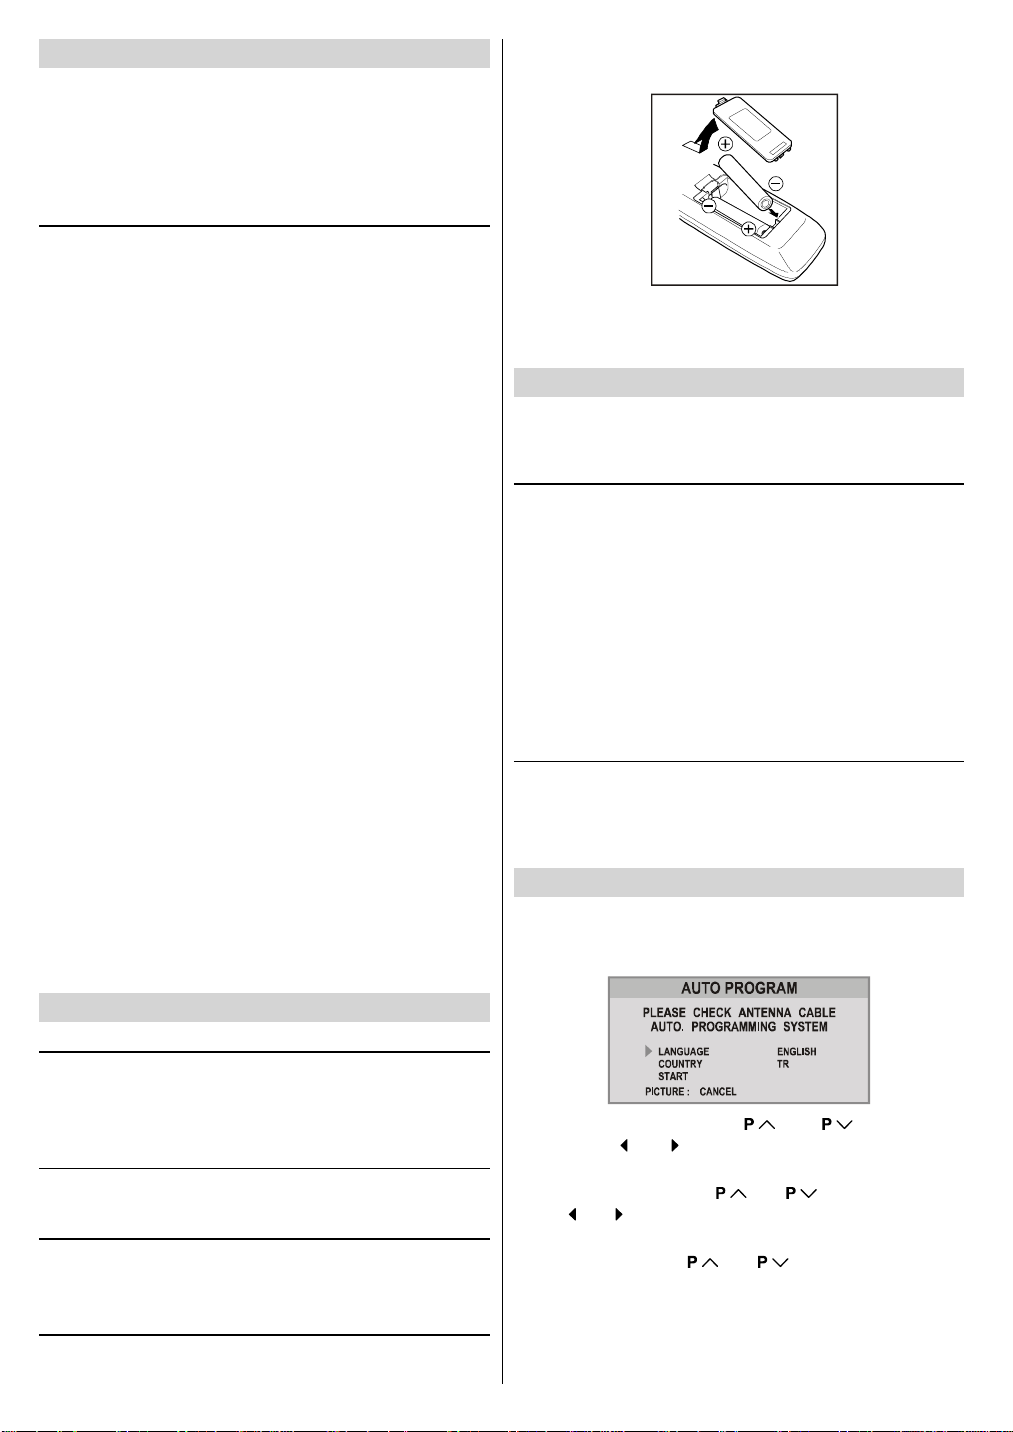
Inserting batteries in the remote control han set .......... 116
Switching the V ON/OFF ................................... 116
To switch the TV on...................................................... 116
To switch the TV off ...................................................... 116
Initial Settings ...................................................... 116
T-V LINK ...................................................................... 117
Operating with the onset buttons .................................. 118
Operating with Remote Control ..................................... 118
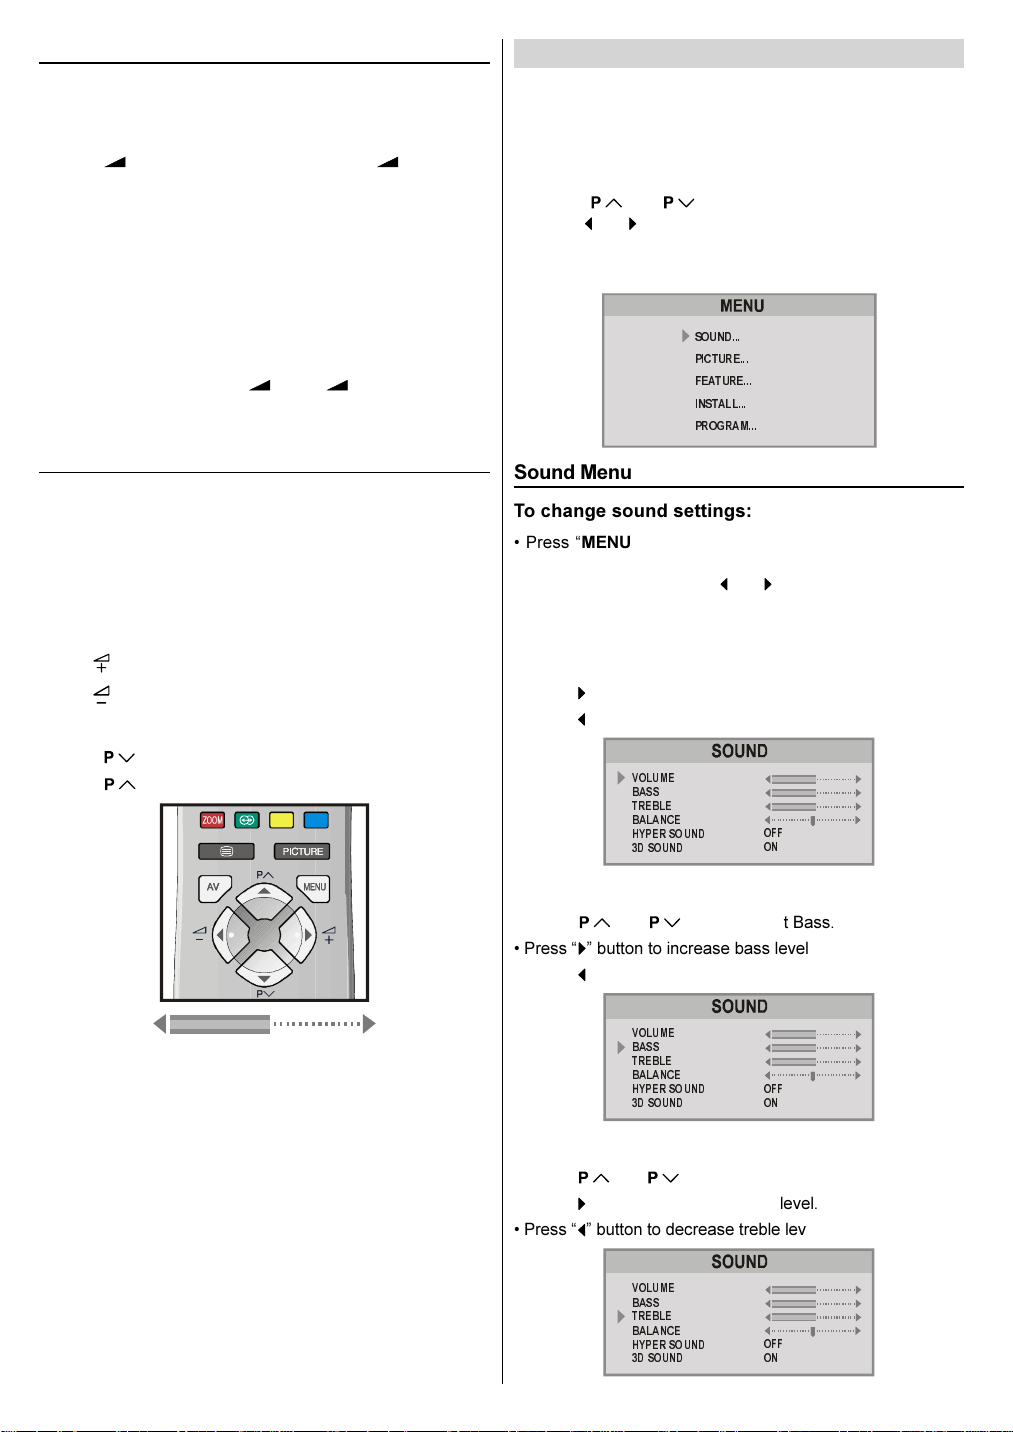
Menu System ........................................................ 118
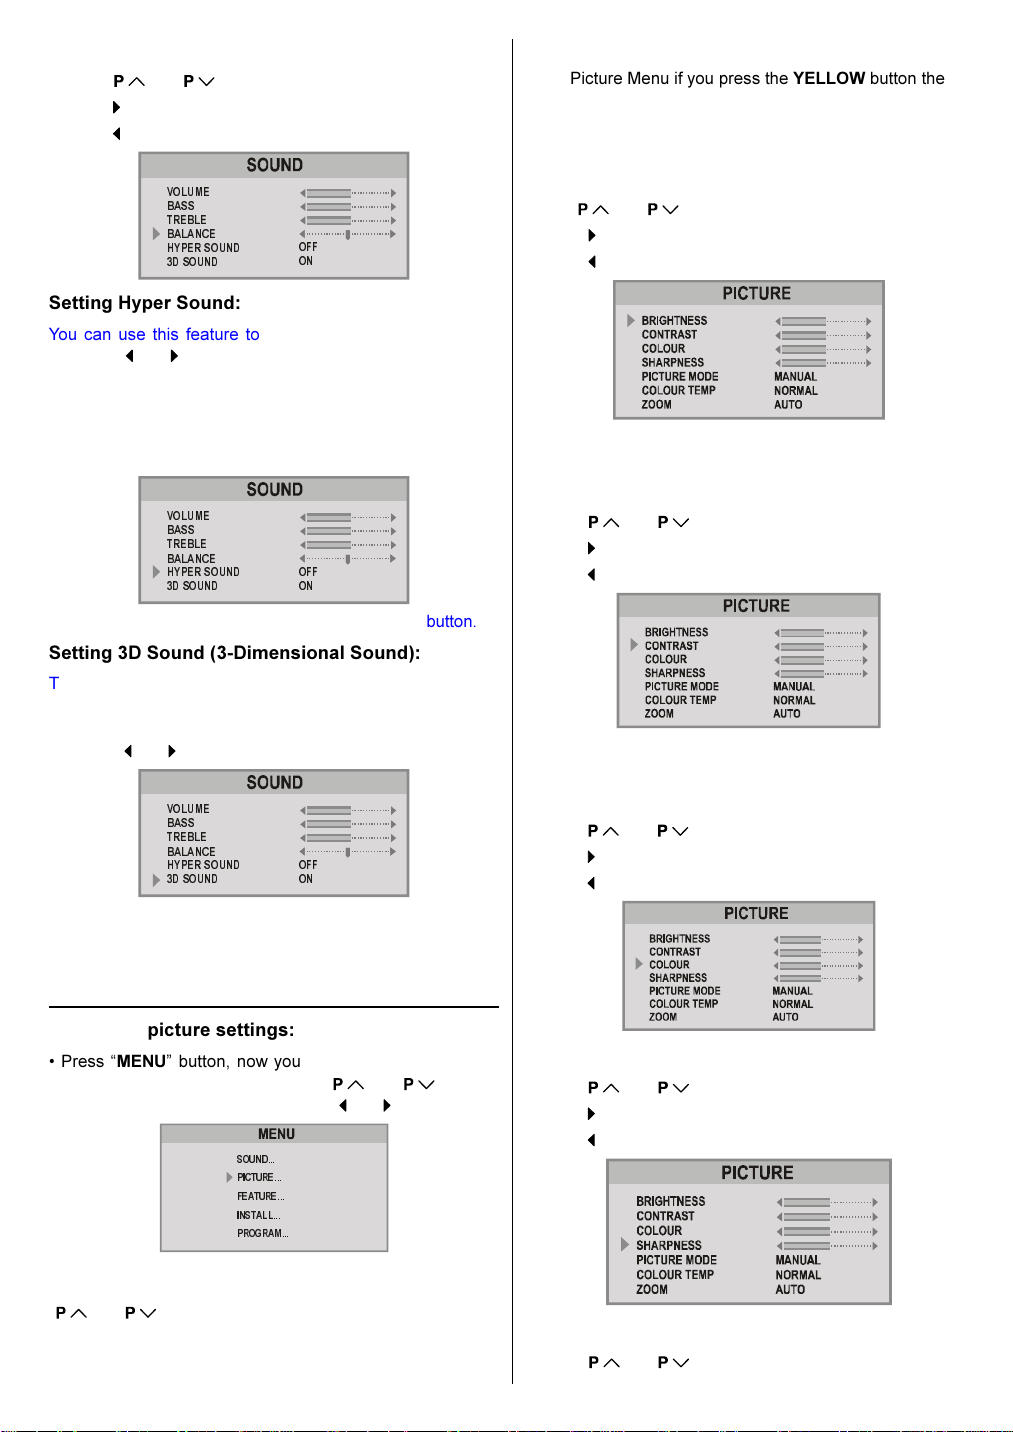
Soun Menu ................................................................. 118
Picture Menu ............................................................... 119
Feature Menu ............................................................... 121
Install (Installation) Menu .............................................. 121
Using the Deco er(EXT-2) function ............................... 122
Program (Programming) Menu ..................................... 123
To start AUTO PROGRAM (AUTOSTORE) ................... 123
Other Features ..................................................... 124
Soun Mute ................................................................. 124
Stereo / Bilingual .......................................................... 124
Information on Screen .................................................. 124
To Display the Time...................................................... 124
Picture ......................................................................... 124
VCR / DVD Control Buttons an VCR / / DVD
Switch .......................................................................... 124
eletext ................................................................. 124
To operate Teletext ....................................................... 124
To select a page of Teletext .......................................... 124
To Select In ex Page ................................................... 125
Searching for a teletext page while watching TV ........... 125
To Select Double Height Text ....................................... 125
To Reveal conceale  Information ................................ 125
To Stop Automatic Page Change .................................. 125
To Select a Subco e Page ........................................... 125
To exit Teletext ............................................................. 125
Fastext an Toptext ..................................................... 125
Connect the External Equipments ..................... 126
Via the Euroconnector .................................................. 126
T-V LINK compatible VCR ............................................ 126
RGB mo e ................................................................... 126
EXT-2S Mo e ............................................................... 126
Via the RCA jacks ........................................................ 126
Via the ANT (aerial) socket ........................................... 126
TV an Vi eo Reco er (VCR) ....................................... 126
NTSC Playback ........................................................... 126
Copy Facility ................................................................ 126
Connecting Hea phones .............................................. 126
ips ........................................................................ 128
Specifications ....................................................... 128
Safety Precautions
1. Power Source
The receiver shoul be operate only from a 220-240V AC,
50 Hz. outlet. Ensure you select the correct voltage setting
for your convenience.
2. Power Cord
The power supply cor shoul be place so that they are not
likely to be walke on or pinche by items place upon them
or against them. Pay particular attention to cor where they
enter the plug, power outlet, an the point where they exit
from the receiver.
3. Moisture and Water
Do not use this equipment in a humi an amp place (avoi
the bathroom, the sink in the kitchen, an near the washing
machine). Do not expose this equipment to rain or water an
o not place objects fille with liqui s on it as this may be
angerous.
4. Cleaning
Before cleaning, unplug the receiver from the main supply
outlet. Do not use liqui or aerosol cleaners. Use with soft
an ry cloth.
5. Ventilation
The slots an openings on the receiver are inten e for venti-
lation an to ensure reliable operation. To prevent overheat-
ing, these openings must not be blocke or covere in any-
way.
6. Lightning
In case of storm an lightning or when going on holi ay, is-
connect the power cor from the wall outlet.
7. eplacement Part
When replacement parts are require , be sure the service
technician has use replacement parts which are specifie
by the manufacturer or have the same specifications as the
original one. Unauthorize substitutions may result in fire,
electrical shock, or other hazar s.
8. Servicing
Please refer all servicing to qualifie personnel. Do not re-
move cover as this may result in electric shock.
9. Flame sources
Do not place nake flame sources on the apparatus.
10. Stand-By
Do not leave your TV stan -by or operating con ition when you
leave your house.
Warning!
Any intervention contrary to regulations, in particular, any
modification of high voltage or a replacement of the picture
tube may lead to an increased concentration of x-rays. Any
television modified in this way no longer complies with li-
cense and must not be operated.
Instructions for waste disposal:
Packaging and packaging aids are recyclable and should
principally be recycled. Packaging materials, such as foil
bag, must be kept away from children.
Batteries, including those which are heavy metal-free, should
not be disposed of with household waste. Please dispose of
used batteries in an environmentally sound manner. Find out
about the legal regulations which apply in your area.
08-ENG-2835-AK45-1512UK-16-9-(AV-28GT20U)-50053856.p65 22.07.2004, 17:39113
ENGLISH - 114 -
Remote Control Buttons
= Stan By / Power
0 - 9 = Direct Program
Yellow Button / Factory Settings in Picture Menu
Blue Button
PICTURE = Picture Mo e Change
( ) = Programme Up (Cursor Up)
MENU = Menu Button
( ) = Cursor Right / Volume +
( ) = Programme Down (Cursor Down)
Teletext / VCR /DVD Control Buttons
= Stereo / Bilingual Button
= VCR / / DVD Switch
= Information Button / T-V Link in Program Menu
( ) = Cursor Left / Volume -
AV = AV Button
= Teletext Button
17
ZOOM = Zoom (Picture Size) Change / Re Button
18
= Hyper Soun / Green Button
19
= Mute
CAUTION
RISK OF ELECTRIC SHOCK
The lightning flash with arrowhea symbol, within an equilateral triangle, is inten e to alert the user to the presence of
uninsulate " angerous voltage" within the pro uct's enclosure that may be of sufficient magnitu e to constitute a risk
of electric shock of persons.
The exclamation point within an equilateral triangle is inten e to alert the user to the presence of important operating
an maintenance (servicing) instructions in the literature accompanying the appliance.
13
14
4
5
6
7
8
9
10
11
12
1
2
3
15
16
17
18
19
08-ENG-2835-AK45-1512UK-16-9-(AV-28GT20U)-50053856.p65 22.07.2004, 17:39114
ENGLISH - 115 -
Control Panel Buttons
Antenna Connections
/
3&K
5
69+6
0HQX
3URJUDP
9ROXPH
$XGLR,QSXW
7HUPLQDO
9LGHR,QSXW
7HUPLQDO
+HDGSKRQH
)5217$9
&21752/
3$1(/
%877216
3RZHU
(;7
08-ENG-2835-AK45-1512UK-16-9-(AV-28GT20U)-50053856.p65 22.07.2004, 17:39115
ENGLISH - 116 -
Preparation
Place TV on a soli surface.
For ventilation, leave a space of at least 10 cm free all aroun
the set. To prevent any fault an unsafe situations, please o
not place any objects on top of the set.
Use this apparatus in tropical an mo erate climates.
Features
 It is a remote controlle colour television.
 100 programmes from VHF, UHF ban s or cable channels
can be preset.
 It can tune cable channels.
 Controlling the TV is very easy by its menu riven system.
 It has three Euroconnector sockets for external evices
(such as vi eo recor er, vi eo games, au io set, etc.)
 Front AV (EXT-4) Input available.
 Stereo soun systems (German+Nicam) are available.
 3D Soun .
 Full function Teletext (Fastext, Toptext).
 It is possible to connect hea phone.
 Direct channel access.
 AUTO PROGRAM (Automatic Programming System).
 All programmes can be name .
 Forwar or backwar automatic tuning.
 Sleep timer.
 Chil Lock.
 Blue Backgroun .
 Panoramic Mo e.
 Comb Filter : Digital circuitry to make a justments provi -
ing outstan ing picture quality with sharp, crisp e ges,
while virtually eliminating ot crawl.
 CTI : (Colour Transient Improvement) Improvement of hori-
zontal transitions of chrominance (colour) signals.
 T-V Link.
 Automatic soun mute when no transmission.
 When no vali signal is etecte , after 5 minutes the TV
switches itself automatically to stan -by mo e.
 WSS (Wi e Screen Signaling).
 NTSC Playback.
Before Switching on your TV
Power connection
Imp rtant: The TV set is esigne to operate on 220-240 V
AC, 50 Hz.
 After unpacking, allow the TV set to reach the ambient
room temperature before you connect the set to the mains.
Aerial Connections
 Connect the aerial plug to the aerial input socket locate at
the back of the TV.
How to connect the external equipments
See C nnect the External Equipments on page 127.
 See the instruction manuals provi e with the external e-
vices too.
Inserting batteries in the remote control handset
 Remove the battery cover locate on the back of the han -
set by gently pulling upwar s from the in icate part.
 Insert two AA (R6) or equivalent type batteries insi e.
 Replace the battery cover.
NOTE: emove batteries from remote control handset when it
is not to be used for a long period. Otherwise it can be damaged
due to any leakage of batteries.
Switching the TV ON OFF
You can operate your TV either using the remote control
handset or directly using the TV onset buttons
To switch the TV on
Your TV will switch on in two steps:
1- Press the power button locate on the front of the TV.
Then the TV switches itself to stan by mo e an the RED
LED locate below the TV turns on.
2- To switch on the TV from stan -by mo e either:
Press a igit button on the remote control so that a program-
me number is selecte ,
or,
Press Stan by / Power Button or Programme Up an Down
buttons on the TV or on the remote control respectively, so
the TV will switch on an the RED Le will turn GREEN.
To switch the TV off
 Press the stan -by button on the remote control, so the TV
will switch to stan -by mo e an the GREEN LED will be-
come RED, or,
 Press the power button locate on the front of the TV.
Initial Settings
The message PLEASE CHECK ANTENNA CABLE AUTO.
PROGRAMMING SYSTEM will be isplaye when you turn
on your TV for the first time.
1- Select LANGUAGE with   or   button, then
press the   or   button to select a menu language.
2- Select COUNTRY with   or   button, then press
the   or   button to select the country you are now lo-
cate .
3- Select START with   or   button, then press the
right button to start AUTO PROGRAM
AUTO PROGRAM, (Automatic Programming System) auto-
matically programmes the receive channels in your TVs
programme numbers. During AUTO PROGRAM, AUTO
PROGRAM IS RUNNING PLEASE WAIT will be isplaye .
08-ENG-2835-AK45-1512UK-16-9-(AV-28GT20U)-50053856.p65 22.07.2004, 17:39116
ENGLISH - 117 -
After AUTO PROGRAM is finalize , the PROGRAM menu
appears.
To cancel AUTO PROGRAM, press the PICTURE button.
You can elete a channel, insert a channel into a programme
number, or re-start AUTO PROGRAM with the PROGRAM
menu. For etails, see Pr gram (Pr gramming) Menu on
page 123.
4- If you o not have a T-V LINK compatible VCR, press
PICTURE button to exit the menu.
If you have a T-V LINK compatible VCR connecte to the
EXT.2 terminal, press   button to isplay T-V LINK
menu. Then follow the operating proce ure D wnl ading
data t VCR in the following T-V LINK section.
If the message PLEASE CHECK ANTENNA CABLE AUTO.
PROGRAMMING SYSTEM oes not appear, or if you want
to mo ify the settings later, you can o manually with the
FEATURE, INSTALL an PROGRAM menus.
T-V LINK
When a T-V LINK compatible VCR is connecte to the EXT.2
Terminal on the TV, it is easier to set up the VCR an to view
vi eos. T-V LINK uses the following features:
o use -V LINK functions:
A T-V LINK c mpatible VCR means a JVC vi eo cassette
recor er with the T-V LINK logo, or with one of the following
logos. However, these VCRs may support some or all of the
features escribe earlier. For etails, see your VCR instruc-
tion manual.
Q-LINK (a tra emark of Panasonic Corporation)
Data L gic (a tra emark of Metz Corporation)
Easy Link (a tra emark of Phillips Corporation)
Megal gic (a tra emark of Grun ig Corporation)
SMARTLINK (a tra emark of Sony Corporation)
Downloading data to VCR:
The VCR will automatically ownloa the registere ata on
the TV channels from the TV. This means you o not nee to
set up the programme channels on your VCR manually.
The T-V LINK menu will be isplaye when you press the
 button while PROGRAM menu is isplaye , or when-
ever the INSTALL menu operations are performe .
Press   button to start ownloa ing ata to VCR.
 If you o not want to o, press the PICTURE button to
exit the menu.
When FEATURE NOT AVAILABLE... is isplaye :
If FEATURE NOT AVAILABLE... is isplaye , the ownloa
was not performe correctly. Before trying to ownloa again,
check that:
 The VCR power is turne on
 The VCR is T-V LINK compatible
 The VCR is connecte to the EXT.2 terminal
 The SCART cable is fully wire .
Direct Rec:
What Y u See Is What Y u Rec rd
You can easy recor to VCR the images that you are watch-
ing on the TV. For etails, rea the manual for your VCR,
Use your VCR controls. You cannot carryout Direct Rec us-
ing your TVs control.
79 /,1. 79  9&5
9&5 ,6 5(&25',1*

When the VCR is not rea y (for example when there is no
tape inserte ), NO RECORDING is isplaye .
In the following situations, the VCR will stop recor ing if the
TV is turne off, if the TV channel or input is change , or if
the menu is isplaye on the TV:
 When recor ing images from an external evice connecte
to the TV. (for example a camcor er)
 When recor ing a TV channel after it has been un-
scramble on a eco er.
 When recor ing a TV channel by using the TVs output be-
cause the VCRs own tuner cannot properly receive that
channel.
V auto power on/VCR image view:
When the VCR starts playing, the TV automatically turns on
an the images from EXT.2 (EXT-2) terminal appear on the
screen.
This functi n d es n t happen if y ur TVs main p wer
is turned ff. Set y ur TVs main p wer t n (standby
m de).
08-ENG-2835-AK45-1512UK-16-9-(AV-28GT20U)-50053856.p65 22.07.2004, 17:39117
ENGLISH - 118 -
Operating with the onset buttons
Volume setting an programme selection can be ma e using
the buttons on the right si e of the TV.
V lume Setting:
 Press  - button to ecrease volume or  + button to
increase volume, so a volume level scale will be isplaye
on the screen.
Pr gramme Selecting:
 Press P/Ch+ button to select next programme or P/Ch-
button to select the previous programme.
Entering Main Menu:
 Press MENU button to enter main menu. In the main
menu select submenu using P/Ch+ or P/Ch- button an
enter the submenu using  + or  - button. To learn
the usage of the menus, refer to Menu System on page
118.
Operating with emote Control
The remote control han set of your TV is esigne to control
all the functions of the mo el you selecte . The functions will
be escribe in accor ance with the menu system of your
TV.
Functions which you can use out of menu system are e-
scribe below.
V lume Setting:
Press  button to increase volume.
Press   button to ecrease volume.
Pr gramme Selecting (Previ us r next pr gramme):
 Press   button to select the previous programme.
 Press   button to select the next programme.
Pr gramme Selecting (direct access):
Press igit buttons on the remote control han set to select
programmes between 0 an 9. TV will switch to the selecte
program after a short elay.
 For a two igit program number enter the secon igit after
pressing the first igit within 2 secon s.
Menu System
Your TV has been esigne with a menu system. Display
MENU (main menu) an enter one of five menus (SOUND,
PICTURE, FEATURE, INSTALL an PROGRAM).
1- Press MENU button to isplay MENU (main menu).
The menu titles will be isplaye in the main menu.
2- Press   or   button to select a menu title, then
press   or   button to enter the menu.
 To exit a menu, press PICTURE button.
 To go to the previous menu, press MENU button.
6281'
3,&785(
)($785(
,167$//
352*5$0
Sound Menu
o change sound settings:
 Press MENU button, now you are in main menu. In the
main menu, SOUND will be the first selecte option. Enter
the soun menu pressing   or   button.
Setting Volume:
As you enter the soun menu, Volume will be the first select-
e option.
 Press   button to increase volume.
 Press   button to ecrease volume.
92/80(
%$66
75(%/(
%$/$1&(
+<3(56281'
'6281' 2))
21
Setting Bass Level:
 Using   or   button select Bass.
 Press   button to increase bass level.
 Press   button to ecrease bass level.
92/80(
%$66
75(%/(
%$/$1&(
+<3(56281'
'6281' 2))
21
Setting reble Level:
 Using   or   button select Treble.
 Press   button to increase treble level.
 Press   button to ecrease treble level.
92/80(
%$66
75(%/(
%$/$1&(
+<3(56281'
'6281' 2))
21
08-ENG-2835-AK45-1512UK-16-9-(AV-28GT20U)-50053856.p65 22.07.2004, 17:39118
ENGLISH - 119 -
Setting Balance:
 Using   or   button select Balance.
 Press   button to change balance rightwar .
 Press   button to change balance leftwar .
92/80(
%$66
75(%/(
%$/$1&(
+<3(56281'
'6281' 2))
21
Setting Hyper Sound:
You can use this feature to switch on or off Hyper Soun .
Pressing   or   button will turn on or off this feature. If the
current soun system is MONO an the Hyper Soun is set
ON, then the soun will be hear as if it is STEREO. If the
current soun system is STEREO, switching Hyper Soun
on will make the soun eeper. Switching it off will make no
change in MONO an STEREO.
92/80(
%$66
75(%/(
%$/$1&(
+<3(56281'
'6281' 2))
21
Hyper Soun can be set On or Off also by GREEN button.
Setting 3D Sound (3-Dimensional Sound):
This function creates a 3- imensional soun by using 2 ex-
isting lou speakers on your TV set without any a itional
speakers.
Pressing   or   button will turn this feature on an off.
92/80(
%$66
75(%/(
%$/$1&(
+<3(56281'
'6281' 2))
21
Note:
3D Sound is functional only when the current sound system
is STE EO.
Picture Menu
o change picture settings:
 Press MENU button, now you are in main menu. In the
main menu, select PICTURE using   or   button,
then enter the picture menu pressing   or   button.
6281'
3,&785(
)($785(
,167$//
352*5$0
N te: When Picture Mo e is not MANUAL, BRIGHTNESS,
CONTRAST an COLOUR options can not be reache by
 or   buttons.
Factory Settings:
In the Picture Menu if you press the YELLOW button the a -
justments switches themselves to the factory settings.
Setting Brightness:
You can change Brightness only when Picture Mo e is se-
lecte MANUAL.
Using   or   button select Brightness.
 Press   button to increase Brightness.
 Press   button to ecrease Brightness.
Setting Contrast:
You can change C ntrast only when Picture Mo e is select-
e MANUAL.
 Using   or   button select Contrast.
 Press   button to increase Contrast level.
 Press   button to ecrease Contrast level.
Setting Colour:
You can change C l ur only when Picture Mo e is selecte
MANUAL.
 Using   or   button select Colour.
 Press   button to increase Colour level.
 Press   button to ecrease Colour level.
Setting Sharpness:
 Using   or   button select Sharpness.
 Press   button to increase Sharpness level.
 Press   button to ecrease Sharpness level.
Setting Hue (In AV mode only):
 Using   or   button select Hue.
08-ENG-2835-AK45-1512UK-16-9-(AV-28GT20U)-50053856.p65 22.07.2004, 17:39119
ENGLISH - 120 -
 Press   button to increase Hue level.
 Press   button to ecrease Hue level.
Hue a just is functional only when NTSC 3.58/4.43 is applie
in AV mo e. It oes not appear when other colour systems
use .
Setting VCR Mode (In AV mode only) :
 Using   or   button select VCR MODE.
 When you watch a picture from your VCR an the picture is
unstable, you may improve it by changing the "VCR MODE"
setting from "ON" to "OFF".
Picture Mode
This item is use to change the picture mo e. By pressing
 or   button you may choose one of these options:
BRIGHT, STANDARD, SOFT, MANUAL.
Colour emp
This item is use to change the Colour Temperature. By
pressing   or   button you may choose one of these op-
tions: COOL, WARM, NORMAL.
Zoom
You can change the screen size accor ing to the picture as-
pect ratio. Choose the optimum one from the following ZOOM
mo es.
AUTO:
When a WSS (Wide Screen Signalling) signal, which
shows the aspect ratio of the picture, is inclu e in the
broa cast signal or the signal from an external evice, the TV
automatically changes the ZOOM mo e to 16:9 ZOOM mo e
or FULL mo e accor ing to the WSS signal.
If a WSS signal is not inclu e , the picture is isplaye in
the PANORAMIC mo e.
 When the AUTO mo e oes not function correctly ue to
poor WSS signal quality or when you want to change the
ZOOM mo e, change to another ZOOM mo e manually.
REGULAR:
Use to view a normal picture (4:3 aspect ratio) as this is its
original shape.
PANORAMIC:
This stretches the left an right si es of a normal picture (4:3
aspect ratio) to fill the screen, without making the picture ap-
pear unnatural.
 The top an bottom of the picture are slightly cut off.
14:9 ZOOM:
This zooms up the wi e picture (14:9 aspect ratio) to the up-
per an lower limits of the screen.
16:9 ZOOM:
This zooms up the wi e picture (16:9 aspect ratio) to the full
screen.
16:9ZOOM S:
This zooms up the wi e picture (16:9 aspect ratio) with subti-
tles to the full screen.
FULL:
This uniformly stretches the left an right si es of a normal
picture (4:3 aspect ratio) to fill the wi e TV screen.
 For 16:9 aspect ratio pictures that have been squeeze into
a normal picture (4:3 aspect ratio), use the FULL mo e to
restore the picture to its original shape.
Choose the ZOOM mode:
Press the   or   button to choose a ZOOM mo e.
08-ENG-2835-AK45-1512UK-16-9-(AV-28GT20U)-50053856.p65 22.07.2004, 17:39120
ENGLISH - 121 -
 You can choose the ZOOM mo e by pressing the ZOOM
(RED) button when no menu appears on the screen.
 The ZOOM mo e may be automatically change by the
control signal from an external evice. When you want to
return the previous ZOOM mo e, choose the ZOOM mo e
again.
Adjusting the visible area of the picture:
If subtitles or the top (or bottom) of the picture are cut off,
you can a just the visible area of the picture manually.
1. Press ZOOM button once.
The ZOOM mo e in icator appears. The ZOOM mo e will
not be change .
2. While it is isplaye , press   or   to change the
position of the picture.
 You cannot a just the visible area in REGULAR or FULL
mo e.
Feature Menu
 Press MENU button, now you are in main menu. In the
main menu, select FEATURE, using   or   button.
Then enter the feature menu pressing   or   button.
6281'
3,&785(
)($785(
,167$//
352*5$0
Sleep imer:
The sleep timer is use to turn the TV off after a efine peri-
o . Press   or   button to choose a perio of time after
selecting this item. The timer can be programme between
Off an 120 minutes in steps of 10 minutes. (OFF, 010, 020,
030, 040, ......... ,120.)
If sleep timer is activate , at the en of the selecte the time,
the TV goes automatically to stan -by mo e.
6/((37,0(5
&+,/'/2&.
/$1*8$*(
(;7287387
%/8(%$&.*5281'
2))
2))
(1*/,6+
79
2))
Child lock:
You can isable the control panel buttons (except the POW-
ER button) with this item.
Press   or   button to change the setting to On or Off after
selecting this item.
When you set this item to On, the TV can be operate only
by using the remote control han set.
6/((37,0(5
&+,/'/2&.
/$1*8$*(
(;7287387
%/8(%$&.*5281'
2))
2))
(1*/,6+
79
2))
Warning: If Chil Lock item is set to ON, the TV can not be
operate by VCR.
Language:
Menu Language can be selecte by pressing   or   button
on Language item.
6/((37,0(5
&+,/'/2&.
/$1*8$*(
(;7287387
%/8(%$&.*5281'
2))
2))
(1*/,6+
79
2))
Setting External Source Output:
 You can use this menu to select the internal or external
source that will be output at EXT.2 terminal.
 In the Feature menu select EXT-2 Output using  
or   button. Then select the source you want to be out-
put at EXT.2 pressing   or   button (one of the sources:
TV, EXT-1, EXT-3 or EXT-4 (Fr nt AV).
6/((37,0(5
&+,/'/2&.
/$1*8$*(
(;7287387
%/8(%$&.*5281'
2))
2))
(1*/,6+
79
2))
Blue Background During No-Signal:
The Blue Backgr und feature can be set by   or   button
to either On or Off.
Install (Installation) Menu
You can store a channel manually, or mo ify the current set-
tings of a channel (for example, fine-tuning a channel).
You can also changing the colour system, or change the
DECODER(EXT-2) setting.
 Press MENU button to isplay the main menu.
 Press   or   button to select INSTALL item.
Then   or   button to isplay the INSTALL menu.
6281'
3,&785(
)($785(
,167$//
352*5$0
N te:
 If you want to mo ify the current settings of a channel, se-
lect the channel of which you want to mo ify the setting.
Then isplay the main menu on screen.
 In AV mo e, you can change only the COLOUR SYSTEM
item.
08-ENG-2835-AK45-1512UK-16-9-(AV-28GT20U)-50053856.p65 22.07.2004, 17:39121
ENGLISH - 122 -
1. PROGRAMME will be the first selecte item as you enter
the INSTALL menu. Pressing   or   button select the
programme number where you want to the tune channel
to be store . (You may also type the programme number
using the igit buttons.)
N te:
 Do not use PROGRAMME item when you mo ify the cur-
rent programme numbers setting. If you select other
programme number by mistake, the selecte programme
numbers setting will be change .
2. Press   or   button to select BAND. Using   or
 button to select the ban in which you want to search
a channel.
3. Press   or   button to select SEARCH. Press
 or   button to start searching. (Press   button to
search forwar . Press   to search backwar s.)
 If the foun channel is not the esire one, press   or
 button to start searching again.
 To stop searching before a channel is foun , press the
reverse irection button. For example, when the TV is
searching forwar with   button, press   button to
stop searching.
 If you know the channel number which you want to fin ,
you can fin the channel irectly. Follow the step 4 to
select the correct stan ar , then press   or  
to select CHANNEL again, an press   or   button to
select the channel number, or enter the number with the
igit buttons.
4. If the soun or picture is abnormal, change the stan ar
(broa casting system) of new channel. Press   or
 button to select STANDARD, then press   or  
button to change the correct one.
 The in icate number will be change when you change
the stan ar .
B/G : C02-C12, C21-C73 / S01-S41 / S75-S79
D/K : 01-C12, C21-C69 / S01-S19, S22-S41
L : C01-C73 / S01-S41 / S75-S77
L : C04-C09
5. If the picture is not clear or no colour appears, change the
colour system to isplay the picture normally. Press
 or   button to select COLOUR SYSTEM, then
press   or   button to choose the correct one.
 In TV mo e: PAL / SECAM
 In AV mo e: AUTO / PAL / SECAM / NTSC 3.58 / NTSC 4.43
6. If the channel reception is poor, fine-tune the channel.
Press   or   to select FINE TUNING, then press
 or   button to fine-tune the channel.
7. After the all settings are complete , store the new
channels setting to the programme number which you se-
lecte . Press   or   to select STORE, then
press   or   button to store it. T-V LINK menu will ap-
pear after the TV stores the settings.
8. If you o not have a T-V LINK compatible VCR, press
PICTURE button to exit the menu.
If you have a T-V LINK compatible VCR connecte to the
EXT-2 terminal, press   button to isplay T-V LINK
menu. Then follow the operating proce ure D wnl ading
the data t VCR on page 117 to transmit the
Programme table ata to the VCR.
To change the Colour system:
If the picture is not clear or no colour appears, choose the
correct colour system to isplay the picture normally.
1. Press   or   button to select COLOUR SYS-
TEM, then press   or   button to choose the correct
one.
 In TV mo e: PAL / SECAM
 In AV mo e: AUTO / PAL / SECAM / NTSC 3.58 / NTSC 4.43
2. Press   or   to select STORE, then press   or
 button to store it.
3. When T-V LINK menu appears, follow the step 4.
4. If you o not have a T-V LINK compatible VCR, press
PICTURE button to exit the menu.
If you have a T-V LINK compatible VCR connecte to the
EXT.2 terminal, follow the operating proce ure D wn-
l ading the data t VCR on page 117 to transmit the
Programme table ata to the VCR.
Using the Decoder(EXT-2) function
If you have a eco er connecte to a T-V LINK compatible
VCR, which in turn is connecte to the EXT.2 terminal, use
DECODER(EXT-2) to unscramble the scramble TV chan-
nels.
1. Exit the menu.
2. Turn on the eco er power.
3. Display the scramble TV channel on the TV. Even if the
eco er is working, a scramble picture appears.
4. Display the INSTALL menu again.
5. Press   or   button to select DECODER(EXT-2),
then press   or   button to set to ON
6. Press   or   to select STORE, then press   or
 button to store it. T-V LINK menu will appear after the
TV stores the setting.
08-ENG-2835-AK45-1512UK-16-9-(AV-28GT20U)-50053856.p65 22.07.2004, 17:39122
ENGLISH - 123 -
7. Follow the operating proce ure D wnl ading the data
t VCR on page 117 to transmit the revise programme
table ata to the VCR.
 If you o not want to transmit, press PICTURE button
to exit the menu.
N te:
You can only use this item if you have a eco er connecte
to a T-V LINK compatible VCR to EXT.2 terminal. Setting this
item to ON by mistake causes the picture/soun of a TV
channel you are currently viewing to isappear.
If this item has been set to ON but the TV channel cannot
be unscramble , check the following:
 Has the eco er been connecte to the VCR properly ac-
cor ing to the VCR an Deco er instruction manuals?
 Can the TV channel be unscramble with a eco er?
 Do you nee to change the VCR settings in or er to con-
nect the eco er? Confirm that the VCR is set properly by
rechecking the VCR instruction manual.
Program (Programming) Menu
You can use the Program (Programming) menu to elete a
channel, to change the programme number of a channel, to
give a channel name to a channel, an to start the AUTO
PROGRAM (AUTOSTORE) function.
 Press MENU button to isplay the main menu.
 Press   or   button to select PROGRAM item,
then   or   button to isplay the PROGRAM menu.
o choose a channel in the PROGRAM menu:
 Press   /  /   /   button. The programme num-
ber that you choose is high-lighte in the PROGRAM menu
an you can view the picture of that channel.
Cauti n:
Using DELETE or INSERT function rewrite the current
channel list in the PROGRAM menu. Therefore, the pro-
gramme numbers of some of channels will change.
When you complete the settings of PROGRAM
menu:
If you have a T-V LINK compatible VCR, press the   but-
ton to isplay the T-V LINK menu. Then follow the operating
proce ure D wnl ading the data t VCR on page 117 to
transmit the Programme table ata to the VCR.
If you o not have a T-V LINK compatible VCR, press PIC-
TURE button to exit the menu.
o give a channel name (NAME):
1. Choose the channel you want to give a channel name.
2. Press the RED button to enter the NAME mo e.
3. Press   or   button to choose the position, an press
 or   button to choose each character of chan-
nel name.
4. Press the RED button to store the channel name.
 To cancel the NAME mo e, press the BLUE button.
o delete a channel (DELE E):
1. Choose the channel you want to elete.
2. Press the YELLOW button to enter the DELETE mo e.
3. Press the YELLOW button to elete it.
 To cancel this DELETE mo e, press the BLUE button.
o change the programme number of a channel
(INSER ):
1. Choose the channel you want to change the programme
number.
2. Press the GREEN button to enter the INSERT mo e.
3. Press   /   /   /   button to choose new
programme number.
4. Press the GREEN button to insert the channel to the cho-
sen programme number.
 To cancel this INSERT mo e, press the BLUE button.
To start AUTO P OG AM (AUTOSTO E)
AUTO PROGRAM Automatically programmes the receive
channels in your TVs programme numbers.
1. Press the BLUE button to enter the AUTOSTORE mo e.
A warning message appears.
 To cancel the AUTOSTORE mo e, press the PIC-
TURE button.
2. Press   or   button to choose the COUNTRY,
then press   or   button the choose country you are
now locate .
3. Press   or   button to choose the CONTINUE,
then press   button to start AUTO PROGRAM The fol-
lowing message appears.
08-ENG-2835-AK45-1512UK-16-9-(AV-28GT20U)-50053856.p65 22.07.2004, 17:39123
ENGLISH - 124 -
 To cancel the AUTO PROGRAM, press the PICTURE
button.
4. After AUTO PROGRAM is finalize , the PROGRAM menu
appears again.
Other Features
Sound Mute
To cut off the soun of the TV, press   button. The soun
will be cut off. To cancel mute, press   or   or   but-
ton. The volume level will be the same as the level before
mute when you cancel mute.
Stereo / Bilingual
 If the TV channel you are watching broa casts in two lan-
guages (e.g. Eurosport), you can select the ubbe or the
original language, pressing the   button.
 When the stereo broa cast is receive poorly, you can
change from stereo to mono soun so that you can hear
the broa cast more clearly an easily.
Information on Screen
First pressing the   button isplays the current status
Pr gramme number, Stati n name an S und sta-
tus.
Pressing this button again isplays the current time.
Pressing this button once more remove the on-screen is-
play.
To Display the Time
 While watching a TV programme with Teletext transmission
press   button twice. The current time information, cap-
ture from Teletext will be isplaye at the upper left corner
of the screen.
 If the programme being watche oes not have Teletext
transmission, no time information will be isplaye .
 The time information will isappear after pressing   but-
ton again.
Picture
You can change Picture M de settings by pressing PIC-
TURE button when no menu appears.
VC / DVD Control Buttons and VC / / DVD
Switch
The buttons can be use to operate a JVC bran VCR or
DVD player. Pressing the button having the same appear-
ance as the original remote control button of a evice makes
the function work in the same way as the original remote
control.
1. Set the VCR / / DVD Switch to the VCR or DVD posi-
tion.
VCR:
When you are operating the VCR, set the switch to the VCR
position.
DVD:
When you are operating the DVD player, set the switch to
the DVD position.
(Text):
When you are viewing Teletext programmes, set the switch
to the (Text) position.
2. Press the VCR / DVD Control Button to control your VCR
or DVD player.
N te:
 If your evice is not ma e by JVC, these buttons cannot be
use .
 Even if your evice is ma e by JVC, some of these buttons
or any one of the buttons may not work, epen ing on the
evice.
 You can use the / buttons to choose a TV channel
which the VCR will receive or choose the chapter which the
DVD player plays back.
 Some DVD player mo els use the / buttons for oper-
ating of Fast forwar /backwar functions an choosing the
chapter. In this case, the / the buttons o not
work.
Teletext
Teletext is an information system that isplays text on your
TV screen. Using the Teletext information system you can
view a page of information on a subject that is available in the
list of contents (in ex).
No on screen isplay will be available in text mo e.
No contrast, brightness or colour control, but volume control
is available in text mo e.
To operate Teletext
 Select a TV station on which Teletext is being transmitte .
 Press (teletext)   button. Usually the list of contents (in-
ex) is isplaye on the screen.
 Set the VCR / / DVD switch to the (Text) position.
To select a page of Teletext
 Press the appropriate igit buttons for the require Teletext
page number.
The selecte page number is isplaye at the top left corner
of the screen. The Teletext page counter searches until the
selecte page number is locate , so that the esire page is
isplaye on the screen.
 Press   button to move the Teletext screen forwar
one page at a time.
 Press   button to move the Teletext screen backwar
one page at a time.
08-ENG-2835-AK45-1512UK-16-9-(AV-28GT20U)-50053856.p65 22.07.2004, 17:39124
ENGLISH - 125 -
To Select Index Page
 To select the page number of the in ex (generally page
100), press   button.
Searching for a teletext page while watching TV
 In the Teletext mo e pressing   button will switch the
screen to the TV mo e. In the TV mo e enter a page num-
ber using igit buttons. As you enter last igit of page num-
ber,   sign will replace the page number an flash until
the entere page number is foun . Then the page number
will replace   sign again. Now you can isplay this tele-
text page pressing   button.
To Select Double Height Text
 Press   button for the top half of the information page to
be isplaye in ouble height text.
 Press   button again for the bottom half of the informa-
tion page to be isplaye in ouble height text.
 Press   button once more for the full page of normal
height text.
To eveal concealed Information
 Pressing   button once will reveal answers on a quiz or
games page.
 Pressing   button again will conceal the reveale an-
swers.
To Stop Automatic Page Change
The teletext page you have selecte may contain more infor-
mation than what is on the screen; the rest of the information
will be isplaye after a perio of time.
 Press   button to stop the automatic page change.
 Press   button again to allow the next page to be is-
playe .
To Select a Subcode Page
Subco e pages are subsections of long Teletext pages that
can only be isplaye on the screen one section at a time.
 Select the require Teletext page.
 Press   button.
 Select the require subco e page number by pressing four
igit buttons (e.g. 0001).
 If the selecte subco e page is not isplaye in a short
time, press   button. TV programme will be isplaye on
the screen.
 Teletext page number will be isplaye on the upper left
corner of the screen when the selecte page is foun .
 Press   button to isplay the selecte Teletext page.
To exit Teletext
 Press   button. The screen will switch to TV mo e.
Fastext and Toptext
Teletext mo e will be selecte accor ing to transmission au-
tomatically.
Your CTV supports the 7 page Teletext system. When the
page number of any of the 7 pages in memory is entere , the
system will not search for the requeste page; instea it will
isplay the page automatically.
 Press   button to move the Teletext screen forwar
one page at a time.
 Press   button to move the Teletext screen backwar
one page at a time.
For Fastext and optext
The subject-hea ing for the information may have a particular
colour or can be in a form locate in a coloure box.
 Press an appropriate RED, GREEN, YELLOW or BLUE but-
ton in or er to reach the relevant page quickly.
For OP EX
If Toptext transmission is present, colour co e buttons will
appear in status row.
If Toptext transmission is not present, status row will not ap-
pear.
In Toptext mo e the   or   comman s will request
the next or previous page respectively. If Toptext transmis-
sion is not available, in case of operation of these com-
man s, wraparoun occurs. For example page 100 appears
to be one greater than page 199.
08-ENG-2835-AK45-1512UK-16-9-(AV-28GT20U)-50053856.p65 22.07.2004, 17:39125
ENGLISH - 126 -
Connect the External Equipments
Via the Euroconnector
Your TV set has three Euroconnector sockets. If you want to
connect equipments (e.g. vi eo recor er, eco er, etc.)
which have Euroconnectors, to your TV, use the EXT.1
(EXT-1), EXT.2 (EXT-2) or EXT.3 (EXT-3) terminals.
If an external evice is connecte via Euroconnector sockets
TV is switche to AV mo e automatically.
T-V LINK compatible VC
Be sure to connect the T-V LINK compatible VCR to the
EXT.2 terminal. If not, the T-V LINK function will not work
properly.
 When connecting a T-V LINK compatible VCR to the EXT.2
terminal, be sure to connect the eco er to the VCR. If not,
the T-V LINK function may not work properly. An then set
the DECODER(EXT-2) function for the channel to ON to un-
scramble a scramble channel. For etails, see Using the
Dec der(EXT-2) functi n on page 122.
GB mode
If an equipment can output the RGB signals, connect it to
the EXT.1 (EXT-1) terminal.
EXT-2S Mode
If the equipment connecte to your TV set supports S-Vi eo
(Y/C) output from Euroconnector, you can have a better pic-
ture quality by selecting EXT-2S mo e an connecting your
equipment to the EXT.2 (EXT-2S) terminal of TV. See your
equipment's booklet to check if your equipment has such
feature.
Via the CA jacks
If you have an equipment (such as a Camcor er) which has
the RCA jacks, connect it to the Fr nt AV (EXT-4) terminal
with the vi eo an au io cables.
 If the equipment has the mono au io jack, connect it to the
AUDIO-L jack.
Via the ANT (aerial) socket
If your equipment oes not have an Euroconnector or RCA
jacks, connect it to the TV with an aerial cable. For etails,
see the manual provi e with the equipment.
 To store the test signal that comes from the equipment,
see Install (Installati n) Menu on page 121 an store it
to the programme number 0. You can watch images from
that equipment to select the programme number which you
store the test signal.
TV and Video ecoder (VC )
 Connect the Vi eo Recor er to the ANT (antenna input)
socket of the TV with the aerial cable.
 Connect the Vi eo Recor er to the EXT.1 (EXT-1), EXT.2
(EXT-2) or EXT.3 (EXT-3) terminal with the SCART cable, or
connect it to the Fr nt AV (EXT-4) terminal with the au io
an vi eo cables.
NTSC Playback
Connect a NTSC vi eo recor er to a terminal. Then press
AV button to select the correspon ing AV mo e.
NTSC 3.58/4.43 system is etecte automatically in AV
mo e.
Copy Facility
You can output the vi eo an au io signals which inputs from
TV, EXT.1 (EXT-1), EXT.3 (EXT-3) or Fr nt AV (EXT-4) termi-
nal to the vi eo recor er connecte to the EXT.2 (EXT-2) ter-
minal.
 To select the output source, see Setting External S urce
Output on page 121.
Connecting Headphones
Use the stereo hea phone socket of your TV, to connect
hea phones.
08-ENG-2835-AK45-1512UK-16-9-(AV-28GT20U)-50053856.p65 22.07.2004, 17:39126
ENGLISH - 127 -
Connect the External Equipments
Before connecting anything
 Switch off all equipments inclu ing the TV.
 Rea the manuals provi e with the equipments.
T select an AV m de
Pressing AV button on the remote control selects one of six AV mo es (EXT-1, RGB, EXT-2, EXT-2S, EXT-3 or EXT-4)
 To return to the TV mo e, repeate ly press AV button.
EXT.1 (EXT-1) terminal: Euroconnector (21-pin, SCART)
 Vi eo input, Au io L/R inputs an RGB inputs are available.
 TV broa cast outputs (Vi eo an Au io L/R) are available.
EXT.2 (EXT-2) terminal: Euroconnector (21-pin, SCART)
 Vi eo input, S-VIDEO (Y/C) input an Au io L/R inputs are available.
 Vi eo an Au io L/R outputs are available. (see Setting External S urce Output on page 121.)
 T-V LINK functions are available. (see T-V LINK c mpatible VCR on page 126.)
EXT.3 (EXT-3) terminal: Euroconnector (21-pin, SCART)
 TV broa cast outputs (Vi eo an Au io L/R) are available.
Fr nt AV (EXT-4) terminal: RCA connectors x 3
 Vi eo input an Au io L/R inputs are available.
08-ENG-2835-AK45-1512UK-16-9-(AV-28GT20U)-50053856.p65 22.07.2004, 17:39127
ENGLISH - 128 -
Tips
Care of the Screen
Clean the screen with a slightly amp, soft cloth. Do not use
abrasive solvents as they may amage the TV screen coat-
ing layer.
Poor Picture
Have you selecte the correct TV system? Is your TV set or
house aerial locate too close to the lou speakers, non-
earthe au io equipment or neon lights, etc. ?
Mountains or high buil ings can cause ouble pictures or
ghost images. Sometimes you can improve the picture quali-
ty by changing the irection of the aerial.
The picture quality may egra e when two peripherals are
connecte to the TV at the same time. In such a case, is-
connect one of the peripherals.
No Picture
Is the aerial connecte properly? Are the plugs connecte
tightly to the aerial socket? Is the aerial cable amage ? Are
suitable plugs use to connect the aerial? If you are in oubt,
consult your ealer.
N Picture means that your TV is not receiving any trans-
mission. Have you presse the correct keys on the remote
control? Try once more.
Sound
Soun is coming from only one of the speakers. Is the bal-
ance set to one irection extreme? See SOUND menu.
emote Control
Your TV no longer respon s to the remote control. Perhaps
the batteries are exhauste . If so you can still use the local
buttons at the right si e of your TV.
Have you selecte the wrong menu? Press PICTURE but-
ton to return to TV mo e or press MENU button to return to
the previous menu.
No solution
Switch your TV set off an on. If this oes not work, call the
service personnel; never attempt to repair it yourself.
Specifications
TV BROADCASTING
PAL SECAM B/G D/K L/L
RECEIVING CHANNELS
VHF (BANDI/III)
UHF (BAND U)
HYPERBAND
CABLE-TV (B/G: S01-S41 / S75-S79
D/K: S01-S19, S22-S41
L: S01-S41 / S75-S77)
NUMBER OF PRESET CHANNELS
100
CHANNEL INDICATOR
ON SCREEN DISPLAY
RF AERIAL INPUT
75 Ohm Unbalance
OPERATING VOLTAGE
220-240V AC, 50 Hz.
SOUND-MULTIPLEX SYSTEMS
Nicam + German Stereo
PICTURE TUBE
28 16:9
AUDIO OUTPUT POWER (WRMS.) (%10 THD)
2 x 10
POWER CONSUMPTION (W) (max)
120 Watt
DIMENSIONS (WxHxD) (mm)
: + ' :HLJKWNJ
   
',0(16,216
08-ENG-2835-AK45-1512UK-16-9-(AV-28GT20U)-50053856.p65 22.07.2004, 17:39128

Other manuals for AV-28GT20U

1

Other JVC TV manuals

JVC LT-26DY8ZG User manual

JVC

JVC LT-26DY8ZG User manual

JVC InteriArt AV28H20EUS User manual

JVC

JVC InteriArt AV28H20EUS User manual

JVC AV-21Q118B User manual

JVC

JVC AV-21Q118B User manual

JVC AV-29QH4BU User manual

JVC

JVC AV-29QH4BU User manual

JVC AV-21L91 User manual

JVC

JVC AV-21L91 User manual

JVC AV-14FTT User manual

JVC

JVC AV-14FTT User manual

JVC AV-28R4SK User manual

JVC

JVC AV-28R4SK User manual

JVC AV-20F703 User manual

JVC

JVC AV-20F703 User manual

JVC AV-28T4SP User manual

JVC

JVC AV-28T4SP User manual

JVC LT-26X575/KA User manual

JVC

JVC LT-26X575/KA User manual

JVC AV-20NN15 User manual

JVC

JVC AV-20NN15 User manual

JVC LT32P679 - 32" LCD TV User manual

JVC

JVC LT32P679 - 32" LCD TV User manual

JVC LT-20J50SE User manual

JVC

JVC LT-20J50SE User manual

JVC AV-14FR10 User manual

JVC

JVC AV-14FR10 User manual

JVC AV 24F702 User manual

JVC

JVC AV 24F702 User manual

JVC AV-36F703/Y User manual

JVC

JVC AV-36F703/Y User manual

JVC AV-28BD5EKI User manual

JVC

JVC AV-28BD5EKI User manual

JVC AV-29JS25, AV-29MS25, AV-29MX7 User manual

JVC

JVC AV-29JS25, AV-29MS25, AV-29MX7 User manual

JVC AV-28BD5EES User manual

JVC

JVC AV-28BD5EES User manual

JVC LT-40FH96 User manual

JVC

JVC LT-40FH96 User manual

JVC AV-21PB4N User manual

JVC

JVC AV-21PB4N User manual

JVC AV-32F475/Y User manual

JVC

JVC AV-32F475/Y User manual

JVC AV-21YMG4/G Administrator Guide

JVC

JVC AV-21YMG4/G Administrator Guide

JVC AV-21RT4BP User manual

JVC

JVC AV-21RT4BP User manual

Popular TV manuals by other brands

Toshiba 30HF84 - 30" CRT TV Service manual

Toshiba

Toshiba 30HF84 - 30" CRT TV Service manual

Panasonic TX-40CW304 operating instructions

Panasonic

Panasonic TX-40CW304 operating instructions

Philips 21TCDI30 Handbook

Philips

Philips 21TCDI30 Handbook

Haier 21T07 Service manual

Haier

Haier 21T07 Service manual

AWA MSDV1636-O3 Service manual

AWA

AWA MSDV1636-O3 Service manual

Panasonic TX-32C200E operating instructions

Panasonic

Panasonic TX-32C200E operating instructions

Panasonic TX-55CX400B operating instructions

Panasonic

Panasonic TX-55CX400B operating instructions

Hisense 32D33 user manual

Hisense

Hisense 32D33 user manual

Philips 32PHD6927/77 manual

Philips

Philips 32PHD6927/77 manual

aiko NP-42S5 Service manual

aiko

aiko NP-42S5 Service manual

Sony Trinitron KV-28FX20U Service manual

Sony

Sony Trinitron KV-28FX20U Service manual

Toshiba 27AF46C Service manual

Toshiba

Toshiba 27AF46C Service manual

Sharp 32F641 Operation manual

Sharp

Sharp 32F641 Operation manual

Symphonic WF15L5 Service manual

Symphonic

Symphonic WF15L5 Service manual

Panasonic TX-14B3T Service manual

Panasonic

Panasonic TX-14B3T Service manual

Zenith SENTRY 2 Z25A65 Operating guide & warranty

Zenith

Zenith SENTRY 2 Z25A65 Operating guide & warranty

Philips 32PFL7674H manual

Philips

Philips 32PFL7674H manual

Panasonic CT-27G7D operating instructions

Panasonic

Panasonic CT-27G7D operating instructions

manuals.online logo
manuals.online logoBrands
  • About & Mission
  • Contact us
  • Privacy Policy
  • Terms and Conditions

Copyright 2025 Manuals.Online. All Rights Reserved.