manuals.online logo
Brands
  1. Home
  2. •
  3. Brands
  4. •
  5. Kalia SPEC
  6. •
  7. Bathroom Fixture
  8. •
  9. Kalia SPEC 104849 Series User manual

Kalia SPEC 104849 Series User manual

109/23 105169_RevE
Instructions d’installation
Installation Instructions
Conserver ce guide après l’installation car il contient des informations utiles pour le service et la garantie./
Keep these instructions after you have finished the installation, it contains useful information regarding service and warranty.
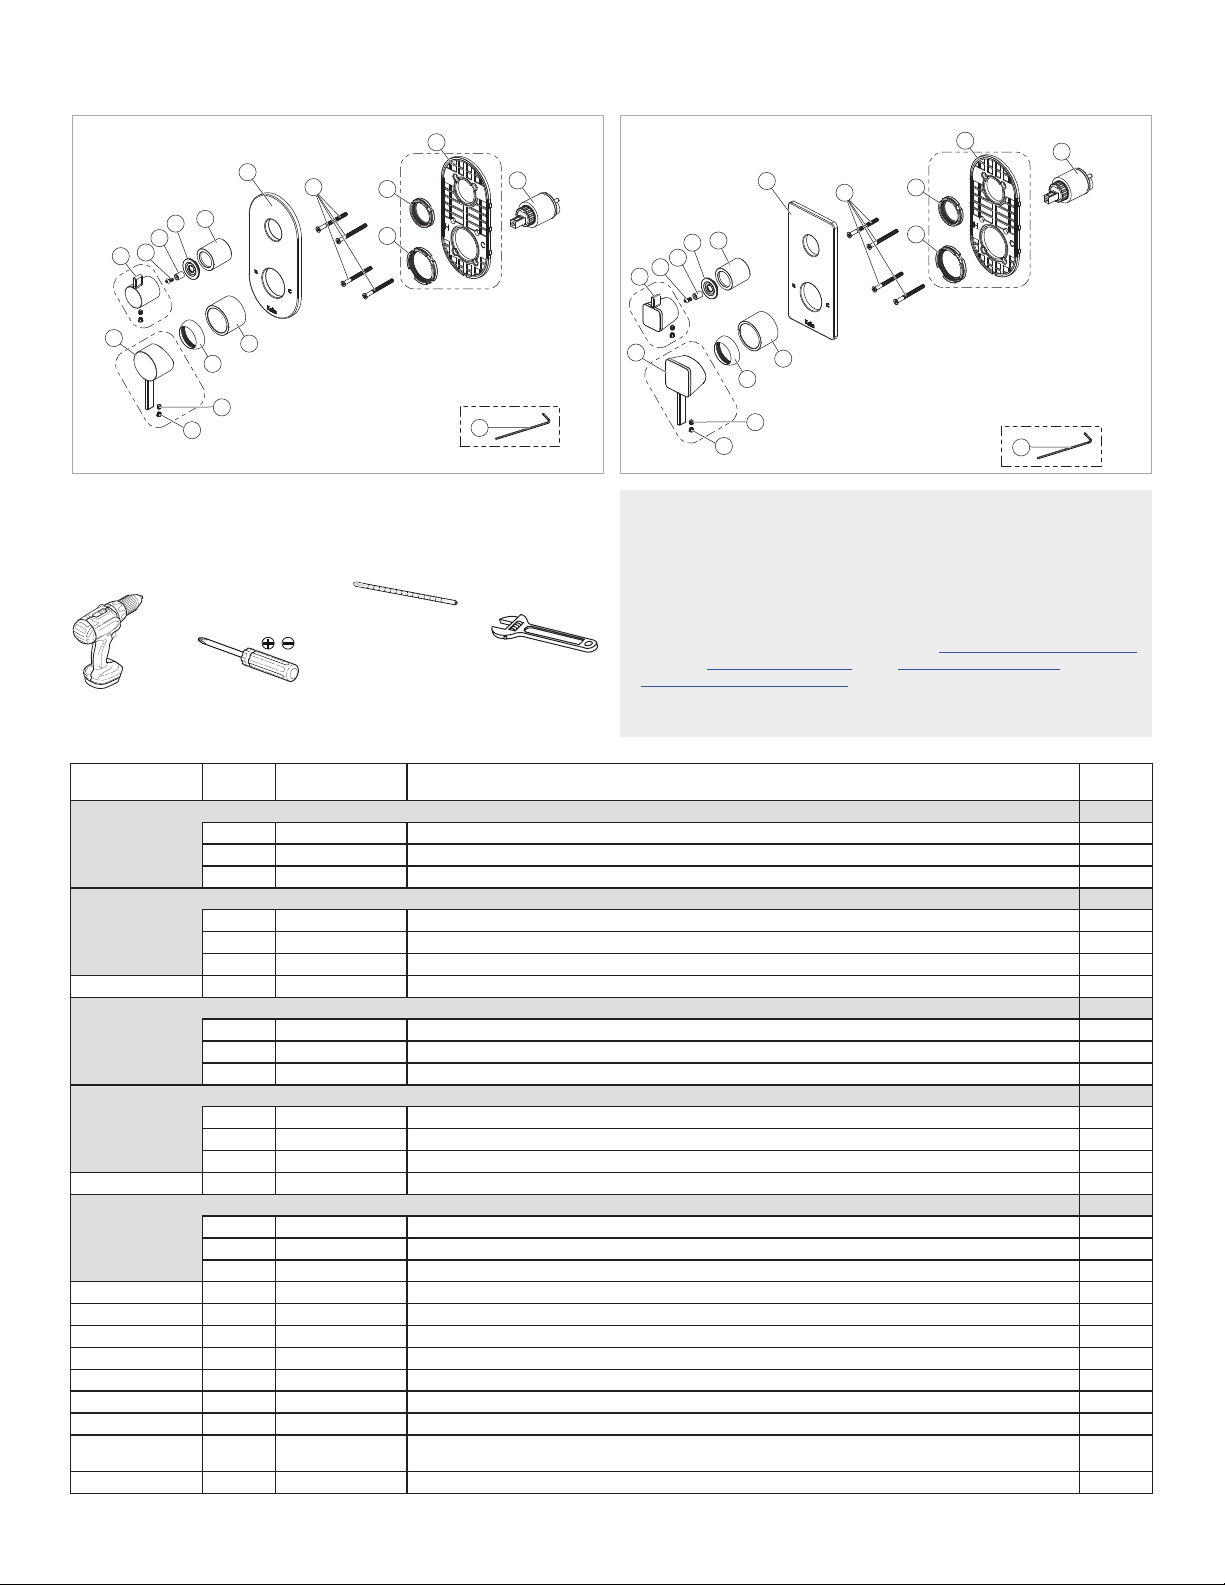
104849-xxx
104851-xxx
Ensemble de finition pour valve à pression
équilibrée ½” avec contrôle de volume
et sélecteur 2 voies – cartouche incluse
½” pressure balance with volume control
valve and 2-way diverter decorative trim
–
cartridge included
1355, 2eRue, Parc industriel,
Sainte-Marie (Québec) G6E 1G9
418 387-9090 | 1 877 465-2542
[email protected]om
kaliaspec.com
IMPORTANT
• Lire attentivement le présent guide avant l’installation.
• Assurez-vous d’avoir tous les outils et matériaux nécessaires à l’installation.
• Vérifier que toutes les pièces illustrées à la section « Schéma des pièces »
sont incluses et qu’aucune pièce n’est endommagée. Si un problème
survient, le signaler immédiatement au vendeur.
• Respecter tous les codes de plomberie et de bâtiment locaux.
Kalia SPEC se réserve le droit d’apporter toute modification au design
du produit et ceci sans préavis. Utiliser le manuel d’installation fourni dans
l’emballage.
Kalia SPECn’est pas responsable des problèmes causés par une installation
non conforme aux directives énoncées dans le présent guide.
IMPORTANT
• Read this guide before proceeding with the installation.
• Make sure you have all the tools and materials needed for installation.
• Make sure all the parts shown in the “Parts Diagram” section are included
and in good condition. If there is a problem, report it
immediately to the seller.
• Respect all local plumbing and building codes.
Kalia SPEC reserves the right to make any changes to the design of the
product, without notice. Use the installation instruction supplied with the
product.
Kalia SPEC is not responsible for problems caused by an instal-
lation not executed in accordance with the directions given in this guide.
Garantie
GARANTIE ET RESTRICTIONS COMMERCIALES
Les produits Kalia SPEC sont garantis au consommateur qui est l’acheteur
initial.Kalia SPEC garantit ses produits contre tout défaut de matériel ou
de fabrication dans des conditions normales d’utilisation et d’entretien. La
période de garantie prévue est la suivante :
• Une garantie à vie limitée sur les cartouches
• Toutes les autres pièces et finis sont garantis pour une période de cinq ans (5)
à partir de la date d’achat
• Une garantie de dix ans (10) pour les portes et bases de douche
• Les composantes de plastique sont garanties un an (1) à partir de la date
d’achat
• La période de garantie relative à tout produit installé dans le cadre d’une
application commerciale est d’un an (1) suivant la date d’achat initiale
Kalia SPEC procédera à sa discrétion à la réparation ou au remplacement de
pièces, ou de produits trouvés défectueux pour un usage domestique normal
pour lequel ils ont été conçus.
Kalia SPEC n’est aucunement responsable pour tous frais de main-d’oeuvre ou
tous autres frais reliés à l’installation d’un produit, sa réparation ou son rem-
placement ainsi que pour tout dommage ou incident, dépense, perte directe ou
indirecte.
SERVICE
Pour se prévaloir du service, veuillez communiquer avec Kalia SPEC inc., soit
par l’entremise de votre détaillant ou encore directement à nos bureaux en
écrivant à : service@kaliastyle.com ou par téléphone au : 1 877 GO-KALIA (1 877
465-2542).
Dans le but de bien identifier le produit, assurez-vous de fournir toute l’infor-
mation nécessaire concernant votre demande soit :
• Description du produit, numéro de modèle, la couleur/fini, la date de l’achat,
le nom du détaillant ou votre facture originale
• La description du problème accompagnée d’une photo
Pour toute autre information ou pour connaître un détaillant près de chez vous,
n’hésitez pas à nous contacter.
Toute demande de service recevra une réponse à l’intérieur d’un délai de 48h,
peu importe sa provenance (téléphone, courriel, représentants externes). Le
premier contact permet une évaluation rapide et courtoise du besoin.
Si un représentant Kalia SPEC est appelé à se rendre sur les lieux, le client sera
avisé que des frais de déplacement de 85 $ seront exigés s’il ne s’agit pas d’un
défaut de fabrication.
Warranty
LIMITED WARRANTIES AND COMMERCIAL LIMITATIONS
Kalia SPEC products are guaranteed to the consumer who is the original buyer.
In addition to the above conditions and restrictions, Kalia SPEC warrants its products
against defects in material and workmanship under normal use and mainte-
nance. The warranty period is as follows:
•
Limited lifetime
warranty on cartridges
• All other parts and finishes are guaranteed for a period of
five years (5)
from
the date of purchase.
• A warranty of
ten years (10)
on shower doors and bases
• The plastic components are guaranteed
one year (1)
from the date of
purchase
• The warranty period for any product installed as part of a commercial appli
cation is
one year (1)
from the date of original purchase.
Kalia SPEC will, at its discretion, repair or replace parts or products that are
found defective for the normal home use for which they were designed.
Kalia SPEC is not responsible in any way for costs related to labour or any
other costs related to a product’s installation, repair or replacement, nor for
any damage, incident, expense, or direct or indirect loss.
WARRANTY SERVICE
You can reach our customer service through your dealer or writing to us at
[email protected]om
or by calling us directly at
1 877 GO-KALIA (1 877
465-2542)
.
To ensure the correct identification of your product, please provide all perti-
nent information with your request including:
• Product description, model number, color/finish, date of purchase, dealer’s
name, or your original invoice
• Problem description with a picture
For more information or to find out a retailer closest to your area, please feel
free to contact us.
We respond to all service requests within 48 hours whether received by
telephone, email, or by a representative.
This allows Kalia SPEC to quickly and courteously assess your needs.
In the event that one of our representatives is called on to make a customer
visit, the customer is informed in advance that an $85 fee will be charged if
the problem is not a manufacturing defect.
105169_RevE
Outil fourni/
Provided tool
104849
15
16
9
7
12
11
3
4
5
13 17
14
18
8
2
19
1
104851
15
22
11
8
20
4
5
21
17
14
18
2
1
Outil fourni/
Provided tool
19
9
7
12
Perceuse
électrique/
Electric drill
Instruction Part list_Shower Faucets.xlsx
*
PBD 104849-51 *
Assemblage
Assembly #Numéro de pièce /
Part Number Description Qté totale
Total qty
1
1 105023-XXX * Capuchon décoratif / Decorative cap 1
2 105024 Vis M5x7 / Set screw M5x7 1
3 105025-XXX * Manette température et contrôle de volume ronde / Temperature and volume control handle round 1
1
13 105037-XXX * Manette du sélecteur ronde/ Diverter handle round 1
2 105024 Vis M5x7 / Screw M5x7 1
1 105023-XXX * Capuchon décoratif / Handle cap 1
- 16 107234-XXX * Plaque décorative ronde/ Decorative plate round 1
1
1 105023-XXX * Capuchon décoratif / Decorative cap 1
2 105024 Vis M5x7 / Set screw M5x7 1
20 105252-XXX * Manette température et contrôle de volume carré/ Temperature and volume control handle square 1
1
21 105253-XXX * Manette du sélecteur carré/ Diverter handle square 1
2 105024 Vis M5x7 / Screw M5x7 1
1 105023-XXX * Capuchon décoratif / Handle cap 1
- 22 107235-XXX * Plaque décorative carré/ Decorative plate square 1
1
9 107238 Plaque de montage / Mounting plate 1
7 107236 Joint de compression / Compression gasket 1
12 107237 Joint de compression / Compression gasket 1
- 4 105027-XXX * Capuchon de finition de la manette / Decorative ring 1
- 5 105028-XXX * Manchon externe de la valve / External valve sleeve 1
- 14 105039-XXX * Rondelle anti-friction / Low friction spacer 1
- 15 105040-XXX * Manchon externe du sélecteur / External diverter sleeve 1
- 17 105255 Vis du sélecteur / Diverter screw 1
- 18 105257 Manchon d'alignement de la manette / Handle alignment sleeve 1
- 8 105032 Vis mécanique #10-24 x 2-1/4'' / Mechanical Screw #10-24 x 2-1/4'' 4
- 11 105036 Cartouche à pressions balancée (Type P) avec contrôle de volume /
Pressure balance cartridge (Type P) with volume control 1
- 19 102887 Clé hexagonale Hex 2.5 pour vis M5 / Allen Key Hex 2.5 for M5 Screw 1
Ensemble plaque de montage / Mounting plate assembly
* XXX signifie que la couleur du fini doit être spécifiée/XXX means that the finish color must be specified
105249-XXX *
Ensemble manette température et volume contôle / Temperature and volume control handle assembly
105250-XXX *
Ensemble sélecteur / Diverter assembly
107233
PBD Trim kit 104849-51
105026-XXX *
Ensemble manette température et volume contôle / Temperature and volume control handle assembly
105109-XXX *
Ensemble sélecteur / Diverter assembly
[ S:\1.KALIA\1._R&D\5.Guides_d'installation\_Instruction part list\Instruction Part list_Shower Faucets.xlsx ]
Schéma des pièces/Parts Diagram
Liste des pièces/Parts List
Outils/Tools
2 105169_RevE
Tournevis
Phillips et plat/
Flat-head
and Phillips
screwdriver
Thermomètre/
Thermometer
Clé
à molette/
Adjustable
wrench
Entretien
et nettoyage
Pour éviter les bris et vous assurer
d’un fonctionnement optimal,
il est nécessaire de suivre ces
recommandations lors de l’en-
tretien de votre produit Kalia.
Visitez le kaliastyle.com/files/
entretien/guide-entretien.pdf
pour savoir comment entretenir
votre produit Kalia.
Maintenance
and cleaning
To avoid damage and optimize
your product, you must follow the
recommendations below when
maintaining your Kalia product.
Go to
kaliastyle.com/files/entretien/
maintenance-guide.pdf
to learn
about how to maintenance
your Kalia product.
1
Enlever le gabarit de perçage
Remove the cutout template
3105169_RevE
1
2
!
FERMÉ
CLOSED
2
Connection
Connexion
A
FERMÉ
CLOSED
3Purger les lignes d’eau
Purge water lines
IMPORTANT
Serrer de 1/4 de tour./
Tighten by 1/4 turn.
A
IMPORTANT
Serrer à la main./
Hand tighten.
BC
11
Installer la cartouche
Install the cartridge
4
B
C
D
IMPORTANT
Serrer à la main./
Hand tighten.
IMPORTANT
Ouvrir l’eau pendant 30 secondes./
Open water 30 secondes.
3Purger les lignes d’eau (suite)
Purge water lines (cont’d)
105169_RevEImprimé en Chine / Printed in China
Il n’y a pas de débit ou/et pas d’eau ?
Raison possible : quelque chose obstrue l’écoulement de l’eau.
SOLUTIONS :
1) S’assurer que les valves d’arrêts sont complètement ouvertes.
2) Dévisser tous les accessoires (tête de pluie, boyau, etc).
3) Lever la poignée. S’il y a un retour de débit ou d’eau :
Nettoyer les accessoires et les réinstaller.
S’assurer que le boyau n’est pas inversé.
There is little or no water? Possible reason: an obstruction.
SOLUTIONS :
1) Make sure the hot and cold shut-off valves are fully opened.
2) Remove all accessories: rainhead, hose, etc.
3) Turn on the water and allow it to flow directly from the wall arm and the
wall-connector. If water comes out:
Clean out the accessories and reinstall them.
Check to see if the hose is not reversed.
Si le débit est réduit ou qu’il n’y a pas d’eau :
1) Fermer l’entrée d’eau principale.
2) Retirer la cartouche ainsi que les valves anti-retour et les nettoyer.
3) Remettre les valves d’arrêt avec anti-retour intégré.
4) Ouvrir les valves d’arrêt de 15 à 20 secondes afin de nettoyer les lignes
d’entrées d’eau.
5) Refermer les valves d’arrêt.
6) Réinstaller la cartouche en suivant les étapes du guide d’installation
(étapes 4 à 8).
If there is no water or reduced water pressure after all
of the above is completed:
1) Close water main valve.
2) Remove the cartridge and the service stops with check valve and clean them.
3) Reinstall service stops with check valve
4) Open the service stops with check valve to let water flow for about
15-20 seconds to clean the water lines.
5) Close the service stops with check valve
6) Reinstall the cartridge following the instructions in Step 4-8.
ATTENTION : Le bout du boyau avec la valve anti-retour doivent être
raccordés au coude d’alimentation.
ATTENTION:
Make sure to reattach the hose so the end with the
check-valve is at the wall-elbow.
Guide de dépannage
Troubleshooting Guide
4 105169_RevE
IMPORTANT
Ouvrir l’eau à 49°C et vérifier la
température./Open water at 49°C
and check the temperature.
A
Tirer et tourner la poignée./
Pull and turn the handle.
B
49°C
8
Test d’eau
Temperature test
A
IMPORTANT
Réinstaller le manchon de la valve et la manette (étape 7)./
Reinstall the valve sleeve and handle (step 7).
D
Retirer la pièce
et tourner. /
Remove piece
and turn.
+
C
B
8.1
Ajustement de la limite de température
Increasing the temprature limit adjustment
5
15
14
4
5
Installer le manchon de la valve
Install the valve sleeve
OUVERT
OPEN
9
8
8
6Installer la plaque de montage
Install the mounting plate
2
1
21
19
Clé Allen 2.5 mm/
2.5 mm Allen key
17
18
16 22
OU/OR
OU/OR
13
20
OU/OR
3
7
Installer la plaque décorative et
la manette/Install the decorative
plate and handle

This manual suits for next models

3

Other Kalia SPEC Bathroom Fixture manuals

Kalia SPEC Basico BF1756 User manual

Kalia SPEC

Kalia SPEC Basico BF1756 User manual

Kalia SPEC Basico BF1771 User manual

Kalia SPEC

Kalia SPEC Basico BF1771 User manual

Kalia SPEC Sobrio BF1815 User manual

Kalia SPEC

Kalia SPEC Sobrio BF1815 User manual

Popular Bathroom Fixture manuals by other brands

Spectrum Brands Pfister Courant F-048-CO Quick installation guide

Spectrum Brands

Spectrum Brands Pfister Courant F-048-CO Quick installation guide

METHVEN ROUND DRY RAIL installation guide

METHVEN

METHVEN ROUND DRY RAIL installation guide

BERNSTEIN NT6705 Assembly instructions

BERNSTEIN

BERNSTEIN NT6705 Assembly instructions

brondell SWASH BL67 owner's manual

brondell

brondell SWASH BL67 owner's manual

BERNSTEIN NT3311 Assembly instructions

BERNSTEIN

BERNSTEIN NT3311 Assembly instructions

Durovin Bathrooms Ravenna 17-2nd U Shape installation manual

Durovin Bathrooms

Durovin Bathrooms Ravenna 17-2nd U Shape installation manual

Grohe Aquatower 1000 manual

Grohe

Grohe Aquatower 1000 manual

Grohe New Tempesta Cosmopolitan Series quick start guide

Grohe

Grohe New Tempesta Cosmopolitan Series quick start guide

Gessi 26897 Installation

Gessi

Gessi 26897 Installation

ellux ELEGANCE installation manual

ellux

ellux ELEGANCE installation manual

Gessi RETTANGOLO K 53001 Bath Mixing Program

Gessi

Gessi RETTANGOLO K 53001 Bath Mixing Program

Brizo Odin 65375LF Series installation guide

Brizo

Brizo Odin 65375LF Series installation guide

KOLO ATOL APN 75 installation manual

KOLO

KOLO ATOL APN 75 installation manual

Croydex QM950022 manual

Croydex

Croydex QM950022 manual

Mira GO 8.5 Installation, operation, maintenance guide

Mira

Mira GO 8.5 Installation, operation, maintenance guide

Bossini MANHATTAN L00890 installation instructions

Bossini

Bossini MANHATTAN L00890 installation instructions

AmazonBasics B07RS44KQN Welcome guide

AmazonBasics

AmazonBasics B07RS44KQN Welcome guide

KRION SMART 100253785 PRE-INSTALLATION AND INSTALLATION MANUAL

KRION

KRION SMART 100253785 PRE-INSTALLATION AND INSTALLATION MANUAL

manuals.online logo
manuals.online logoBrands
  • About & Mission
  • Contact us
  • Privacy Policy
  • Terms and Conditions

Copyright 2025 Manuals.Online. All Rights Reserved.