Kalorik USK DG 1 User manual

QUIGG TO 6
Food Steamer
Cuiseur Vapeur
Cocina a vapor
Panela a vapor
USK DG 1
120V~60H 800W

2
USK DG1 080214

3
USK DG1 080214
UK
1. Lid
2. Rice bowl
3. Superior teaming ba ket with built-in
egg holder
4. Intermediate teaming ba ket with
built-in egg holder
5. Inferior teaming ba ket with built-in
egg holder
6. Juice collector
7. Heating element protection
8. In ide maximum water level
9. Water tank
10. Heating element
11. Exterior water level indicator
12. Di play
13. Button
14. Light
F
1. Couvercle
2. Panier à riz
3. Panier upérieur avec cuit-œuf
incorporé
4. Panier intermédiaire avec cuit-œuf
incorporé
5. Panier inférieur avec cuit-œuf
incorporé
6. Plateau égouttoir
7. Protection de l’élément chauffant
8. Indicateur du niveau maximum d’eau
9. Ré ervoir d'eau
10. Elément chauffant
11. Indicateur extérieur du niveau d’eau
12. Ecran
13. Témoin lumineux
14. Bouton
ES
1. Tapa
2. Ce ta para arroz
3. Ce ta uperior con cuecehuevo
integrado
4. Ce ta intermediaria con cuecehuevo
integrado
5. Ce ta inferior con cuecehuevo
integrado
6. E curridero
7. Protección del elemento calentador
8. Indicador del nivel máximo de agua
9. Tanque para agua
10. Elemento calentador
11. Indicador exterior del nivel de agua
12. Pantalla
13. Te tigo lumino o
14. Botón
P
1. Tampa
2. Ce to para o arroz
3. Ce to uperior com cozedor de ovo a
vapor
4. Ce to intermédio com cozedor de ovo
a vapor
5. Ce to inferior com cozedor de ovo a
vapor
6. Coador
7. Protecção do aquecimento
8. Marca interior do nível máximo da água
9. Depó ito da água
10. Aquecimento
11. Vi or exterior do nível da água
12. Sinalizador
13. Botão
14. Luz

4
USK DG 1 - 080214
A embly page 4/48
IMPORTANT SAFEGUARDS
READ ALL INSTRUCTIONS
Check that your main voltage corre pond to that tated on the
appliance.
Clo e upervi ion i nece ary when any appliance i u ed by or
near children.
Do not touch hot urface . U e handle or knob .
To protect again t electrical hock do not immer e cord, plug , or
the appliance in water or other liquid.
Unplug from outlet when not in u e and before cleaning. Allow to
cool before putting on or taking off part .
Do not operate any appliance with a damaged cord or plug or
after the appliance malfunction or ha been damaged in any
manner. Return appliance to the neare t competent qualified
ervice facility for examination, repair, or adju tment (*).
The u e of acce ory attachment not recommended by the
appliance manufacturer may cau e injurie .
Do not u e outdoor .
Do not let cord hang over edge of table or counter, or touch hot
urface .
Do not place on or near a hot ga or electric burner, or in a
heated oven.
Extreme caution mu t be u ed when moving an appliance
containing hot oil or other hot liquid .
Alway attach plug to appliance fir t, then plug cord into the wall
outlet. To di connect, put the witch in off po ition, then remove
plug from wall outlet.
Do not u e appliance for other than intended u e.
Never touch the hot part of the appliance during cooking. The
tran lucent ba ket are part of the appliance with hot urface .
You mu t u e their ide handle when handling them.
Make ure nothing come into contact with the heating element
of the appliance. Only water hould be in the tank where the
heating element i . Never place food in it.
Never u e thi appliance without the drip tray.

5
USK DG 1 - 080214
A embly page 5/48
After u e and above all when the water ha n’t completely
evaporated, wait until the team top leaking through the hole
on the upper part of the lid then open the lid carefully in order
not to hurt you. Let the water drip into the food teamer. Slightly
move the lid o that the team doe not reach your hand or your
face. Caution: the conden ation on the ide of the different
ba ket may generate team and burn you.
Be cautiou while tran porting your appliance filled with hot food,
water or other liquid . It i not recommended to move your
appliance when it ha not completely cooled down.
THIS APPLIANCE IS FOR HOUSEHOLD USE ONLY
(*)
Competent qualified electrician : after ale department of the
producer or importer or any per on who i qualified, approved and
competent to perform thi kind of repair in order to avoid all
danger. In any ca e you hould return the appliance to thi
electrician.
SAVE THESE INSTRUCTIONS
POLARIZED PLUG INSTRUCTIONS
Some appliance are equipped with a polarized plug (one blade i
wider than the other). To reduce the ri k of electric hock, thi plug
will fit into the polarized outlet only one way. If the plug doe not
properly fit into the outlet at fir t, rever e it. If it till doe not fit,
contact a competent qualified electrician. Do not attempt to modify
the plug in any way.
For appliance equipped with a tandard plug, imply in ert the plug
into the outlet without paying attention to the way you plug it.
SHORT CORD INSTRUCTIONS
A hort power upply cord i provided to reduce the hazard re ulting
from becoming entangled in, or tripping over a longer cord.
Exten ion cord may be u ed if care i exerci ed in their u e.

6
USK DG 1 - 080214
A embly page 6/48
• The electrical rating of the exten ion cord hould be at lea t
that of the appliance. If the electrical rating of the exten ion
cord i too low, it could overheat and burn.
• The re ulting extended cord hould be arranged o that it will
not drape over the counter top or tabletop where it can be
pulled on by children or tripped over.
BEFORE FIRST USE
In order to eliminate any manufacturing re idue , it i nece ary to
clean the appliance and the acce orie (Cf. "Care and cleaning ")
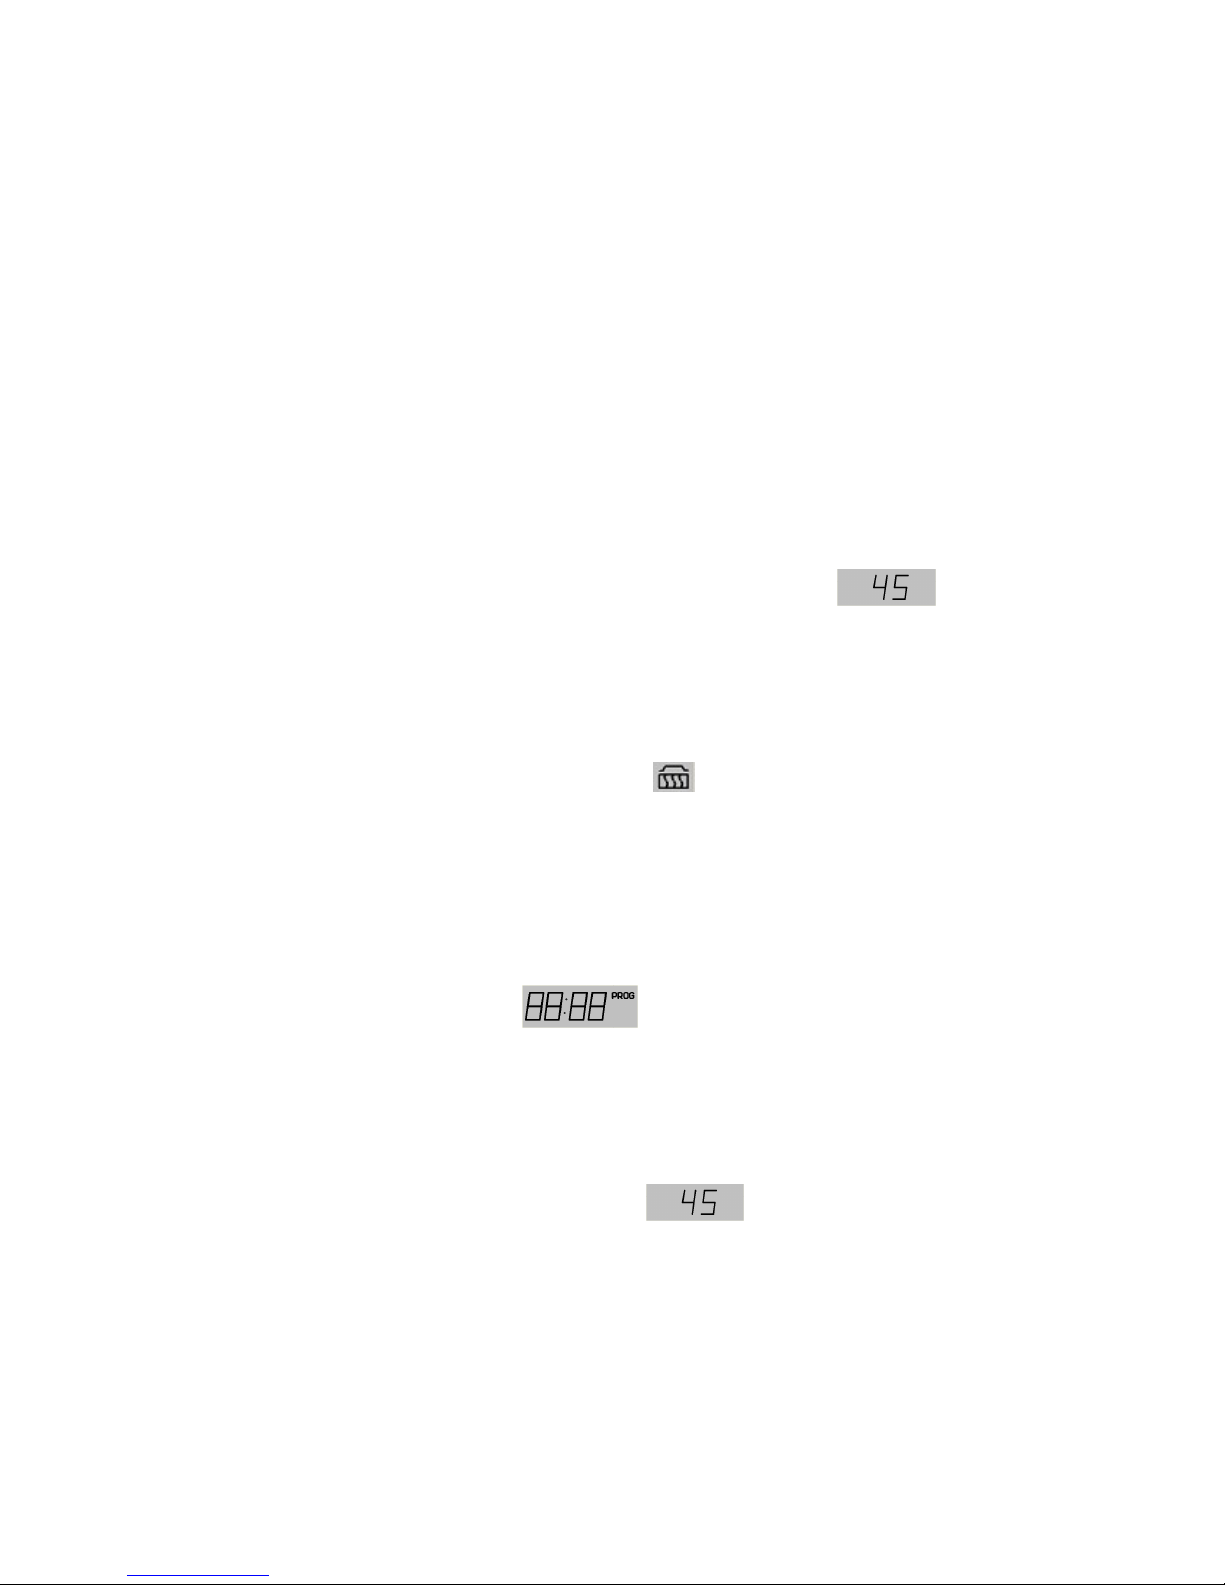
SETTING THE CLOCK
• Plug in the appliance. The di play will how
• Pre the “PROG” and “0/1” button at the ame time & relea e
them. You’ll hear a beep.
• To adju t the clock mode pre on the “+” & “-” button. Each pre
on “+” increa e the time of 10 minute & each pre on “-”
decrea e the time by one minute.
• Once the clock i adju ted, pre the “PROG” button again to end
the proce .
COOKING IN YOUR FOOD STEAMER
• Before u ing your food teamer, make ure it i OFF and cold. Fill
water tank with cold water. To do o, pour the water directly into
the water tank. The amount of water depend on the required
cooking time. However, it i very important to re pect the minimum
and maximum level. Non-ob ervance of thi in truction could
damage your appliance. Do not add any herb , pice or other
liquid uch a wine or broth to the water in the water tank.
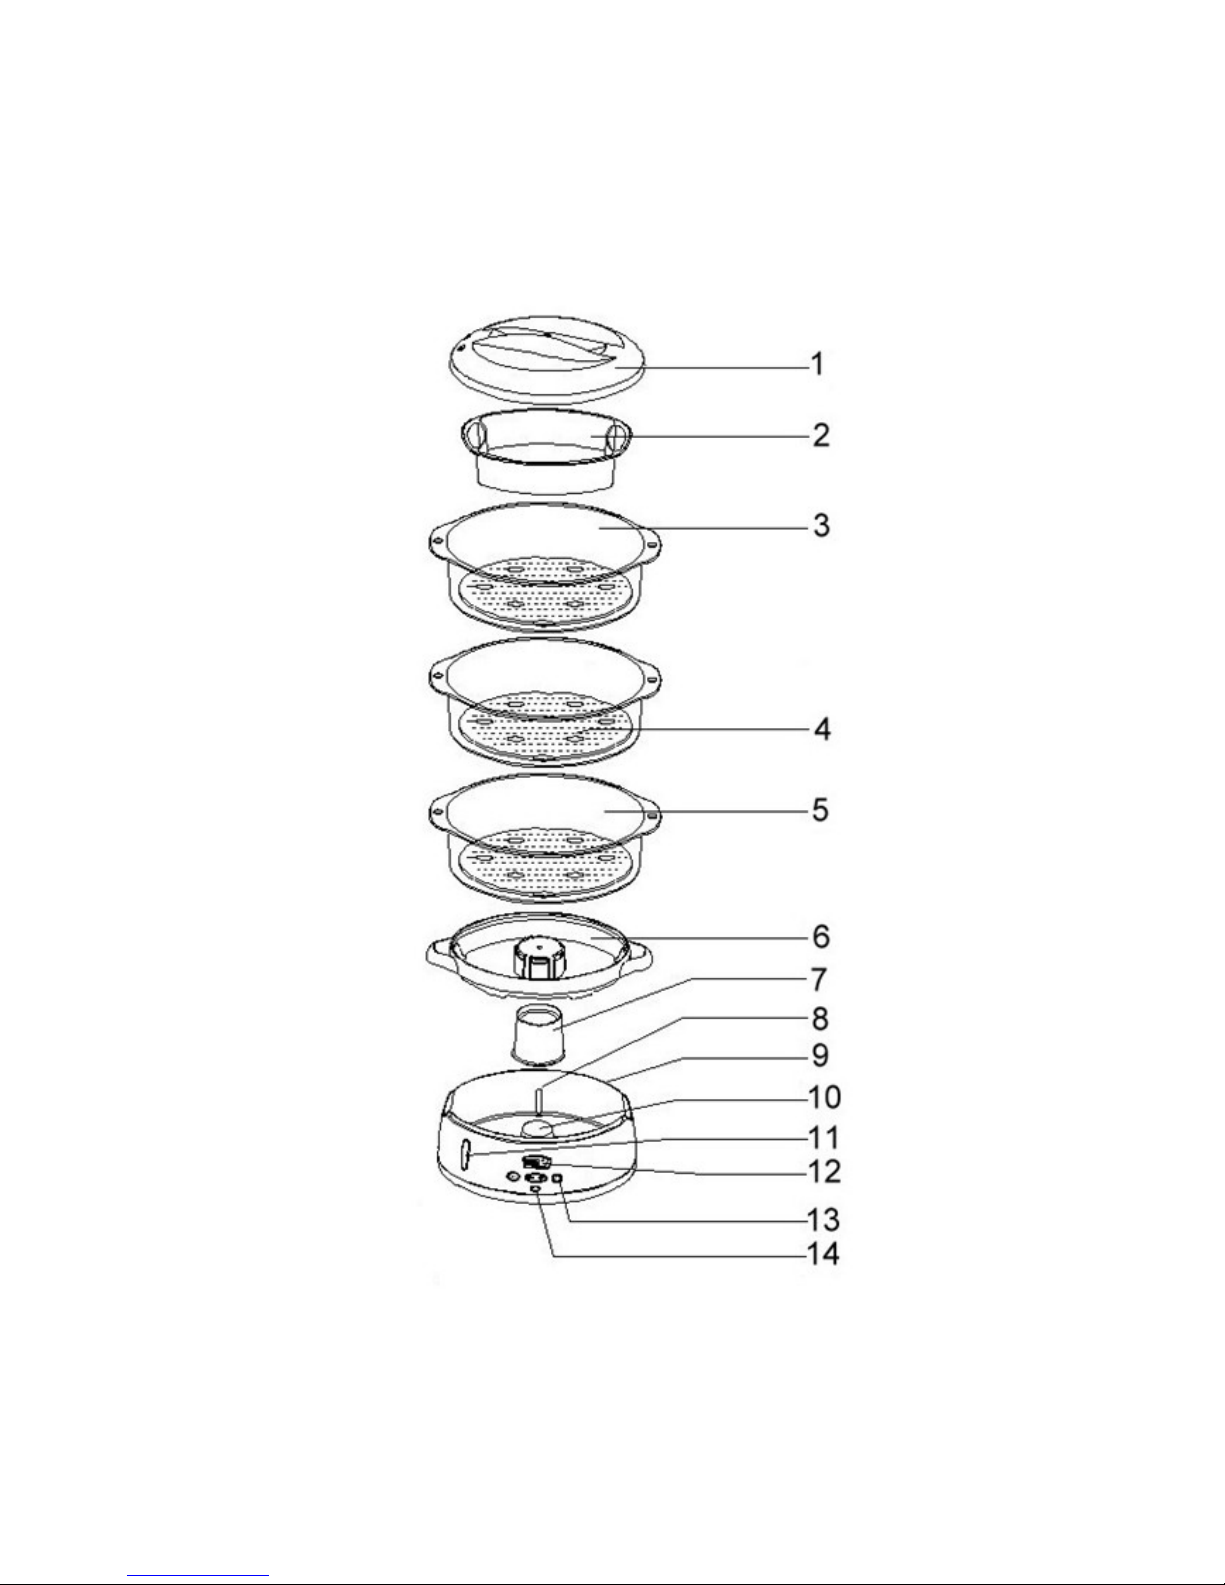
• Make ure the bottom of the ba ket i properly attached, and
place the food in the different teaming ba ket . Do not add
ea oning, herb etc. until cooking ha been completed.
• Make ure the heating element protection i fixed properly
around the heating element with the larger ide downward .
• Then place the drip tray onto the water tank and pile up the
teaming ba ket , paying attention alway to put the ba ket with
the large t ba e on the highe t level. The ize of the ba ket ba e i
indicated by number on the handle of each ba ket. The malle t
i n°1, the middle one i n°2 and the bigge t i n°3.

7
USK DG 1 - 080214
A embly page 7/48
• To pile up the ba ket , make ure the jag on the bottom of the
ba ket fit in the groove fore een on the inferior receptacle.
Caution: always use the side handles to move the baskets. Pay
attention during the po itioning of the ba ket becau e if they
are not placed correctly, team may e cape through the ide of
your appliance and may burn you.
• Place the lid on the upper ba ket DO NOT OPERATE THIS
APPLIANCE UNCOVERED-STEAM IS GENERATED DURING USE.
SETTING THE STEAMING TIME
• In clock mode, pre the “0/1” button, then relea e it. i
di played. After 4 econd you hear a beep and a red pilot light
goe on, meaning that the appliance ha begun to count down.
After the beep you can adju t the cooking time by pre ing “+” or
“-“. Each pre increa e or decrea e the teaming time by 5
minute . The maximum teaming time i 90 minute .
• Once the teaming time i over, the appliance come back
directly to “holding” mode. Time & are di played and a green
pilot light goe on. At the end of the teaming time, the holding
mode keep the food warm (every 8 minute the food i warmed
for two minute )
• Pre “0/1” button to top teaming and return back to clock
mode.
PROGRAMMATION OF THE APPLIANCE
Pre the “PROG” button. i di played. Pre “+” or “-” to
et the moment when you want your appliance to tart.
Caution: thi etting determine in how much time you want your
appliance to tart. For example, it i 6 PM, you want your appliance
to tart at 7 pm, you have to et your appliance for one hour.
Each pre increa e or decrea e the beginning of teaming time by
10 minute . You can et your appliance up to 24 hour in advance.
Pre once again the “PROG” button. i di played. You
can et the teaming time by pre ing on the “+” or “-” button. Each
pre on the “+” or “-” button increa e or decrea e the teaming

8
USK DG 1 - 080214
A embly page 8/48
time by five minute . Pre once again on “PROG”. Time and “PROG”
are di played.
Now your appliance i in “programmation” mode. Once the etting
hour ha come, you hear a beep and a red pilot light goe on. The
appliance tart to team according to your etting . If you want to
cancel the “programmation” mode, pre the “PROG” button, the
appliance come back to clock mode.
Once the teaming i over, the appliance come back to “holding”
mode, the ymbol i di played and a green pilot light goe on.
Every 8 minute , the holding mode warm the food for 2 minute
after the end of cooking time.
Pre “0/1” to come back to the clock mode.
Whatever the mode (steaming, programmation, holding…) the
appliance stops automatically once all the water has run out.
Hints:
• When cooking rice, we advi e you to cover it with hot water in
order to accelerate the cooking proce .
• It i po ible to cook food with very different cooking time but thi
need frequent operation to take away the food that will be
ready. To avoid thi , it i recommended to prepare food with
imilar cooking time.
• Frozen food doe not need to be defro ted, but it cooking time
will be longer.
CARE AND CLEANING
• Empty the water tank and clean it with a damp cloth
• De cale the appliance every 8 time . To proceed, po ition the
ring up ide down around the heating element (the large t ide
up). Fill the water tank with cold water up to “max.” level, fill the
in ide of the ring with vinegar up to the ame level. Leave
overnight to de cale. Rin e out the in ide of water tank with warm
water everal time .
• The ba ket , the drip tray and the lid may be wa hed with oapy
water or in the di hwa her. Never u e abra ive cleaner to clean
your appliance: it could damage the urface .

9
USK DG 1 - 080214
A embly page 9/48
• The body of the appliance hould be wa hed with a mooth
cloth or with a lightly damp towelling.
• Never immerse the body in water or any other liquid.
The teaming time indicated hereunder are approximative.
FRESH VEGETABLES AMOUNT APPROX. TIME
(MIN)
Artichoke (whole) 4 medium 37-40
Asparagus ( pear )
½ - 1 lb.
+/- ½” ∅ / 500gr. 13-15
Beans, green /
wax(cut or whole) 1 lb. / 500 gr 25-28
Broccoli ( pear ) 1 lb. / 500 gr 12-14
Cabbage 1 lb. / 500 gr 17-19
Carrots 1 lb. / 500 gr 15-17
Cauliflower (whole
head)
2 ½ lb . (medium) /
1250gr 14-16
Corn on cob Max. 8 17-19
Mushrooms
(whole)
½ lb. (medium) /
250gr 10-11
Onions (whole),
before grilling
1 lb. (medium)
+/- 4” ∅ / 500 gr 7-9
Peas, green 1 ½ lb . (in pod) /
1500gr 14-16
Peppers (whole),
before grilling
Max. 4 medium
9-11
Potatoes (whole) 1 lb. / 500gr or +/-
8 mall 17-19
Spinach ½ lb. / 250gr 10-12
Squash, ummer
yellow and
zucchini
1 lb. / 500gr
(medium) 11-13
Turnips 1 lb. / 500gr or +/-
5 mall 12-14

10
USK DG 1 - 080214
A embly page 10/48
SEAFOOD AMOUNT APPROX. TIME
(MINUTES)
Clams ½ - 1 lb. 250-500
gr (in hell) 10-12
Crab 1 lb./ 500 gr (+/- 6
pc ) 15-18
Lobster (tail ) 1 or 2 (7/8 oz . /
200gr each) 18-20
Mussels (fre h) 1 lb. / 500gr (in
hell) 12-14
Oysters (fre h) +/- ½ dozen 11-13
Scallops (fre h) ½ lb. /250 gr
( hucked) 10-12
Shrimp 1 lb. /500 gr(in
hell) 11-12
FISH AMOUNT APPROX. TIME
(MINUTES)
Filets:
Sole, … ½ lb. / 250 gr 8-10
Steaks:
Halibut ½ - 1 lb. 250- 500
gr 13-14
Salmon +/- 1” / 2 cm thick
18-21
Tuna +/- 1” / 2 cm thick
14-19
CHICKEN AMOUNT
APPROX. TIME
(MINUTES)
Breast, bonele
fillet ½ lb. Pc / 250 gr 14-16
Breast, plit with
bone 1 - 1 ¼ lb. / 600 gr 37-41
Drumsticks, with
bone 1 lb. / 500 gr 32-36
Thighs, with bone 1 lb. / 500 gr 34-37
Poached chicken
(breast), plit-
bonele or with
bone
1 lb. / 500 gr 45-47

11
USK DG 1 - 080214
A embly page 11/48
SAUSAGES AMOUNT
APPROX. TIME
(MINUTES)
Frankfurters Max. 1 lb. / 500
gr (8-10 pc ) 12-14
Bratwurst Max. 1 lb. / 500
gr 17-19
COMBINED IN RICE BOWL
TYPE OF RICE Rice Cold
water
APPROX.
TIME
(MINUTES
)
Brown
½ cup
1 cup
2/3 cup
1 ¼ cup
40-41
54-57
White
½ cup
1 cup
3/4 cup
1 ¼ cup
34-36
37-41

12
USK DG 1 - 080214
A embly page 12/48
WARRANTY
We ugge t that you complete and return the enclo ed Product
Regi tration Card promptly to facilitate verification of the date of
original purcha e. However, return of the Product Regi tration Card i
not a condition of the e warrantie . You can al o fill thi warranty
card online, at the following addre : www.KALORIK.com
Thi KALORIK product i warranted for 1 year from the date of
purcha e again t defect in material and workman hip. Thi warranty
i not tran ferable. Keep the original ale receipt. Proof of purcha e
i required to obtain warranty performance.
During thi period, the KALORIK product that, upon in pection by
KALORIK, i proved defective, will be repaired or replaced, at
KALORIK' option, without charge to the cu tomer. If a replacement
product i ent, it will carry the remaining warranty of the original
product.
Thi warranty doe not apply to any defect ari ing from a buyer' or
u er' mi u e of the product, negligence, failure to follow KALORIK
in truction noted in the u er’ manual, u e on current or voltage
other than that tamped on the product, wear and tear, alteration
or repair not authorized by KALORIK, or u e for commercial purpo e .
There i no warranty for gla part , gla container , filter ba ket,
blade and agitator , and acce orie in general. There i al o no
warranty for part lo t by the u er.
ANY WARRANTY OF MERCHANTABILITY OR FITNESS WITH RESPECT TO
THIS PRODUCT IS ALSO LIMITED TO THE ONE YEAR LIMITED WARRANTY
PERIOD
Some tate do not allow limitation on how long an implied warranty
la t or do not allow the exclu ion of incidental or con equential
damage , o the above limitation may not apply to you. Thi
warranty give you pecific legal right , and you may al o have other
right which vary from tate to tate.

13
USK DG 1 - 080214
A embly page 13/48
If the appliance hould become defective within the warranty
period and more than 30 day after date of purcha e, do not return
the appliance to the tore: often, our Con umer Service
Repre entative can help olve the problem without having the
product erviced. If ervicing i needed, a Repre entative can
confirm whether the product i under warranty and direct you to the
neare t ervice location.
If thi i the ca e, bring the product (or end it, po tage prepaid),
along with proof of purchase and indicating a return authori ation
number given by our Con umer Service Repre entative , to the
neare t authorized KALORIK Service Center (plea e vi it our web ite
at www.KALORIK.com or call our Cu tomer Service Department for
the addre of the neare t authorized KALORIK Service Center).
If you end the product, plea e include a letter explaining the nature
of the claimed defect.
If you have additional que tion , plea e call our Con umer Service
Department (plea e ee below for complete contact information),
Monday through Friday from 9:00am - 6:00pm (EST). Plea e note
hour are ubject to change.
If you would like to write, plea e end your letter to:
KALORIK Consumer Service department
Team International Group of America Inc
1400 N.W 159th Street, Suite 102
Miami Garden , FL 33169 USA
Or call :
Toll Free: +1 888-521-TEAM
Only letters can be accepted at this address above. Shipments and
packages that do not have a return authori ation number will be
refused.

14
USK DG 1 - 080214
A embly page 14/48
POUR VOTRE SÉCURITÉ
CONSIGNES DE SECURITE
LISEZ ATTENTIVEMENT LA NOTICE AVANT L’UTILISATION DE VOTRE
APPAREIL.
Avant d'utili er l'appareil, vérifiez que la ten ion du ré eau
corre pond bien à celle de l'appareil.
Ne lai ez jamai votre appareil an urveillance lor que celui-ci
e t en marche. Ne le lai ez ni à la portée de enfant ni à la
portée de per onne non re pon able .
Vérifiez régulièrement l’état de votre appareil et ’il e t
endommagé de quelque façon que ce oit, ne l'utili ez pa mai
faite -le vérifier et réparer par un ervice qualifié compétent(*). Si
le câble e t endommagé, il doit être obligatoirement remplacé
par un ervice qualifié compétent(*).
N’utili ez l'appareil que pour de u age dome tique et de la
manière indiquée dan la notice.
Ne plongez jamai l'appareil dan l'eau ou dan tout autre liquide
ni pour on nettoyage ni pour toute autre rai on. Ne le mettez
jamai au lave-vai elle.
N'utili ez pa l'appareil prè de ource de chaleur.
Le cordon d’alimentation doit être débranché avant de nettoyer
l'appareil.
Veillez à ne pa utili er l'appareil à l'extérieur et entrepo ez-le
dan un endroit ec.
Ne pa utili er de acce oire non recommandé par le
fabricant, cela peut pré enter un danger pour l’utili ateur et
ri que d’endommager l’appareil.
Ne déplacez jamai l’appareil en tirant ur le câble. Veillez à ce
que le cordon d’alimentation ne pui e être accidentellement
accroché et ce, afin d’éviter toute chute de l’appareil. Evitez
d’enrouler le cordon autour de l’appareil et ne le tordez pa .
Po ez cet appareil ur une table ou un upport uffi amment
table pour éviter a chute.

15
USK DG 1 - 080214
A embly page 15/48
Veuillez lai er refroidir votre appareil avant on nettoyage et on
rangement.
Ne faite cuire que de aliment approprié à la cui on et
propre à la con ommation. N’utili ez pa d’aliment de trop
grande taille
Veillez à ce que le cordon n’entre pa en contact avec de
urface chaude de l’appareil.
Vou -même, veillez à ne pa toucher le urface chaude de
l’appareil en cour de fonctionnement. Le panier ont de
partie de l’appareil à urface chaude et doivent être
manipulé en utili ant leur poignée latérale .
Prenez garde que rien n’entre en contact avec l’élément
chauffant de l’appareil. En fait, eule de l’eau doit e trouver dan
le ré ervoir où il e itue. Ne jamai y placer d'aliment .
Ne jamai utili er l’appareil an on plateau égouttoir.
Aprè emploi et urtout lor que toute l’eau n'e t pa évaporée,
attendez que la vapeur ce e de ’échapper par le trou itué en
partie upérieure du couvercle pui oulevez et enlevez le
couvercle de façon oigneu e, afin d’éviter tout ri que de brûlure,
et faite égoutter l’eau chaude dan l’appareil. Ba culez le
couvercle en le retirant, de façon à éloigner la vapeur de main
et du vi age. Attention, en coulant, la conden ation e trouvant
ur le paroi de différent ré ervoir ri que de générer de nouveau
de la vapeur et de vou brûler.
Soyez prudent i vou tran portez l’appareil lor qu’il contient de
aliment chaud , de l’eau ou d’autre liquide . Il e t fortement
décon eillé de tran porter votre appareil lor qu’il n’e t pa
totalement froid.
CET APPAREIL EST DESTINE A UN USAGE DOMESTIQUE UNIQUEMENT
(*)
Service qualifié compétent: ervice aprè -vente du fabricant ou
de l'importateur ou une per onne qualifiée, reconnue et habilitée à
faire ce genre de réparation afin d'éviter tout danger. Dan tou le
ca , veuillez retourner l'appareil auprè de ce ervice.
GARDEZ CES INSTRUCTIONS

16
USK DG 1 - 080214
A embly page 16/48
INSTRUCTIONS POUR LES FICHES POLARISÉES
Certain appareil ont une pri e polari ée (une de deux tige
métallique e t plu longue que l’autre). Pour réduire le ri que de
choc électrique, cette pri e ne peut être introduite que d’une eule
façon dan la fiche murale. Si cette pri e ne rentre pa correctement
dan la fiche, retournez-la. Si elle ne rentre toujour pa , contactez
un électricien qualifié et reconnu. N’essaye jamais de modifier
vous-même la prise polarisée.
Pour le appareil équipé d’une pri e tandard, il uffit de brancher
la pri e dan la fiche murale.
CONSIGNES CONCERNANT LE CORDON
Le cordon d’alimentation de l’appareil e t un cordon de type court,
et ce afin de diminuer le ri que d’accident (chute i vou marchez
ur le cordon...). Vou pouvez toutefoi utili er une rallonge i
néce aire mai :
• A urez-vou que l'ampérage de la rallonge oit égal ou
upérieur à celui de l'appareil. Une rallonge avec un
ampérage inférieur à celui de l'appareil ri querait de
urchauffer et de brûler.
• La rallonge ne doit pa pendre du plan de travail ou de la
table afin d'éviter que le enfant ne le tirent ou trébuchent.
AVANT LA PREMIÈRE UTILISATION
Afin d’éliminer le ré idu de fabrication, il e t néce aire de nettoyer
l’appareil et e acce oire (voir chapitre nettoyage et entretien).
REGLAGE DE L’HEURE
• Branchez l’appareil. L’écran affichera .
• Appuyez ur le bouton “PROG” et “0/1” en même temp et
relâchez-le . Vou entendrez un bip.
• Pour régler l’heure, appuyez ur le bouton “+” & “-”. Chaque
pre ion ur « + » augmente l’heure de 10 minute et chaque
pre ion ur le bouton « - » diminue l’heure d’une minute.

17
USK DG 1 - 080214
A embly page 17/48
• Une foi l’horloge réglée, appuyez ur le bouton « PROG » pour
terminer le réglage.
CUISINER DANS VOTRE CUISEUR VAPEUR
• Le cordon d’alimentation doit être débranché et l’appareil
refroidi. Rempli ez le ré ervoir avec de l’eau froide; ver ez-la
directement dan le ré ervoir. La quantité d’eau dépendra de la
durée de cui on dé irée. Il e t néanmoin important de re pecter
le niveau MAX. Le non-re pect de ce niveau pourrait
endommager l'appareil. Ne rajoutez pa d’herbe , épice ou
autre liquide (tel que du vin ou du bouillon) à l’eau du
ré ervoir.
• Placez le aliment à cuire dan le différent panier à vapeur.
Ne rajoutez pa d’a ai onnement, d’herbe etc. avant la fin de
la cui on.
• A urez-vou que la protection de l'élément chauffant oit mi e
en place et bien fixée, c’e t-à-dire la face la plu large ver le
ba .
• Po itionnez en uite le plateau égouttoir ur le ré ervoir, pui
empilez le panier achant que le plu petit panier (N° 1)doit
toujour être in tallé en premier lieu ur le plateau égouttoir et
que le plu grand panier (N° 3)doit toujour e trouver au-de u
du panier intermédiaire (N° 2).
• Pour empiler le panier correctement, a urez-vou que le
ergot au ba de panier entrent dan le encoche prévue à
cet effet ur le rebord du récipient d'en-de ou . Attention: faites
toujours usage des poignées pour transporter les paniers. Prenez
oin de po itionner de façon correcte le acce oire car ’il ont
mal placé , de la vapeur peut ’échapper par le côté de votre
appareil et ri que de vou brûler.
• Placez le couvercle ur le dernier panier. NE FAITES PAS
FONCTIONNER CET APPAREIL SANS LE COUVERCLE, DE LA VAPEUR
EST PRODUITE LORS DE SON UTILISATION.
RÉGLAGE DU TEMPS DE VAPEUR
• Lor que l’appareil affiche l’heure, appuyez ur le bouton « 0/1 »,
pui relâchez-le.
clignote à l’écran, pui ce e de

18
USK DG 1 - 080214
A embly page 18/48
clignoter. Un bip onore e fait entendre et un témoin lumineux
rouge ’allume, indiquant que l’appareil commence à
fonctionner, et commence le compte à rebour . Réglez le temp
de cui on en appuyant ur le bouton “+” ou “-”. Chaque
pre ion augmente ou diminue le temp de cui on de 5 minute .
Le temp de cui on maximal e t de 90minute .
• Une foi la cui on terminée, l’appareil revient automatiquement
en mode horloge. Le temp et ’affichent et une lumière
verte ’allume. A la fin de la cui on, le mode « holding » garde
le aliment chaud (toute le 8 minute le aliment ont
réchauffé deux minute )
• Appuyez ur le bouton « 0/1 » pour arrêter la cui on et revenir en
mode horloge.
PROGRAMMATION DE L’APPAREIL
Appuyez ur le bouton « PROG ». L’écran affiche
.
Appuyez ur “+” ou “-” pour régler le moment du début de la
cui on.
Attention : ce réglage détermine dan combien de temp vou
ouhaitez que votre appareil démarre. Par exemple, il e t 18 heure ,
vou ouhaitez que votre appareil démarre à 19 heure , vou devez
le programmer pour une heure. Chaque pre ion augmente ou
diminue le temp de 5 minute . Vou pouvez programmer votre
appareil ju qu’à 24 heure à l’avance.
Appuyez encore ur le bouton « PROG », ’affiche. Vou
pouvez régler le temp de cui on en appuyant ur le bouton “+”
ou “-. ” Chaque pre ion augmente ou diminue le temp de 5
minute . Appuyez encore une foi ur « PROG ». le temp et « PROG »
’affichent.
Votre appareil e t maintenant en mode « programmation ». Lor que
l’heure de programmation e t arrivée, un bip onore e fait entendre
et un témoin rouge ’allume. L’appareil commence la cui on elon
vo réglage .
Si vou ouhaitez annuler le mode « programmation », appuyez ur le
bouton « prog », l’appareil revient en mode horloge.
Lor que la cui on e t terminée, l’appareil revient en mode
« holding », le ymbole ’affiche et un témoin lumineux vert

19
USK DG 1 - 080214
A embly page 19/48
’allume. Toute le 8 minute , le mode holding réchauffe le aliment
pendant deux minute .
Appuyez ur « 0/1 » pour annuler le mode holding et revenir au mode
horloge.
Quel que soit le mode de fonctionnement (cuisson, programmation,
holding…), l’appareil cesse de fonctionner dès qu’il n’y a plus d’eau.
Conseils:
• Pour la cui on du riz il vou e t con eillé de couvrir le riz d'un peu
d'eau, et ce afin d'en accélérer la cui on.
• Il e t po ible de faire cuire de aliment ayant de temp de
cui on totalement différent mai ceci néce itera de
intervention fréquente pour retirer au fur et à me ure le
aliment qui eront prêt . Pour éviter cela, il e t préférable de
préparer imultanément de aliment à temp de cui on proche.
• Le aliment congelé ne devront pa néce airement être
décongelé au préalable mai leur temp de cui on era plu
long.
NETTOYAGE ET ENTRETIEN
• Videz le ré ervoir et nettoyez-le à l’aide d’un chiffon humide.
• Détartrez l’appareil toute le 8 utili ation . Pour ce faire, placez
l’anneau de protection ver le ba autour de l’élément
chauffant(le côté le plu large ver le ba ). Rempli ez le ré ervoir
d’eau froide ju qu’au niveau « max », rempli ez l’intérieur de
l’anneau ju qu’au même niveau avec du vinaigre. Lai ez agir
toute la nuit. Rincez plu ieur foi l’intérieur du ré ervoir avec de
l’eau chaude.
• Le panier , plateau égouttoir et couvercle peuvent être lavé
avec de l’eau avonneu e ou au lave –vai elle mai n'utili ez pa
de produit ou de tampon abra if qui pourraient rayer le
urface .
• La ba e de l’appareil doit être lavée à l’aide d’un chiffon doux
ou d’une éponge légèrement imbibée d’eau.
• Ne jamais immerger la base de l'appareil dans l'eau ou dans tout
autre liquide.

20
USK DG 1 - 080214
A embly page 20/48
LÉGUMES FRAIS POIDS / QUANTITÉ TEMPS MOYEN
(MINUTES)
Artichauts (entier ) 4 moyen 37-40
Asperges (pointe )
250-500 gr / ½ - 1
lb.
+/- ½” ∅
13-15
Haricots, verts /
jaunes (coupé ou
entier )
500 gr / 1 lb 25-28
Brocolis (pointe ) 500 gr / 1 lb 12-14
Choux 500 gr / 1 lb 17-19
Carottes 500 gr / 1 lb 15-17
Choux-fleurs
(entier ) 1,250 gr / 2 ½ lb . 14-16
Epis de maïs Max. 8 17-19
Champignons
(entier ) 250 gr (moyen ) 10-11
Oignons (entier ),
cuisson partielle
pour griller
½ lb. / 250 gr
(moyen )
+/- 6-7 cm ∅
7-9
Petits-pois 1,500 gr / 1 ½ lb
(en co e) 14-16
Poivrons (entier ),
cuisson partielle
pour griller
Max. 4 moyen 9-11
Pommes de terre
(entière )
500 gr / 1 lb. ou +/-
8 petite 17-19
Epinards 250 gr / ½ lb 10-12
Courges,
courgettes
500 gr / 1 lb.
(moyenne ) 11-13
Navets 500 gr / 1 lb.ou +/-
5 petit 12-14
Other manuals for USK DG 1
3
Table of contents
Languages:
Other Kalorik Electric Steamer manuals