Kangaroo KG 43H User manual


1
MỤC LỤC
CONTENTS
LỜI MỞ ĐẦU..........................................................................................................................2
CÁC ĐẶCĐIỂM CỦA MÁY................................................................................................3
LẮPĐẶT............................................................................................................................4, 5
.HƯỚNG DẪN SỬDỤNG..............................................................................................6, 7
THÔNG SỐKỸTHUẬT......................................................................................................8
NHỮNG SỰCỐTHƯỜNG GẶP.......................................................................................9
THÔNG TIN BẢO HÀNH................................................................................................10
LETTER FROM KANGAROO GROUP........................................................................11
NAME OF EACH PART…...........................................................................................…12
SPECIFICATIONS………........................................................................................…… 3.1
INSTALLATION……….................................................................................……… 14,15.
HOWTOUSETHE PRODUCT…….........................................................…16, 17, 18.
TROUBLESHEETINGGUIDE…........................................................................………19
INFORMATION ........................................................................……… 20WARRANTY ..

32
CÁC ĐẶC ĐIỂM CỦA MÁY
Kính gửi Quý khách hàng!
Với một thời gian dài xây dựng và phát triển, Tập oàn Kangaroo luôn mong muốnđ
đ đ đ Đem ến cho Quý khách hàng những sản phẩm tiện ích nhất cho ời sống sinh hoạt. ề
cao sự ổi mới và cải tiến, chúng tôi không ngừng tìm tòi, sáng tạo nhằm thỏa mãn ờiđ đ
sốngtiệnnghingàymột nâng cao.
Phát huy những iều này, chúng tôi xin giới thiệu tới Quý khách hàng sản phẩm mới:đ
MÁY LÀM NÓNG LẠNH NƯỚC UỐNG KANGAROO. Chúng tôi hy vọng với sản phẩm này,
gia ình bạn sẽbớt i những lo lắng, vất vảtrong cuộc sống hằng ngày. Niềm vui của cácđ đ
bạn cùng gia ình cũng là niềm vui và sựtựhào của tập oàn chúng tôi. Và chúng tôi cũngđ đ
rấtvuilòng nếu có thểnhậnợc những ý kiến phản hồi từQuý khách hàng ểtừc sởnàyđư ơđ
chúng tôi có thểtiếp tục hoàn thiện mình, từcó thểem lại cho Quý khách hàng mộtđóđ
dịchvụvà những sảnphẩm chất l ợngtốt nhất.ư
Tập oàn Kangaroo xin chân thành cảm n quý khách ã sửdụng sản phẩm MÁYđ đơ
LÀM NÓNG LẠNH NƯỚC UỐNG KANGAROO của chúng tôi. Xin Quý khách vui lòng ọc kỹđ
h ớng dẫn sử dụng tr ớc khi lắpặt, sửdụng, và giữlại sách h ớng dẫn sử dụng choư ư ưđ
nhữnglúc cần thamkhảo sau này.
Trântrọng!
Tậpđoàn Kangaroo
LỜI MỞ ĐẦU
1. Đènkhoang nóng (đỏ)
2. Đènkhoang lạnh (xanh)
3. Vannước nóng
4. Vannước lạnh
5. Khayhứng nước
6. Côngtắc nóng (đỏ)
7. Lắpbình úp
8. Vanxảnước
9. Giànnóng
10. Phíchđiện nguồn
11. Cầuchì
12. Côngtác lạnh (đen)

4 5
LẮPĐẶTLẮPĐẶT LẮPĐẶT
Dòngđiện lớn hơn12A
Sửdụngdây điệnđúng quyđịnh.
Ổđiện phải lớnhơn 12A
Dùng chung ổ điện với các thiết bị
khác sẽdẫn tới quá tải nhiệt và cháy
nổ
Đặtmáy ởmặt phẳngcứng
Đặtởnơi thăng bằng theo cấu
trúcsàn nhà
Tránh tiếp xúc với nhiệt hoặc nước.
Tránh đặt máy những nơi gần hơi
nóng, nước, ga, dầu, bồn rửa hoặc
gần nơi nước có thểtràn và bắn
vàomáy.
Đặt máy cách tường tối thiểu 15
cm
Lưu ý khi lắpđặtCáchlắp bình úp
1.Bóc tem dínhtrên đầu bình
2.Úp bình nướclên mặt trêncùng của máynóng/lạnh
3. Cọc dẫn nước thông minh của máy sẽmởbình nướcđể nước chảy xuống máy và giữcho
bìnhnước thăng bằngtrên máy
4.Cọc dẫn nướcsẽtự động khóalại khi tháobình úp ra
Tiếpđịa
-Sản phẩm cầnđượcnốiđấtđể tránh điệngiật
-Đặtcọc nốiđất sautrong lòng đấtđểtránh ẩmướt
-Nếu gia đìnhđã lắp thiếtbịnốiđất thì nốidây tiếpđịa củamáy vào thiếtbịnày
Phươngthức lắpđặt
-Mởvỏthùng nhẹnhàng đểtránh trầy xướcbềmặt máy
-Không đặt mátnghiêng quá 450trong khi dichuyển, dễlàm hưmáy.
-Lắpđặt máy xong,để sau 1giờmới cắmđiện chomáy
- Luôn cắmđiện cho máy sau khi nước trong khoang nóng và lạnh của máy đãđầy khi 2 vòi
đãcó nước
-Không nên đểmáy hết nướcliên tụcđểtăngtuổi thọcho máy

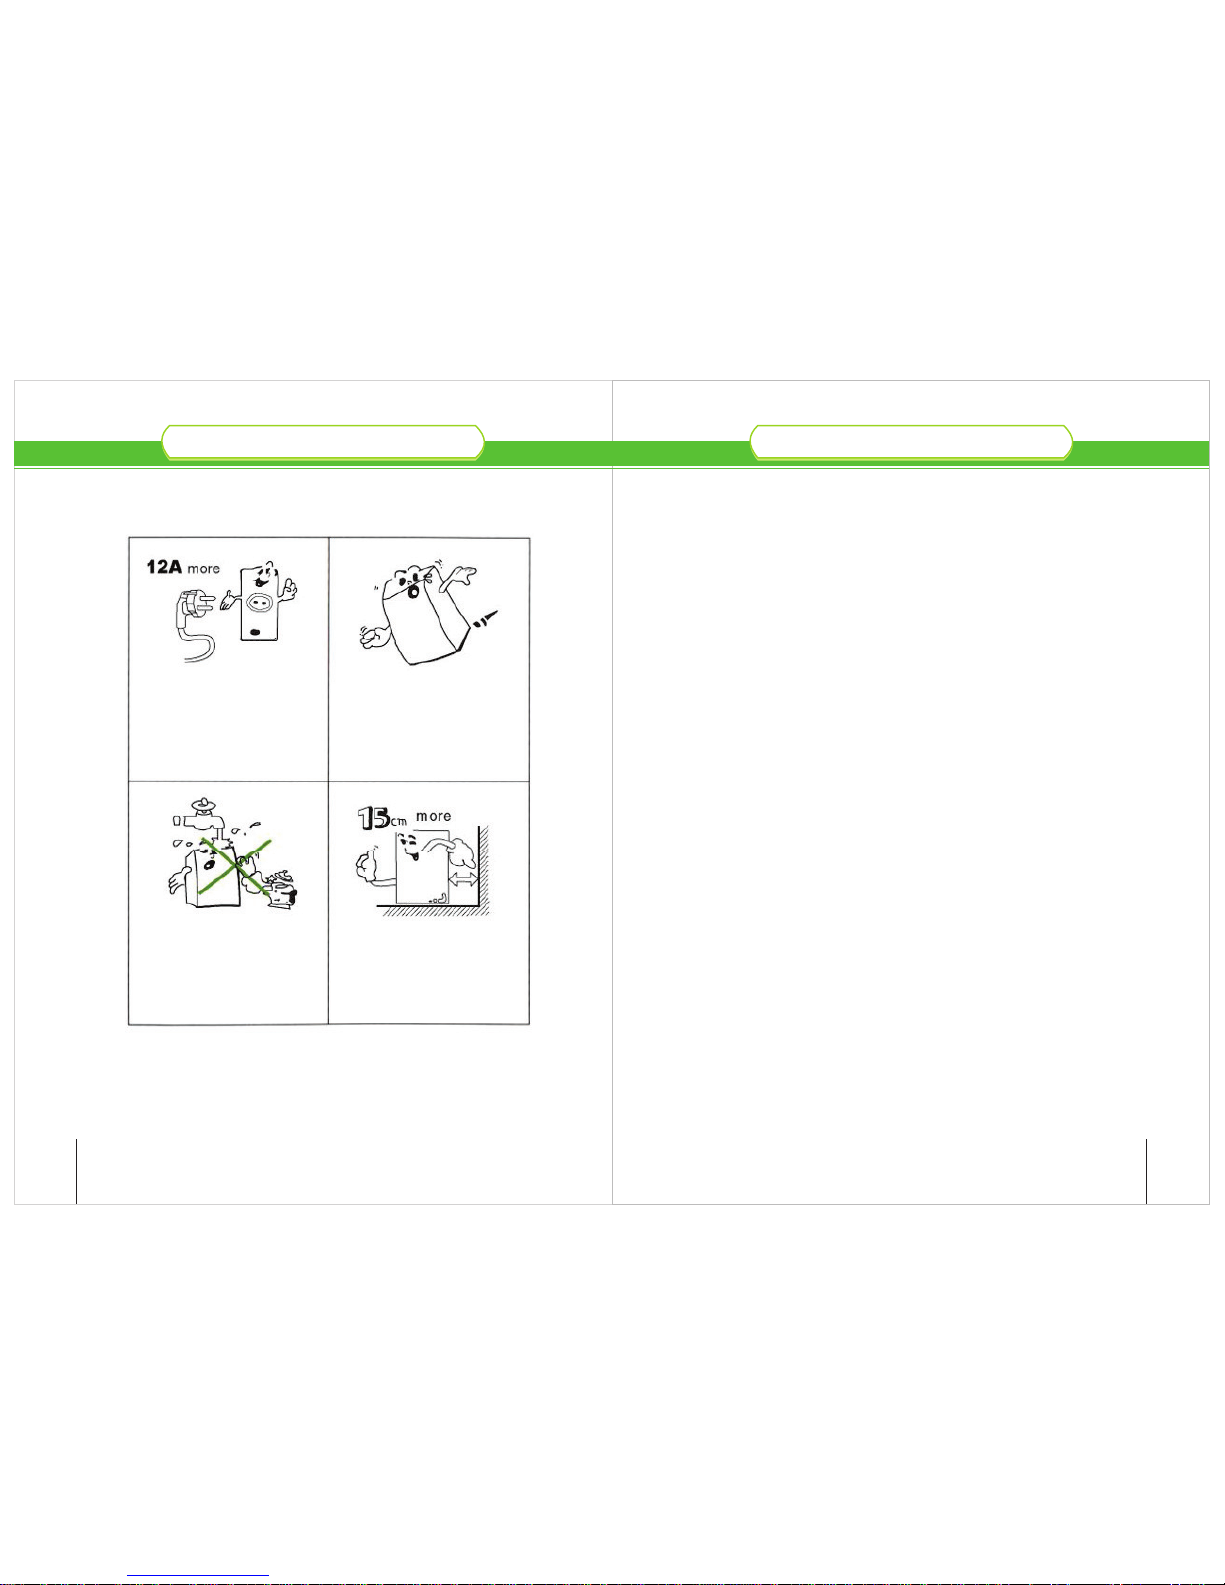
1.Không đặt thiếtbịsinh nhiệt, nướcởgầnvịtrí lắp máy
2.Máy đượcđặt trênsàn nhà bằngphẳng, giữkhoảng cáchtối thiếu 15cmvới tường
3. Chỉcắmđiện sau khi khoang chứa nước nóng/lạnh đãđầy. Cắmđiện khi không có nước
trongkhoang sẽdẫn tớihỏng máy
4. Lắp bình úp: sửdụng bình nước thiết kếriêng cho máy nóng lạnh, lắp bình lên phần trên
cùng của máy nóng/lạnh. Có nhiều bong bóng sủi trong bình nước cho thấy nướcđang
chảy vào khoang nóng/lạnh của máy. Sau khi hết bong bóng trong bình, nhấn van nước
nóngcho tới khicó nước chảyra.
5. Xảbẩn: để nướcở2 vòi chảy tựdo từ3L –5L nước sau đóđóng vòi lại. Cắmđiện, bật
công tắc phía sau máy, công tắc mầuđen cho khoang lạnh, công tắc mầuđỏ cho khoang
nóng.
6. Sau khoảng 30 phút nước sẽsôi ởnhiệtđộ 85 C - 90 C và sau khoảng 20 phút nước
0 0
lạnhởnhiệtđộ 4 C –12 C.Tắt công tắcnước nóng nếuchỉsửdụng nước lạnh
0 0
7. Sau khi nướcđủ nhiệtđộ nóng/lạnh, máy tự động ngắtđiện chuyển sang chế độ giữ
nhiệt cho nước, đèn tín hiệu vẫn sáng. Khi nhiệtđộ giảm xuống 85 C máy lại khởiđộng lại
0
vàlàm nóng nước,khi nhiệtđộkhoanglạnh lên đến10 C chếđộlàm lạnh lạikhởiđộng lại
0
8.Khay hứng nướctháo ra được,thỉnh thoảng nêntháo ra đểvệsinh và rửasạch
9. Chỉsửdụng nước tinh khiết cho máy nóng lạnh nước uống để tăng tuổi thọcho máy.
Khôngsửdụng nước máy,nước trà hoặccác loại nướckhác
Lưuý:
- Không nên để trẻem, người có thểchất kém, dị ứng, mắc bệnh tâm thần hay thiếu kinh
nghiệmvà kiến thứcsửdụng máy
- Nếu các mối nối của máy bịhỏng phải liên hệvới nhà sản xuất, đại lý gần nhất hoặc người
cótay nghểđểsửa chữa
-Sửdụng theo đúnghướng dẫnđểtránhnguy hiểm vàhưhại cho máy
-Phải luôn ngắtnguồnđiện trước khilàm vệsinh máy
- Không sửdụng chất tẩy rửa hoặc các chất hóa học có hại tới sức khỏeđể vệsinh khoang
lạnhcủa máy
-Lau mặt trướcvà sau củamáy bằng khănmềm sạch ẩmnước
-Không xịt nướctrực tiếp lênbềmặt máy
-Vệsinh dàn nóngcủa máy bằngkhăn mềm khô
-Sau khi vệsinhmáy xong, phảichờmáy hoàn toànkhô mới cắmđiện
Nếukhông sửdụng máytrongthời gian dài:
1. Mở2 vòi để tháo hết nước khỏi khoang nóng/lạnh của máy ( để nướcđọng lâu dễgây
tắcbình)
2.Xảhết nước trongbầuđun bằng cáchmởnúm van xảmàuvàng ởphía saumáy
3. Lau sạch nướcđọng trên các thiết bịcủa máy. Không để nướcđọng trên các linh kiện
củamáy, dễgây rỉ
4. Đóng gói máy bằng chính vỏthùng của máy để tránh trầy xước, bụi bẩn và những va
đậptừbên ngoài
·Cácbộphận cần vệsinh
6
HƯỚNG DẪN SỬDỤNG
7
HƯỚNG DẪN SỬDỤNG
Các phần cần vệsinh
Đĩađệm bình úp
Khay hứng nước
Khoang nóng/lạnh
Van nước nóng lạnh
Thân máy
Các phần cần vệsinh
Hàng ngày
2 lần/ngày
Hàng tuần
Hàng ngày
3 ngày/lần
Tần suất
Lau bằng nước tẩy rửa không gây
độc hại. Sửdụng khăn mềm, sạch
Kiểm tra thường xuyên, gầnđầy là phải
đổ đi và rửa sạch bằng nước tẩy rửa
không độc hại
Thay nước, lau sạch bằng khănấm
Lau bằng khăn mềm, sạch
Lau bằng khăn mềm, sạch.
Không sửdụng xăng dầu hoặc những
vật liệu có thểlàm thay đổi hoặc làm
xước bềmặt máy
Phươngpháp làm vệsinhkhoanglạnh
1.Tháo nắp cọcthông minh
2.Lấy khăn sạchlau khoang chứanước lạnh

8
THÔNG SỐKỸTHUẬT NHỮNG SỰCỐTHƯỜNG GẶP
9
STT
1
2
3
4
5
6
7
8
9
10
11
12
13
14
Tên sản phẩm
Kích thước ngoài
Trọng lượng
Block làm lạnh
Hệthống làm lạnh
Khoang chứa nước lạnh
Khoang chứa nước nóng
Nhiệtđộ làm lạnh
Nhiệtđộ làm nóng
Điều khiển nhiệtđộ
Công suất nóng
Công suất lạnh
Nguồnđiện
Giàn nóng
Thiết bị đun nóng
Máy nóng lạnh nước uống
36x34x104(cm)
25 kg
Block LG môi chất làm lạnh R134a
Hệthống làm lạnh trực tiếp
Dung tích 3L, bình INOX 304
Dung tích 1.8L, bình INOX 304
4 C - 12 C
0 0
85 C - 90 C
0 0
Sốlạnh ( thermostat)
430W
85W
220V/50Hz
Dạng lưới
Điện trởngoài
* Vui lòng xem thông sốkỹthuật chi tiết trên tem phụcủa máy. Nhà sản xuất có
thểthay đổi Model, thông sốkỹthuật mà không thông báo trước.
Hiện tượng
Máy không hoạtđộng
Làm lạnh không tốt
Tiếng ồn lạ
Không làm nóng nước
Rò rỉnước
Nguyên nhân
1.Ổ điện sai
2.Dây nguồn hỏng
3.Hỏng cầu chì
1.Khí thoát phía sau kém
2.Nước trong bình úp
quá nóng
3.Điều chỉnh bộ ổnđịnh
nhiệt không thích hợp
1.Máy đặt chưa cân bằng
2.Máy chạm vào các
thiết bịkhác
1.Chưa cắmđiện
2.Chưa bật công tắc
nóng
1.Vòi nước bịtuột
Biên pháp khắc phục
1.Kiểm tra nguồnđiện
2.Thay dây điện
3.Thay cầu chì mới
1.Duy trì khoảng cách tối thiểu
15cm giữa máy và tường
2.Nhiệtđộ nước trong bình úp
phải dưới 30 C
0
3.Điều chỉnh lại bộ ổn nhiệt
1.Đặt máy ởvịtrí sàn cứng và
bằng phẳng
2.Đảm bảo không chạm vào
bất cứthiết bịnào
1.Đảm bảo nguồnđiện 220-240V
2.Bật công tắc nóng
1.Kiểm tra vòi nước
2.Tháo ổ điện

MÁY LÀM NÓNG LẠNH NƯỚC UỐNG KANGAROO ã ợcội ngũkỹthuật của Tậpđ đđư
đoànKagaroogiámsátvà kiểmtrachấtl ợngmộtcáchnghiêmngặt.ư
Với vai trò là nhà sản xuất và cung cấp hàng gia dụng hàng ầu Việt Nam, chúng tôiđ
xincamkếtmang ếnchoquýkháchhàngnhữngsảnphẩmvà dịchvụbảohànhtốtnhất.đ
Nếu sản phẩm có sai hỏng trong thời gian bảo hành do lỗi của nhà sản xuất, sản
phẩm sẽ ợc sửa chữa, bảo d ỡng hoặc thay thếcác bộphận h hỏng hoàn toànđư ư ư
miễnphí.
1.Sản phẩmợc bảohành 12 thángđư
2.Trong các tr ờnghợp sau, máysẽ ợc sửa chữacó tính phí:ư đư
a.Hết thời hạnbảo hành.
b.Hỏng hóc dosửdụng bất cẩnhoặc sửdụng saiso với h ớngdẫn sửdụng.ư
c.Hỏng hóc dothiên tai, hỏahoạn gây ra.
d.Mất thẻbảo hành.
Tất cả các phần ớng dẫn sử dụ ã ợc biên tập và kiểm tratrong hưng này đ đư
rất kỹ ỡ ối với bất kỹ lỗi sai và thiếu sót do việc in ấn hoặc sự hiểu nhầlư ng. Đm
đối vớ ớng dẫn sử dụng, công ty chúng tôi hoàn toàn có quyền giải thíchi hư
những vấ ề này. Thêm nữa, bất kỳsựcải tiến kỹthuật nào thểhiệnđn trong
hư đư i mà không thông báo trướng dẫn có thểsẽ ợc sử ổ ớc. Hình ảnh và màuađ
sắc sản phẩ ớng dẫn sửdụng chỉmang tính chất minh họa.m trong hư
Dear Customers!
For a long time building and development, Kangaroo group always try our best
to give customers the best products for utility daily life. Enhancing innovation and
improvement, we constantly explore innovation to meet the improving of modern
life. Keep the way, Kangaroo Group introduces a new product: KANGAROO
BLENDER
We hope with this new product, you will feel more convenient and enjoy your
life. The happiness of your family is glad and pride of our group, too. And we will be
happy if we can get feedback from you. From this base we can continue to improve
ourselves, that we can provide you and other customers a best service, best
quality products.
Thank you for purchasing KANGAROO BLENDER. Please kindly read this
instruction manual in detail before installation and operating. Always keep this
user manual for future reference.
Best Regards,
KANGAROO GROUP
THÔNG TIN BẢO HÀNH LETTER FROM KANGAROO GROUP
10 11

NAME OF EACH PART SPECIFICATIONS
12 13
7.Water guard
8.Drain cap
9.Condenser
10.Power cord
11.Fuse
12.Cold water switch
1.Hot lamp(red)
2.Cold lamp(blue)
3.Hot water faucet
4.Cold water faucet
5.Drip tray receiver
6.Hot water switch
Name of Product
External Dimensions
Weight
Compressor
Refrigerant
Cooling
Cold water tank
Hot water tank
Water cooling
Water heating
Temperature control
Heater power consumption
Motor power consumption
Regulated power
Heater
Overheat protection device
Hot-cold water dispenser
36.5 x 35 x 104 cm
16.7 kg
LG
R134a
Forced cooling type
Inox 304 SS, 3Liters
Inox 304 SS, 1.8 Liters
Abt. 4 W- 12 W
Abt. 85 W- 90 W
Thermostat
430W
85W
220V/50Hz
Band heater
Bi-metal(auto return)
Please take the technical parameters on the label sticked on the product as the
standard. We may change model and data plate, excuse us for not notifying
separately in advance.

Grounding
-Grounding of theproducts is requiredto prevent electricshock;
-Place the groundrod deep intoground containing sufficientmoisture;
-If a groundingterminal is installed,use this groundingterminal.
Installationmethod
- Do no excert excessive power when unpacking to avoid damaging the surface of
productbody;
- Do not tilt the product more than 45 degree while moving the product. It may cause
manufuntionof product;
- When finishing installation do not apply electric power for at least one hour
thereafter;
- Always apply electric power after filling with water once water falling continuously
fromhot-cold faucet;
- Applying electric power without water in the hot-cold water tanks will damage the
product.
INSTALLATION INSTALLATION
14 15
12Amore
Use electric cord of proper capacity.
The plug should be rated for more
than12A.
Sharing with other electrical products
in the same outlet will overheat the
outletandmay cause fire.
Place the product on the hard level
surface.
Place products on the horizontal,
structurally
Soundfloor.
Avoid contact with hear or water.
Avoid placing product near source of
heat or steam such as gas range, oil
stove or near sink, or other place
where water may be splashed on
product.
Maintain sufficient distance from wall
atleast 15 cm.
Precaution during installation

Pleaseobserve the followingprecautions during installation:
1.Avoid heat, sourceof heat, watercontacting with theproduct;
2. Place the product on the horizontal, structurally sound floor, maintain sufficient
distancefrom wall atleast 15 cm.
3. Confirm electric power supply once water filling full to hot-cold water tank, if applying
electricpower without waterin the hot-coldwater tank willdamage the product.
4. Installing water bottle: Using designated bottle for water dispenser only, insert the
bottle into the top of the water dispenser, bubbles are generated inside the bottle
indication that water is flowing into the hot water and cold water tanks. After bubbles are
notgenerated any more,press the hotwater valve untilflows through itcontinuously.
5.Dust water drain:shut off 3water faucets afterwater draining continuouslyof 3L –5L;
6. After applying power, about 30 minutes required to use hot water(85W-90W), and
about20 minutes forusing of coldwater(4W- 12W). Turnoff the hotwater switch.
7. When the heating power has turnoff it means the temperature of the water in hot
water bucket has reached about 90W, the bucket is in warm-keeping state, temperature
lamp keep lighting. When the temperature drops to 85Wthen heating starts again, when
thetemperature of thecold water risesto 10Wthe refrigerationstarts again.
8.Usually detach thewater tank fromthe drip tray.
9. Use only a designated bottle for the product. If use tap water, barley tea or any other
typeof drinking watermay shorten thelife of theproduct.
Warning
1. This appliance is not intended for use by persons who are children, reduced physical,
sensoryof mental capabilities,or lack ofexperience and knowledge.
2. If the supply cord is damaged it must be replaced by the manufacturer, its service
agentor similarly qualifiedperson in orderto avoid ahazard.
3. To avoid any hazard due to instability of the appliance, it must be fixed in accordance
withthe instructions.
4.Always unplug thepower cord beforecleaning the product.
5.Never use detergentor chemicals.
6.Wipe the frontand back orproduct with water-soaked,soft cloth.
7.Do not directlyspray water onthe surface ofthe product.
8. If dust or other foreign substance has accumulated on the condenser, wipe off with
water-soakedsoft cloth.
HOW TO USE THE PRODUCT
16 17
HOW TO USE THE PRODUCT

TROUBLE SHOOTING GUIDE
18 19
Problem
Not working
Not good in colding
Noise and strange
sound
Hot water not
working well
Water leakage
Particle piece of ice
produced
Possible reason
1. Electric cord is wrong
2. Power cord is bad
3. Fuse is cut
1. Airing of the back
side is bad
2. The thermostat controller
is not in good condition
1. Flow installed dispenser
is not horizontal
2. ouching to otherT
products
1. Electric power is not
applied
2. Hot water switch is off
1. connecting hose
came out
Thermostat badly
controlled
Solution
1. Check the power source
2. Check the power cord
3. Change fuse
1. Maintain at least 15cm from
wall for a good ventilating
2. Turn the thermostat controller
to more colder place
1. Place dispenser on hard,
level floor
2. Avoid touching to other
products
1. Confirm electric power
(220-240V)
2. Turn on the hot water switch
1. Extract power cord
2. Confirm the connecting hose
Adjust the thermostat control
to proper position
Ifthe product won'tbe use toprolonged period
1.Water can bedrained completely byloosening the hot-coldwater caps
2. Remove any remaining surface moisture from each part of the product. Damp
surfacecause rusting
3. Wrap the product in its original vinyl and corrugated paper to prevent from being
damagedby rust, dustand other foreignsubstances.
4.To use again,follow the installinginstruction.
Cleaningmethod
HOW TO USE THE PRODUCT
Parts to be cleaned
Waste water tank
Hot-warm-cold faucet
External
Hot-cold water tank
Frequency
Twice daily
Once daily
Once per 3 days
Weekly
Cleaning method
Check frequently and wipe off with
neutral detergent
Clean with damp cloth and then wipe,
using dry cloth
Clean with damp cloth, do not use
…gasoline, benzene such as materials
may change the surface color or
scratch the sur face
Replace water, wipe with damp cloth
Howto clean thecold water tank
1.Take off thescrew fixing topcover fixing topcover on therear of product
2.With pulling thetop cover afterthe hold upa little atthe rear side,lift up thetop cover

WARRANTY INFORMATION
20
HOT COLD WATER DISPENSER is strictly monitored and examined in quality by the
technical team from Kangaroo Corporation.
As the leader in manufacture and produce household in Vietnam, we undertake
to provide customers with the best products and best warranty services.
If the product gets defected or disordered during the warranty time, the
detected elements will be fixed, maintained or replaced free of charge.
1. The warranty period is 12 months
2. In the following cases, the products will be repaired with charging fee:
a. Expiry of warranty period.
b. Damages caused by careless of users or using not follow the instruction of
manual.
c. Damages by disaster or fire.
d. Loss warranty card.
All the contents in this USER MANUAL have been subjected to careful
check. For any mistake and mission in printing or misunderstanding of the
contents, the company keeps the right of explanations. Additionally, any
technical improvement will be shown in the revised manual without notice.
The product appearance and color in this manual just for your reference.
This manual suits for next models
1
Table of contents
Languages: