Kanto YU 4 User manual

Supporting your digital lifestyle™
English
User Manual
YU4 Powered Speaker
POWERED SPEAKERS

3
Introduction
Thank you for choosing YU4 Powered Speakers, designed by Kanto in Canada. YU4 outputs
140W Peak power into 4 Ohm speakers, for remarkably bold and clean sound. Excellent
sensitivity and frequency response provide deep thumping lows and clear, scintillating highs.
YU4 is an amazingly exible speaker system that can accept ve input sources and connect to
a subwoofer for enhanced low frequency response. Additionally, it is equipped with the latest
Bluetooth technology and a USB port for charging your devices. YU4 has a universal input
power supply and can be used worldwide from 110V AC to 240V AC.
We recommend you read all instructions carefully before using the system and keep them for
future reference. Kanto cannot be liable for damage or injury caused by incorrect setup or
use of this product.
This powered speaker system was carefully tested and inspected during production,
and before packaging and shipping. After unpacking, please check for any damage. It
is rare that a unit is damaged during shipping, but if this happens contact your retailer
immediately. You can also contact Kanto directly using one of the methods below.
What’s In the Box?
YU4 Active
Speaker
(Left Channel)
YU4 Passive
Speaker
(Right Channel)
Power
Cord
User
Manuals
x3
x8
Self-Adhesive
Rubber Feet
3.5 mm cable
AUX
Speaker
Wire
AUX
RCA OPT2OPT1
BALANCE
BASS TREBLE
YU4
Remote
x2
‘AAA’
Batteries
Email: [email protected]
Toll Free: US & Canada: 1-888-848-2643 | UK: +44 800086999

Right Channel Out
OPT1
OPT2
Sub
Out
AUX
L
R
RCA
Serial Number
ON OFF
USB Charge
5V / 1A
www.kantoaudio.com
Designed in Canada
Made in China
RCA
Phono Line
GND
FCC ID:
IC:
Front & Rear Panels
FRONT PANEL
1 1” Silk Dome Tweeter
2 4” Kevlar®Mid/Woofer Driver
3 LED
White - Power on / Playback Mode
Yellow - Standby (solid)
- Mute (ashing)
Blue - Discover Mode (ashing)
- Paired (solid)
4 Volume / Input Select / Standby /
Wake-up
REAR PANEL
5 RCA L/R Input
6 3.5 mm AUX Input
7 Subwoofer Output
8 Optical 1 and Optical 2 Inputs
9 Right Channel Output Terminals
(+ and −) for Passive Speaker
Connection
10 Turntable Ground Post
11 RCA input Phono/Line switch
12 USB Charge Port (5 V 1.0A)
13 ON / OFF Switch
14 AC Input Connection (100 V - 240 V)
4Supporting your digital lifestyle™
2
3
4
6
5
7
8
9
12
11
13
10
14
1
YU4’s volume knob functions as an input
select knob as well.
Push the knob to select an input source
- it cycles through the following inputs
depending on what input source was
last used.
RCA AUX OPT1 OPT2 BLUETOOTH
Push and hold the knob to enter
standby or wake up from standby
Volume/Input Select Knob

5
AUX
RCA OPT2OPT1
BALANCE
BASS TREBLE
Remote Control
1 Standby Button - press to enter
Standby Mode or return to Playback
Mode
2 RCA Input Select
3 3.5 mm Stereo AUX
Input Select
4 Optical 1 Input Select
5 Optical 2 Input Select
6 Bluetooth® Input Select
7 Bluetooth®Reset
8 Increase Volume
9 Decrease Volume
10 Increase Bass Output
11 Decrease Bass Output
12 Reset Bass Output
13 Increase Treble Output
14 Decrease Treble Output
15 Reset Treble Output
16 Mute
17 Balance Control Left Channel
18 Balance Control Right Channel
19 Reset Balance (Left and Right
Channels)
20 Previous Track (Bluetooth® Operation)
21 Play / Pause (Bluetooth® Operation)
22 Next Track (Bluetooth® Operation)
2
3
1
6
7
8
4 5
9
10
11
13
14
15
12
18
19
17
16
20 22
21
Install two supplied AAA batteries in the back of your YU4 remote. Remote Control
functions are listed below.

6Supporting your digital lifestyle™
Setting Up Your Speakers
The YU4 powered speaker system is designed for either bookshelf or stand mounting. The stands
should be of rigid construction, between 26” to 32” high. We recommend the Kanto SP26 speaker
stands to go with your YU4.
The space between the two speakers and the distance from the listener is important. If the
speakers are positioned too close or too far apart, stereo imaging will not be fully developed.
YU4 is designed to perform optimally positioned at least 8” from the rear wall in an average
listening room. However, it may not be possible to install the speakers in this position and since
rooms vary in shape, size, and furnishing, a certain amount of experimentation is necessary to
determine the most suitable position.
Moving the speakers very close to the rear wall will enhance the bass frequencies but will tend to
reduce soundstage depth, while moving the speakers away from the rear wall will tend to have
the opposite eect. Avoid positioning the speakers close to or in the corners of the room, as
this will excite undesirable room coupling in the low and middle frequencies. If the width of the
rear wall is limited then toe-in the speakers slightly to reduce reections. Room characteristics
and positioning have a profound eect on the performance of the speakers, so time and eort
devoted to achieving the optimum positions will be rewarded.
Ensure that the ON/OFF Switch is in the OFF position.
Connect the two speakers together as shown below using the supplied speaker cable. Connect
the RED (+) and BLACK (−) terminals from the active speaker (left channel) to the corresponding
terminals on the passive speaker (right channel). If you wish to place your speakers farther apart
than the supplied cable will reach, we recommend that you purchase a heavier gauge of speaker
cable to minimize signal loss.
Follow the instructions on the ensuing pages to connect your audio sources to YU4.
Connect the power cord from YU4’s active speaker to the wall outlet.
OPT1
OPT2
Sub
Out
AUX
R
L
RCA
ON OFF
USB Charge
5V / 1A
RCA
Phono Line
GND
www.kantoaudio.com
Designed in Canada
Made in China
www.kantoaudio.com
Designed in Canada
Made in China
ATTENTION
When connecting audio cables the ON/OFF Switch must be turned OFF. After connecting all cables, the unit can be
turned ON.
When the volume is high, this system can produce noise levels that could permanently damage your hearing.
YU4 is a self-powered speaker system. Do not connect the speaker terminals to the speaker intputs of a stereo
amplier. Damage may occur. Use only the power cord provided with the speakers.

7
Connecting Audio Sources
Connecting a Turntable
YU4 features a high quality DAC (digital-to-analog converter) for the optical inputs that
supports data streams up to 24-bit/96 kHz resolution.
YU4 supports Bluetooth 4.0 with Qualcomm® aptX™ technology.
Use the appropriate audio cable to connect your audio source components to your
speakers.
• 3.5 mm stereo mini-jack AUX cable
• Stereo RCA to 3.5 mm stereo mini-jack ‘Y’ cable
• Optical Toslink cable
YU4 features a built in Phono Pre-Amp that allows you to connect directly to a turntable.
• connect your turntable to the RCA L/R inputs on the back of the YU4
• connect your turntables grounding wire to the grounding post (not all turntables
feature a ground wire)
• If your turntable does not have a built in Phono Pre-Amp, use the “Phono” setting
on the Phono switch.
• If your turntable has a built in Phono Pre-Amp, use the “Line” setting on the Phono
switch.
ATTENTION
Some models of turntables include a built-in Phono Pre-Amp. If your turntable has a
built in Phono Pre-Amp, DO NOT use the Phono setting on the RCA switch. Doing so
will void your warranty and could cause severe damage to your speakers.

8Supporting your digital lifestyle™
Auto Power-up / Auto Power-down
The YU4 is designed to save power when not in use. When no audio signal has been detected for 15
minutes, the YU4 Amp will put itself into stand-by mode. If the audio signal returns via the same input
that the YU4 was playing when it entered standby, the YU4 will wake up and resume playing. It can also
be woken up manually by:
• Pressing the Standby Button on the Remote
• Pressing the Control knob
If you do not nd the Auto Power-up (APU) feature useful, you can disable it by pressing the Balance
Reset button on the remote and holding it for 5 seconds. The Status LED will blink once to indicate that
you have disabled the APU feature. To enable the APU if you have disabled it, simply press and hold
the Balance Reset button again for 5 seconds. The Status LED will blink twice to indicate that you have
enabled the APU.
Note that APU is always turned on when power is applied, but will only work after automatic power
down. APU will not work if unit is manually switched to standby using the remote or control knob.
Note that APU function will not work when using the Bluetooth input.
Connecting a Subwoofer
YU4 is equipped with a RCA connector to provide output signal to a powered subwoofer. Simply
connect a single RCA cable from the SUB OUT connection on the YU4 to the AUDIO INPUT on your
subwoofer. If your subwoofer has a stereo L/R RCA input, either input will work.
We recommend the Kanto sub6 or sub8 powered subwoofer with crossover and volume controls. Most
quality subwoofers oer these controls, which allow you to customize the amount of bass you will
experience.
Look for details on the Kanto website at: www.kantoaudio.com
Right Channel Out
OPT1
OPT2
Sub
Out
AUX
L
R
RCA
Serial Number
ON OFF
www.kantoaudio.com
Designed in Canada
Made in China
RCA
Phono Line
GND
SUB
RCA (MONO)
U
U

9
USB Charging Operation
YU4 features one 5V 1.0 A USB charging port on the back panel. This is a convenient power source to
charge your devices.
When YU4 is in Playback Mode (LED White) and Standby Mode (LED yellow), the port is active, and
whatever device is connected is able to draw up to 1.0 A of power.
Bluetooth®Operation
1. We recommend keeping a maximum distance of 10 meters between the speaker and your device.
The best signal delity is within this range.
2. You can stream audio from your device to the speaker using either the player control buttons of
your device or the control buttons of the remote control (see diagram of Remote Control on page 5
of this manual – buttons #20, #21, and #22).
3. Take note of the following behavior and functionality during Bluetooth operation. When you are
successfully connected, the Blue LED will be lit solid, and your device will show as connected to ‘YU4
by Kanto’.
• The connection between speaker and device remains active even if input source has changed.
For instance, you can switch to another input source (e.g. RCA) and return to Bluetooth
operation without losing signal connection and, therefore, do not need to pair with the device
again.
• When the speaker is put in Standby mode or powered OFF, Bluetooth connection with the
device is lost. When the speaker returns to Playback mode, the Bluetooth connection between
the speaker and device is re-established. However, you may notice a choppy playback signal for
approximately 30 seconds after reconnection. It will normalize.
• While the speaker can be paired with more than one device, only one device can play and
transmit audio signal at a time.
4. The YU4 remote control features a Bluetooth Reset button to quickly disconnect a paired device and
allow a second device to pair with the speaker (button #7 on the Remote Control diagram on page
5).
• Press Bluetooth Reset button to disconnect a paired device.
• Follow the pairing instructions to pair another device.
• The same behavior and functionality apply to the second device.
Bluetooth®Pairing
YU4 features Bluetooth 4.0 with Qualcomm® aptX™ technology and can be paired with many devices
for wireless audio playback from your phone, MP3 player or tablet. Pairing is easy.
1. Press the Bluetooth button ( ) on YU4’s remote to select it as the input source. The Bluetooth LED
(blue) will ash to indicate that YU4 is in pairing mode.
2. Enable your Bluetooth device to search for a new device to pair with. Select ‘YU4 by Kanto’ from the
list of Bluetooth devices available for pairing.
3. If pairing is successful, the Bluetooth LED (blue) will remain solid. You will not need to pair the same
Bluetooth device again - ‘YU4 by Kanto’ will remain on your device list until you remove it from the
list.
4. If the device does not pair with YU4, turn the speaker’s ON/OFF Switch to the OFF position, then
repeat Steps 1 to 3. Alternatively, you can press the Bluetooth reset button ( ) on the remote or
turn o Bluetooth on your device and turn it back on again.

10 Supporting your digital lifestyle™
Audio Troubleshooting Guide
Frequently asked questions about Kanto’s YU4 speakers.
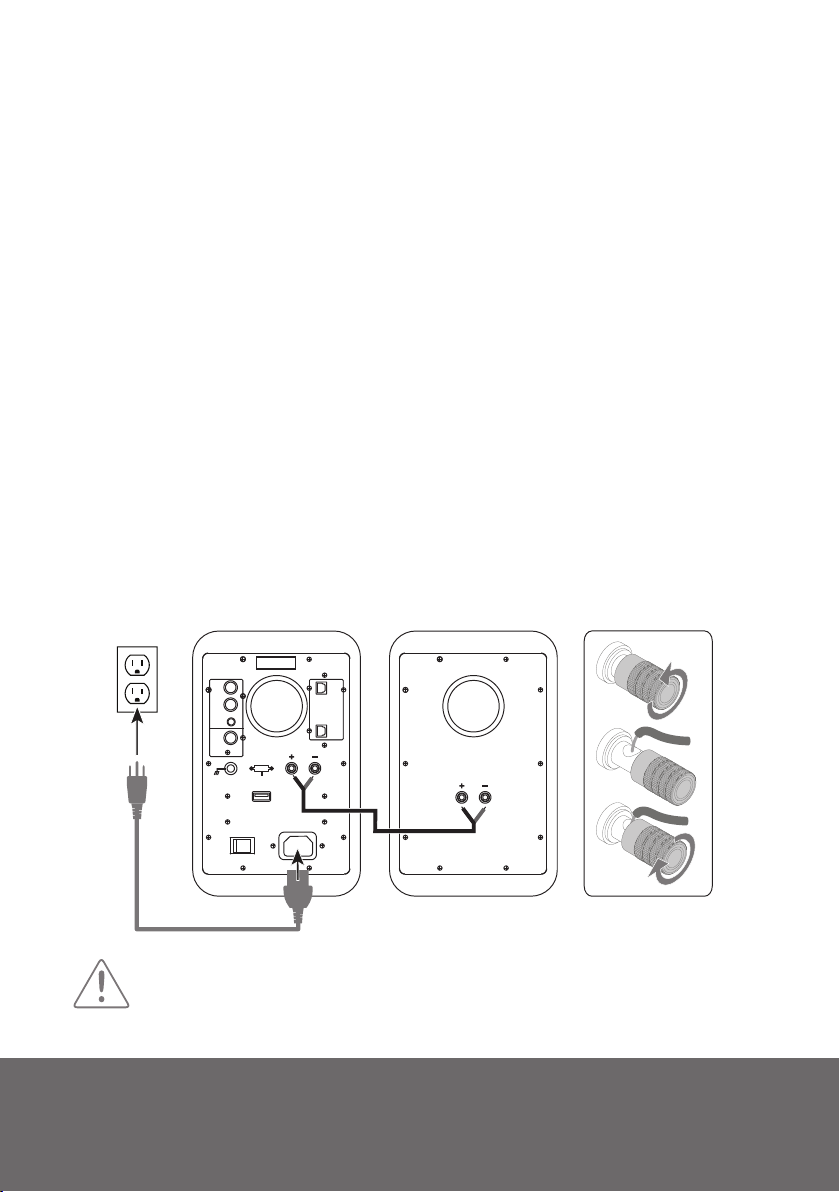
• Make sure the power cable is connected to the speaker
and power outlet.
• Ensure that the power outlet is providing power.
• Verify that the power switch on the rear of the speaker
is in the “On” position.
• Set the volume of the source to its highest level. Low
source volume can negatively aect dynamic range.
• Verify that the speaker wire is connected to the same
color terminals on the active speaker and passive
speaker.
• Ensure that the rear of the speaker is spaced away
from the wall by at least 8 inches, allowing the rear
port function to be left unimpeded.
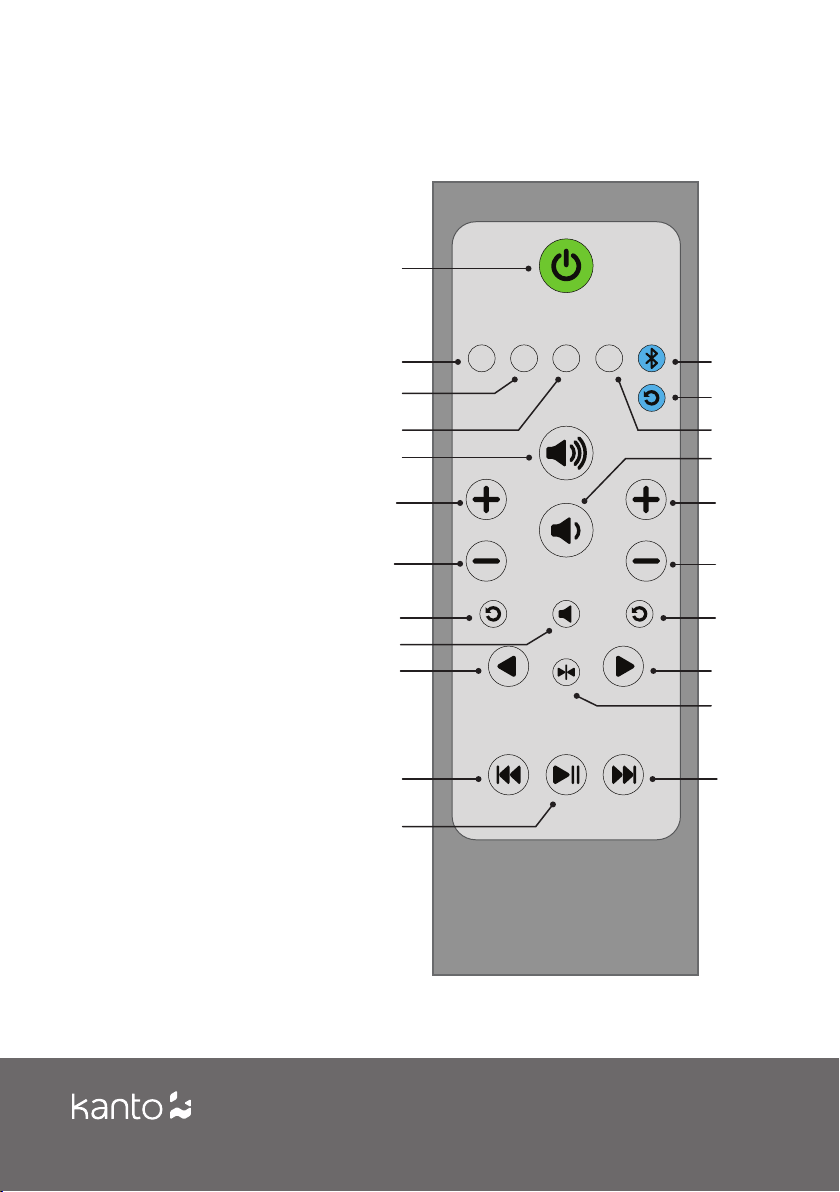
• Set the bass and treble levels to the default setting by
pressing the EQ reset button on the remote.
• Test a dierent song or source to isolate the issue.
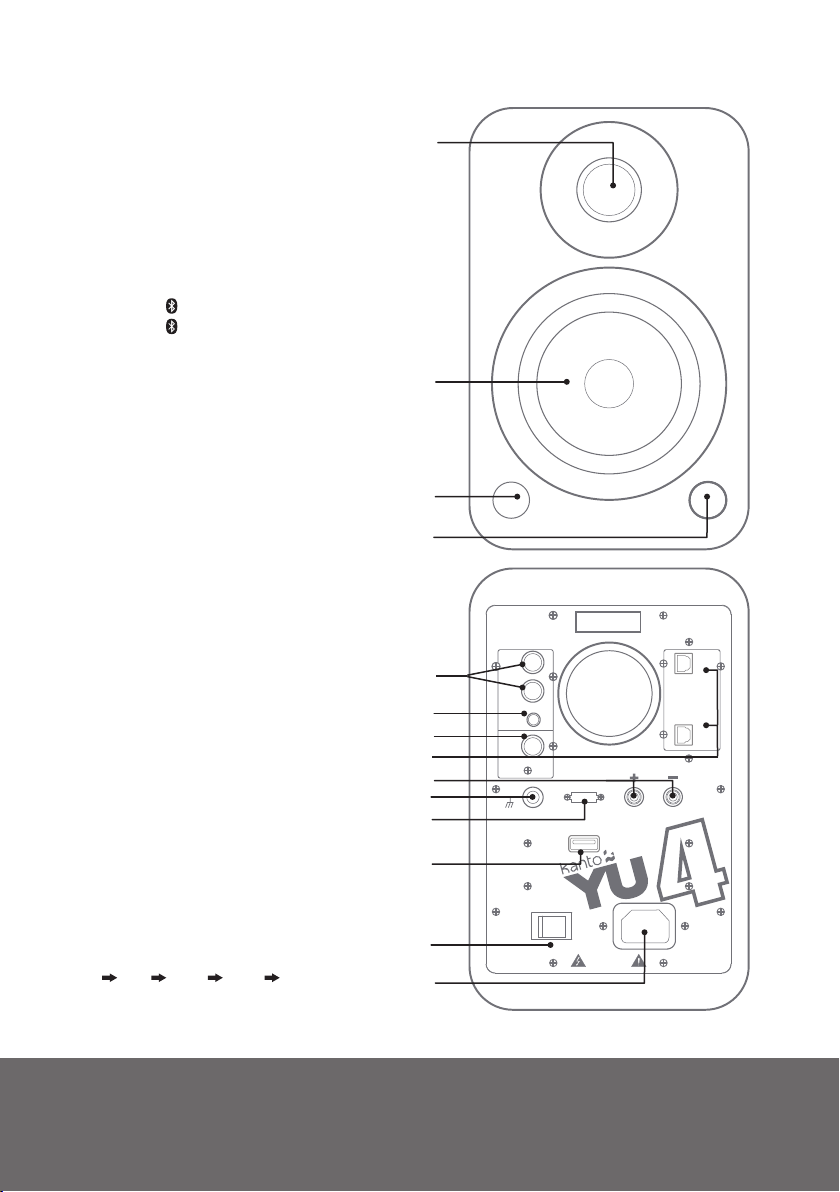
• Make sure the correct input is selected. Click the knob
on the front of the speakers to cycle through the
ve dierent inputs or use the remote to choose the
correct input.
• Set the volume of the source to its highest level.
Ensure audio source is playing audio.
• Check that the audio cable connected to and from the
source is rmly connected. Test another audio cable
if available.
• Verify that the volume of the speaker is not at its
minimum level. Turn the volume up using the knob on
the front or the volume controls on the remote.
• Ensure the speakers are in Bluetooth mode by
clicking the Bluetooth button on the remote or
cycle through the inputs by clicking the knob on
the front of the speakers until the blue light on the
front panel of the speakers starts ashing.
• Make sure the blue light on the front panel of the
speakers is ashing, indicating the speakers are in
pairing mode. If the blue light is solidly lit, click the
Bluetooth reset button on the remote to unpair a
previously used device.
• On the source, turn Bluetooth o and on again.
• If the speakers cannot be found while searching for
devices on the source, turn o the speakers using
the power switch on the rear of the speaker. Switch
them back on and try these steps again.
• Reconnect the speaker wire between the active
speaker and passive speaker and ensure the ends of
the speaker wire are fastened securely through the
binding posts.
• Check that the audio cable connected to and from the
source is rmly seated. Try a dierent cable or source
to isolate the issue.
• Ensure that the balance setting on the source is
centered. Some sources may not have an adjustable
balance setting.
• Ensure that the balance setting on the speakers is
centered by using the balance reset button on the
remote.
• If using the optical input, set the source’s output to
stereo — not surround, Dolby, DTS, or 5.1 — and
set the sample rate to 96Khz or lower.
• Verify if the noise is coming from the source by
removing all sources from the speakers.
• Make sure it is not a power issue by trying a power
outlet that is on a dierent circuit.
• Check that the audio cable connected to and from
the source is rmly seated. Try a dierent cable or
source to isolate the issue.
• When using AUX with a PC, reduce the volume of
the speakers and increase the PC volume. Also try
connecting the speaker ground terminal to the PC
chassis ground if noise persists.
2.
7.
1. 6.
4.
9.
5.
3.
8.
The white light on the front panel is
illuminated but there’s no audio playing.
The source will not connect to Bluetooth.
None of the lights on the front panel are
illuminated.
You are experiencing poor audio quality.
Audio is only playing through one
speaker.
You are experiencing buzzing, hissing or
distortion.
Your remote is not functioning correctly.
There’s no audio coming from an attached
subwoofer.
Speakers are going into standby while
listening to audio.
• Ensure there is a clear line of sight from the remote to
the speakers. Aim the remote at the speakers.
• Check battery compartment of remote to make sure
the batteries are installed and aligned correctly.
• Replace batteries.
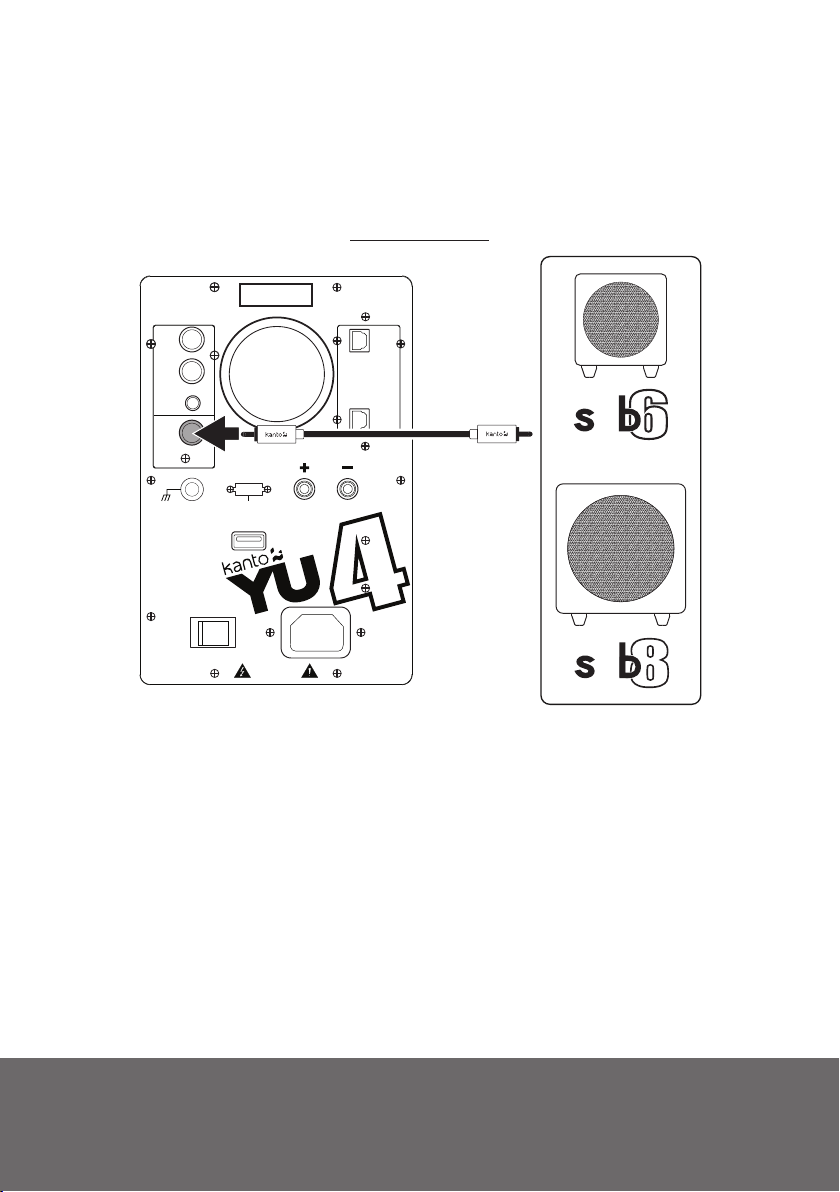
• Check that the RCA cable connected to and from the
subwoofer is rmly seated. Try a dierent cable or
source to isolate the issue.
• Make sure the subwoofer is connected to a power
outlet and is set to “On” or “Auto”.
• Increase the volume of the subwoofer.
• Set the volume of the source to its highest level.
Low source volume can inadvertently trigger
standby mode.

11
Specications
Tweeters 1 inch Silk Dome
Woofers 4 inch Kevlar®
Nominal Impedance 4 Ohm
Amplier Type Class D
Power Output 140 Watts Peak
Input Sensitivity 560 mV
Total Harmonic Distortion < 0.25%
Crossover System 2-way
Crossover Frequency 2.0 kHz
Frequency Response 60Hz – 20kHz
Inputs 1 x 3.5 mm stereo mini-jack AUX
1 x RCA L/R
2 x Optical (Toslink)
1 x Bluetooth® 4.0 with Qualcomm aptX
Outputs 1 x Subwoofer
1 x USB Charge Port 5 V 1.0A
Speaker Terminals Left and Right Binding Posts
Input Voltage / Frequency AC 100 V - 240 V 50/60 Hz (auto switching)
Standby Power Consumption < 0.5 W
Remote Included
Dimensions (each speaker) W 5.5”x H 8.7” x D 7.5” (140 x 220 x 190 mm)
Net Weight (Active) 6.9 lb (3.2 kg)
Net Weight (Passive) 5.5 lb (2.5 kg)
Gross Weight 16.5 lb (7.5 kg) (boxed pair)
YU4 POWERED SPEAKER SYSTEM
NOTICE: The Bluetooth® word mark and logos are registered trademarks owned by Bluetooth SIG,
Inc. and any use of such marks by Kanto Distribution Inc. is under license.
NOTICE: Qualcomm aptX is a product of Qualcomm Technologies International, Ltd. Qualcomm is
a trademark of Qualcomm Incorporated, registered in the United States and other countries, used
with permission. aptX is a trademark of Qualcomm Technologies International, Ltd., registered in
the United States and other countries, used with permission.
NOTICE: This appliance is labeled in accordance with European Directive 2002/96/
EC concerning waste electrical and electronic equipment (WEEE). This label indicates
that this product should not be disposed of with household waste. It should be
deposited at an appropriate facility to enable recovery and recycling.
MANUFACTURER AND IMPORTER:
Kanto Living Inc., 9136 196A Street, Langley, BC, Canada V1M 3B4
Other manuals for YU 4
1
Table of contents
Other Kanto Speakers manuals

Kanto
Kanto iPair5 User manual

Kanto
Kanto YU Passive 4 User manual

Kanto
Kanto Tuk User manual

Kanto
Kanto SYD User manual

Kanto
Kanto YUMI POWERED SPEAKER User manual

Kanto
Kanto GRANDSTAND User manual

Kanto
Kanto iPair5 User manual

Kanto
Kanto YU6 User manual

Kanto
Kanto YU User manual

Kanto
Kanto SP6HD User manual