manuals.online logo
Brands
  1. Home
  2. •
  3. Brands
  4. •
  5. Karma
  6. •
  7. TV Mount
  8. •
  9. Karma VD 013 User manual

Karma VD 013 User manual

VD 013
Supporto TV da 13” a 42”
DD
Installazione dell'adattatore
.Individuate lo standard VESA appropriato al TV/monitor, fissate l'adattatore alla parte posteriore dello schermo,
utilizzando l'opportuna combinazione di viti e rondelle (come mostrato nella figura 2.1, 2.2 e 2.3)
.Le viti devono fare almeno 3 giri completi nel foro di montaggio ed entrare facilmente. Non stringere in eccesso
.Ripetete l'operazione per tutti i fori di montaggio, livellate la piastra e stringete le viti.
Installing adapter plate
.Find the appropriate VESA, attach the adapter plate to the back of the screen using the appropriate combination
of screws, washers, as shown in fig.2.1, fig.2.2 and fig.2.3.
.Begin with the proper screw, hand thread through washer and adapter plate into screen as shown below.
.Screw must make as least three full turns into mounting hole adn fit snug into place. Do not over tighten.
.Repeat for remaining mounting holes,level plate and tighten screws.
Pitching angle adjustment
.Use the tilting adjusting M6*15mm screws to adjust your TV to the desired angle, the pitching angle can be
adjusted between -3°~ +10°, as shown fig 3.1.
Regolazione angolo di inclinazione
.Utilizzate le viti M6*15mm per regolare l'angolo d'inclinazione del vostro televisore. L'angolo di inclinazione può
essere regolato da -3°~ +10°, come mostrato nella fig 3.1.
Manutenzione
Una volta montati la staffa e lo schermo piatto, controllate che siano ben fissati e sufficientemente saldi.
Suggeriamo di controllare le viti ogni due mesi. Per qualunque dubbio sull'installazione consultate la nostra
assistenza.
Maintenance
Once you have mounted the bracket and the plat screen, check that they are sufficiently secure and saft to use.
You should check whether screws are fixed well each two months. If you have any doubts regarding the
installation, please consult our retailer or service dapartment for detail.
fig. 2.1 fig. 2.2
fig. 3.1
tilting adjusting screws
fig. 2.3
C
(Optional) M-E
wall
ver. 18.1
KARMA ITALIANA Srl
Via Gozzano 38 bis
21052, Busto Arsizio (VA) - Italy
Telefono +39 0331.628.244 www.karmaitaliana.itmade in China
I
E
Strumenti richiesti
. Cacciavite a croce (lunghezza 200mm
escludere la maniglia)
. Trapano elettrico e punta da muro 10 mm
per installazione a muro in calcestruzzo
. pennarello
. Martello
Tools required
. Phillips Head Screw driver(200mm length
exclude the handle)
. Electric drill and 10mm masonry bit for concrete
all installation
. marking Pen
. Hammer
Componenti della confezione / Component Checklist
ATTENZIONE: Assicurarsi di aver ricevuto tutte le parti dall'elenco di
controllo dei componenti prima dell'installazione. Se alcune parti mancano
o sono difettose, avvisa il nostro reparto tecnico.
IMPORTANT: Ensure you have received all parts against the
component checklist prior to installing. If any parts are missing or
faulty,telephone the special franchiser for a replacement.
Pacco M / Package M
Pacco W / Package W
M4 x 15 (x4)
M-A
M6 x 15 (x2)
ST6.3 x 50mm (x3)
W-A
(x3)
W-B
Pacco P / Package P
M6 x 15 (x4)
M-B
M8 x 15 (x4)
M-C
D6 (Φ6 x Φ16)
rondella / washer (x4)
M-D
1a INSTALLAZIONE SU UNA PARETE IN LEGNO
. Utilizzate un apposito rilevatore per individuare le estremità dei montanti. L'utilizzo di un'apparecchiatura di
precisione è altamente raccomandata. Tracciate una linea verticale in corrispondenza del centro del montante
. Posizionate la piastra di fissaggio sulla parete e segnate il centro dei fori di montaggio.
Assicuratevi che i fori siano perfettamente centrati.
. Fate con il trapano 3 fori di diametro 1/8” (3mm) e profondità 2.4” (60mm). Dopo esservi accertati che la piastra sia
in bolla, fissatela usando 3 tirafondo per legno come mostrato nella figura 1.1
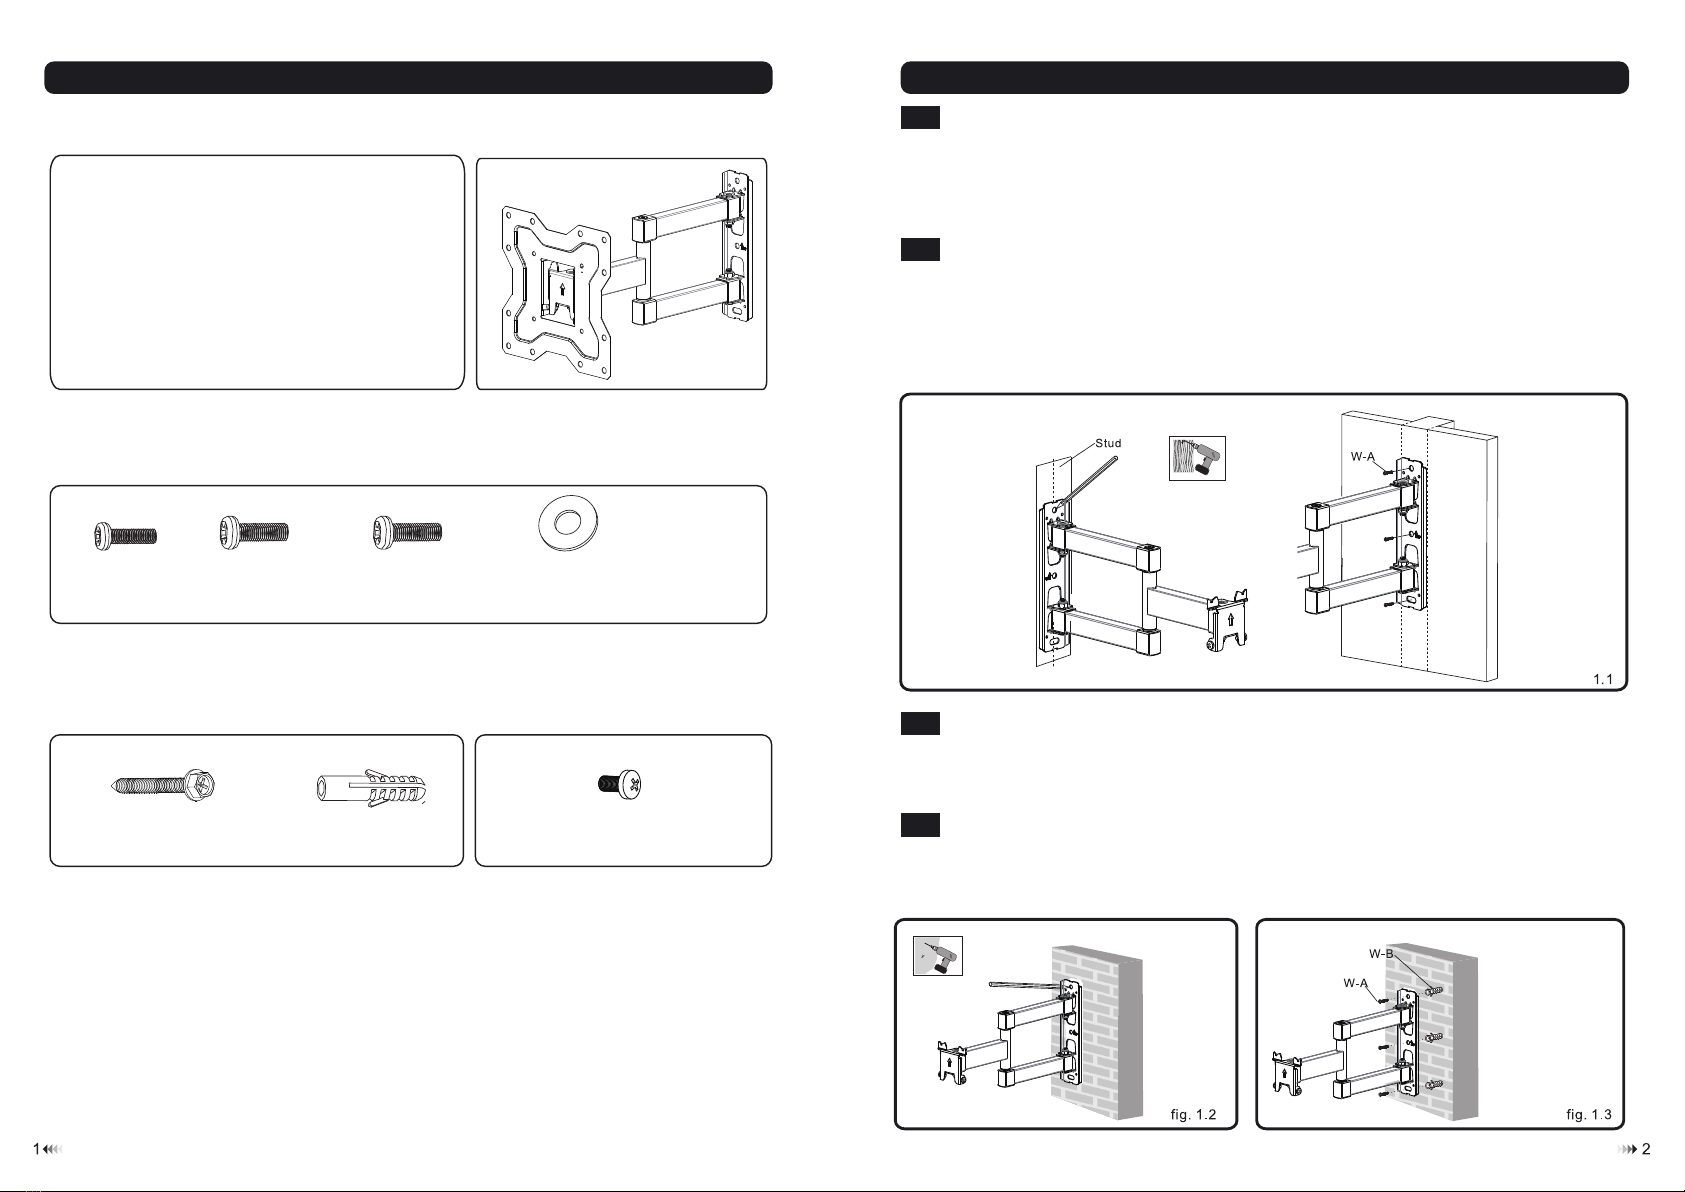
1a INSTALLATION ON A WOODEN WALL
. Use a stud finder to locate the edges of the studs. Use of an edge-to-edge stud finder is highly recommended.
Based on their edges, draw a vertical line down each stud’s center.
. Place wall plate on wall as a template. And mark the center of the two mounting holes. Make sure that the
mounting holes are on the stud centerline.
. Drill three 1/8” (3mm) dia. Holes2.4” (60mm) deep. Make sure that the wall plate is level, secure it using three Lag
bolts (W-A) as shown in fig. 1.1
1b INSTALLAZIONE SU PARETI IN MATTONI / CEMENTO
. Utilizzate la piastra come come sagoma per segnare la traccia dei 3 fori da fare sul muro (come mostrato nella figura 1.2)
. Iniziate a praticare dei fori in corrispondenza dei segni con una punta per muratura da 10mm ad una profondità di almeno
60mm. Inserite un tassello in ciascun foro. Fissate la piastra al muro utilizzando 3 tirafondo come da figura 1.3. .
1b SOLID BRICK AND CONCRETE BLOCK MOUNTING:
. Use the wall plate as a template to mark 3 holes locations on the wall,as shown fig. 1.2.
. Pre-drill these holes with a 10mm masonry bit to at least 60mm in depth, Insert a Concrete Anchor (W-B) into each of
these holes. Attach the Wall Plate to the wall using 3 lag bolts (W-A), as in fig. 1.3. into each of these holes. Attach the
Wall Plate to the wall using 3 lag bolts (W-A), as in fig. 1.3.

Other Karma TV Mount manuals

Karma VD 156 User manual

Karma

Karma VD 156 User manual

Karma VD 163 User manual

Karma

Karma VD 163 User manual

Karma VD 42 User manual

Karma

Karma VD 42 User manual

Karma VD 123 User manual

Karma

Karma VD 123 User manual

Karma VD 09 User manual

Karma

Karma VD 09 User manual

Popular TV Mount manuals by other brands

Gembird WM-37T-01 user manual

Gembird

Gembird WM-37T-01 user manual

peerless-AV tru-vue TRWS251/BK installation instructions

peerless-AV

peerless-AV tru-vue TRWS251/BK installation instructions

Mounting Dream MD2617-03 installation instructions

Mounting Dream

Mounting Dream MD2617-03 installation instructions

Chamberlain CAPXLTK quick start guide

Chamberlain

Chamberlain CAPXLTK quick start guide

Toshiba WAL14C Operation manual

Toshiba

Toshiba WAL14C Operation manual

Philips SQM6325 user manual

Philips

Philips SQM6325 user manual

QSC QM-BW user manual

QSC

QSC QM-BW user manual

Orion Stealth+ installation guide

Orion

Orion Stealth+ installation guide

Extron electronics SMB 111T installation guide

Extron electronics

Extron electronics SMB 111T installation guide

Premier Mounts PTDM1 installation guide

Premier Mounts

Premier Mounts PTDM1 installation guide

AVF JML2400 manual

AVF

AVF JML2400 manual

SMS C281U018-1A Installation and adjustment manual

SMS

SMS C281U018-1A Installation and adjustment manual

Rhino-Rack 43173 quick start guide

Rhino-Rack

Rhino-Rack 43173 quick start guide

Vivo MOUNT-VW03G instruction manual

Vivo

Vivo MOUNT-VW03G instruction manual

Speaka Professional 98 99 30 operating instructions

Speaka Professional

Speaka Professional 98 99 30 operating instructions

Kanto DM1000 user manual

Kanto

Kanto DM1000 user manual

JVC RK-C42WBT3 Assembly and mounting instructions

JVC

JVC RK-C42WBT3 Assembly and mounting instructions

Hama 00049527 quick start guide

Hama

Hama 00049527 quick start guide

manuals.online logo
manuals.online logoBrands
  • About & Mission
  • Contact us
  • Privacy Policy
  • Terms and Conditions

Copyright 2025 Manuals.Online. All Rights Reserved.