Karman Healthcare XO-202 Series User manual

INSTRUCTION MANUAL
POWER STAND UPWHEELCHAIR
KARMAN HEALTHCARE INC.

Table of Contents
P.3 XO-202: Parts Explanation
Chapter 1. SAFETY TIPS
1-1. Standing
1.2. Important symbols found on the vehicle
1-3. Safety Information on Driving and Freewheel Mode
1-4. Rear Wheels
1-5. Armrests
1-6. Power Drive Attachments
1-7. Modifications
Chapter 2.
UNPACKINGAND PREPARING THE STAND UP
WHEELCHAIR EX SERIES STAND UPWHEELCHAIR FOR USE
2-1. The original package and accessories.
2-2. Unfolding the stand up wheelchair
Chapter 3. ADJUSTMENT
3-1. Adjusting the seat depth
3-2. Adjusting the backrest height
3-3. Adjusting the Footrest height
3-4. Adjusting the Footrest Angle
3-5. The knee support and safety belt and chest belt
3-6. Adjusting the Armrest height
3-7. The heel strap
3-8. Gas spring
3-9. The seat cushion
Chapter 4. DRIVING
4-1. Before Driving for the First Time
4-2. Taking Obstacles
4-3. Driving Up and Down Gradients
4-4. Free Wheeling
Chapter 5. OPERATION THE STANDING AND SITTING
Chapter 6. CONTROL SYSTEM
6-1. The SHARK II Remote
6-2. Battery and control box connection
6-3. Battery charge
Chapter 7. MAINTENANCE & WARRANTIES

XO-202 Series
01
02
03
04
05
06
07
08
09
10
11
12
01 Backrest 07 Armrest
02 Chest belt 08 Controller Chest belt
03 Side Panel 09 Seat Rest
04 Rear Wheel 10 Knee Support Set
05 Motor/Differential Gear 11 Footrest
06 Front Wheel 12 Stand Up Casters

Chapter 1. SAFETY TIPS
Powered Chair Electromagnetic Interference (EMI)
WARNINGS
The following warning listed below should reduce the chance of unintended brake
release or Powerchair movement, which could result in serious injury.
1. Do not operate hand-held transceivers (transmitter-receivers), such as citizens
band (CB) radios, or turn ON personal communication devices, such as cellular
phones, while the Powerchair is turned ON.
2. Be aware of nearby transmitters, such as raio or TV stations, and try to acoid
coming close to them.
3. In unintended movement or brake release occurs, turn the Powerchair OFF as
soon as it is safe.
4. Be awre that adding accessories or components, or modifying the Powerchair
may make it more susceptible to EMI.
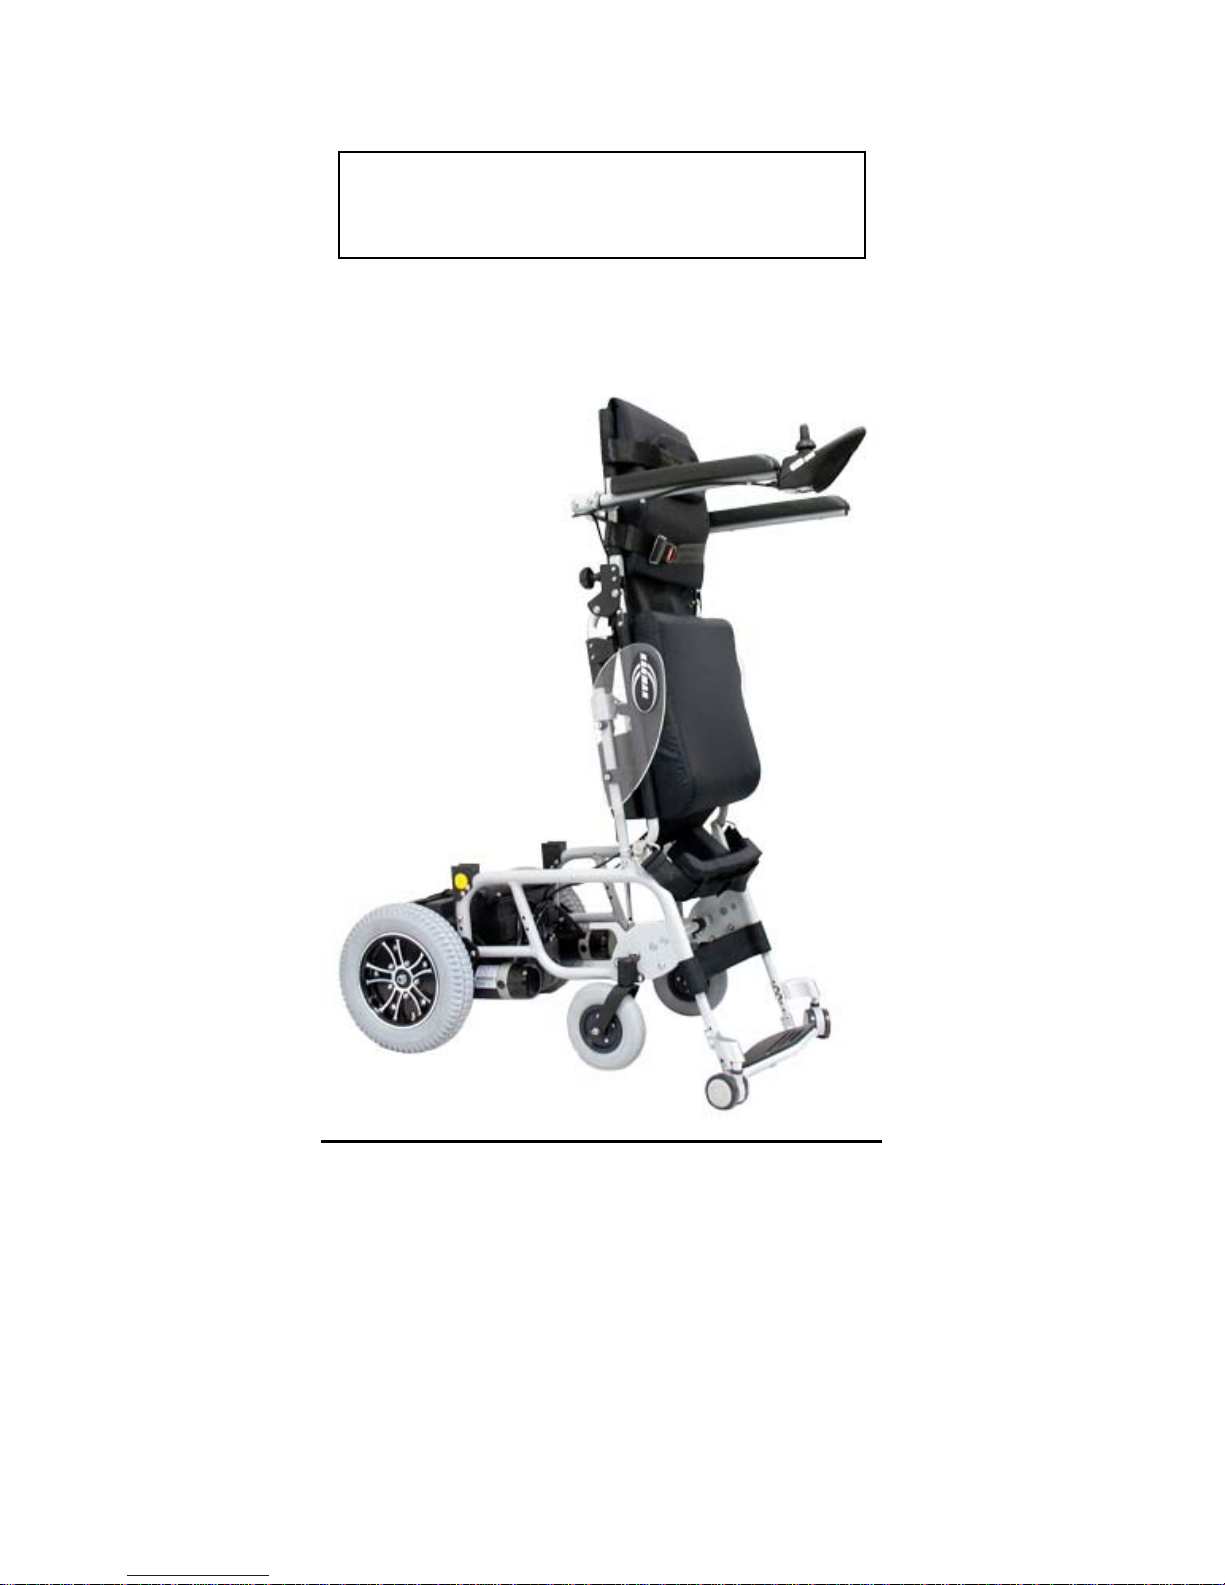
1-1. Standing
Attention:
●Standing up stresses your body in ways you may not be used to. You should consult your doctor or
physical therapist before using the stand-up wheelchair.
●Before using the stand up wheelchair you should suppose to be familiar with the
operation and the function.
●Use only standard household and hard even ground. Not use in the ground of dripping wet.
●In case of staircase, the stand up wheelchair must be carried by 2 persons.
●When rides or leaves the stand up wheelchair, should not put the foot on the footplate, to avoid the
dangers.
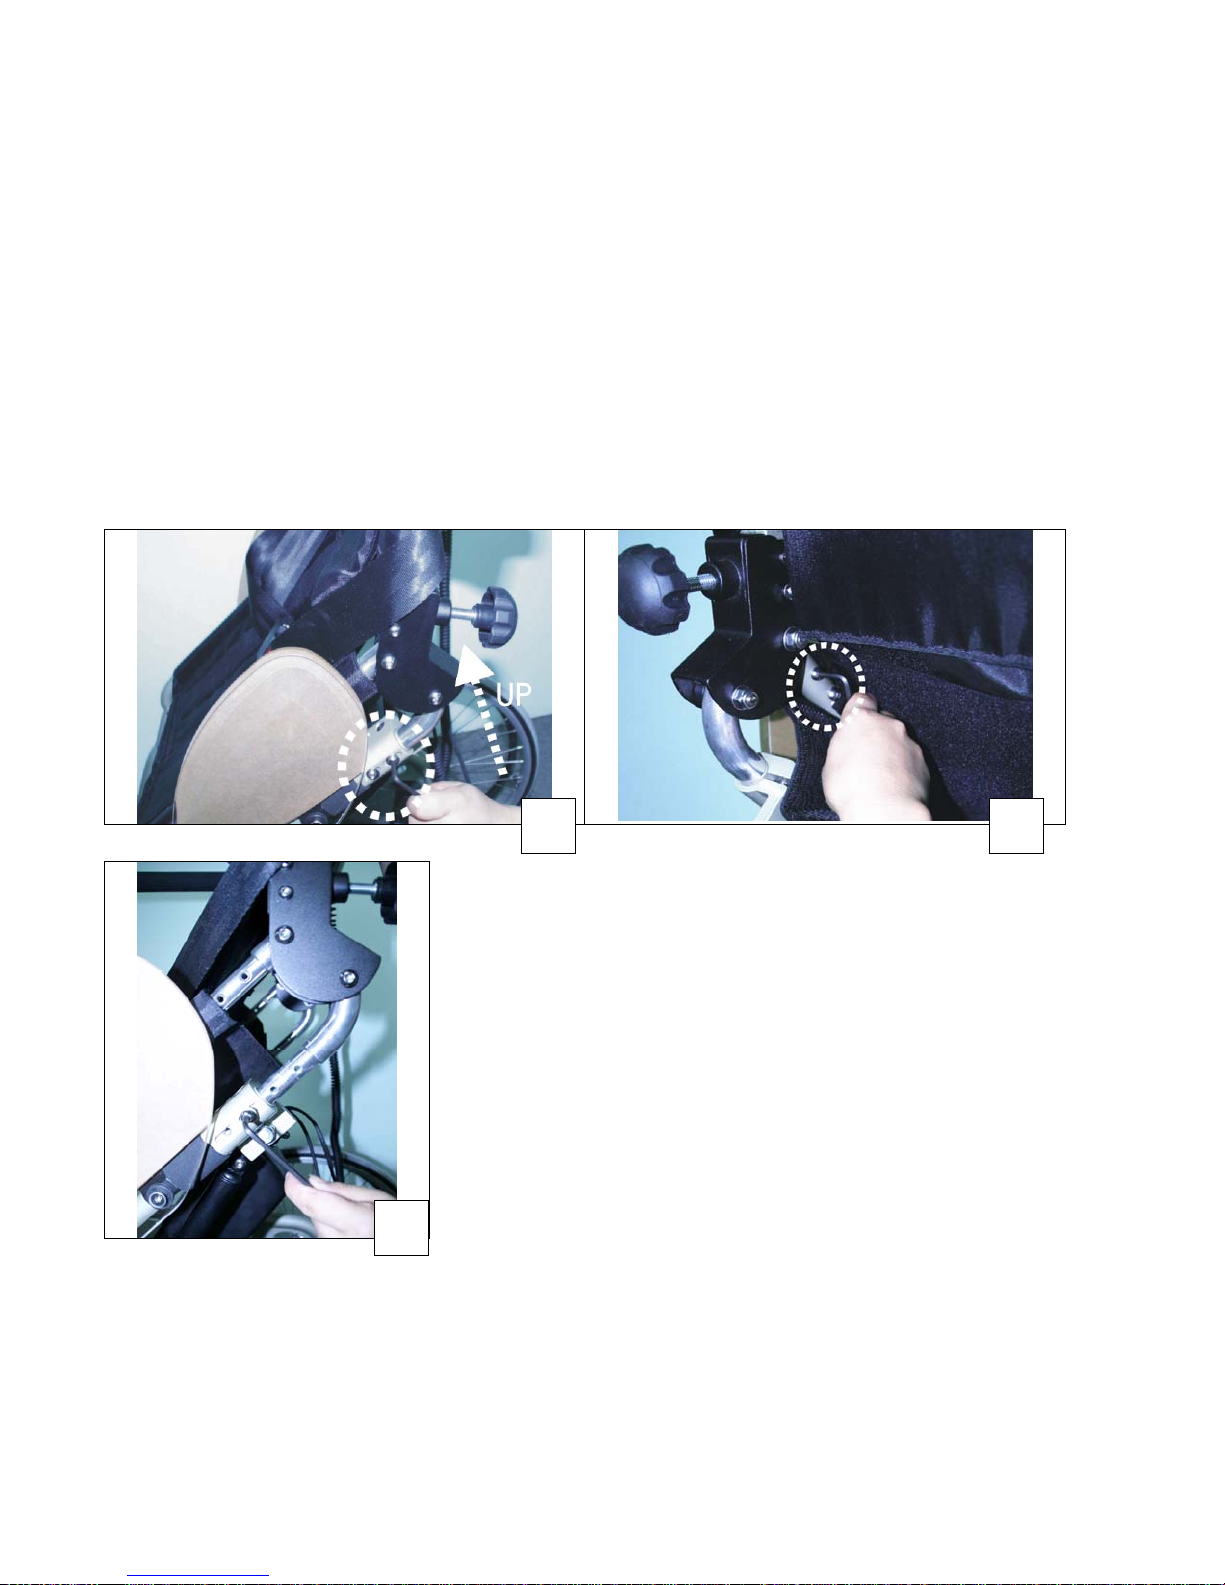
●Before standing up it is absolutely vital that the knee support, safety belt and Chest belt are fixed
correctly.
WARNING:
Maximum weight limit should not exceed
XO-202: 250 lbs.

1-2.Important symbols found on the vehicle
DO NOT DRIVE OVER UNEVEN GROUND!
Danger of tipping over!
DO NOT LEAN OUT OF THE RAISED VERTICALIZER!
Danger of tipping over!
NEVER DRIVE ON ASCENDING OR DOWNWARD SLOPES
WHEN THE VERTICALIZER IS RAISED!
Danger of tipping over!
NEVER REACH INTO THE MOVINGAPPARATUS OFTHE
RAISED VERTICALIZER!
Danger of crushing!
1-3 Safety Information on Driving and Freewheel Mode
Danger of injury if the wheelchair tips over
●Only ever negotiate gradients up to the maximum tilt-resistant gradient and only with the backrest
and seat tilt in an upright position.
●Only ever drive downhill at a maximum of 2/3 of the top speed! Avoid abrupt braking or
acceleration on gradients.
●If at all possible, avoid driving on slippery surface(such as gravel) where there is a danger of you
losing control over the vehicle, especially on a gradient! If driving on such a surface is inevitable,
then always drive slower and with the utmost caution.

●Never attempt to overcome an obstacle when on an uphill or downhill gradient!
●Never attempt to drive up or down a flight of steps with your wheelchair!
●Always approach straight on! Ensure that the front wheels and rear wheels move over the obstacle in
one stroke! Do not stop halfway! Do not exceed the maximum obstacle height!
●Avoid shifting your centre of gravity as well as abrupt joystick movements and changes of direction
when the wheelchair is in motion!
●Never use the wheelchair to transport more then on person!
●Do not exceed the maximum permissible load!
●Note that the wheelchair will brake or accelerate if you change the Driving Mode while the
wheelchair is in motion!
1-4. Rear Wheels
CURBS, INCLINES AND RAMPS
Always practice with your Healthcare professional or attendant before attempting to negotiate
curbs, inclines or ramps alone. It is important for you to develop a safe technique that is suitable
to your abilities.
WARNING:
Doing a ”wheelie”(tilting the wheelchair Backward to its balance point) can be dangerous.
Do not attempt this maneuver without an attendant.
1-5. Armrests
Flip-back Armrests
Never lift the wheelchair by the Flip-back armrests. These parts are detachable and lifting the
wheelchair by them may cause damage to the chair or injury to the user.
1-6. Power Drive Attachments
Power stand up wheelchair does not advocate the use of power drive attachments on any XO-202
series wheelchair. Use of a power drive attachment on XO-202 series wheelchair alters its
intended use. Installation of a power drive attachment is considered an alteration to the frame and
voids the warranty.

1-7. Modifications
Marking any unauthorized modifications or using parts not supplied by (Karman Healthcare Inc.)
may change the wheelchair structure and create an unsafe condition voiding the warranty.
This product has been supplied from an environmentally aware manufacturer that
complies with the Waste Electrical Equipment (WEEE) Directive 2002/96/CE.
Please be environmentally responsible and recycle this product at the end of its life
through your local recycling facility.
This product may contain substances that could be harmful to the
environment if disposed of into a landfill.

Chapter 2. UNPACKINGAND PREPARINGTHE POWER STAND UP
WHEELCHAIR XO-202 SERIES FOR USE
2-1. The Original Package AndAccessories
The Following Components:
●Power Stand up wheelchair wheel strap & chest belt
●Knee Support
●Charger (USA users check charger switch is set to 115VAC)
●Oil pot
●User manual and tool
●Options as ordered
2-2. Unfolding the Stand up Wheelchair
Please Process as Follows:
●Remove any transport straps or transport guards.
●Grasp the wheelchair at the backrest and pull backward and push downward up to stop.
(Fig-1 & 2)
●Tighten the knob of left and right. (Fig-3)
●Press the flip-back Armrest forward.
●Connect the DC power line to power socket of battery.
1 2 3

Chapter 3. ADJUSTMENT
Should you require adjustments and alterations to the mechanism of the wheelchair, or any
maintenance work, please contact qualified technicians.
3-1. Adjusting the Seat Depth
(1)Pull upward(push forward)the handle controller let the wheelchair frame rise over the rear
wheel.
(2)After loosening the left(right)both side screws the seat depth can be adjusted using the
different holes at 1” distance. (Fig- 4 ~ 6)
(3)Retighten the left(right)both side screws.(Fig- 7 & 8)
4 5
3-2. Adjusting the Backrest Height (Fig-9 ~12)
(1)Remove the backrest padded.
(2)After opening the screws, the backrest height can be
adjusted using the different concave at 2cm distance.
(3)Retighten the screws.
7

10
9
11 12
3-3. Adjusting the Footrest Height
The height of the footrest is adjustable and should be altered in line with your body proportions
to guarantee the best standing position possible. Footrest adjustment should also take account of
your choice of seat cushion. (Fig-13 ~ 16)
13 14

●After loosening the screws the Footrest height can be adjusted using the different holes at 1.8cm
distance.
●Retighten the screws.(not too tight)
3-4. Adjusting the FootrestAngle
●After release the screws the footplate angle can be adjusted using the different hole at 10° incline
angle. (Fig-17 & 18)
●Retighten the screws.(Fig-19)
3-5. The Knee Support and Safety Belt and Chest Belt
The most important safety features of the stand-up wheelchairs are the knee
support & safety belt and chest belt. It is absolutely essential that these be correctly
in place before you attempt to stand up.
16
19
17 18
15

3-5-1. The knee support
The knee support holds the knees in an extended posture and prevents you slipping out the
power wheelchair while standing up.
Attach the two triangular form of the knee lock
support to the double-head screws on either side of
the wheelchair.(Fig-20)
Center the knee support in front of each knee using
the Velour fasteners, then pull it until it is sitting
firmly in place, just below (not right on) the knee cap
and not too tight. (Fig-21)
20
21
3-5-2. The safety belt(Fig-22)
●The safety belt holds the waist in place.
●Make sure that the safety belt is secure on the
backrest of velour fasten.
●Close the catch on the safety belt and pull it and not
too tight.
●To release the safety belt. Simply press the red
button in the center of the catch.
●To slacken, hold the catch at a right angle to the belt
and pull.
22
3-5-3. Adjusting the cheat belt(Fig-23 ~ 25)
●Make sure that the chest belt is secure on the backrest of velour fastening.
●The chest belt is holding the upper body (chest in place).

23 24 25
3-6. Adjusting the Armrest Height
(1)Release the left(right)screws up to the clamp can be removed to suit position.(height
7”~10”)(Fig-26 & 27)
(2)Retighten the screws of clamp.
26 27
3-7. The Heels Strap (Fig-28)
The purpose of the heel strap is to prevent the
legs and feet slipping backwards. It is fitted
behind the heels or higher. By making use of the
Velour fastening it is possible to alter the length of
the strap and thus to ensure the ideal position for
the feet on the footrest. Ideal positioning of the
28
feet is vital in ensuring a good standing position.

3-8. Gas Spring
The gas springs are specially designed to help hold your body weight in the balance.
NOTE: Contents under pressure. Do not take apart puncture apply heat or fire.
3-9. The Seat Cushion
The Velcro fasteners prevent the cushion from slipping out of place even when you are standing
up. The height of the footrest should be adjusted to take into account the height of a given seat
cushion.
Once the knee support, safety belt and chest belt are fitted correctly you are ready
to stand up.

Chapter4. DRIVING
4-1 Before Driving for the First Time
Before you take your first trip, you should familiarize yourself well with the operation of the
vehicle and with all operating elements. Take your time to test all functions and driving modes.
Attention:
●You are within easy reach of all operating controls.
●The battery charge is sufficient for the distance intended to be covered.
4-2 Taking Obstacles
Your electric wheelchair is able to overcome obstacles and curbstones to a maximum height of
4cm.
WARNING:
●Never approach obstacles at an angle!
●Put your backrest into an upright position before climbing an obstacle!
●Never drive over obstacles with an erected vertical. Always lower the vertical completely prior to
this.
4-3 Driving up and down gradients
Your electric wheelchair has a maximum tilt-resistant climbing ability of 17.6%.
WARNING:
●Only ever drive downhill at a maximum of 1/2 of the top speed.
●Avoid sudden changes of direction or abrupt braking when driving on slopes.
●Always return the backrest of your seat or the seat tilt to an upright position before ascending
slopes. We recommend that you position the seat backrest or the seat tilt slightly to the rear before
descending slopes.
●If the lifter is raised drive mode is only used for positioning and not for regular drive operation.
Lower the lifter before ascending a slope.
●Never attempt to ascend or descend a slope on slippery surfaces or where there is a danger of
skidding.
●Avoid trying to get out of the vehicle on an incline or a gradient.
●Always drive straight in the direction the road or path you are on goes, rather than attempting to
zigzag.

●Never attempt to turn around on an incline or a slope.
DANGER:
●When the vertical is raised drive operation only serves positioning and not normal driving.
●Never driver over uneven ground, on an upward or downward slope obstacles when the vertical.
4-4 Free Wheeling:
Because the motors are designed to engage the electromagnetic brakes when the vehicle is not in
use or when the power is OFF. There is also a manual feature that allows them to “free-wheel”.
Free- wheeling is accomplished by pulling the free- wheeling levers to the free-wheeling position.
(Fig29)
29
WARNING:
● Never free-wheel your power wheelchair on a slope.
● Never free-wheel the motors while operating your vehicle.
●Always remember to engage the motors before turning the power back ON.

Chapter5. OPERATION THE STANDINGAND SITTING
1. First, adjusting and fixed the knee support to suit position and make sure the two triangular form of
knee support lock to the double-head screws of frame. (Fig-30 & 31)
30 31
2. Fixed the safety belt.(Fig-32)
3. Fixed the chest belt.(Fig-33)
32 33
4. Pull upward(push forward)the handle of controller the wheelchair is operated for
standing up.
5. Push downward(pull backward)the Handle of controller the wheelchair is operated for sitting
down.
Note:
●Please make sure your hand not under the stand up mechanism.
●Make sure not children in the wheelchair back.

Chapter 6. CONTROL SYSTEM
6-1. The SHARK II Remote
Assembly of the remote
1. Battery gauge
2. ON/OFF
3. Activate / connect through /
deactivate adjusting mode
4. Decrease speed
5. Speedometer
6. Horn
7. Increase speed
8. Attendant control LED
9. Service indicator LED
10. Joystick
Lower side
1. Combined charging socket /
programming socket

6-2. Battery and Control Connection
The main electrical control system is composed of motor, Control box battery and controller.
The connection of control system as below.
Stand up Motor
6-3. Battery Charge (Fig-34)
1. First, the battery charge line connects to the battery DC power socket and make sure the line is
right connect.
2. Connect the AC power line to the AC socket.(110~220V)
3. The light of battery charger from yellow color, become green color and represent the battery
charge in finish.
Battery capacity
indictor color Power condition
Green Full power
Yellow Low power
Red Empty power
34
When the battery capacity is empty power, it will stop working.

3.Charge your battery from the battery charger provided by manufacturer only.
2 .New battery must charged over 8 hours.
1. Anytime check the battery capacity.
Attention:
6-4. Main Circuit Breaker
The mean circuit breaker reset button is located on the battery box. ( Fig 35).
The main circuit breaker monitors the electric current drawn form the
battery. It is a safety feature built in your wheelchair for your extra safety.
The entire electric system of the wheelchair is protected by the main circuit
breaker against overloading.
31
Table of contents
Other Karman Healthcare Wheelchair manuals

Karman Healthcare
Karman Healthcare MVP 502 series User manual

Karman Healthcare
Karman Healthcare S-Ergo 105(KM-1500?3) User manual

Karman Healthcare
Karman Healthcare KN-700 User manual

Karman Healthcare
Karman Healthcare XO-505 User manual

Karman Healthcare
Karman Healthcare Standing Wheelchair User manual