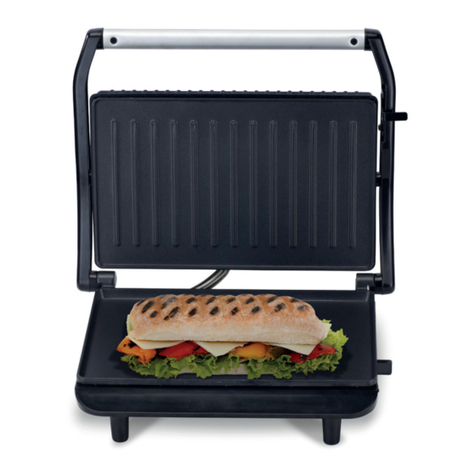
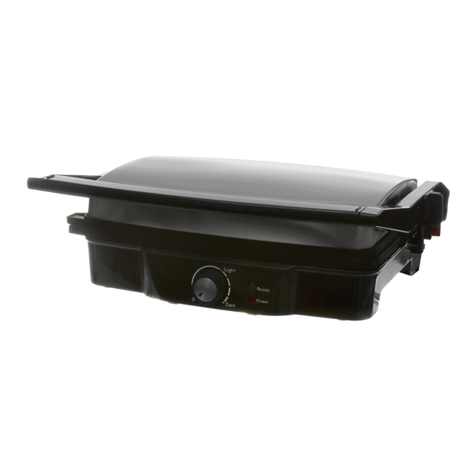
Kasanova AIK000001 User manual

GRILL 3 IN 1
3 IN 1 GRILL • ÌKONTAKTGRILL 3-IN-1 •
MACHINE À SANDWICH • SANDWICHERA 3 EN 1
INSTRUCTIONS MANUAL • BEDIENUNGSANLEITUNG •
MANUEL D’INSTRUCTION • MANUAL DE INSTRUCCIONES
MANUALE DI ISTRUZIONI
AIK000001

2GRILL 3 IN 1 ITA
DATI TECNICI
AVVERTENZE
VOLTAGGIO: 220-240V
POTENZA: 650W
FREQUENZA: 50Hz
Durante l’uso di apparecchi elettronici, è importante seguire basilari precauzioni per la
sicurezza, incluse le seguenti:
• NON utilizzare l’apparecchio per scopi diversi da quelli a cui è destinato.
Prodotto destinato al solo uso domestico.
• Scollegare il cavio dalla presa di alimentazione ogni volta che il dispositivo non è in uso
o durante le operazioni di pulizia.
• Scollegare l’apparecchio staccando il cavo dalla presa a muro. NON tirare il cavo.
• Questo apparecchio non è un giocattolo per bambini. Può essere utilizzato da bambini
al di sopra degli 8 anni di età e da persone con ridotte capacità siche, sensoriali e
mentali o con scarsa esperienza e conoscenza SOLO se supervisionati o istruiti
adeguatamente sull’uso sicuro dell’apparecchio stesso e se sono in grado di compren-
dere i pericoli insiti. La pulizia e la manutenzione non devono essere eseguite da
bambini, a meno che non abbiano più di 8 anni e non siano supervisionati. Tenere
l’apparecchio e il suo cavo al di fuori dalla portata dei bambini al di sotto degli 8 anni.
• NON utilizzare l’apparecchio in caso presenti danni al cavo o alla spina elettrica. Non
utilizzare l’apparecchio nel caso risulti malfunzionante o in qualche modo danneggiato.
Far revisionare l’appareccghio SOLO da personale competente.
• NON utilizzare l’apparecchio con mani bagnate.
• Per evitare il rischio di shock elettrico, NON immergere il cavo di alimentazione, la
spina o l’unità principale in alcun liquido.
• NON utilizzare l’apparecchio con accessori diversi da quelli in dotazione.
• NON introdurre corpi estranei all’interno dell’apparecchio.
• NON toccare le piastre quando il dispositivo è acceso per evitare scottature e shock
elettrici.
• Durante l’utilizzo le piastre diventano estremamente calde: NON TOCCARE!
• Durante l’utilizzo la supercie esterna diventa estremamente calda. Maneggiare il
dispositivo utilizzando esclusivamente le maniglie, e/o servendosi di presine
• Posizionare l’apparecchio su una supercie piana e liscia.

3
GRILL 3 IN 1 ITA
UTILIZZO
• Per evitare eventuale surriscaldamento durante l’uso, posizionare l’apparecchio in un
luogo arieggiato.
• Non posizionare vicino a tende o altro tipo di materiale facilmente inammabile.
• Quando aprite l’apparecchio per estrarre il contenuto, fare attenzione al vapore
bollente che ne fuoriesce.
Attendere che le piastre siano completamente rareddate prima di rimuoverle :
rischio di ustioni!!
PRIMO UTILIZZO:
• Al primo utilizzo rimuovi l’apparecchio e gli accessori dall’imballaggio e rimuovi even-
tuali etichette o pellicole di plastica.
• Pulisci gli accessori con un panno o una spugna umida e asciuga accuratamente. Non
utilizzare prodotti abrasivi. NON immergere l’unità centrale in acqua o altro liquido
• Per prolungare la vita del rivestimento antiaderente, applica sulle piastre una leggera
patina di olio e strona delicatamente con un panno.
1. Seleziona il tipo di piastra a seconda della tua ricetta
2. Inserisci le due piastre in corrispondenza dei supporti della base.
3. Ogni piastra ha 2 inviti sul retro (nella parte centalre e nella parte laterale):
posiziona le piastre facendo aderire gli inviti alle piastre nchè non sentirai
che sono fermamente bloccati.
4. Abbassa la piastra superiore
5. Inserisci il cavo nella presa di corrente, la spia luminosa si illuminerà di
rosso
6. Per 3-5minuti preriscalda la piastra, quando la piastra sarà completamente
preriscaldata la spia luminosa si spegnerà.
NOTA BENE: lo spegnimento della spia luminosa indica che la massima
temperature è stata raggiunta. NON indica che la cottura è terminata.

4GRILL 3 IN 1 ITA
Toast e Panini
Waes
Grill
1. Posiziona gli alimenti che vuoi cuocere sulla piastra preriscaldata e cuoci
no a quando raggiungerai il grado di cottura desiderato
(Se vuoi cuocere più alimenti pre-riscalda nuovamente la piastra)
2. Rimuovi il cavo dalla presa di corrente per interrompere la cottura quando
hai ottenuto la cottura desiderata.
Rimuovi gli alimenti con cautela, il grasso in eccesso della carne potrebbe
essersi accumulato sulla piasta.
1. Prepara in panino
2. Posizionalo sulla piastra preriscaldata e cuoci nchè il pane è dorato (4-5
minuti)
(Se vuoi preparare più di un panino pre-riscalda nuovamente la piastra)
3. Rimuovi il cavo dalla presa di corrente per interrompere la cottura quando
il tuo toast ha raggiunto la cottura desiderata.
1. Prepara il composto per il wae secondo la tua ricetta
2. Quando la piastra sarà pre-riscaldata (la spia luminosa sarà OFF) riempi
gli stampi con il composto wae, servendoti di un mestolo.
Riempi a lo gli stampi e non eccedere nel riempimento, in caso contrario il
composto in eccesso si brucierà
3. Abbassa la piastra superiore. Il wae sarò pronto in 7/8 minuti di cottura
(Se vuoi preparare più di un wae pre-riscalda nuovamente la piastra)
4. Rimuovi il cavo dalla presa di corrente per interrompere la cottura quando i
tuoi wae saranno pronti.

5
GRILL 3 IN 1 ITA
PULIZIA E MANUTENZIONE
A cottura iniziata controlla l’avanzamento degli alimenti sollevando con caute-
la la piastra superiore attraverso la maniglia.
Utilizza sempre utensili in legno o in plastica per rimuovere gli alimenti dalla
piastra al ne di non rovinare o graare o le piastre.
- Prima di pulire l’apparecchio assicurarsi sempre che la spina sia scollegata
dalla corrente.
- NON immergere mai l’apparecchio in acqua o sotto acqua corrente.
- Per pulire la parte esterna della tostiera usare un panno umido e asciugare
con cura.
- Per pulire le piastre, attendere che siano COMPLETAMENTE raredda-
te e passare con una spugnetta umida.
- Le piastre possono essere lavate in lavastoviglie.
- Non usare mai spugne abrasive ne prodotti abrasivi.

6GRILL 3 IN 1 ITA
Come preparare i Wae
Farina 00: 280 g
Burro 220 g
6 Uova medie, a temperatura ambiente
2 g di lievito in polvere per dolci
Zucchero: 180 g
Un pizzico di sale
Vaniglia o Cannella a piacere
Sciogliete il burro al microonde o a bagnomaria e lasciatelo rareddare. Nel
frattempo rompete le uova a temperatura ambiente in una ciotola e unite lo
zucchero mescolando. Unite la farina e il lievito direttamente all’interno della
ciotola,
aggiungete il sale e mescolate energicamente con la frusta per amalgamare
le polveri al composto e rimuovere eventuali grumi. Versare il burro fuso
intiepidito nella ciotola poco alla volta, in modo da incorporarlo gradualmente
con la frusta. Aggiungere Vaniglia o Cannella a piacere
Coprite la ciotola con la pellicola e lasciate riposare l’impasto in frigorifero per
almeno un’ora.
Trascorso il tempo di riposo, lasciate tornare l’impasto a temperatura ambien-
te e nel frattempo riscaldate la piastra per wae per farla arrivare a tempera-
tura. Quando la piastra sarà ben calda, versate un mestolo scarso di impasto
all’interno dello stampo in modo da ricoprirne interamente la supercie.
Chiudete la piastra e lasciate cuocere per circa 7-8 minuti (controllate dopo
qualche minuto lo stato di cottura dei wae)
Quando i wae avranno assunto un colore dorato, aprite il coperchio, stac-
cateli delicatamente dalla piastra e trasferiteli su un piatto . Guarnite i vostri
wae a piacere e BUON APPETITO!

7
GRILL 3 IN 1 ITA
TRATTAMENTO DEL DISPOSITIVO ELETTRICO ED ELETTRONICO A
FINE VITA
Informazione agli utenti per il corretto smaltimento del prodotto ai sensi della
Direttiva Europea 2002/96/CE e del D.lgs N. 151/2005.
Caro consumatore,
è importante ricordarti che, come buon cittadino, avrai l’obbligo di smalti-
re questo prodotto non come riuto urbano, ma di eettuare una raccolta
separata. Il simbolo sopra indicato e riportato sull’apparecchiatura indica che
il riuto deve essere oggetto di “raccolta separata”. I dispositivi elettrici ed
elettronici non devono essere considerati riuti domestici. Pertanto, il pro-
dotto alla ne della sua vita utile, non deve essere smaltito insieme ai riuti
urbani. L’utente dovrà conferire (o far conferire) il riuto ai centri di raccolta
dierenziata predisposti dalle amministrazioni locali, oppure consegnarlo al
rivenditore contro l’acquisto di una nuova apparecchiatura di tipo equivalente.
La raccolta dierenziata del riuto e le successive operazioni di trattamento,
recupero e smaltimento favoriscono la produzione di apparecchiature con
materiali riciclati e limitano gli eetti negativi sull’ambiente e sulla salute even-
tualmente causati da una gestione impropria del riuto.
Grazie!

83 IN 1 GRILL
TECHNICAL DATA
Important safety instruction
VOLTAGE: 220-240V
POWER: 650W
FREQUENCY: 50Hz
When using an electrical appliance, basic safety precautions should be observed.
PLEASE READ AND SAVE ALL INSTRUCTIONS BEFORE USING THE 3 IN 1 SAN-
DWICH AND WAFFLE MAKER.
1. Close supervision is necessary when any appliance is used near children. The 3 in 1
Maker is not intended for use by children.
2. Do not touch hot surfaces. Use handles, knobs or oven mitts.
3. For indoor household use only.
4. Unplug the 3 in 1 Maker from the outlet when not in use and before cleaning. Allow
the 3 in 1 Maker to cool before putting on or taking o parts, and before cleaning.
5. To protect against electric shock, do not immerse cord, plugs, or 3 in 1 Maker base in
water or any other liquid.
6. Do not operate the 3 in 1 Maker with a damaged cord or plug, or after the 3 in 1 Maker
malfunctions, or has been damaged in any manner. Return the 3 in 1 Maker to the
nearest authorized service facility for examination, repair or adjustment.
7. Never use accessories which are not recommended by the manufacturer. They could
constitute a danger to the user and risk damage to the 3 in 1 Maker.
8. Never move the 3 in 1 Maker by pulling the cord. DO NOT let the electrical cord hang
over the edge of a table or counter or touch hot surfaces.
9. Place the 3 in 1 Maker on a at, level, stable, heat resistant surface when using.
10. Make sure the cord never comes into contact with the hot parts of the 3 in 1 Maker.
11. Do not place the 3 in 1 Maker on or near a hot gas or electric burner or in a heated
oven.
12. Do not use the 3 in 1 Maker with a damaged outlet.
13. Make sure hands are dry when plugging in and unplugging the 3 in 1 Maker.
14. Any examination, repair, or adjustment for the 3 in 1 Maker should be made by the
authorized service agent.
15. Do not use this 3 in 1 Maker for other than intended use.

9
3 IN 1 GRILL
16. Take proper precautions to prevent the risk of burns, re, or other personal or proper-
ty damage, as the 3 in 1 Maker generates heat and escaping steam during use.
17. Use only heat resistant wooden or plastic utensils to add or remove food from the 3
in 1 Maker.
WARNING!
Read and understand all instructions. Failure to follow all instructions listed
below may result in electric shock, re or serious personal injury. The warnin-
gs, cautions, and instructions discussed in this instruction manual cannot co-
ver all possible conditions and situations that may occur. It must be understo-
od by the operator that common sense and caution are a factor which cannot
be built into this product, but must be supplied by the operator.
CAUTION
A short power supply cord is provided to reduce the risk of personal injury
resulting from becoming entangled in or tripping over a longer cord.
ELECTRIC POWER
If electric circuit is overloaded with other appliances, your 3 in 1 Maker may
not operate properly. The 3 in 1 Maker should be operated on a separate
electrical circuit from other operating appliances.
General Safety Instructions
SAFETY WARNING
Although your appliance is easy to operate, the warnings below must be
followed for your safety:
1. Do not place the appliance near a heat source.
2. Use the appliance on a stable surface.
3. Do not unplug by pulling on the power supply cord.
4. The appliance must be unplugged:
A. Before any cleaning or maintenance.
B. If it appears to be faulty.

10 3 IN 1 GRILL
1. Open lid and remove the pre-installed plates by pressing the Upper and
Lower Plate Release Buttons .
2. Wash plates in warm soapy water, rinse, and dry thoroughly before rst
use.
3. Do NOT immerse base in water or any other liquid.
4. To help maintain the non-stick coating, before using the cooking plates for
the rst time, lightly coat with vegetable oil on a paper towel or lightly spray
with a cooking spray. You may do this periodically throughout the use of this
product.
BEFORE FIRST USE
1. Select a matching pair of plates to use depending on what you plan to
cook.
2. Insert the selected plates securely into the top and bottom of the unit.
3. Each set of plates has 2 tabs on the rear edge of the plate. The tabs t into
the rear of the base unit.
4. Each set of plates has a tab in the center of the front edge of the plate.
This will snap into the center locking tab on the top and bottom of this unit.
Press plates rmly into place to secure the plate into the proper position.
5. Close the lid and plug the power supply cord into a standard 110V outlet.
The indicator light will come on.
6. Always preheat the unit with the lid closed. The Red Ready Indicator Light
will turn o when the unit is preheated, approx. 3-5 minutes. PLEASE NOTE:
the Red Ready Indicator Light will cycle on and o throughout the cooking
time to let you know that the unit has reached its maximum temperature. It
does NOT indicate when the cooking time is complete.
HOW TO USE

11
3 IN 1 GRILL
To Make Pocket Sandwich: Insert Sandwich Making Plates
To Make Waes: Insert Wae Baking Plates
1) Prepare your sandwich using 1 slice of bread and your choice of llings.
DO NOT overll your sandwich as this could cause a spill and prevent the
safety latch from closing completely. For best results leave a minimum of a
½” edge around the lling.
2) You may lightly butter the side of the bread that will come into contact with
the heated sandwich making plates to obtain a golden brown.
3) Once the unit is preheated, carefully open the unit and place the sandwich
on the bottom plate. Gently, but rmly close the lid and secure the safety
latch. Please note you may see a little bit of steam escaping from the unit.
This is normal.
4) Unlock the safety latch and check the sandwich in 4-5 minutes to see if it is
golden brown. You may add or delete time depending on your personal taste.
5) Use a wooden kitchen utensil to remove your sandwich. Never use a metal
utensil as this may cause damage to the non-stick coating.
6) If making more than one sandwich, close the lid and let the unit heat up
again. When the Red Ready Indicator Light goes o you may add your next
sandwich.
After use, unplug the power supply cord from the outlet and let the unit cool
completely before cleaning.
1) Preheat the unit with the lid closed.
2) Open lid and pour approximately ¼ cup of wae batter onto each side of
the wae plate. Do NOT overll as this could cause a spill and burning of the
batter.
3) Close the lid rmly, but do not secure the safety latch.
4) Check your wae for doneness in approx. 7-8 minutes by gently lifting the
lid. If the wae comes away easily from the lid it should be ready. You may
add or delete time depending on your personal taste.
5) Use a wooden kitchen utensil to remove your wae. Never use a metal

12 3 IN 1 GRILL
To Grill: Insert Grill Plates
1) Preheat the unit with the lid closed.
2) Place the item to be grilled on the bottom plate and gently close the lid. Do
NOT secure the safety latch.
3) When cooking, keep the lid closed. It may be necessary to open the lid
briey to turn the item over for even cooking.
4) When the item reaches your desired doneness, open the lid and remove
the item using a wooden kitchen utensil. Never use a metal utensil as this
may cause damage to the non-stick coating.
5) If making more than one item, close the lid and let the unit heat up again.
When the green Ready Indicator Light goes o you may pour your next item.
6) After use, unplug the power supply cord from the outlet and let the unit cool
completely before cleaning.
7) The grill plates are perfect for making paninis and other items that are not
high in fat content. NOTE: This item does not have a grease drip container.
utensil as this may cause damage to the non-stick coating.
6) If making more than one wae, close the lid and let the unit heat up again.
When the Red Ready Indicator Light goes o you may pour your next wae.
7) After use, unplug the power supply cord from the outlet and let the unit cool
completely before cleaning.

13
3 IN 1 GRILL
CLEANING
1. Remove the sandwich or wae plates by pressing and sliding the Upper
and Lower Plate Release Buttons.
2. Wash the plates in warm soapy water, rinse, and dry thoroughly before
storing.
3. Wipe the base with a damp cloth, sponge, or paper towel. Do NOT immer-
se the base or run water over the base unit. Dry the surfaces with a soft cloth
or paper towel before storing.
4. Do not use abrasive cleaners on the plates or the base unit.
5. To remove cooked on food, use a plastic bristle brush or plastic mesh pad.
6. The plates are dishwasher safe.
CARE & CLEANING
DO NOT IMMERSE IN WATER OR ANY LIQUID
INFORMATION FOR USERS OF DOMESTIC APPLIANCES
This symbol on the product or in its packaging indicates that this product shall not be treated as
household waste. Instead it shall be handed over to the applicable collection point for the recycling
of electrical and electronic equipment. By ensuring this product is disposed of correctly, you will
help prevent potential negative consequences for the environment and human health, which could
otherwise be caused by inappropriate waste handling of this product. The recycling of materials
will help to conserve natural resources. For more detailed information about recycling of this
product, please contact your local city oce, your household waste disposal service or the shop
where you purchased the product

14 ÌKONTAKTGRILL 3-IN-1
Bevor Sie diesen Ofen benutzen, lesen Sie sich bitte das
Handbuch vollständig durch.
WICHTIGE SICHERHEITSHINWEISE:
1. Lesen Sie bitte alle Hinweise.
2. Berühren Sie keine heißen Oberächen. Fassen Sie
ausschließlich Bügel und Grie an.
3. Um sich vor elektrischen Schlägen zu schützen, tauchen
Sie nicht das Stromkabel oder den Stecker in Wasser oder
andere Flüssigkeiten ein.
4. Aufsicht wird notwendig, wenn das Gerät durch Kinder oder
in der Nähe von Kindern betrieben wird.
5. Trennen Sie das Gerät von der Stromversorgung, wenn es
nicht benutzt wird oder gereinigt werden soll. Lassen Sie es
abkühlen, bevor Sie Teile herausnehmen.
6. Benutzen Sie das Gerät nicht, wenn das Stromkabel oder
der Stecker beschädigt wurden, das Gerät fehlerhaft arbeitet
oder auf eine andere Art und Weise beschädigt ist. Lassen
Sie in diesen Fällen das Gerät von einem autorisierten
Fachhändler prüfen, reparieren oder einstellen.
7. Die Nutzung von Zubehörteilen, welche nicht durch den
Hersteller empfohlen wurden, kann zu Verletzungen führen.
8. Nutzen Sie das Gerät nicht im Freien, für kommerzielle
Zwecke oder für den industriellen Gebrauch.
9. Lassen Sie das Stromkabel nicht über Kanten hängen oder
heiße Oberächen berühren.
10. Platzieren Sie das Gerät nicht neben heißen Gas- und
elektrischen Brennern sowie in einem heißen Ofen.
11. Größtmögliche Vorsicht ist geboten, wenn das Gerät
bewegt wird während sich heißes Öl oder andere heiße
Flüssigkeiten darin benden.
12. Um das Gerät abzustecken, schalten Sie alle Kontrollen auf
„O“ und trennen Sie es von der Stromversorgung.

15
ÌKONTAKTGRILL 3-IN-1
13. Dieses Gerät hat einen gepolten Stecker (ein Blatt steht
weiter als das andere). Als Sicherheitsmaßnahme passt
der Stecker in eine gepolte Steckdose nur in eine Richtung.
Sollte der Stecker nicht komplett in eine Steckdose passen,
drehen Sie ihn bitte um. Sollte der Stecker dennoch
nicht in die Steckdose passen, ziehen Sie bitte einen
qualizierten Elektriker zu Rate. Versuchen Sie nicht, diese
Sicherheitsvorkehrung durch Anwendung von Kraft zu
übergehen.
14. Nutzen Sie das Gerät ausschließlich für die dafür
vorgesehenen Zwecke.
15. Entnehmen Sie keine Lebensmittel während das Gerät an
den Stromkreis angeschlossen ist.
16. Es kann zu Bränden führen, wenn das Gerät während des
Betriebs durch entzündliche Materialien abgedeckt wird
oder von diesen berührt wird. Dies betrit beispielsweise
Gardinen, Vorhänge, Wandbehänge und ähnlich
Gegenstände.
17. Gießen Sie kein Öl oder Fett auf die Platte, um
Lebensmittel zu frittieren, da dies zu Bränden und
Beschädigungen führen kann.
18. Ein kürzeres Stromkabel wird mitgeliefert, um Gefahren
durch Verfangen oder Stolpern über ein längeres Kabel zu
vermeiden.
19. Längere Stromkabel können angeschlossen werden, wenn
diese mit der entsprechenden Sorgfalt genutzt werden.
20. Wenn ein längeres Stromkabel oder Verlängerungskabel
angeschlossen wird:
• Sollte die elektrische Leistung des Kabels mit der
elektrischen Leistung des Gerätes übereinstimmen;
• Falls das Haushaltsgerät geerdet ist, sollte das
Verlängerungskabel ein geerdetes 3- Draht- Kabel sein;
• Je länger das Kabel ist, desto mehr Vorsicht ist beim

16 ÌKONTAKTGRILL 3-IN-1
Verlegen des Kabels geboten. Es sollte daher nicht
über Arbeitsplatten oder Tische geführt werden, oder in
Bereichen liegen, wo es leicht von Kindern gezogen werden
kann oder allgemein ein Stolperhindernis darstellt.
VOR DEM ERSTEN GEBRAUCH
• Reinigen Sie die Platten mit einem feuchten Lappen oder
Schwamm
• Fetten Sie die Platten leicht mit Butter oder Speiseöl ein
• Verbinden Sie den Paniniofen mit der Stromversorgung
und erhitzen Sie die Platten, bis sich die grüne „Backfertig-
Kontrollleuchte“ ausschaltet
• Der Paniniofen ist für den Gebrauch bereit
Hinweis: Wenn Sie das Gerät zum ersten Mal benutzen, kann
ein leichter Dunst entstehen. Dies ist normal, da die internen
Komponenten zum ersten Mal erhitzt werden.
TOASTEN VON SANDWICHES:
• Stecken Sie das Stromkabel in die Steckdose. Die rote
„Power- Kontrollleuchte“ sowie die grüne „Backfertig-
Kontrollleuchte“ leuchten nun auf. Wenn die grüne
„Backfertig- Kontrollleuchte“ erlischt, ist das Gerät für den
Gebrauch bereit.
• Bereiten Sie die Zutaten für Ihr Sandwich vor. Für jedes
Sandwich benötigen Sie zwei Scheiben Toastbrot und die
gewünschte Füllung. Bereiten Sie Ihr Toastbrot auf Basis
kreativer Rezeptvorschläge vor.
• Um das Brot goldgelb zu backen, können Sie die
Außenseiten des Toastbrots leicht mit Butter bestreichen.

17
ÌKONTAKTGRILL 3-IN-1
• Legen Sie dazu die mit Butter bestrichene Seite auf die
untere Platte, belegen das Brot mit der Füllung und legen
dann eine Scheibe Toast mit der butterbestrichenen Seite
nach oben zeigend darauf. Sie können so, wenn gewünscht,
auch nur ein Sandwich im Gerät zubereiten.
• Die Füllung sollte nicht über die Brotscheiben hinausstehen.
• Schließen Sie nun die obere Backplatte vorsichtig und
verriegeln Sie das Gerät.
• Önen Sie das Gerät nach 2- 3 Minuten und prüfen Sie,
ob das Sandwich die gewünschte goldgelbe Farbe erreicht
hat. Die individuelle Backzeit für knusprig- goldgelbe
Sandwiches hängt von der Art des Toastbrotes, von der
Füllung sowie von Ihrem persönlichen Geschmack ab.
• Nutzen Sie nichtmetallisches Küchenzubehör, um das
Sandwich dem Gerät zu entnehmen. Nutzen Sie keine
scharfkantigen oder rauen Küchengeräte.
• Trennen Sie das Gerät von der Stromversorgung.
•
Hinweis: Während des Backvorganges schaltet sich die
„Backfertig- Kontrollleuchte“ periodisch ein, um die Temperatur
konstant zu halten.
NACH DEM GEBRAUCH:
• Trennen Sie das Gerät von der Stromversorgung und lassen
Sie es abkühlen, bevor Sie mit der Reinigung beginnen.
Reinigen Sie die Platten mit einem feuchten Lappen oder
Schwamm.
• Vermeiden Sie, dass Wasser in das Gerät eindringen kann.
• Tauchen Sie das Gerät niemals in Wasser ein.
• Benutzen Sie zur Reinigung keinen metallischen oder
rauen Schwamm, da dies die Beschichtung der Platten
beschädigen kann.
• Das Gerät kann in einer vertikalen Position verstaut werden.

18 ÌKONTAKTGRILL 3-IN-1
ALLGEMEINE GESCHÄFTSBEDINGUNGEN
1. Die Garantie ist ungültig, wenn:
a) Zum Zeitpunkt der Reparatur keine vollständig ausgefüllte
Servicekarte vorgewiesen wird.
b) Das Produkt nicht nach den hier beschriebenen Anweisungen
betrieben wurde.
c) Beschädigungen durch Blitzschlag, außergewöhnliche
Stromschwankungen, das Eindringen von Wasser oder anderen
Flüssigkeiten, Feuer, Hochwasser, Unfall, Vernachlässigung oder
unsachgemäße Behandlung hervorgerufen wurden.
d) Das Produkt bei der Installation, Reparatur oder
aufgrund von Veränderungen durch einen unautorisierten
Dienstleistungsanbieter oder eine unautorisierte Person
beschädigt wurde.
e) Das Typenschild, welches die Modelnummer, Seriennummer
sowie den Produktionscode speziziert, entfernt oder verändert
wurde.
f) Wenn Defekte oder Teile hinsichtlich gewöhnlicher
Abnutzungserscheinungen, Korrosion, Rost oder Verfärbungen,
Kratzer, Dellen am Gehäuse oder Beschädigungen an der
Beschichtung, nicht ersetzt wurden.
g) Wenn Beschädigungen oder Defekte durch den Einsatz im
kommerziellen/industriellen Bereich oder durch Vermietung/
Leasing oder anderweitige Nutzung im nichthäuslichen Bereich
entstanden sind.
h) Forderungen hinsichtlich beschädigter und/oder fehlender
Teile müssen bis spätestens 7 Tage nach dem Empfang der
Ware gestellt werden.
2. Reparaturen oder Ersatzleistungen dürfen nur durch einen
autorisierten Dienstleistungsanbieter erfolgen.
3. Während der begrenzten Gewährleistungsdauer übernehmen
Lifelong oder ein autorisierter Dienstleistungsanbieter die

19
ÌKONTAKTGRILL 3-IN-1
Reparatur defekter Teile ohne Kostenstellung, inklusive der
Arbeitszeit und Ersatzteilkosten, und stellen folglich den
optimalen Arbeitszustand des Gerätes wieder her. Alle defekten
Teile, welche im Rahmen der Gewährleistung getauscht
werden sollen, müssen an Lifelong und/oder einen autorisierten
Dienstleistungsanbieter übergeben werden.
4. Alle Kosten die durch die Abholung des/der Gerät/e oder von
Einzelteile/n von einem autorisierten Dienstleistungsanbieter
anfallen, inklusive aller anderen damit zusammenhängenden
Kosten und Nebenkosten, sind durch den Verbraucher zu tragen.
5. Die Verpichtungen von Lifelong beschränken sich auf die
Reparatur und den Ersatz defekter Produkte. Ausgenommen
der oben beschriebenen Bedingungen gibt es keine
anderen ausdrücklichen oder impliziten Garantien. Alle
Garantiebedingungen sowie andere in Statuten oder dem
bürgerlichen Recht festgesetzte Bedingungen (dies betrit
jegliche Gewährleistung von zufriedenstellender Qualität,
Handelsüblichkeit oder Eignung für einen speziellen Zweck)
werden ausgeschlossen soweit dies nach diesen Rechten
zulässig ist.
6. Lifelongs Verantwortung für Schäden in Verbindung mit oder
entstehend aus dem Kauf oder der Nutzung des Produktes,
ungeachtet des Schadenstyps oder der Schadensursache
sowie der Form der Schadensansprüche (z.B. Vertrag oder
Schadensersatzanspruch), dürfen nicht den Orginalkaufpreis des
Produktes übersteigen.
7. In keinem Fall ist Lifelong oder ein von Lifelong autorisierter
Dienstleistungsanbieter haftbar zu machen für jedwede
indirekten oder resultierenden Verluste oder Schäden aufgrund
von strafbaren Handlungen oder besonderen Vorkommnissen
(dies beinhaltet ohne Begrenzung Schadenersatz für den Verlust
von Einkommen, Geschäft, Gewinnen, Firmenwert, Verträgen,
Geschäftsunterbrechungen, Verlust von Geschäftsinformationen

20 ÌKONTAKTGRILL 3-IN-1
oder andere vermögensrechtlichen Verluste). Dies trit
ungeachtet ob Lifelong über die Möglichkeit solcher Schäden
unterrichtet wurde oder nicht, zu. Diese Einschränkungen
treten auch bei Nichtzutreen der grundsätzlichen Zwecke
jeglicher begrenzten Garantieleistung in Kraft. Diese begrenzte
Gewährleistungsgarantie schränkt gesetzlich festgelegte
Verbraucherrechte nicht ein.
8. Kein Übermittler, Händler oder Beschäftigter ist
bevollmächtigt, diese Garantie zu verändern. Sie sollten auf
dergleichen Versuche nicht eingehen. Lifelong behält sich vor,
Geschäftsbedingungen zu verändern, wenn dies als notwendig
erachtet wird.
UMWELTGERECHTE ENTSORGUNG
Helfen Sie mit beim Umweltschutz!
Bitte denken Sie an ihre örtlichen Umweltschutzauagen:
Geben Sie elektrische Geräte zur Entsorgung bei den
entsprechenden Sammelstellen ab.
Table of contents
Languages:
Other Kasanova Grill manuals

Kasanova
Kasanova LEI000966NOC User manual

Kasanova
Kasanova KBO000011NOC User manual

Kasanova
Kasanova ASU000001NOC User manual

Kasanova
Kasanova KBO000017NOC User manual

Kasanova
Kasanova KBO000007NOC User manual

Kasanova
Kasanova I TUTTOFARE GRIGLIATUTTO XL User manual

Kasanova
Kasanova GRILL FOR ALL User manual

Kasanova
Kasanova SWO000021NOC User manual

Kasanova
Kasanova AIK000009NOC User manual

Kasanova
Kasanova AIK000007 User manual