Kasco CertiSafe 2400C61 Manual

CertiSafe™Tank Mixer
Operation & Maintenance Manual
3020379
ANSI/UL 778: 2016
Ed.6+R:22Feb2017
CSA C22.2 #108: 2014 Ed.5
Document number 852110

CERTISAFE™ TANK MIXER MANUAL
852110 / 2021.1.1
2
Contents
Safety First �������������������������������������������������������������������������������������������������������3
Mount & Control Panel Options������������������������������������������������������������������������4
System Overview����������������������������������������������������������������������������������������������5
System Specications ��������������������������������������������������������������������������������������5
Suggested Tools and Supplies �������������������������������������������������������������������������6
Cable Installation Parts Included����������������������������������������������������������������������6
Suggested Tank Penetration ����������������������������������������������������������������������������7
Unit Parts����������������������������������������������������������������������������������������������������������9
Injection Nozzle Placement Recommendations ��������������������������������������������� 10
Maintenance Recommendations���������������������������������������������������������������������11
Warranty ��������������������������������������������������������������������������������������������������������� 12
Non-Warranty Repairs������������������������������������������������������������������������������������ 13
Repair Contact Form �������������������������������������������������������������������������������������� 14
Phone: 715-262-4488
Fax: 715-262-4487
www.kascomarine.com
Questions?

CERTISAFE™ TANK MIXER MANUAL
852110 / 2021.1.1
3
IMPORTANT: PLEASE READ THIS MANUAL AND SAVE FOR FUTURE REFERENCE
SAFETY FIRST
• Under NO circumstances should anyone enter the water with the mixer connected or in operation�
• Running the unit out of water will create a dangerous situation and damage the seals�
• NEVER lift the unit by the power cord� If you need to remove the mixer, use the installation or mount apparatus�
• The unit must be connected to a GFCI-protected circuit�
• Comply with local and national wiring standards during any electrical service disconnect�
• Consult a qualied professional for electrical installation.
• Use all Personal Protective Equipment necessary for safe ingress, installation, and egress from the work site�
• Refer to applicable national and local laws and standards to facilitate the safe installation of a CertiSafe Tank Mixer� These may
include but are not limited to OSHA, CCOHS, and other regulations related to:
• Working over or near water
• Fall protection systems
• Falling object protection systems
• Electrical standards
• Illumination
• Ventilation
• Installation of CertiSafe™ Tank Mixers requires entry into environments that pose potential hazards, such as those described in
section 1910.146 of OSHA’s Occupational Safety and Health Standards for Permit-required conned spaces. As such:
• Observe any applicable pre-entry measures required by the entry supervisor�
• Only those authorized via the permit system in place at the installation site should participate in installation�
• Any authorized entrant should be accompanied by at least one authorized attendant to monitor conditions inside and outside
the permit spaces during installation�
• Prior to installation, be aware of all potential fall, trip, and atmospheric hazards in the permit space, both before and after an
entrance cover is removed�
Back to Contents

CERTISAFE™ TANK MIXER MANUAL
852110 / 2021.1.1
4
MOUNT & CONTROL PANEL OPTIONSMOUNT & CONTROL PANEL OPTIONS
Kasco offers a variety of mounting options to best position a CertiSafe™ mixer in any tank environment, all featuring durable stainless
steel� There are also several optional control panels�
Note: These mounting kits are designed for proper placement AND retrieval of CertiSafe™ mixers� Once installed, ONLY remove
mixers via the retrieval method specic to the mount.
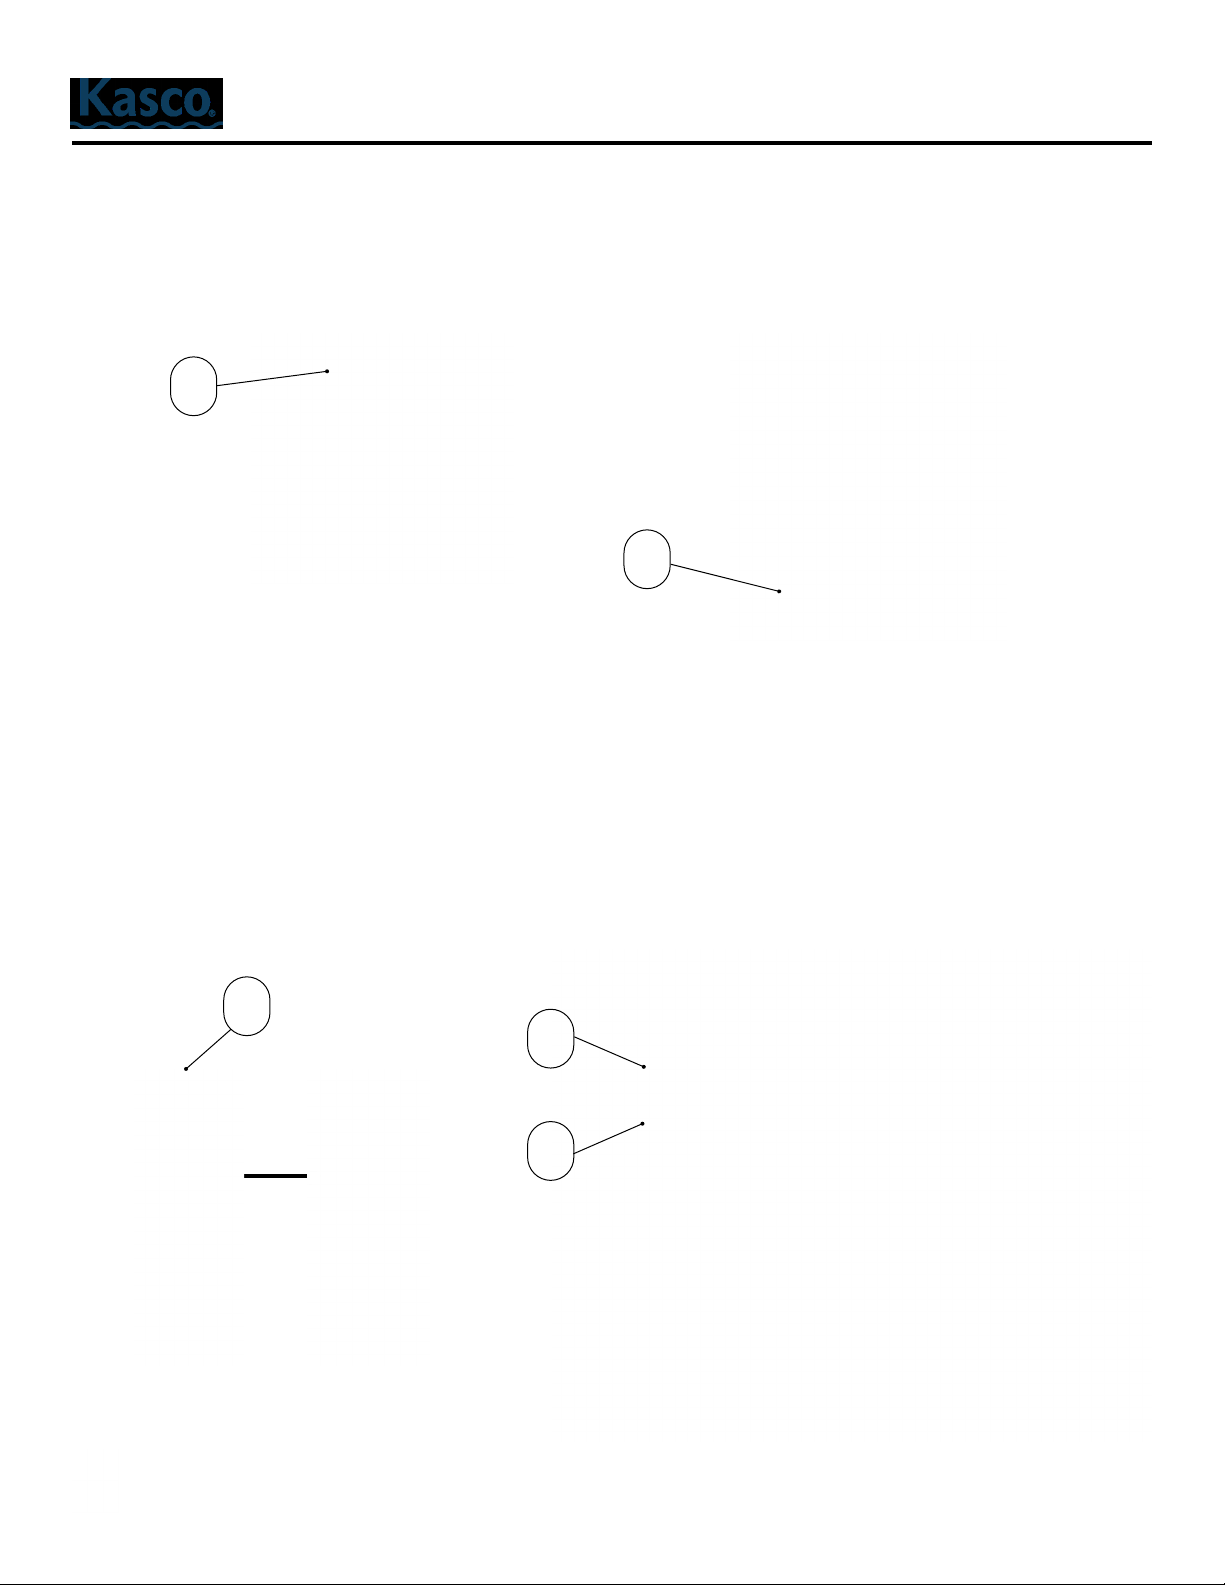
PM-100
Pipe Mount
The PM-100 makes use of other struc-
tures in the tank to position the mixer�
Use the upper mount parts above the
water line to adjust the unit’s vertical
position and to swivel the lower mount
parts and the attached mixer� (Pre-cut
stainless steel pipe not included�)
RM-100
Floor Mount
The RM-100 positions the mixer stably
on the tank oor and comes with a re-
trieval chain to safely lift the unit for ob-
servation and maintenance� Protective
feet on each of the legs are designed to
prevent any damage to the tank� (Note:
minimum clearance is 24” for square
hatches, 25” for round hatches�)
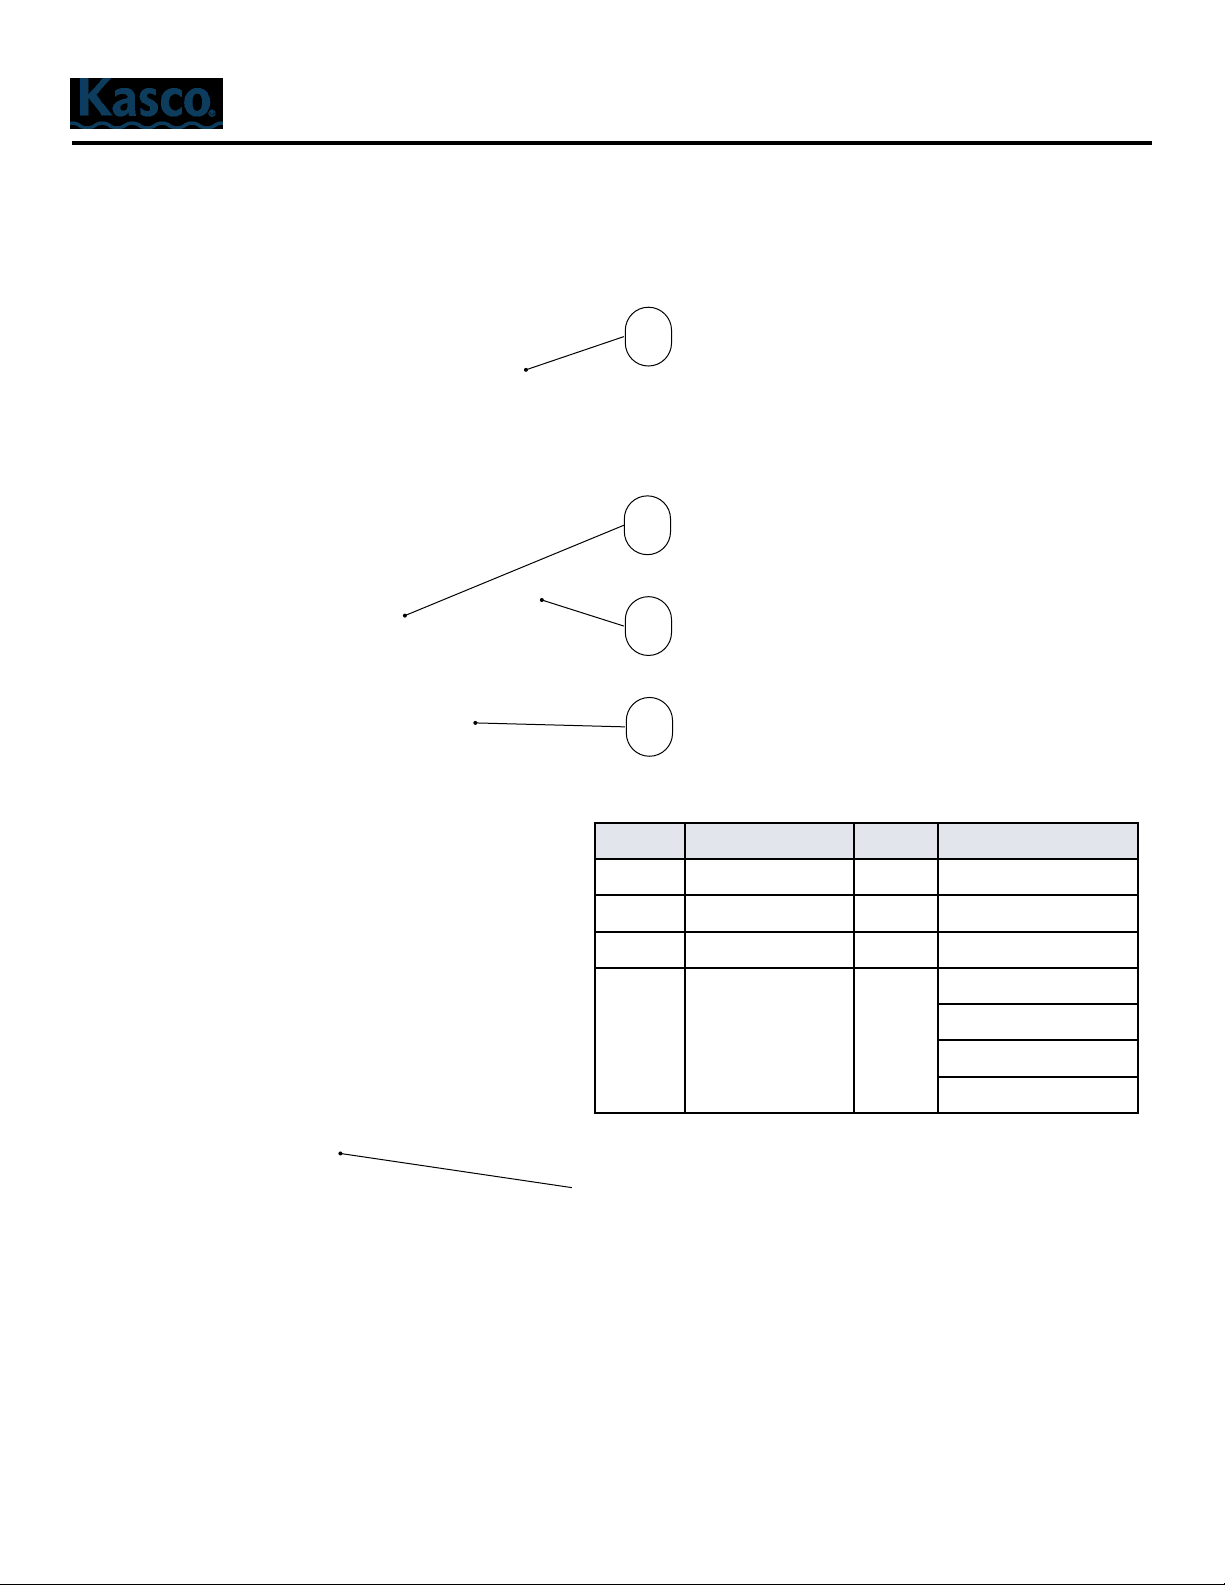
SM-100
Suspended Mount
Suspended from the tank roof, the
SM-100 uses a 60” stretcher bar to sup-
port the mixer in a raised position within
the tank� Two chains adjust the unit’s
elevation and facilitate safe removal for
observation and maintenance�
Control Panel Options
Standard CS-100, CS-200
• Motor contactor
• HOA, Manual or Automatic con-
trol through SCADA input
• Low water automatic shutoff
• UL 4X/3R enclosure
• 120V panel uses a 20A single
pole circuit breaker
• 240V panel uses a 30A single
pole circuit breaker
Advanced CS-150, CS-250
All Standard features PLUS:
• Ground fault protection
• HOA, Hand and Auto position
dry contacts for SCADA
• Mixer fault dry contact for
SCADA
• Mixer running dry contact for
SCADA
• Larger 4X/3R enclosure
Advanced models
are also available
in Stainless Steel:
• CS-150SS
• CS-250SS
Back to Contents

CERTISAFE™ TANK MIXER MANUAL
852110 / 2021.1.1
5
SYSTEM OVERVIEW
The Kasco CertiSafe™ Tank Mixer is part of a submerged active mixing system� It is intended for potable water tanks (20,000 gallons
and larger) to eliminate thermal stratication and ice formation, as well as maintain residual disinfectant uniformity.
CertiSafe™ mixers are shipped prepared for use� The motor is equipped with thermal overload protection; however, the mixing unit
must be continuously submerged to ensure safe operation� It is important that the installation provides appropriate voltage to the motor�
Operating the mixer continuously provides maximum water circulation in your tank� Optional system controls are available from Kasco
for mixer units (see page 4)�
CertiSafe™ systems have a maximum operating depth of 50 feet� Effective mixing can be achieved in deeper tanks with mounting at or
above this depth�
NOTE: This manual will cover the tank penetration process necessary to pass the power cable through the tank roof during installation�
Individual mount manuals contain information on additional tank penetration and unit installation�
SYSTEM SPECIFICATIONS
Model Voltage Phase Current
Draw
Amps Lock Rotor
Amps
Cord Gauge
50’ cord 100’ cord 200’ cord
2400C61 120 1 5�7 5�7 12 16 14 12
3400C61 120 1 7�0 7 18 16 14 12
3400HC61 240 1 3�5 3�5 9 14 14 12
4400C61 120 1 9�1 9�1 40 14 12 10
4400HC61 240 1 4�5 4�5 20 14 14 12
8400C61 240 1 9�0 9 40 14 12 12
Back to Contents

CERTISAFE™ TANK MIXER MANUAL
852110 / 2021.1.1
6
SUGGESTED TOOLS AND SUPPLIES
Electric or cordless drill
7/8” hole saw
(or 1-7/64” for 10 AWG cable)
Half-round metal le
Pan to catch shavings
Adjustable pliers
CABLE INSTALLATION PARTS INCLUDED
Description Item Qty. Part number for use with Cord AWG
Cord grip A 1
997210 14-16 AWG
997211 12 AWG
997212 * 10 AWG
Cord grip nut B 1 997215 12-16 AWG
997216 10 AWG
Cable support C 1 997220 10 AWG
997221 12-16 AWG
* Requires larger hole in tank roof (1-7/64”)
A
B
C
Eye bolt hardware
and installation instructions
included with mounting kits�
Fig. 1
Fig. 2
Back to Contents

CERTISAFE™ TANK MIXER MANUAL
852110 / 2021.1.1
7
SUGGESTED TANK PENETRATION
Depending on the mount option you choose, two or three tank penetration holes will be required. The rst is a either a 7/8” or 1-7/64”
diameter hole, depending on the cord gauge� This is for the cord grip, shipped with the CertiSafe™ Tank Mixer� Others are 3/8” in diam-
eter, for eye bolts that hold the cable support and any chains included with the mount�
For reference, all tank penetration measurements are detailed below, followed by instructions for the cord grip pass-through� Instruc-
tions and equipment for additional tank penetration are included with the CertiSafe™ mounting kits�
To prevent galling, we recommend a moisture-cured, polyurethane compound sealant suitable for contact with potable water and certi-
ed to meet the shrinkage for interior and exterior use. Refer to NSF/ANSI Standard 61 for indirect additives.
Note:
• The maximum tank roof thickness accommodated by the tank penetration parts included is 1/8”�
• Suggested measurements are based on a 24” square access hatch�
Ø 7/8” or 1-7/64”
Ø 3/8”
4”
Ø 7/8” or 1-7/64”
Ø 3/8”
4”
29”29”
Ø 3/8”
Floor Mount and Pipe Mount
Cord grip pass-through
7/8” or 1-7/64” hole located near the tank hatch�
Eye bolt pass-through
3/8” hole about 4” away from cord grip pass-
through�
Suspended Mount
Eye bolt pass-throughs
Two 3/8” holes located in line 29” to either side of
the tank hatch center point�
Cord grip pass-through
7/8” or 1-7/64” hole about 4” closer to the tank
hatch center point than one of the eye bolt pass-
throughs�
Fig. 3
Fig. 4
Back to Contents

CERTISAFE™ TANK MIXER MANUAL
852110 / 2021.1.1
8
1� Drill a 7/8” hole (or 1-7/64” hole for 10 AWG cable) at the distance suggested for your mount� See page 7 for details�
2� Deburr both sides of the hole� This is for the cord grip�
3� From the tank exterior, pass the cord grip (A) through the clearance hole, with the O-ring outside the tank roof�
4� From the tank interior, t the cord grip nut (B) on the threads protruding into the tank.
5� Tighten the nut (B) until snug, being careful not to over-tighten�
6� Feed the power cable through the cable support (C)�
• The cable support hangs on a connecting link suspended from an eye bolt� The connecting link and eye bolt are included with
CertiSafe™ mounting kits�
7� Continue to feed power cable through the cord grip (A) and out of the tank until all excess cord length has been taken up, only
leaving enough so that there is no strain on the cable�
8� Tighten the top nut on the cord grip to seal the power cable penetration�
9� Terminate the power cable into an exterior junction box (not supplied by Kasco)�
C
Steel tank roof
A
Fig. 5
Steel tank roof
B
Fig. 6
Fig. 7
A
B
Fig. 8
Back to Contents

CERTISAFE™ TANK MIXER MANUAL
852110 / 2021.1.1
9
Item Description Qty. Part number
A CertiSafe™ cage 1 993205
B Serrated screw 1 840543
C Serrated nut 1 840532
D Propeller 1 2400K
3400J
4400M
8400
UNIT PARTSUNIT PARTS
Fig. 9
Sealed motor unit
A
B
C
D
Back to Contents

CERTISAFE™ TANK MIXER MANUAL
852110 / 2021.1.1
10
INJECTION NOZZLE PLACEMENT RECOMMENDATIONS
Once installed, its placement within the tank and powerful active mixing capabilities make Kasco’s CertiSafe™ Tank Mixer an ideal
anchor point for common third-party NSF-approved chemical injection nozzles�
• For this purpose, we recommend that you x any nozzles (not supplied by Kasco) to the unit’s cage, spaced as shown below.
• Use stainless steal hose clamps to secure the nozzle body to the cage, ensuring that the nozzle is snug against the cage and that
the tip is below the propeller�
• Shown here with two nozzles, solutions will be mixed together with the water pulled through the propeller�
Chemical injection nozzle
Stainless steel hose clamps
Position nozzles below propeller
Fig. 10
Back to Contents

CERTISAFE™ TANK MIXER MANUAL
852110 / 2021.1.1
11
MAINTENANCE RECOMMENDATIONSMAINTENANCE RECOMMENDATIONS
Electrical Troubleshooting
• If a unit fails to operate, you can use a series of simple checks to determine the general cause�
• Once you’ve located the fault, please contact your distributor for information on how to proceed with repair�
Is the GFCI Tripped?
1� If yes, reset the GFCI and check operation�
2� If the GFCI continues to trip, disconnect the unit in the panel and reset the GFCI�
• If the GFCI doesn’t trip, the fault lies in the unit or its cord�
• If the GFCI continues to trip, the fault lies in the control panel power source�
Is the cord damaged?
1� With the power off, perform a visual inspection of the power cord�
• If there is visible damage, contact your distributor for repair options�
What happens with an alternate
power source?
1� If the power cord and unit appear to be in good condition, safely plug it into an
alternate GFCI-protected power source�
• If the unit starts and continues to run, fault lies in the control panel or power
source�
• If the alternate GFCI continues to trip, fault lies in the unit or cord�
GFCI
• GFCI (Ground Fault Circuit Interrupter) is a safety feature
that can alert you to problems with the mixer� It is important
to test the GFCI upon installation, after each re-installation,
and regularly thereafter to ensure consistent operation� If
you experience repeat interruptions, disconnect and remove
the equipment� Inspect the power cord and unit (mixer) for
damage� If no damage is apparent, please contact your
Kasco distributor or representative for further instruction�
Observation
• Monitor the operating mixer for any reduction or variation in
performance�
• Inspect the mixer annually and clean as needed to allow for
heat dissipation and to verify that the propeller is clean and
free of nicks�
• Inspect the power cable annually for damage or abrasion
and replace as necessary�
• Regularly clean all external rotating parts and examine them
for wear�
• If you note a deciency in performance, remove the equip-
ment from service and inspect for any damage or failure� If
you observe any canister leakage during annual inspection,
send the mixer to Kasco’s factory for service and repair�
Cleaning
• The stainless-steel motor housing needs to be kept clean in
order to allow heat to effectively dissipate�
Seal and Oil Replacement
• Replacing the seal and changing the oil every 3-5 years will
add reliability and longevity to the mixer�
• Seal replacement and all other repair services should be
performed by Kasco Marine�
IMPORTANT: Disconnect electrical power prior to any maintenance or servicing!
Back to Contents

CERTISAFE™ TANK MIXER MANUAL
852110 / 2021.1.1
12
WARRANTY
Kasco offers a standard 3-year warranty with the following
models:
• 2400C61
• 3400C61 / 3400HC61
• 4400C61 / 4400HC61
• 8400C61
At the time of purchase, a 5-year warranty is available for pack-
ages including Advanced model control panels�
Warranty must be purchased at the same time as the mixer
package� (Mixer package consists of the mixer, mount, and
control panel�)
Control panel MUST have GFCI protection�
Kasco® Marine, Inc� warrants this CertiSafe™ mixing system to
be free from defects in material or workmanship under appro-
priate use and service� The Kasco Marine, Inc� obligation under
this warranty is limited to replacing or repairing, without charge,
proven defective part while within the warranty period� Customer
shall pay shipping charges for returning the unit to Kasco�
Note: Kasco only accepts complete assemblies for warranty repair� We must receive the power cord and all other components
with the motor as originally assembled� Kasco will bill the customer to replace any missing parts necessary for repair� It is not
necessary to return the control panel, mount, or other parts with the motor assembly, unless specically requested by a Kasco
representative�
Please attach a repair form with the shipment� The repair form must include a name, physical address (for return delivery of the
repaired unit), daytime phone number, and an e-mail address for correspondence regarding the warranty claim�
Any expedited shipping method for the return of the unit is at the customer’s expense� Kasco Marine will return units repaired
under warranty at our expense via ground freight within the continental United States�
Shipping Address:
Kasco Marine, Inc�
800 Deere Rd�
Prescott, WI 54021
Attn: Repairs
THIS WARRANTY IS IN LIEU OF ANY OTHER WARRANTIES,
EXPRESSED OR IMPLIED� IN NO EVENT WILL KASCO
MARINE, INC� BE LIABLE FOR ANY CONSEQUENTIAL
DAMAGES�
Warranty is void if:
• The mixer is not maintained according to the recommenda-
tions supplied in this manual�
• The mixer is returned for repair without the power cord�
• The unit, control box, or power cord are altered in any way
from original shipment�
• The power cord is nicked or cut�
• The mixer is damaged by unauthorized service�
Warranty Claim Procedure
Warranty period is established by the original receipt. For efcient service, please register the unit online at:
www�kascomarine�com/warranty-registration�
Once warranty coverage has been established, you may send the unit to Kasco for evaluation and repair�
Back to Contents

CERTISAFE™ TANK MIXER MANUAL
852110 / 2021.1.1
13
NON-WARRANTY REPAIRS
You can often repair failed equipment at a lower cost than re-
placement� Kasco Marine estimates repairs at the request of the
customer� This request should include a daytime phone number
and e-mail address�
Estimate options are as follows:
• Kasco contacts the customer with a repair total after we
evaluate the unit, but before we perform the work quoted�
• Customer pre-approves repair of the unit if costs are below
a stated dollar amount� Example: “Please repair if total is
under $150�00 before shipping charges�”
3020379
ANSI/UL 778: 2016
Ed.6+R:22Feb2017
CSA C22.2 #108: 2014 Ed.5
Kasco will recycle any unit we receive for estimate but which
the customer declines to repair, unless the customer species
otherwise� If the customer would like the product returned, Kasco
will return the unit to the condition in which we received it, and
we will ship it at the customer’s expense�
Billing
Contact Kasco to arrange payment for any non-warranty repairs�
We will request payment information upon customer approval of
the estimate�
Kasco Marine
800 Deere Road
Prescott, WI 54021
Contact Us
Phone: 715-262-4488
Fax: 715-262-4487
www.kascomarine.com
Back to Contents

CERTISAFE™ TANK MIXER MANUAL
852110 / 2021.1.1
14
REPAIR CONTACT FORM
• Kasco requires that all equipment sent for repair MUST be accompanied by this form and marked to Repairs attention�
• Kasco is NOT responsible for shipping damage accrued in return shipment�
• It is the responsibility of the customer to ship and pay freight to Kasco�
• Do not ship the mount or control panel with unit, unless otherwise instructed�
• A fee of $60 per hour will be assessed for cleaning excessively dirty units�
• Refer to the CertiSafe™ Tank Mixer Operation & Maintenance Manual for easy-to-follow troubleshooting tips to rule out site issues�
Note: Contact Information should be that of the person or company to contact for repair information�
Company name
Contact name
First name Last name
Address
Street
City
State
ZIP code
Phone number
Primary Alternate
Email address
Preferred method of contact
(circle) Phone Email
Purchase order number
Additional notes
for repair technician:
Kasco Marine
800 Deere Road
Prescott, WI 54021
Back to Contents
Other manuals for CertiSafe 2400C61
1
This manual suits for next models
5
Table of contents
Other Kasco Mixer manuals
Popular Mixer manuals by other brands

Hill Audio
Hill Audio RPX-2300 user manual

Electrolux
Electrolux B3000 Brochure & specs

MULTIQUIP
MULTIQUIP MC-62S Operation and parts manual

Scheppach
Scheppach MIX140 Translation from the original instruction manual

Sound Devices
Sound Devices 688 user manual

EIBENSTOCK
EIBENSTOCK EHR 15.2 SB Original instructions