Katanax K1 PRIME User manual

®
Automatic fluxer
1


1
Thank you for having chosen the K1 Prime fusion machine from Katanax. To enjoy
years of reliable, efficient and safe use of this time-saving instrument, please read
this manual thoroughly and keep it in a safe and handy place for future reference.
Should you have any question regarding the use, maintenance or repair of your
instrument, kindly contact Katanax directly for assistance (see page 55 for contact
details).
© 2018, Katanax inc. All rights reserved.

2
Index
Index ...............................................................................................2
Installation......................................................................................4
Box contents ............................................................................................ 4
Location................................................................................................... 4
Leveling ................................................................................................... 5
Connection............................................................................................... 5
Compatibility with the older K1 model ....................................................... 5
Questions ?.............................................................................................. 5
Introduction....................................................................................6
The fusion theory ..................................................................................... 6
Automatic fluxers ..................................................................................... 6
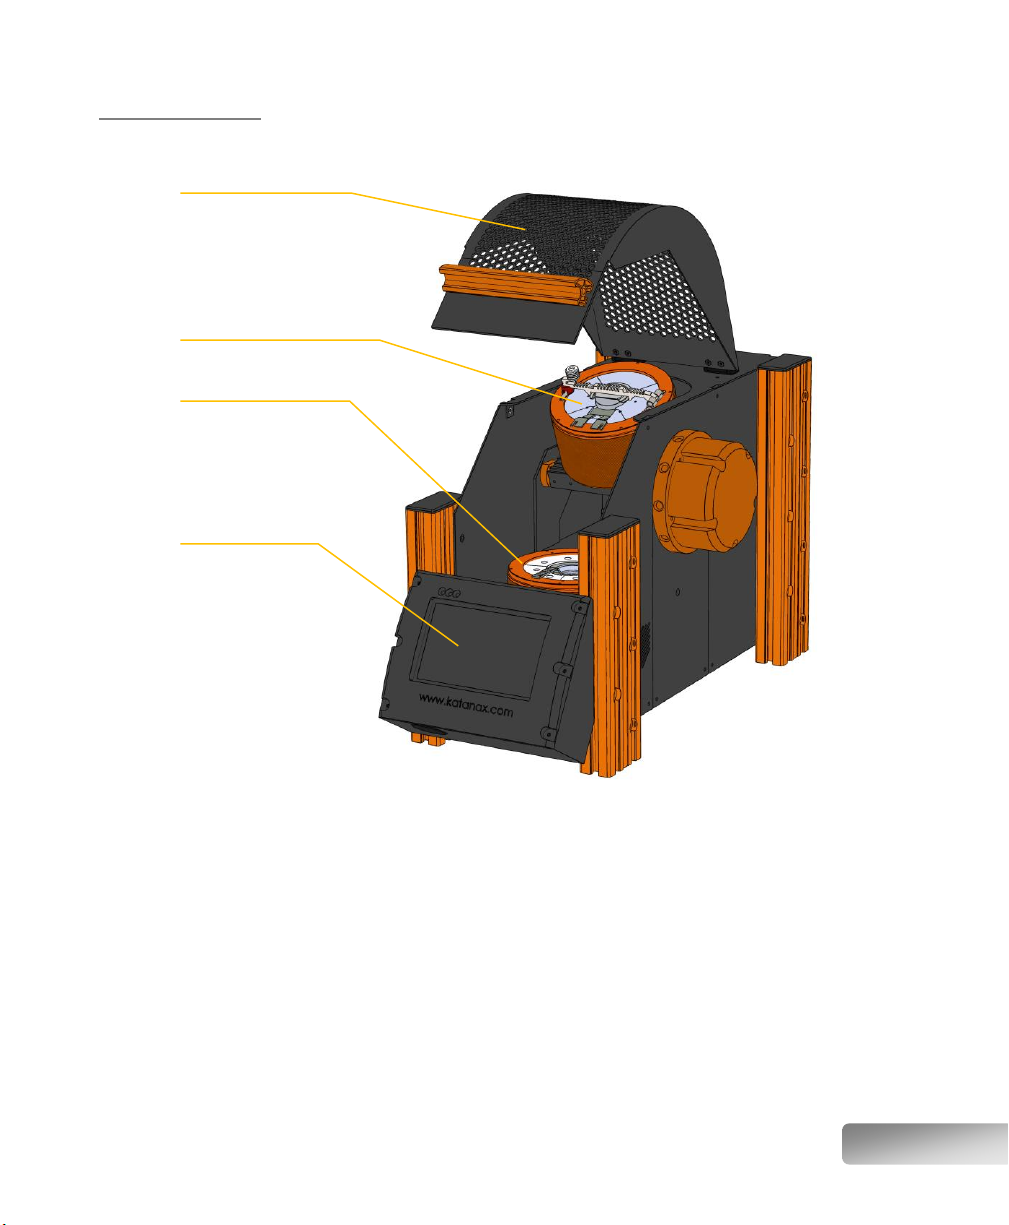
The K1 Prime fluxer.................................................................................. 7
Main features of the Katanax K1 Prime.................................................... 10
Precautions ...................................................................................12
High temperature................................................................................... 12
High voltage........................................................................................... 12
Acid spills............................................................................................... 12
Heavy instrument................................................................................... 12
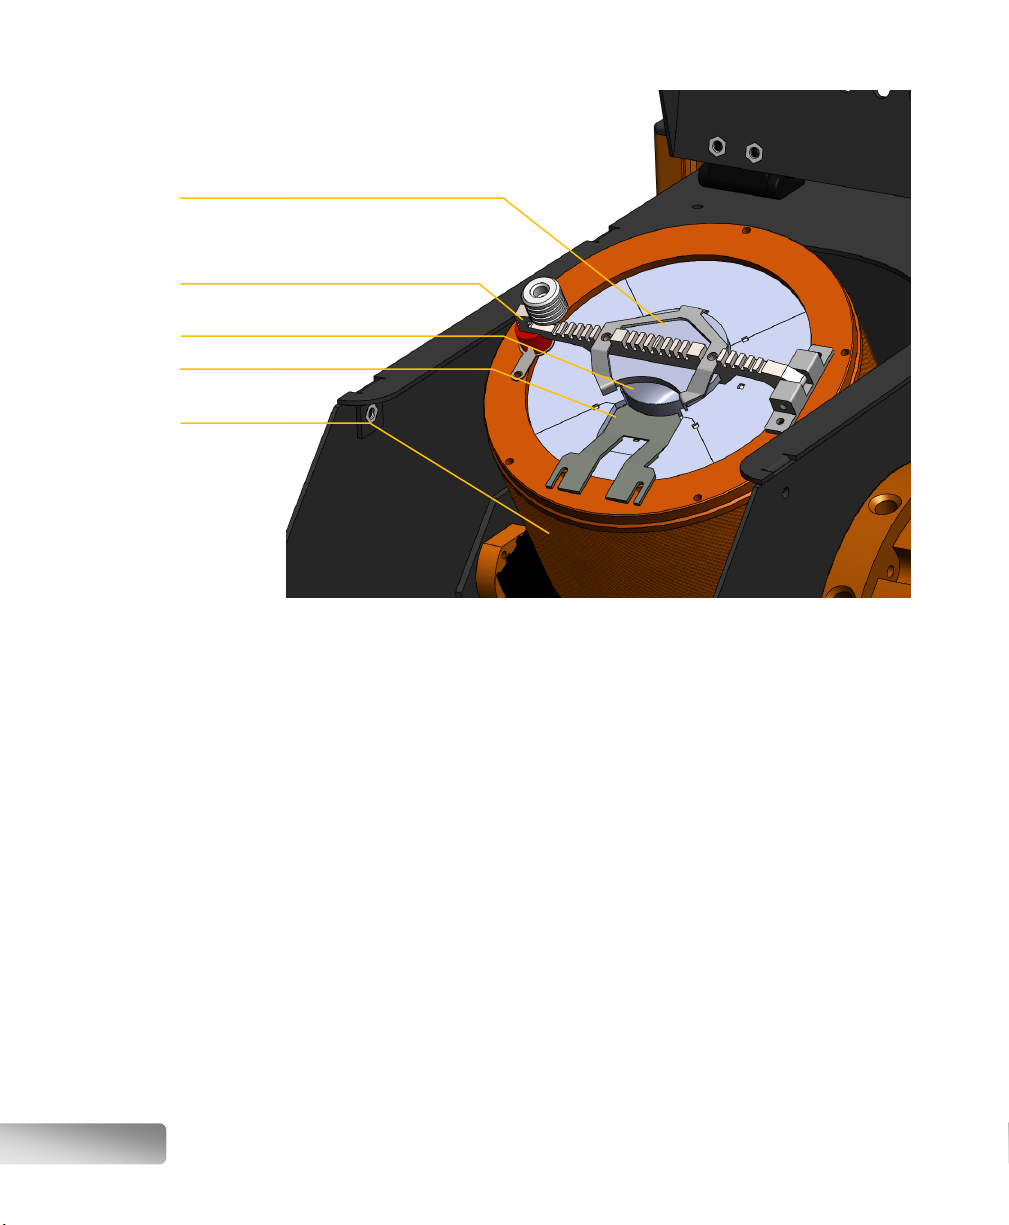
Crucible locking ...................................................................................... 12
How the unit works ......................................................................13
Heating.................................................................................................. 13
Agitation and pouring of the melt ............................................................ 13
Cooling .................................................................................................. 13
Solution agitation ................................................................................... 13
Using the K1 Prime (basic) ..........................................................15
The main running screen ........................................................................ 15
During a fusion....................................................................................... 17
The right ingredients .............................................................................. 18
Care of the elements .............................................................................. 21
Crucible installation ................................................................................ 22
Mold installation ..................................................................................... 22
A general fusion ..................................................................................... 22
Making solutions..................................................................................... 23
Description of the fusion steps ................................................................ 24
Programming the K1 Prime (advanced)......................................27
Viewing the fusion parameters ................................................................ 27
Unlocking the advanced mode ................................................................ 31
Managing fusion methods ....................................................................... 31
Preparing a fusion program..................................................................... 32
Heating steps ......................................................................................... 32
Pouring step........................................................................................... 33
Cooling steps ......................................................................................... 34

3
Solution programs.................................................................................. 35
On-the-fly editing ................................................................................... 35
Global parameters ........................................................................36
Language............................................................................................... 36
Automatic shut-off delay......................................................................... 36
Fusion counter ....................................................................................... 36
Fusion troubleshooting.................................................................37
Disk cracks............................................................................................. 37
Disk crystallizes...................................................................................... 37
Incomplete disk...................................................................................... 38
Non-homogenous disk............................................................................ 38
Bubbles in disk ....................................................................................... 38
Periodic inspection .......................................................................39
Warning................................................................................................. 39
Inspection schedule table........................................................................ 39
Flux spillages.......................................................................................... 39
Visual integrity of heating elements......................................................... 40
Element terminal connections ................................................................. 41
Thermocouple junction ........................................................................... 41
Service operations ........................................................................43
Warning................................................................................................. 43
Crucible heating element replacement..................................................... 43
Mold heating element replacement.......................................................... 47
Firmware and program transfers.................................................50
Preset programs..................................................................................... 50
Backup or restore by USB....................................................................... 51
Technical specifications................................................................53
Electrical ................................................................................................ 53
Physical ................................................................................................. 53
Warranty .......................................................................................54
Contacting Katanax ......................................................................55

4
Installation
Congratulations on your acquisition of the K1 Prime fluxer, from Katanax. Please
read the following section for proper commissioning of your instrument. Do not
hesitate to contact Katanax with any question you might have with this crucial
step.
IMPORTANT: It is advisable that at least two persons carry this instrument to
avoid injuries. Do not drop instrument.
Box contents
The instrument comes with its essential accessories. In addition to optional items
you might have ordered, the box should contain:
1 fluxer (K1 Prime main unit)
1 mold heating/cooling unit
1 mold holder to fit your mold size
1 power cord
1 tool kit (hex keys, spare fuses...)
1 instruction manual (this booklet)
Additionally, if you have ordered a K1 Prime with solution-making capability, you
will find:
1 solution agitation module
1 unbreakable Teflon beaker
1 magnetic stirring bars
Location
Vent hood
Molten flux, additives and some samples may produce vapors and gases that
need to be extracted, but since this instrument does not produce post-combustion
hot gases, only a small hood is required. A wide, funnel-ended, flexible suction
duct may be the most practical and economical solution.
Table
The counter on which the instrument is to be used must be made of non-
combustible material and must be able to withstand a weight of 30 kg (66 lbs). It
is recommended to use the instrument from a standing position, and adjust table
height accordingly.
It is advisable that at two persons carry the instrument to avoid back injuries.
Clearances
Because your new fluxer will produce heat, a minimal safety clearance must be
provided to prevent surrounding material from heating and potentially catching
fire. All around the instrument, a minimum distance of 30 cm (12’’) must be free

5
from combustible materials. Similarly, a clearance of at least 45 cm (18’’) must be
provided above the top of the instrument.
Leveling
In order to obtain glass beads with a regular thickness, it is important that the
mold be reasonably horizontal upon pouring. If in doubt, place a lightweight
bubble spirit level on the mold and adjust instrument’s feet to compensate for
possible slant. (See page 22 for mold installation details.)
Connection
The K1 Prime works on 117-127 or 220-240 VAC, 50/60 Hz.
When used at 117-127 VAC, the power line must be able to provide
12 A.
When used at 220-240 VAC, the power line must be able to provide
10 A.
While it is technically workable to use the instrument in the lower range of
voltages, heat-up times will be longer than in the recommended voltage range. It
is possible that the instrument show heating errors due to this, because the
microprocessor monitors temperature increase vs. time.
In areas where the voltage during operation is likely to fall below the lower
recommended limit, the use of a 1500 W step-up transformer is required.
Compatibility
with the older
K1 model
If you own an older-generation K1 unit, please note that the mold heating module
and the solution agitation module, while being physically very similar to their new
versions, are NOT compatible.
IMPORTANT: Damage to the instrument will occur if an older module is
connected to the K1 Prime.
Questions ?
Should you have any question regarding the proper installation and start-up of
your instrument, please contact Katanax directly (see information on page 55) for
assistance.

6
Introduction
This section intends to introduce the reader to the fusion technique and to
familiarize him or her to the K1 Prime.
The fusion
theory
Fusion is a technique used to prepare inorganic samples, with a view to analyze
them by x-ray fluorescence (XRF), inductively coupled plasma (ICP) atomic
absorption (AA) or any traditional wet chemistry method. Typical samples include:
cements, ores, slag, sediments, soils, rocks, ceramics, pigments, glasses and
even metals.
A fusion can produce either a small, homogenous solid glass disk (or “bead”) for
XRF, or an acid solution for other analytical methods.
The process of fusion as a sample preparation method exhibits many advantages
over other methods, as it does not produce mineralogy, grain size or orientation
effects and the result is perfectly homogenous.
In sample preparation by fusion, the sample never actually melts. It is merely
dissolved into a solvent. This solvent, generally a lithium borate flux, is solid at
room temperature and must be molten to dissolve anything. This is the only
reason the process requires heat.
Therefore, the peak temperature of a sample preparation by fusion is
determined only by the type of flux, not the type of sample.
A fusion temperature of 1100°C should be considered as a maximum.
Heating above that temperature could cause flux evaporation that could bias the
subsequent analysis.
Automatic
fluxers
Because of the potential risk of manipulating red-hot samples and to increase
repeatability of temperature, mixing and duration, the industry has now adopted
the automated fusion machine as the standard equipment to prepare samples by
fusion.

7
The K1 Prime
fluxer
General view
Enter the K1 Prime, the fusion machine that is the evolution of the original K1,
which was the first and only fully automated electric resistance fluxer. Based on
this success, Katanax has updated the concept, making it sturdier and easier-to-
use than ever.
The K1 Prime comes pre-loaded with various fusion methods that can be used as
is, or can be customized. All fusion methods can be saved, renamed, deleted or
copied, just like computer files. Only the preset methods are protected to avoid
accidental overwriting.
Crucible
heater
Mold heater
LCD
interface
Safety shield

8
Crucible heater
A straight-walled platinum crucible is loaded with a few grams of powdered
sample, an appropriate flux and often other agents. The crucible is inserted into
the crucible heater, and locked by the locking bar’s crucible lid.
A removable spill protector is provided, so that any pouring residue can easily be
cleaned.
Crucible
Locking bar
Crucible
heater
Crucible lid
Spill protector

9
Mold heating/cooling unit
A platinum mold in a special holder is then installed in the removable mold heater.
The mold is actually placed in a metal holder, which is available in various sizes to
accommodate all typical mold diameters.
Should your instrument be fitted with a mold holder that is not suitable for your
mold, please order as follows:
Part number
For mold with
nominal diameter
KP0037A
30 mm
KP0038A
32 mm
KP0039A
35 mm
KP0040A
40 mm
A blower underneath will provide the necessary airflow to cool down the mold and
glass bead at the end of the cycle. This is why this unit is sometimes referred to
as the mold heating/cooling unit. For simplicity, we will simply refer to the “mold
heater”.
Mold
Element
Mold holder
Mold heater
Blower
Banana plug

10
Fusion sequence
When the user instructs the K1 Prime to launch the actual fusion, all heating steps
are automatically started in sequence. Temperature is constantly monitored and
displayed.
Once the flux is molten (after a programmable time), a back-and-forth rocking of
the crucible heater continuously mixes the flux with the sample.
The liquid flux starts dissolving the sample. When all sample is dissolved (after the
programmed time), the crucible heater tilts forward and the crucible pours its
contents into the mold.
If set so in the fusion program, it is possible for the now-full mold to be re-heated
by its heater, before the final cooling. (This operation is called annealing and is
needed in very special cases only.)
A blower located underneath cools the mold; when the mold is completely cooled,
the user picks up a perfectly homogenous glass bead, ready for analysis by XRF.
For solution preparation, the hot melt is poured into an unbreakable beaker
(instead of a mold), which contains a dilute acid that is automatically stirred by a
magnetic system (optional).
Some fusion types, such as peroxide and pyrosulfate, do not even require
pouring. The K1 Prime is also designed for such fusions, where the whole crucible
is dipped into an acid, after the fusion, to prepare a solution by leaching.
Main features
of the Katanax
K1 Prime
Accuracy
Entirely automated
Fully reproducible fusion methods
Real-time temperature display
Safety
Integrated safety shield
No gases used, so no post-combustion toxic products released
Minimal heat dissipation; no need for a powerful vent hood
Versatility
Makes glass disks for XRF, as well as peroxide or pyrosulfate fusions
With optional solution agitation module, can also prepare solutions
Ready to fuse with built-in methods for oxides, minerals, metals, alloys, sulfides,
fluorides and more
Can perform solid oxidations
Can be used at both 120 and 240 VAC (voltage selection at the back of the
instrument)
Can be connected in any standard outlet (consumption is lower than 1300 W)
Fully customizable fusion methods
USB connectivity

11
Productivity
Throughput of 5 to 7 samples/hour
Simplicity
Simple, intelligent, high-performance heaters
Easy installation
Intuitive touch-screen color LCD graphics interface
Easy icon and menu navigation
Low maintenance; easy component access
1-year limited warranty

12
Precautions
High
temperature
Although this instrument has been built to be very safe, it is still capable of
reaching temperatures up to 1150ºC. Care must be taken in order to avoid
touching hot surfaces.
Even though the mold is supposed to be cool at the end of a fusion cycle, in order
to avoid risks of burns, use appropriate gloves, laboratory tongs or some other
adapted tool to manipulate the mold and glass disk. The crucible and its locking
bar will remain hot at all times –use appropriate gear or tool.
User is advised that this instrument remains very hot for a long time, even after
turning it off.
High voltage
This instrument is powered by 120/240 Volts AC. Although the elements are
powered at voltages below 24 V, reasonable precautions must be taken.
Disconnect power cord before attempting any cleaning, maintenance or repair
operation.
Be careful that no liquid infiltrate into the unit’s casing.
Acid spills
When making solutions, user is strongly discouraged to use glass beakers, as acid
spills in instruments are dangerous and not covered by warranty. Use only
unbreakable Teflon beakers; otherwise, there is a risk of user injury, due to flying
glass shards or acid splatter.
Heavy
instrument
It is advisable that at least two persons carry this instrument to avoid injuries. Do
not drop instrument.
Crucible
locking
Installing the crucible requires that the crucible locking bar be secured by means
of its magnet. To ensure safe operation, this needs to be checked by the user
before each fusion. See page 22, Crucible installation, for detailed instructions.

13
How the unit works
Heating
Heating of both the mold and the crucible is achieved in separate heaters, using a
state-of-the art alloy heating elements coiled around rigid ceramic rods. These
rods run along a semi-soft, highly insulating material. These parts are then
assembled into an aluminum container.
During heating, temperature is controlled by means of a platinum thermocouple.
To improve energy efficiency, a small cover is moved over the crucible. This lid
also doubles as a stopper that keeps the crucible in its heater during pouring.
In the case of the mold, a ring-shaped holder is placed around the mold to keep
as much energy in the heater as possible.
Agitation and
pouring of the
melt
Homogenization of the sample into the flux is produced by the rotation of a
geared stepper motor located at the far right of the instrument. This motor
directly drives the crucible heater with a back-and-forth motion to agitate the
melt.
At the moment of pouring, this tilting motor rotates the crucible heater further
forward to an adjustable pouring angle, at an adjustable speed. The melt pours
naturally into the mold, and the crucible heater is automatically brought back to
the horizontal, ready for another fusion.
The pouring step can also be completely disabled, for procedures such as
pyrosulfate or peroxide fusions, which do not need transferring the melt into
another container.
Cooling
The mold heater is fastened right above a blower (centrifugal fan). When
requested, this fan is powered and draws fresh air through the holes of the
ceramic ring around the mold, then through the holes at the bottom of the mold
heater ceramic shell. The mold heater thermocouple monitors the cooling process.
Solution
agitation
Making solutions requires that the instrument be fitted with the optional solution
agitation module.
When making solutions, the hot melt is poured directly into a beaker containing
an acid. This beaker, along with the solution agitation module, is to be installed
before the fusion is launched. The acid solution must be agitated to improve the
dissolution speed of the crystallized flux and sample.

14
To do so, alternatively powered magnetic coils produce a rotating magnetic field
under the beaker. By placing a laboratory-type magnetic stirring bar in the acid
before fusion, the agitation will be automatically started and stopped.

15
Using the K1 Prime
(basic)
The main
running screen
After the booting screen, you will obtain a display similar to the following (not all
buttons/icons will appear, depending on the instruments’ settings):
Here is a short explanation of the various zones and buttons:
The graph zone shows the outline of
the crucible temperature as a function
of time.
The “Start” button, quite obviously, is
used to launch the currently selected
fusion program.

16
The crucible temperature icon is
depicted with
the actual measured temperature
(in orange), and
the target temperature, which the
crucible heater is in the process of
reaching (in gray)
Similarly, the mold temperature icon is
shown with corresponding actual
(orange) and target (gray)
temperatures.
The “parameters” button is used to
adjust the individual setting of each
program step. More details are given
at page 27, Programming the K1
Prime (advanced).
This zone is used to select the current
program. Click on the arrows to scroll
among existing programs.
Clicking on the program name itself
will also allow you to rename it. More
details on this are given at page 31,
Managing fusion methods.
The Copy button is useful to duplicate
an existing program, to create a
derived program. More details are
given at page 31, Managing fusion
methods.
The Delete button is used to erase a
program from memory. More details
are given at page 31, Managing fusion
methods.
The Save button is used to write the
current program and its parameters
into memory. More details are given at
page 31, Managing fusion methods.
The Global Parameters button is used
to access a screen where general
configuration settings can be modified.
More details are given at page 36,
Global parameters.

17
The padlock icon/button shows the
state of the fusion program
parameters.
A closed padlock means that the
parameters are locked, and a
password is required to unlock
parameter access. Conversely, an
open padlock means that all
parameters can now be freely
changed.
More details are given at page 27,
Programming the K1 Prime
(advanced).
Entering the password is also required
to access the Global parameters
screen.
During a fusion
While the instrument is running, the main screen will display additional
information and buttons.
Here is the explanation of the new graphical elements. (Other icons were
explained at page 15, in The main running screen section.)

18
The Pause button is used to temporarily “freeze” the
ongoing fusion.
In pause mode, timers are suspended, and the current
furnace temperature is maintained. Any ongoing motor
motion will be continued or completed. This can be useful
when some extra time is required to complete an oxidation
or dissolution reaction, for example.
Press the Pause button again to resume normal operation.
This icon represents the ramping speed to reach the
programmed crucible temperature. Default value is “Fast”
(i.e. the crucible heats at full power), but it is possible to
slowly ramp up the temperatures, at rates expressed in
°C/minute.
This cluster represents the elapsed time (mm : ss) since
the requested temperature is attained, as well as the
currently-running step number (in red).
See page 24, Description of the fusion steps, for more
information on this topic.
The Stop button, as the name implies, is used to halt an
ongoing fusion process, stopping all motors.
This can be used when one realizes that the crucibles or
molds are not properly prepared, or in case of emergency,
for example.
Pressing Stop again will cancel the ongoing program and
reset the instrument.
Pressing Start instead will resume the fusion program.
The right
ingredients
From the preceding paragraphs, we already know how to launch a fusion
program. There are, however, a few other things than one should know to obtain
a perfect disk. These include:
1. properly preparing the sample for the fusion,
2. selecting the appropriate flux blend for the sample type,
3. determining the total mass in the crucible from the mold capacity,
4. estimating the flux-to-sample ratio,
5. using the appropriate additives, and
6. mixing the components together.
Table of contents
Other Katanax Dispenser manuals
Popular Dispenser manuals by other brands

RealCup
RealCup RC400 Service manual

Perlick
Perlick 8184C Installation and operation instructions

Toto
Toto TLK01101 Series installation manual

Franke
Franke RODX672 Installation and operating instructions

Component Hardware
Component Hardware KS15-2020 user manual

Glas Craft
Glas Craft Guardian A6-6000 IP user manual

Glas Craft
Glas Craft Auto Probler P2 user manual

Fillmaster Systems
Fillmaster Systems Auto user guide

SureShot
SureShot ACFC-10 Operation manual

Silvercrest
Silvercrest SSE 6 D2 Operation and safety notes

Scotsman
Scotsman IOD Series Installation, operation and maintenance manual

SELFMAKER
SELFMAKER SELFCLEAN user manual