Kathrein ZAW 13 User manual

1 / 4
Zu dieser Anleitung
Dieses Dokument ist Teil des Produkts.
►Das Gerät erst installieren und benutzen, nachdem Sie dieses Dokument gelesen und verstanden haben.
►Die in diesem Dokument beschriebenen Maßnahmen immer in der angegebenen Reihenfolge durchführen.
►
Dieses Dokument während der Lebensdauer des Geräts aufbewahren. Das Dokument an nachfolgende Besitzer und Benutzer weiter-
geben.
Die aktuelle Version dieses Dokuments finden Sie auf
www.kathrein-ds.com
Merkmale
●Passend für die Kompression-Stecker EMK 12 und EMK 19
●Verpackungs-Einheit/Gewicht (St./kg): 1/0,4
Arbeitsschritte
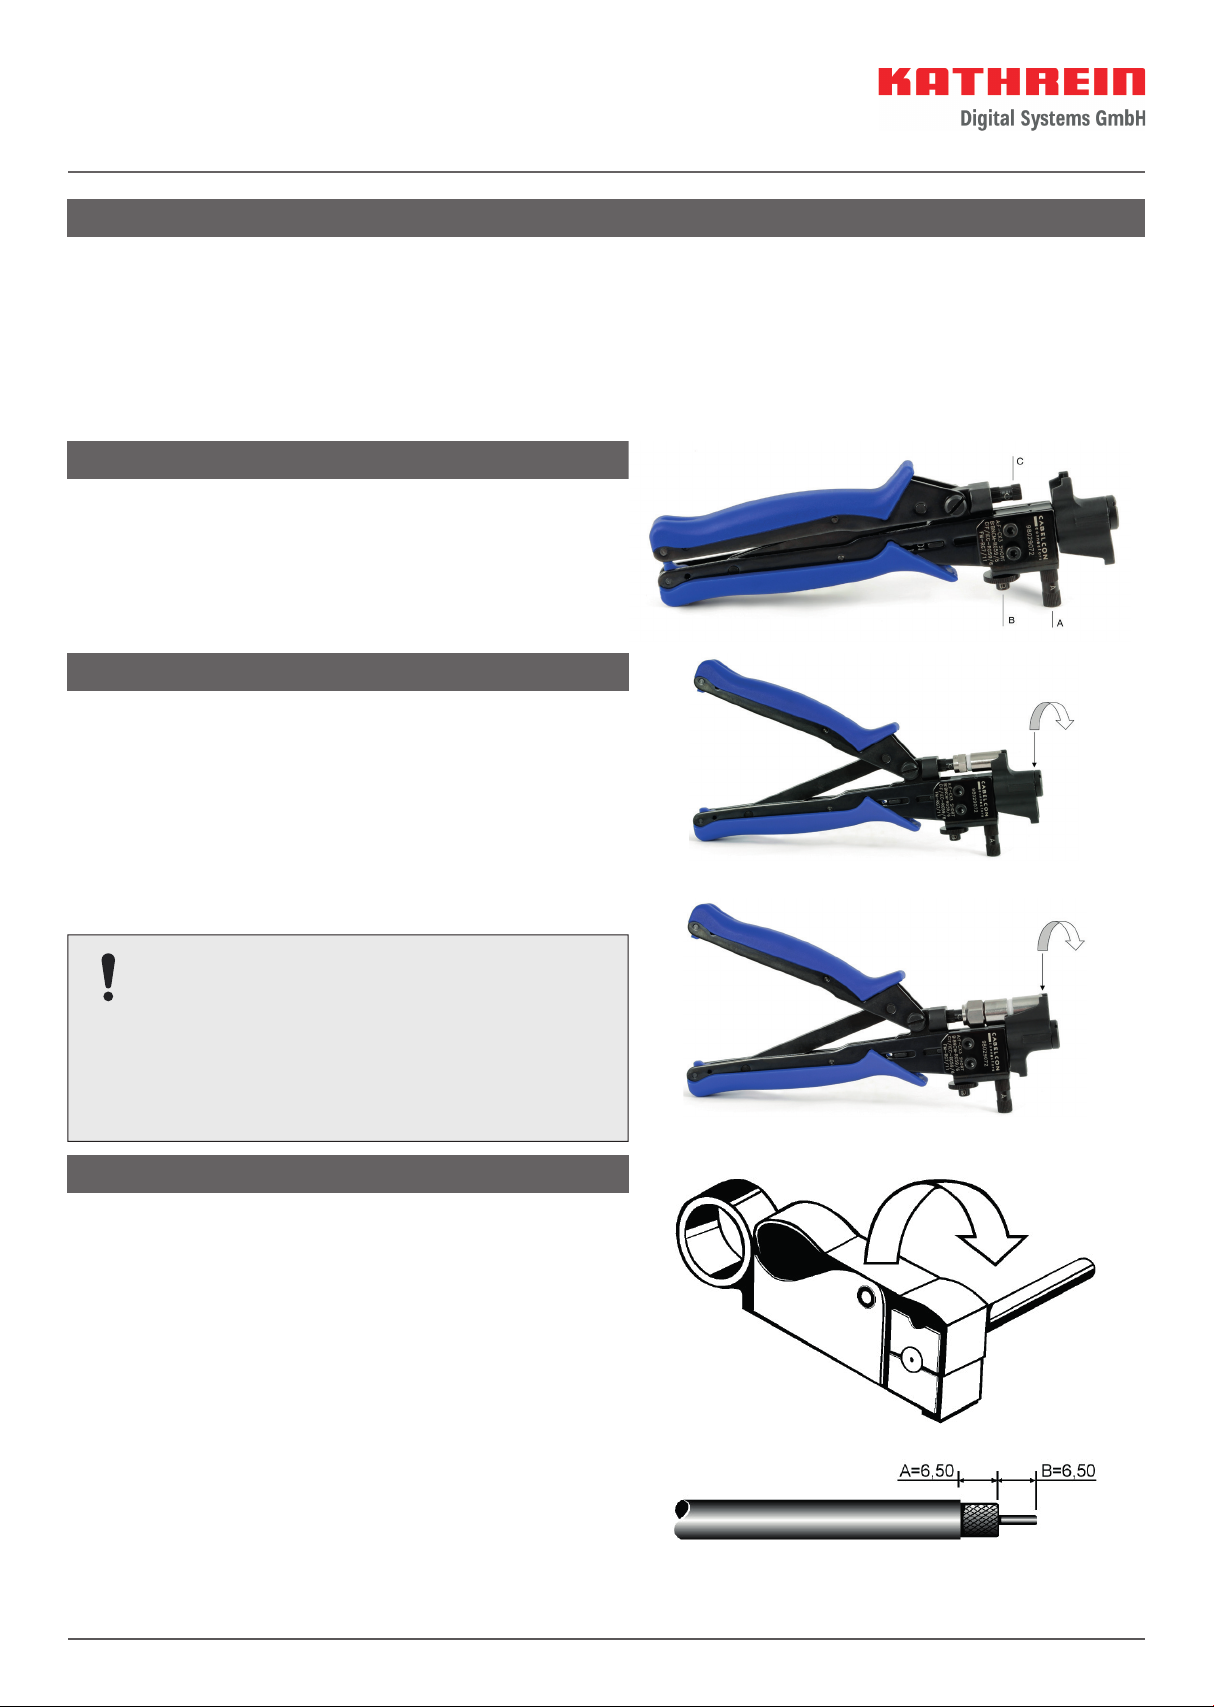
1. Passenden Adapter befestigen (fest aufschrauben):
●Adapter A -> Für kurze F-Stecker
●Adapter B -> Für BNC-Stecker RG 5/59
●Adapter C -> Für Kompressions-Stecker EMK 12 und EMK 19
(vormontiert) und für IEC-Stecker/-Buchsen RG 6/59
2. Zangen-Kopf durch Drehen an die Steckerlänge EMK 12 (kurze
Länge, siehe Bild 1) oder EMK 19 (Bild 2) anpassen
3. Stecker in Zange einlegen und verpressen
Für die Montage benötigte Hilfswerkzeuge können bei der
Kathrein-Servicestelle bestellt werden:
autronic electronic-service GmbH
Haupstraße 2a
35792 Löhneberg-Obershausen, Germany
Telefon: +49 6477 612 310 1
Fax: +49 6477 612 302 0
Email: service-kathrein@autronic-service.de
Bild 1
Bild 2
Montage
1. Schritt
Für die einwandfreie Vorbereitung des Kabels empfehlen wir die
Verwendung eines Abisolierautomaten (z. B. Absetzwerkzeug
ZAW 16, Bestell-Nr.: 21410014).
Absetzmaße:
A = 6,5 mm; B = 6,5 mm
Für die Einstellung der genauen Schnitttiefe beachten Sie bitte,
dass das Geflecht nicht abgeschnitten und der Innenleiter nicht
angeritzt werden darf.
ZAW 13 21410012
Kompressions-Zange

2. Schritt
Falten Sie das freigelegte Geflecht über den Mantel zurück. Bei
„Quad Shield“, „Tri Shield“ und „Super Shield“-Kabeln entfernen
Sie nur die äußere Folie und Geflecht. Das innere Geflecht muss
über den Mantel zurückgefaltet werden. Vergewissern Sie sich,
dass die Folie am Dielektrikum anliegt und unverletzt ist.
3. Schritt (für EMK 12)
Drehen Sie den Stecker um und schieben die Frontseite über die
Folie. Nun drehen Sie ihn leicht unter Beachtung der Überlap-
pungsrichtung, um die Folie zu glätten und eng an das Dielekt-
rikum zu pressen.
4. Schritt
4.1 Für EMK 12
Drücken Sie den Stecker mit der inneren Crimp-Hülse zwischen
Folie und Geflecht, bis das Dielektrikum bündig mit der Auflage-
fläche des Steckers ist.
4.2 Für EMK 19
Schieben Sie den Stecker mit der inneren Crimp-Hülse zwischen
Folie und Gefl echt. Drücken Sie den Stecker gegen das Kabel, bis
der bewegliche Pin gemäß Abbildung aus dem Stecker heraus-
ragt. Somit ist der sichere Kontakt des Innenleiters gewährleistet.
5. Schritt
Verpressen Sie den Stecker mit Hilfe der Kompressions-Zange.
Der Adapter C muss dabei eingesetzt sein.
KATHREIN Digital Systems GmbH | Anton-Kathrein-Str. 1–3 | 83022 Rosenheim | Deutschland | Telefon +49 731 270 909 70

3 / 4
ZAW 13 21410012
Compression pliers
About This Guide
This document is part of the product.
►Do not install or use the device until you have read and understood this document.
►Perform all operating steps described in this manual in the specified sequence.
►
Keep this document for reference throughout the service life of the device. Pass this document on to any new owner or user.
For the most up-to-date version of this document, go to
www.kathrein-ds.com
Compression pliers ZAW 13
●Suitable for the EMK 12 and EMK 19 compression plugs
●Packing unit/weight (pc./kg): 1/0,4
Procedure
1. Fix suitable adaptor (screw tightly):
●Adaptor A -> For short F connectors
●Adaptor B -> For BNC plug RG 5/59
●Adaptor C -> For compression plugs EMK 12 and EMK 19
(premounted) and IEC plug/socket RG 6/59
2. Adapt pliers-head to length of EMK 12 or EMK 19 plug by moving it
(short length, see fig. 1; EMK 19 see fig. 2)
3. Insert plug into pliers and press
Auxiliary tools for the mounting are available at the Ka-
threin service centre:
autronic electronic-service GmbH
Haupstraße 2a
35792 Löhneberg-Obershausen, Germany
Telefon: +49 6477 612 310 1
Fax: +49 6477 612 302 0
Email: service-kathrein@autronic-service.de
fig. 1
fig. 2
Mounting
1. step
We recommend using a skinning machine for preparing the cable
properly.
Trimming dimensions:
A = 6,5 mm; B = 6,5 mm
When setting the exact depth of cut please mind that the braiding
must not be cut o and the inner conductor must not be scored.

2. step
Fold up the braded braiding over the sheath. With ‚Quad Shield‘,
‚Tri Shield‘ and ‚Super Shield‘ cables only remove the outer film
and braiding. The inner braiding must be folded up over the
sheath. Make sure that the fi lm abuts against the dielectric and
is intact.
3. step (for EMK 12)
Turn the plug around and pull its front-side over the film. Now
move it slightly to smooth out the film, and press it tightly onto
the dielectric, observing the direction in which it overlaps.
4. step
4.1 For EMK 12
Press the plug with the inner crimp-ferrule between film and brai-
ding until the dielectric is flush with the contact surface of the
plug.
4.2 For EMK 19
Press the plug with the inner crimp-ferrule between film and
braiding. Press the plug against the cable until the flexible pin
protrudes from the plug, as shown here. So a safe contact of the
inner conductor is ensured.
5. step
Use ZAW 13 compression pliers (order no. 21410012) to grout the
plug.
Adaptor C must be inserted.
KATHREIN Digital Systems GmbH | Anton-Kathrein-Str. 1–3 | 83022 Rosenheim | Germany | Phone +49 731 270 909 70
This manual suits for next models
1
Table of contents
Languages: