Kawai AnytimeX User manual

- 1 -
ANYTIME PIANO
Owner's Manual
Anytime 2005 05.4.21, 4:12 PM1

- 2 -
Read this section carefully before using this product. It contains important safety warnings and cautions,
which must be followed.
The following symbols are used on the product and their meanings are given below.
Safety Instructions
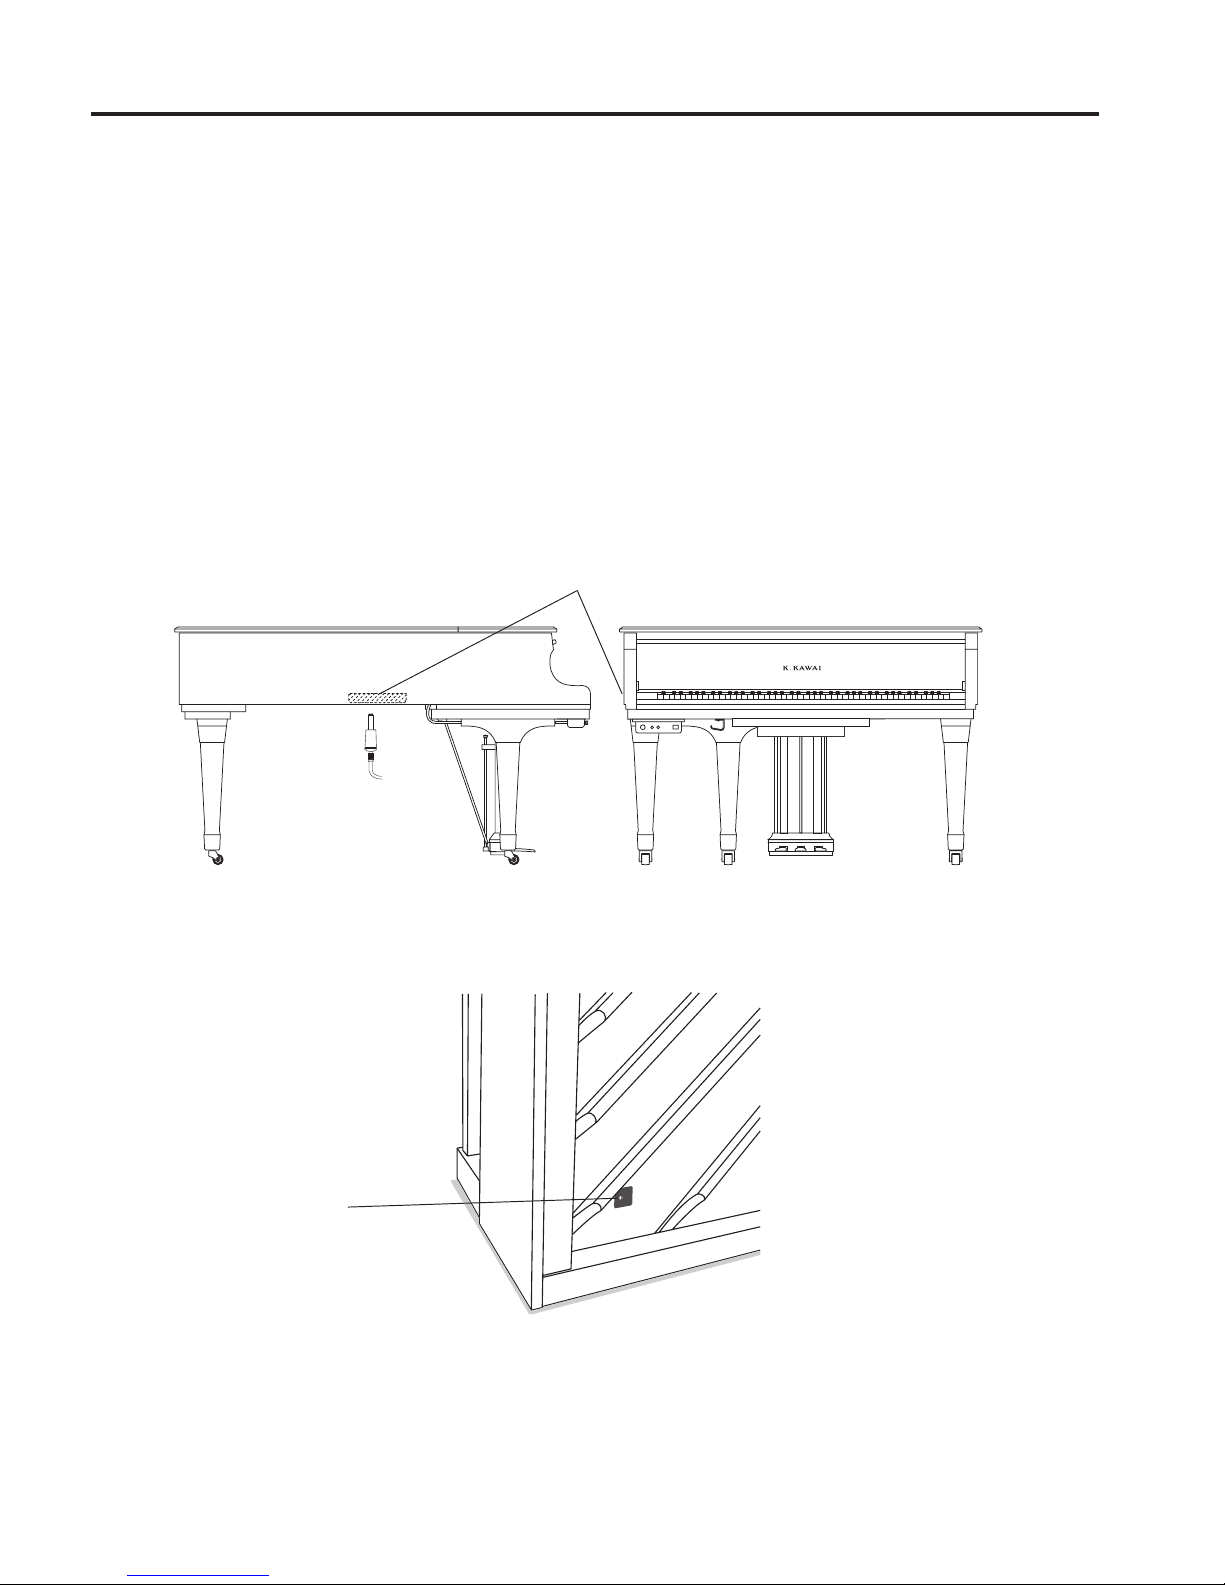
Please note that the product is heavy and must
be carried by more than two persons.
Dropping the product may result in breakdown.
Take care not to let the product fall down.
If the product will not be used for a long
time, unplug the AC power
cord from the AC outlet.
●Failure to do so may cause fire in case of
lightning.
●Failure to do so may over-heat the product,
resulting in fire.
Do not disassemble, repair or modify
the product. Doing so may result in product breakdown,electric
shock or short-circuit.
When using the headphones, do not
listen for long periods of
time at high volume levels.
Doing so may result in hearing problems.
The bench must be used properly(it must be
used only when playing the product).
● Do not play with it or stand on it.
● Only one person is allowed to sit on it.
● Do not sit on it during height adjustment.
● Do not sit on it when opening the lid.
Doing so may cause the bench to fall over or your
fingers to be trapped, resulting in injury.
Do not insert or disconnect the power
cord plug with wet hands. Doing so may cause electric shock.
The product should be connected to
an AC outlet of the specified
voltage.
●Use the AC adapter supplied with the product
or one recommended by Kawai.
●If you are going to use an AC power cord,
make sure that its has the correct plug shape
and conforms to the specified power voltage.
●Failure to do so may result in fire.
WARNING
denotes that care should be taken.
The example instructs the user to take care not to allow fingers to be trapped.
denotes a prohibited operation.
The example instructs that disassembly of the product is prohibited.
denotes an operation that should be carried out.
The example instructs the user to remove the power cord plug from the AC outlet.
Examples of Picture Symbols
WARNING Indicates a potential hazard that could result in death or serious injury if the product is
handled incorrectly.
Indicates a potential hazard that could result in injury or damage to the product or other
property if the product is handled incorrectly.
CAUTION
CAUTION: To prevent fire and electric shock, do not
expose the product to rain or moisture.
Risk of electric shock.
Do not open.
Alerts the user to the risk of electric shock.
Alerts the user to the presence of general cautions
and warnings in the instruction manual accompanying
the product.
CAUTION
120V 240V230V
Anytime 2005 05.4.21, 4:12 PM2

- 3 -
Failure to do so may cause breakdown of this
product and other devices.
●Doing so may cause the product to generate
noise.
●If the product generates noise, move the
product sufficiently away from the electrical
appliance or connect it to another AC outlet.
Notes on Repair
Should an abnormality occur in the product, immediately turn the power OFF, disconnect the power cord plug, and then contact
the shop from which the product was purchased.
●Doing so may cause the product to become
deformed or fall over, resulting in breakdown
or injury.
●Doing so may result in discoloration or deformation
of the product.
●When cleaning the product, put a soft cloth in
lukewarm water, squeeze it well, then wipe the
product.
Failure to do so may damage them, resulting in
fire, electric shock or short-circuit.
Doing so may cause the product to fall over,
resulting in injury.
Entry of water, needles or hair pins may result
in breakdown or short-circuit.
Do not wipe the product with benzene
or thinner.
Do not stand on the product or exert
excessive force.
When connecting the AC power cord
and other cords, take care
not to get them tangled.
Do not place the product near electrical
appliances such as TVs and
radios.
Do not lean against the keyboard.
Take care not to allow any foreign
matter to enter the product.
Before connecting cords, make sure
that the power to this product
and other devices is turned
OFF.
CAUTION
OFF
Using the product in such areas may result in
product breakdown.
Closing it roughly may trap your fingers, resulting
in injury.
Do not use the product in the following areas.
● Areas, such as those near windows, where the product is
exposed to direct sunlight
● Extremely hot areas, such as near a heater
● Extremely cold areas, such as outside
● Extremely humid areas
● Areas where a large amount of sand or dust is present
● Areas where the product is exposed to excessive
vibrations
When you close the fallboard,
close it gently.
Anytime 2005 05.4.21, 4:12 PM3

- 4 -
FCC Information ( for U.S.A. )
Note: This equipment has been tested and found to comply with the limits for a Class B digital device, pursuant
to Part 15 of the FCC Rules. These limits are designed to provide reasonable protection against harmful
interference in a residential installation. This equipment generates, uses and can radiate radio frequency energy
and, if not installed and used in accordance with the instructions, may cause harmful interference to radio
communications. However, there is no guarantee that interference will not occur in a particular installation. If
this equipment does cause harmful interference to radio or television reception, which can be determined by
turning the equipment off and on, the user is encouraged to try to correct the interference by one or more of the
following measures;
- Reorient or relocate the receiving antenna.
- Increase the separation between the equipment and receiver.
- Connect the equipment into an outlet on a circuit different from that to which the receivers connected.
- Consult the dealer or an experienced radio/TV technician for help.
Canadian Radio Interference Regulations
This instrument has been certified to comply with the limits for a class B digital apparatus, pursuant to the
Radio Interference Regulations, C.R.C., c. 1374,
This musical instrument should be not commercial use but household use.
THE ANYTIME PIANO™
Thank you for purchasing a Kawai Anytime Piano. The Anytime Piano is a revolutionary new instrument that
combines the capabilities of an acoustic piano and a digital piano. With the Anytime Piano, you can enjoy the
pleasing, expressive tone that only a Kawai acoustic piano can provide… plus the powerful and exciting features
that can only be found on a digital instrument.
As its name implies, the most compelling aspect of the Anytime Piano is that it can be played literally anytime
without disturbing family or neighbours. It will let you enjoy the touch of a fine Kawai acoustic piano but still
have the privacy and power of built-in digital sound. The Anytime Piano will offer many creative new possibilities
for music-making in your home, school, or recording studio.
To get the most from your Anytime Piano, please read this manual carefully and become familiar with all its
powerful functions and features. We trust that you and your Anytime Piano will be making beautiful music
together (at any time of the day or night) for many years to come.
Anytime 2005 05.4.21, 4:12 PM4

- 5 -
CONTENTS
. . . . . . . . . . . . . . . . . . . . . . . . . . . . . . . . . . . . . . . . . . . . . . . . . . . . . . . . . . . . . . PAGE
SETTING UPYOUR ANYTIME PIANO . . . . . . . . . . . . . . . . . . . . . . . . . . . . . . . . . . . . . . . 6
ENJOY PLAYING INPRIVATE WITH “ANYTIME” MODE
1. TURN THE POWER ON. . . . . . . . . . . . . . . . . . . . . . . . . . . . . . . . . . . . . . . . . . . . . . 7
2. ACTIVATING ANYTIME MODE . . . . . . . . . . . . . . . . . . . . . . . . . . . . . . . . . . . . . . . . . . 7
3. SELECTING ASOUND . . . . . . . . . . . . . . . . . . . . . . . . . . . . . . . . . . . . . . . . . . . . . . . 8
4. ADJUSTING VOLUME AND REVERB . . . . . . . . . . . . . . . . . . . . . . . . . . . . . . . . . . . . . . 9
5. LAYERING TWO SOUNDS (DUAL) . . . . . . . . . . . . . . . . . . . . . . . . . . . . . . . . . . . . . . . 9
6. TRANSPOSE . . . . . . . . . . . . . . . . . . . . . . . . . . . . . . . . . . . . . . . . . . . . . . . . . . . . 10
7. RETURNING TO NORMAL MODE . . . . . . . . . . . . . . . . . . . . . . . . . . . . . . . . . . . . . . . . 10
OTHER ADVANCED CAPABILITIES
1. RECORDING YOUR PERFORMANCE . . . . . . . . . . . . . . . . . . . . . . . . . . . . . . . . . . . . . . 11
2. USING THE METRONOME . . . . . . . . . . . . . . . . . . . . . . . . . . . . . . . . . . . . . . . . . . . . 12
VIRTUAL TECHNICIAN
0. DUAL BALANCE . . . . . . . . . . . . . . . . . . . . . . . . . . . . . . . . . . . . . . . . . . . . . . . . . . 14
1. TUNING . . . . . . . . . . . . . . . . . . . . . . . . . . . . . . . . . . . . . . . . . . . . . . . . . . . . . . . 15
2. VOICING . . . . . . . . . . . . . . . . . . . . . . . . . . . . . . . . . . . . . . . . . . . . . . . . . . . . . . 15
3. DAMPER EFFECT . . . . . . . . . . . . . . . . . . . . . . . . . . . . . . . . . . . . . . . . . . . . . . . . . 16
4. STRING RESONANCE . . . . . . . . . . . . . . . . . . . . . . . . . . . . . . . . . . . . . . . . . . . . . . . 16
5. TOUCH CURVE . . . . . . . . . . . . . . . . . . . . . . . . . . . . . . . . . . . . . . . . . . . . . . . . . . . 17
6. TEMPERAMENT . . . . . . . . . . . . . . . . . . . . . . . . . . . . . . . . . . . . . . . . . . . . . . . . . . 18
7. KEY OF TEMPERAMENT . . . . . . . . . . . . . . . . . . . . . . . . . . . . . . . . . . . . . . . . . . . . . 20
8. STRETCH TUNING . . . . . . . . . . . . . . . . . . . . . . . . . . . . . . . . . . . . . . . . . . . . . . . . . 20
9. USER MEMORY . . . . . . . . . . . . . . . . . . . . . . . . . . . . . . . . . . . . . . . . . . . . . . . . . . 21
10. FACTORY RESET . . . . . . . . . . . . . . . . . . . . . . . . . . . . . . . . . . . . . . . . . . . . . . . . 21
SETTING MODE . . . . . . . . . . . . . . . . . . . . . . . . . . . . . . . . . . . . . . . . . . . . . . . . . . . . 22
SELECTING SOUNDS IN"SETTING MODE" . . . . . . . . . . . . . . . . . . . . . . . . . . . . . . . . . . . . 23
SELECTING REVERB AND DAMPER EFFECT . . . . . . . . . . . . . . . . . . . . . . . . . . . . . . . . . . . . 23
SELECTING METRONOME IN"SETTING MODE" . . . . . . . . . . . . . . . . . . . . . . . . . . . . . . . . . 24
USING THE ANYTIME PIANO WITH YOUR HOME AUDIO SYSTEM
CONNECTING THE ANYTIME PIANO TO AN EXTERNAL AMPLIFIER AND SPEAKERS . . . . . . . . . . . . 25
CONNECTING THE ANYTIME PIANO TO AHOME STEREO OR RECEIVER . . . . . . . . . . . . . . . . . . 26
RECORD YOUR PERFORMANCE ON ACASSETTE TAPE / MINI DISC . . . . . . . . . . . . . . . . . . . . 26
USING MIDI
MIDI APPLICATIONS . . . . . . . . . . . . . . . . . . . . . . . . . . . . . . . . . . . . . . . . . . . . . . . . . 27
MIDI CONNECTIONS . . . . . . . . . . . . . . . . . . . . . . . . . . . . . . . . . . . . . . . . . . . . . . . . . 27
MIDI CHANNEL . . . . . . . . . . . . . . . . . . . . . . . . . . . . . . . . . . . . . . . . . . . . . . . . . . . . 28
MIDI CONNECTION EXAMPLES . . . . . . . . . . . . . . . . . . . . . . . . . . . . . . . . . . . . . . . . . . . 28
MIDI LOCAL CONTROL ON/ OFF . . . . . . . . . . . . . . . . . . . . . . . . . . . . . . . . . . . . . . . . . 30
GENERAL INFORMATION
1. PARTS AND NAMES . . . . . . . . . . . . . . . . . . . . . . . . . . . . . . . . . . . . . . . . . . . . . . . 31
2. DIGITAL SPECIFICATIONS . . . . . . . . . . . . . . . . . . . . . . . . . . . . . . . . . . . . . . . . . . . . 34
3. MIDI IMPLEMENTATION CHART . . . . . . . . . . . . . . . . . . . . . . . . . . . . . . . . . . . . . . . . 35
Anytime 2005 05.4.21, 4:12 PM5

- 6 -
SETTING UP YOUR ANYTIME PIANO
Because it is an acoustic/electronic instrument, the Anytime Piano requires AC power to operate. Place the
Anytime Piano in a location where electricity is available.
You can find the DC IN jack on the left side of your Anytime Grand Piano and on the lower left, at the rear, of
your Anytime Upright Piano. Find the AC power adaptor (which is supplied with the instrument) and plug
the smaller end into the DC IN jack (see Figure 1). Then, plug the larger end of the AC adaptor into your
electrical wall outlet.
Setup is now complete and your Anytime Piano is ready to play.
DC IN
Fig 1
DC IN
ANYTIME GRAND PIANO
ANYTIME UPRIGHT PIANO
Anytime 2005 05.4.21, 4:12 PM6

- 7 -
Fig. 2
ENJOY PLAYING IN PRIVATE WITH “ANYTIME”MODE
You’re now ready to activate the “Anytime” capability. This function mutes the acoustic piano sound by stopping
the piano hammers before they hit the strings. With “Anytime” capability, you will never lose the “touch and
feel” of an acoustic piano. Your playing on the keyboard will activate a digital sound generator so that sound
will only be heard through headphones.
This feature is extremely useful for practice late at night when family members or neighbours are asleep, for
practicing in a room that must be shared with others who desire a quiet environment, or for group music classes
in which several students must practice at the same time. You’ll never have to worry about disturbing anyone!
Here’s how to play in “Anytime” mode:
1. TURN THE POWER ON
The power switch is located on the front panel of the Control Box. When power is on,
the red lamp will be lit. If the red lamp does not light, check to be sure that the small
end of the AC power adaptor is plugged into the DC IN jack on the left side (Grand
Piano) or on the backside, bottom left rear, (Upright Piano).
2. ACTIVATING ANYTIME MODE
Find the “Mute Lever” which is located
underneath the left side of the keyboard (see
Figure 2). This lever turns the “Anytime”
mode on and off. Push the mute lever
carefully to the left as far as it will go (only
about 5 cm / 2 inches). This puts you in
Anytime Mode.
In Anytime Mode (with the mute lever moved
to the left), you will not hear acoustic piano
sound, but you will hear digital piano sound
through headphones when you touch the
keys.
Mute Lever
Anytime mode
Normal mode
Fig. 2
Anytime 2005 05.4.21, 4:12 PM7

- 8 -
IMPORTANT INFORMATION: ( Please Read )
• Never leave the Mute Lever halfway between Anytime and Normal modes.
• Never move the Mute Lever while you are playing.
Both of these conditions can cause serious damage to the action mechanism of your
Anytime Piano.
• Normal Mechanical Sound
In Anytime Mode, you will not hear acoustic piano sound, but you may hear the normal
mechanical noise that is produced when the keys are struck. All acoustic pianos make
this type of noise, but you generally will not be aware of it when the sound of the piano
strings is present. This is not a defect.
3. SELECTING A SOUND
The Anytime Piano has total twenty digital sounds; ten acoustic piano sounds and ten
other sounds. To select one of these sounds, press the PIANO button or the OTHERS
button as many times as necessary until you reach the desired sound. Each time the
button is pressed, a different sound is produced. A red lamp will light to indicate which
button is currently selected. Try playing a few notes using the Jazz Organ, Strings or
other sounds.
You can also select these sounds by using pedal and keyboard in “Setting Mode” (see
Page 22).
PIANO BUTTON ASSIGNABLE BUTTON
Concert Grand Jazz Organ
Concert Grand 2 Drawbar Organ
Studio Grand Church Organ
Studio Grand 2 Diapason
Mellow Grand Harpsichord
Mellow Grand 2 Harpsichord Oct
Modern Piano Vibraphone
Rock Piano Slow String
Classic E. Piano Choir
Modern E. P. New Age Pad
Anytime 2005 05.4.21, 4:12 PM8

- 9 -
4. ADJUSTING VOLUME AND REVERB
Plug headphones into the HEADPHONE JACKS on the front panel of the Control
Box. Find the volume knob on the front panel of the Control Box and adjust the
volume appropriately.
Then adjust the reverb setting to suit your taste. Reverb adds a rich ambient effect to
the digital sound. There are five reverb settings available:
ROOM 1 & 2: Offers a soft reverberation, simulating the sound of a small room
STAGE : Simulates the sound of playing on stage
HALL 1 & 2: Simulates the deep reverberation of a large concert hall
Hold down the REVERB button for more than one second to select the reverb. To
select the reverb type, while holding down the REVERB button press “VALUE +”or
“VALUE - ”button to select. After you have selected the reverb type, let go of the
REVERB button and it goes back to sound selection screen.
You can switch the Reverb on/off each time you press the REVERB button. When the
reverb is on, the LED will be lit.
You can also select the reverb by using pedal and keyboard in "Setting Mode" (see Page
22).
To access the button on the Control Panel with the grand piano, there is a place where
you can place your hand on the cheekblock to lift it up.
5. LAYERING TWO SOUNDS (DUAL)
You can combine the piano sound with a tone selected from the Assignable sounds and
layer them across the keyboard. This function is called “DUAL”.
To try DUAL, select a sound that you wish to use with the PIANO button and OTHERS
button and the sound you have selected first will be displayed in the top line of the
screen.
To select Jazz Organ, Drawbar Organ; while holding down the PIANO button, press
OTHERS button once again.
You can adjust the volume balance between the two sounds in VIRTUAL
TECHNICIAN MODE (see Page 14). To leave the DUAL function, simply press
either the PIANO button or the OTHERS button.
Anytime 2005 05.4.21, 4:12 PM9

- 10 -
6. TRANSPOSE
The Transpose function lets you raise or lower the piano’s key in half steps. This is
especially useful when you have learned a song in one key and have to play it in another
key. The transpose feature allows you to play the song in the original key, but hear it in
another key.
Hold down the TRANSPOSE button for more than one second to select the transpose
amount.
The LCD display shows you the current value. The value is
always set to “0”when the power is turned on. You can
switch transpose on/off by pressing the button each time.
The LED indicator will be turned on to indicate that
transpose is in use.
To select, while holding down the TRANSPOSE button press “VALUE +”or
“VALUE - ”button to select.
The LCD display shows you a number telling you how many
half steps up or down you have transposed the piano. -5
for example, represent a transposition that is 5 half steps
lower. “0”indicates no transposition.
The piano can be transposed up to 12 half steps higher or 12 half steps lower.
Pressing TRANSPOSE button again turns the TRANSPOSE function off.
The TRANSPOSE function remembers the current setting as long as the power is on.
7. RETURNING TO NORMAL MODE
Hold the Mute Lever and gently move it to the right as far as it will go. This turns the
Anytime Mode off and returns you to normal playing mode. In Normal Mode, the
piano produces normal acoustic sound when you play the keys.
In Normal Mode, you can still hear digital piano sound through headphones.
Transpose
= 0
Transpose
= -5
Anytime 2005 05.4.21, 4:12 PM10

- 11 -
Record
SONG 1
OTHER ADVANCED CAPABILITIES
1. RECORDING YOUR PERFORMANCE
The Anytime Piano is equipped with a digital recorder that records what you play on
the piano and plays it back with digital sounds. This is very helpful and useful function
to practice and check your playing by yourself. A built-in metronome helps you stay at
the right tempo when practicing.
With the Recorder, it is also possible to play two parts by yourself. Record one part first
and play it back with the recorder while you play another part in real time.
RECORDING
RECORD
To record, press the REC button to put the piano in Stand-by mode. The piano
will start recording as soon as you press a key or by pressing the PLAY/STOP button.
Press the REC button to exit Stand-by mode and go back to the normal screen.
Hold down the REC button for more than one second to select a song to record.
To select a song, while holding down the REC button, press Song 1, 2, 3 buttons.
The LCD display shows the song number to be recorded.
You can start recording also by pressing the PLAY/STOP button instead of a key. The
Recorder begins to function as soon as the button is pressed, regardless of which key
you press.
Press PLAY/STOP button to stop recording.
The display will show that the recording has stopped and it automatically goes back to
sound selection screen. If you press REC button and PLAY/STOP button at a
same time, the piano will be in Song Delete mode. Both LED’s will be lit at this point.
Press the REC button to delete the song. You can cancel the delete operation by pressing
any button other than REC button. To select the song you want to delete, press the
REC button and PLAY/STOP button for more than one second.
While holding down the REC button and PLAY/STOP button, press Song 1, 2, 3
buttons.
Anytime 2005 05.4.21, 4:12 PM11

- 12 -
The total recording capacity is approximately 15,000 notes and the piano stores and
plays the song you have recorded in memory up to 3 songs.
You can start recording again but the song that was previously recorded would be erased.
PLAYING BACK
To listen to the music, start playback by pressing the PLAY/STOP button. While
holding down the PLAY/STOP button, press Sound 1, 2, 3 buttons to select the song
you want to hear.
2. USING THE METRONOME
The metronome provides a reference tempo and is helpful to keep the tempo steady
when recording.
Press the METRONOME button to activate the function. You should hear simple
ticks (no beat) when it’s on. There are different beats available; 2- beat, 3-beat and 4-
beat. Each touch of the METRONOME button switches to the next rhythm and one
more touch will turn off the metronome sound.
Beat is displayed in the LCD.
TEMPO of metronome
Hold down the METRONOME button for more than one second to enter the Tempo
setting mode. While holding down the METRONOME button, press “VALUE +”or
“VALUE - ”button to change the tempo. The tempo range is 30 - 300 beats per
minute.
Tempo is displayed in number of beats per minute.
To leave the Tempo setting mode, let go of the METRONOME button and it
automatically goes back to Beat setting mode.
BEAT = 4/4
( = 120)
TEMPO = 120
Anytime 2005 05.4.21, 4:12 PM12

- 13 -
OLUME = 5
VOLUME of metronome
Press the Metronome button and the VIRTUAL TECHNICIAN button at the same
time to put the piano in Volume setting mode. Let go of the METRONOME button
and VIRTUAL TECHNICIAN button and press “VALUE +”or “VALUE - ”button
to change the volume. The volume changes in the range of 1 - 10.
The volume level is displayed.
If you press down the METRONOME button, it goes back to Beat setting mode. If
you press the VIRTUAL TECHNICIAN button, the metronome function turns off
and switches to VIRTUAL TECHNICIAN mode.
Anytime 2005 05.4.21, 4:12 PM13

- 14 -
VIRTUAL TECHNICIAN
VIRTUAL TECHNICIAN
A piano technician is essential to an acoustic piano. He not only tunes the piano but
also performs regulation and voicing adjustments to make the piano sound and play
better. Virtual Technician simulates the work of a piano technician electronically and
allows you to customize the Anytime piano to your personal taste.
These are the functions of Virtual Technician.
0. DUAL BALANCE 6. TEMPERAMENT
1. TUNING 7. KEY OF TEMPERAMENT
2. VOICING 8. STRETCH TUNING
3. DAMPER EFFECT 9. USER MEMORY
4. STRING RESONANCE 10. FACTORY RESET
5. TOUCH CURVE
Press the VIRTUAL TECHNICIAN button to put the piano in setting mode. You can
cancel VIRTUAL TECHNICIAN by pressing any button other than the REC, PLAY/
STOP button. While holding down the VIRTUAL TECHNICIAN button, press the
“VALUE +”or “VALUE - ”to change the function. The “VALUE +”button increases
the value and the “VALUE - ”button decreases the value. After you have selected the
value, release the VIRTUAL TECHNICIAN button.
0. DUAL BALANCE
With DUAL mode, you can layer two sounds together with Dual Balance, you can set
the volume between the two sounds.
Hold down the VIRTUAL TECHNICIAN button and put the piano in Dual Balance
mode.
The LCD display shows the Dual Balance.
0 Dual Balance
= 5 - 5
Anytime 2005 05.4.21, 4:12 PM14

- 15 -
2 oicing
= Normal
In the display, on the right side it shows the volume balance of the piano sound.
On the second line’s left side, it shows the volume balance of sounds other than piano.
You can select the volume of the balance from 9 - 1 to 1 - 9 by pressing “VALUE +”or
“VALUE - ”button.
1. TUNING
To do this, hold down the VIRTUAL TECHNICIAN button and press the VALUE
button a few times and set the piano in Tuning mode.
Let go of the VIRTUAL TECHNICIAN button and press the “VALUE +”or
“VALUE - ”button to change the pitch by 0.5Hz. You may change the pitch within
the range of 427.0 - 453.0Hz. The default setting is 440.0Hz.
The LCD display shows the setting.
If you have finished setting the pitch, press button other than REC, PLAY/STOP button
to turn the setting mode off.
You can also select the tuning function by using the pedal and keyboard in “Setting
Mode”(see Page 22).
2. VOICING
Voicing is a technique used by piano technicians to mold the character of a piano’s
sound. The Voicing functions lets you change the Anytime piano’s tone quality by
choosing one of four types of voicing.
To do this, hold down the VIRTUAL TECHNICIAN button and press the VALUE
button a few times and set the piano in Voicing mode.
The LCD display shows the setting.
Normal Produces the normal timbre of an acoustic piano throughout the entire
dynamic range. This is the preset value.
Bright 1, 2 Produces a brighter tone throughout the entire dynamic range. Bright
2 is brighter than Bright 1.
Dynamic The tone will change dramatically from mellow to bright according to
your playing technique.
1 Tuning
= 440.0
Anytime 2005 05.4.21, 4:12 PM15

- 16 -
Mellow 1, 2 Produces a mellower tone throughout the entire dynamic range.
Mellow 2 is more mellow than Mellow 1.
Let go of the VIRTUAL TECHNICIAN button and press the “VALUE +”or
“VALUE - ”button to change the voicing. If you have finished setting, press any
button other than the REC, PLAY/STOP button to turn the setting mode off. The
default setting is Normal.
3. DAMPER EFFECT
When the sustain pedal is depressed on an acoustic piano, all the dampers are lifted up
allowing the strings to vibrate freely. When you play a note or chord on the piano with
the sustain pedal depressed not only will the strings for the notes you played vibrate but
other strings will vibrate in sympathetic resonance. The Damper Effect function
simulates this phenomenon. You can select the level of effect from off, 1 to 10.
The default setting is 5.
To do this, hold down the VIRTUAL TECHNICIAN button and press VALUE button
a few times to set the piano in Damper Effect mode.
The LCD display shows the setting.
Let go of the VIRTUAL TECHNICIAN button and press the “VALUE +”or
“VALUE - ”button to change the Damper Effect value. If you have finished setting the
Damper Effect, press button other than REC, PLAY/STOP button to turn the setting
mode off.
4. STRING RESONANCE
Even when the sustain pedal is not depressed on an acoustic piano, the strings for any
notes you are holding will be un-damped and will resonate freely in sympathy with the
strings of other notes that you play even if they are part of the same harmonic series. In
addition, adjacent notes will also be resonated. The String Resonance function simulates
this phenomenon. You can select the level of resonance from off, 1 to 10. The default
setting is 5. String Resonance is not active when the damper pedal is depressed.
The LCD display shows the setting.
To do this, hold down the VIRTUAL TECHNICIAN button and press the VALUE
button few times setting the piano in String Resonance mode.
Let go of the VIRTUAL TECHNICIAN button and press the “VALUE +”or
3 Damper Effect
= 5
4 String Reso.
= 5
Anytime 2005 05.4.21, 4:12 PM16

- 17 -
“VALUE - ”button to change the value. If you have finished setting, press any other
than the REC, PLAY/STOP button to turn the setting mode off.
5. TOUCH CURVE
Touch lets you select different touch sensitivity for the keyboard from the standard
touch of an acoustic piano. You can change the sensitivity to one of six different settings:
LIGHT, LIGHT+, NORMAL, HEAVY, HEAVY+, OFF.
Heavy+ Requires more striking force to achieve a loud volume.
Heavy Perfect for those with strong fingers. Requires a heavier touch to produce
a loud volume.
Normal Produces the normal touch curve of an acoustic piano throughout the
entire dynamic range. This is the preset value.
Light For those still developing finger strength. A louder volume is produced
even when playing with a soft touch.
Light+ For players with a delicate touch. Requires less striking force in order to
achieve a forte note.
Off A constant volume is produced regardless of how hard the keys are struck.
This setting is suitable for sounds that have a fixed dynamic range such
as Organ and Harpsichord.
To do this, hold down the VIRTUAL TECHNICIAN button and press the VALUE
button a few times setting the piano in Touch Curve mode.
The LCD display shows the setting.
Let go of the VIRTUAL TECHNICIAN button and press the “VALUE +”or
“VALUE - ”button to change the value. If you have finished setting the touch curve,
press any other than the REC, PLAY/STOP button to turn the setting mode off.
Touch selection is global for all the preset tones. You cannot have an individual setting
for each one.
◆ NOTE LIGHT and HEAVY do not represent the physical weight of the keys. These are settings
that affect the sensitivity of the keys, which determines the volume level in response to
the key movement.
5 Touch
= Normal
Anytime 2005 05.4.21, 4:12 PM17

- 18 -
6. TEMPERAMENT
The Anytime piano offers not only equal temperament (the modern standard) but also
immediate access to temperaments popular during the Renaissance and Baroque periods.
It should be interesting and educational to try some of the different temperaments,
although the equal temperament is dominant today.
BRIEF EXPLANATION OF TEMPERAMENTS
EQUAL TEMPERAMENT (PIANO ONLY)
This is the default temperament. If a piano sound is selected, the tuning is stretched
like an acoustic piano (EQUAL TEMPERAMENT). If any other type of sound is
selected the tuning will be EQUAL (FLAT). An explanation of EQUAL
TEMPERAMENT and EQUAL TEMPERAMENT (FLAT) is provided later in this
section.
If a piano sound is used in a layer with any other sound then both sound will use the
EQUAL TEMPERAMENT (Stretched) tuning.
MERSENNE PURE TEMPERAMENT (MAJOR)
MERSENNE PURE TEMPERAMENT (MINOR)
This temperament, which eliminates dissonances for thirds and fifths, is still popular
for choral music because of its perfect harmony. You need to be aware what key you are
playing in with this temperament. Any key modulation will result in dissonances.
When you play music in a particular key, you need to match the key of the temperament
as well. When playing in a major key select Pure (Major) and when playing in a minor
key select Pure (Minor).
MEANTONE TEMPERAMENT
This temperament, which uses a mean between a major and minor whole tone to
eliminate dissonance for thirds, was devised to eliminate the lack of consonance’s
experienced with certain fifths for the Mersenne pure temperament. It produces chords
that are more beautiful than those with the equal temperament.
Anytime 2005 05.4.21, 4:12 PM18

- 19 -
WERCKMEISTER III TEMPERAMENT
KIRNBERGER III TEMPERAMENT
These two temperaments are placed in between Mean tone and Pythagorean. For music
with few accidentals, this temperament produces the beautiful chords of the mean tone,
but as accidentals increase, the temperament produces the characteristic melodies of
the Pythagorean temperament. It is used primarily for classical music written in the
Baroque era to revive the original characteristics.
EQUAL TEMPERAMENT (FLAT)
This is “un-stretched”equal temperament that divides the scale into twelve equal
semitones. This produces the same chordal intervals in all twelve keys, and has the
advantage of limitless modulation of the key. However the tonality of each key becomes
less characteristic and no chord is in pure consonance.
EQUAL TEMPERAMENT
This is the most popular piano temperament. The hearing ability of a human is uneven
and is not as accurate with high frequency and low frequency as it is with the middle
range. This temperament’s tuning is stretched to compensate for this so the sound will
be heard naturally to the ears. This “Stretched”equal temperament is a practical
variation of the “un-stretched”equal temperament, which was invented on a
mathematical basis.
To do this, hold down the VIRTUAL TECHNICIAN button and press the VALUE
button a few times setting the piano in Temperament mode.
The LCD display shows the setting.
Let go of the VIRTUAL TECHNICIAN button and press the “VALUE +”or
“VALUE - ”button to change the temperament. If you have finished setting, press
any other than the REC, PLAY/STOP button to turn the setting off.
6 Temperament
= Equal(P.only)
Anytime 2005 05.4.21, 4:12 PM19

- 20 -
7. KEY OF TEMPERAMENT
Limitless modulation of the key became available only after the invention of Equal
temperament. When we use a temperament other than Equal temperament, we must
carefully choose the key signature to play in. For example, if the song you are going to
play is written in D major, choose “D”as the temperament key.
While holding down the VIRTUAL TECHNICIAN button, press the VALUE button
a few times setting the piano in the key of temperament mode.
The LCD display shows the setting.
Let go of the VIRTUAL TECHNICIAN button and press the “VALUE +”or
“VALUE - ”and select the key between C - B. If you have finished setting the key of
temperament, press any other than the REC, PLAY/STOP button to turn the setting
mode off.
◆ NOTE This function is not displayed when Equal temperament is selected.
8. STRETCH TUNING
This function determines the level of stretch tuning. You can select either Normal or
Wide.
To do this, hold down the VIRTUAL TECHNICIAN button and press the VALUE
button a few times setting the piano in Stretch Tuning mode.
The LCD display shows the setting.
Hold down the VIRTUAL TECHNICIAN button and press the “VALUE +”or
“VALUE - ”and select either Normal or Wide. If you select Wide, the lower part will
sound even lower and higher part will sound even higher. If you have finished setting
the Stretch Tuning, press any other than the REC, PLAY/STOP button to turn the
setting mode off.
◆ NOTE This function appears in the LCD screen only when you have selected Equal or Equal
(Piano Only) temperament.
7 Key of Temper
= C
8 StretchTuning
= Normal
Anytime 2005 05.4.21, 4:12 PM20
Other manuals for AnytimeX
4
Table of contents
Other Kawai Musical Instrument manuals

Kawai
Kawai L1 -LDS User manual

Kawai
Kawai Concert Performer CP205 User manual

Kawai
Kawai Concert Artist CA59 B User manual

Kawai
Kawai Digital Piano CA51 User manual

Kawai
Kawai DX80 User manual

Kawai
Kawai CL25-LDS User manual

Kawai
Kawai AnyTimeX2 User manual

Kawai
Kawai MP11 User manual

Kawai
Kawai CN23 User manual

Kawai
Kawai KX330 User manual

Kawai
Kawai DG30 Manual

Kawai
Kawai CONCERT ARTIST CA63 User manual

Kawai
Kawai PN81 User manual

Kawai
Kawai E-520 User manual

Kawai
Kawai CP115 User manual

Kawai
Kawai MP9000 User manual

Kawai
Kawai CN31 User manual

Kawai
Kawai K-500 Aures User manual

Kawai
Kawai EGP-10 Grand E1 User manual

Kawai
Kawai KCP90 User manual