manuals.online logo
Brands
  1. Home
  2. •
  3. Brands
  4. •
  5. KayserBetten
  6. •
  7. Indoor Furnishing
  8. •
  9. KayserBetten Olaf User manual

KayserBetten Olaf User manual

Aufbau Olaf engl.fh11 11.03.2008 10:46 Uhr Seite 1
Probedruck
C M Y CM MY CY CMY K
… the original!
Assembly Instructions
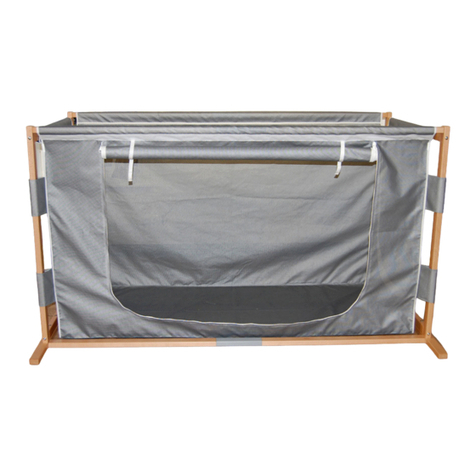
for your new - care cot
)
Aufbau Olaf engl.fh11 11.03.2008 10:46 Uhr Seite 1
Probedruck
C M Y CM MY CY CMY K
Please lay the architrave 4 and the back part 2 on the ground in order
to push in the transverse nuts 7 . Now screw in the threaded bars 5 .
Set up one side frame 1 and then install the architrave 4 by putting it with
the threaded bars through the lower drilled holes of the side frame. The wooden
pegs must fit properly into the drillings. Bolt the architrave with two brass
caps 8 .
Now, the construction stands steady already!
Set up the second side frame 1 so that the architrave 4 can be hung in.
Secure this connection with loosely screwed brass caps.
Now the back part 2 has to be put between the side frames. Fit it into the
first frame and then push the second side frame onto the threaded bars
(drawing below).
(For the Olaf 135 only: Screw the lower back part with brass caps securely to
the side frame. Now the upper back part has to be put on the lower one and
must be screwed securely to the same side frame. After this, screw the second
side frame with brass caps.)
Secure all threaded bars with brass caps. In order to avoid tilting, firstly screw
all brass caps on one side and then those on the other side.
Assembly Instructions
for your new - care cot
These are our mechanics
Robert and Stefan.
They will help you
to assemble your KayserBed!
Nice to meet you!
Hello!
Aufbau Olaf engl.fh11 11.03.2008 10:47 Uhr Seite 1
Probedruck
C M Y CM MY CY CMY K
Now lay the lock bar 19 into the mounting brackets. By putting on the clamps
20 which are secured by the Segufix-buttons, your care cot Olaf will cope
with all demands.
To remove the buttons, hold the Segufix-magnet 21 above the surface of the
buttons.
Now your new Olaf-cot is ready to use.
The bed is now ready so that the sleeping platform 10 can be inserted.
At first, take the control units out of the packaging and fasten the power supply
unit with mounting plate 14 to the lower inside of the sleeping platform (facing
the back part) with the screws provided 15 . The drillings do already exist.
Then you need a second person to help with the sleeping platform. To avoid
pinching your fingers, hold it from the inside. The sleeping platform needs to
be laid carefully on the angles of the side frames. Please make sure that the
cables are underneath in order to avoid them being trapped.
Install the switch box 12 with the screws provided 13 on the exterior of a
side frame (out of reach of the patient).
After screwing the threaded bars 6 into the assembly strips of the folding
doors you should insert the doors with the lower guide pin into the aluminium
profile of the architrave. Then push them against the side frame. Finally, screw
the brass caps 8 onto the three threaded bars .
The mounting brackets 17 for the reception of the external door security
locking system are screwed to the two corner posts beside the doors with the
screws provided 18 .
Aufbau Olaf engl.fh11 11.03.2008 10:45 Uhr Seite 1
Probedruck
C M Y CM MY CY CMY K
0
11
12345678910
19 18 17 16 15 14 13 12
212223242526272829
39 38 37 36 35 34 33 32 31
41 42 43 44 45 46 47 48 49 50
11
45678910
17 16 15 14 13 12
www.bremerdesign.de
Rieper Straße 12
29683 Dorfmark
Telefon: +49 5163 / 6595
Telefax: +49 5163 / 2076
Internet: www.kayserbetten.de
E-mail: info@kayserbetten.de
Pos. Qty. Designation
Wooden surround
1 2 side frame
2 1 back part
3 2 folding door
4 1 architrave 150mm
Fittings
5 10 threaded bars M8x140mm
6 6 threaded bars M8x110mm
6 8 threaded bars M8x110mm
(for Olaf 135)
7 10 transverse nuts
8 16 brass caps
8 18 brass caps, (for Olaf 135)
9 1 allen key
Sleeping platform
10 1 sleeping platform with slatted frame
11 1 manual control switch
12 1 security switch box
13 4 screws for switch box (4x25mm)
14 1 power supply unit with mounting plate
15 2 screws for power supply unit (6x30mm)
16 1 mounting for power cable
External door security locking system
17 2 mounting bracket
18 8 screws for mounting brackets (4,5x45mm
)
19 1 lock bar
20 2 clamp + Segufix-button
21 1 Segufix-magnet
Optional
22 1 lifter
Parts list and explosion views of your
new - care cot
14
12
2
37
4
10
5
1
9
16
8
11
22
6
17
19
21
20
13
15
18

Other KayserBetten Indoor Furnishing manuals

KayserBetten Hannah 135 User manual

KayserBetten

KayserBetten Hannah 135 User manual

KayserBetten NILS User manual

KayserBetten

KayserBetten NILS User manual

KayserBetten Hannah 135 UK User manual

KayserBetten

KayserBetten Hannah 135 UK User manual

Popular Indoor Furnishing manuals by other brands

Rapidline AM100 Assembly instructions

Rapidline

Rapidline AM100 Assembly instructions

Home Decorators Collection BANKSIDE 21075-VS31-WT Assembly instructions

Home Decorators Collection

Home Decorators Collection BANKSIDE 21075-VS31-WT Assembly instructions

ULAX FURNITURE 970144 manual

ULAX FURNITURE

ULAX FURNITURE 970144 manual

Sauder 419409 manual

Sauder

Sauder 419409 manual

versa Brewer 1000 Installation and operation manual

versa

versa Brewer 1000 Installation and operation manual

Furniture of America FOA-DK915 Assembly instructions

Furniture of America

Furniture of America FOA-DK915 Assembly instructions

Home Styles 88 5029 9411 manual

Home Styles

Home Styles 88 5029 9411 manual

Triarch 32370/2 owner's manual

Triarch

Triarch 32370/2 owner's manual

Triarch 32509 Assembly instructions

Triarch

Triarch 32509 Assembly instructions

Habitat Maui 818329 manual

Habitat

Habitat Maui 818329 manual

PIURE NEX PUR BOX Assembly instructions

PIURE

PIURE NEX PUR BOX Assembly instructions

KLIM K120E user manual

KLIM

KLIM K120E user manual

Suncast BMDB13400 owner's manual

Suncast

Suncast BMDB13400 owner's manual

Coaster 4137 Assembly instructions

Coaster

Coaster 4137 Assembly instructions

Forte FINVNKK212 Assembling Instruction

Forte

Forte FINVNKK212 Assembling Instruction

Broyhill LEGACY THORNWOOD GB21-801 Assembly instructions

Broyhill

Broyhill LEGACY THORNWOOD GB21-801 Assembly instructions

Enwork Multi-Piece Conference Top installation guide

Enwork

Enwork Multi-Piece Conference Top installation guide

Lifestyle C072 A Assembly instructions

Lifestyle

Lifestyle C072 A Assembly instructions

manuals.online logo
manuals.online logoBrands
  • About & Mission
  • Contact us
  • Privacy Policy
  • Terms and Conditions

Copyright 2025 Manuals.Online. All Rights Reserved.