KBO Hurricane User manual

Owner's Manual
www.kbobike.com
HURRICANE

Content
About Manual 1
Product Speci�ication 2
Product Structure 3
Safety Checklist 4
Assembly Instructions 6
Recommended Torque Values 7
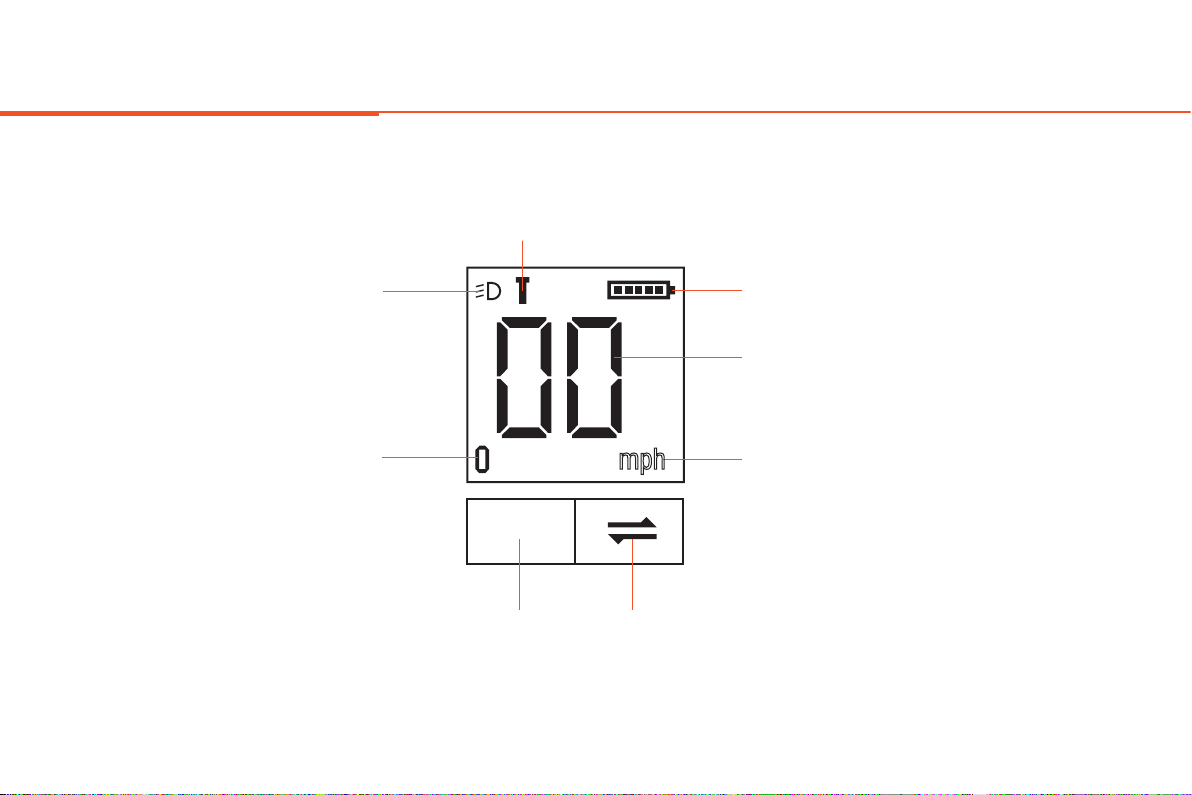
Display Features 8
Routine Operation 10
Driving Range 11
Parking Storage and Transport 12
Basic Battery Charging Tips 13
Bicycle Care 14
Basic Troubleshooting 15
Warranty Info 18
Additional Warranty Terms 19
·································································································································
·····························································································································
·····································································································································
····························································································································
································································································································
··································································································································
·····················································································································
···································································································································
······················································································································
···················································································································
····································································································································
····························································································································
······················································································································
····································································································································
······································································································································

About Manual
This manual contains details of the product, and information on its operation and maintenance and other helpful tips for owners. Read it
carefully and familiarize yourself with the KBO Hurricane before using it to ensure safe use and prevent tragic accidents. Be sure to retain this
manual as your convenient KBO Hurricane information source.
All information in this manual should be carefully reviewed and if you have any questions you should contact KBO Bike immediately. The notes
contained within the manual and marked by this dialogue balloons symbol should also be given special care. Users should also pay special
attention to information marked in this manual beginning with NOTICE.
Because it is impossible to anticipate every situation or condition which can occur while riding, this manual makes no representations about the
safe use of bicycles under all conditions. There are risks associated with the use of any bicycle which cannot be predicted or avoided, and which
are the sole responsibility of the rider. You should keep this manual, along with any other documents that were included with your bicycle, for
future reference, however all content in this manual is subject to change or withdrawal without notice. Visit www.kbobike.com to download the
latest version. KBO Bike makes every effort to ensure the accuracy of its documentation and assumes no responsibility or liability if any errors
or inaccuracies appear within. Assembly and �irst adjustment of your KBO Bike require special tools and skills and it is recommended that this
should be done by a trained bicycle mechanic if possible.
1

Product Speci�ication
Battery
Motor
Display
Speed
Pedal Assist
Charging Time
Recommended
Rider Heights
36V 9.6Ah Lithium Battery
250W Brushless Geared Motor
LCD Display
20 MPH
3-level Pedal Assist
4~5 Hours
5.6” ~ 6.6”
Bike Frame
Charger
Brake
Front Fork
Tires
Product Weight
Total Payload
Capacity
28” * 21” 6061 Aluminum Alloy
US Standard 2.0A Charger
Mechanical Disc Brakes
Aluminum Alloy
700x32C
36 lbs
275 lbs
2

Product Structure
❶ Handle
❷ On/Off
❸ LCD Display
❹ Bell
❺ Brake Lever
❻ Saddle
❼ Frame
❽ Battery
❾ LED Head Light
❿ Front Fork
⓫ Front Brake
⓬ Tire
⓭ Pedal
⓮ Controller
⓯ Belt Drive
⓰ Spoke
⓱ Motor
⓲ Rear Brake
124
5
9
678
14
16
17
18
13
11
12
10
15
3
3

Safety Checklist
Brakes
Wheels and Tires
Steering
Safety Check Basic Steps
· Ensure front and rear brakes work properly.
· Ensure brake pads are not over worn and are correctly positioned in relation to the rims.
· Ensure brake control cables are lubricated, correctly adjusted and display no obvious wear.
· Ensure brake control levers are lubricated and tightly secured to the handlebars.
· Ensure tires are in�lated to within the recommended limits.
· Ensure tires have tread and have no BULGES OR EXCESSIVE WEAR.
· Ensure rims run true and have no obvious wobbles or kinks.
· Ensure all wheel spokes are tight and not broken.
· Ensure handlebar and stem are correctly adjusted and tightened, and allow proper steering.
· Ensure the handlebar is set correctly in relation to the forks and the direction of travel.
NOTICE: Before every ride it is important to carry out the following safety checks.
4

Safety Checklist
Chain
Cranks and Pedals
Motor Drive Assembly
Battery Pack
Safety Check Basic Steps
· Ensure pedals are securely tightened to the cranks.
· Ensure the cranks are securely tightened and are not bent.
· Ensure the chain is clean and runs smoothly.
· Extra care is required in wet or dusty conditions.
· Ensure the hub motor is spinning smoothly and the motor bearings are in good working order.
· Ensure all power cables running to the hub motor are secured and undamaged.
· Make sure the hub motor axle bolts are secured and all torque arms and torque washers are in place.
· Ensure battery is charged before use.
· Ensure there is no damage to the battery pack.
5

Assembly Instructions
Step 1 : Install the handlebars. Use the assembly tool to remove the four screws from the stem. Set the handlebars in the stem ensuring the
linear markings on the handlebars are centered and the handlebars are adjusted to a comfortable position. Finally, tighten the screws
with the assembly tool.
Step 2 : Install the pedals. The left and right pedals are marked on both ends. First, install the left pedal by tightening the pedal in a counter
clockwise direction. The right pedal is tightened by turning the pedal in a clockwise direction. Both pedals should be tightened to 35
Newton meters by using a torque wrench.
Step 3 : Install the front wheel. Remove the plastic guards from the fork and axle being sure not to touch the brake rotor set. Align the dropouts
with the axle of the wheel hub, then lower the wheel ensuring the brake rotor goes into the caliper. Install the quick-release skewer
starting from the brake rotor side of the wheel. Put on the cone spring and tighten the thumb nut, and then use the palm of your hand to
close the quick-release skewer.
Step 4 : Adjust the saddle height to a comfortable position. Loosen up the quick release on the seat, �ind a height that works for you, and tighten
the quick-release.
Step 5 : Adjust the seat position forwards or backwards. Use an allen wrench to loosen the seat adjustment bolt, choose a proper position, and
tighten it.
NOTICE: The following assembly steps are only a general guide to assist in the assembly of your KBO Bike and not a complete or
comprehensive manual of all aspects of assembly, maintenance and repair. We recommend you consult a certi�ied bicycle
mechanic to assist in the assembly, repair and maintenance of your bicycle. For detailed instructions please view the KBO
Hurricane assembly video found at www.kbobike.com.
6

Recommended Torque Values
Hardware Location
Handlebar
Stem
Saddle
Front Wheel
Rear Wheel
Bottom Bracket Parts
Hardware Location
Pedals
Disk Mounting Bolts
Disk Caliper Mount
Crank Bolts
Saddle Post Clamp
Torque Required (Nm)
18-20
18-20
18-20
16-25
35-40
35-55
Torque Required (Nm)
35
6
10
40
7
NOTICE: Ensure all hardware is tightened properly and all safety checks in the following sections are performed before �irst use.
Please refer to the assembly video on Youtube channel KBO Bike and detailing a closer look if you have any questions regarding
the assembly of your bike. If you are not able to ensure all the assembly steps in the assembly video are performed properly, or you
are unable to view the assembly video please consult a certi�ied local bicycle service provider for assistance in addition to
contacting KBO Bike for help.
7

Display Features
The image shows the various features and information displayed on the display.
Error Code Indicator
Headlight
Pedal Assist Level
Battery Charge Indicator
Current Speed
Speed Unit( miles per hour(MPH))
Switch/Light
8
mph
M
Pedal Assist

Display Features
The display pad is equipped with 2 buttons including " " and " ". The M button is the switch/light button. The " " button is the pedal
assist level button.
Press and hold the " " button for 3 seconds on the handlebar controls to turn on the display. Now, your e-bike is ready to ride. To turn off,
press and hold the " "button for 3 seconds.
Press the " " button to turn on the light. And press it again to switch the light off.
Press the " " button to increase/decrease pedal assist level. The pedal assist level will display according to the order like level
0-1-2-3-0-1-2-3.
The display pad provides you with a variety of displays to meet the demand of your riding. The display contents are:
1. Speed Indicator:
It shows the real-time speed (mph) of your e-bike.
2. Battery Charge Indicator:
The battery charge indicator on the display will show the current battery energy remaining.
3. Pedal Assist Level:
It shows the pedal assist level and the default range is 0-3 levels.
4. Error Code Indicator:
The code will be displayed in the event of a problem.
5. Front Light:
Press the " " button to display the item.
9
M
M
M
M
M

Routine Operation
Error Code
1
3
5
Error Code
2
4
6
De�inition
Abnormal Communication
Twist Defect On the Throttle
Motor Phase Problem
De�inition
Motor Hall Defect
Controller Defect
Brake Failed or Brake Applied While Turning On
NOTICE: When the error code is displayed, please promptly remove the fault. After the fault occurs, the electric bike will not be
able to ride normally.
10

Driving Range
The range of your KBO Bike is the distance the bike will travel on a single full charge of the onboard battery pack. The range values in this
manual are estimates based on expected usage characteristics. Some of the factors which affect the range include changes in elevation, speed,
payload, and acceleration, number of starts and stops and ambient air temperatures. Tire pressure and terrain are also important variables to
consider.
We suggest that you select a lower pedal assist level when you �irst get your KBO Bike to get to know your bike and travel routes. Once you
become familiar with the range requirements of your travel routes, and the capabilities of your KBO Bike you can then adjust your riding
characteristics if you desire.
The following table provides general estimates and outlines various factors’ effective range and their combined estimated effects on range. This
table is meant to help owners understand the factors that can increase or decrease range, but KBO Bike makes no claims to the range that
individual users might obtain.
Best Practices for Extending Range and Battery Life
◆Do not climb hills steeper than 15% in grade.
◆Pedal to assist the motor when climbing hills and accelerating from a stop.
◆Avoid sudden starts and stops.
◆Accelerate slowly.
11

Parking Storage and Transport
Please follow these basic parking, storage and transport tips to ensure your bike is well cared for on and off the road.
◆ When pushing the vehicle manually, turn off the power to avoid accidental acceleration from the motor.
◆ It is recommended to park indoors.
◆ Switch the power and all the lights off to save battery life. Remove the key from the bike for security.
◆ In public places, your KBO Bike must be parked in accordance with local rules and regulations.
◆ If you must park outdoors in rain, or wet conditions you should only leave your KBO Bike outside for a few hours and proceed to park the
bike in a dry location afterwards to allow all the systems to dry out. Much like a regular bike, use in wet conditions mandates a more regular
maintenance schedule to ensure your bike does not become rusty, corroded and to ensure all systems are always working safely.
◆ Do not park, store, or transport your KBO Bike on a rack that is not designed for the size and weight of the bike.
◆ Locking up your bike is recommended to ensure your bike is secure and the chance of theft is reduced. KBO Bike makes no claims or
recommendations on the proper lock hardware or procedures to secure your bike, but we do recommend you take the appropriate
precautions to keep your KBO Bike safe from theft.
◆ When storing your bike or carrying your bike on a rack for transport, you can remove the battery pack to reduce the weight of the bike
and make lifting and loading easier.
12

Basic Battery Charging Tips
◆ The battery should be recharged after each use. There is no memory effect, so you can charge the battery after short rides without damage.
◆ The battery can be recharged on or off the bike.
◆ Flip the bike over, use the tool to loosen the screws at the bottom of the downtube, unplug the cables, and then take the battery out for
service or replacement.
◆ The charger is designed to prevent overcharge when the battery pack is full.
◆ Always charge in dry locations and indoors away from direct sunlight, dirt or debris.
◆ Do not cover up the charger when plugged in or charging, it air cools and needs to be left in an open space. Do not charge with the charger
in the inverted position which can inhibit cooling and reduce the charger’s life.
◆ Check the charger cables, charger and battery for damage before beginning each charge.
◆ The light on the charger will turn green when charge is complete and stay red while the battery charges.
Charging Time
When the input and output plugs of the charger are connected properly, and the battery is not fully charged, the red charging indicator light
should illuminate, showing that the battery is charging. The time that the battery takes to fully charge the battery is dependent on various
factors including distance traveled, riding characteristics, terrain, payload, and battery age.
NOTICE: The battery pack can take longer to charge when fully depleted and when the battery is new. As your battery ages you
might also experience increased charging times, but this is only expected after 3-5 years of regular use. If your battery does not
seem to be charging normally, and taking longer to charge than expected, please discontinue charging and contact KBO Bike
immediately.
13

Bicycle Care
To ensure safe riding conditions you must ensure your bike is properly maintained. You should follow these basic guidelines and see your
certi�ied bicycle mechanic at regular intervals to ensure your bike is safe for use.
1. Properly maintain batteries by keeping them fully charged when not in use.
2. Never immerse the bike or any components in water as the electrical system may be damaged.
3. Periodically check wiring and connectors to ensure there is no damage and the connectors are secure.
4. To clean, wipe the frame with a damp cloth soaked in a mild non-corrosive detergent mixture. Dry with a cloth.
5. Store under shelter; avoid leaving it in the rain or exposed to corrosive materials. If exposed to rain, dry your bicycle afterwards and apply
anti-rust treatment to chain and other unpainted steel surfaces.
6. Riding on the beach or in coastal areas exposes your bicycle to salt which is very corrosive. Wash your bicycle frequently and wipe or spray all
unpainted parts with anti-rust treatment. Damage from corrosion is not covered under warranty so special care should be given to extend the
life of your bike when used in coastal areas or areas with salty air or water.
7. If the hub and bottom bracket bearings have been submerged in water, they should be taken out and re-greased. This will prevent accelerated
bearing deterioration.
8. If the paint has become scratched or chipped in the metal, use touch up paint to prevent rust. Clear nail polish can also be used as a preventa
tive measure.
9. Regularly clean and lubricate all moving parts, tighten components and adjust as required.
14

Basic Troubleshooting
It doesn’t work
Irregular acceleration and/or
reduced top speed
When powered on the motor
does not respond
Reduced range
The battery won’t charge
Safety Check Basic Steps Most Common Solutions
1. Insuf�icient battery power
2. Faulty connections
3. Battery not fully seated in tray
4. Improper turn on sequence
5. Brakes are applied
1. Insuf�icient battery power
1. Loose wiring
2. Loose or damaged motor plug wire
3. Damaged motor
1. Low tire pressure
2. Low or faulty battery
3. Driving with too many hills, headwind, braking, and/or excessive load
4. Battery discharged for long period of time without regular charges, aged or damaged
5. Brakes rubbing
1. Charger not well connected
2. Charger damaged
3. Battery damaged
4. Wiring damaged
1. Charge the battery pack
2. Clean and repair connectors
3. Install battery correctly
4. Turn on bike with proper sequence
5. Disengage brakes
1. Charge or replace battery
1. Repair and or reconnect
2. Secure or replace
3. Repair or replace
1. Adjust tire pressure
2. Check connections or charge battery
3. Assist with pedals or adjust route
4. Replace the battery
1. Adjust the connections
2. Replace
3. Replace
4. Repair or replace
15

Basic Troubleshooting
All users must read and understand this manual before �irst use. Additional manuals for components used on your bicycle may also be
provided and should be read before use in addition to this manual.
◆ Ensure that you comprehend all instruction and safety notes.
◆ Ensure the bike �its you properly before �irst use. You may lose control or fall if your bike is too big or too small.
◆ Always wear an approved bicycle helmet whenever using this product and ensure that all helmet manufacturer instructions are used for �it
and care of your helmet. Failure to wear a helmet when riding may result in serious injury or death.
◆ Ensure correct tightening and setup is performed on your bicycle before �irst and checked regularly.
◆ It is your responsibility to familiarize yourself with the laws and requirements of operation of this product in the area(s) where you ride.
◆ Ensure handle bar grips are not damaged and properly installed. Loose or damaged grips can cause you to lose control and fall.
Safety Check Basic Steps Most Common Solutions
1. Damaged motor bearings
2. Damaged wheel spokes or rim
3. Damaged motor wiring
1. Replace
2. Repair or replace
3. Repair or replace motor
16
Wheel or motor makes strange
noises

Basic Troubleshooting
◆ Do not use this product with standard bicycle trailers, stands or bicycle racks. Contact KBO Bike to check if your equipment will work
with the bicycle.
◆ Engaging in extreme riding is extremely dangerous and should be avoided. Although many articles/advertisements/catalogues depict
extreme riding this is not recommended nor permitted, and you can be seriously injured or killed if you perform extreme riding.
◆ Bicycles and bicycle parts have strength and integrity limitations and extreme riding should not be performed or you risk damaging the
components or becoming seriously injured or killed.
◆ Failure to con�irm proper installation, compatibility, proper operation or maintenance of any component or accessory can result in serious
injury or death.
◆ You should check the operation of the brake inhibitor switches before each ride. The brake system is equipped with an inhibitor which shuts
down the power to the electric motor whenever the brakes are engaged. Check proper operation of brake switches before riding.
◆ Failure to properly charge, store or use your battery will void the warranty and may cause a hazardous situation.
As a parent or guardian, you are responsible for the activities and safety of your child. The KBO Hurricane is not designed for use
by children.
17

Warranty Info
Every bike is covered under a manufacturer's two-year all-inclusive warranty for the original owner against all manufacturing defects. KBO Bike
warrants this product, including all individual components against defects in material or workmanship as follows:
KBO Bike LIMITED 2-YEAR WARRANTY
KBO Bike bicycle components including frame, forks, stem, handlebar, headset, seat post, saddle, brakes, lights, bottom bracket, crank set,
pedals, rims, spokes, wheel hub, motor, controller, wiring harness, LCD display, re�lectors and hardware are warranted to be free from manufac-
ture defects in materials and/or workmanship for a 2-year period from the date of original purchase.
Wear and tear is not covered under warranty. KBO Bike lithium ion batteries are warranted to be free from manufacturing defects in materials
and/or workmanship for a 2-year period from the date of original purchase. The battery warranty does not include damage from power surges,
use of improper charger, improper maintenance or other such misuse, normal wear or water damage.
The Following are Also Excluded from the Warranty:
• Liability for material defects does not cover normal wear which occurs from the manufacturers intended use of the product. Components
such as the battery pack, motor system, braking system, drivetrain system, saddle, grips and pedals are all subject to intended use-related
wear and are not covered under the warranty from normal wear.
• Damage arising from the use of the bike in a competition or other applications outside of normal intended use.
• Damage arising by improper tools or inadequate maintenance performed on the bike.
• Damage resulting from adding non-standard equipment, parts or technical modi�ications.
18
Table of contents
Other KBO Bicycle manuals