Keba KeMes A1 Series Parts list manual

KeMes A1xx/ A2xx Brief description
Specifications are subject to change due to further technical developments.
Details presented may be subject to correction.
All rights reserved.
KEBA AG Head-
quarters:
Gewerbepark Urfahr, 4041 Linz, Austria,
Phone: +43 732 7090-0, Fax: +43 732 7309-10,
For information about our subsidiaries please look at www.keba.com.
V 1.05
Caution
● This brief description does not replace the operating instructions!
● You absolutely must observe all instructions in the operating instructions for use
and safety of the product!
Information
The current operating instructions are available in German, English, Spanish, Ital-
ian and French and can be downloaded directly from the KEBA website (http://
www.keba.com/kemes). If you require the operating instructions in another lan-
guage, please contact KEBA.
Original language: German Valid for firmware version 2.0 and later
Bluetooth declaration
The Bluetooth® trademark and logos are registered trademarks of Bluetooth SIG,
Inc. and each use of this trademark by KEBA is licensed. Other trademarks and
brands are the property of their respective owners.
Information for the Canadian market
This Class B digital apparatus meets all requirements of the Canadian Interference-
Causing Equipment Regulations.

Safety notes for personal safety
WARNING!
Health hazard for persons with pacemakers, metallic implants and hearing
aids!
The device is equipped with magnets. Magnets can affect the function of pacemak-
ers and implanted defibrillators. A pacemaker can be switched into test mode and
cause discomfort. A defibrillator may stop working in some cases.
WARNING!
Danger due to lithium polymer batteries
This device contains rechargeable lithium polymer batteries
In the event that these instructions are not observed, the device can explode, fire
may ignite and a formation of smoke may develop. Furthermore, impaired function
may result and safe operation cannot be ensured.
The device must never:
● be disassembled or modified in any form
● be exposed to heat or burned
● be used when it is damaged
● be operated with a power supply unit other than that specified
● be pierced through with foreign objects (for example, nails), impacted or kicked
● be subjected to an impact load or sliding movement
● be placed in a microwave device or a high-pressure vessel
● be operated in an improper state (for example, with batteries that are becoming
drained or in the event of a deformed enclosure).
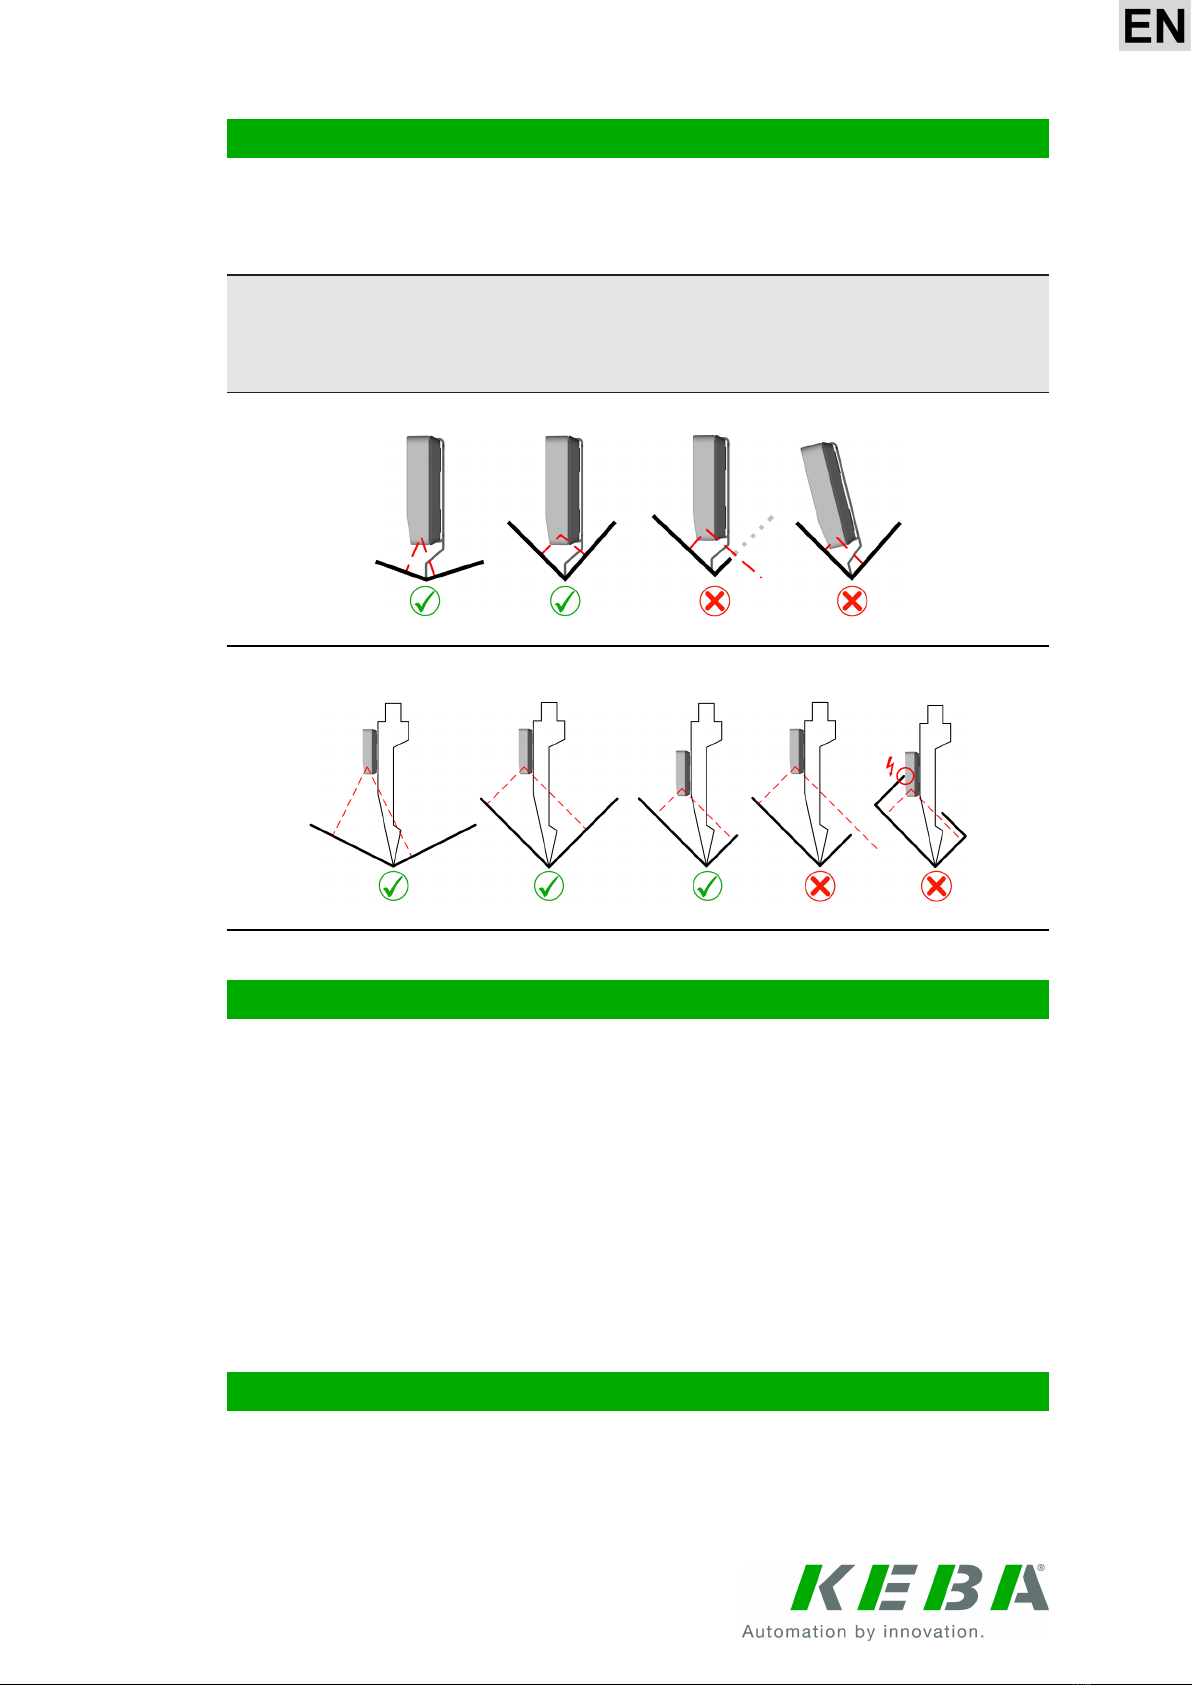
CAUTION!
LASER RADIATION
DO NOT LOOK INTO THE BEAM
LASER CLASS 2
IEC 60825-1:2014
660 nm; 7 mW; pulsed
The laser beam must not be pointed at persons or animals. Avoid looking into the
direct or reflected laser beam.
The device must be switched off again after use. Ensure that it is not used by un-
qualified personnel at any time.

Front and rear view
1Display 2Operating button
3Cover of USB or charging socket 4Output for laser radiation (mirror)
5Type plate 6Magnets
7Recesses for measuring aid
Operating button
All control of the device is executed by the operating button.
Operating button Meaning
Press 1x briefly
● Switch on the device and activate the mode used most re-
cently
● Manual termination of a measurement
● Restarting a measurement
Press 2x briefly
● End measurement
● Return to the preceding menu item
● Switch off the device from the main menu
Press and hold
● Navigate forward within the menu level
● Increase set value
● Switch from individual measurement to continuous measure-
ment
● Execute selected action
Press 1x briefly, then press and
hold
● Navigate backward within the menu level
● Reduce set value
Charging the device
Information
Before first use, the device must be charged completely.
Proceed as follows to charge the battery:
1) Plug the USB cable with the Type A plug into the power supply unit.
2) Plug the power supply unit into the power supply.
3) Plug the USB cable with the Type C connector into the charging socket of the
device. The battery symbol appears on the display and the battery is
charged.

4) Press the operating button once to display the state of charge.
5) Press the operating button twice to switch off the device again. The device con-
tinues charging.
Once appears on the switched-on display, the battery is completely charged.
Materials and surfaces
Material Easy to measure Not measurable / hard to
measure1)
Aluminum x
Steel x
Stainless steel x
Galvanized sheets x
Non-metallic materials x
1) These materials usually cannot be measured or can be measured only with limited
accuracy.
Surface Easy to measure Not measurable / hard to
measure2)
Smooth surface x
Sheets with protective foil x
Clean surface x
(Heavily) scaled sheets x
Electrolytically galvanized sheets
for machine reading x
Painted sheets x
Enameled sheets x
Pickled surface x
Mechanically treated surface3):
● Brushed surface x
● Ground surface x
● Blasted surface x
Highly reflective (glassy)
surface x
Dirty/corroded surface x
Scratched surface x
Surface with oil or rust stains x
Surface with weld spatter x
2) These surfaces usually cannot be measured or can be measured only with limited
accuracy.
3) Mechanically processed surfaces can be measured when a protective film is at-
tached.

Positioning
Since the measurement principle of KeMes is based on the reflection of a laser
beam, attention must be paid to the correct positioning of the device. Measurement
is not possible on bent workpieces or in the bending radius.
Information
For an exact measurement, a minimum distance of 20 mm between the device and
the surface of the workpiece is required.
Fig.1-1: Examples of positioning using the measuring aid
Fig.1-2: Examples of positioning using the upper tool
Manual measurement
1) Attach the measuring aid to the device.
2) Switch the device on by pressing the operating button.
3) Navigate to the Manual menu item by pressing and holding the operating button.
4) Place the device close to the workpiece so that the measuring aid touches the
bending edge.
5) Start the measurement (switch on the laser) by pressing the operating button
once.
6) Position the device so that the laser beam can hit both legs of the workpiece at
an angle of 90° without being obstructed.
7) Hold the device still until the measurement is complete and the laser switches
off automatically.
Settings on the press brake
● Adjust the decompression path. For a correct measurement result, the press
beam must be moved up far enough and the legs of the workpiece must be un-
stressed. For more information, see the Downloads area of the KEBA website.

● Set a minimum opening stroke of 50 mm to achieve sufficient velocity to trigger
the measurement.
Installation on the upper tool
1) Create a gap of approx. 6 mm in the upper tool of the press brake.
2) Attach KeMes so that the laser beam can penetrate the gap unobstructed and
hit both legs of the workpiece at an angle of 90°.
3) Align the device symmetrically using the centering mark.
1Stamp segments 2Gap / recess
Information
For a correct measurement result, the device must be attached in parallel to the
bending edge and is allowed to be mounted only on vertical surfaces.
Measurement at the press brake (machine mode)
1) Attach the device to the upper tool.
2) Switch the device on by pressing the operating button.
3) Navigate to the Machine menu item by pressing and holding the operating but-
ton.
4) Start machine mode by pressing the operating button once.
5) Wait until the idle state has been reached (display shows" ").
6) Start the bending operation. The measurement operation starts automatically.
If there are too few individual measurement values, the displayed measurement
value will flash and could be incorrect.
Continuous measurement
1) Press and hold the operating button until appears on the display.
2) Carry out the measurement.
The measurement can be terminated by pressing the operating button 2x briefly.

Switching on the Bluetooth wireless interface (valid for A2xx)
1) Navigate to the Bluetooth menu entry. The device serial number is displayed in
the Bluetooth menu.
2) Enable the wireless connection by pressing the operating button once. The
Bluetooth icon appears on the display. The device is now ready for a wireless
connection to be set up.
How a wireless connection is set up and how the device is coupled to the receiver
depend on the version and are described in the operating instructions.
Sending measured values after a manual measurement (valid for A2xx)
If the device is connected to a receiver, the device flashes once the measurement of
the measuring angle is complete. You can send the angle value to the receiver by
briefly pressing the operating button once.
When it is pressed twice briefly, the measured value is discarded and ---.--° ap-
pears on the display. Briefly pressing the button again starts a new measurement.

Technical data
General information
Protection type: IP20
Measurement range: 30° to 150°
Minimum measurement distance: 20 mm to the surface
Resolution: 0.01°
Measurement accuracy: ±0.2° *)
Repeat accuracy: 0.1°
Power supply: 5 V DC, 500 mA
Battery: 2 integrated LiPo batteries with safety circuits
Nominal battery voltage: 3.7 V
Battery capacity: 2 x 330 mAh
*) See the operating instructions for a measurement accuracy reference.
Ambient conditions
Operating temperature: +5 °C to +40 °C
Charging temperature: +5 °C to +40 °C
Storage temperature: -20°C to +45°C
Relative air humidity: 5% to 95% (non condensing)
Laser
Laser class: 2 in accordance with IEC 60825-1:2014
Wavelength: 660 nm
Laser output: 7 mW (pulsed)
Laser output calibration uncertainty: ±0.9 mW
Laser beam diameter: 3 mm (at the exit point)
Beam divergence: 35 mrad
Pulse frequency: 167 Hz
IEC 60825-1:2014, Table 10, Condition 3: 200 mm (most restrictive location); 36 µs (impulse
duration in orifice plate)
For a complete list of the technical data, please refer to the operating instructions or
the data sheet.

EU Declaration of Conformity


FCC Supplier's Declaration of Conformity

FCC Supplier's Declaration of Conformity
This manual suits for next models
1
Table of contents
Other Keba Industrial Equipment manuals
Popular Industrial Equipment manuals by other brands

schmersal
schmersal AZM201Z-I2-SK-T-1P2PW-DU Operation and assembly instructions

Tidland
Tidland 900 KA Series Operation & maintenance manual

iseg
iseg ECH 44A Technical documentation

TECNA
TECNA 9320AX instruction manual

Grundfos
Grundfos SMD Installation and operating instructions

ABB
ABB XAC18507 Operation manual