KegLand Benchy - Glycol User manual

Benchy –Glycol Instruction Manual
Page 2of 9www.KegLand.com.au Last Updated 14/12/2020 5:29 PM
WARNING
IF THE BENCHY HAS JUST BEEN MOVED DO NOT TURN ON UNLESS THE
BENCHY HAS BEEN STANDING UPRIGHT FOR 24 HOURS. FAILURE TO DO SO
WILL VOID WARRANTY. STAND THE BENCHY IN THE UPRIGHT POSITION
FOR 24 HOURS BEFORE PLUGGING INTO THE MAINS SOCKET
WARNING
PERFORM A PRESSURE TEST ON ALL PRODUCT LINES PRIOR TO USE
WARNING
ENSURE THAT THERE IS ALWAYS ATLEAST 100mm OF CLEARANCE ON EACH
SIDE OF THE BENCHY TO ALLOW ADEQUATE AIRFLOW. NOT ALLOWING
ADEQUATE VENTILATION WILL REDUCE PERFORMANCE, INCREASE POWER
CONSUMPTION AND VOID WARRANTY
WARNING
DO NOT RUN THE PUMP DRY. ENSURE THE PUMP IS ALWAYS SUBMERGED
WHEN IN OPERATION. RUNNING DRY CAN DAMAGE THE PUMP
WARNING
ONLY CLEAN PRODUCT LINES WITH COLD TO WARM WATER. DO NOT USE
HOT WATER TO CLEAN THE PRODUCT LINES.

Benchy –Glycol Instruction Manual
Page 3of 9www.KegLand.com.au Last Updated 14/12/2020 5:29 PM
Initial Start-up and Testing
Important
Let the Benchy sit for at least 24 hours after delivery or after sitting on its side before turning the
unit on.
Whenever the Benchy is operating and cooling the reservoir the agitator pump needs to be
operating to keep the liquid in the reservoir agitated and avoid ice formation. The pump is wired
into the temperature controller and hence should always be running when the unit is turned on.
Assemble the sight tube:
Firmly push the two 3/8” duotight tee pieces (KL07023) onto the push fit tubes on the
front of the Benchy and push your sight tube into each of the duotight tee pieces as
shown to the right. Confirm this is held in place securely by pulling on the duotight
fittings and ensuring they are locked in place. Then, push a 3/8”plug (KL06965) into
each of the duotight tee pieces.
To remove the plug/tube from the duotight tee piece, push the collar on the tee piece
in towards the fitting as you pull the plug/tube out of the tee piece.
Attaching a keg
On the side of the Benchy you will find two 5/8” threaded shanks. Screw a duotight
8mm x 5/8” fitting (KL06903) onto each of the threaded shanks (ensuring the washer
is in place internally on the duotight).
Push 8mm OD EVABarrier hose into the Duotight fitting on the shank on the sight of the Benchy.
Connect this 8mm OD EVABarrier hose to your coupler or disconnect on your keg.

Benchy –Glycol Instruction Manual
Page 4of 9www.KegLand.com.au Last Updated 14/12/2020 5:29 PM
Leak Testing Product Lines
It is essential to pressure test all four product lines prior to running any liquid through them for
dispensing.
The product lines need to be pressure tested to a pressure that is at least 1.5 times the pressure that
will be used for dispensing to a maximum of 50psi. For example, if your dispensing pressure is 20 psi
then your product lines should be pressure tested at 30 psi and your testing pressure shouldn’t
exceed 50 psi.
The product lines can be leak tested via multiple methods which are outlined below. It is a good idea
to test the system using multiple methods to be certain the system is holding pressure:
1. Pressure decay test
Step 1. Screw a 8mm x 5/8” Duotight fitting onto each all thread shank on the side of the
Benchy.
Step 2. Push 8mm EVABarrier hosing connected to a regulated pressure source into one of
the Duotight fittings.
Step 3. Set the pressure on the regulator to 1.5 times the dispensing pressure up to a
maximum of 50 psi.
Step 4. Turn the gas cylinder off and leave to sit for a few hours. Then check if the pressure
on the regulator has decreased from the set pressure.
If the pressure has dropped double check that the leak isn’t occurring externally from the
Benchy. Check all duotight connections and connections to your gas cylinder or regulator
with a soapy solution to check for the formation of bubbles indicating a leak.
If the pressure remains stable then this product line has passed the leak test.
Perform the above steps on the other product line.
2. Bubble (Air-leak) test
Step 1. Fill the reservoir with water
Step 2. Screw a 8mm x 5/8” duotight fitting onto each all thread shank on the side of the
Benchy.
Step 3. Push 8mm EVABarrier hosing connected to a regulated pressure source into one of
the duotight fittings.
Step 4. Set the pressure on the regulator to 1.5 times the dispensing pressure up to a
maximum of 50 psi.
Step 5. Look for the formation of bubbles in reservoir indicating a leak
Repeat the above steps on the other product line.

Benchy –Glycol Instruction Manual
Page 5of 9www.KegLand.com.au Last Updated 14/12/2020 5:29 PM
3. Hydrostatic leak test
Step 1. Empty the reservoir
Step 2. Screw a 8mm x 5/8” duotight fitting onto each all thread shank on the side of the
Benchy.
Step 3. Push 8mm EVABarrier hosing connected to a regulated water source into one of the
duotight fittings.
The pressure of the water source can be regulated using an inline regulator for example
(KL15035) or by connecting a keg full of water pressurised at 1.5 times the dispensing
pressure up to a maximum of 50 psi.
Step 4. Look for any leaks in the reservoir from the product line.
Repeat the above steps on the other product line.
Testing the Agitator Pump and Compressor
Step 1. With the Benchy unplugged fill the reservoir with water until all the cooling coils are
submerged and the impeller of the agitator pump is submerged.
Step 4. Plug the Benchy in using the provided IEC cable and turn the red power switch on.
Step 5. Set the temperature on the temperature controller on the front of the Benchy to 2°C
To change any settings on the temperature controller for the reservoir such as temperature
hysteresis or calibration refer to this instruction manual:
KegLand STC1000 Instructions
Step 8. Leave the Benchy for 12 hours to ensure that it drops the temperature of the reservoir to
the set temperature on the temperature controller.
The system has now been tested for cooling and leaks and is ready to be used to dispense from a
keg.

Benchy –Glycol Instruction Manual
Page 6of 9www.KegLand.com.au Last Updated 14/12/2020 5:29 PM
Filling the Reservoir
The Benchy can be operated with either just water in the reservoir or both water and glycol to
reduce the freezing point of water.
IMPORTANT: If you are only using water in the reservoir and not glycol then do not set the
temperature of the reservoir below 2°C.
Fill the reservoir until the copper cooling coils are submerged with water if the reservoir is set at 2°C
or an appropriate concentration of glycol and water solution if dropping the reservoir below 2°C
according to the table below. The amount of glycol required to be added to the reservoir depends
on the desired set temperature of the reservoir which is dependent on a number of factors including
heat ingress into the entire system, insulation of the glycol lines, ambient temperature, the number
of kegs being cooled and the temperature of the kegs. Use the table below to determine what
percentage of glycol you require.
Glycol Volume %
Freezing Point °C
Specific Gravity at 21°C
0
0.0
1.000
10
-3.3
1.006
20
-7.8
1.015
30
-13.3
1.024
You can measure the glycol percentage using a calibrated refractometer and comparing to the
specific gravity at 21°C in the above table.
We would advise running a 20% glycol solution however, if you do not have a jacketed fermenter or
have the fermenter in a very warm environment you can run it at a higher glycol concentration. The
pumps are not designed to be run with a glycol concentration higher than 30% hence it is not
advised to exceed this glycol concentration. Doing so may damage the pumps.
Dispensing Beverages Through the Benchy
Use the diagrams below to determine how to dispense beverages through the benchy. Please note
that the diagrams below are for demonstration purposes only. You may have a different style
coupler or tap and shank setup to what is shown in the below diagrams. Fittings other than duotight
fittings can be screwed onto the 5/8”BSP shanks for the product lines such as:
•Liquid Ball Lock Post with 5/8”Thread (KL00840)
•K-lok female to 5/8”Female (KL04916)
•Duotight 5/8”Female to 9.5mm (3/8) Push in (KL06910)
•Swivel nut (KL05074) and any of the below barbs:
•Angle Barb 6mm (KL05081)
•Straight barb 6mm (KL05098)
•Straight barb 8mm (KL05104)
•Straight barb 10mm (KL05111)
•Straight barb 13mm (KL05128)

Benchy –Glycol Instruction Manual
Page 9of 9www.KegLand.com.au Last Updated 14/12/2020 5:29 PM
Balancing Your Benchy Dispensing System with CO2
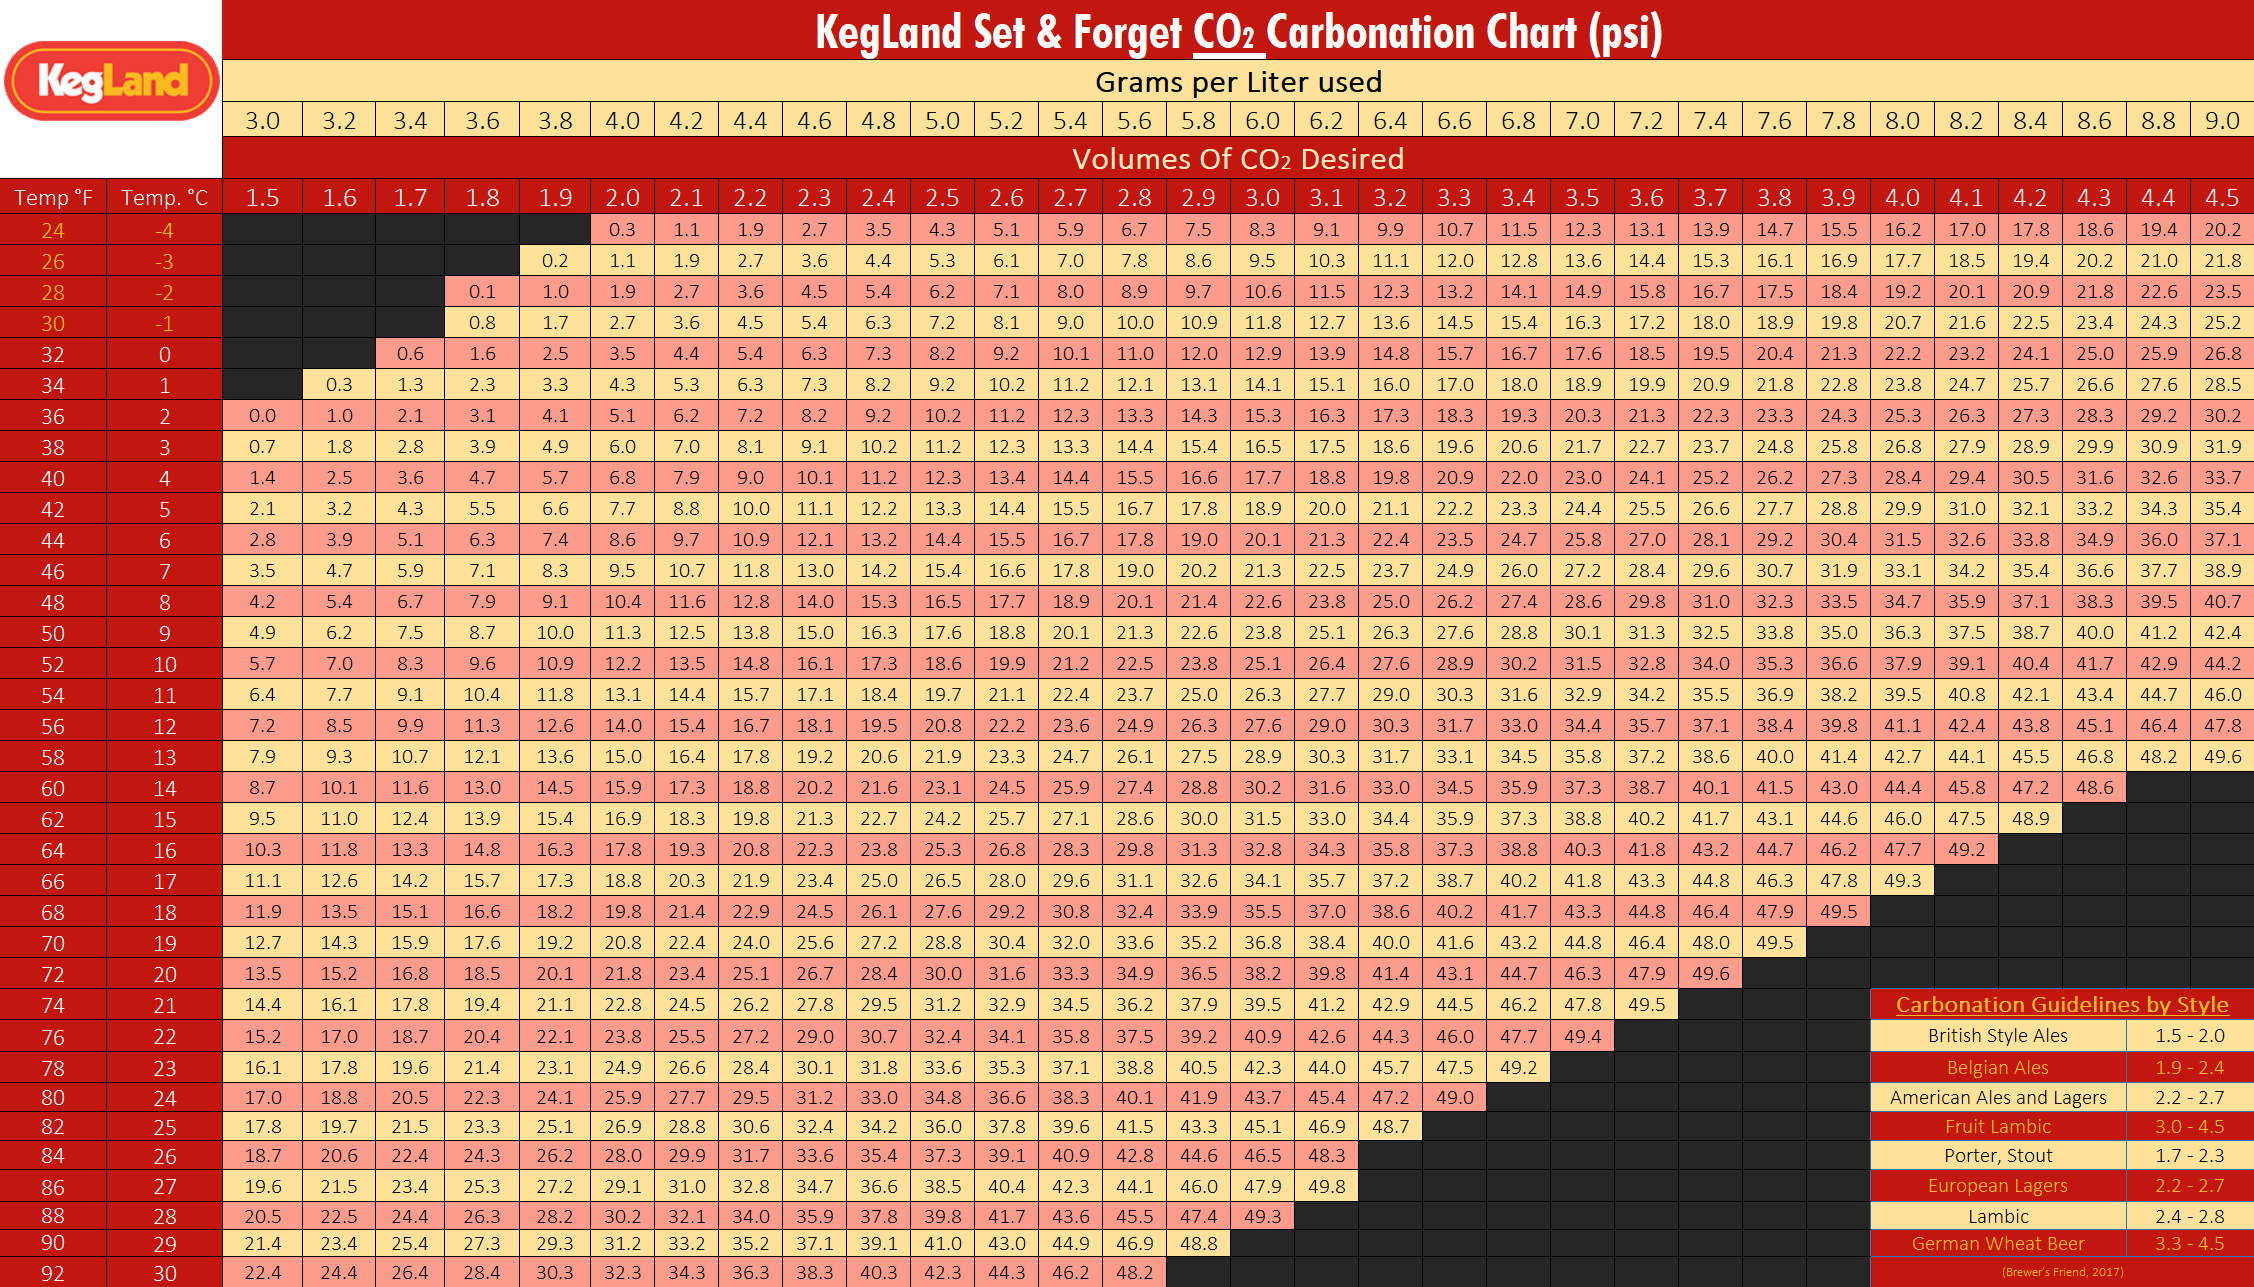
The pressure to be set on your regulator differs according to the temperature that the keg is stored
at. If the product is stored at a higher temperature it will require a higher pressure to maintain the
desired level of carbonation. Refer to a carbonation chart to determine what pressure you should be
setting your regulator at to reach your desired level of carbonation based on the ambient
temperature the keg is stored in.
For most styles of beer, you should be aiming for a carbonation level of between 2.3-2.8 volumes of
carbonation with the average carbonation level being 2.6 volumes (if you are unsure of the
carbonation level of the beer i.e. if it is a commercial keg then assume it is at 2.6 volumes of
carbonation). To achieve a specific carbonation level during carbonation or priming refer to the table
in the link below and correlate the temperature of the keg with the desired carbonation level.
KegLand Carbonation Chart
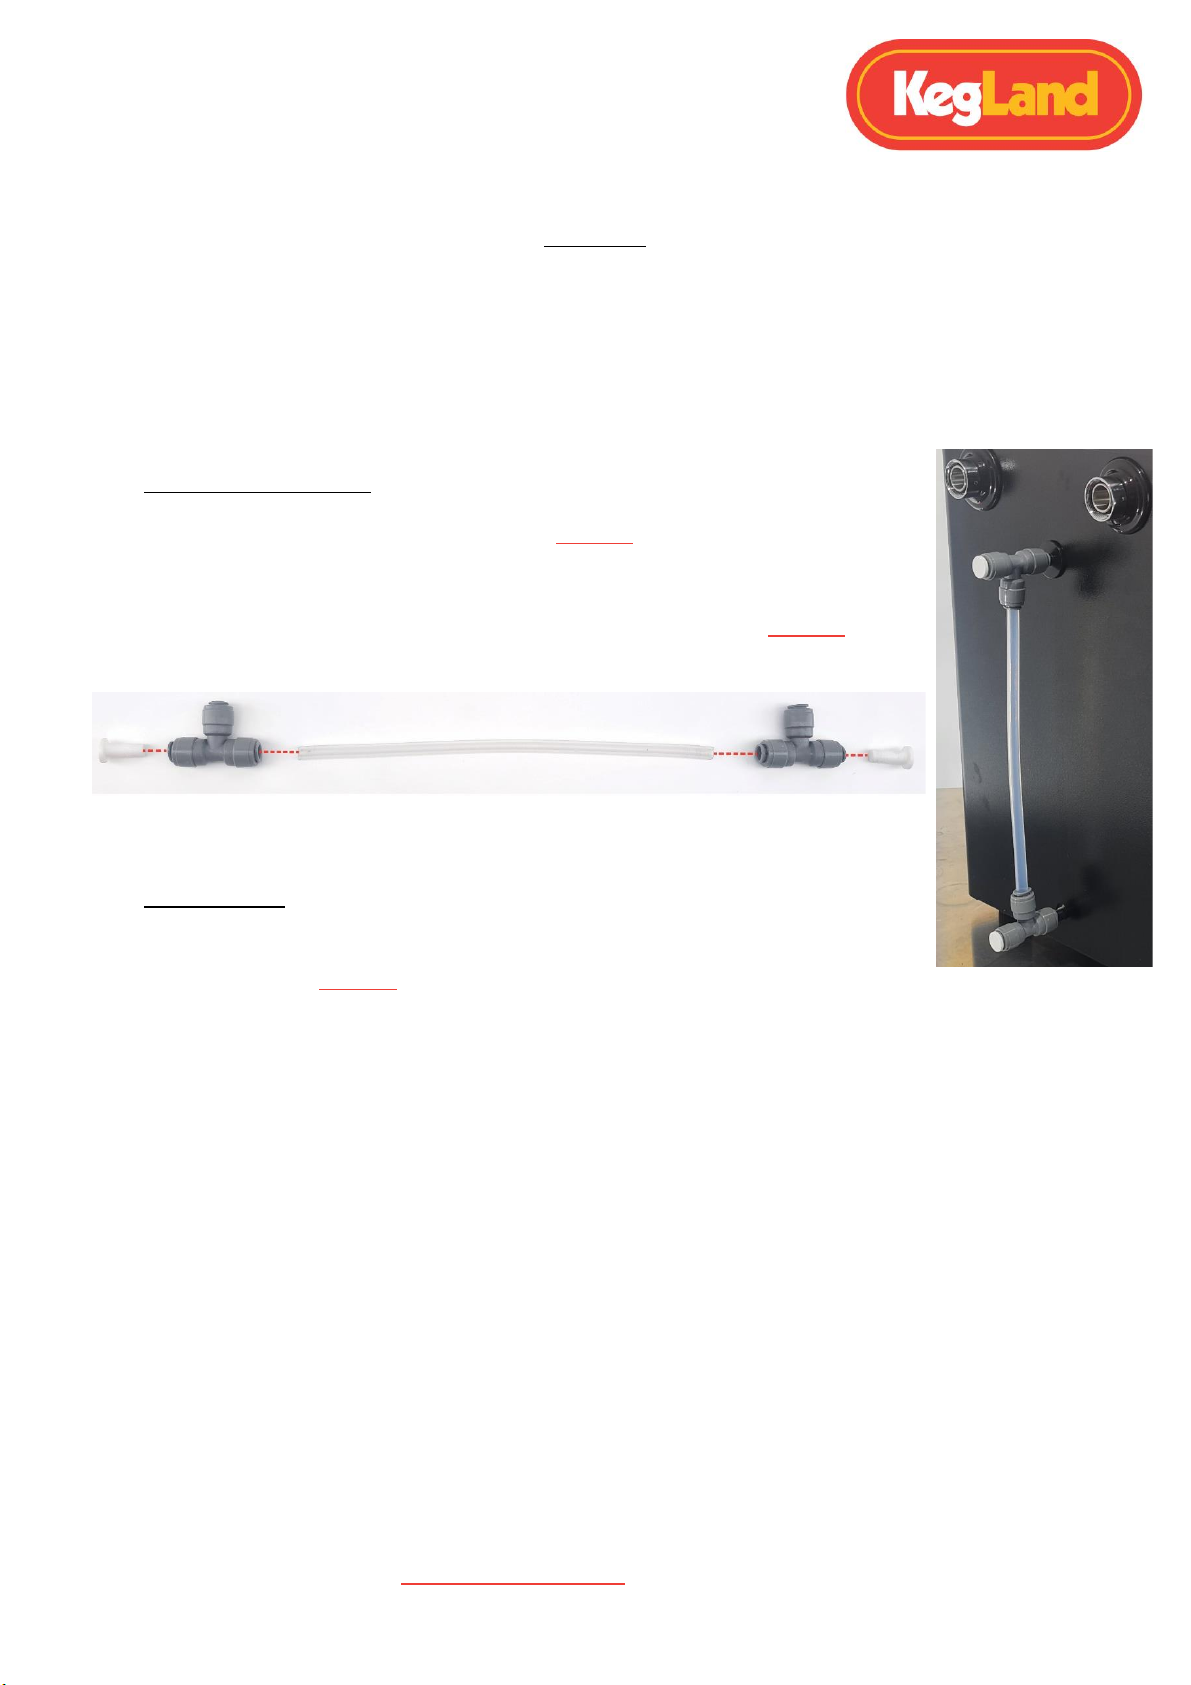
NOTE: Do not try to fix a slow or fast pour rate by adjusting the dispensing pressure. This will result
in your beer either going flat or over carbonated. It is best to adjust the beverage line length and
diameter. If the pour is too fast and is producing a lot of froth then increase the length of the
beverage line between the Benchy and the keg. Alternatively, if the pour is too slow then decrease
the length of the beverage line between the Benchy and the keg.
When adjusting your beverage line length to achieve the perfect pour it is always best to start with a
longer length of beverage line as you can always trim a longer length of hose.
Alternatively, you could use a short length of beer line and then a flow control tap (KL15523) or flow
control ball lock disconnect (KL09041) to reduce the flow rate.
MAINTENANCE
If the glycol solution has been stored for an extended period of time then it is suggested to replace
the solution, despite glycol having antimicrobial properties. It is recommended to replace the glycol
if it has changed colour dramatically or between 12 to 24 months of usage. To replace the glycol
solution empty the reservoir using the drainage port and then refill with the required concentration
of glycol using a refractometer to confirm the concentration.
This manual suits for next models
1
Table of contents
Other KegLand Kegerator manuals