WILLIAMSWARN BrewKeg50 User manual

BrewKeg50TM
User Guide
© 2018 WilliamsWarn NZ Ltd
DOWNLOAD OUR 3
MOST POPULAR RECIPES.
Simply register your brewery at
brew.williamswarn.com/register-now.html
Help us to support you by registering your new
brewing equipment. Registration is easy and is
helpful for warranty and support queries!
OVERVIEW 01
BREWKEG50TM USER GUIDE 02
Video Resources 02
Equipment 02
Process Summary 03
BREWING INSTRUCTIONS
Clean 04
Mix 06
Adjust 08
Dispense 11
APPENDICES
Special Note on Pressure and Carbonation 12
CO2Levels from Pressure vs. Temperature 12
Adjusting Carbonation 13
Carbonation for Warmer Beverages 13
VERSION 02

1
USER GUIDE
OVERVIEW
BrewKeg50TM Structure
STAINLESS STEEL VESSEL
VESSEL BUTTERFLY VALVEDRAINING SEDIMENT
BOTTLE
VESSEL LID
Optional Wheelset Accessory
1

2
BREWKEG50TM USER GUIDE
INTRODUCTION
The BrewKeg50TM User Guide provides you
the basic information you need to:
CLEAN: Prepare your BrewKeg50TM for use;
MIX: Create a beer from your ingredients;
ADJUST: Ferment and then clarify the beer
ready for drinking;
DISPENSE: Enjoy your finished product —
a chilled, carbonated and clear beer or cider.
VIDEO RESOURCES
There are a series of instructional videos under
the Video Resources option off the main menu
onthe WilliamsWarn website. Please step through
these videos at your leisure before you make your
first beer or cider to support the content you read
within the Quick Start guide.
You can scroll to specific videos, search by title or
use the tags to filter those videos relevant to your
needs. If you choose the tags of BrewKeg50TM
and QuickStart when searching, you will find the
videos that support the content of this guide.
Alternatively, all videos are available on the
Youtube Channel williamswarn.com/youtube
You will also find a wide range of videos to assist
with techniques, tips and tricks, recipe ideas
how-to’s and more. We encourage you to book-
mark this site and work your way through all
relevant videos.
NOTE: you may find that in some instances the videos
donot match exactly the instructions within this guide.
It is worth noting that there are multiple ways to achieve
the steps below and they are all correct. So, consider
youroptions and do what works best for you.
IMPORTANT VIDEOS TO WATCH
Connecting Gas and Liquid Correctly
Disassembling and assembling the
BrewKeg lid
BrewKeg Easy Cleaning
Dispensing from a BrewKeg
Doing a basic brew
Successfully pouring your beer
Using the new Sodastream adaptor
The BrewKeg: Step 1 Clean
The BrewKeg: Step 2 Mix
The BrewKeg: Step 3 Adjust
The BrewKeg: Step 4 Dispense
EQUIPMENT YOU NEED
You will need the following items to make
and enjoy your own beer or cider:
• A BrewKeg50TM
• Sundry Accessories
– spatula to mix
– Clarification Agent
– Brewery Detergent
– non-scratch sponge
– thermometer
– hydrometer
• A jug or kettle to boil water or very
hot water, 80ºC plus (176ºF)
• A pair of scissors
• A bucket or plastic jug
• A Dosing Device to add the
Clarification Agent
• A Pressure Gauge used to monitor
pressure during fermentation
• Beer or cider ingredients for the BrewKeg50TM
• A warm environment to ferment (18ºC-28ºC
ideally, (65ºF-83ºF))
• A chiller or fridge for chilling your beer
• A CO2Gas Bottle with CO2regulator
and gas line connector
• A beer tap to dispense your beer

USER GUIDE
PROCESS
SUMMARY
CLEAN
01. Rinse off the internal yeast ring — ensure
the internal surface is visibly clean.
02. Add hot water and detergent — shake with
lid on — take some liquid out of the beer line.
03. Open the vessel butterfly valve and add
remaining detergent to the sediment bottle.
04. Rinse the detergent from the BrewKeg50TM,
its lid, sediment bottle and beer line.
MIX
01. Add the extracts to the vessel with hot
water and stir to dissolve.
02. Add any extra ingredients (e.g. hop tea).
03. Top up with water. Target 25ºC (77ºF)
when full. Stir.
04. Rehydrate yeast in 250ml of 25ºC (77ºF)
water and add to vessel.
05. Attach sediment bottle and open vessel valve.
06. Top up again, attach lid, set VPRV to approx.
2.5 turns and set temperature to ideally
25ºC (77ºF) or within the range of 18-28ºC
(64-82ºF) in your fridge or room.
ADJUST
01. Maintain temperature for 4 days.
02. Check and adjust the pressure as required
after 24 hours. Target 1.5 bar (22 psi).
03. Drain sediment from sediment bottle
ifrequiredto create room for additional
clarification sediment.
04. Chill to 1-4ºC (34-39ºF) when fermentation
is finished.
05. Clarify beer — 2 step process. Cider does
not require clarification.
DISPENSE
01. Close the vessel butterfly valve and drain
thesediment bottle. Remove the bottom half
components of the sediment bottle to rinse
clean.Rinse the underside of the valve and
replace the cleaned components.
02. Ensure CO2is connected to the gas-in
port on the lid.
03. Connect draft tap to the beverage-out
port on the lid and pour a beverage.
Transfer the beverage to bottles
or kegs if required.

4
BREWING INSTRUCTIONS
CLEAN
The cleaning process requires the BrewKeg50TM and all
parts to be: cleaned with cold water (removing all visible
brewing residues), washed with Brewery Detergent (removing
unseen build up), rinsed (removing all Brewery Detergent
residue), and sanitised with boiling water. Once this is done
you are ready to mix in your ingredients.
01. Boil 2L (0.5 gal.) of water, ready for use later.
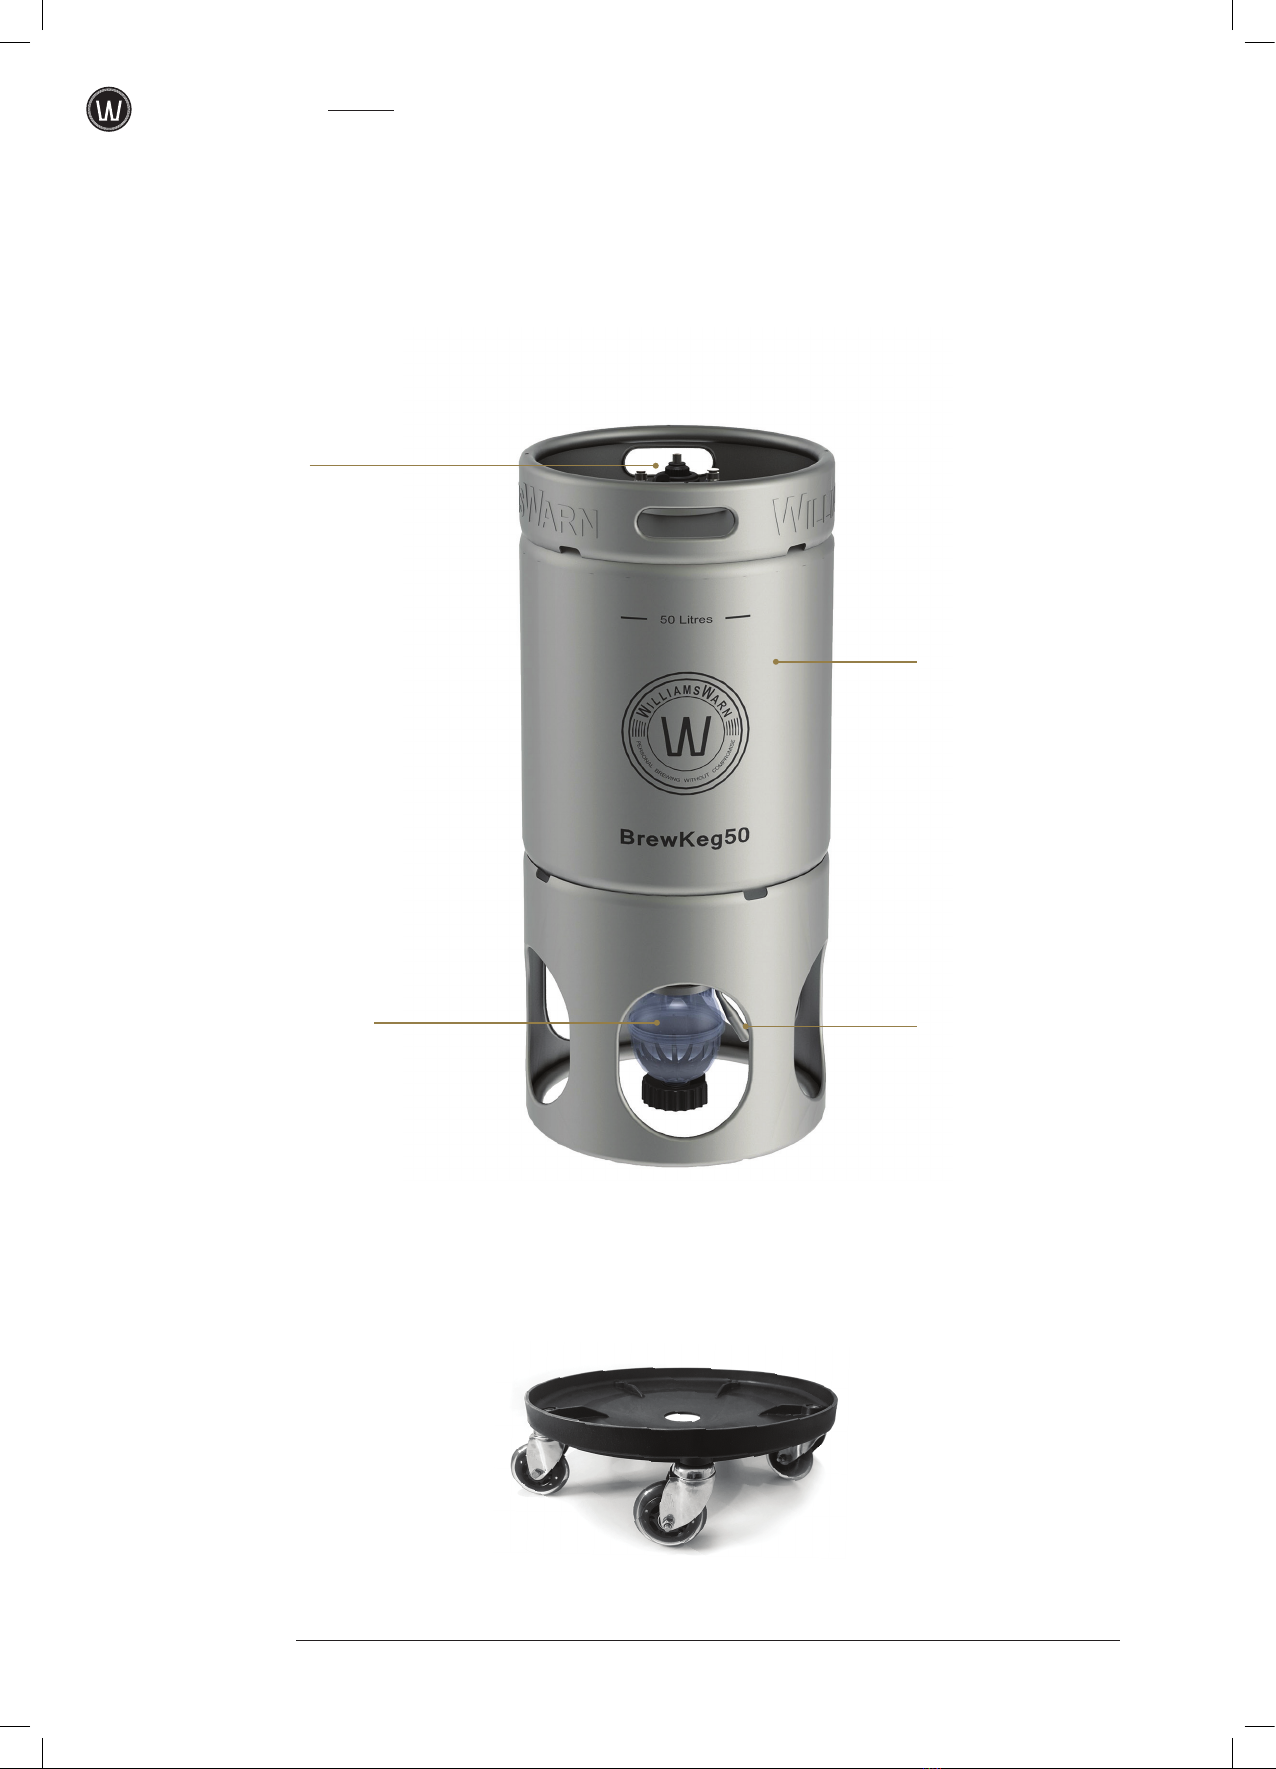
02. Disassemble BrewKeg50TM into individual parts:
lid, silicon lid seal, Variable Pressure Relief Valve
(VPRV), beer tube, black anti-block fitting (on
end of plastic beer line) and all base components
of the bottom half of the sediment bottle.
03. In a sink, jug, or small bucket, add 1 teaspoon
(0.17 fl. oz.) of detergent per litre of hot tap water.
Soak all disassembled lid parts and sediment
bottle components in hot water, wiping clean with
the non-scratch sponge to remove any visible
yeast/krausen/hops residue of previous brew.
04. Rinse the entire BrewKeg50TM with cold water
over a drain or sink. Using the non-scratch
sponge remove the yeast ring, krausen and
hops residues at the BrewKeg50TM fill mark. Pay
special attention to the underside of the seal area
and bottom valve area. Turn the BrewKeg50TM
over and clean the underside of the bottom valve
and sediment bottle component. Ensure it is
thoroughly clean before closing the bottom valve
and pouring a small amount of boiling water
intothe underside of the closed bottom valve
fitting to sanitise.
05. Return to upright position and re-rinse with
cold water. Open the bottom valve to drain
excess water.
06. Re-assemble lid, beer tube, anti-block fitting,
and VPRV. Ensure the anti-block opening is
facing inward and beer tube is inserted firmly
into the lid beneath the correct port (Liquid
Portmarked ‘L’).
07. Turn the VPRV to fully closed position.
08. Install sediment bottle and fill BrewKeg50TM
with 3L (3 qt.) of hot water and add 2 teaspoons
(0.34 fl. oz.) of brewery detergent. Wipe interior
stainless-steel surfaces of BrewKeg50TM with
non-scratch sponge.
09. Fill jug again and boil 2L of water (0.5 gal.),
ready for use later.
10. Install lid with silicon seal properly. The small
tabs on the silicon seal should line up with the
seams down the long length of the lid. Shake
vessel upright, inverted, and on its side for at
least 10 seconds.
11. After every 4-5 uses of the BrewKeg50TM it
is a good idea to run the Brewery Detergent
through your Beer taps. Attach draft beer taps
and flush beer line and beer out port with the
hot detergent.
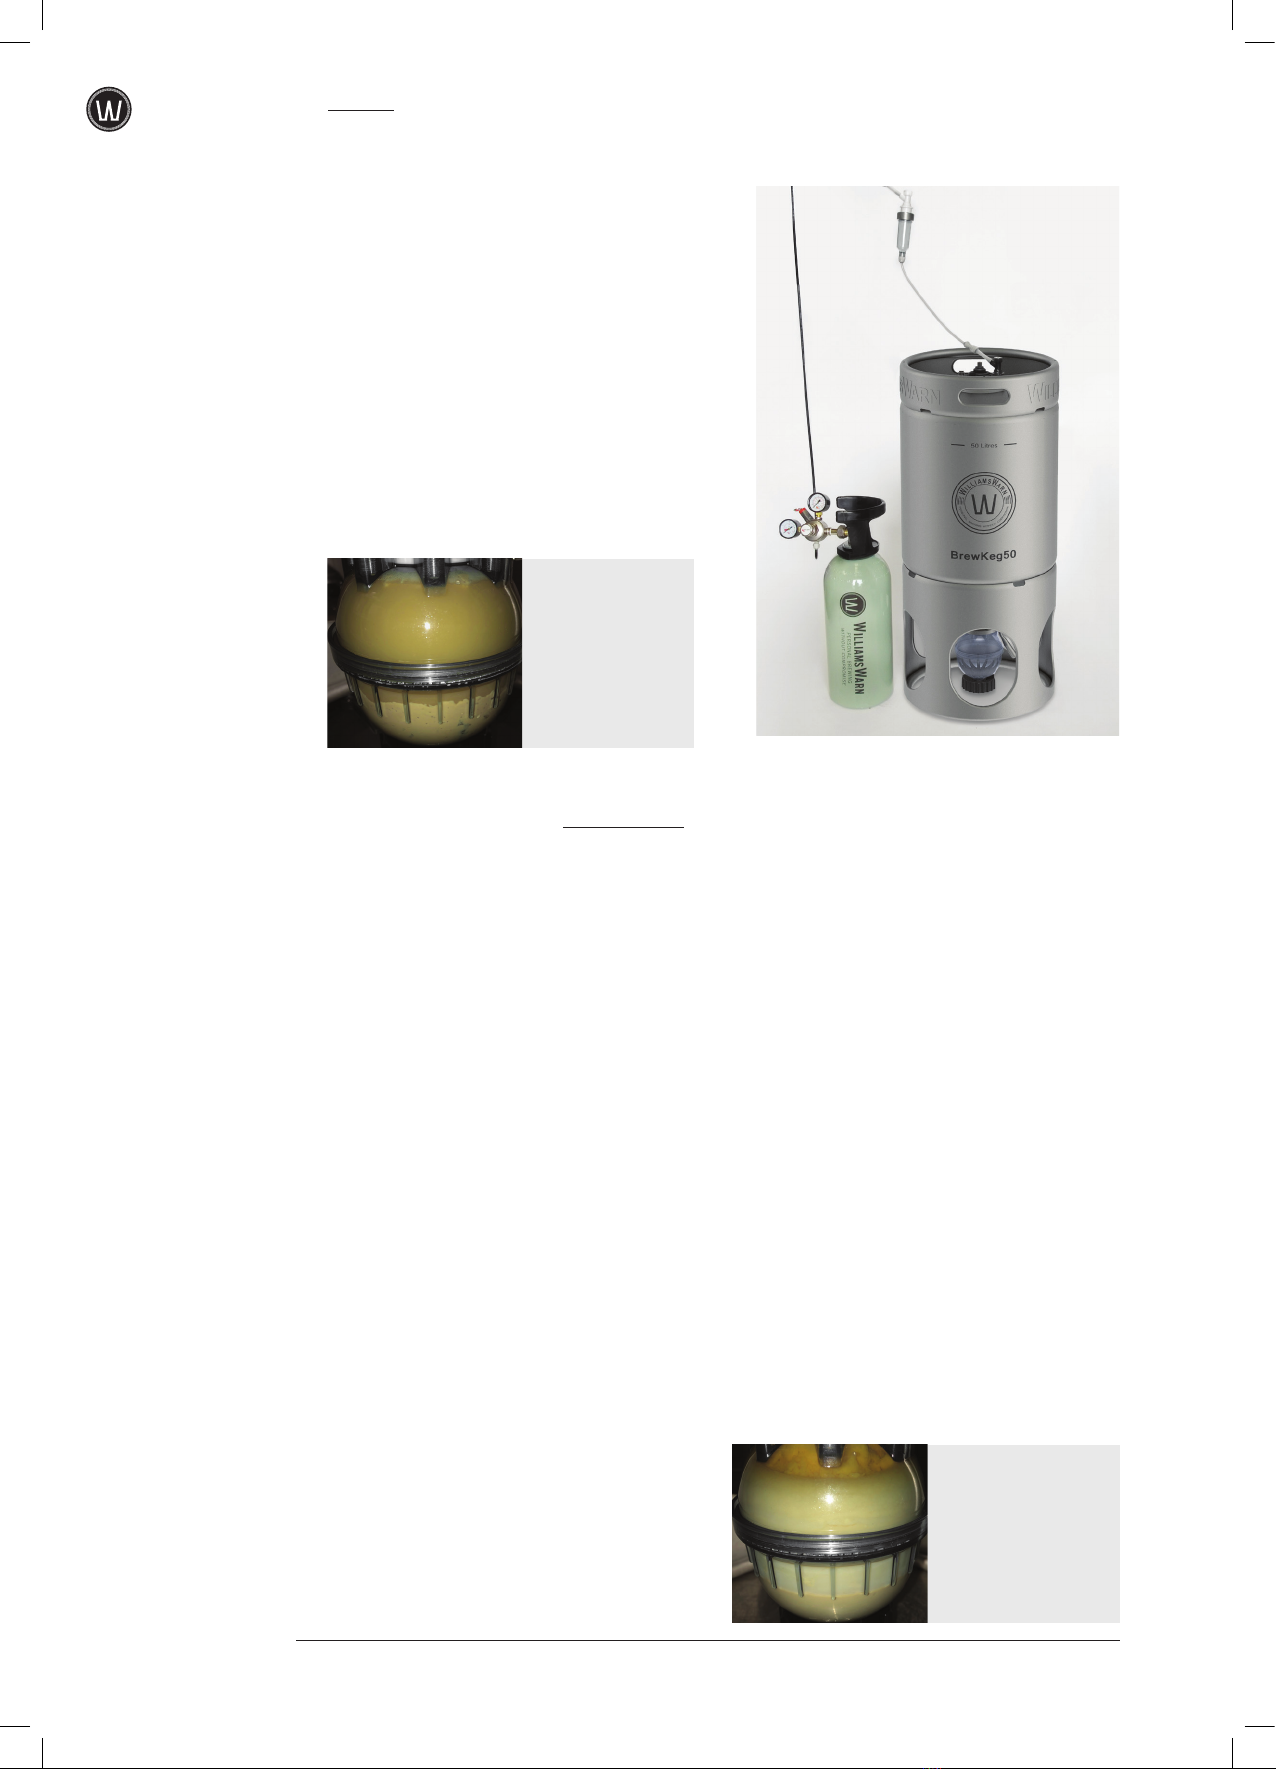
NOTE: Enough pressure should build up via shaking
of boiling water in the BrewKeg50TM to allow flushing of
the beer line. If there is not enough pressure, attach
CO2 gas cylinder Gas-Disconnect (Grey) to the gas port
(marked with a ‘G’ on the lid) and pressurise slightly to
0.3 bar (5 psi). The correct methods for connecting and
disconnecting your gas and liquid disconnects to your
BrewKeg50TM lid can be found in the Video Resources
on the WilliamsWarn website.
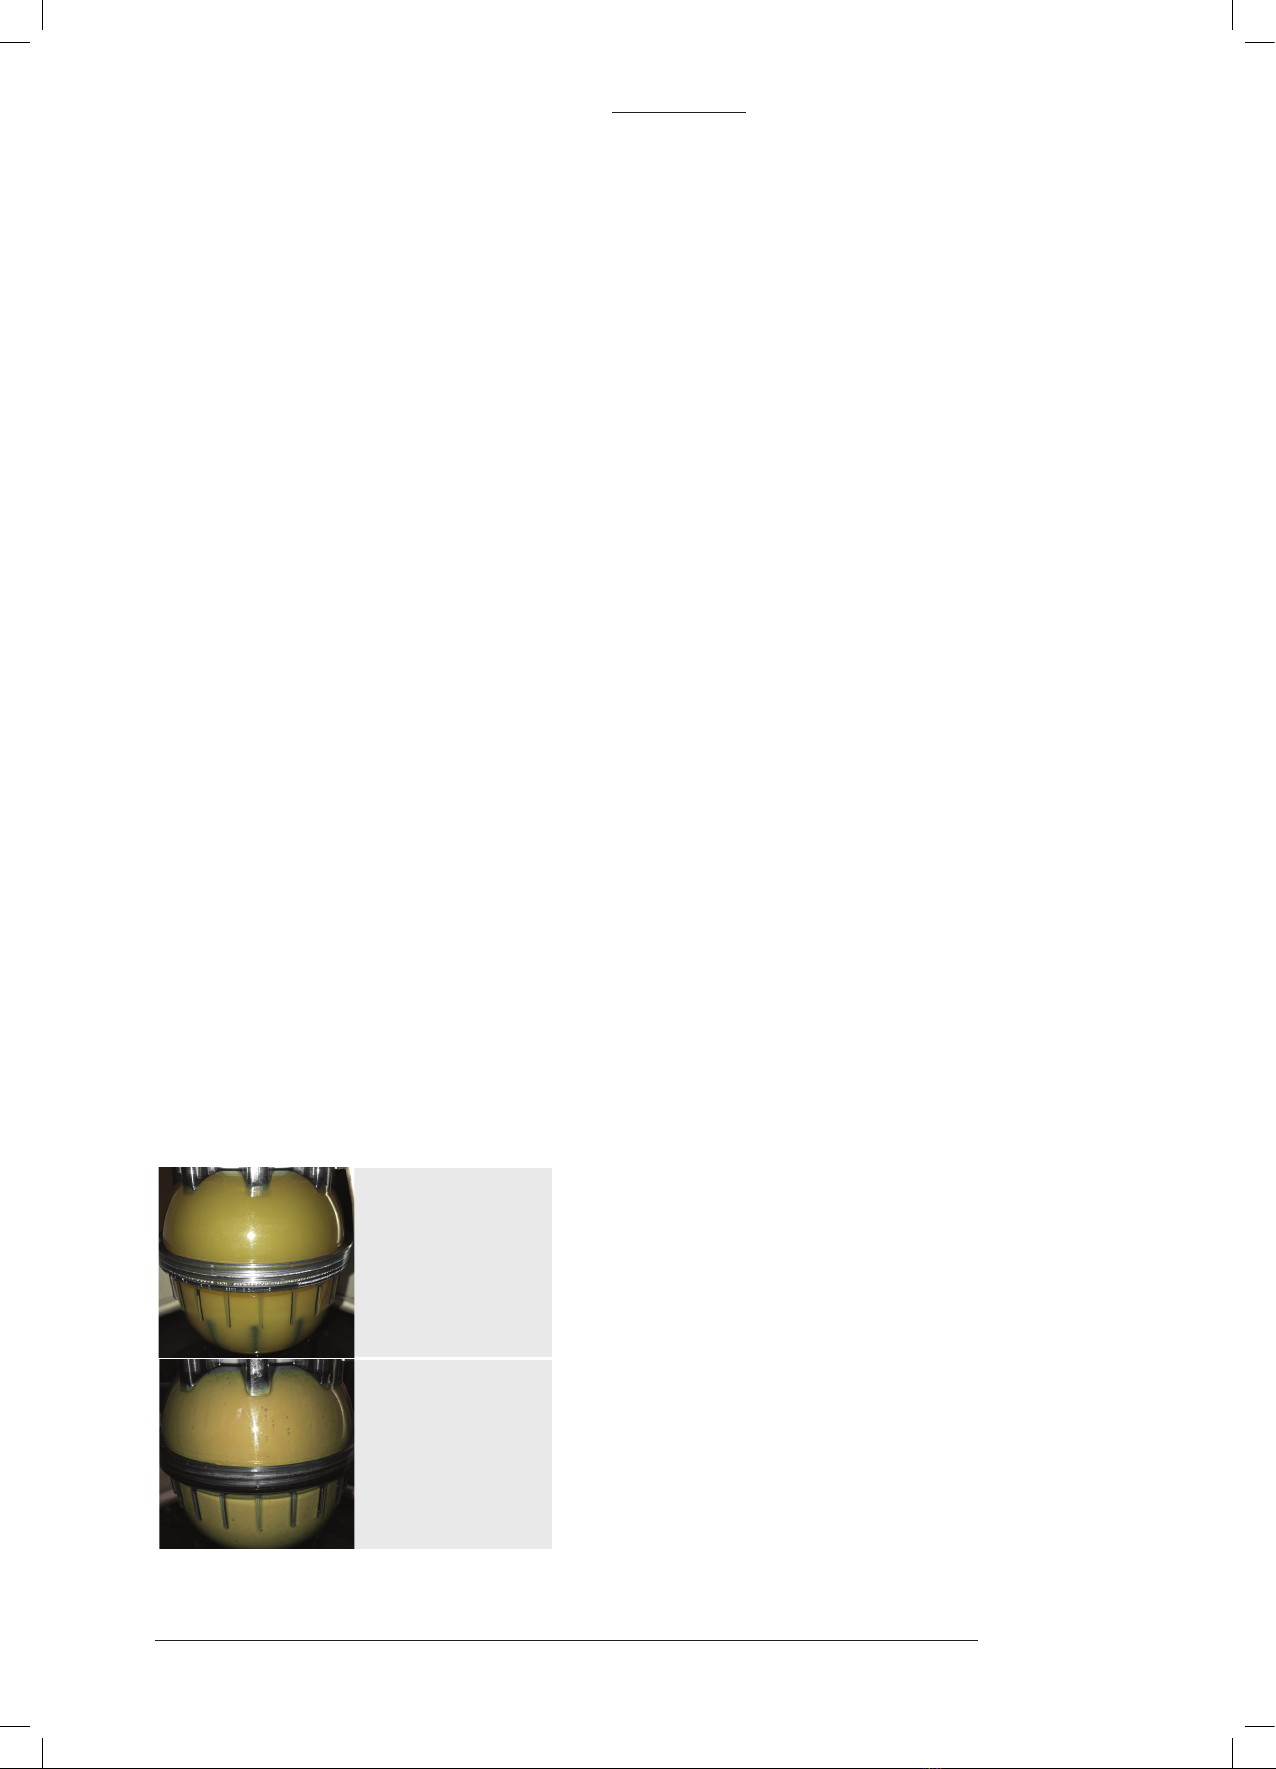
Fig 1: Disassembled BrewKegTM Lid

5
USER GUIDE
12. Remove any pressure in the vessel by pressing
the button on the VPRV. Remove lid, sediment
bottle and drain BrewKeg50TM.
13. Rinse sediment bottle in cold water thoroughly.
14. Rinse lid in cold water and place upside down
on bench.
15. Open butterfly valve and rinse out BrewKeg50TM
again to remove all the detergent residue.
16. Close butterfly valve.
17. Fill BrewKeg50TM with 4L (1 gal.) of boiling water.
18. Install lid with silicon seal properly and shake
upright, inverted and on its side for at least
10 seconds.
19. Connect CO2briefly to pressurise if required
before connecting beer tap lines to flush
with remaining boiling water from inside the
BrewKeg50TM. (Run through beer lines until
itruns hot).
20. Remove any pressure in the vessel by pressing
the button on the VPRV.
21. Remove lid and place upside down on bench
before draining the BrewKeg50TM.
22. Re-assemble the sediment bottle components
and attach two halves of sediment bottle together.
Fig 2: Assembled BrewKegTM Lid
BEVERAGE-OUT PORT
(WITHOUT NOTCHES
ON ITS BASE HEX, WITH
TUBE EXTENDING INTO
THE VESSEL)
BREWKEGTM LID.
GAS-IN PORT
(WITH NOTCHES
ON ITS BASE HEX)
‘L’ IS FOR LIQUID OUT.
THE BLACK DISCONNECT
CONNECTS TO IT
‘G’ IS FOR GAS IN.
THE GREY DISCONNECT
CONNECTS TO IT
VARIABLE PRESSURE
RELIEF VALVE (VPRV)

6
BREWING INSTRUCTIONS
MIX
The mixing step combines all ingredients for your brew
together into the BrewKeg50TM. Fermentation commences
once the base ingredients are mixed in, the BrewKeg50TM
is sealed, and the wort (ingredients and water) have been
introduced to the yeast. For specific details on how to
create advanced recipes, steep hops or grain, add fruit to
ciders, and more please refer to the Video Resources on
the WilliamsWarn website.
01. Boil 4L (1 gal.) of water.
02. Fill a clean glass with 250ml of water. Aim
for25ºC (77ºF), 20-30ºC (68ºF-86ºF) is
acceptable. Do not allow temperature to be
above40ºC (104ºF) or you may kill the yeast.
03. Rehydrate the yeast:
A. Open the yeast sachet(s) and tip contents into
the glass.
B. Swirl around gently for 30 seconds. Place
glass on the bench.
04. Ensure Bottom Valve on BrewKeg50TM is closed.
05. Adding Ingredients
For WilliamsWarn Cider brews:
A. Open the cider pouches with scissors.
B. Empty contents into BrewKeg50TM.
C. Add 2L (2 qt.) of boiling water.
D. Add any other extra ingredients (fruit syrups
etc. as per recipe).
E. Top with cold water to 50L (13.2 gal.) mark.
NOTE: You are aiming for 25ºC-30ºC
(77ºF-86ºF) and no higher than 40ºC (104ºF).
F. Stir well.
G. Open butterfly valve to introduce mixed
ingredients to sediment bottle.
H. Re-top up with cold water to the 50L
(13.2 gal.) mark on the side of the vessel.
For WilliamsWarn Beer Kits:
A. If you are steeping hops, put some of the
boiled water aside for steeping your hops so
that it can cool to 80ºC (176ºF) and re-boil
the jug. Information regarding steeping hops
can be found in the Video Resources on the
WilliamsWarn website.
B. Ensure valve is closed then pour 2L (2 qt.)
of boiling water into the BrewKeg50TM
to commence the mixing process.
C. Open the cans of liquid malt extract (LME)
andtip contents directly into the BrewKeg50TM
(warming the can in hot water will make
the malt less viscous for a better pour). Fill
the emptied LME can half way with boiling
water, stir and tip into BrewKeg50TM to get all
remaining malt from can.
D. Stir well with spatula to dissolve malt
especially around the bottom of the cone.
Malt will dissolve to a liquid.
E. Add cold water to approximately quarter full.
You are aiming for approximately 40ºC (104ºF)
(±10ºC) (±18ºF) as an optimal temperature
tomix dry malt ingredients.
F. Add the 3kg (6.6lb) bag of dry malt extract
(DME) to the BrewKeg50TM and stir to break
down the lumps. Some lumps may remain and
that is okay, they will break down naturally.

7
USER GUIDE
G. Add any extra ingredients (e.g. hop tea via
strainer or additional malts).
H. Top up with cold water to the 50L (13
gal.) mark on the side of the vessel. Target
temperature is 25ºC-30ºC (77ºF-86ºF)
when full.
NOTE: The fill line is 6.8cm (2.7 inches) below the
vessel rim. You can make a mark 6.8cm (2.7 inches)
from the top of your spatula handle to provide a guide
as you fill the BrewKeg50TM.
I. Stir thoroughly.
J. Open butterfly valve to introduce mixed
ingredients to sediment bottle.
K. Re-top up with cold water to the 50L
(13.2 gal.) mark on the side of the vessel.
07. Pour yeast contents from glass into the
BrewKeg50TM ensuring yeast mixes into wort.
08. Install the lid and lid seal and set the VPRV
to 4 half turns anti-clockwise from fully closed.
09. Set temperature to ideally 25ºC (77ºF) or
within the range of 18-30ºC (64-82ºF) in your
fermentation area.

8
BREWING INSTRUCTIONS
ADJUST
There are two key processes in the adjust phase:
Fermentation and Clarification.
FERMENTATION
01. Attach the WilliamsWarn Pressure Gauge to the
gas port (marked with a ‘G’) on the BrewKeg50TM
lid to monitor pressure through the fermentation
and clarification process. You will want your fer-
mentation to read 1.8 bar (26 psi) after 24 to 36
hours and then, ideally, maintain this pressure.
It is good practice to remove the Pressure Gauge
once you are comfortable with the pressure
attained in your BrewKeg50TM and re-attach to
check as required. Please review the APPENDICES
for options relating to fermentation pressure.
02. Adjusting the VPRV pressure set point:
Ifrequired, once your BrewKeg50TM contains
CO2pressure from yeast activity (after 24-36
hours), you may increase the pressure set point
by turning the VPRV valve clockwise or you
can decrease the set point pressure by turning
the VPRV valve anti-clockwise. You may relieve
pressure by pressing the silver button in the
centre of the VPRV valve.
NOTE: Removing too much pressure quickly while
the ferment is in full swing could result in foaming out
of the VPRV.
03. Maintain fermentation temperature between
18-28ºC (65-82ºF) for approximately 4 days
or until fermentation has completed.
Note: A completed fermentation can take longer
for higher alcohol beverages and take less time with
certain yeast strains, so 4 days is a guideline. A lack
ofyeast activity appearing in the sediment bottle is the
keyindication as to whether a fermentation is complete.
04. Check your sediment bottle for activity daily.
05. It can be useful to shine a torch through the side
into the top, clearest part of the sediment bottle
to assess activity. The activity in the sediment
bottle will go through various stages as the
beverage ferments.
06. The final stages of fermentation can be seen
when there are a few fine bubbles or the
occasional yeast ‘bombs’ rising from the yeast
bed in the sediment bottle. Shortly following
this you will see a clear layer of compacted
sediment with cloudy liquid above it. There will
be no sign of yeast activity after your fermentation
is complete. If you think fermentation may
not becomplete, it is always safe to wait an
additional day.
07. Once fermentation is complete, it is time to chill
your beverage to prepare it for clarification.
08. Move your BrewKeg50TM to your refrigerator or
chiller and chill your beer or cider to 1-3ºC
(34-37.5ºF).
09. Wait 6 hours for the vessel and liquid to cool
before commencing clarification.
NOTE: CO2pressure indicated on the Pressure Gauge will
reduce slightly as CO2is absorbed from the head space of
the BrewKeg50TM into the cooled beverage.
Fig 4: Sediment Bottle Activity Phases. Appearance may
differ depending on yeast strain and wort combination.
STAGE B Fermentation
Day 4.
Sediment bottle may
be full.
STAGE A
Fermentation Day 1.
Close inspection will
showmany fine bubbles
rising from the yeast.

9
USER GUIDE
CLARIFICATION
CIDER CLARIFICATION
Cider does not need to be clarified. It clears
naturally within 24-36 hours, the closer to
1ºC (34ºF), the more efficient the clarification.
Once the cider is clear, you can progress to the
DISPENSE stage.
BEER CLARIFICATION
You may need to drain your sediment bottle prior
to commencing the CLARIFICATION steps. Please
follow the instructions on the next page.
Prepare your gas bottle, regulator and gas line.
Set your gas bottle outward pressure to 1.1 bar
(16 psi). Refer to WilliamsWarn Video Resources
to set up and use your gas bottle.
10. Wind the VPRV valve to a fully closed position
and close the bottom valve.
11. Unscrew the lid of the Dosing Device and
measure 60ml (1 fl. oz.) of Clarification Agent
into the device. Screw the lid back on.
12. Connect the Gas-Disconnect (Grey) fitting from
the gas bottle to the lid of the Dosing Device.
13. Press the VPRV valve on the BrewKeg50TM lid
until the Pressure Gauge reads 0.6 bar (9 psi).
14. Connect the Liquid-Disconnect (Black) fitting
from the Dosing Device to the liquid out post
on the BrewKeg50TM (marked ‘L’ on the lid).
The difference in pressure ensures the
Clarification Agent immediately bubbles through
the liquid. You should hear the bubbling.
Keep the Liquid-Disconnect (Black) attached
until the pressure in the BrewKeg50TM is the
same as the gas bottle (1.1 bar / 16psi), then
disconnect from the BrewKeg50TM.
15. To flush the Clarification Agent residue form the
Dosing Device, add 60ml (fl.oz) of cold water to
the Dosing Device and repeat steps 04 – 06.
16. Disconnect the Dosing Device from the Gas Line
and Liquid Post and remove the Pressure Gauge.
17. Connect the Gas-Disconnect (Grey) of the gas
bottle to the gas post on the BrewKeg50TM set at
1.1 bar (16psi).
18. Open the bottom valve. The beer will now clarify
and dump a new layer of yeast and haze into the
sediment bottle.
19. You will see a separation of clearer beer and
sediment appearing in your sediment bottle.
20. After 12 hours, repeat steps 3-12 with 40ml
(0.7 fl. oz.) of Clarification Agent.
21. A third yeast and haze layer will fall into the
sediment bottle over the next 24 hours. It may be
necessary to drain additional sediment to ensure
all sediment is within the sediment bottle.
22. When you see a clear line of crystal clear beer
above the compacted sediment in your sediment
bottle, you are now ready to enjoy your beer!
DRAINING THE SEDIMENT BOTTLE
Fig 4: Dosing Device setup
STAGE C
Fermentation Day 4,
after draining
(if required)
STAGE D
24 hours after second
clarification. Note
the compacted layers
and clear beer that
appears inthe topof
thesediment bottle.

1
0
BREWING INSTRUCTIONS
It may be necessary to drain the contents of the
sediment bottle to make room for additional
sediment. This may occur due to extra ingredients
being added and therefore the sediment bottle
filling past half full during the fermentation. The
best time to drain the sediment bottle is before
the first clarification.
You will need:
• Silicon hose (supplied)
• A jug or container to accommodate
drained sediment
• A floor drain if using the vertical drain
component instead of the horizontal version
which suits the silicone tube
i. Ensure the BrewKeg50TM sediment bottle is
accessible, assess whether you should move it to
better location for draining.
ii. Slide the silicon hose onto the horizontal outlet
atthe base of the sediment bottle.
iii. Place the end of the hose into the jug or container.
iv. Holding the external part of the drain valve (black
part), turn it clockwise to open and then back and
forth by 1/4to 1/8turns continuously. You will see
the sediment begin to exit the sediment bottle via
the silicon tube as the interior stirrer disturbs the
bed of sediment and ensures and even removal
ofthe layers of sediment.
v. Continue to drain to allow enough space to
remain for clarification sediment to follow.
Depending on beer style and other additions
youmay have made, you may wish to leave
no more than a quarter of the sediment bottle
withlayered sediment.
vi. Once complete, wind the dial at the base of the
sediment bottle anti-clockwise to a close position
(finger tight).
vii. Remove silicon hose.
viii. Dump sediment.
ix. Wash hose and jug.
Refer to WilliamsWarn Video Resources to see
how to drain the sediment bottle
PART A
1/8turns to jiggle the sediment removal dial
PART B
Drain via the silicon hose into jug or container
Fig 5: Draining the sediment bottle

1
1
USER GUIDE
DISPENSE
Ensuring a good pour is a combination of beverage and
beer line temperature, level of beverage carbonation, and
pouring pressure.
01. The gas remains connected to the BrewKeg50TM
from the previous Clarification steps, set at 1.1
bar (16 psi).
Provided the BrewKeg50TM remains under 5ºC
(41ºF), it is okay to leave the sediment bottle
attached with the bottom valve closed while
dispensing. If you want to remove and dump the
sediment bottle, close the bottom valve, connect
the silicone hose to the outlet on the drain
valve and sit the other end into a container/jug,
open the valve clockwise to relieve the pressure
and lower the liquid level below the screwed
connection before screwing the lower half of the
sediment bottle to remove. It screws off clockwise
as you are looking down at it. This is advisable
to do in a drained or suitable area for hosing off
yeast sediment up underneath the valve fitting.
Important: If you have left the sediment bottle on
while dispensing, make sure you open the valve
again before exposing the BrewKeg™ to higher
temperatures where the yeast might re-activate
and create pressure.
02. Connect the black fitting of your draft beer tap to
the liquid out post on the BrewKeg50TM (marked
with an ‘L’).
NOTE: Ensure your beer lines are chilled from being
contained within your fridge prior to pouring. If you use
a Kegerator ensure your fan has been on and the font
iscool to touch. Cold beer will froth if it travels through
warm beer lines.
03. Your cold, clear, carbonated beer is ready to
pour.Enjoy!
NOTE: If you find the carbonation level is a too high for
your personal preference or you are seeing too much
froth in the beer glass (a symptom sometimes of very
hot days and un-chilled beer lines), you can refer to the
APPENDICES in this document on pressure, temperature
and carbonation and adjust accordingly.
04. You can transfer the beverage to bottles or kegs
ifrequired. Simply follow supplied instructions
and refer to the Video Resources on the
WilliamsWarn website.
05. Once the beer is dispensed it is best to leave the
BrewKeg50TM chilled until you intend to clean it.
WARNING: If removing the BrewKeg50TM from the fridge
while the sediment bottle is full, ensure that the bottom
valve is in the open position to avoid pressure building up
in the sediment bottle.

1
2
Special Note on Pressure and Carbonation
Beverage Typical Grams
per Litre (g/L) CO2
British Ales 3.0 - 4.0
Porter, Stout 3.5 - 4.5
Belgian Ales 4.0 - 4.5
American Ales 4.5 - 5.5
European Lagers, Belgian Lambics 5.0 - 5.5
Some Lagers, New World Ales 5.5 - 6.0
Cider and Mead Still - 8.0
American Wheat 5.5 - 6.5
German Wheat Beers 6.5 - 8.0
Historically the amount of CO2in a beer has
depended on its beer style and this ranges from 3g/L
to 8g/L. We’ve found over the years that WilliamsWarn
brewers like to target around about 6–6.4g/L CO2in
their beers.
Beverage Typical Serving
Temperature
British Ales 1 – 7°C / 34 – 45°F
Porter, Stout 1 – 8°C / 34 – 46°F
Belgian Ales 6 – 10°C / 43 – 50°F
American Ales 7 – 13°C / 45 – 55°F
European Lagers, Belgian Lambics 5 – 16°C / 41 – 61°F
Some Lagers, New World Ales 10 – 15°C / 41 – 59°F
The typical serving temperature for beers also has
a historical basis and ranges from 1ºC–15/16ºC
(34ºF–59/61ºF). The brewers in New Zealand,
Australia and the USA tend to like the colder beers,
so we’ve targeted 1ºC (34ºF) as the starting point for
these instructional manuals.
CO2Levels From Pressure vs Temperature
CO2Level g/L
Tank Pressure (BAR)
Temp (ºC)
13
12
11
10
9
8
7
6
5
4
3
2
1
APPENDICES
APPENDICES

1
3
USER GUIDE
WilliamsWarn brewers tend to like quite highly
carbonated beers so we’ve targeted 6.4g/L in a
BrewKeg50TM at 1ºC. This means, as you can see
on this graph, we need a pressure of 1.1 bar during
dispense. So that’s why we set 1.1 bar pressure on
the low pressure gauge on our CO2supply regulator.
Adjusting Carbonation
Carbonation g/L CO2Pressure on CO2Supply for
Clarification and dispense (1ºC/34ºF)
High 6.4 g/L 1.10 bar
High 6.2 g/L 1.03 bar
High 6.0 g/L 0.96 bar
Moderate 5.8 g/L 0.90 bar
Moderate 5.6 g/L 0.83 bar
Average 5.4 g/L 0.76 bar
Average 5.2 g/L 0.70 bar
Average 5.0 g/L 0.63 bar
Low 4.8 g/L 0.56 bar
Low 4.6 g/L 0.49 bar
If you find this high carbonation level is a little bit too
high for your personal preference, or you are getting
a little too much foam out of the draft beer tap,
then for your next brews just target a lower dispense
pressure. For example 0.9 bar will give you 5.8g/L
carbon dioxide. So that is what you would set on
the low pressure gauge on your CO2supply. During
fermentation set your VPRV to release at about 0.4
bar higher than the dispense pressure you’ve chosen
to allow for a pressure drop during cooling and to
have a little excess carbonation in the beer before
clarification. Also, when clarifying you will need to
reduce the vessel pressure to 0.5 bar (7.25psi) below
the dispense pressure (not the fermented pressure) to
introduce the Clarification Agent.
Carbonation for Warmer Beverages
Carbonation g/L CO2Pressure on CO2Supply for
Clarification and dispense (5ºC/41ºF)
High 6.4 g/L 1.41 bar
High 6.2 g/L 1.34 bar
High 6.0 g/L 1.26 bar
Moderate 5.8 g/L 1.19 bar
Moderate 5.6 g/L 1.11 bar
Average 5.4 g/L 1.03 bar
Average 5.2 g/L 0.96 bar
Average 5.0 g/L 0.88 bar
Low 4.8 g/L 0.81 bar
Low 4.6 g/L 0.73 bar
Please note, if you prefer a warmer beverage
temperature at dispense, for the same amount
of carbonation you need more pressure. So
choose the amount of carbonation you want
and use the graph on the left to set the dispense
pressure you need. If you find your beverage
is over carbonated to your personal taste or
maybe over foaming through your beverage
tap system, put the pressure gauge back on
and open the VPRV up to a lower pressure
and let it stand overnight. This will reduce
the carbonation level. If you’re short of time,
you could try shaking the keg a little bit to help
force the CO2out of the beverage.
A Simple Rule of Thumb
If you like the level of carbonation that 1.1 bar
(16 psi) gives you at 1ºC (34ºF), but would like
a warmer beer, a simple rule of thumb is to try
1.2 bar at 2ºC (35.6ºF), or 1.3 bar at 3ºC (37ºF),
or 1.4 bar at 4ºC (39ºF), or 1.5 bar at 5ºC (41ºF).
This works well for those who like a high carbonation
level and it will not result in foaming of the beer out
the tap when the beer is poured.

1
4
APPENDICES
FINAL WORDS
These instructions represent a means for anyone to make great
beer or cider the first time they use a BrewKeg25TM. As you brew
more, you may find you come up with your own tweaks to what
is written here or develop radically different methods that suit
you better. As long as you and your friends are happy with the
final beer or cider, feel free to make you own adjustments to the
process if you feel the need or see an easier way to brew using
your set up.
NOTES

Table of contents
Other WILLIAMSWARN Kegerator manuals