Keiser KMS800 User manual

Operating Manual
GB
1
2
3
4
5
6
7
8
2
1
3
5
6
8
7
4
KMS800
KMD900
To o l f i t t i n gf
M 1 2 0 0 M X 1 8 0 0 D
M 1 4
1 2 0 m m
6kg
M27
140mm
8.5kg
1800w
Technical Data
Model KMS800 KMD900
Power 1800 W 1900 W
Frequency 50/60 Hz 50/60 Hz
No-Load Speed 1st Gear 150 - 300 rpm 150 – 300 rpm
2nd Gear 300 – 650 rpm 300 – 650 rpm
Maximum Tool Diameter 140 mm 140 mm
Weight 7.8 kg 8.5 kg
Mixing Quantity Up to 65 Litres Up to 90 Litres
Protection Class / II / II
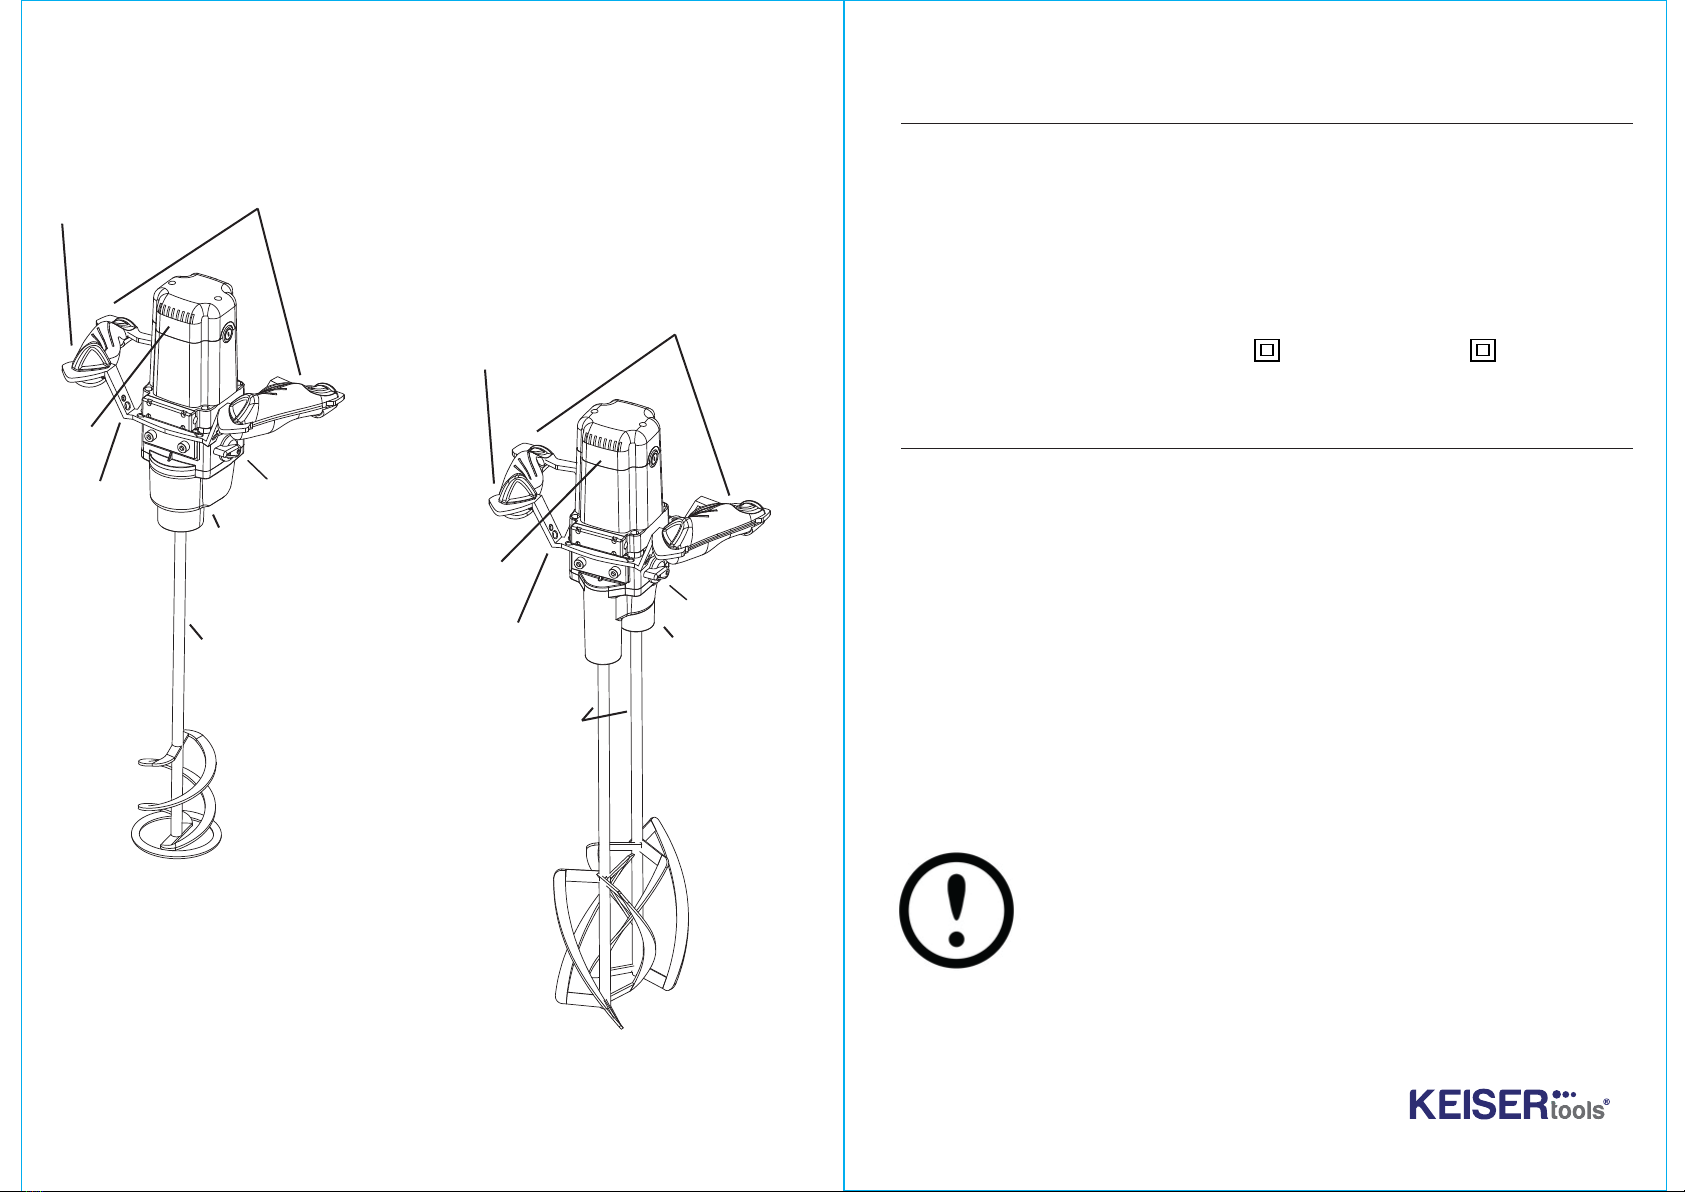
1
Machine components
1 Release button for ON/OFF switch
2 ON/OFF switch
3 Gear selection switch
4 Handle frame
5 Handles
6 Ventilation slits
7 Neck of the machine
8 Mixing shaft
Not all the accessories illustrated or
described are included as standard delivery
WARNING:
Read all notes and instructions on safety.
Failure to observe any of the notes and instructions on safety
may result in an electric shock, fire and/or serious injury.

23
To be able to use the machine safely it is essential that you read the operating instructions
and the safety instructions thoroughly and comply with all of them. The machine is to be
used only by persons who have read the operating instructions and who are acquainted
with the occupational safety and accident prevention regulations in force in your country.
In addition, you must also comply with the general safety instructions also included with
the machine.
rating plate.
Do not use the device in any environment with potentially explosive atmosphere. Do not
below 21° C.
Take care to ensure that no liquid splashes against the motor housing and keep it away
from the rain – risk of electric shock!
Never clean the machine with water – risk of electric shock!
Do not wind cables or leads around any parts of your body.
Do not use the machine with a damaged cable. Do not touch the cable and pull out the
power plug immediately. There is an increased risk of electric shock from damaged cables.
If the mains power cable has to be replaced (because of damage or similar), ensure that it is
replaced by an authorized representative of the manufacturer (electrician) in order to avoid
any risk to safety.
sure you have a secure footing.
Before starting up, check that the mixing rod is securely attached and rotates without a hitch.
Start up and run down the machine in the mixing container only. Ensure that the mixing
Do not reach into the mixing container with your hands or insert any other objects into it
while mixing is in progress. Risk of crushing!
Wait until the machine or tool comes to a complete standstill. Rotating tools can snag and
cause injuries or damage.
Use ear protection!
We recommend that you wear work gloves and protective goggles when using the mixer.
To protect yourself from harmful dust while mixing, wear a dust mask. Use a dust extractor
wherever possible.
Always connect machines via a residual current device (RCD) with a rated residual current
of 30 mA or less
Read and observe the operating instructions for the
machine before you start it up!
Always wear protective goggles and ear protection
while working.
It is advisable to wear a dust mask whenever working
with materials which generate large amounts of dust.
Always wear protective gloves while working.
Safety Precautions

45
Operation
Check that the power supply shown on the rating plate is the same as the mains power supply.
Always hold the machine with both hands. Press the starting lockout button (1).
Press the ON/OFF switch (2).
For safety reasons, the ON/OFF switch cannot be locked! Always work with the ON/ OFF switch
fully pressed.
To stop working, release the ON/OFF switch.
Machines with 2-speed gear units have two maximum speeds available (First gear: Slow and
Second gear: Fast).
To change from one gear to the other, turn the gear selection lever. Only ever actuate it when
the machine is at a standstill.
Always reduce the speed when submerging the mixing tool in the mixing material or lifting it
out. Once the mixing tool is fully submerged, increase the speed again to ensure that the
motor is adequately cooled.
During mixing you should guide the machine around the mixing container. Continue mixing
until all of the mixing material is completely mixed. Please follow the processing instructions
of the manufacturer of the material.
The greater the viscosity of the material, the greater the impact of the torque forces on the
machine, so you should be prepared for this when you carry out your work.
If the mixing tool comes into contact with a surface (e.g. the bottom of the tub) while running,
it may kick back.
Set the machine down resting on the guard handle after you have nished your mixing work.
Proper use
The machine is designed for mixing liquid and powder-based building products such as
paints, mortar, adhesives, plaster and similar substances. Use the right mixing tool for the
consistency of the material and the quantity to be mixed.
Please refer to the information in the technical data when choosing the size of mixing tool
(diameter/ mixing action). If the wrong mixing action or mixing tool diameter is selected,
this may cause the machine/gear unit to become overloaded and lead to damage as a result.
Please remember that a mixing tool with a mixing action from the top down puts a greater
strain on the electrical tool than one with the reverse mixing action.
This electrical tool is not designed for use in continuous operation.
Given the high torque levels generated by the machine, it must not be used as a power drill.
The machine must not be used for the preparation of foodstus.
The machine is not suitable for mixing materials containing graphite dust, brine or slurry.
Mixing of these materials or substances may damage the machine beyond repair.
Assembly Operation
Always pull the power plug out of the socket outlet before carrying out any work on the
machine.
Fitting the mixing tool / tool change-over: Screw the mixing tool with a size M14 male
thread into the M14 adapter on the mixing shaft. The mixing tool tightens itself during
operation.
To release the mixing tool you will need one SW 22 and one SW 24 open-ended wrench.
Place the one open-ended wrench on the adapter and the other on the hexagonal holding
xture and turn them both in opposite directions to one another until the mixing tool is
released

67
Care and maintenance
Before you carry out any operations on the machine, and especially when changing the
mixing tool, always pull out the power plug rst.
Clean the machine and the mixing tool immediately after use.
Take the mixing tool out of the coupling after you have nished your work.
Grease the M14/M27 mount of the coupling at regular intervals with suitable grease.
Keep the ventilation slits clean and clear at all times so that the machine can be properly
cooled. Blocked ventilation slits will lead to irreparable damage to the machine.
Make sure that the ON/OFF switch moves and releases smoothly at all times.
The machine is equipped with self-deactivating carbon brushes. This means that the
machine will shut itself down once a certain level of wear is reached. The carbon brushes can
be replaced by the authorized customer service centre or by the KEISERtools Service centre.
Have repairs carried out only by an approved workshop or by your KEISERtools Service. Only
use original KEISERtools accessories and replacement parts.
Disposal
The device, accessories and packaging should all be consigned for environment-friendly
recycling. Electrical tools which have come to the end of their service lives must be made
unusable by removing the mains power cable.
For EU countries only:
Do not dispose of electrical tools with household waste.
In accordance with EU Directive 2002/96/ EC concerned with used electrical and electronic
equipment and the incorporation of the requirements of the directive in national legislation,
unusable electrical equipment must be collected separately and consigned for environ-
ment-friendly recycling.
Warranty
The manufacturer provides a warranty within the framework of his terms and conditions of
delivery in accordance with the requirements of statutory/ country-specic provisions. Should
you need to make a claim under the warranty, please provide us with your invoice or delivery
note.
On no account will any warranty claims be accepted if any repairs are carried out by third
parties. In the event of any irregularities, please send the machine to us. Complaints can only
be accepted if the device is sent to the KEISERtools Service centre undismantled.
The warranty does not apply to damages caused by normal wear, overloading, improper
handling, unsuitable accessories or inadequate maintenance.
Any structural or functional modications to the machine which are made without our agree-
ment shall render the warranty and the Declaration of Conformity null and void.
Subject to change.

89
KMS800
No.
Description
No.
Description
1
Right Handle
33
The rotor
2
Left Handle
34
M insulation gasket
3
Screw ST3.9X20
35
Bearing 608 Z
4
Clamp
36
Needle bearing HK0810
5
Screw ST3.5X16
37
The second active gear shaft
6
Capacitance
38
Hemicycle key 2.5X3.7X10
7
Round inductance
39
Motor gear
8
The inductance
40
Safety ring
¢
10
9
Circuitry board
41
Bearing 698 Z
10
Sleeve
42
The third active gear shaft
11
Cable
43
Parallel key 4X4X45
12
Switch
44
Spindle double gear
13
Steel frame
45
Flat washer
¢
16*8*0.8
14
Screw M8X12
46
Pivot
¢
6*106
15
Cord
47
Coulisse
16
Sleeve
(
Big
)
48
Partial core + eccentric wheel core
17
Safety ring
¢
47
49
Ball
¢
4
18
Dust cover
50
Spring
¢
0.5*
¢
3.9*L12
19
Screw M5X20
51
Lever
20
Spring washer
¢
5
52
Screw ST3X16
21
Bearing cover
53
Screw ST5X65
22
Pin 4*14
54
Brush cap
23
Spindle
55
Carbon brush 6.5*15*18
24
Hemicycle key 4X5X12
56
Brush holder
25
Bearing 6204 Z
57
Screw M5X25
26
Safety ring
¢
20
58
Air guide shim
27
Spindle gear
59
The stator (including the brush ring)
28
Safety ring
¢
15
60
Chassis
29
Bearing 6000 Z
61
Clamp
30
Gear box
62
Constant power board
31
Sealring
¢
28*1.9
63
Circuit board seats
32
Bearing 6001 2RS
64
Rear cover

10 11
KMD900
No.
Description
No.
Description
1
Right Handle
37
Safety ring
¢
9
2
Left Handle
38
The reversing shaft
3
Screw ST3.9X20
39
Safety ring
¢
26
4
Clamp
40
Reversing the tooth
5
Screw ST3.5X16
41
Bearing 6000 Z
6
Capacitance
42
Needle bearing HK0810
7
Round inductance
43
The second active gear shaft
8
The inductance
44
Hemicycle key 2.5X3.7X10
9
Circuitry board
45
Motor gear
10
Sleeve
46
Safety ring
¢
10
11
Cable
47
Bearing 698 Z
12
Switch
48
The third active gear shaft
13
Steel frame
49
Parallel key 4X4X45
14
Screw M8X12
50
Spindle double gear
15
Cord
51
Flat washer
¢
16*8*0.8
16
Sleeve
(
Big
)
52
Needle bearing HK0808
17
Threaded sleeve
53
Pivot
¢
6*89
18
Safety ring
¢
40
54
Coulisse
19
Dust cover
55
Partial core + eccentric wheel core
20
Bearing 6203 Z
56
Air guide shim
21
Screw M5X20
57
The stator (including the brush ring)
22
Spring washer
¢
5
58
Chassis
23
Bearing cover
59
Clamp
24
Spindle
60
Constant power board
25
Hemicycle key 3X3X10
61
Ball
¢
4
26
Bearing 6002 Z
62
Spring
¢
0.5*
¢
3.9*L12
27
Safety ring
¢
17
63
Lever
28
Spindle gear
64
Screw ST3X16
29
Safety ring
¢
12
65
Screw ST5X65
30
Gear box
66
Brush cap
31
Seal ring
¢
28*1.9
67
Carbon brush 6.5*15*18
32
Bearing 6001 2RS
68
Brush holder
33
The rotor
69
Screw M5X25
34
M insulation gasket
70
Circuit board seats
35
Bearing 608 Z
71
Rear cover
36
Pin 4*14
This manual suits for next models
1
Table of contents


