Kelfort KEL-KAN 1500 User manual

HETELUCHTKANON
GAS HEATER
Gebruiksaanwijzing / Manual
KEL-KAN 1500
1514709
DIT PRODUCT IS ALLEEN GESCHIKT VOOR GOED GEÏSOLEERDE RUIMTES OF INCIDENTEEL GEBRUIK.
THIS PRODUCT IS ONLY SUITABLE FOR WELL INSULATED SPACES OR OCCASIONAL USE.

LEES EN BEWAAR DEZE INSTRUCTIES
Lees dit instructieboekje a.u.b. aandachtig door voordat u de kachel
in gebruik neemt of er onderhoud aan pleegt. Bescherm uzelf en
anderen door de veiligheidsvoorschriften in acht te nemen. Het niet
correct volgen van de instructies en voorschriften kan resulteren in
persoonlijke verwondingen en beschadiging van uw eigendommen.
Bewaar dit instructieboekje om het ook later te kunnen raadplegen.
VEILIGHEIDSVOORSCHRIFTEN:
•Het niet naleven van de voorzorgsmaatregelen en instructies die
bij de verwarming zijn geleverd, kan de dood, ernstig lichame-
lijk letsel en verlies van eigendommen of schade door brand,
en / of elektrische schokken tot gevolg hebben.
•Alleen personen die de instructies kunnen begrijpen en opvol-
gen, mogen dit heteluchtkanon gebruiken of onderhouden.
•Niet voor gebruik in huis of in een recreatief voertuig.
•Alleen gebruiken in een goed geventileerde ruimte en uit de
buurt van brandbare materialen.
•Na gebruik de gastoevoer an de gastank afsluiten.
•Zorg ervoor dat de ventilator correct werkt voordat u de branders
aansteekt.
VEILIGHEIDSINSTRUCTIES
•De verwarmingstoestellen die in deze handleiding worden
genoemd, mogen alleen buiten of in een goed geventileerde
omgeving worden gebruikt.
•Voor elke KW is een permanente ventilatie van 25cm³ nodig,
gelijkmatig verdeeld tussen vloer en plafond, met een minimale
uitlaat van 250cm³. (Fig. 3)
• -
stemming met de geldende voorschriften.
•
• Gebruik alleen de meegeleverde gasdrukregelaar.
•Gebruik de kachel nooit zonder de kap.
•Overschrijd niet de 100W/m³ vrije ruimte. Het minimale volume
van de ruimte moet groter zijn dan 100m³.
•Blokkeer de inlaat- of uitlaatsecties van de kachel niet.
•Als de kachel lange tijd op maximale capaciteit moet werken, is
er mogelijk ijsvorming op de cilinder. Dit komt door een te grote
damponttrekking. Niet om deze reden, of voor enige andere,
of op zijn minst te verminderen, gebruikt u een grote cilinder of
•Gebruik de kachel niet in kelders of in een kamer onder het
maaiveld.
•Neem in geval van storing contact op met uw ijzerwarenvakhan-
del.
•Draai na gebruik de gaskraan dicht.
•-
maatregelen, weg van elke mogelijke ontstekingsbron.
•De gasslang mag niet worden gedraaid of gebogen.
•De kachel moet zodanig geplaatst worden dat er geen risico op
READ INSTRUCTIONS CAREFULLY
Read this manual carefully before you use the heater or carry out
maintenance. Protect yourself and others by observing the safety
regulations. Failure to follow the instructions correctly may result in
personal injury and damage to your property. Keep this instruction
booklet for future reference.
GENERAL HAZARD WARNING:
•Failure to comply with the precautions and instructions provided
with heater, can result in death, serious bodily injury and
asphyxiation, carbon monxide poisoning, and/or electrical
shock.
• Only persons who can understand and follow the instructions
should use or service this heater.
• Not for home or recreational vehicle use.
• Use only in a well ventilated area and away from combustible
materials.
•
• Ensure that the fan is operating correctly before lighting the
burners.
SAFETY INSTRUCTIONS
•The heaters mentioned in this manual must only be used out-
doors or in well ventilated surroundings.
•For every KW it is necessary to have permanent ventilation of
with a minimum outlet of 250cm³. (Fig. 3)
•Gas cylinders must be used and kept in accordance with current
regulations.
•
• Use only the supplied pressure regulator.
•Never use the heater without its cover.
•Do not exceed 100W/m³ of free room.The minimum volume of
the room must be larger than 100m³.
•Do not obstruct the inlet or outlet sections of the heater.
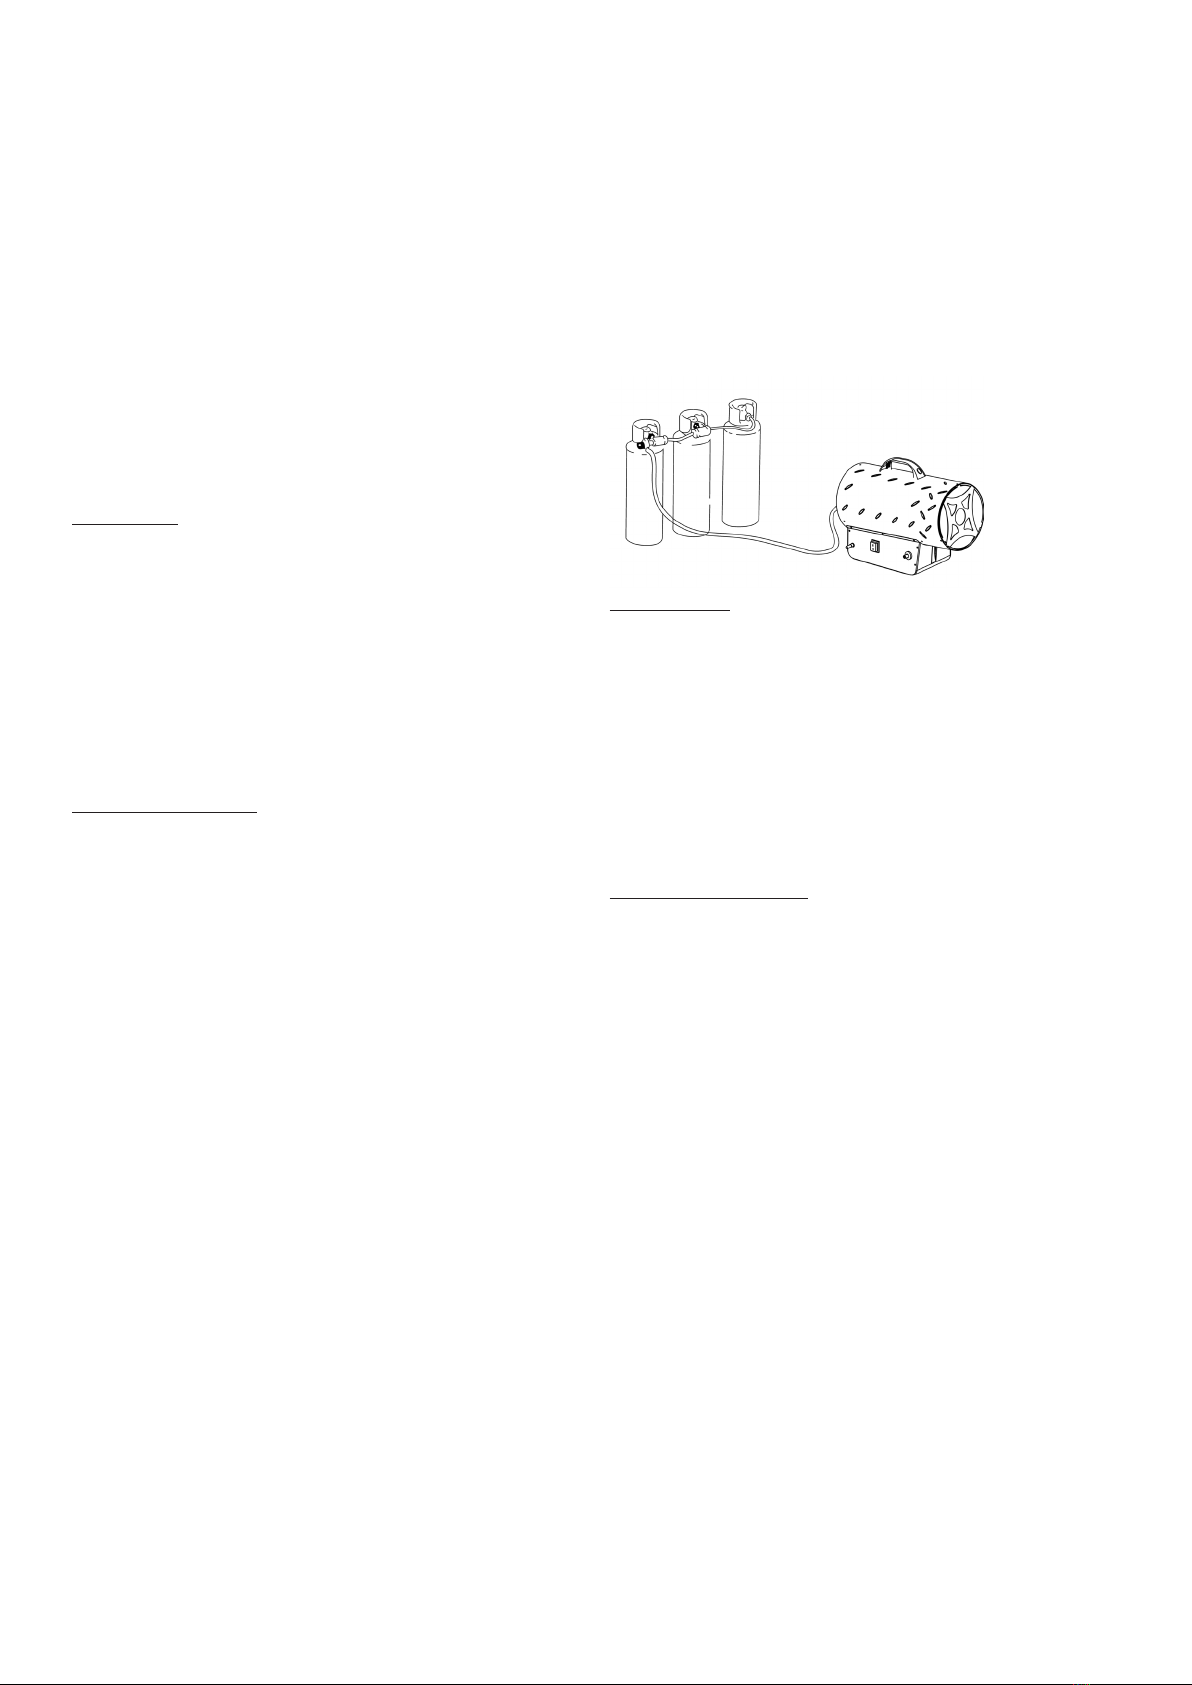
•If the heater has to work for a long period at its maximum capa-
city, it’s possible that ice will form on the cylinder. This is due to
excessive vapor withdrawal. Not for this reason, or for any other,
reduce it, use a large cylinder or two cylinders linked together
(Fig. 1).
•Do not use the heater in cellars, basements or in any room below
the ground level.
•In case of malfunction, please contact the technical assistance
service.
•
• The gas bottle must always be replaced following safety rules
away from any possible source of ignition.
•The gas hose must not be twisted or bent.
•
ceiling and must never be directed towards the gas bottle.

brand is, de uitlaat van de hete lucht moet zich op minstens 3
meter van een brandbare wand of plafond bevinden en mag
nooit in de richting van de gases worden gericht.
•Gebruik alleen originele gasslang en reserveonderdelen.
•Heteluchtkanonnen die in deze handleiding worden beschreven,
zijn niet bedoeld voor huishoudelijk gebruik.
•In het geval dat een gaslek wordt gevonden of wordt vermoed,
sluit dan onmiddellijk de gases, zet de kachel uit en gebruik
hem niet meer totdat hij is gecontroleerd door een gekwali-
ceerd servicecentrum. Als de verwarming binnenshuis wordt
geïnstalleerd, zorg dan voor een goede ventilatie door de deur
en de ramen volledig te openen. Geen vonken of open vuur
produceren.
•Neem bij twijfel contact op met uw leverancier.
INSTALLATIE
•Sluit de kachel aan op een geschikt stopcontact / 230V ~ 50Hz.
•Zorg ervoor dat het apparaat goed is geaard.
•Sluit de gasslang aan op de gasdrukregelaar en sluit de regelaar
aan op een geschikte gases.
•Open de kraan van de gases en controleer de slang en ttingen
op gaslekken.Voor deze handeling wordt het aanbevolen om
een goedgekeurde lekdetector te gebruiken.
•GEBRUIK NOOIT OPENVUUR.
GEBRUIKSAANWIJZING
VOORBEREIDING OP DEWERKING
•Controleer de kachel op mogelijke transportschade.
•Sluit de slang en de regelaar aan op de gases door de moer
tegen de klok in de uitlaat van de gases te draaien en stevig
vast te draaien.
•Open de gaskraan en controleer alle gasaansluitingen met een
oplossing van zeep en water.
•Sluit het snoer aan op een goed geaard 230V ~ 50Hz stopcon-
tact.
ONTSTEKING
•Zet de aan/uit-schakelaar in stand I en controleer of de ventila-
tor correct werkt.
•Druk op de knop van het gasventiel en druk herhaaldelijk op de
piëzo-elektrische ontsteker totdat de vlam oplicht.
•Terwijl de vlam oplicht, houdt u de klepknop ongeveer 10
seconden ingedrukt. Als de kachel stopt wanneer de klepknop is
losgelaten, wacht dan een minuut en herhaal de startprocedure
waarbij de knop van de klep langere tijd ingedrukt blijft.
•Regel de gasdruk overeenkomstig het gewenste thermische ver-
mogen, door het wiel van de gasdrukregelaar linksom te draaien
om de druk te verhogen of met de klok mee om te verlagen.
•Neem contact op met uw leverancier als een probleem zich blijft
voordoen.
•Only use original gas hose and spare parts.
•Heaters described in this leaet are not intended for domestic
use.
•In the case that a gas leak is found or suspected, immediately
close the gas cylinder, switch the heater o and do not use it
again until it has been checked by a qualied service center. If
the heater is installed indoors, provide a good ventilation by
opening door and windows completely. Do not produce sparks
or free ames.
•If in any doubt contact your supplier.
INSTALLATION
•Connect the heater to a suitable electric socket /230V~50Hz
•Make sure that the machine is properly earthed.
•Connect the gas supply hose to the pressure regulator and
connect the regulator to a suitable LPG cylinder.
•Open the tap of the cylinder and check the supply hose and
ttings for gas leak. For this operation it is recommended to use
an approved leak detector.
•NEVER USE NAKED FLAMES.
INSTRUCTIONS FOR USE
PREPARING FOR OPERATION
•Check the heater for possible shipping damage.
•Connect the hose and regulator assembly to the LPG cylinder by
rotating the nut counterclockwise into the LPG cylinder’s valve
outlet and securely tighten.
•Open the cylinder’s gas valve and check all gas connections with
a soap and water solution.
•Connect power cord to well-grounded 230V~ 50Hz source of
power.
IGNITION
•Turn the power switch to position I and check that the fan starts
running correctly.
•Push the gas valve button and push repeatedly the piezoelectric
lighter until the ame lights up.
•As the ame lights up, keep the valve button pushed for 10
seconds approx. Should the heater stop when the valve button
has been released, wait one minute and repeat the starting
operation keeping the valve button pushed for a longer time.
•Regulate the gas ow pressure according to the thermal power
desired, by turning the wheel of the pressure reducer anti-
clockwise to increase the pressure or clockwise to decrease.
•Contact your supplier should any problem continue.
Fig. 1

LET OP
ALS DE ONTSTEKING MOEILIJK OF ONREGELMATIG IS, ZORG
ERVOOR DAT DE VENTILATOR NIET IS VERGRENDELD EN DAT
DE LUCHTINLAAT EN UITLAAT ONBELEMMERD ZIJN, VOOR
DAT U DE ONTSTEKING HERHAALT.
UITZETTEN
Om de kachel uit te zetten, draait u de gaskraan dicht. Laat de venti-
lator draaien totdat de vlam dooft en draai vervolgens de ventilator-
schakelaar naar stand O.
AIRCONDITIONING
De heteluchtkanon kan ook als ventilator worden gebruikt. Verwijder
in dit geval de gasslang en sluit de stekker van de heteluchtkanon
aan op een geschikt stopcontact. Zet de ventilatorschakelaar in stand
I.
!!!WAARSCHUWING!!!
VERSTIKKINGSGEVAAR
•Gebruik de kachel niet om woonverblijven te verwarmen.
•Niet gebruiken in ongeventileerde ruimtes.
•De stroom verbrandings- en ventilatielucht mag niet worden
belemmerd.
•Voor een goede verbranding moet de juiste hoeveelheid ventila-
tielucht in acht worden genomen.
•Gebrek aan de juiste hoeveelheid ventilatielucht zal leiden tot
onjuiste verbranding.
•Onjuiste verbranding kan leiden tot koolmonoxidevergiftiging
die leidt tot ernstig letsel of overlijden. Symptoom van koolmo-
noxidevergiftiging kan zijn hoofdpijn duizeligheid en ademha-
lingsmoeilijkheden.
GASLUCHT
LPG en aardgas bevatten toegevoegde geurstoen die speci-
ek zijn toegevoegd voor het detecteren van lekken van gas.
Hierdoor kunt u het gas ruiken bij een gaslek Aangezien gas
zwaarder is dan lucht, ruikt u de geur het beste bij de grond.
ELKE GASLUCHT IS UW SIGNAAL OM ONMIDDELLIJKE IN ACTIE
TE KOMEN!
•Doe niets om het gas te kunnen laten ontsteken. Gebruik geen
elektrische schakelaars. Trek niet aan een kabel of verlengsnoer.
Steek geen lucifers of andere vlammen aan. Gebruik uw telefoon
niet.
•Haal iedereen meteen weg uit het gebouw en uit de buurt.
•Sluit alle gaskleppen.
•Gas is zwaarder dan lucht en kan zich laag bij de grond verzame-
len.Wanneer u een lek te vermoedt, blijf dan rechtop.
•Bel direct de brandweer. Ga niet terug naar het gebouw of
gebied.
•Blijf uit het gebouw en uit de buurt van het gebied totdat het
veilig is verklaard door de brandweer.
CAUTION
IF IGNITION IS DIFFICULTOR IRREGULAR BEFORE REPEATING
THE IGNITION OPERATIONS MAKE SURE THAT THE FAN IS NOT
LOCKED AND THE AIR INLET AND OUTLET ARE
UNOBSTRUCTED.
SWITCH OFF
To stop the heater, shut o the gas cylinder tap. Let the fan run until
the ame shuts down and then turn the fan switch to position O.
AIR CONDITIONING
The heater can also be used as a ventilator. In this case remove the
gas supply hose and connect the plug of heater to a suitable electrical
supply. Set the fan switch to position I.
!!!WARNING!!!
$)0,*/( HAZARD
•Do not use heater for heating human quarters.
•Do not use in unventilated areas.
•The ow of combustion and ventilation air must not be obstruc-
ted.
•Proper ventilation air must be provided to support the combusti-
on air requirements of the heater being used.
•Lack of proper ventilation air will lead to improper combustion.
•Improper combustion can lead to carbon monoxide poisoning
leading to serious injury or death. Symptom of carbon monoxide
poisoning can include headaches dizziness and diculty in
breathing.
FUEL GAS ODOR
LP gas and natural gas have manmade odorants added speci-
cally for detection of fuel gas leaks.
If a gas leak occurs you should be able to smell the fuel gas.
Since Propane (LP) is heavier than air you should smell for
the gas odor low to the oor. ANY GAS ODOR IS YOUR SIGNAL
TO GO INTO IMMEDIATE ACTION!
•Do not take any action that could ignite the fuel gas. Do not
operate any electrical switches. Do not pull any power supply
or extension cords. Do not light matches or any other source of
ame. Do not use your telephone.
•Get everyone out of the building and away from the area
immediately.
•Close all propane (LP) gas tank or cylinder fuel supply valves,
or the main fuel supply valve located at the meter if you use
natural gas.
•Propane (LP) gas is heavier than air and may settle in low areas.
When you have reason to suspect a propane leak, keep out of all
low areas.
•Call your re department. Do not reenter the building or area.
•Stay out of the building and away from the area from the area
until declare safe by the reghters.

MAINTENANCE
•The repairs or maintenance operations must only be carried out
•
a year.
•Regularly check the conditions of gas hose, and gas regulator if
it must be replaced only use original spare parts.
•Before starting any maintenance operation on the heater
disconnect from both gas and electrical suppliers.
•If the unit has not been used for a long period we advise that
a technician carries out a general checkup before using. It is
important to control the following:
•Periodically check the gas supply hose conditions and, should it
be changed, use only original spare parts.
•Check the starting electrode position (Fig. 2).
•Check the connections of the safety thermostat and of the ther-
mocouple: they must always be clean. If necessary clean the fan
blade and the inside of the heater using compressed air.
ONDERHOUD
•De reparaties of onderhoudswerkzaamheden mogen alleen door
•Het apparaat moet minstens één keer per jaar worden gecontro-
•Controleer regelmatig de staat van de gasslang en controleer
als de gasregelaar moet worden vervangen. Gebruik alleen
originele reserve-onderdelen.
•Voordat u met een onderhoudswerkzaamheden begint, dient u
de stekker uit het stopcontact te halen.
•Als het apparaat gedurende een lange periode niet is gebruikt,
adviseren wij dat een technicus een algemene controle uitvoert
voordat het wordt gebruikt. Daarbij is het belangrijk de volgen-
de zaken te controleren:
•Controleer regelmatig de voorwaarden van de gastoevoerslang
en, als deze wordt vervangen, gebruik alleen originele reserve-
onderdelen.
•Controleer de positie van de startelektrode (Fig. 2).
•Controleer de aansluitingen van de veiligheidsthermostaat en
van het thermokoppel: ze moeten altijd schoon zijn. Reinig het
ventilatorblad en de binnenkant van de kachel indien nodig met
perslucht.
PROBLEEMOPLOSSING
Fig. 2
PROBLEEM OORZAKEN OPLOSSINGEN
De motor werkt niet. Geen stroomvoorziening. Controleer het klemmenbord met een tester.
De veiligheidsthermostaat staat aan. Wacht ongeveer een minuut en start dan opnieuw op.
De motor werkt, maar de brander brandt niet en
na enkele seconden stopt de verwarming. De gaskraan van de cilinder is gesloten. Open de gaskraan.
De cilinder is leeg. Gebruik een nieuwe cilinder.
Het mondstuk is verstopt. Verwijder het mondstuk en maak het schoon.
De klep van het magneetventiel is niet open. Controleer of het magneetventiel werkt.
Er is geen vonk. Controleer de positie van de elektrode.
De brander gaat branden maar na enkele sec-
onden stopt de verwarming. Geen verbinding met het aardingssysteem. Controleer en sluit op de juiste manier aan.
Defecte verbinding tussen sensor en beveilig-
ing. Controleer en sluit op de juiste manier aan.
Defecte beveiliging. Vervang de beveiliging.
De verwarming stopt tijdens bedrijf Overmatige gastoevoer. Controleer de drukregelaar en vervang deze indien nodig.
Onvoldoende luchtstroom. Controleer of de motor correct werkt.
Onvoldoende gastoevoer door ijsvorming op
de cilinder.
Controleer en gebruik een grotere cilinder of twee cilin-
ders die met elkaar zijn verbonden.

TROUBLESHOOTING
TECHNISCHE GEGEVENS: TECNICAL DATA:
KELKAN 1500
1514709
Max. vermogen / Power 15000W
Aansluitspanning / Connection voltage 220 - 240V~
Gasverbruik / Usage 1.09kg/h
Thermisch beveiligd tot / Thermally secured to 80°C
Gasdruk / Gas supply pressure 700 mbar
PROBLEM CAUSES SOLUTIONS
The motor does not work No electricity supply Check the terminal board with a tester
The safety thermostat is on Wait about one minute then restart
The motor works, but the burner does not light up
and after few seconds the heater stops The cylinder gas tap is closed Open the gas tap
The cylinder is empty Use a new cylinder
The nozzle is obstructed Remove the nozzle and clean it.
The solenoid gas valve is not open Check that the solenoid valve works
There is no spark Check the position of electrode
The burner lights up but after few seconds the
heater stops No connection with the earthing system Check and connect properly
Defective connection between sensor and
safety device Check and connect properly
Defective safety device Replace the safety device
The heater stops during operation Excessive gas supply Check the pressure reducer and if required replace it
Insucient air ow Check that the motor works properly
Insucient gas supply due to ice formation
on the cylinder
Check and use a larger cylinder or two cylinders connect-
ed together.
Fig. 3

Model identifier(s): BGA1401-15-18
Indirect heating functionality: [no]
Direct heatoutput: 15 (kW)
Indirect heatoutput: N/A (kW)
Fuel
Space heating emissions (*)
NOx
Select
fuel type
[gaseous] G30 115.54 [mg/ kWhinput] (GCV)
Item
Symbo
l
Value Unit Item SymbolValue Unit
Heatoutput
Useful efficiency (NCV)
Nominalheat
output
Pnom
15 kW Useful efficiency at nominal
heat
outputȘth,nom
100
%
Minimum heat
output (indicative)
Pmin
N/A
kW Useful efficiency at minimum
heat
output (indicative) Șth,min
N/A
%
Auxiliary electricity consumption Type
of
heat
output/room temperature control (select one)
At nominal heat
output
elmax
N/A kW
Single stage heat output,
no
room
temperature
control
[yes]
At
minimum heat
outputelmin
N/A kW
two
or
more
manual
stages,
no
room temperature control [no]
In standby mode
elSB N/A
kW
with mechanic
thermostat
room
te
mperature
control
[no]
with electronic room temperature control [no]
with
electronic
room
temperature control
plus
day
timer [no]
with
electronic
room
temperature
control
plus week timer
[no]
Other control options (multiple selections possible)
room temperature control, with presence detectio
n
[no]
Room temperature control, with open
windowdetection
[no]
with distance control option [no]
with adaptive
start
control
[no]
with working
time
limitation
[no]
with black
bulb sensor
[no]
Permanentpilot flame power requirement
Pilot flame power
requirement (if
applicable)
Ppilot 0
kW
Contact details
NingBo Baogong Electrical Appliance CO., LTD.
Fuhai Industrial Zone,Cixi,
Ningbo,Zhejiang,315332,P.R.China
(*)
NOx
= nitrogen oxides
Ferney Group BV, Ampèrestraat 15, 1704 SM Heerhugowaard
Nederland
KEL-KAN 1500 (1514709)

CE-conformiteitsverklaring
Hierbij verklaart de producent /The producer
Ferney Group BV
Ampèrestraat 15
1704 SM Heerhugowaard
Nederland
dat de onderstaande elektrische ventilatorkachel in overeenstemming is met de volgende normen:
hereby declares that the following electric fan heater is in accordance with the following standards:
Merk /Brand KELFORT
Type KEL-KAN 1500
Normen / Standards: EN 55014-1 : 2000 A1+A2
EN 55014-2 : 1997 A1
EN 61000-3-2 : 2000 A2
EN 61000-3-3 : 1995 A1+A2
EN 60335-1 : 2002 A2+A11+A12
EN 60335-1 : 2006 A1
EN 60335-2-40 : 2003
EN 50366 : 2003
Heerhugowaard, 1-6-2018 .................................................
H. Jenster
Algemeen Directeur
General Manager
-------------------------------------------------------------------------------------------------------------------------------------------
kelfort.nl
This manual suits for next models
1
Table of contents
Other Kelfort Heater manuals
Popular Heater manuals by other brands

Eliz
Eliz EWH 200 operating instructions

Black & Decker
Black & Decker BDTH600 Use and care book

Ducasa
Ducasa AVANT-A 350 Instructions for operation

OC IMP Klima
OC IMP Klima TKV Series Installation and start-up manual

Helios
Helios AIR1-EVH RH Installation and operating instructions

RADSON
RADSON COSMOLEDO E Instruction

solamagic
solamagic S1 Installation and instruction manual

Reznor
Reznor RHC 8000(m) RJL Installation, comissioning and servicing instructions

Profile
Profile Vega manual

Amerec
Amerec T1.7 Installation and service instructions

Thermon
Thermon Caloritech EX Series Installation, operation & maintenance instructions

Bionaire
Bionaire BCH4175 instruction manual