manuals.online logo
Brands
  1. Home
  2. •
  3. Brands
  4. •
  5. Kestrel
  6. •
  7. Measuring Instrument
  8. •
  9. Kestrel 2500 User manual

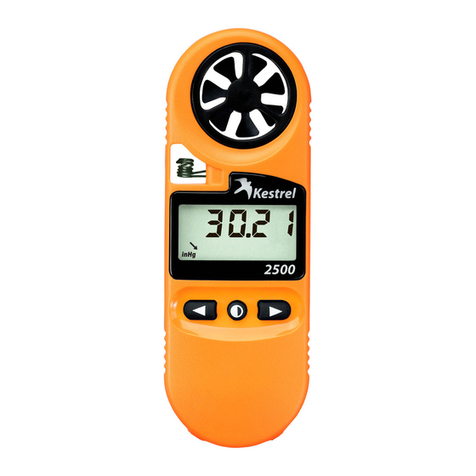
Kestrel 2500 User manual

Thank you for purchasing the Kestrel 2500 Pocket Weather Meter.
This instrument will measure the following environmental conditions:
• wind speed
• wind chill
• maximum wind gust
• barometric pressure
• average wind speed
• altitude
• temperature (air, water, snow)
2500
Pocket Weather
®Meter
with Backlight
Revised 05/07
INSTRUCTION MANUAL
Plus additional features:
• waterproof and oats
• clock
• 3-hour pressure trend
• data hold function
• backlight
• automatic power-down
function
OPERATION
1. Slide off cover.
2. Turn on. Press the center button (
mph mph
MAX
mph
AVG
Current
Wind Speed Maximum 3-
Second Gust
Since Power On
Average Wind
Speed Since
Power On
MAX AVG
or
) to turn on the unit.
3. Select operating mode. Press the right arrow (
mph mph
MAX
mph
AVG
Current
Wind Speed Maximum 3-
Second Gust
Since Power On
Average Wind
Speed Since
Power On
MAX AVG
or
) to scroll through the measurements
listed below. Press the left arrow (
mph mph
MAX
mph
AVG
Current
Wind Speed Maximum 3-
Second Gust
Since Power On
Average Wind
Speed Since
Power On
MAX AVG
or
) to scroll through the measurements in reverse
order. The instantaneous measurements will be displayed. (See Understanding the
Measurements section for more information.)
4. Select the unit of measure. While holding
mph mph
MAX
mph
AVG
Current
Wind Speed Maximum 3-
Second Gust
Since Power On
Average Wind
Speed Since
Power On
MAX AVG
or
, press
mph mph
MAX
mph
AVG
Current
Wind Speed Maximum 3-
Second Gust
Since Power On
Average Wind
Speed Since
Power On
MAX AVG
or
to scroll through the units of
measure listed below.
Mode Hint Icon Units of Measure
Clock --- --- 12-hr, 24-hr
Wind Speed SPd m/s, ft/min, km/h, mph, kt, B
Max Gust SPd MAX m/s, ft/min, km/h, mph, kt, B
Avg Speed SPd AVG m/s, ft/min, km/h, mph, kt, B
Temperature dEG C, F
Wind Chill chill C, F
2
Mode Hint Icon Units of Measure
Barometric Pressure* hPa, inHg
Altitude Alt m, ft
* Only one of the pressure icons will be displayed,indicating the 3-hour pressure trend.
pressure rising quickly (rise more than +0.18 inHg)
pressure rising (rise within +0.06 inHg and +0.18 inHg)
pressure stable (remain within -0.06 and +0.06 inHg)
pressure falling (drop within -0.06 inHg and -0.18 inHg)
pressure falling quickly (drop more than -0.18 inHg)
5. Hold mode.While holding
mph mph
MAX
mph
AVG
Current
Wind Speed Maximum 3-
Second Gust
Since Power On
Average Wind
Speed Since
Power On
MAX AVG
or
, press
mph mph
MAX
mph
AVG
Current
Wind Speed Maximum 3-
Second Gust
Since Power On
Average Wind
Speed Since
Power On
MAX AVG
or
to hold the time and all of the measured values.
The word “HOLD” will blink to indicate the Hold Mode. Press
mph mph
MAX
mph
AVG
Current
Wind Speed Maximum 3-
Second Gust
Since Power On
Average Wind
Speed Since
Power On
MAX AVG
or
or
mph mph
MAX
mph
AVG
Current
Wind Speed Maximum 3-
Second Gust
Since Power On
Average Wind
Speed Since
Power On
MAX AVG
or
to view the other
measurements in Hold Mode. While holding
mph mph
MAX
mph
AVG
Current
Wind Speed Maximum 3-
Second Gust
Since Power On
Average Wind
Speed Since
Power On
MAX AVG
or
, press
mph mph
MAX
mph
AVG
Current
Wind Speed Maximum 3-
Second Gust
Since Power On
Average Wind
Speed Since
Power On
MAX AVG
or
to exit the Hold Mode. This
mode can be useful for taking measurements when unable to view the display.
6. Turn on the backlight. Press
mph mph
MAX
mph
AVG
Current
Wind Speed Maximum 3-
Second Gust
Since Power On
Average Wind
Speed Since
Power On
MAX AVG
or
to activate the backlight for 10 seconds. If
mph mph
MAX
mph
AVG
Current
Wind Speed Maximum 3-
Second Gust
Since Power On
Average Wind
Speed Since
Power On
MAX AVG
or
or
mph mph
MAX
mph
AVG
Current
Wind Speed Maximum 3-
Second Gust
Since Power On
Average Wind
Speed Since
Power On
MAX AVG
or
are pressed while the backlight is illuminated, the backlight will remain illuminated for
another 10 seconds. Press
mph mph
MAX
mph
AVG
Current
Wind Speed Maximum 3-
Second Gust
Since Power On
Average Wind
Speed Since
Power On
MAX AVG
or
while the backlight is illuminated to manually turn off
the backlight.
3
7. Adjust the clock. Simultaneously press
mph mph
MAX
mph
AVG
Current
Wind Speed Maximum 3-
Second Gust
Since Power On
Average Wind
Speed Since
Power On
MAX AVG
or
and
mph mph
MAX
mph
AVG
Current
Wind Speed Maximum 3-
Second Gust
Since Power On
Average Wind
Speed Since
Power On
MAX AVG
or
to adjust the clock.While the clock is
blinking, press
mph mph
MAX
mph
AVG
Current
Wind Speed Maximum 3-
Second Gust
Since Power On
Average Wind
Speed Since
Power On
MAX AVG
or
or
mph mph
MAX
mph
AVG
Current
Wind Speed Maximum 3-
Second Gust
Since Power On
Average Wind
Speed Since
Power On
MAX AVG
or
to adjust the clock. Hold
mph mph
MAX
mph
AVG
Current
Wind Speed Maximum 3-
Second Gust
Since Power On
Average Wind
Speed Since
Power On
MAX AVG
or
or
mph mph
MAX
mph
AVG
Current
Wind Speed Maximum 3-
Second Gust
Since Power On
Average Wind
Speed Since
Power On
MAX AVG
or
to adjust the times quickly.
Simultaneously press
mph mph
MAX
mph
AVG
Current
Wind Speed Maximum 3-
Second Gust
Since Power On
Average Wind
Speed Since
Power On
MAX AVG
or
and
mph mph
MAX
mph
AVG
Current
Wind Speed Maximum 3-
Second Gust
Since Power On
Average Wind
Speed Since
Power On
MAX AVG
or
to exit the clock adjustment.
8. Adjust the reference altitude. Obtain your altitude from a topographic map or landmark
to use as your reference altitude. From the barometric pressure screen, simultaneously
press
mph mph
MAX
mph
AVG
Current
Wind Speed Maximum 3-
Second Gust
Since Power On
Average Wind
Speed Since
Power On
MAX AVG
or
and
mph mph
MAX
mph
AVG
Current
Wind Speed Maximum 3-
Second Gust
Since Power On
Average Wind
Speed Since
Power On
MAX AVG
or
buttons to adjust the reference altitude. Press
mph mph
MAX
mph
AVG
Current
Wind Speed Maximum 3-
Second Gust
Since Power On
Average Wind
Speed Since
Power On
MAX AVG
or
or
mph mph
MAX
mph
AVG
Current
Wind Speed Maximum 3-
Second Gust
Since Power On
Average Wind
Speed Since
Power On
MAX AVG
or
to adjust the
reference altitude, or hold
mph mph
MAX
mph
AVG
Current
Wind Speed Maximum 3-
Second Gust
Since Power On
Average Wind
Speed Since
Power On
MAX AVG
or
or
mph mph
MAX
mph
AVG
Current
Wind Speed Maximum 3-
Second Gust
Since Power On
Average Wind
Speed Since
Power On
MAX AVG
or
to adjust the value quickly. Simultaneously press
mph mph
MAX
mph
AVG
Current
Wind Speed Maximum 3-
Second Gust
Since Power On
Average Wind
Speed Since
Power On
MAX AVG
or
and
mph mph
MAX
mph
AVG
Current
Wind Speed Maximum 3-
Second Gust
Since Power On
Average Wind
Speed Since
Power On
MAX AVG
or
to exit the reference altitude adjustment.
9. Adjust the reference pressure. Obtain your barometric pressure reading from a local
weather source to use as your reference pressure. From the altitude screen, simultaneously
press
mph mph
MAX
mph
AVG
Current
Wind Speed Maximum 3-
Second Gust
Since Power On
Average Wind
Speed Since
Power On
MAX AVG
or
and
mph mph
MAX
mph
AVG
Current
Wind Speed Maximum 3-
Second Gust
Since Power On
Average Wind
Speed Since
Power On
MAX AVG
or
buttons to adjust the reference pressure. Press
mph mph
MAX
mph
AVG
Current
Wind Speed Maximum 3-
Second Gust
Since Power On
Average Wind
Speed Since
Power On
MAX AVG
or
or
mph mph
MAX
mph
AVG
Current
Wind Speed Maximum 3-
Second Gust
Since Power On
Average Wind
Speed Since
Power On
MAX AVG
or
to adjust the
reference pressure, or hold
mph mph
MAX
mph
AVG
Current
Wind Speed Maximum 3-
Second Gust
Since Power On
Average Wind
Speed Since
Power On
MAX AVG
or
or
mph mph
MAX
mph
AVG
Current
Wind Speed Maximum 3-
Second Gust
Since Power On
Average Wind
Speed Since
Power On
MAX AVG
or
to adjust the value quickly. Simultaneously press
mph mph
MAX
mph
AVG
Current
Wind Speed Maximum 3-
Second Gust
Since Power On
Average Wind
Speed Since
Power On
MAX AVG
or
and
mph mph
MAX
mph
AVG
Current
Wind Speed Maximum 3-
Second Gust
Since Power On
Average Wind
Speed Since
Power On
MAX AVG
or
to exit the reference pressure adjustment.
10. Turn off. Hold
mph mph
MAX
mph
AVG
Current
Wind Speed Maximum 3-
Second Gust
Since Power On
Average Wind
Speed Since
Power On
MAX AVG
or
for 2 seconds to manually turn off the unit.The unit will automatically
turn off if no buttons have been pressed for 45 minutes.
4
UNDERSTANDING THE MEASUREMENTS
Wind Speed - average over the previous three seconds. The measurement will be accurate
for air ow through the front or rear of the unit.
Maximum Wind Gust - maximum 3 - second wind speed since the unit was turned on.
Average Wind Speed - average wind speed since the unit was turned on.
Temperature - instantaneous temperature of the thermistor, which is located at the end
of the long coiled leads in the open cavity below the impeller. The exposed thermistor will
respond quickly to changes in temperature when air ows past it. For fastest response, either
hold the unit into the wind or wave the unit side to side for 15 seconds. Readings should be
taken in the shade. Water and snow temperatures can be taken by hold the unit in the water
or snow.
Wind Chill - combination of wind speed and temperature, as dened by the US National
Weather Service. Wind chill is the effective temperature on a human or animal at low
temperatures due to wind speed. Wind chill readings will be the same as the temperature
readings above 45ºF or below 3 mph.
Altitude and Barometric Pressure - the Kestrel 2500 will measure station pressure in order
to calculate barometric pressure and altitude. Changes in either air pressure or altitude will
affect these readings, so it’s important to make adjustments as necessary.
First, you will need to obtain either (a) the current barometric pressure or (b) the altitude of
your location. You can obtain your current barometric pressure by contacting a local airport
5
or weather service. Set this value as your reference pressure on the ALTITUDE screen to
determine your altitude. Otherwise, you can obtain your altitude from a topographic map
or local landmark. Set this value as your reference altitude on the BAROMETRIC PRESSURE
screen to determine your barometric pressure.
There are two examples for when and how to use the BAROMETRIC PRESSURE and
ALTITUDE screens.
First, assume that you know the altitude from one of the sources above. Set the reference
altitude on the BAROMETRIC PRESSURE screen to this elevation. As long as you remain
at home, you can accurately track changes in the barometric pressure. However, the
measurement on the ALTITUDE screen also changes. This value will uctuate as pressure
fronts pass through your location. Since you know your house in not changing elevation, you
can ignore this screen.
Now let’s assume that you are planning a day hike and you’d like to track your altitude.
Before starting, you’ll need to adjust the reference pressure on the ALTITUDE screen. You
can do this by simply adjusting the reference pressure until you reach the elevation of your
house. The reference pressure will be the same as the pressure reading on the BAROMETRIC
PRESSURE screen. You can now track the altitude as you hike. You can ignore the values on
the BAROMETRIC PRESSURE screen, since the pressure changes are predominantly due to
changes in elevation.
As with all pressure altimeters, it must be assumed that any change in pressure due to
weather is small over the course of one day. If you were to encounter an elevation landmark,
6
you can adjust the reference pressure until the altitude matches the landmark elevation.This
will correct the altitude for any pressure changes due to weather.
MAINTENANCE & TROUBLESHOOTING
Environmental
Every Kestrel Meter is fully waterproof and oats, and has passed mil-spec drop testing.
Storing Your Kestrel
Avoid storing your Kestrel where it will be exposed to temperatures below -30°C [-22°F] or
above 60° C [176° F] for extended periods of time. Doing so may cause permanent damage.
(Note that the inside of a car parked in the hot sun can reach very high temperatures.)
Use of the Lanyard and Cover
The cover can be captured on the lanyard to avoid loss. First, remove the cord poplock. Then
feed the lanyard end through the large opening in the over and
out the slot. Replace the poplock on the lanyard.
Replacing the Battery
When your display becomes dim or disappears, replace the
battery. Use a large coin to open the battery compartment. Use
only new CR2032 coin cell batteries (available where watch
batteries are sold). Wipe the battery clean of any ngerprints
and insert the positive (+) pole up, angling the battery Replacing the Battery
7
downward and pressing it rmly into place. When replacing the battery door, be sure to keep
the black rubber o-ring seated in the groove on the case back.
Why does the Impeller Appear Imbalanced?
It is NORMAL for the impeller to oscillate as it comes to a stop. It is NOT imbalanced. Rather,
it contains a very small magnet that responds to the earth’s magnetic elds. This does not
affect the accuracy of the wind speed readings because the magnetic eld applies both a
braking and an accelerating force which cancel each other. The impeller has been calibrated
to provide wind speed readings accurate to within at least ± 3%.
High Speed Use
After several hours of sustained operation over 25 M/S (~49 KT, 90 KM/H, 56 MPH or
4,923 FPM), the Kestrel will lose some accuracy due to wear of the sapphire bearings in
the impeller.
Replacing the Impeller
You may recalibrate the wind speed readings by replacing
the impeller. Press FIRMLY on the sides of the black impeller
housing with your thumbs to remove the entire assembly.
When inserting the new impeller, be sure the arrow is
facing the display side of the unit, and is aligned with the
top of the meter. Press on the sides of the housing rather
than the center. Replacing the Impeller
8
About the Backlight
The Kestrel 2500 NV is olive drab with a night-vision preserving backlight. The backlight
incorporates an optical lter to reduce overall brightness and minimize blue and green
spectrum light to preserve night vision. (Note: This backlight appears soft greyish pink, not
“red”, and is still in the visible spectrum, so is not compatible with night-vision equipment.)
The NV’s backlight preserves the natural night vision of users such as military personnel
and pilots. It takes 30 to 45 minutes for the average eye to adapt to darkness and maximize
night vision. Even a short burst of white, yellow, green or blue light “bleaches out” the rod cell
photoreceptors in the eye and causes night blindness until the entire adaptation process can
take place again. Light in the red spectrum does not cause this “bleaching out”, preventing
night blindness and night vision fatigue. This unit’s backlight is also much dimmer than a
standard backlight, making it more difcult to detect with the naked eye in night operations.
Sensor Calibration
All the sensors have been factory calibrated to be accurate within specications. For
recalibration, you may either return it to Nielsen-Kellerman for factory calibration, or contact
NK for eld calibration instructions.
9
BEAUFORT SCALE
The Beaufort Scale is a system for estimating
wind force without the use of instruments based
on the visible effects of the wind on the physical
environment. The behavior of smoke, waves, trees,
etc., is rated on a 13 point scale. The scale was
devised in 1805 by the British naval Commander
Sir Francis Beaufort (1774-1857) and is still
commonly used by mariners.
KESTREL POCKET WEATHER METERS
WARRANTY
NK does not believe in “disposable electronics.” We know that Kestrel Meters don’t typically
lead pampered lives, and we design them for years of performance in tough conditions.
Every Kestrel is designed and manufactured at NK’s facility in Boothwyn, PA. We guarantee
every Kestrel Pocket Weather Meter to be free of defects in materials and workmanship
for a period of FIVE YEARS from your date of purchase. We will repair or replace any
defective product or part when notied within the warranty period, and will return the
product via domestic ground shipping at no charge. Additionally, each Kestrel has a 30-day
money back guarantee.
Force Description Kts
0 Calm 0
1Light Air 1-3
2Light Breeze 4-6
3 Gentle Breeze 7-10
4Moderate Breeze 11-16
5Fresh Breeze 17-21
6Strong Breeze 22-27
7Near Gale 28-33
8Gale 34-40
9Strong Gale 41-47
10 Storm 48-55
11 Violent Storm 56-63
12+ Hurricane 64+
10
The following issues do not result from a manufacturing defect and are not covered under
this warranty: damage due to improper use or neglect (including corrosion), impact damage,
modications or attempted repairs by someone other than an authorized NK repair agent,
impeller failure not caused by a manufacturing defect, normal wear from use of the product,
failed batteries, and re-calibration beyond 30 days from your date of purchase.
Your warranty period will be measured from your date of purchase. The best way to ensure
full warranty coverage is to REGISTER your NK product promptly on our website:
www.kestrelweather.com. We keep your registration information strictly condential and
do not sell it, share it, or use it for anything but product-related information bulletins (which
you may decline receiving). If you do not register and cannot provide proof of purchase,
your warranty period will be measured from our date of manufacture, determined by
serial number.
We request that you contact NK if you feel your product is not working properly. We can
often solve product issues by phone or e-mail, saving you the time and expense of returning
the unit. If we require the product to be returned, we will issue a Return Authorization to
expedite the handling of your warranty claim.
The Kestrel Pocket Weather Meters are covered by the following patents: 5,783,753,
5,939,645, 6,257,074, and 7,059,170.
11
LIFETIME CUSTOMER CARE WARRANTY
NK wants you to be an NK customer for life, so we take care of you even beyond the terms of
the above warranty with our Customer Care Program. Trade-in any Kestrel Pocket Weather
Meter, no matter the age or condition, and receive a generous discount on the replacement
product (same model only). Our Customer Care Program applies only as long as we
manufacture the product, and does not cover product upgrades.
CALIBRATIONS, CERTIFICATIONS AND SERVICE
Every NK product is tested and calibrated before it leaves our factory. We guarantee that it
will perform within specications when you receive it. Each Kestrel comes with a Certicate
of Conformity, with the stated specications for that product on the back. If you feel an
NK product is not meeting specs when you receive it, call us and we’ll make sure you are
operating it correctly. If it still appears that it may be out of spec, return it to us within 30
days of purchase and we will test and recalibrate all values at no charge. Beyond 30 days, we
offer reasonably-priced tests, calibration services and N.I.S.T. certied calibrations as well as
Kestrel tune-ups.
All of our measurements are traceable to the National Institute of Standards and Technology,
ensuring the highest level of accuracy. Our primary Calibration Standards are sent for
calibration in accordance with N.I.S.T. requirements and based on a regular schedule.
Only approved laboratories and N.I.S.T themselves are used for these calibration services.
Incoming and outgoing data is supplied with the certicate of calibration.
12
We also offer full factory service on every product we manufacture for as long as we make
the product (and as long after as component availability permits). If we can’t repair a product,
we will offer you a brand-new replacement under our Customer Care Program (even for
accidental damage and misuse).
ADDITIONAL INFORMATION
What is a “Kestrel”? The American Kestrel is the smallest North American falcon.
Beautiful and highly adaptable, it can be found virtually everywhere in North
America. It is unique among falcons for its ability to both hover at very low
speeds and dive at very high speeds.
Assembled in the USA. The Kestrel 2500 is protected by US Patent 5,783,753, 5,939,645 and
6,257,079. Nielsen-Kellerman reserves the right to change product specications. ©2007.
Kestrel, the Kestrel logo, Pocket Wind, NK and the NK logo are trademarks of the Nielsen-
Kellerman Co.
13
NIELSEN-KELLERMAN
21 Creek Circle, Boothwyn, PA 19061
Phone: (610) 447-1555
Fax: (610) 447-1577
Web: www.kestrelweather.com
Email: [email protected]
Register your Kestrel® Pocket Weather® Meter online at www.kestrelweather.com.

Other manuals for 2500

2

Other Kestrel Measuring Instrument manuals

Kestrel 5000 User manual

Kestrel

Kestrel 5000 User manual

Kestrel 5000AG User manual

Kestrel

Kestrel 5000AG User manual

Kestrel 4400 Operating and maintenance manual

Kestrel

Kestrel 4400 Operating and maintenance manual

Kestrel 1000 User manual

Kestrel

Kestrel 1000 User manual

Kestrel 1000 User manual

Kestrel

Kestrel 1000 User manual

Kestrel 1000 User manual

Kestrel

Kestrel 1000 User manual

Kestrel 2000 Pocket Weather User manual

Kestrel

Kestrel 2000 Pocket Weather User manual

Kestrel 2000 User manual

Kestrel

Kestrel 2000 User manual

Kestrel 5700 Sportsman User manual

Kestrel

Kestrel 5700 Sportsman User manual

Kestrel 5700 Elite User manual

Kestrel

Kestrel 5700 Elite User manual

Kestrel Elite User manual

Kestrel

Kestrel Elite User manual

Kestrel Elite User manual

Kestrel

Kestrel Elite User manual

Kestrel 2000 User manual

Kestrel

Kestrel 2000 User manual

Kestrel 3500 Delta T User manual

Kestrel

Kestrel 3500 Delta T User manual

Kestrel 5000 User manual

Kestrel

Kestrel 5000 User manual

Kestrel 3550FW User manual

Kestrel

Kestrel 3550FW User manual

Kestrel 2500 NV User manual

Kestrel

Kestrel 2500 NV User manual

Kestrel 5000 Operating instructions

Kestrel

Kestrel 5000 Operating instructions

Kestrel 5000 User manual

Kestrel

Kestrel 5000 User manual

Kestrel 5700 Sportsman Operating and maintenance instructions

Kestrel

Kestrel 5700 Sportsman Operating and maintenance instructions

Kestrel 3500 Series Instruction Manual

Kestrel

Kestrel 3500 Series Instruction Manual

Kestrel 4200 User manual

Kestrel

Kestrel 4200 User manual

Kestrel 3500 Delta T User manual

Kestrel

Kestrel 3500 Delta T User manual

Kestrel 4250 User manual

Kestrel

Kestrel 4250 User manual

Popular Measuring Instrument manuals by other brands

Excelitas Technologies X-Cite XR2100 user guide

Excelitas Technologies

Excelitas Technologies X-Cite XR2100 user guide

PCB Piezotronics 3741E1210G Installation and operating manual

PCB Piezotronics

PCB Piezotronics 3741E1210G Installation and operating manual

BorMann BDM2500 owner's manual

BorMann

BorMann BDM2500 owner's manual

Odyssey ODY-02-7 quick start guide

Odyssey

Odyssey ODY-02-7 quick start guide

Tektronix SPECMON3 manual

Tektronix

Tektronix SPECMON3 manual

Tektronix TLA5000 Series Installation guides

Tektronix

Tektronix TLA5000 Series Installation guides

Ebtron AIR-IQ Quick installation guide

Ebtron

Ebtron AIR-IQ Quick installation guide

GE Druck ADTS 405 user manual

GE

GE Druck ADTS 405 user manual

Tenma 72-3500 manual

Tenma

Tenma 72-3500 manual

Bosch BEA 070 Original instructions

Bosch

Bosch BEA 070 Original instructions

Elimko E-PR-200 Series user manual

Elimko

Elimko E-PR-200 Series user manual

AEMC instruments MN379T user manual

AEMC instruments

AEMC instruments MN379T user manual

Lovato DME D111 MID installation manual

Lovato

Lovato DME D111 MID installation manual

Hach 9523sc user manual

Hach

Hach 9523sc user manual

Sensaphone IMS-1000 user manual

Sensaphone

Sensaphone IMS-1000 user manual

Orbit Merret OM 621BCD user manual

Orbit Merret

Orbit Merret OM 621BCD user manual

Rice Lake IQ plus 590-D installation manual

Rice Lake

Rice Lake IQ plus 590-D installation manual

SymCom MotorSaver 250A Schematics

SymCom

SymCom MotorSaver 250A Schematics

manuals.online logo
manuals.online logoBrands
  • About & Mission
  • Contact us
  • Privacy Policy
  • Terms and Conditions

Copyright 2025 Manuals.Online. All Rights Reserved.