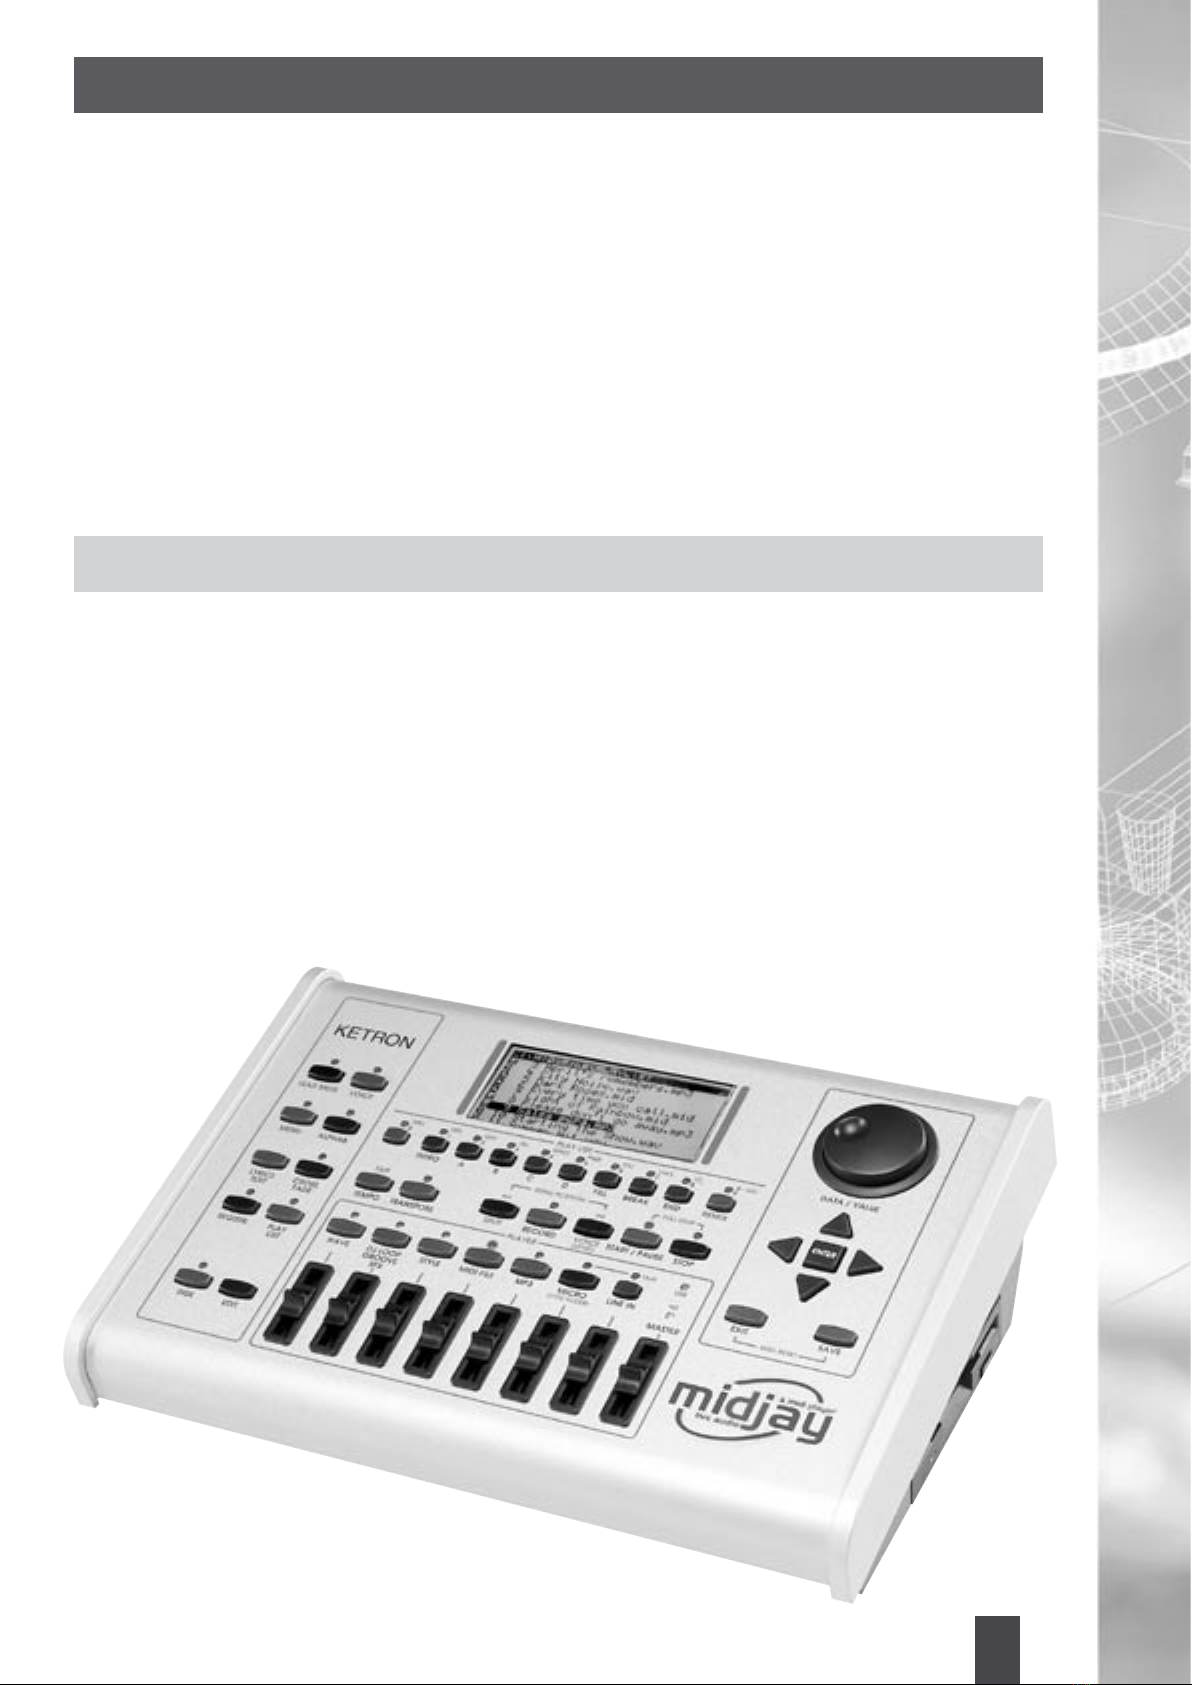
KETRON MIDJAY User manual


• Safety Instructions 2
• Introduction 3
Turning ON the MIDJAY 3
• Output / Connections 4
• Controls 5
• Wave 7
Playing Waves 7
Wave Menu 7
Common Functions 8
The Manipulation of Wave Files 9
Suppressing the Lead Voice from a Song
Lead Mute 9
Wave Pitch and Stretch 9
Wave Transposer 9
Folder Auto Play Function 10
• DJ Loop/Groove/Effects (SFX) 11
DJ Loops 11
Grooves 12
Effects (SFX) 12
• Playing MIDI Files 13
Editing a MIDI File 13
Saving an Edited MIDI File 14
Instantly Mute a Part from a Song
Lead Mute 15
Associate Wave or MP3 to the MIDI File 15
Drum Remix 15
More Functions Associated with MIDI File
MIDI File Menu 16
Markers 16
Function 16
• Playing MP3 Files 17
MP3 Menu 17
• Playback of Multiple File Types (Multiplay) 18
• Quick Search for Music and Files 18
• Automatic Cross Fade 19
• Text Files (.TXT) Associated
with MIDI Files, Waves or MP3 19
Automatic Change of Text Pages 19
• Play List 20
Creating a Play List 20
Editing a Play List 21
• Footswitch 21
• Menu Controls 22
• Power On Setup 24
• Loading Songs Into the MIDJAY (USB) 25
Connection Procedure and Use 25
• Hard Disk Recording 26
Hard Disk Recording Parameters 26
Multi-Track Recording 27
Useful Hints and Tips 27
• Voices 28
Editing Voices 28
Changing Voices Preset 29
Voice Controlling via MIDI 29
• Styles 30
Other Style Functions 31
Editing Styles 31
Controlling the Styles
from an External MIDI Controller 31
How to Record on Computer
a Sequence with Style and Voice
Played in Real Time with MIDJAY 32
MIDI File Playback 32
• Registrations 33
• Microphone 33
• Disk 34
Copying Files from Floppy Disk to Hard disk 34
Moving Files among Different Folders
to the Hard Disk 34
Deleting Files on Hard Disk / Floppy 34
Renaming Files on Hard Disk 35
Creating a New Folder on Hard Disk 35
• Updating the MIDJAY 36
• Technical Specications (Release 2.0) 37
MIDJAY TABLE OF CONTENTS

2
3
SAFETY INSTRUCTIONS
AC Power Adaptor
To connect the instrument to the wall socket you will need the supplied KETRON AC Power Adaptor.
Use of other AC adaptors could result in damage to the instrument’s power circuit. So be sure to ask for the right kind.
Instructions About Risk of Fire, Electric Shock or Injury to Persons
Warning: to reduce the risk of re or electric shock, do not expose this instrument to rain or moisture.
Earthing: his product must be connected to an earthed outlet. In case of malfunctioning, the earthing will reduce the risk of
electric shock. The instrument comes with an earthed power cable and plug to be used with an earthed outlet.
Improper earthing connections may cause electric shocks. In case of doubts, have your electric installation checked by a
qualied electrician.
Do not modify the power cable coming with the instrument.
Important Safety and Installation Instructions
• Before using this instrument, carefully read the User’s Manual.
• When the instrument is used by children, the presence of an adult is required.
• Do not use the instrument near water, for example near a wash-basin, a swimming-pool, a wet surface, etc.
• Power Supply. Before connecting this instrument to any other equipment (amplier, mixer, other MIDI instruments, etc.)
make sure that all units are switched off.
• Do not play the instrument at a high volume for a long period of time: exceedingly loud music can cause damage to
your health.
• The instrument is to be used in a position where adequate ventilation is provided.
• Use the instrument far away from heat sources such as radiators, heaters, etc.
• Disconnect the power cable if the instrument is not used for longer periods of time.
• Be careful to avoid any objects or liquids from falling into the inside of the enclosure.
• Bring the instrument to an service centre in the following cases:
a. Damages on the power cable or plug.
b. Objects or liquids fallen into its inside.
c. The instrument has been exposed to rain.
d. Abnormal running or an evident decrease of the instrument’s performance.
e. The instrument has fallen down or the enclosure has been damaged.
• Never try to repair the instrument yourself. All operations must be performed by specialised engineers.
How to Avoid Radio/TV Interference
This instrument operates at radio frequencies, and if not correctly installed according to the instructions supplied, it may
cause interference with radio and television reception.
Though this instrument has been designed according to the applicable standards and notwithstanding the reasonable
protections against interference it has been equipped with, there is no guarantee that such events will not occur. In order
to check if the interference is actually caused by this instrument, switch it off and see if the interference disappears. Then
switch it on again and check if the interference appears again. Once you have made sure that the interference is originated
by this instrument, take one of the following measures:
• Turn the radio or TV antenna in a different direction.
• Modify the instrument’s position with respect to the receiver.
• Increase the distance between the instrument and the receiver.
• Connect the instrument’s plug to a different outlet to make sure that the instrument and the receiver are connected to
two different circuits.
• If necessary, contact a specialised technician.
How to Clean This Instrument
Use only a soft and dry cloth to clean the external surface of your instrument. Never use petrol, thinners or solvents
generally speaking.
In Order Not to Loose Data
Please remember that the data stored in the instrument can be deleted at any time in case of abnormal running conditions.
We therefore advise to carry
out back-up copies of your data during the various programming phases.

2
3
INTRODUCTION
Congratulations on your purchase of the new KETRON MIDJAY Multi-Player (pronounced ‘mi-dee-jay’). Your
Multi Player is designed and built to provide you with long-term trouble-free performance. Drawing on over 29
years experience in the design and manufacture of musical instruments, the KETRON engineers were able
to optimize the design of the MIDJAY to include comprehensive features such as quick and easy playback
of Wave, MP3 and MIDI Files, the capability to suppress the Lead vocals of a Wave Song, gradually fade
out of one Song into another (Cross Fade), chain up to 10 Songs and have the unit play them back-to-back
automatically (Play List), addition of Styles and Voices to be used as a sound module or Drum machine in
conjunction with an external controller or Sequencer, and a massive 20GB Hard Disk capable of being linked
to a PC/Mac via a USB port for data download and transfer.
Before you start using MIDJAY, please read these instructions carefully to enjoy optimum performance and
a longer service life. This manual can also be used in conjunction with the XPress Manual (that can be
downloaded from our website). Keep this manual in a safe place for future use.
TURNING ON THE MIDJAY
When you turn on the unit, the “MIDJAY” logo will be displayed for a couple of seconds while it boots up. Next
the current Operating System release will be shown on the unit as well. The Operating System resides in ash
and can always be updated to include new functions (as requested by our customers). For further information
on updating the MIDJAY, go to page 36 of the manual.
At the end of the initialization stage (boot), a display will appear with a list of Files contained in the MIDI File
directory, and the related LED will ash.

4
5
1 2 3 4
5 6 7 8
10
9
11
12
13
OUTPUT / CONNECTIONS
1 Out Micro: Separate output for the microphone to be directed toward the external amplier.
2 Out Right - Left / Mono: Stereo output to connect to your stereo equipment/PA/Mixer, etc.
3 Out Monitor: For the connection to a Computer monitor. In order to connect the device to a TV (home TV
or similar equipment), it is necessary to use a PC/Mac video converter for TV. This product is distributed
by Ketron or can be purchased in stores that sell Computer equipment.
4 MIDI In/Out/Thru: Output for MIDI connection toward devices equipped with this type of interfacing.
5 USB: USB component for the connection of the MIDJAY to the Computer. This type of connection is
recommended for the procedures of transfer and reorganization of Files.
6 Headphone: Output for the connection to stereo headphones.
7 Micro In: Input for the connection of the microphone.
8 DC 9V Power In: Connector for the MIDJAY’s dedicated power supply unit.
Important: Use only the power supply unit provided with the MIDJAY.
9 ON/OFF: MIDJAY’s ON/OFF switch.
10 Line In - Left/Right: Input for external audio line. Through the Line In slider, this connection can be used to
control the volume of external equipment (like a CD Player, a Dat, or to record in HD Recording Mode).
Warning: When the MIDJAY is connected to a Mixer, and the mixer’s output is redirected toward
the Line In input, a common audio LOOP effect can take place. Such occurrence could be very
dangerous for the monitors connected to the system (especially for tweeter monitors). In order to
avoid this inconvenience, use the Local OFF function (See Hard Disk recording - Edit).
11 Click: Output for metronome Click. Direct this output toward a Mixer or a headphone amplier. The direct
connection to typical headphones (passive) will not ensure sufcient volume.
12 Micro Gain: Slider to control microphone Gain input
13 Footswitch: Connection for Ketron FS6 - FS13 Footswitch. This component is used as a foot pedal to
control several functions, like Start, Stop, Fill, etc.

4
5
CONTROLS
The controls of the MIDJAY are clearly laid out for easy operation. The buttons on the left side of the unit are
used for functions and in some cases, these functions will change depending on the current situation/use
of the unit.
[Lead Mute] This button is used to remove the Lead Voice (or notes) from a MIDI File or suppress it from a
Wave File.
[Voice] This button is used to select the Voices within the MIDJAY module. These Voices can be played through
an external controller such as the KETRON GP10, a MIDI accordion or MIDI Guitar. The Voices can be recalled
using two different methods: Program Change (see related table) or directly from the MIDJAY panel.
[Menu] This accesses a bunch of functions within the module such as the Play Modes, MIDI settings, DSP,
Footswitch settings, Monitor settings and Metronome Click settings.
[Alphab] This button is in conjunction with the Play List buttons ABC, DEF... Z to search for Files alphabetically
within any selected Folder.
[Lyrics/Text] This is used to display lyrics or text associated with MIDI Files or Wave Files.
[Cross Fade] It allows the capability of obtaining a fading effect between one Song and the next (works on
MIDI and Wave Files).
[Registr.] This is used to call up different settings of MIDJAY for quick performance and access to Song
settings.
[Play List] This button grants access to the various Play Lists (combination of up to 10 Songs that are instantly
recalled). They are displayed by simply pressing the Play List buttons 0-9.
[Disk] This activates access to the Disk functions when used in conjunction with the Edit button (Copy, Move,
Delete, Rename, New Folder) for File or Song management.
[Edit] This button is used for various edit purposes. According to the type of File chosen (Wave, MIDI, MP3),
the Edit command will ensure different functions.
[Tap/Tempo] The Wave and MIDI File Modes allow to display and edit the time value of the current Song. In
Style Mode, the key operates in Tap\Time function.

6
7
[Transpose] It is used to edit the transposer. This function works with Wave, Style and MIDI File.
[<</Split] This button is used to rewind a Wave, MIDI File or MP3 which is playing. In Arranger / Style Mode
this button sets the Split point of the Arranger.
[Record] This button is used to record all activity that happens on the MIDJAY in real time or record a signal
coming in through the Line IN input jack. The File is stored as a Wave File directly onto the Hard Disk.
[>>/Voice (Level)] This button is used to fast-forward a Wave, MIDI File or MP3 Song. It is also used to set the
level of the Voice being played through the Module (in Arranger Mode when the Style button is turned ON).
[Start/Pause] This buttons is used to start playing the selected File (Wave, DJ Loop, Grooves, Effects, Styles,
MIDI Files and MP3s).
[Stop] This button is used to Stop playback of the current selection. If pressed together with the Start/Pause
button (Full Stop), all activity is stopped at once regardless of the current selection.
Using the keys above the sliders, it is possible to access quickly the different types of Files.
[Wave] It is used to access the Files with a Wav extension. It is advisable to store all Wave Files in this Folder
when copying Files from your CDs or Computer into the MIDJAY. The Wave File is an uncompressed audio
File, created by Microsoft, which has become a standard in the world of PCs.
[DJ Loop/Groove/SFX] This button is used to display the Folders that contain the DJ Loops, Grooves and
Effects. Selecting any of the Folders and going in, displays the associated Files.
[Style] This button is used to display the Styles within the MIDJAY. Initially the ROM Styles are displayed.
The Disk Styles can be displayed by pressing the Exit button. We advise that you copy all your Styles into this
Folder as well.
[MIDI File] It is used to access the Files with a Mid extension. MP3. It is used to access the Files with a MP3
extension. The MP3 File (MPEG-1 Audio Layer-3) is a compressed Audio File whose size occupies about 1/12
of the original Wave File.
[Micro (Vocalizer)] The Micro key grants the access to functions specically dedicated to setting the
microphone and the Vocalizer (optional).
[Talk/Line IN] With the Talk key, it is possible to eliminate the Reverb effect from the Microphone.
When the related LED ashes, the microphone is in the Dry Mode. The corresponding slider volume is used
to control the volume of the device (such as an external CD or Minidisk Player) that is connected to the Line
IN input on the side of the MIDJAY.
These Files each have independent volume controls at the bottom so you can evenly balance between
different Songs that are playing simultaneously!
To the right of the Player are the data controls used to select the various Files as they are shown on the
screen.
[Alpha Dial] The Alpha Dial rotary command is used to modify a value or to position oneself on a chosen File.
[Enter] This is used to conrm an operation such as playing a highlighted File or conrming a displayed
message.
[Exit] Is used to get out of a current operation or in some cases (such as with Styles or Voices) toggle between
different types.
[Save] It is used for all saving functions. If pressed within the Wave, DJ Loop/Groove/SFX or MP3 Folder,
the Machine.ini File is saved; this is the File which contains all information regarding the settings that are
supposed to be working at the time of startup of the instrument.

6
7
WAVE
The MIDJAY comes with some bonus Wave Files for your listening and performance pleasure. These Files
are found in the Wave Folder of the internal Hard Disk. Of course you can always download your own Wave
Files or music from existing CDs into the Player for future playback.
PLAYING WAVES
1. With the unit turned ON, press the Master Folder Wave
Player button (this button should be on by default whenever
the Player is turned ON and the blue LED should light up).
The top of the screen shows the Folder location “C:\Wave”
and it lists all the contents of this Folder. The rst column
shows the type of File with a small icon.. (The speaker
icon is used to denote a Wave File, while the Folder icon is
used to denote Folders within this directory which contain
other Wave Files of a certain category or other Folders
with still more Wave Files). The second column shows the number assigned to each File within the Folder
as it was loaded into the Hard Disk of the MIDJAY. This makes searching for a File numerically easier (using
the numbers 0-9)... if you remember the number that was assigned to the File in question.
2. Highlight (using either the Alpha Dial wheel or “∧” and “∨” Cursor keys) the File you wish to play and
press Enter or Start/Pause to start playing it. If you select a Folder “Folder sign here”, the Files within the
Folder will be displayed once you press Enter. Proceed as above to select and play any of the Files within
the selected Folder.
3. To pause a File while it is playing, simply press the Start/Pause button. The associated light (LED) will
ash.
4. Playback will resume from this point if this button is pressed once more.
You can select another File (while the rst is still playing) and press Enter to instantly start playing the new
Song (the previous Song is stopped immediately).
The Song Position buttons “<<” and “>>” can be used during the performance to either fast forward or
rewind the Song to a specic location by pressing and holding either one. The “SONG TIME” screen displays
to show the name of the File playing along with the total time of the Song and the time left for the Song to
end. During a performance you can periodically press one of these buttons (do not hold down) just to see how
much time is left for you so you can prepare the next Song for the performance. DJs will nd this very useful.
WAVE MENU
In order to enter the Edit Mode pertaining the Wave File, press
the Wave key and select one File, then press the Edit key.
The functions related to Wave are the following:
Loop: When the Loop function is active (ON), the Wave File
will start again from the beginning, upon reaching the end,
without having to press the Enter or Pause key.
It is possible to select the Loop function using the Cursor
keys and to turn it on or OFF using the Enter key.
Info WAV: This function displays the data pertaining the
Wave currently playing:
Title, Size, Rate, Tyle, Bit, Time.
It is possible to select the Info Wave function using the Cursor keys, and to accept it pressing the Enter key.
The following Functions, which are active in the Wave Folder, are common also in the other DJL, MIDI File,
and MP3 Folders.

8
9
COMMON FUNCTIONS
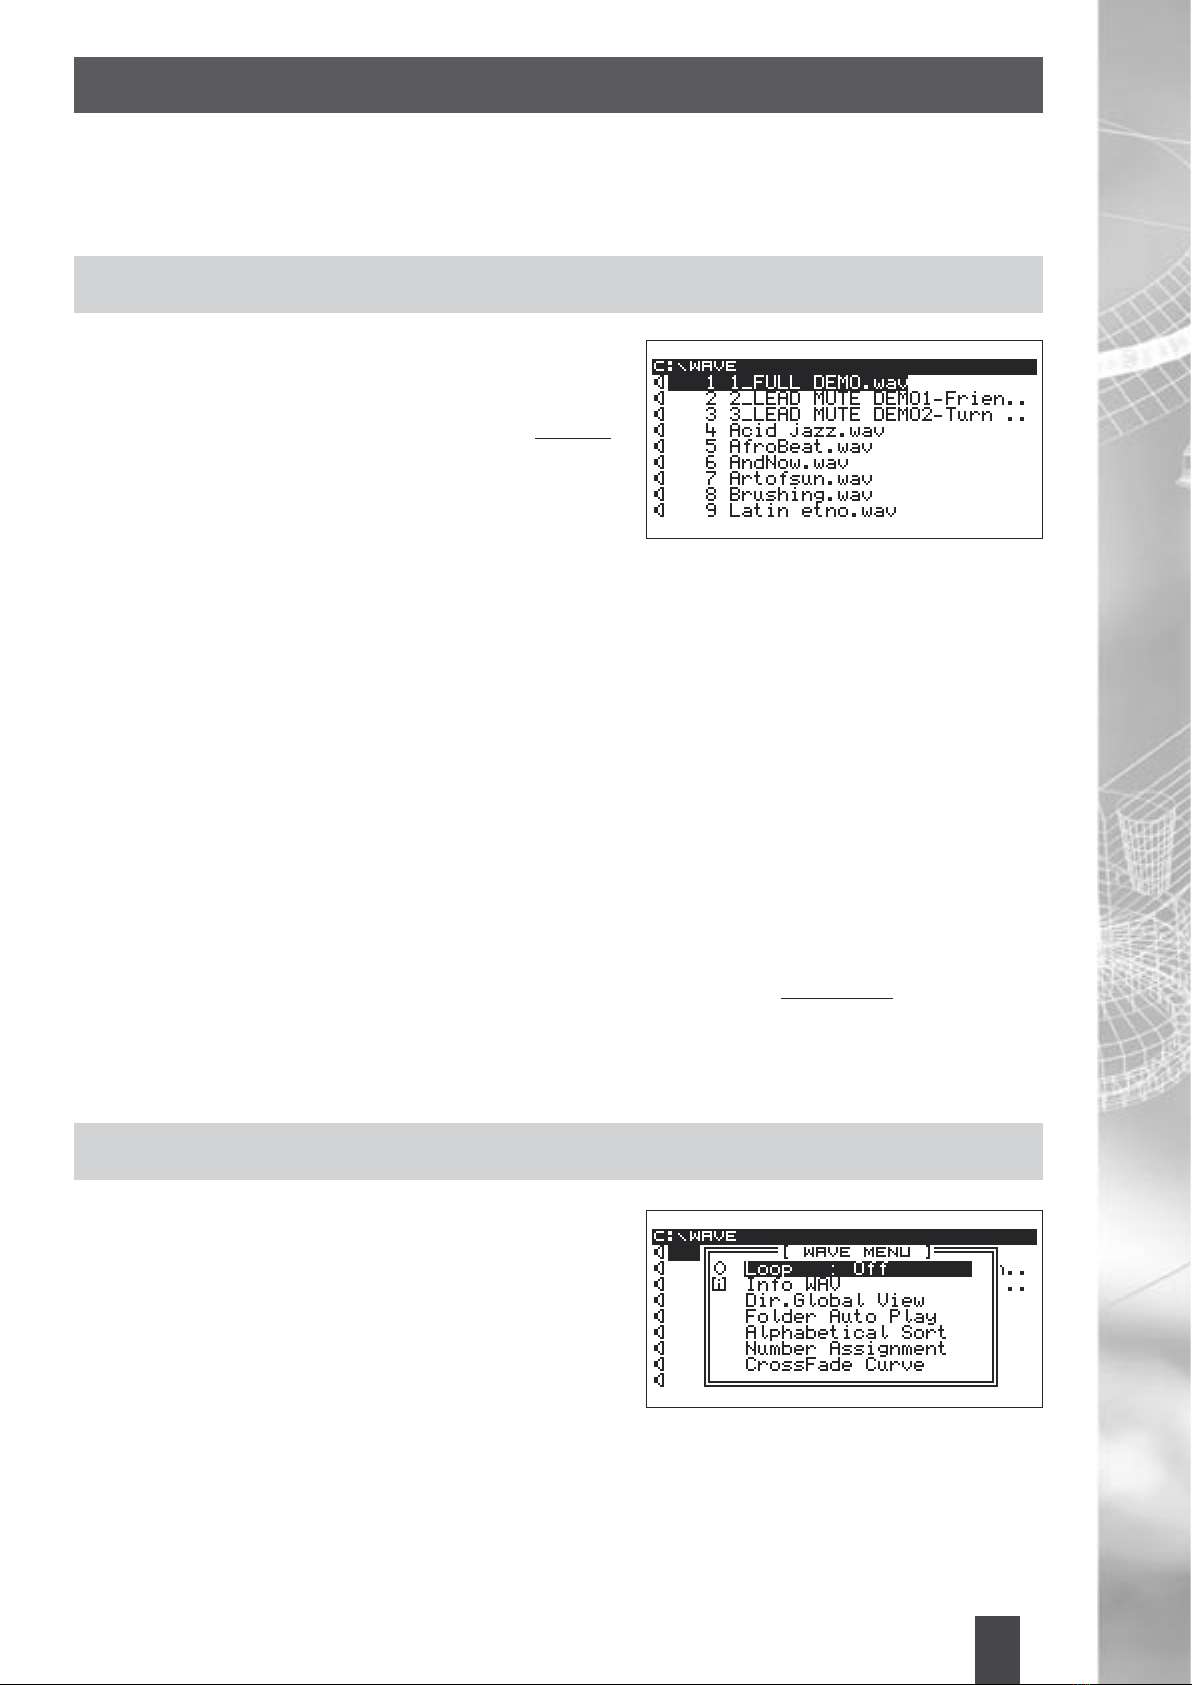
Dir. Global View: It displays all types of Files, also those which do not have a Wav extension. It is possible to
select the function using the Cursor keys and to turn it on or OFF using the Enter key.
Folder Auto Play: With this function it is possible to execute all Files contained in the current Folder; when
the last Song has been executed, the rst will be played back automatically. It is possible to select this function
using the Cursor keys and to turn it on using the Enter key.
Alphabetical / Numerical Sort: This function displays all Files, contained in the directory, in alphabetical
order or in numerical order. The progressive number assigned in this case concerns only the displaying of
the Files, and is not stored permanently in the memory within the File itself. (On the contrary, this permanent
storage occurs when using the Number Assignment function - See below).
Furthermore, the Alphabetical or Numerical option species whether the Number Assignment procedure will
be performed also by following the alphabetical or numerical order. The Alphabetical / Numerical selection is
carried out with the Cursor and Enter keys.
Number Assignment: In standard Mode, the MIDJAY typically arranges the Files’ names alphabetically and
numbers them in chronological order (that is, following the order of input). Therefore, when a new File is
added, the number assigned to the Files inside the Folder changes.
The Number Assignment function allows you to associate a progressive number with each File. In this way, the
number remains stored in the memory, even when additional Files are added at a later time.
IMPORTANT: Whenever a new Number is assigned, the directory is updated, according to the pre-
existing Files, and, consequently, the Files’ numerical and alphabetical lists are modied.
Therefore, it is recommended not to perform too often a Number Assignment procedure, as, each time, the
entire repertoire’s numerical order changes completely. It is advisable to assign Numbers only during the initial
organization of the Disk and of the various directories. This procedure will ensure that the repertoire’s list, once
printed and organized for several Folders, will remain current in time. New Files, that are stored afterwards in
the MIDJAY, will be added at the end, with progressive numbers and in alphabetical order, without changing
the pre-existing list and numerical assignments.
Here is the procedure to follow:
1. Select the Folder which you intend to use for the Files’ numerical assignment and press Edit.
2. Select the Number Assignment function with the Cursor keys and press Enter.
If the Files have never been numbered, the message “Assign number to Files” will appear.
Press Enter to conrm. The display, according to the active Folder, will show the message “.WAV (or .MP3 or
.MID, etc.) Files only” - “All Files”.
The “.Files only” option allows you to number only those Files whose extension corresponds to that of the active Folder
(for instance, only Wave Files, if the Wave Folder is active). On the other hand, if the “All Files” option is chosen, all
Files in the Folder will be numbered, even those with a different extension: MID, MP3, REG, PLS, DJL, GRV.
The Files with a number assignment will show a small triangle on the right side of the number.
Whereas, if the Files have been numbered at least once, a double message will appear: “Assign number to
Files” - “Remove number from Files”.
In order to continue with a new number assignment, choose Enter in the rst function. Otherwise, if you intend
to erase all numbers previously stored, select the “Remove number from Files” option, and then press Enter.
Cross Fade: This feature grants the ability to change gradually the volume in-between an outgoing Song
(fade out) and an incoming one (crescendo). It works between two Wave and two MIDI Files. In a Play List
environment, this feature works also among Wave, MP3, and MIDI Files.
The Cross Fade curve can be set in the Edit Menu, with three different typologies: Slow, Medium or Fast.
The chosen Curve is selected as follows:
1. Select the Cross Fade Curve with the Cursor keys and view the three available Modes with the Enter key.
2. Select one of the three Modes with the Cursor keys and press the Enter key.

8
9
THE MANIPULATION OF WAVE FILES
There are some interesting functions that MIDJAY can do to Wave Files to better personalize and enhance
your performance. Until now, one of the limitations to Audio was being able to manipulate the Songs so that
you could for an example change the speed/temp without changing the pitch or change the key of a Song
or take out the Lead Voice of a Song so you could sing over the music. Thanks to new technology and great
Engineering, KETRON has provided these functions in yet a tiny little box!
SUPPRESSING THE LEAD VOICE FROM A SONG - LEAD MUTE
With the Lead Mute, simply pressing this button suppresses the Lead Voice while the music continues to
play and the audience can now sing the Lead parts or choral part in time with the music. At the touch of a
button, the Lead is restored. When playing back a Wave File, the Lead Mute button provides the capability to
‘suppress’ the Lead Voice in a Song, allowing for someone else to sing the Song with their own expressions
and feelings. (The effect of this greatly depends on the Wave File being used and as such will be felt more in
some than others). To suppress the Lead Voice or part, simply press the Lead Mute button when the Wave
File is playing. This feature does not work on MP3 Files. Again it should be noted that this feature will have a
better response on many Wave Files but not all.
WAVE PITCH AND STRETCH
The MIDJAY allows to edit the Wave time in two different
ways: Pitch and Stretch.
Pitch: editing the Wave time through the Pitch means that
the time is modied by raising or lowering the Pitch, that is
the tuning of the Wave.
Stretch: With the Stretch Mode, only the Wave time is
edited. The Pitch remains the original one, independently of
the time value.
Here is the procedure to perform the editing of the time Wave:
1. Select the Wave File and execute it with the Start or the Enter key.
2. Press the Tempo key, and, with the Cursor keys, select the desired Mode (Pitch or Stretch).
3. The percentage value of time increase or decrease can be modied with the Alpha Dial wheel.
If the time is increased using the Stretch Mode, it is possible to edit the value even before executing the File.
This procedure allows you to perform the change of time without bothersome skips. It is possible to record the
Wave on Hard Disc Recording with a modied time value. This allows us to recall the Wave quickly, without
having to reset the Time changes every single time; furthermore, the original File will remain unchanged.
WAVE TRANSPOSER
With this function, you are no longer forced to sing along to a Song in the key in which it was initially performed.
Some artist go through months and even years of vocal training and exercise to be able to perform the way
they do so trying to imitate them in a ash just might not cut it. Rather than ‘meeting the music’, why not have
the music ‘meet you’ in the range you feel more comfortable with? Can this be done? With MIDJAY, yes it can.
It is now possible to transpose a Wave File or Song so you can sing along or perform in the key or tone you
feel more comfortable with.
To proceed:
1. Select and play the Wave File.
2. Press the Transpose button.
3. While the “Transpose” screen is up (for about 4 seconds), change the transposition value buy either using
the Alpha Dial wheel or using the Cursor keys.

10
11
While working in “Transpose” Mode, press the Edit key. 4 sound processing Modes will appear. This is due to
the fact that different sound results are obtained with different transposition materials. However... the choice
is yours. Select the Mode with the Cursor keys and turn on the feature with Enter.
It is possible to record the Wave on Hard Disc Recording with a modied transposer value. This will allow us
to recall the Wave quickly, without having to reset the Transposer Value each time.
Keep in mind that the Transposition Modes are available only for the Master Folder Wave!
FOLDER AUTO PLAY FUNCTION
With this feature it is possible to select a Folder and execute its content. In this section is explained the way to
operate this Folder, which is obviously similar to that of other Master Folders (MIDI Files or MP3).
Here is the procedure:
1. Position yourself on the Folder that you want to execute.
2. Press the Edit key, and position yourself with the Cursor keys on the Folder Auto Play function (checked
ag); press Enter.
3. Press now Exit to exit the icon, and press the Start key. At this point the entire content of the Folder will be
executed, starting right away from the rst Song which the Folder contains!
Some Suggestions:
If you want to start from a certain point of the Folder content, in Folder Auto Play function, this is the
procedure:
1. Position yourself on the Folder that you want to execute.
2. Press the Edit key, and position yourself with the Alpha Dial on the Folder Auto Play function (checked
ag); press Enter.
3. Press now Exit to exit the icon, and press Enter again. This will allow you to view the selected Folder.
Position yourself with the Alpha Dial on any Song, contained in the Folder, that you intend to execute, and
press Start.
4. Now the Start key will execute, from that point on, all the Songs contained in the Folder!!

10
11
DJ LOOP/GROOVE/EFFECTS (SFX)
There are many DJ Loops and Effects within the MIDJAY
Player and these effects can serve lots of purposes in terms
of enhancing your performance or simply ‘spicing it up’ a
little. Adding sounds like applauding, sounds of the ocean,
birds, animals, machine sounds etc can be very exciting
when played along with your music, and each one of these
has its own great uses during performances. Here is how you
play DJLOOPS, Grooves and Effects with the MIDJAY:
1. With the unit turned ON, press the Master Folder DJ Loop/Groove/SFX Player button. The corresponding
blue LED should turn on.
2. The top of the screen shows the Folder location “C:\SFX_LOOP” and it lists all the various Sub-Folders
within this Master Folder. The rst column shows the Folder-type sign. The second column shows the number
assigned to each Folder/File as it was loaded into the Hard Disk of the MIDJAY.
3. Highlight (using either the Alpha Dial wheel or “∧” and “∨” Cursor keys) the Folder you wish to access and
press Enter to display the Files within this Folder
DJ LOOPS
There are certain chord structures or changes that are the
fundamental musical structures to a particular type of music,
(as an example it is usual for a Merengue or Reggae to have
3 major chords or 2 majors and one minor chord). Picking
out the common chord changes (with Bass and chords) for
many different kinds of music and incorporating these with
live Drums is what KETRON has introduced into the MIDJAY
as DJ Loops.
The DJ Loops are made of renowned musical loops
incorporating Drum, Bass and instrumental lines that stand out within a particular genre of music.
The Loop types have been arranged into Folders within the Hard drive that clearly distinguish the kinds of
loops within the Folder (Acoustic Drum, Afro, Chill Out, Oriental, etc).
Select the chosen Folder; with the Alpha Dial or the Cursor keys, select the DJ Loop and press the
Enter key.
The DJ Loops within this Folder are now displayed. Select any of the loops and press Start/Pause to start playing
immediately or Enter to load into RAM - you can then press Start/Pause when you are ready to play the loop.
You will now be at the DJ Loop screen that shows you the name of the Loop selected and its associated
volume, a Voice (that can be played via an external MIDI device/controller) and its associated volume, the
current Split point and the Beats Per Minute (BPM) and Transposition value.
The DJ Loop consist of different sections: Intro, A, B, C, D, Fill, Break and End. To activate the different
sections, use the 1/8 keys under the display.
You can either stop the loop musically by pressing the End button or stop it abruptly by pressing the Stop
button.
Press the Exit button to get back to the list of other DJ Loops available for your selection.
NB: To add more to your effects, you can change from one variation to another (using the Play List buttons
Intro, A, B... End) instantly without waiting for the Loop to complete before changing. This is accomplished by
pressing the Cross Fade button while playing the loops.

12
13
GROOVES
When you select this Groove Folder, you will be brought to a
screen showing you all the Groove Files within the Folder.
Highlight and select the Groove you wish to listen to and
press Enter to load the Groove. “Grv. Loading” will be
displayed while the Groove loads.
You will now be at the Groove screen that shows you the
Groove selected and its associated volume, the Voice (that
can be used via an external MIDI device/controller) and its
associated volume, the current split point, the Bar counter
and the Beats Per Minute (BPM) and Transposition value.
Press Start/Pause to play the Groove. The Grooves within the unit have been broken down into various
variations (which can be accessed or changed using the Play List buttons (Intro, A, B, C, D, Fill, Break and
End). You can either stop the Groove musically by pressing the End button or stop it abruptly by pressing the
Stop button. Press the Exit button to get back to the list of other Grooves available.
EFFECTS (SFX)
These effects are special sounds, effects, Voices etc that can
be used to enhance your performance at any time.
Selecting this Folder, you will nd some Files with Special
Effects, which can be instantly activated, and several
attached Sub-Folders, with many other Effects divided
according to genres.
Highlight and select the effect you wish to listen to and press
Enter or Start/Pause to start playing it. Remember that these
can be used in conjunction with the Wave or MP3 Files.

12
13
PLAYING MIDI FILES
In order to play a MIDI File, turn on the MIDJAY.
1. Press the Master Folder MIDI File Player button. The top
of the screen shows the Folder location “C:\MIDI File” and
it lists all the contents of this Folder.
The rst column of the screen shows the type of File with a
sign. These Folders might contain other Folders or Files as
well. (You can use Folders to easily group and associate
different kinds of Songs or artists for an example). The
second column shows the number assigned to each File
within the Folder as it was loaded into the Hard Disk of the MIDJAY.
2. Highlight (using either the Alpha Dial wheel or “∧” and “∨” Cursor keys) the File you wish to play and
press Enter or Start/Pause to start playing it. If you select a Folder “Folder sign here”, the Files within this
Folder will be displayed once you press Enter. Proceed as above to select and play any of the Files within
the selected Folder.
EDITING A MIDI FILE
In order to edit a MIDI File:
1. Select a MIDI File and play it with Start or Enter. Press the
Edit button to go to the “MIDI File” Edit Menu where the
Editable parameters are located.
2. Select “GM Part” and press Enter to access the “GM Part
Edit” screen.
You can now modify the various General MIDI (GM) parts
as you see t by using the Cursor “∧” and “∨” keys to
highlight the associated selection and changing its value
with the Alpha Dial wheel.
Part: This is associated with the track of the MIDI File. (Think
of this as your band with a maximum of 16 Players!!). As
you turn the Alpha Dial wheel to go through all 16 parts,
their associated Voices, Volumes... etc are displayed on the
screen. There are 16 parts in total and for each part, you
have its associated
• Voice: This is the Voice that is used by this part (e.g.
Piano, Guitar). You can highlight this and change the
Voices for this part using the Alpha Dial wheel.
• Volume: This determines how loud the selected Voice (above) is relative to the other Voices of the other
parts/tracks.
• Mute: Used to turn ON/OFF this particular part.
• Solo: Used to play only this particular part and mute all others.
• Shift: Used to ‘tune’ the Voice currently being used.
• Pan: This is used to create a Stereo effect of having this particular Voice more to the left or right speakers.
Values of 0-63 are for the left, while 65-123 are for the right. The value of 64 is in the middle for both left and
right speakers equally.
• Rev: Used to adjust the Reverb level.
• Effect: For the type of effects being applied to this Voice/part.
• Level: Used to adjust the level of the Effects being used.
• Rx Ch: This is the MIDI reception channel. Incase you want to communicate with other devices, this is
used to map this part to MIDI information coming into the MIDJAY’s MIDI input.
• Tx Ch: This is the MIDI transmission channel for this part. For communication with other devices, this is

14
15
used to map thi spart to MIDI information leaving the MIDJAY via the MIDI out ports to another MIDI device.
• Edit [*]: This is used to access the “Voice Edit” screen to
Edit the current Voice selected.
The editable parameters include:-
• Cut Off: Value after which the sound is no longer heard.
• Resonance: Filter resonance value.
• Attack: Value used to denote when the sound is heard
immediately a key is pressed on the MIDI controller.
• Decay: Value used to denote the gradual decrease in the
volume of the sound after a key is pressed on the MIDI controller.
• Sustain: Value used to denote how long a sound is maintained before it reduces in volume after a key is
released on the MIDI controller.
• Release: Value used to denote when the sound is terminated after the key is released on the MIDI
controller.
• LF1 Rate: Checks the vibrato speed, according to the Pitch.
• LF1 Depht: Checks the vibrato depth, according to the Pitch.
• LF2 Rate: Checks the vibrato speed on the lter.
• LF2 Depht: Checks the vibrato depth on the lter.
• LF3 Depht: Checks the vibrato depth on the range.
These parameters can be edited separately for all the tracks, with the exception of the Drum part (Part 10).
That is because the Mixer function is located in part 10 instead of Edit.
In the Mixer part it is possible to edit Volume, Reverb, Pan and Tune, for each family of the Drum part. Even here
the values to be edited are selected with the Cursor keys, and the value can be edited with the Alpha Dial.
SAVING AN EDITED MIDI FILE
When the changes have been implemented, without exiting
the “GM Part Edit”, stop the MIDI File with the Start/Pause
key and follow this procedure:
1. Press the Save key.
2. Now it is possible to decide if to save the MIDI File in
Initial Mode or in Global Mode. One can toggle between
the two Modes with the Cursor keys and conrm the
choice with Enter.
Initial: This means that the changes implemented will substitute only the Controls and Program Change at
the beginning of the track.
Global: This means that the changes are valid for the entire track.
Following is an explanation of the two options: Let’s assume that we intend to edit the Volume of part 01 of a
MIDI File. Furthermore, let’s assume that part 01 contains different volume controls. By selecting Initial, the
new volume value will substitute only the rst one which is found according to the time, and all the other ones
will be left unchanged. On the other hand, if Global is chosen, the new Volume will supersede all the Volume
controls of that part.
3. Name the MIDI File using the 0-9 keys under the display, then press Enter. If the original name is left, the
following screen will appear: “Warning. File... .MID is present in this Folder. Overwrite?”.
By selecting OK, the new File will substitute the original one; by selecting Cancel, the procedure is voided.
Otherwise, if the name is edited, a new File is created and the original will remain unchanged.
The OK and Cancel options can be selected with the Cursor keys and can be conrmed with the Enter key.

14
15
INSTANTLY MUTE A PART FROM A SONG - LEAD MUTE
There are times when as you play, you will want to eliminate one of the parts of the Song (e.g. take out the
Drums, Bass, Lead Part...). When playing back a MIDI File, this provides the capability to eliminate the Lead
part in a Song, allowing for someone to either sing or play the Lead part in real time (or a variation of it). In
order to achieve this when playing the MIDI File, simply press the Lead Mute button to mute the Lead track.
The track which this button is applied to can be changed as follows:
1. Press the MIDI File key.
2. Press Edit.
3. With the Cursor key, select Function and choose the feature with the Enter key.
4. Edit the value with Alpha Dial.
ASSOCIATE WAVE OR MP3 TO THE MIDI FILE
You can also associate a MIDI File with a Wave Song File or MP3. This is a cool feature that allows you to
associate sounds that are not possible with MIDI (due to its limited sound library) with any existing MIDI File.
With this feature, you can now focus more on your performance and audience and let MIDJAY automatically
call up Wave Files for you during the Song, or do this as you perform. Imagine playing a MIDI File called “I will
Always Love you” and having the real sound of rain or birds or the seashore or... just setting the right romantic
scene and these parts coming in at just the right time!!
To do this automatically so that each time you play the MIDI File, it will automatically call up the Wave File
when or as needed;
1. Select a MIDI File and start playing it (as shown above).
2. As it plays, press the Record button. You can now select a File from the Wave Folder or even the DJ Loop
Folder (where you have all the effects) and play it at the appropriate time (the MIDI File Folder LED will
ash). At the end of the procedure, press again the MIDI File key and the Stop key in order to complete the
registration.
3. At this point, MIDJAY will show a display indicating that the executed File has been edited and that it needs
to be saved (“File: ... has changed. Save changes?”).
In order to continue with the saving process, press Enter and then follow the usual saving method; on the
other hand, if the changes implemented do not need to be saved, and if you want to exit the operation,
select Cancel and press Enter.
DRUM REMIX
One of the poorest qualities of MIDI Files resides in the Drums (due to lack of the ‘real human touch’/nuance
and also in the fact that like a record, it can only be played the same way over and over again. Thanks to the
special Drum Remix feature, these factors are discarded when using the MIDJAY. You can now play a MIDI
File and replace the song’s Drum tracks with any Style found in the MIDJAY. Not only that, but you can totally
control the Style (Intro, Arranger A-D, Fills and Endings) as you play in real time. This will denitely bring your
music to live or add/make a great difference.
How would you achieve this easily?
1. Select the MIDI File you want to play with and press Play.
2. As the Song starts to play, press the Style button and then press the Remix button to turn on the Remix
feature.
3. Once you select the Style you want to use and press Enter, the Style replaces the MIDI Drums with the live
KETRON Drums. Play around with the Arranger A-D, Fill ins and Ending buttons to add variation to your
music. It is advisable to keep the timing of the Song similar to that of the Style used (so, if the Song is in
a 4/4 time, select a Style that is in a 4/4 time and not say a 3/4 time - strange but not bad results could be
achieved though now that we think about it.

16
17
4. You can even use the Alpha Dial wheel to change the Tempo of both the Style and the MIDI File in real
time. Your real Drummer is locked in right there with you as you perform.
5. You can also toggle between the original Drum tracks of your MIDI File (Remix OFF) and those of MIDJAY
(Remix ON), buy repeatedly pressing the Remix button as you perform.
6. To save the Remix function, press the MIDI File key and, during the execution of the two sections, press Save.
Now a window opens which is used to name the MIDI File. If the same name is kept, the MIDI File will be
overwritten; if the name is changed, a new File will be created and the original File will remain unchanged.
As with other procedures, use the Enter key to conrm that the File has been saved.
MORE FUNCTIONS ASSOCIATED WITH MIDI FILES - MIDI FILE MENU
There are some functions that are associated only with MIDI Files. These functions can be accessed by
pressing the Edit button (so long as the MIDI File LED is on). Press the Edit button to access the “MIDI
File Menu” screen.
GM Part: This is used to access the “GM Part Edit” screen and edit the various parts of a MIDI File.
Marker: Imagine having the capability to now jump instantly from one part of a Song to another as you perform
live and not having any delay what so ever as you switch and play. You can now create your own ‘loops’ within
a Song or better still remix the entire Song so your performance really centralizes around you. You can now
set 16 Marker points within any given MIDI File / Song.
MARKERS
When Markers have been inserted in a MIDI File, they will appear in the display when the MIDI File is started.
If the MIDI File contains a text used to display the Markers, the Lyric/Txt key should be pressed or the Marker
function should be accessed from the Edit Menu. Once the Markers have been displayed, it is possible to
toggle between Markers using the 0-9 keys or using the Cursor keys; press then Enter to conrm.
When you go from one section to the next of a specic Song, the change can occur at the end of the beat or
at the end of the part. This option can be chosen with the Marker Jump Mode function which is found in the
Function Edit Menu.
FUNCTION
This is used to control the following functions associated with
MIDI Files. Move inside this menu with the Alpha Dial and
with the Cursor keys.
1. Drum & Bass: When this function is active, all tracks in the
MIDI File are placed in Mute function, with the exception
of the Base and the Drum-Set. The function can be turned
ON or OFF through the Alpha Dial or the Enter key.
2. Play Mode: With this Mode it is possible to access the
MIDI Files. The Modes available are two: Fast and Normal.
Fast: When Fast is selected, the rst beats of the MIDI File (those which do not contain notes but only
controls) are read in a very quick way. Reading the MIDI File becomes normal again when the rst note is
reached. With this function, the time necessary to start the MIDI File after the pressure of the Enter key
(Start/Pause) is almost entirely eliminated.
Normal: When the Normal Mode is selected, the MIDI Files are read in a normal way, without speeding
up the reading of the initial beats. To toggle between one Mode and the next, select the function with the
Cursor keys and choose the selected Mode with the Alpha Dial or with the Enter key.
3. Intelligent Transposer: When the Intelligent Transposer function is active, the sounds contained within the
MIDI File are brought back to their natural Range. In this way, the MIDI Files do not lose their original natural
sound, even when transpositions with very high values are performed.

16
17
4. Marker Jump Mode: This Mode allows you to establish if the passage between one Marker and the
next should occur at the end of the part or at the end of the beat. To toggle between one Mode and the
next, select the function with the Cursor keys and choose the selected Mode with the Alpha Dial or with
the Enter key.
5. Drum Mixer: This Mode displays the parameters which concern the sections of the Drum part. It is possible
to engage the Drum Mixer function by selecting the related (*) symbol with the Cursor keys and by pressing
Enter. For each section, it is possible to edit: Volume, Reverb, Pan, and Tune. It is possible to toggle
between one value and the next with the Cursor keys, and then to execute the change with the Alpha Dial.
To cancel the value immediately, press Enter.
6. MIDI Filter Rx: This function allows you to turn ON or OFF the reception of some MIDI Controls. In order
to choose the feature, select MIDI Filter Rx and then press Enter. The Controls can be selected with the
Cursor keys; Alpha Dial or the Enter key can be used to turn on or OFF the function.
The control is ltered and then discharged if set on ON.
7. MIDI Filter Tx: This function allows you to turn ON or OFF the transmission of some MIDI Controls. In order
to choose this feature, select MIDI Filter Tx and then press Enter. The Controls can be selected with the
Cursor keys; Alpha Dial or the Enter key can be used to turn ON or OFF the function.
PLAYING MP3 FILES
MP3 Files are just compressed versions of Audio Files. These
Files are compressed in order to speed up downloading or
transfer time through the internet or allow smaller devices
(such as hand held MP3 Players) carry many Files at one
time for instant playback. The MIDJAY comes with some
bonus MP3 Files for your listening and performance pleasure
(a lot are similar to the Wave Files in the Wave Folder). These
Files are found in the MP3 Folder of the Hard Disk. Of course
you can always download your own MP3 Files into the Hard
Disk of the Player MIDJAY
With the unit turned ON, press the MP3 Player button.
The top of the screen shows the Folder location “C:\MP3” and it lists all the contents of this Folder. The rst
column shows the type of File with a sign. The second column shows the number assigned to each File within
the Folder as it was loaded into the Hard Disk of the MIDJAY.
Highlight (using either the Alpha Dial wheel or “∧” and “∨” Cursor keys) the File you wish to play and press
Enter or Start/Pause to start playing it. If you select a Folder, the Files within the Folder will be displayed
when you press Enter. Proceed as above to select and play any of the Files within the selected Folder. You
can instantly select another File (while the rst is still playing) and press Enter to start immediate playback.
You can pause the Song by pressing the Start/Pause button, and resume playback by pressing this button
once more.
MP3 MENU
You will nd a few functions associated with the MP3 Files.
To access this menu, use the Edit key (obviously only when
the Master Folder MP3 LED ashes); move within this menu
in the usual way, with Alpha Dial wheel and the Cursor
keys, and then select the function with Enter.
Eq. Hig. / Eq. Low: This function refers to the Equalizer for
MP3 with two High and Low bands. Adjust the parameters
at will.

18
19
PLAYBACK OF MULTIPLE FILE TYPES (MULTIPLAY)
From here on it gets more and more interesting. With one File playing (e.g. Wave), it is possible to select
another File from another category (e.g. MP3) and also have that File playing together with the Wave File that
was initially playing. To achieve this:
1. Select and play a Wave File as shown above under “Wave Files”. The Wave LED stays ON.
2. As this File is playing, press the MP3 button to access the MP3 Folder on the Hard Drive of the MIDJAY
(or MIDI File or any other). Also the Start/Pause light goes of while the Stop light comes ON denoting the
current status of the current selection... no File is playing yet. This scenario is true for all cases when more
than one File type is being played... the LED associated with the initial Files ashes while that associated
with the current selection stays on steady.
3. Scroll up or down the list either with the “∧” or “∨” Cursor keys or the Alpha Dial wheel to highlight the
Song or File you wish to play. You can now start playing this Song either by pressing the Start/Pause button
or the Enter button.
3. Use the associated volume sliders to adjust and balance the volumes accordingly. Remember if you have
both the Wave and MP3 sliders up, you will hear both Songs being played simultaneously!
4. If you want to stop all Songs that are currently playing at any given time, simply press the Full Stop (both
the Start/Pause and Stop) buttons simultaneously.
You can now manually mix or ‘Morph’ from one Song into another by simply playing the Songs within the
Wave, MP3 and MIDI File Folder and using each one’s respective volume control to adjust what is actually
being heard. So start playing a Wave File / Song (with its volume turned up). As it plays, select an MP3 Song
with its volume turned down. Press the Song position button “>>” once to see how much time is left. As the
Song ends, go to the MP3 Folder and start the next Song. Now gradually reduce the volume of the Wave Song
while you increase the volume of the MP3 Song. The same can be achieved with the MIDI Files, Grooves
and Effects and even the Styles (for the musician who wants to easily ease on from music to his performance
without stopping).
NB: Remember that the blue light ashes when another Folder is being worked with while the previously
selected Song is still playing. Controls such as Start/Pause and Stop will only affect the current selection i.e.
the selection or Folder with the steady light (ON), while the ashing light can be seen as what is going on in
the background. Hence to stop a particular Song, make sure the Song is in the current active Folder.
QUICK SEARCH FOR MUSIC AND FILES
With the massive 20GB of Hard Disk storage, it possible to
have hundreds and hundreds of Files within each Folder.
There will soon come a time when it will be difcult to manually
scroll through each File in search of a particular Song. This is
why two express search Modes have been included for your
convenience when trying to look for a particular Song.
1. Numeric Search: This can be obtained by using the Play
List numeric buttons (0-9). Whenever a Song or File is
loaded into the Hard Disk of the MIDJAY, it is assigned a
number in succession (1, 2, 3, ....). Regardless of the Folder you are in, if you know the number that was
previously assigned to a Song, you can enter its number directly by using the Play List numeric buttons (once
in that Folder). The “File Number” screen will prompt you for the numbers after you enter the rst one.
2. Alphabetical Search: This search can be obtained by pressing the Alphab. button.
With the corresponding light ON, the “Alphab. Finder” message will be displayed on the screen.
Single Dir: la ricerca viene eseguita solo nella cartella attiva.
Global Dir: la ricerca viene eseguita su tutto l’Hard Disk.
You can now use the letters of the Play List buttons (ABC, DEF...) to select the letters of the File you would
like to look for. Press Enter to go to that File.
Table of contents
Other KETRON Accessories For Musical Instruments manuals