KETRON DG100 User manual

Owner’s Manual

Owner’s Manual DG100 1
INDEX
Ketron DG100: a new wonderful musical adventure is about to begin!
Connections
Control panel and push button functions
Parameter management
Having fun with the DG100! A guide on how to start playing and having fun right away
Voice and User Voice
Programs and One Touch
Sound Load
The Sampler
Drawbars
Drum Set
Arranger
Style & Sound
RAM Styles and Flash RAM
Pattern Edit
Power On Set Up
Song Play, Midifiles and Karaoke
Video Out and Karaoke
Recording a Midi file
.KAR Midi files and .TXT files
Using the microphone
Vocalizer
Effects
On Line Effects and Rotor effect menus
Registration
Utility
MIDI Accordions
Midi
Using a MIDI pedal
Demo & Hit
Disk
Up-dating and Resetting the DG100
Sequencer
Tutorial
PAGE
3
5
7
13
15
23
28
33
35
40
41
45
55
56
60
68
69
77
79
80
82
84
90
93
94
97
103
105
110
111
113
121
122
137


Owner’s Manual DG100 3
Ketron DG100: a new wonderful musical adventure
is about to begin!
Congratulations for having purchased the new Ketron DG100 Digital Grand. It has taken us two years of painstaking research and programming
to offer you improved and more natural timbres, modern and musical arrangements and new reproduction functions for MIDI files, samples, text
files and General MIDI files.
If you are already familiar with Ketron SD1 then you will have no problem in using the DG100. If you are new to the world of Ketron and elec-
tronic keyboards then we advise you to read the “Having fun with the DG100!” section.
Then again if you are experienced musicians and programmers and you’re interested in the real nitty-gritty then the specific sections for each
operational environment is what you’re looking for!
Finally whatever category of skill you belong to we recommend that you read the first few pages of this manual. They provide a description of
the operational control panel, the connections and the navigation principles among the parameters that are valid for all parts of this manual.
We hope you have lots of fun with the Ketron DG100!
THE NEW FEATURES OF THE DG100
Whereas many electronic keyboards are becoming real workstations, with ever-complicated functions and often not within everyone’s reach,
our DG100 keyboard has been designed as an instrument capable of enhancing the musician’s skill at the centre of the show. Our desire has
been that of offering the DG100 as an instrument deceptively simple to operate that below the surface hides amazing potential with virtually
endless possibilities for the musician who loves playing, entertaining and interacting with his musical instrument. You can of course use the
DG100 just to reproduce files but you would be missing out on much of the fruits of our research carried out worldwide!
Some aspects of the DG100 are similar to many other professional electronic keyboards:
●Polyphony of 64 notes.
●Hundreds of styles.
●Hundreds of timbres.
●A sophisticated arranger.
●Reproduction of Midi files.
●Display of the words of a Midi file also on the monitor.
●A timbre editor.
●General MIDI and Standard MIDI File compatibility.
●A sequencer with sixteen tracks.
●A style editor.
Other aspects on the other hand are more unique and often offered as optional extras on other brand instruments but provided as standard on
the DG100:
●A Vocalizer for harmonizing the voice.
●A hard disk of six Gigabytes.
●Two MIDI inputs.
●Two audio mic inputs for microphones.
●A sampler with 16Mb RAM and wave form editing.
●A semi-weighted keyboard with 76 keys.
●Four audio outputs.
●Compatibility with audio .WAV files.
●RAM for loading new samples.
●The use of Styles directly from the disk.
Last but not least the DG100 has some capabilities and features that you have never seen or heard of on other electronic keyboards as they are
exclusive to Ketron DG100:
●The use of audio .WAV files in real time with a Midi file in sync with the transposition and change of the tempo thanks to a proprietary algo-
rithm that does not alter the timbre for compatible intervals.
●The sampled grooves, processed and entered in the Styles to provide that certain musical realism that is impossible to achieve with ordi-
nary programming using drum sounds.
●The muting of the individual instruments within a sampled groove.
●Two drum tracks for each style.
●The possibility to display a text file (.TXT) while using the Arranger to do away with awkward piles of song sheets and booklets.
●The complete automation of all loading procedures via the Registrations that can load for example the words, the audio files and the Midi
file of a song all in one go.

DG100 Owner’s Manual
4
●Management of the hard disk via a serial port on a separate PC to organise your own back-up copies and to view all the files on a larger
display.
●The possibility to immediately call up any Midi file stored in a dedicated folder.
●The simplified management of the hard disk thanks to the new Master Folder concept.
●A menu especially prepared for MIDI accordions.
●A new professional look (though we do not claim to be the inventors of this one !).
Not bad eh? If you are impressed with these features then you could have probably purchased the DG100 just looking at a brochure. What we
and all of our customers too are really proud of are not just the specifications and the new functions, which are certainly one step ahead of the
current standard, but of how the DG100 sounds! We are proud of the new acoustic piano sample with a peviously unattainable timbral warmth
and realism. The 48 Mb of Wave ROM produces sounds of such authenticity and accuracy that they are the envy of many; the grooves with so
much infectious rhythmic vitality that it is impossible to keep your feet still while listening to them;
Before we even started to design the DG100 we thought of the sounds and the styles, which had to be the best ever. We are convinced that we
may just have achieved perfection!
Lots of fun from Ketron!
IMPORTANT NOTE: SOME OF THE COMMONLY USED TERMS IN THIS MANUAL ARE BRIEFLY EXPLAINED BELOW FOR THE BENEFIT OF
NEW USERS AND THOSE UNFAMILIAR WITH PREVIOUS KETRON PRODUCTS
TIMBRE: An instrument or synth sound ( or ‘voice’ ) known more commonly as ‘sound patches’ comprising ‘factory preset’ or
‘user’ patches on other brand instruments. Ketron uses the word ‘timbre’ for these sounds to avoid any confusion with
the 4-voice split or layer setup called ‘PATCH’ as a sub-mode of ‘PROGRAMS’ on DG100.
VOICE: This again basically means the same thing as the ‘timbre’ above and refers to the factory or user sounds utilised to play
the Arranger or manual parts on the key- board. It does not however mean ‘human voice’ (which is called ‘vocals’!)
ENABLE: Simply means pressing a button ‘ON’ to call up or turn on a function etc.
ACKNOWLEDGE: (Chords etc.) To ‘recognise’,’identify’ or ‘confirm’ and sometimes ‘utilise’.
‘RELATIVE TO’.. : Simply means ‘related to’ and usually refers to a button etc. which calls up a group of voices or parameters of one
family.
MODIFY: Simply means ‘to edit’ or alter some parameter(s) for such purpose.

Owner’s Manual DG100 5
Connections
The DG100 is provided with all the audio and MIDI connections required as standard including the sockets for the pedals needed for its opti-
mum use. The only optional extras are the video interface and the two pedals. Below are the connections, from the left to the right of the panel:
MICRO 1: Audio input for microphones on balanced XLR connection. It is preferable to use this input for the main microphone for two major
reasons: the balanced connection produces lower background noise and is more resistant to environmental interference. The signal made avai-
lable by this input can be processed by the Vocalizer built in the DG100.
MICRO 2: Audio mono Jack input 1/4’ unbalanced for auxiliary microphones. The Micro 2 signal cannot be processed by the Vocalizer built in
the DG100, but only by the overall effects.
MICRO GAIN: This controls the gain of the Audio microphone inputs.
PHONES: This is used to connect a stereo headphone.
MICRO 2 OUTPUT:
Monophonic audio output 1/4’ of the input signal of Micro 1 no processed by the Vocalizer internal effects as Reverb and chorus.
MICRO 1 OUTPUT: Monophonic 1/4’ jack direct audio output of the input signal of Micro 1 processed by the Vocalizer but not by the internal
effects like Reverb or chorus.
OUTPUT LEFT/MONO 1, RIGHT 2, 3, 4: Monophonic 1/4” jack audio outputs where the Left out can work as the summed monophonic
output for the whole instrument. When the Left and Right outputs are used the DG100 works in stereo. Outputs 3 and 4, are monophonic, and
can be used for particular instrumental sections of the keyboard so that they can be controlled by an external mixer or processor with sepa-
rate effects.
PEDAL FOOTSWITCH: This is a multipolar socket used to connect optional pedals with six or thirteen switches,
to control many functions including automatic accompaniment commands.
SUSTAIN PEDAL: This is the socket for the Sustain On/Off type pedal.
VOLUME PEDAL: This is the socket for the continuous Volume control pedal. It is advisable to use pedals produced by Ketron to avoid dan-
gerous short circuits or abnormal conditions in general.
MIDI In (GM): Midi Input Port used just to control the General MIDI timbre generator of the DG100 with sixteen MIDI parts.
MIDI In 2 (Keyboard):
MIDI port for connecting an external MIDI keyboard or accordion which can operate the DG100 in a similar way to its own keyboard.
MIDI Out: MIDI port used to send the data generated by the DG100, including automatic accompaniment and lead part.
MIDI Thru: MIDI port that passes through unaltered all received data only from the MIDI IN 1 input.
COMPUTER INTERFACE:
The DG100 can be directly connected to a PC or to a Mac via this port, thus acting as MIDI interface between the two units.
VIDEO INTERFACE: This optional device is used to display the words of a Midi file and other information provided by the musician on a moni-
tor for the audience.
MAIN SWITCH: This push button turns the DG100 on.
AC: Socket for the power supply cable.

DG100 Owner’s Manual
6
FURTHER ELEMENTS OF THE DG100
HARD DISK
The 6 GB hard disk supplied as standard in each DG100 has been chosen to ensure fast operation and long life.
DISK DRIVE
Supplied as standard, it is used to read and write 720 KB and 1.4 MB floppy disks in DOS format. Floppy disks formatted on any PC can also be
used.
MODULATION WHEEL
This wheel is used to control the timbre modulation ( usually created by the Pitch and Amplitude LFOs with programmable parameters) but, with
the Rotor effect enabled, it can also control the Rotor speed Fast / Slow.
PITCH BEND WHEEL
This is used to raise or lower the pitch of the voice assigned to the Right section.
VELOCITY
The key dynamics is used to control some timbre parameters such as the volume of the note or the filter.
GENERAL VOLUME
The volume cursor seen on the front panel controls the general volume of the audio outputs Left & Right of the whole keyboard, including the
microphone signals. The cursor does not send a Volume data to the MIDI Out port.

Owner’s Manual DG100 7
Control panel and push button functions
The control panel is divided into sections according to the group of functions related to the push buttons. From left to right you will see the following:
VOLUME
Two rows of six push buttons that are used to control the general volume for the Drums, Bass, Chords, Orchestral, Lower and Right sec-
tions. The volume can be immediately muted by pressing the right-hand and left-hand VOLUME push buttons of that section together
at the same time. To restore the volume set prior to muting simply press one of the two VOLUME push buttons of the section once.
HOW TO MODIFY THE VOLUME OF THE RIGHT LEAD
To raise the volume, hold the right-hand RIGHT VOLUME push button down. To lower the volume, use the left-hand push button.
To Mute the sound totally press the two RIGHT VOLUME push buttons together at the same time wich sets it to “O”.
To restore the previous volume set press a RIGHT VOLUME push button.
PUSH BUTTONS ON THE CENTRAL LEFT-HAND AREA
There are seventeen push buttons on the central left-hand area of the control panel. All of these are provided with a LED which, when lit, points
out that the push button is enabled. They are used to gain access to menus controlling crucial functions. We have from left to right and from
the top to the bottom:
SONG RECORD This enables the sequencer in registration mode and makes it possible to record everything played on the DG100, from
the styles to calling up the Voices.
SONG PLAY This enables the sequencer in reproduction mode. It is also used to call up Midi file chains, to display the words and to
transpose the whole Midi file.
PATTERN EDIT This is used to call up the menus for programming and modifying the style.
SEQUENCER This is used to gain access to a complete sequencer with various editing functions.
GRAND PIANO This is used to instantly call up the sound of the Grand Piano on the complete extension of the keyboard.
MASTER FOLDER
When the LED is lit the hard disk utilises the Master Folder function to simplify and automate the reading and writing of any type of file.
SINGLE REGISTR.
When the LED is lit the single Registrations stored on hard or floppy disk are called up.
SAMPLER MPS This is used to call up the menus and the functions of the built-in sampler with the relative editing functions.
DISK This is used to gain access to the management functions both on floppy disk and built-in hard disk.
When the DISK LED is lit the PAGE + and PAGE – push buttons can be used to select the hard disk or the floppy disk.
ROTOR When the LED is lit it enables the Leslie ® effect (rotary speaker) as used with the electro-magnetic organs for the
typical Hammond sounds!
MANUAL BASS When the LED is lit the bass part of the style can be played manually.
SPLIT This enables the choice of the split point of the keyboard that splits the lead section (Right) on the right from that dedi-
cated to the Arranger and to the manual accompaniment parts (Lower and Manual Bass) to its left. To set the split point,
hold the SPLIT push button down and play the note on the keyboard that represents the split point. The default split
point is set as note C3. To play the right-hand lead voice over the whole keyboard press the SPLIT push button and then
the lowest key of the keyboard at the left end (E0).
BLOCK/LIST RAM STYLE
This is used to instantaneously display the list of styles stored on hard disk from which one or a number of styles can
be loaded in RAM. The push button can be enabled only if the MASTER FOLDER push button LED is already lit.
16'
5 1/3'
8' 2'
2 2/3'
4'
DRUMS
BASS
CHORD RIGHT
RECORD PLAY PATTERN
EDIT
SEQUENCER
MASTER
FOLDER
SINGLE
REG.
SAMPLER
MSP
DISK ROTOR MANUAL BASS
BASS TO
LOWEST
BASS TO
ROOT
–+PAGE GM JUKE
BOX
VIDEO
MIDI 8 BEAT 16 BEAT POP&FUNK
COUNTRY PARTY RO CK&SOUL
SWING LATIN R&ROLL
ABCDHOLD
RAM/FLASH USER VOICE DRAWBAR 1 TOUCH EDIT
CHOIR BRASS SAX FLUTE PAD SYNTH ETHNIC EFFECT
PIANO
12345678
910111213141516
E.PIANO CHROM ORGAN ACCORD. GUITAR BASS STRINGS
ON/OFF
ON LINE
EFFECT
SOUND
LOAD
PORTAMENTO PIANIST
DRUMSET DRUM
MIXER
MANUAL
DRUM
OCTAVE
PROGRAM 2nd VOICE EDIT
COUNT/PAUSE
RESTART
LOCK KEY
START
KEY
STOP
TAP
<RIT ACC>
FADE
OUT
BLOCK
REGISTR.
DYN AMI C
HARMONY
STYLE
SETTING
START SLOW
–+
FAST
FOLK DANCE ORCHESTRAL
ETHNIC
*0#
789
456
123
EDIT VOICE
DRAWBAR
EDIT
PROGRAM
EDIT DRUM
MICRO
EDIT
LEAD
DRUM
&BASS
LYR IC
ARRANGE VIEW
CONTRAST
$%&– 0 12345678 9 A BC DEFGHI J KLMNOPQRSTUVWXYZ_CANCEL
ARRANGE MODE
UTILITY
EFFECT
–+CURSOR
TRANSPOSER
BALANCE
SAVE/ENTER EXIT
–+VALU E
1 3/5'
1 1/3'
1'
SPLIT BLOCK/LIST SINGLE CUSTOM
STYLE
JUMP
INTRO/ENDING
11
22
33BREAK TO END
LOWER
ORCHESTRAL
MASTER
VOLUME SONG
F1
F2
F3
F4
F5
F6
F7
F8
F9
F10
GRAND PIANO
RAM STYLE
FILL IN
HARD/FLOPPY VOIC ES
VOCA LIZER
DEMO&HIT
MICRO OVERDRIVE

SINGLE RAM STYLE
When the LED is lit it is used to directly enter the number of the style stored on disk and to be immediately loaded in RAM.
CUSTOM STYLE This is used to select a style from the internal memory. CUSTOM STYLE is disabled as soon as SINGLE is pressed to
load styles in volatile RAM from disk, in all the other cases the CUSTOM STYLE LED is always lit as the default setting.
BASS TO LOWEST When the LED is lit the bass part of the style plays the lowest note of any fingered chord played by the left hand below
the split point..This makes it possible to produce stepwise descending or ascending bass notes as found in some songs
by just playing the required inversion of each chord the lowest note of which gets played by the bass part of the
Arranger rather than the root of the chord it would normally play.
BASS TO ROOT When the LED is lit the bass track of the style plays the root note of any chord. played by the left hand below the split
point. It can be used together with Manual Bass.
SELECTION, DATA ENTRY AND CONFIRMATION PUSH BUTTONS
These are used to explore the display, together with the function push buttons, to enter parameters and to confirm a procedure or otherwise.
PAGE + PAGE - When the display shows that there are more pages following the first one (as for Voice and Style), the PAGE + push but-
ton is used to move one page forwards and PAGE – to go back a page. The PAGE + and PAGE – push buttons, with the
LED of the DISK push button lit, are used to select the hard disk rather than the floppy disk drive. In these cases, to
move onto the following pages of a directory, the musician must use the CURSOR +/- push buttons. In the main page
the PAGE + and PAGE – push buttons directly control the Tempo value of the Arranger.
CURSOR +, CURSOR - When there are a number of parameters to be modified within a menu or the function push buttons do not directly rela-
te to a parameter (as in the case of the parameters situated in the middle of the display), these push buttons are used
to move between the parameters to select the one to be modified. In the Disk environment the CURSOR +/- push but-
tons are used to select following groups of files that are not shown on the display. The presence of following or pre-
vious pages to that in use is pointed out by symbols or seen under or above the group of files displayed. In the
main page the CURSOR + and CURSOR – push buttons are used to Transpose all the DG100 sound sections globally in
steps of one semitone. To reset the transposition, simply press the two push buttons together at the same time.
VALUE +, VALUE - These are used to change the value of a parameter selected. The initial value of the parameter is reset by pressing the
VALUE + and VALUE – push buttons together at the same time, even after the parameter has been modified. On the
main page the VALUE buttons allow you to balance the Arranger and Lead volumes.
SAVE/ENTER This is used to store and save on disk any edits or modifications carried out by the user.
EXIT This push button is pressed once to return to the main page of the display. EXIT is disabled in the menus dedicated to
the Sequencer and Song Play where the SEQUENCER or SONG PLAY push buttons are to be pressed again to return to
the main page of the display.
The twelve STYLE push buttons are used to enter the number of a folder or file while managing the hard disk or modifying parameters, where
they are used as a numeric keypad.
THE DISPLAY, THE MAIN PAGE AND THE FUNCTION PUSH BUTTONS
Fig. 1 illustrates the main page of the display from which access is gained to the programming functions using the function keys at the side of
the display together with the dedicated push buttons. Based on the functions called up the display shows the related parameters and enables
their selection thanks to the push buttons at the side of the display (or function keys from F1 to F10, called so as they have a different func-
tion depending on the page displayed). Therefore simply press the function push button adjacent to a parameter to enable or select that param-
eter. When the parameters are situated in the middle of the display then they are selected using the CURSOR + and CURSOR – push buttons.
While you will find detailed descriptions of the modification pages further on, below is a description of the single parameters that are displayed.
DG100 Owner’s Manual
8
Style number and name
Style volume
Split note
Transpositon
Selected timbre
Timbre volume
Second Voice
Played chord
Right hand volume
Style tempo
Left hand volume
Accompaniment sections volumes

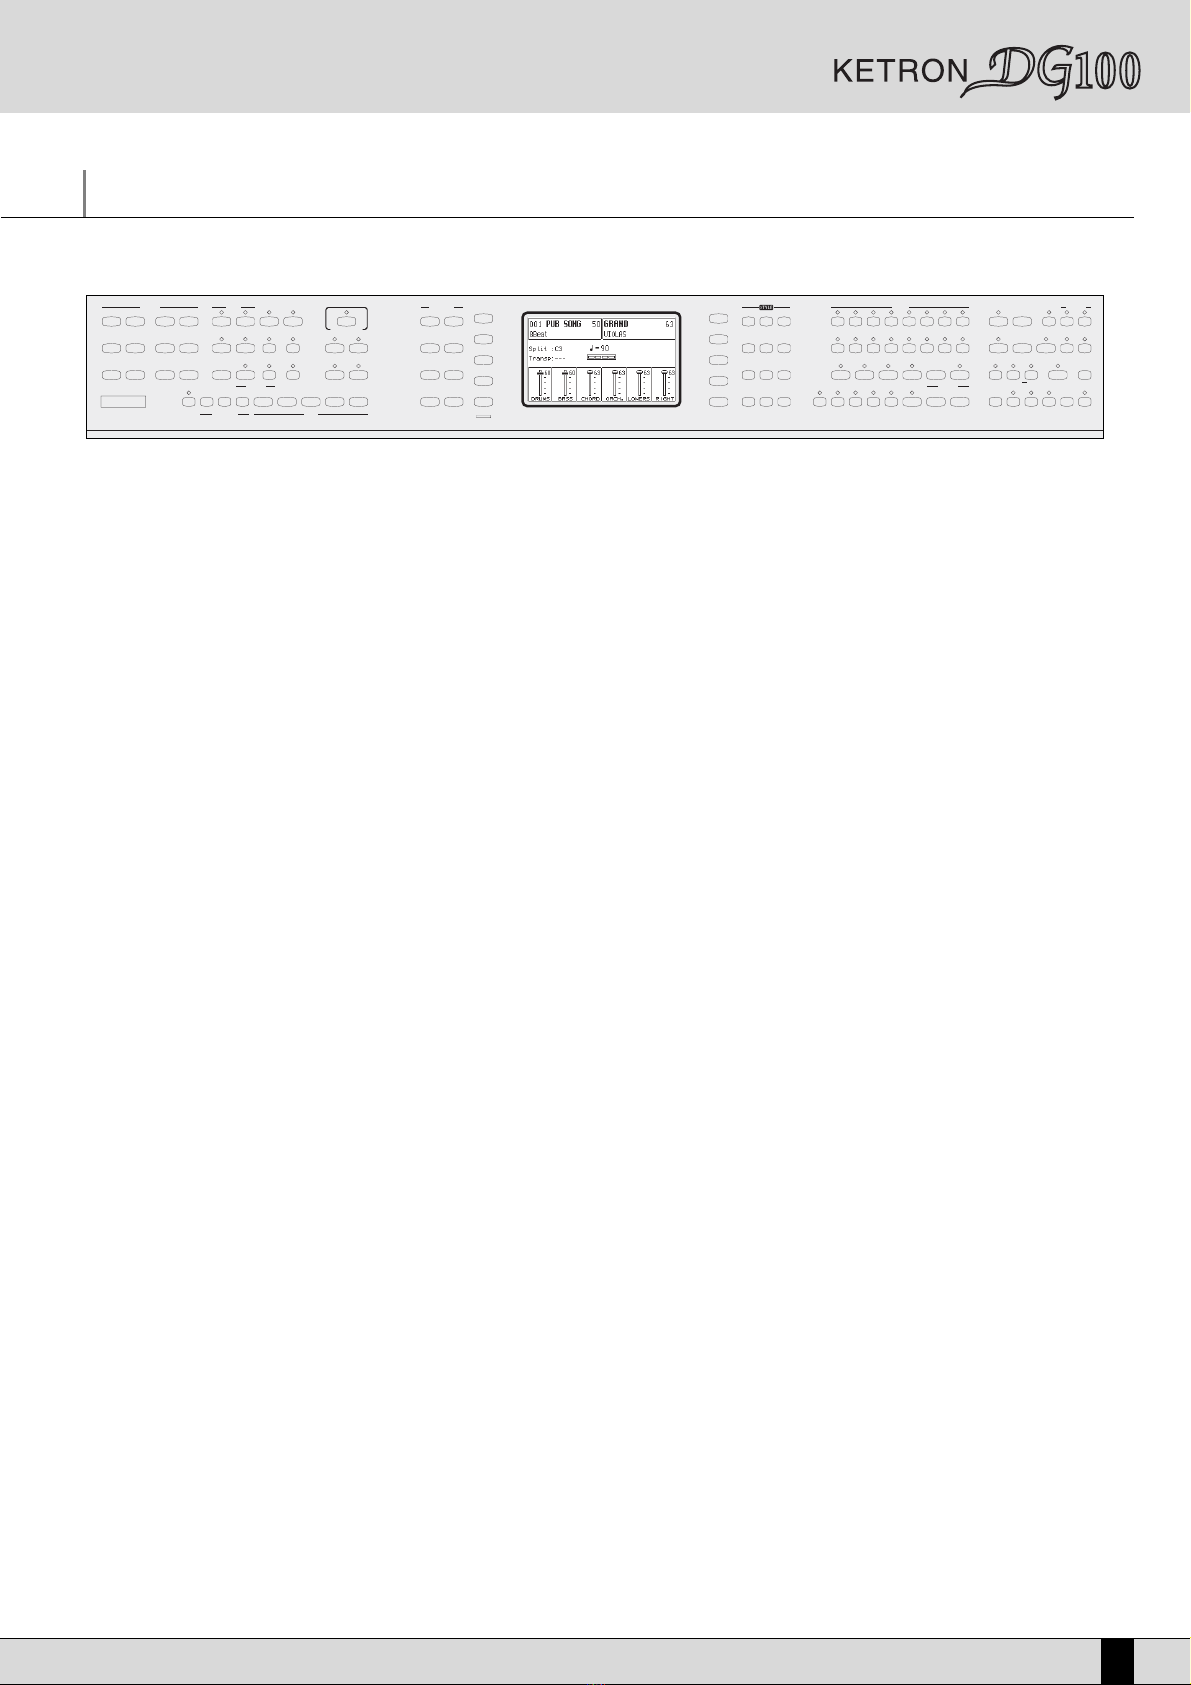
Number, name and volume of the style: This indicates the name and number of the style currently in use. Use the STYLE push buttons to
call up another one. To modify the volume press the VALUE + and VALUE – push buttons, which in this page are used as Balance.
Timbre selected and volume: To change the timbre in use on the Right lead section use the VOICES push buttons related to the single group
or the USER VOICES push button. The pair of RIGHT VOLUME push buttons are used to modify the volume of the timbre.
Second Voices: This indicates a second timbre to be layered with the Right lead section. It is entered using the 2ND VOICE push button.
Split point and transpose: This indicates the note to the right of which the lead or Right section dedicated to the right hand plays. The part
of the keyboard to the left of this split point however is used for playing the chords for the arranger and any assigned manual ‘Lower’ voices .
This split-point is set using the SPLIT push button as already described previously. Transp. This indicates the number of semitones for trans-
position that can be changed using the CURSOR + and CURSOR - push buttons. When a double dash is displayed transposition is off.
Tempo and beat of the style: This indicates the current Tempo of the Arranger. Use the PAGE + and PAGE – push buttons to modify it. The
beat indicator is used to avoid visually losing the beat of the bar being played.
Chord: This indicates the chord currently being played. To change it play another chord on the part of keyboard to the left of the Split point.
Volume cursors of the main sections of the keyboard: These graphically display, with absolute values, the settings of the volumes of the Drums,
Bass, Chord, Orchestral, Lower and Right sections, the value of which can be directly modified using the pair of VOLUME push buttons pairs.
To modify the display contrast turn the CONTRAST knob on the control panel.
A set of functions corresponds to each function push button F1/F10, in the main page of the display, which can be directly accessed by press-
ing the relative push button.
F1 GM: This selects the menu with the parameters related to the single MIDI parts of the sixteen offered by the standard General MIDI.
F2 EFFECT: This is used to quickly modify the Reverbs and to enable the modulation effects and also to access the individual parameters of
the single effects.
F3 UTILITY: This controls the overall parameters of the keyboard and the physical controllers.
F4 ARRANGE MODE: This is used to gain access to the parameters dedicated to the Arranger when playing live.
F5 ARRANGE VIEW: Four menu pages offer the facility to re-program the timbres, volumes and effects of each single section of the Arranger.
F6 MIDI: Via the sub-menus access is gained to the programming of MIDI events even during transmission and reception mode and to the assi-
gnment function of the MIDI channels to each single section of the keyboard.
F7 EDIT VOICE/DRAWBARS: This is used to modify the main parameters relating to the timbre such as the envelope, the filter and the LFOs.
When the LED of the DRAWBAR push button is lit, access can be gained to the programming function and display of all the 9 Drawbars to
create new organ sounds by pressing the EDIT VOICE/DRAWBARS push button from the main page of the display.
F8 EDIT PROGRAM: This is used to program or modify the parameters relative to the four timbres that can be used at the same time for the
lead section.
F9 EDIT DRUM: For the drum tracks and not only. This group of functions is dedicated to the programming of a complete drum kit, of which
up to two samples can be indicated for each key of the keyboard.
F10 MICRO EDIT: This is related to the use of microphones and to the two relative inputs with the facility to modify the volumes and the
amounts of the various effects (Sends).
THE PUSH BUTTONS AND THE CHOICE OF THE STYLES
Twelve push buttons are used to call up just as many groups of styles directly from the control panel. When a group is selected the display shows
five styles to the left and another five to the right. To enable a style simply press the function push button next to its name on the display.
Considering that the DG100 offers more than ten styles per group, the user can move onto the next pages either using the PAGE + and PAGE –
push buttons or by pressing the push button related to the group of styles in use again. When the DG100 reaches the last page of styles avail-
able, the user can return to the first page by pressing the push button for that same group of styles again and not the PAGE + and PAGE – push
buttons. In some editing situations the twelve STYLES push buttons become numeric keys that are used to enter the value directly.
THE PUSH BUTTONS AND THE CHOICE OF THE VOICES
The two rows of eight push buttons called VOICES are used to call up timbres or Preset Voices (that cannot be edited by the user) according to
the family to which they belong. When a family is selected with one push button the display shows five Voices to the left and five Voices to the
right, which can be enabled by pressing the function push button next to that timbre. Considering that the DG100 offers more than ten Voices
per family, the user can move onto the next pages either using the PAGE + and PAGE – push buttons or by pressing the push button of that
family of Voices in use again. When the DG100 reaches the last page of Voices available, the user can return to the first page of Voices by press-
ing the same push button for that family of Voices again and not the PAGE + and PAGE - push buttons.
The VOICES push buttons are not only used to call up the pre-set voices alone.
●If the LED of the USER VOICE push button, i.e. of the bank of timbres that can be programmed by the user is activated, then the VOICES
push buttons call up the 128 User Voice timbres in groups of ten at a time.
●If the LED of the DRAWBAR push button is lit, an organ timbre corresponds to each single VOICES push button.
●If the LED of the PROGRAM push button is lit, the VOICE push buttons call up the Program memories.
Owner’s Manual DG100 9

●If the LED of the ONE TOUCH push button is lit, the first row of STYLE push buttons calls up one of the eight pages of which the One Touch
memories are made up.
●If the LEDs of the SET DRUM and MANUAL DRUM push buttons are lit, the first six VOICES push buttons are used to select the banks inclu-
ding ten Drum Kits each.
PUSH BUTTONS ON THE CENTRAL RIGHT-HAND AREA
RAM/FLASH This is used to immediately call up any sounds from the RAM (loaded from the Disk by means of the Sound Load function)!
USER VOICE If the LED is lit, then the VOICES push buttons call up the 128 User Voice timbres, i.e. the bank of timbres that can be pro-
grammed by the user, in groups of ten at a time.
DRAWBAR If the LED is lit, an organ timbre corresponds to each single VOICES push button.
1 TOUCH When the LED is lit, ten timbres of the first of the eight groups available are displayed. The One Touch Solo function is used
to save the most frequently used Voices so that they can be called up easier rather than having to first select the group and
then a timbre from within it.
VOCALIZER EDIT This is used to gain access to the programming parameters of the Vocalizer from the main page.
VOCALIZER ON/OFF
When the LED is lit, the Vocalizer is enabled on the Voice or the audio signal received via the Mic 1 (XLR) input.
PUSH BUTTONS ON THE RIGHT HAND AREA
ON LINE EFFECT A number of modulation effects can be assigned to the Right section, together with the Reverb and standard chorus. The
On Line Effect page is used to enable up to four modulation effects simultaneously and also to control the effects that will
process the microphone input, the parameters of which can be called up using the F10 MICRO EDIT push button. The LED
of the ON LINE EFFECT push button will light up when the microphone input signal is too high and could therefore be distor-
ted in the pre-amplifier stage.
SOUND LOAD This is used to enable a short-cut for loading new sampled sounds from hard disk, at a maximum of 16 Mbs directly from the
Master Folder, the LED of which will light up automatically when the SOUND LOAD push button is pressed. To load .WAV or
.MSP samples, select F8 Dir WAV which gives access to the dedicated folder. To return to .INS samples, select F9 Dir
INSTRUM to load single files, or using F9 again, select Dir Block to load groups of single .INS files in one go.
PORTAMENTO When the LED is lit, the Portamento is enabled, namely the sliding from one note to another , the time of which can be pro-
grammed.
PIANIST When the LED is lit the chords are accepted over the full length of the keyboard, including the Right section. This function
has been devised for proper piano playing using both hands over the whole keyboard and still fully exploiting the Arranger
. If the same timbre is required right along the whole keyboard, for example the piano, the lowest note on the keyboard ( E
0) must be set as the Split point using the dedicated push button. There are two different chord acknowledgement methods
that can be chosen in the Utility menu. The default setting is Standard.
STYLE SETTING For each style Ketron has provided ten settings, enabling just as many timbres to be called up for the Style lead part. When
the LED is lit the ten timbres pre-set for that style are displayed. The timbres assigned to a Style can be changed
.
DEMO & HIT By pressing the PIANIST and STYLE SETTING push buttons together at the same time access is gained to the folder of the
hard disk called Demo & Hit, which can store both demo files and any other Midi file up to a total of 999 files. In contrast to
SONG PLAY, Demo & Hit is used to immediately play a Midi file by simply selecting it using the F1-F10 function push but-
tons and it allows a large number of Midi files to be ready to be played. Press EXIT to exit from Demo & Hit. Considering
that Demo & Hit refers to a specific folder on the hard disk, the Midi files within Demo & Hit can be copied and erased with
the normal procedures dedicated to the management of the hard disk. The Right and Lower part can be played while a MIDI
file is being played back with the SPLIT push button still enabled.
#
In this version of the operating system this special push button is used together with *to disable the Sustain in the Pianist mode.
*This is situated on the FOLK push button of the STYLES push buttons. It works when the Demo & Hit function is in use
where, when the Midi file selected is Stopped, it is used to put the Midi files within the folder in the desired order with the
possibility of replacing them or cancelling their position. It is also used in SONG PLAY when in the Juke-Box function where,
if it is pressed, the Chain Select command appears for creating temporary chains of Midi files to be reproduced one after
the other. Furthermore, in the Pianist enabled mode, when pressed together with the #push button it disables the Sustain.
LEAD The FILL 1 push button has another function when the Demo & Hit function is in use. It is used to cut-out the Lead track,
usually set to the MIDI channel 4 within the Midi file.
DRUM & BASS The FILL 2 push button has another function when the Demo & Hit function is in use. It mutes the volume of all the tracks
with the exception of the drum and bass ones.
DG100 Owner’s Manual
10

Owner’s Manual DG100 11
DRUM SET The drum set assigned to the Drum tracks of the style can be changed when the LED is lit. The drum set pages following the
first page can be called up using PAGE +/-or directly using the first six VOICES push buttons. Drum Kit written in capital
letters refers to those made up of ROM samples, those on the other hand with a dot at the side are the sampled grooves,
assigned to the Drum 2 tracks of the style.
DRUM MIXER For each drum set Ketron has grouped the percussion sounds together in ten categories that can be selected using the F1-
F10 function push buttons. When a category is ticked (√), the percussion instruments within it will play but if un-ticked ( )
they will be muted (Mute function). The purpose of the Drum Mixer is that of being able to create new rhythm combina-
tions by simply Muting some percussion instruments. It proves especially useful in Latin-American rhythms and in dance.
Drum Mixer also works for the sampled grooves, enabling the creation of unique and realistic rhythms in a handy way.
MANUAL DRUM When the LED is lit the single instruments that make up a drum set can be played right over the whole keyboard, with the
Right and Lower sections automatically disabled. The volume is controlled by the DRUM VOLUME push buttons. If MANUAL
DRUM is enabled while playing a style, with acknowledged chord, the arrangement and bass tracks will continue to play
according to the chord acknowledged. MANUAL DRUM does not disable the Drum tracks of the style.
OCTAVE When the LED is lit, the Right section is transposed by one Octave lower, or rather the lead of the right hand. The transpo-
sition direction can be changed by pressing the push button twice consecutively with the LED flashing.
HARMONY When the LED is lit it enables and allows the selection of one of the 10 different harmonies to be assigned to the lead accor-
ding to the chord played on the left below the split point. Each of these automatically cuts out the others. The Speed para-
meter is related to the Repeat mode, namely the repetition of the lead notes.
PROGRAM When the LED is lit, eight Program memories are displayed, to be selected using the function push buttons. A Program com-
bines up to four timbres dedicated to the lead section with the related parameters.
2ND VOICE When the LED is lit, the second Voice is enabled on the lead, the name of which is displayed under the main one.
2ND VOICE EDIT When the LED is lit it is used to call up a new timbre to replace that set by Ketron for the second voice using the VOICES
push buttons and also from the User Voice group. By pressing 2ND VOICE and 2ND VOICE EDIT at the same time the block
of the timbre assigned at the time to the Second Voice is shown, which will appear with an asterisk in front of the name.
BLOCK REGISTR.
The Registrations memorise all the DG100 settings for instant retrieval , including the automatic call up of audio and TXT files.
When the LED is lit the user can call up one of the 198 Registrations using the numeric keypad, namely the STYLE push buttons.
The single Registration can be loaded directly from hard disk or floppy disk using the SINGLE REGISTR. push button in use.
DYNAMIC This is used to choose a Dynamic Curve for the keyboard among the 5 preset ones (Soft, Medium, Normal, Hard 1, Hard 2)
and among the 5 programmable ones (User 1 - User 5).
To start editing the curve, simply select one of the User curves and then press both Value keys at the same time.
THE PUSH BUTTONS REQUIRED TO CONTROL THE ARRANGER
The bottom row of the control panel is almost entirely dedicated to controlling the Arranger in real time. From left to right you will see:
JUMP When the LED is lit it is used to move onto other variations of the style using the Fill In’s and is used to re-play the Intro’s
in a song that has already been started.
INTRO/ENDING 1, 2, 3
If one of these three push buttons is pressed while the Arranger is stopped an Intro is enabled, of which there are three with
varying complexity. If one of these three push buttons is pressed while the Arranger is playing, an Ending is enabled with
three available variations having different levels of complexity. If the LED of the JUMP push button is lit and an Intro push
button is pressed, the Intro selected will be played
.
FILL 1, 2, 3If one of these three push buttons are pressed while the Arranger is in use, one or a number of Fill-Ins will be played. If the
LED of the JUMP push button is lit and the FILL 1 and 2push buttons are pressed, the next variation of the style will be
enabled. The FILL 3 push button will move the style being played back to the previous variation. If one of the three FILL
push buttons are held down for a while, the Arranger will cyclically play Fill In 1, 2 and 3 one after the other until the push
button is released (Multi Fill).
BREAK This is used to add a Break beat at the end of which the Arranger will start to play again. The Multi Fill function is enabled
by holding it down.
TO END In case of some necessity or desire to end the song being played quickly this push button plays a short 1-bar Ending after
which the Arranger stops.
On the bottom right row, again from left to right you will see:
A, B, C, DEach of these push buttons corresponds to a variation of the style, from the most simple to the most complex. Further to
these push buttons, also FILL IN and JUMP can be used to move forward or back between the variations.
HOLD When the LED is on the last chord played to the left of the Split point on the keyboard is memorised and kept active driving

the Arranger which carries on playing normally even after the left hand is taken off the keys.. This chord is held as the har-
monic basis of all the Arranger parts until a new chord is actually played below the split point which the Arranger follows by
changing the parts to suit. If the LED is switched off, the accompaniment will only work as long as the chord is held down
on the keyboard, but the drum tracks will continue to play regardless.
START When pressed it starts to play the automatic accompaniment. If START is pressed while the Arranger is already playing then
everything is stopped, in other words it acts as a Stop push button.
SLOW This decreases the Tempo value of the Arranger or of the Sequencer.
FAST This increases the Tempo value of the Arranger or of the Sequencer. By pressing SLOW and FAST together at the same time,
the Tempo value is locked (marked by an asterisk) so that it cannot be modified by calling up another Style with a different
Tempo. To disable this locking, press SLOW and FAST together at the same time . To restore the default Tempo of the style
press PAGE + and PAGE – together at the same time.
COUNT/PAUSE RESTART
With the Arranger stopped, COUNT adds a Count In beat where a stick beats the crotchets. If an INTRO has also been
pressed before COUNT with the JUMP push button enabled, the Intro chosen will be enabled at the end of the count. With
the Arranger running, pressing this push button returns immediately to the first beat of the bar, regardless of on which beat
of any bar it is pressed. This may prove very useful when backing a singer whose timing is all over the place! When work-
ing with the Sequencer (SEQUENCER LED lit), this push button sets the playback to stand-by until the COUNT/PAUSE
RESTART push button is pressed again
LOCK This calls up the Lock and Interactive Arranger page. It is possible to select which accompaniment tracks among Drums, Bass
and Orchestra, situated to the left of the display, will not change voices and rhythm, so that the tracks of one style can be
combined freely with those of another. It is also a quick way of playing back a style with the voices of another style and thus
creating endless variations on any Style. When the Interactive Arrange (F10) function is enabled the player can choose
which of the automatic accompaniment tracks set to ‘ On’ among 2, 3, 4 and 5 will not be played when at least one key of
the Right section of the keyboard is pressed. The tracks will start playing again on the following beat, if no note of the Right
section is played. Thus it is possible to directly control the status of the tracks from the lead.
KEY START When the LED is lit and the Arranger is stopped, this push button is used to start the accompaniment when a note to the left
of the split point on the keyboard is played. If an INTRO or a FILL is selected, as soon as a chord is played that Intro or Fill-
In of the style will start. To control the performance of the Lower section, namely the manual voices for the left hand, the
player must access the ARRANGE MODE menu where these Lower voices can be disabled when the Arranger is not run-
ning. This makes it possible to mute the Lower voices if you wish to play a chord silently below the split-point before the
Arranger is started.
KEY STOP When the LED is lit it stops the Arranger performance if a very short note or chord is played. It is restarted if another one
or even the same one is played. If the note or the chord is held down for longer than a quarter note, the Arranger continues
to play. With the Arranger stopped, KEY STOP is used to restart it by playing a chord that is longer than the time set in Sync
Time in the Arrange Mode menu. If a FILL or an INTRO has been selected, with the Arranger stopped and playing a chord
that is longer than the above mentioned value, the whole FILL or the INTRO will be played, whereas if the chord is very short,
the Arranger will stop immediately. If the KEY START LED is lit, as soon as the player takes his hand off the left part of the
split point, the Arranger stops and starts again as soon as a note or a chord is played on the part of the keyboard to the left
of the split point
.
TAP By playing crotchets on this push button at the required tempo, this can be set as the Tempo to be used by the Arranger
and the sequencer .Provided they are in stop or standby mode, once the Tempo has been established the playback will start.
When the Arranger and Sequencer are running, the push button is used to increase the Tempo in steps of five points each
time it is pressed (Accelerando). By holding the TAP push button down, the Accelerando is reversed (this can be seen by
the direction of the arrow) thus decreasing the Tempo in steps of five each time it is pressed (Ritardando).
FADE IN/OUT With the Arranger running, it generates a fade out, in other words taking the volume of all the sections, including the Right
section, from the current value to zero. With the Arranger stopped it generates a fade in, in other words taking the volume
of all the sections from zero to the set volume. When pressed repeatedly it will not generate abrupt volume variations.
DG100 Manuale di Istruzioni
12

Owner’s Manual DG100 13
Parameter management
Before going into the actual programming subject the musician must first be aware of how the menus and parameters of the DG100 work. The
rules that are listed in this chapter are valid for all the following sections and are crucial to controlling the keyboard in the best way possible.
CONVENTIONS
The following conventions are used within this manual, which refer to:
Push buttons on the control panel: all in capital letters or bold print (for example START, STOP, SPLIT push buttons)
Functions, parameters, items, commands displayed and that can be selected using the F1-F10 function keys adjacent to them: in bold print (for
example F5 Escape, F10 Save)
The functions and the parameters displayed are written in full and the indicators shown on the display are written between brackets, in differ-
ent letters.
CALLING UP THE MENUS
The parameters of the DG100 are grouped in menus that are always called up from the main page of the display which can be accessed using
the EXIT push button (apart from some exceptions which we will see later).
The first group of parameter menus is associated with the F1-F10 function push buttons at the side of the display and include the following
menus:
F1 GM
F2 EFFECT
F3 UTILITY
F4 ARRANGE MODE
F5 ARRANGE VIEW
F6 MIDI
F7 EDIT VOICE/DRAWBARS
F8 EDIT PROGRAM
F9 EDIT DRUM
F10 MICRO EDIT
The EXIT push button must always be pressed to exit one of these pages.
A second group of menus is associated directly with some push buttons on the control panel. They are called up from the main page and are
exited using the EXIT push button and also using the push button again that was used to call up these pages. The menus relative to the single
push buttons are the following:
SONG RECORD
PATTERN EDIT
SAMPLER MPS
DISK
SAVE/ENTER
BLOCK/LIST RAM STYLE
VOCALIZER EDIT
ON LINE EFFECT
HARMONY
The following menus are an exceptions to this rule:
SEQUENCER
SONG PLAY
The push buttons related to these menus must be pressed again to return to the main page of the display. This procedure has been devised
to prevent the playback of a Midi file from being accidentally stopped by pressing the EXIT push button by mistake.
EXCEPTIONS TO THE EXIT COMMAND
In some menus in addition to the EXIT push button the Escape command may appear, which is assigned to a function push button at the side
of the display. Therefore if the EXIT push button should fail to work, look carefully at the display to find the Escape function amongst the com-
mands, or try pressing the key used to access the specific menu again.
There are another few exceptions that aid programming: for example the editing of the Vocalizer can be accessed from any menu.

THE F1-F10 FUNCTION PUSH BUTTONS
There are five push buttons to the left and five to the right of the display. They are called that as they have no specific function (apart from
calling up the menus as already explained), but they take on the function of the command displayed next to them. If you take a close look you
will see that a blue line connects each function push button that relates to a specific area on the display. This area, when there are choices or
commands available, displays a rectangle that bears the name of either the function, of the Voice or of the style to be called up.
DATA ENTRY
There are various possibilities based on the parameter to be modified within a menu.
Direct call up: for the Voices and the styles, the selecting of one of these using a function push button immediately calls them up.
Enabling and disabling: Some parameters may have an ON status and Off status, Active or Inactive and the function push button related to that
parameter is used to alternate between the two.
Selection of a line of parameters: Likewise for Program editing, the function push button is used to select a group of parameters, the value of
which is entered using the VALUE +/- push buttons.
Parameters in the middle of the display: Likewise for Voice editing, some parameters may be found in the middle of the display and are accessed
using the CURSOR +/- push buttons.
Calling up a Midi file: TTogether with the manual selection of a Midi file from a directory, it is also possible to directly select the Midi file to be
loaded, with the MASTER FOLDER enabled, by entering the number of the Midi file using the numeric keypad (STYLES push buttons).
Calling up a Single RAM Style: Using the enabled SINGLE RAM STYLE push button, a style can be called up from hard disk by directly entering
the number associated with it.
Entering words or letters: When saving some files the DG100 requests the entry of words, which can be done using the keys on the keyboard to
which letters and numbers are assigned. The CURSOR +/-push buttons are used to move within the letters of the name and the VALUE +/-
push buttons are used to enter the required letter.
.
DG100 Owner’s Manual
14

Manuale di Istruzioni DG100 15
Having fun with the DG100!
A guide on how to start playing and having fun right away
You will certainly want to know how to use some functions of the DG100 such as how to reproduce Midi files, how to use the Arranger, how to
call up Styles and Voices, how to use a MIDI accordion and the Vocalizer with a microphone. If this is the case then this section is just up your
street. If you’re not a programmer and you’re not interested in the nitty-gritty of the menus then you can just skip this section
HOW TO USE A MIDI FILE
The DG100 is capable of reading Midi files with .MID and .KAR extension. Both types of files can have words for karaoke (in particular .KAR files),
which will be displayed.
To gain access to the reproduction menu of Midi files press SONG PLAY (the LED will light up) and choose whether to load the Midi file from
hard disk (press the PAGE – push button) or from floppy disk (press the PAGE + push button).
REPRODUCING FROM FLOPPY DISK
●To gain access to the reproduction menu of Midi files press: SONG PLAY
●Choose whether to load the Midi file from floppy disk by pressing the FLOPPY (PAGE +) push button
●Display, if desired, the list of Midi files stored using the F5 Dir function
●As you will see, the DG100 automatically numbers the Midi files stored. To load a Midi file type-in the number using the numeric keypad (STY-
LES push buttons)
●A Midi file can also be selected by entering one or a number of letters of its title using the keys of the KEYBOARD, thanks to the search
function that is always enabled (F5 - DIR)
●To return to the main page of the display press the SONG PLAY push button: (the LED will switch off) SONG PLAY
If a single number without zeros before it is entered the DG100 waits a few seconds and loads the song with that number. Once this is done,
the display shows the title of the Midi file loaded.
REPRODUCING A MIDI FILE FROM THE HARD DISK
●Press the SONG PLAY push button.
●Select the hard disk using the HARD (PAGE -) push button.
●Check if the LED of the MASTER FOLDER push button is lit otherwise press the MASTER FOLDER push button.
●To display the list of Midi files stored in the dedicated directory of the Master Folder, press F5: F5 DIR
●The DG100 assigns a number to each Midi file. To load a Midi file type-in this number using the numeric keypad with the STYLES push but-
tons. The display will show the title of the Midi file loaded.
●A Midi file can also be selected by entering one or a number of letters of its title using the keys of the KEYBOARD, thanks to the search
function that is always enabled.
●To return to the main page of the display press the SONG PLAY push button: (the LED switches off)
●The number can be entered without zeros before it and the DG100 will load the relative file after a few seconds.
HOW TO REPRODUCE A .KAR MIDI FILE
The Midi files with .KAR extension are normally Midi files with the Karaoke words already stored. The .KAR files are however almost always
Standard Midi files in format 1 and therefore need to be converted to format 0 so that they can be reproduced instantly from the hard disk. The
same procedure is required for the Midi files in format 1. The DG100 converts these automatically without needing to know in advance if the
Midi file is in format 1 or format 0. When attempting to load a Midi file or a .KAR file in format 1, using the procedures explained previously, the
DG100 offers two options:
●conversion of the Midi file for immediate use
●save the Midi file converted.

Generally speaking there is no need to store Midi files in format 1 or .KAR files on hard disk. It is always better to save them after they have
been converted so that they are loaded rapidly.
CONTROLLING PLAYBACK ( = REPRODUCTION )
Whether you have loaded a song from floppy or hard disk, some commands are offered on the control panel to modify some reproduction
parameters in real time.
●To reproduce the song press the START push button
●To stop the procedure press the START push button
●To set the reproduction procedure in stand-by press the CONT/PAUSE push button
●To start reproducing from stand-by press the CONT/PAUSE push button
●To transpose the entire song press the TRANSPOSER (CURSOR +/-) push buttons
●To cut-out the lead of the song (OFF) press: F8 Lead (Off)
●To reproduce just the Drum and Bass tracks alone press: F9 Drum + Bas (On)
●To display the words when available on the display (Karaoke), press: F10 Lyric (On)
●To increase the song volume compared to the timbre assigned to the keyboard press: BALANCE (VALUE +/-)
●To select another Midi file to be reproduced, enter its number using the numeric keypad (i.e. the STYLES push buttons).
TRANSPOSITION
As you will have noticed, when you transpose the song, the timbre assigned to the keyboard is not also transposed. To change the transposi-
tion of a song and of the timbre assigned to the keyboard simultaneously you must access the menu dedicated to the transposition parame-
ters and enable the transposition of the keyboard too. The procedure is the following:
From the SONG PLAY page press F3 Transp and set the F1 Global parameter in ON. In this way, using the TRANSPOSE (CURSOR +/-) push but-
tons, you can transpose both the keyboard and the Midi file in semitones. Another extremely useful function is available in the same menu,
which relates to the musical transposition of the bass line. By enabling parameter F6 Intellig. (default setting in On), the bass line will always
play within its natural range whatever the transposition level.
HOW TO CREATE A CHAIN OF MIDI FILES
When playing live it may prove rather handy to be able to create a chain of Midi files that play one after the other to do away with the time gap
between one song and another. This chain can be created at any time or even chains of 32 Midi files can be created in advance and saved on
hard disk to be called up at a later date. For the time being we will just describe the temporary chain.
●From the main page of the display, enable the SONG PLAY push button
●Select the Midi file source, either hard or floppy disk using the PAGE +/- push buttons
●Select the F6 Juke-Box function
●To display the F9 Chain Select function press the * push button
DG100 Owner’s Manual
16

Owner’s Manual DG100 17
●Find the first Midi file of the chain using the VALUE +/- push buttons
●Choose the next Midi file using the VALUE +/- push buttons: VALUE +/-
●Confirm the choice using the F9 function: Then repeat the last procedures until the Midi file chain has been completed. F9 Chain
Select
●Start reproducing the first Midi file using the F7 function: F7 Go Next
●To move onto the next Midi file use the F7 function F7 Go Next or stop the playback using START and press the START push button again
to start reproducing the next Midi file.
●To modify any reproduction parameters from the SONG PLAY page without losing the chain, press the EXIT push button.
The only restriction in creating chains of Midi files is that the DG100 cannot use Midi files on hard disk and floppy disk at the same time. You
must always work with the files stored only on one or the other.
HOW TO RECORD A MIDI FILE WITH THE DG100
There are two ways of recording a song: the built-in sequencer works over sixteen independent tracks and has been devised to record the songs
accurately track by track. The Song Record function on the other hand is used to create a Midi file by recording everything played on the key-
board and various tracks of the Arranger. This last method is used to exploit the powerful automatic arrangement functions to obtain a com-
plete song. A separate section has been dedicated to the Sequencer and below is the information on how to record a song using Song Record:
●From the main page of the display press the SONG RECORD push button
●Enter the name to be given to the Midi file using the KEYBOARD keys
●Save the title using the F10 SAVE function
●Start SONG RECORD using the F10 START function
●From here you can start playing, start the Arranger, call up timbres and Styles and the DG100 will record everything. Upon completion press
the SONG RECORD push button
●The Midi file just recorded is now ready to be played back using the START push button
Considering that it is in actual fact a true Midi file it can be later modified using the Sequencer editing functions or it can be put on sequencer
software to add the finishing touches.
Further details on how to use Midi files are found in the following sections:
- Song Play
- Song Record
- Disk
- MIDI
- Sequencer
HOW TO USE THE ARRANGER
The Arranger is the engine of the DG100’S automatic accompaniment function. It produces an accompaniment according to musical styles, the
chord and the controls of the panel. The heart of the Arranger is the Style, namely a combination of bass, drum and harmony tracks that have
been designed for that kind of music. Without going into too much detail (for this you can refer to the Arranger section), these tracks can have
four variations called A, B, C and D, three Intro’s and three Endings that have different levels of complexity. Then there are also the Fill-Ins with
which you can move on from one variation to the other or even remain on the same variation, depending on what you prefer. Generally speak-
ing the Arranger of the DG100 is very powerful and allows you to build up your accompaniment very carefully. Start from an Intro, then remain
on a first variation and, with a Fill-In, move onto the refrain with a second variation to terminate with an End. This is just a simple example of
what you can do. Whatever the case Ketron has developed some Styles that will never smother the lead vocal or timbre but will enhance it.
When the DG100 is turned on it is always pre-set to use the Arranger with a piano timbre for the lead (Right section) to be played with the right
hand, a background of strings and electric piano for the left hand (Lower section), a keyboard split point to keep the right hand separate from
the left, set on note C3 and Style 001 ‘Pub Song’ ready to be used.
The part to the left of the split point of the keyboard is used not only to control the two Lower timbres but also to acknowledge the chord played
by the user, which will be shown next to the four sections indicating the current measure.

HOW TO SELECT A STYLE
There are twelve STYLES push buttons to the right of the display, each of which indicates a musical genre. For each of these Ketron has fore-
seen up to a maximum of 42 Styles. When, from the main page of the display and with the CUSTOM STYLE push button enabled (LED lit), you
press one of these STYLES push buttons the display shows five Styles on the right and another five on the left. The individual Style is called
up using the relative function key (F1-F10), situated at the side of the display that, when pressed, immediately calls up the Style for the Arranger.
To check if the Style has been called up simply look at the name that appears at the top of the central window of the display.
The DG100 stores the Styles of each kind of music in groups of ten and the number of the next groups is indicated as Pages. To call up the other
groups of Styles that are not currently displayed, simply press the STYLES push button again to which the groups belong or use the PAGE +/-
push buttons. The display will show the Styles that follow, which can be selected again using the relative push buttons at the side of the dis-
play (F1-F10).
HOW TO CONTROL THE ARRANGER
The Arranger controls are also described in the Arranger section.
Below are simply the main concepts.
●To move the split point hold the SPLIT push button down.Then simultaneously press the key on the keyboard that will be the new split point.
●To start the Arranger press the START push button.
●To stop the Arranger press the START push button.
●To add an Intro with the Arranger stopped, play the starting chord first below the split point and then press one of the three INTRO 1,2,3
push buttons.
●To add a Fill-in with the Arranger running press one of the three FILL 1, 2, 3 push buttons.
●To start the Arranger with the first chord played set it up on standby using the dedicated push button (the LED lights up) KEY START
●To start the Intro with the starting chord of your choice, select an Intro using one of the INTRO 1,2,3 push buttons and then play the chord
(KEY START INTRO ENDING 1, 2, 3)
●To conclude an automatic accompaniment with an Ending, ensure that the JUMP push button LED is switched off (therefore disabled) and
press one of the following push buttons with the Arranger running: INTRO ENDING 1, 2, 3
●To call up one of the four variations, with the Arranger running, press one of the A,B,C,D push buttons.
●To move on by one variation with the Fill In 1 and 2, enable it using the dedicated push button (the LED lights up) JUMP + FILL 1, 2
●To go back by one variation with the fill In 3, enable it using the dedicated push button (the LED lights up) JUMP + FILL 3
●To play over the whole keyboard and still have the Arranger follow you by reading your chords, enable the function using the dedicated push
button: PIANIST
●To modify the tempo set on the Arranger, use the SLOW FAST push buttons
●To create an Accelerando press the TAP push button repeatedly and briefly: RIT ACC (TAP)
●To create a Ritardando, change the direction of the arrow by holding the TAP push button down for a few seconds and then press it repea-
tedly and briefly: RIT ACC (TAP)
●To enter a break, press the BREAK push button.
●To immediately end an arrangement with a short end, press the END push button: TO END
●To stop an accompaniment when the next chord is released, enable the KEY STOP push button (the LED of the push button lights up) and
then play a chord very briefly.
●To hold the arrangement only while the chord is played, enable these functions using the dedicated push buttons: KEY START+KEY STOP
●To play the accompaniment again from the first beat, in whatever measure it currently is, press the RESTART push button.
●To cut-out the accompaniment tracks, execept for the drum tracks, when no chord is played, disable the HOLD function using the dedicated
push button (the LED switches off): HOLD
●To cyclically repeat all the Fill In’s, press a FILL 1, 2, 3 push button and hold it down.
●To balance the volume of the Arranger with the lead played on the part of keyboard to the right of the split point, press these push buttons:
BALANCE +/- (VALUE +/-)
●To restore the original tempo of the Style, press the PAGE +/- push buttons simultaneously
●To repeat the Intro while a Style is playing, enable the function and then press one of the three Intro push buttons: JUMP + INTRO
●To reproduce only the Ending while the Arranger is stopped, enable the function and press one of the following push buttons: JUMP + INTRO
●To cut-out the timbres assigned to the part of keyboard to the left of the split point, press these push buttons simultaneously to mute the
volume: LOWER VOLUME
DG100 Owner’s Manual
18

Owner’s Manual DG100 19
HOW TO LOAD A STYLE FROM DISK
Thanks to the built-in hard disk the DG100 facilitates the use of any Styles that are not saved in the memory but are stored as files on the hard
disk, either by loading them from folders created by the user or by using a preferential folder with the Master Folder enabled. As default set-
ting the DG100 utilises the Styles stored in the memory and called up by enabling the CUSTOM STYLE push button. The Styles on hard disk can
be called up in two different ways: Single Style is used to load a Style simply by entering the number without therefore changing the page of
the display in use and Block Style on the other hand brings up the Disk menu from which to select a desired number of Styles (subject to avail-
able free RAM) to be loaded all together so that they are immediately called up with the ‘Single Style’ button. Another advantage of the Block
Styles, (which will be explained in the Disk section) is that all the preferred styles can be loaded in from the hard disk automatically when the
DG100 is turned on!
To load a Style with SINGLE STYLE
●Activate the push button SINGLE RAM STYLE (you will notice that the CUSTOM STYLE push button will be automatically disabled).
●Enter the number of the Style to be loaded using the numeric keypad: STYLES push buttons
The advantage of using the Single Style is that it is possible to choose the next Style in ad- vance to come after the one currently being used
by the Arranger without having to stop the automatic accompaniment.
To load a Style with BLOCK/LIST RAM STYLE
●Activate this push button: BLOCK/LIST RAM STYLE
●Any pages that follow can be displayed using the CURSOR +/- push buttons
●Find the Style desired using the VALUE +/- push buttons
●Select the Style to be loaded using the F10 Select function
●Select the next Styles to be loaded using the F10 Select function
●Confirm loading in memory using the F1 Load function
●To exit from this page press this push button again: BLOCK/LIST RAM STYLE or press the EXIT push button.
A third alternative is offered again in the BLOCK/LIST RAM STYLE page where the list of 33 patterns is displayed all together,making it easier
to find the desired patterns
●Enable this push button: BLOCK/LIST RAM STYLE
●Select the F7 Pattern List function
●Scroll the pages that follow using the PAGE +/- push buttons
●Select the Style in the page using the CURSOR +/- push buttons
●Confirm loading using the F10 Load function
●To load the Style desired, without selecting it you can also directly enter the number using the numeric keypad: STYLES push buttons
●To exit this page press this push button again: BLOCK/LIST RAM STYLE
●In alternative, to exit press the EXIT push button
It is obviously possible to control many other aspects of the Arranger, amongst which are the timbres to be assigned to the right hand or the
settings for the single accompaniment tracks. For the time being however you can already have fun and meet your basic requirements. You will
find detailed information in the sections dedicated to the following:
- Arranger
- Style
- Registration
- Timbres
- MIDI
- Disk
Table of contents
Other KETRON Musical Instrument manuals