KETRON DG20 User manual

Owner’s Manual • Manuale di Istruzioni • Benutzerhandbuch
Manuel d’instruction • Manual de Instrucciones • Manual do proprietário

English
DG 20 - DG 30
2
Safety instructions
MEANING OF GRAPHIC SYMBOLS:
The lightning arrow inside an equilateral triangle warns you about the presence of dangerous, not insulated voltage that may constitute a risk of elec-
tric shock.
The exclamation mark in an equilateral triangle informs you about important instructions in the User's Manual.
INSTRUCTIONS ABOUT RISK OF FIRE, ELECTRIC SHOCK OR INJURY TO PERONS.
Warning: to reduce the risk of fire or electric shock, do not expose this instrument to rain or moisture.
- Earthing instructions -
This product must be connected to an earthed outlet. In case of malfunctioning, the earthing will reduce the risk of electric shock. The instru-
ment comes with an earthed power cable and plug to be used with an earthed outlet.
DANGER - Improper earthing connections may cause electric shocks. In case of doubts, have your electric installation checked by a qualified
electrician. Do not modify the power cable coming with the instrument.
IMPORTANT SAFETEY AND INSTALLATION INSTRUCTIONS
WARNING - When using electrical products, some basic precautions must be followed, including the following:
●Before using this instrument, carefully read the User's Manual.
●When the instrument is used by children, the presence of an adult is required.
●Do not use the instrument near water, for example near a wash-basin, a swimming-pool, a wet surface, etc.
●The instrument must be used only on supports recommended by the manufacturer.
●Do not play the instrument at a high volume for a long period of time: exceedingly loud music can cause damage to your health.
●The instrument is to be used in a position where adequate ventilation is provided.
●Use the instrument far away from heat sources such as radiators, heaters, etc.
Use only the supplied power cable for connecting the instrument to the mains.
●The identification and power supply data are reported on the bottom of the instrument.
●Disconnect the power cable if the instrument is not used for longer periods of time.
●Be careful to avoid any objects or liquids from falling into the inside of the enclosure.
●Bring the instrument to an service centre in the following cases:
- Damages on the power cable or plug.
- Objects or liquids fallen into its inside.
- The instrument has been exposed to rain.
- Abnormal running or an evident decrease of the instrument's performance.
- The instrument has fallen down or the enclosure has been damaged.
●Never try to repair the instrument yourself. All operations must be performed by specialised engineers.
KEEP THESE INSTRUMENTS IN A SAFE PLACE
CAUTION !!!
RISK OF ELECTRIC SHOCK
DO NOT OPEN
CAUTION!
TO REDUCE THE RISK OF ELECTRIC
SHOCK, DO NOT OPEN THE COVER.

DG 20 - DG 30
DG 20 - DG 30 3
HOW TO AVOID RADIO/TV INTERFERENCE
This instrument operates at radio frequencies, and if not correctly installed according to the instructions supplied, it may cause interference with
radio and television reception.
Though this instrument has been designed according to the applicable standards and notwithstanding the reasonable protections against interfe-
rence it has been equipped with, there is no guarantee that such events will not occur. In order to check if the interference is actually caused by this
instrument, switch it off and see if the interference disappears. Then switch it on again and check if the interference appears again.
Once you have made sure that the interference is originated by this instrument, take one of the following measures:
●Turn the radio or TV antenna in a different direction. .
●Modify the instrument's position with respect to the receiver.
●Increase the distance between the instrument and the receiver.
●Connect the instrument's plug to a different outlet to make sure that the instrument and the receiver are connected to two different cir-
cuits.
●If necessary, contact a specialised technician.
WARNINGS
After having read the safety precautions and instructions on the previous pages, carefully read and conform to the following recommenda-
tions:
POWER SUPPLY
●
Before connecting this instrument to any other equipment (amplifier, mixer, other MIDI instruments, etc.) make sure that all units are switched off.
●Read the instructions about Radio and TV interference..
HOW TO CLEAN THIS INSTRUMENT
●Use only a soft and dry cloth to clean the external surface of your instrument.
●Never use petrol, thinners or solvents generally speaking.
OTHER PRECAUTIONS
●If you wish to use your instrument abroad and if you have any doubts about the power supply, contact a qualified engineer previously.
●The instrument should never be subject to strong vibrations.
●Never exert excessive pressure on the keys and knobs.
●Do not place any objects on the central display. The transparent panel could brake or be damaged and the reading of data could become more
difficult.
●The instrument's cover could be slightly heated during playing. This is caused by heat dissipation of its internal components and is considered
to be a normal effect.
●Nonetheless the instrument should be placed in a ventilated area, if possible.

English
DG 20
4
88 keys weighted hammer action keyboard
2. Soft, Sustain.
64 notes.
Grand Piano, El. Piano, Vibes, Strings.
DX Piano, Harps., Choir, Church..
In, Out Thru.
3 Curves. Soft, Medium, Hard.
4 Demo sequences.
Room, Theatre.
+/- 64 cents.
+/- 12 half tones.
controls (+/-). Function.
Volume
2ND Voice level. Brilliance control.
2 X 25 W RMS.
Left/Mono, Right.
Left, Right.
2 stereo
Dark rosewood PVC. Sliding key cover.
136 x 84 x 51 cms. / 53,4” x 33” x 20”
Kg. 53 (116 lbs.)
KEYBOARD
PEDALS
POLYPHONY
VOICES
VARIATION
MIDI
DYNAMIC
DEMO
REVERB
TUNE
TRANSPOSE
VALUE
MASTER
BRILLIANCE
AMPLIFICATION
OUTPUTS
INPUTS
HEADPHONES
FINISH
DIMENSIONS
WEIGHT
SPECIFICATIONS AND APPEARANCE ARE SUBJECT TO CHANGE WITHOUT NOTICE.
DG20 Specifications
Control panel

DG 20
DG 20 5
CONNECTIONS
The KETRON DG 20 digital piano is equipped with the following connections on the rear panel under the keyboard:
OUTPUTS:2Right and Left audio stereo outputs, to which external amplifiers, mixer consoles or PA systems can be connected.
INPUTS:2Right and Left audio stereo inputs to which keyboards, compact disk drives or other equipment complete with linear
signal ou put can be connected.
PEDALS:Socket for the connection connector of the 2 pedals to the console of the DG 20.
MIDI In/Out/Thru:MIDI sockets. The MIDI unit is a digital interface used to communicate and exchange musical data between electronic
instruments equipped with MIDI.
HEADPHONES:There are two stereo headphones on the left hand side of the instrument under the keyboard. The headphones are used
to practice on your own or to play right through the night without disturbing anybody. The built-in speakers amplifica-
tion system is automatically disabled when the headphones are connected.
AMPLIFICATION SYSTEM
The DG 20 is equipped with a built-in stereo amplification system that includes a 2 x 25 W RMS amplifier and a set of wide band speakers.
MASTER VOLUME
The volume cursor controls the total sound level of the instrument. To adequately reproduce the sound of the piano, you are recommended not
to exceed 50-70% of the total volume, since this value allows you to obtain a sound level comparable with that of a traditional acoustic piano.
KEYBOARD / PEDALS
The DG 20 is equipped with a keyboard of 88 high quality weighted keys, sensitive to the touch.
It also avails of 2 pedals that are capable of reproducing the range of the expressive effects similar to those produced by the pedals of the
acoustic piano.
●SSOOFFTT(left pedal): this tones down the volume and the brilliance of the sound.
●SSUUSSTTAAIINN(right pedal): it works just like the typical Sustain pedal on the acoustic piano and extends the notes played.
PRESETS
The DG 20 is equipped with 8 Preset instrument voices: Grand Piano, E. Piano, Vibes, Strings, DX Piano, Harpsichord, Choir, Church.
As there are 4 keys foreseen to select the Voices (near to the Master and Brilliance cursor keys), each key has been assigned two voices and
the user switches from one to the other by pressing the Variation key. If one of the first four voices is to be selected (i.e. Grand Piano, E. Piano,
Vibes, Strings), the VVaarriiaattiioonnkey must be off, whereas if a voice among the second group of four (DX Piano, Harpsichord, Choir, Church) is to be
selected, first of all activate the Variation key.
DUAL MODE
The Dual Mode is used to select two Preset Voices simultaneously. If, for example, you wish to play Piano and Strings together, press and hold
the Grand key down and then press the Strings key too. In this case the Strings Voice is denominated 2nd Voice, since it is the second one
pressed. If a Preset Voice amongst the first 4 locations is to be played in Dual Mode with another amongst the second 4, such as Grand and
Choir for example, press the Grand key first and hold it down, then press Variation and then, holding both keys down, press the key relative to
the Choir Voice too.
BRILLIANCE / 2ND VOICE BALANCE
The Brilliance / 2nd Voice Brilliance cursor has two different functions:
●BBrriilllliiaannccee: when you play with just one voice at a time, the cursor controls the brilliance of the sound. To obtain a soft and natural sound
of a piano, you are recommended not to exceed 70-80 % of the total Brilliance value.

DG 20
6
English
●22nnddVVooiicceeBBaallaannccee: When you are playing in Dual mode with 2 Voices overlapped, the cursor carries out the function of 2nd Voice Balance, in
other words it controls the volume of just the second voice.
In the case of Piano and Strings, in which Strings is the 2nd Voice, the cursor will just control the volume of the Strings alone.
TRANSPOSER
The Transposer is used to raise or lower the sound pitch of the entire keyboard in semitone intervals. On the DG 20 a transposition of +/- 12 semito-
nes can be carried out.
This function makes it easier to play with difficult tonalities and makes it possible, for example, to easily adapt the sound pitch of the keyboard to the
vocal extension of the singer. Proceed as follows to modify the Transposer of the DG2O:
●Press the Tune/Transposer (Function) key once.
●Modify the value using the Value +/- keys. Press the Value +/- keys together at the same time to immediately reset the value at 0.
Press the Tune/Transposer (Function) key again to exit the function.
TUNE
The Tune function controls the precision tuning of the DG 20 over a range of +/- 100 cents.
This function may prove useful when you play with acoustic instruments or with recorded music.
Proceed as follows to modify the Tune of the DG 20:
●Press the Tune/Transposer key twice consecutively (the relative LED starts to flash).
●Modify the value using the Value +/- keys. Press the Value +/- keys together at the same time to reset the normal value (440 Hz).
Press the Tune/Transposer (Function) key again to exit the function.
Both the Transposer value and the Tune value remain set until the instrument is turned off.
REVERB
The DG 20 is equipped with two types of Reverb (Room and Theatre) to extend the dimension of the sound. The effect is disabled when both LED’s of
the Reverb key are switched off.
DYNAMIC
The Dynamic function is used to choose the type of dynamic response of the keyboard. There are 3 curves: Soft, Medium, Hard. When none of the 3
LED’s of the Dynamic Curve key is lit, a fixed dynamic curve is set with Key Velocity value 64.
MIDI TRANSMISSION AND RECEIVING
By means of the MIDI connectors the DG 20 transmits and receives the MIDI data on fixed channels: 1 and 4. The Notes, Controls and Program chan-
ges concerning the main voice are transmitted and received on MIDI Channel 1. The 2nd voice is transmitted and received on MIDI Channel 4.

DG 30 7
DG 30
88 keys weighted hammer action keyboard
3. Soft, Sostenuto, Sustain.
64 notes.
Grand Piano,Rock Piano, El. Piano 1, DX Piano, Vibes, Strings, Pipe, Pad 1.
Upright, Honky, El.Piano2, Stage, Harpsichord, Choir, Jazz Organ, Pad 2.
In, Out Thru.
3 Curves. Soft, Medium, Hard.
Hall, Theatre.
+/- 64 cents.
+/- 12 half tones.
Volume, Shift, Tune, Pitch/Transposer, Pan, Sustain, Treshold. Value control +/- .
2 Tracks. 10.000 notes. Real time recording. Record. Play. Start. Tempo control .Metronome
8 songs
Volume.
Brilliance control. 2nd voice level.
2 X 25 W RMS.
Left/Mono, Right
Left, Right.
2 stereo
Natural wood: Mahogany, Walnut, Dark rosewood. PVC: Dark rosewood. Sliding key cover
136 x 84 x 51 cms. / 53, 4î x 33 ìx 20î.
Kg. 53 (116 lbs.)
KEYBOARD
PEDALS
POLYPHONY
VOICES
VARIATION
MIDI
DYNAMIC
REVERB
CHORUS
TUNE
TRANSPOSE
SPLIT EDIT
SEQUENCER
DEMO
MASTER
BRILLIANCE
AMPLIFICATION
OUTPUTS
INPUTS
HEADPHONES
FINISH
DIMENSIONS
WEIGHT
SPECIFICATIONS AND APPEARANCE ARE SUBJECT TO CHANGE WITHOUT NOTICE.
DG30 Specifications
Control panel

DG 30
8
English
CONNECTIONS
The DG 30 digital piano is equipped with the following connections in the control panel under the keyboard:
OUTPUTS:2Right and Left audio stereo outputs, to which external amplifiers, mixer consoles or PA systems can be connected.
INPUTS:2Right and Left audio stereo inputs to which keyboards, compact disk drives or other equipment complete with linear
signal output can be connected.
PEDALS:Socket for the connection connector of the 3 pedals to the console of the DG 30.
MIDI In/Out/Thru:MIDI sockets. The MIDI unit is a digital interface used to communicate and exchange musical data between electronic
instruments equipped with MIDI.
HEADPHONES:There are two stereo headphones on the left hand side of the instrument under the keyboard. The headphones are used
to practice on your own or to play right through the night without disturbing anybody.
The built-in speakers amplification system is automatically disabled when the headphones are connected.
AMPLIFICATION SYSTEM
The DG 30 is equipped with a built-in stereo amplification system that includes a 2 x 25 W RMS amplifier and a set of wide band speakers
MASTER VOLUME
The volume cursor controls the total sound level of the instrument. To adequately reproduce the sound of the piano, you are recommended not
to exceed 50-70% of the total volume, since this value allows you to obtain a sound level comparable with that of a traditional acoustic piano.
KEYBOARD / PEDALS
The DG 30 is equipped with a keyboard of 88 high quality weighed keys, sensitive to the touch.
It also avails of 3 pedals that are capable of reproducing the range of the expressive effects similar to those produced by the pedals of the
acoustic piano.
●SSOOFFTT(left pedal): this tones down the volume and the brilliance of the sound.
●SSUUSSTTAAIINN(right pedal): it works just like the typical Sustain pedal on the acoustic piano and extends the notes played.
●HHOOLLDD(middle pedal): it works just like the Sustain pedal but the notes held are only those pressed when the pedal is activated.
This function is used, for example, to extend a chord while the other notes are played in separately.
PRESETS
The DG 30 is equipped with 1166PPrreesseetts, namely pre-selected voices, which however cannot be programmed. There are 8 keys used to select the
Voices and they are situated on the right hand side of the display. 2 Voices are assigned to each of the 8 keys. When the LED of the VVaarriiaattiioonn
key is switched off, the 8 keys are used to select the sounds written under the keys (Grand, Rock etc.); when the VVaarriiaattiioonnkey is lit, they are
used to select the sounds written above the keys ( Upright, Honky etc. ).
The names written on the panel only refer to the Presets (and not to the Programs ).
To select a Preset, check if the LED of the Program key is switched off first.
Here’s the LLiissttof the PPrreesseettss:
P.ch. VVaarriiaattiioonnactive
01 Grand 09 Upright
02 Rock 10 Honky
03 E. Piano 1 11 E. Piano2
04 DX Piano 12 Stage
05 Vibes 13 Harps
06 Strings 14 Choir
07 Pipe 15 Jazz Organ
08 Pad 1 16 Pad 2
DUAL MODE
The Dual Mode is used to select two Preset Voices simultaneously. If, for example, you wish to play Piano and Strings together, press and hold
the Grand key down and then press the Strings key too. In this case the Strings Voice is denominated 2nd Voice, since it is the second one
pressed. If a Preset Voice amongst the first 8 locations is to be played in Dual Mode with another amongst the second 8, such as Grand and
Choir for example, press the Grand key first and hold it down, then press Variation and then, holding both keys down, press the key relative to
the Choir Voice too. The Dual mode works exclusively with the Presets (and not with the Programs ).

DG 30 9
DG 30
BRILLIANCE / 2ND VOICE BALANCE
The Brilliance / 2nd Voice Balance cursor has two different functions:
●BBrriilllliiaannccee: when you play with just one voice at a time, the cursor controls the brilliance of the sound. To obtain a soft and natural sound
of a piano, you are recommended not to exceed 70-80 % of the total Brilliance value.
●22nnddVVooiicceeBBaallaannccee: When you are playing in Dual mode with 2 Voices overlapped, the cursor carries out the function of 2nd Voice Balance, in
other words it controls the volume of just the second voice.
In the case of Piano and Strings, in which Strings is the 2nd Voice, the cursor will just control the volume of the Strings alone.
SPLIT
In Preset mode, the keyboard of the DG 30 can be split-up into two zones in the following manner:
●Press and hold the Split key down.
●Holding the Split key down, select the voice to be played on the right hand side.
●Still holding the Split key down, play the note where the Split is to be set on the keyboard.
●Still holding the Split key down, select the voice to be played on the left hand side of the keyboard.
●Let the Split key go.
With the Split key enabled, the Brilliance / 2nd Voice Balance cursor controls the volume of the Voice situated to the left of the Split. This function can
become very useful to mute the left keyboard section when the DG 30 is connected to external MIDI modules or keyboards such as KETRON XD9 or
XD3 (See MIDI Applications).
NOTE.
This function cannot be used with the Programs since they already have a split point set internally (see Edit Program ).
Switch the Split key off to exit Split mode.
TRANSPOSER
The Transposer is used to raise or lower the sound tuning of the entire keyboard in semitone intervals for an overall range of +/- 12 semitones.
This function makes it easier to play with difficult tonalities and makes it possible to adapt the song to the vocal extension of the singer.
Proceed as follows to modify the Transposer of the DG3O:
●Press the Edit Function key.
●Press the Pitch/Transposer key once.
●Modify the value using the Value +/- keys. Press the Value +/- keys together at the same time to immediately reset the value at 0.
Press the Edit Function key to exit the function.
PITCH
Pitch controls the precision tuning of the DG 30 over a range of +/- 100 cents.
This function may prove useful to tune the piano in with other acoustic instruments or with pre-recorded music ( CD, tapes etc. ).
Proceed as follows to modify the Pitch of the DG 30:
●Press the Edit Function key.
●Press the Pitch/Transposer key twice consecutively (the relative LED starts to flash).
●Modify the value using the Value +/- keys. Press the Value +/- keys together at the same time to reset the normal value (440 Hz).
Press the Edit Function key to exit the function.
Both the Transposer value and the Pitch value remain set until the instrument is turned off.
REVERB / CHORUS
The DG 30 is equipped with two types of effects, the RReevveerrbbwith the two Hall and Theatre environments to extend the dimension of the sound and
the CChhoorruussto enhance the depth of the voices of the Electric Piano, Organ, Pad etc. The effects are disabled when both LED’s of the Reverb and the
Chorus keys are switched off.
DYNAMIC
The Dynamic function is used to choose the type of dynamic response of the keyboard. There are 3 curves: Soft, Medium, Hard.
When none of the 3 LED’s of the Dynamic Curve key is lit, a fixed dynamic curve is set with Key Velocity value 64.
METRONOME
The metronome can be used both to practice and also as a rhythmic guide while recording a sequence (See Sequencer ).
It is activated by enabling the Metronome key. The value is normally set at 120 and can be modified using the Tempo keys (Value +/-).
Simply press the Value +/- keys together at the same time to immediately reset the standard tempo (120).
DEMO
The DG 30 is equipped with 8 Demo songs with well-known piano pieces.

DG 30
10
English
Proceed as follows to listen to the Demo songs:
●Press the DEMO key (the 8 keys of the Preset voices start to flash).
●Press one of the 8 keys that are flashing.
You can easily move on from one song to another.
To stop the song simply press the Demo key again.
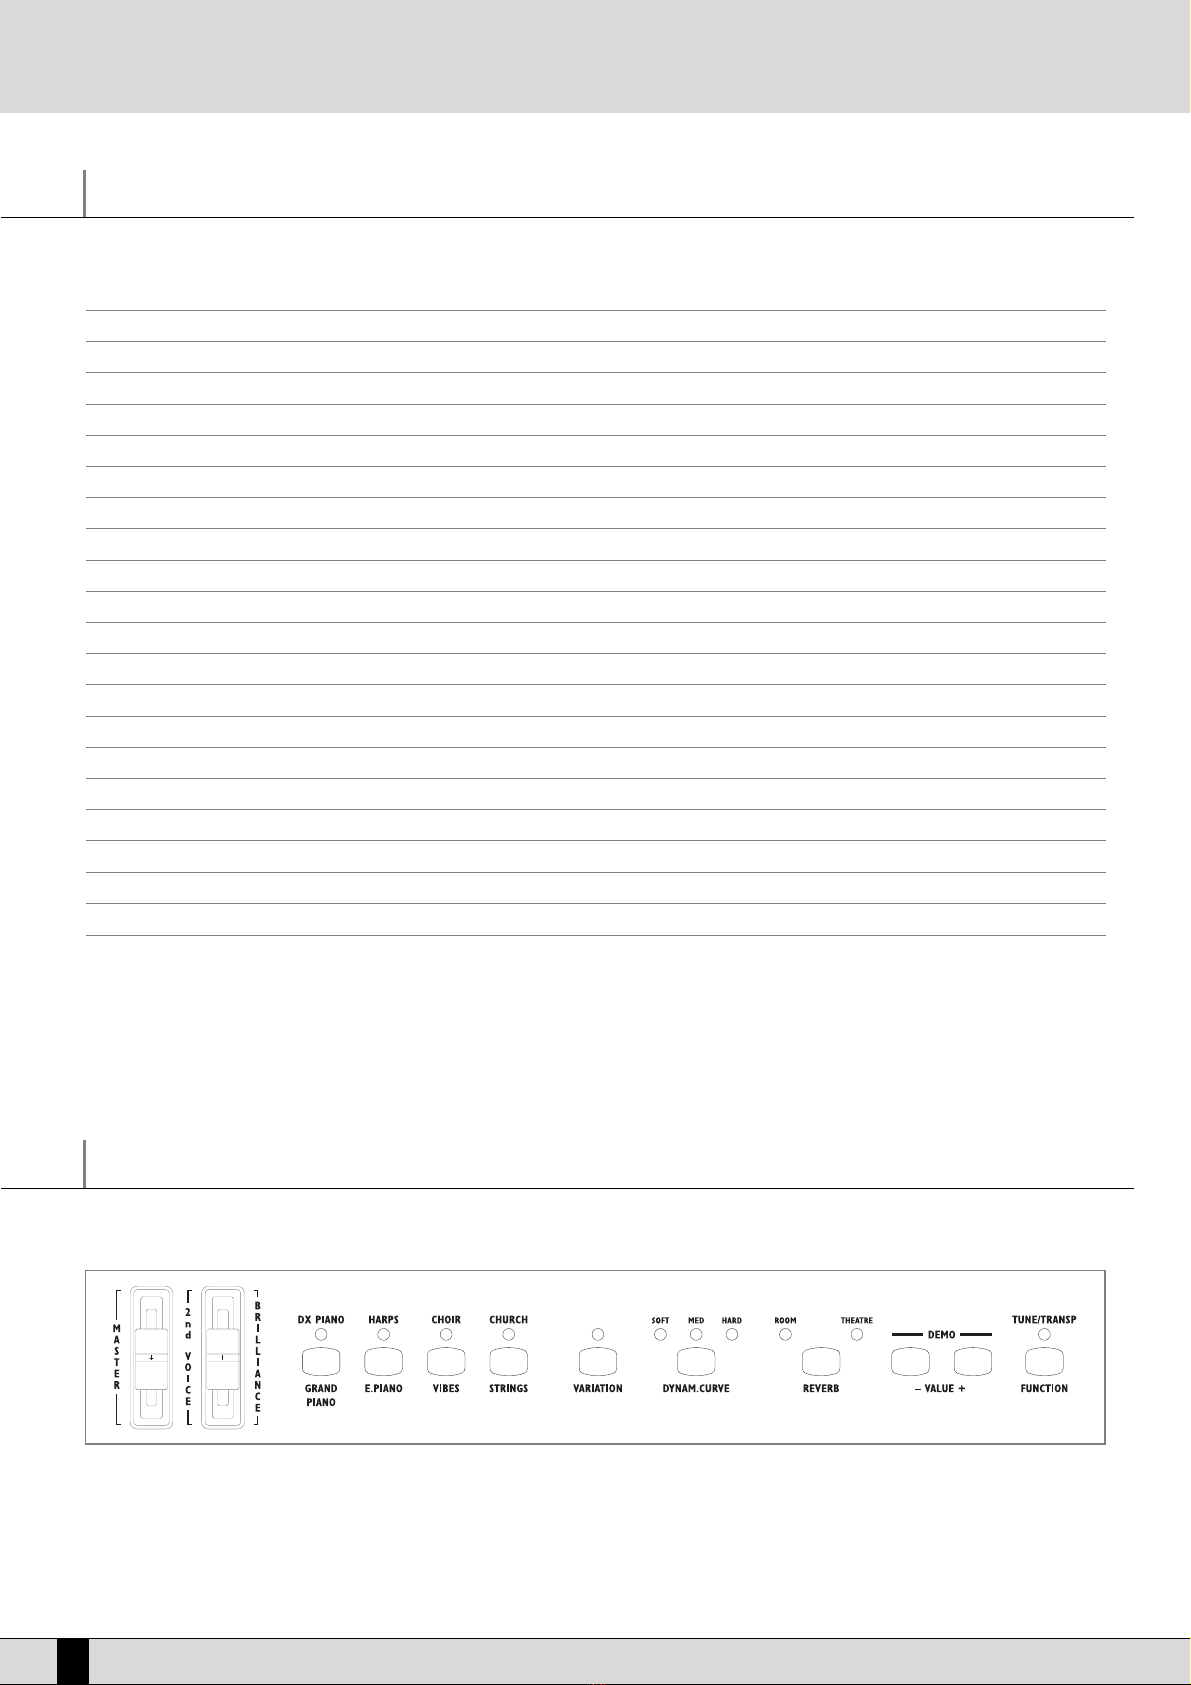
STANDARD TONES
The Preset voice and Programs of the DG 30 are all played with 32 standard tones (Original Tones). These 32 standard tones are also those that can
be used to program the Programs from scrap (or to modify existent Programs).
Below is the List of standard tones ( OOrriiggiinnaallTToonneess):
00 Piano 1 08 Stage 16 Harpsichord 24 Choir
01 Piano 2 09 DX Piano 17 Vibes 25 Warmness
02 Piano 3 10 Vintage 18 Jazz Organ 26 Syn Strings
03 Piano 4 11 Mark Piano 19 Church 27 Slow Strings 1
04 Honky Tonky 12 Elopiano 20 Jazz Bass 28 Slow Strings 2
05 Upright 13 ElectroPiano 21 Finger 29 Dark Pad
06 Bright Piano 14 Rodes lo 22 Subbas 30 Mix Pad
07 Rodes 15 Rodes hi 23 Strings 31 Jazz Bass & Ride
PROGRAMS
The DG 30 is equipped with 16 Programs, made up of 2 or 3 overlapped standard tones that are played on the keyboard simultaneously.
The Programs are selected in the same way as the Presets: enable the Program key and use the 8 Grand, Rock etc. keys to select the Programs from
1 to 8, whereas for those from 9 to 16 you need to activate the Variation key too.
The 16 Programs are already programmed but they can also be edited or programmed from scrap.
Below is the table illustrating the standard Programs of the DG 30 :
PP..cchh..MMooddeePP..cchh..VVaarriiaattiioonnaaccttiivveeMMooddee
01 Grand & Strings Layer 09 Bright Piano Layer
02 Rock & Strings Layer 10 J. Orgaan & Finger Split
03 El. Piano & Pad Layer 11 Rodes Layer
04 Dx Piano & Pad Layer 12 Vintage Layer
05 Octa & Pad Split 13 Slow stgs & Piano Split
06 Strings ensemble Layer 14 Jazz bass & Grand Split
07 Pipe & Choir Layer 15 El. Piano & Finger Split
08 Full pad 1 Layer 16 Jazzb./Ride & Piano Split
EDIT PROGRAMS
As mentioned above the Programs can be programmed.
3 standard tones can be managed for each Program (Original tone) and you can select the following for each standard tone: Tone, Volume, Shift, Tune,
Pan Pot, Sustain, Threshold, Reverb, Chorus, Split.
Proceed as follows to edit the Program:
●Enable the Program key.
●Select one of the 16 Programs available.
●Press the EEddiittFFuunnccttiioonnkey.
From here onwards only the first three Grand, Rock and E. Piano 1 work, which are used to select the voice to be edited amongst the three available.
When you access Edit Program, the DG 30 always automatically sets itself on the first voice of the Program (The display indicates the number of the
Grand standard tone).
The following can be modified for each of the three voices of the Program:
TONE:To modify the tone of each of the three voices of the Program, find the tone desired out of the 32 standard tones ava-
lable using the Value +/- keys.
VOLUME:To modify the Volume of the voice selected, press the Volume key (Metronome), then modify the value using the Value
+/- keys (0 – 63). The value of the volume is reset by pressing the Value keys together at the same time.
SHIFT:To modify the Shift, namely the octave of the voice selected, press the Shift key (Track 1), then modify the value using
the Value +/- keys (+/- 2). The value is reset by pressing the Value keys together at the same time

DG 30 11
DG 30
TUNE:To modify the Tune, namely the fine-tuning of the voice, press the Tune key (Track 2), then modify the value using the
Value +/- keys (+/- 63). The value is reset by pressing the Value keys together at the same time.
PAN POT:To modify the Pan Pot, namely the stereo panorama, press the Pan Pot key (Record), then modify the value using the
Value +/- keys (+/- 8). The Pan Pot is reset in the middle by pressing the Value keys together at the same time.
SUSTAIN:This is used to establish whether the voice selected must respond to the Sustain control or otherwise, when the relati-
ve pedal is pressed. When switched “On”, the Sustain pedal affects the voice selected, whereas when it is switched “Off”
it has no affect. To modify the function press the Sustain key (Play), then select On/Off using the Value +/- keys. This
function may prove useful when building-up a Program made up of Piano and Strings, for example, in which the Piano
must respond to the Sustain pedal, whereas the Strings must not in order to avoid unpleasant sound overlapping.
THRESHOLD:This is used to restrict the dynamics range within which the voice selected must play. There are two dynamics values
for each voice, the minimum value (Lo) and the maximum value (Hi). To access the function, press the Threshold key
(Start). The display shows “Lo” for roughly one second and then the relative value straight afterwards. If you press the
Threshold key again the display shows “Hi”, then the relative value. The “Lo and Hi” values are modified using the Value
+/- keys (0 – 127). If, for example, the “Lo” value is set at 40 and the “Hi” value at 96, the Voice selected will only play
when the notes with dynamics no lower than 40 and no higher than 96 are played on the keyboard. The Threshold con-
trol is used to create some Programs in which you can switch immediately from one sound to another based on the
dynamics (the so-called Velocity switch function) or the sounds area added together only starting from a certain dyna-
mics threshold ( Velocity mix).
REVERB:To modify the reverb quantity, press the Reverb key and then modify the value using the Value +/- keys (0-63). The
Reverb value is reset by pressing the Value +/- keys together at the same time.
CHORUS:To enable or disable the Chorus effect, press the relative key and set the On/Off setting using the Value +/- keys.
SPLIT:The Split function is used to restrict the keyboard zone within which the voice selected is to work. There are two values
for each voice, which establish the lowest note and the highest note. The function is enabled in the following manner:
Press the Split key (the relative LED starts to flash), then press the lowest note on the keyboard followed by the highe-
st note. The Split value is reset on “OFF” by pressing the Value +/- keys together at the same time, therefore the voice
will play automatically over the whole keyboard.
SAVING THE PROGRAM
Proceed as follows to save a Program:
●Press the Program key (the 8 keys used to select the Voices start to flash).
●Press the key on which the new Program is to be saved.
The Variation key must be switched off if the Program is to be saved in a location that goes from 1 to 8. It must be switched ON if the Program is to
be saved in a location that goes from 9 to 16.
When the new Program is saved it replaces the old one.
If you no longer wish to save the Program, simply exit the Edit Program function by switching the Edit Function key off.
The standard Programs can be restored again at any time using the Reset function (see further on).
SEQUENCER
The Sequencer of the DG 30 is used to record up to 8 musical songs made up of 1 or 2 tracks and played in real time on the keyboard.
You can also play over the sequences recorded. This function does indeed prove useful when studying and practicing.
RECORDING
Proceed as follows to start recording a sequence:
●Press the Record key. The display automatically goes to sequence N. 1.
●Using the Value +/- keys, select the sequence to be recorded amongst the 8 available.
●Select the track to be recorded first using the relative key (Track 1 or Track 2). The LED of the track selected starts to flash together with the Start
key.
●Start recording by pressing the Start key or simply start by playing on the keyboard of the DG 30. If you wish to have a reference tempo, press
the Metronome key and select the Tempo value using the Tempo keys (Value +/-).
●To stop recording, press the Record key again. The LED of the Play key will automatically light up. Press the Start key to play back what you have
just recorded.
●To stop the play back of a sequence, press the Start key again.
●To record the second track, simply press the Record key again, then press the key relative to the track still empty. While you are recording the
second track, you can play back the contents of the first one.

DG 30
12
English
The data recorded will be cancelled each time the track to be recorded is selected. Only the data relative to the track selected will be cancelled howe-
ver, while the contents of the other track will remain unaltered.
NOTE.
The Presets can also be recorded in Dual mode and in Split mode. In Dual mode however the Program change of the 2nd Voice will not be recorded,
whereas in Split mode the Program change of the left voice will not be recorded. The reproduction will be achieved therefore only bearing in mind
the Program change of the main voice in the first case and of the voice to the right of the split in the second case.
PLAY BACK
Proceed as follows to play the sequence back:
●Press the Play key.
●Select the sequence to be played back amongst the 8 available using the Value +/- keys.
●Press the Start key.
You can play over the sequence being played back both with the Preset voices and the Programs.
The sequence is stopped automatically when it ends. It can be stopped at any time by pressing the Start key. The display will show the number of
the last sequence played back. Select the new sequence using the Value +/- keys and then press Start.
MIDI
By means of the MIDI connectors the DG 30 transmits and receives the MIDI data on 4 fixed channels: 1, 4, 7, 11.
The Notes, Controls and Program changes from 1 to 32 concerning the main voice are transmitted and received on MIDI Channel 1, both when a Preset
is selected and when a Program is selected.
The Program changes from 1 to 16 are the Presets, from 17 to 32 are the Programs. The Program changes above 32 are always accepted as Program
16 (namely Prog. Change with value 32).
The 2nd voice or the voice to the left, if you are playing in Split mode, is transmitted and received on MIDI Channel 4.
The notes relative to tracks 1 and 2 of the sequencer are transmitted and received repeatedly on MIDI Channels 7 and 11.
The Program changes relative to the tracks of the Sequencer are not transmitted.
MIDI APPLICATIONS
In the following two rather frequent examples of MIDI Applications with the DG 30 connected to external MIDI keyboards or modules ( like for exam-
ple KETRON XD3, XD9, SD1,X1, X4 etc.) are given. For easier description, reference to Mod. XD3 is made.
●DDGG3300wwiitthhccoommpplleetteeppiiaannookkeeyybbooaarrdd.
In this case it will be sufficient to set the GLOBAL Channel of the XD3 on reception on Channel 01. The module will behave exactly like a keyboard
with the Arranger and Lead sections already split on C3. The DG 30 will sound on the complete extension.
●DDGG3300wwiitthhkkeeyybbooaarrddsspplliittttiinnggaannddPPiiaannoooonnllyytthheelleeaaddsseeccttiioonn.
In this case, first of all the keyboard split must be activated ( see Chapter SPLIT). As a matter of fact, every time a keyboard split is created, the
left section of the DG 30 will transmit on the MIDI 04 channel whereas the right section transmits on Channel 01.
If you wish to assign the Arranger section of the XD3 to the left section of the DG 30, you need to set only the LEFT section of the XD3 on Channel
04 for MIDI reception.
Simply put the Brilliance control to zero to mute the left section of the DG 30. As already seen before, Brilliance has a double function: it softens
the sound brilliance in normal playing conditions, and it also allows to control the volume of the 2nd Voice ( in Dual mode) and of the Voice left
to the split point when the keyboard splitting is activated.
RESET
The Reset function of the DG 30 is used to restore all the functions and the initial parameters of the instrument.
To Reset the instrument, turn the instrument on holding the Track 1 and Record keys down together at the same time.

DG 20 - DG 30
68
Tables
MIDI Implementation
Only midi channel0/3/6/9/10/13/14/15 are recognized
MMIIDDIIMMEESSSSAAGGEEHHEEXXCCOODDEEDDEESSCCRRIIPPTTIIOONNCCOOMMPPAATTIIBBIILLIITTYY
NOTE ON 9nH kk vv Midi channel n(0-15); note ON #kk(1-127), velocity vv(1-127). MIDI
vv=0 means NOTE OFF
NOTE OFF 8nH kk vv Midi channel n(0-15) note OFF #kk(1-127), vv is don’t care. Pitch MIDI
PITCH BEND EnH bl bh bend as specified by bh|bl (14 bits) Maximum swing is +/- 1 GM
tone (power-up). Can be changed using "pitch bend sensitivity".
Center position is 00H 40H.
PROGRAM CHANGE CnH pp 0 to15: Voice 0 to 15 GM/GS
16 to 31: Program (patch) 0 to 15
CHANNEL AFTERTOUCH DnH vv vv pressure value. Effect set using Sys. Ex. 40H 2nH 20H-26H MIDI
MIDI RESET FFH Reset to power-up condition
CTRL 00 BnH 00H cc Not recognized GS/DREAM
CTRL 01 BnH 01H cc Modulation wheel. Rate and maximum depth can be set MIDI
using SYSEX
CTRL 05 BnH 05H cc Portamento time. MIDI
CTRL 06 BnH 06H cc Data entry : provides data to RPN and NRPN MIDI
CTRL 07 BnH 07H cc Volume (default=100) MIDI
CTRL 10 BnH 0AH cc Pan (default=64 center) MIDI
CTRL 11 BnH 0BH cc Expression (default=127) MIDI/GM
CTRL 64 BnH 40H cc Sustain (damper) pedal MIDI
CTRL 65 BnH 41H cc Portamento ON/OFF MIDI
CTRL 66 BnH 42H cc Sostenuto pedal MIDI
CTRL 67 BnH 43H cc Soft pedal MIDI
CTRL 91 BnH 5BH vv Reverb send level vv=00H to 7FH GS
CTRL 93 BnH 5DH vv Chorus send level vv=00H to 7FH GS
CTRL 120 BnH 78H 00H All sound off (abrupt stop of sound on channel n) MIDI
CTRL 121 BnH 79H 00H Reset all controllers MIDI
CTRL 123 BnH 7BH 00H All notes off MIDI
CTRL 126 BnH 7EH 00H Mono on MIDI
CTRL 127 BnH 7FH 00H Poly on (default power-up) MIDI
CTRL CC1 BnH ccH vvH Assignable Controller 1. cc=Controller number (0-5Fh), GS
vv=Control value (0-7Fh). Control number (ccH) can be set on
CC1 CONTROLLER NUMBER (Sys. Ex 40 1x 1F). The resulting effect is
determined by CC1 controller function (Sys.Ex. 40 2x 40-4A)
CTRL CC2 BnH ccH vvH Assignable Controller 2. cc=Controller number (00h-5Fh),
vv=control value (0-7Fh). Control number can be set on
CC2 CONTROLLER NUMBER (Sys.Ex. 40 1x 20).
The resulting effect is determined by CC2
controller function (Sys.Ex.40 2x 50-5A).
RPN 0001H BnH 65H 00H 64H 01H 06H vv Fine tuning in cents (vv=00 -100, vv=40H 0, vv=7FH +100 MIDI
RPN 0002H BnH 65H 00H 64H 02H 06H vv Coarse tuning in half-tones (vv=00 -64, vv=40H 0, vv=7FH +64 MIDI
NRPN 0108H BnH 63H 01H 62H 08H 06H vv Vibrate rate modify (vv=40H -> no modif) GS
NRPN 0109H BnH 63H 01H 62H 09H 06H vv Vibrate depth modify (vv=40H -> no modif) GS
NRPN 010AH BnN 63H 01H 62H 0AH 06H vv Vibrate delay modify (vv=40H -> no modif) GS
NRPN 0120H Bnh 63H 01H 62H 20H 06H vv TVF cutoff freq modify(vv=40H -> no modif) GS
NRPN 0121H BnH 63H 01H 62H 21H 06H vv TVF resonance modify (vv=40H -> no modif) GS
NRPN 0163H Bnh 63H 01H 62H 63H 06H vv Env. attack time modify(vv=40H ->no modif) GS
NRPN 0164H BnH 63H 01H 62H 64H 06H vv Env. decay time modify(vv=40H -> no modif) GS
NRPN 0166H BnH 63H 01H 62H 66H 06H vv Env. release time modif(vv=40H ->no modif) GS
NRPN 18rrH BnH 63H 18H 62H rr 06H vv Pitch coarse of drum instr. note rr in semitones GS
(vv=40H -> no modif)
NRPN 1ArrH BnH 63H 1AH 62H rr 06H vv Level of drum instrument note rr (vv=00 to 7FH) GS
NRPN 1CrrH BnH 63H 1CH 62H rr 06H vv Pan of drum instrument note rr (40H = middle) GS
NRPN 1DrrH BnH 63H 1DH 62H rr 06H vv Reverb send level of drum instrument note rr (vv=00 to 7FH) GS
NRPN 1ErrH BnH 63H 1EH 62H rr 06H vv Chorus send level of drum instrument note rr GS
(vv=00 to 7FH)
NRPN 37xxH BnH 63H 37H 62H xx 06H vv Special Synthesis features controls (see §1-4- above) DREAM

DG 20 - DG 30
DG 20 - DG 30 69
MMIIDDIIMMEESSSSAAGGEEHHEEXXCCOODDEEDDEESSCCRRIIPPTTIIOONNCCOOMMPPAATTIIBBIILLIITTYY
Standard Sysex F0H 7EH 7FH 09H 01H F7H General MIDI reset GM
Standard Sysex F0H 7FH 7FH 04H 01H 00H ll F7H Master volume (ll=0 to 127, default 127) GM
SYSEX F0H 41H 00H 42H 12H 40H 00H Master tune (default dd= 00H 04H 00H 00H) -100.0 to +100.0 GS
00H dd dd dd dd xx F7H cents. Nibblized data should be used (always four bytes).
For example, to tune to +100.0 cents, sent data should
be 00H 07H 0EH 08H
SYSEX F0H 41H 00H 42H 12H 40H 00H Master volume (default vv=7FH) GS
04H vv xx F7H
SYSEX F0H 41H 00H 42H 12H 40H 00H Master key-shift (default vv=40H, no transpose) GS
05H vv xx F7H
SYSEX F0H 41H 00H 42H 12H 40H 00H Master pan (default vv=40H, center)
06H vv xx F7H
SYSEX F0H 41H 00H 42H 12H 40H 00H GS reset GS
7FH 00H xx F7H
SYSEX F0H 41H 00H 42H 12H 40 01H 10H Voice reserve : GS
vv1 vv2 vv3 vv4 vv5 vv6 vv7 vv8 vv1= Part 10 (Default vv=2)
vv9 vv10 vv11 vv12 vv13 vv14 vv15 vv2 to vv10 = Part 1 to 9 (Default vv=2)
vv16 xx F7h vv11 to vv16= Part 11 to 16 (Default vv=0)
SYSEX F0H 41H 00H 42H 12H 40H 01H Reverb type (vv=0 to 7), default = 04H GS
30H vv xx F7H 00H : Room1 01H : Room2
02H : Room3 03H : Hall1
04H : Hall2 05H : Plate
06H : Delay 07H : Pan delay
SYSEX F0H 41H 00H 42H 12H 40H 01H Reverb character, default 04H GS
31H vv xx F7H
SYSEX F0H 41H 00H 42H 12H 40H 01H Reverb Pre-LPF, 0 to 7, default = 0 GS
32H vv xx F7H
SYSEX F0H 41H 00H 42H 12H 40H 01H Reverb master level, default = 64 GS
33H vv xx F7H
SYSEX F0H 41H 00H 42H 12H 40H 01H Reverb time GS
34H vv xx F7H
SYSEX F0H 41H 00H 42H 12H 40H 01H Reverb delay feedback. Only if reverb number=6 or 7 (delays) GS
35H vv xx F7H
SYSEX F0H 41H 00H 42H 12H 40H 01H Chorus type (vv=0 to 7), default = 02H GS
38H vv xx F7H 00H : Chorus1 01H : Chorus2
02H : Chorus3 03H : Chorus4
04H : Feedback 05H : Flanger
06H : Short delay 07H : FB delay
SYSEX F0H 41H 00H 42H 12H 40H 01H Chorus Pre-LPF, 0 to 7, default = 0 GS
39H vv xx F7H
SYSEX F0H 41H 00H 42H 12H 40H 01H Chorus master level, default = 64 GS
3AH vv xx F7H
SYSEX F0H 41H 00H 42H 12H 40H 01H Chorus feedback GS
3BH vv xx F7H
SYSEX F0H 41H 00H 42H 12H 40H 01H Chorus delay GS
3CH vv xx F7H
SYSEX F0H 41H 00H 42H 12H 40H 01H Chorus depth GS
3EH vv xx F7H
SYSEX F0H 41H 00H 42H 12H 40H 1pH MIDI channel to part assign, p is part (0 to 15), nn is MIDI GS
02H nn xx F7H channel (0 to 15, 16=OFF). This SYSEX allows to assign several
parts to a single MIDI channel or to mute a part.
Default assignment :
part MIDI channel
0 9 (DRUMS)
1-9 0-8
10-15 10-15
SYSEX F0H 41H 00H 42H 12H 40H 1pH Part to rhythm allocation, p is part (0 to 15), vv is 00 GS
5H vv xx F7H (sound part) or 01 (rhythm part).
This SYSEX allows a part to play sound or drumset. There is no
limitation of the number of parts playing drumset.
Default assignment : part 0 plays drums (default MIDI channel 9)
all other parts play sound.

DG 20 - DG 30
70
Tables
MMIIDDIIMMEESSSSAAGGEEHHEEXXCCOODDEEDDEESSCCRRIIPPTTIIOONNCCOOMMPPAATTIIBBIILLIITTYY
SYSEX F0H 41H 00H 42H 12H 40H 1nH Scale tuning, n is MIDI channel (0 to 15), v1 to v12 are 12 GS
40H v1 v2 ... v12 xx F7H semi-tones tuning values (C, C#, D, ... A#, B), in the range -64
(00H) 0 (40H) +63(7FH) cents.
This SYSEX allows non chromatic tuning of the musical scale on
a given MIDI channel. Default v1, v2, ... ,v12 = 40H, 40H,...,40H
(chromatic tuning).
Scale tuning has no effect if the part is assigned to a rhythm
channel or if the sound played is not of chromatic type.
SYSEX F0H 41H 00H 42H 12H 40H 1nH Velocity slope from 00H to 7FH (default = 40H) GS
1AH vv xx F7H
SYSEX F0H 41H 00H 42H 12H 40H 1nH Velocity offset from 00H to 7FH (default = 40H) GS
1BH vv xx F7H
SYSEX F0H 41H 00H 42H 12H 40H 1nH CC1 Controller number (00-5FH) (default = 10H) GS
1FH vv xx F7H
SYSEX F0H 41H 00H 42H 12H 40H 1nH CC2 Controller number (00-5FH) (default = 11H) GS
20H vv xx F7H
SYSEX F0H 41H 00H 42H 12H 40H 2nH Mod pitch control (-24,+24 semitone) (default = 40H) GS
00H vv xx F7H
SYSEX F0H 41H 00H 42H 12H 40H 2nH Mod tvf cutoff control (default = 40H) GS
01H vv xx F7H
SYSEX F0H 41H 00H 42H 12H 40H 2nH Mod Amplitude control (-100%-+100%) (default=40H) GS
02H vv xx F7H
SYSEX F0H 41H 00H 42H 12H 40H 2nH Mod lfo1 rate control (default = 40H). n is don’t care. GS
03H vv xx F7H Rate is common on all channels
SYSEX F0H 41H 00H 42H 12H 40H 2nH Mod lfo1 pitch depth (0-600 cents) (default=0AH) GS
04H vv xx F7H
SYSEX F0H 41H 00H 42H 12H 40H 2nH Mod lfo1 tvf depth (default = 0H) GS
05H vv xx F7H
SYSEX F0H 41H 00H 42H 12H 40H 2nH Mod lfo1 tva depth (0-100%) (default = 0H) GS
06H vv xx F7H
SYSEX F0H 41H 00H 42H 12H 40H 2nH Bend pitch control (-24,+24 semitone) (default = 42H) GS
10H vv xx F7H
SYSEX F0H 41H 00H 42H 12H 40H 2nH Bend tvf cutoff control (default = 40H) GS
11H vv xx F7H
SYSEX F0H 41H 00H 42H 12H 40H 2nH Bend Amplitude control (-100%-+100%) (default=40H) GS
12H vv xx F7H
SYSEX F0H 41H 00H 42H 12H 40H 2nH Bend lfo1 pitch depth (0-600 cents) (default=0AH) GS
14H vv xx F7H
SYSEX F0H 41H 00H 42H 12H 40H 2nH Bend lfo1 tvf depth (default = 0H) GS
15H vv xx F7H
SYSEX F0H 41H 00H 42H 12H 40H 2nH Bend lfo1 tva depth (0-100%) (default = 0H) GS
16H vv xx F7H
SYSEX F0H 41H 00H 42H 12H 40H 2nH CAF pitch control (-24,+24 semitone) (default = 40H) GS
20H vv xx F7H
SYSEX F0H 41H 00H 42H 12H 40H 2nH CAF tvf cutoff control (default = 40H) GS
21H vv xx F7H
SYSEX F0H 41H 00H 42H 12H 40H 2nH CAF Amplitude control (-100%-+100%) (default=40H) GS
22H vv xx F7H
SYSEX F0H 41H 00H 42H 12H 40H 2nH CAF lfo1 tvf depth (default = 0H) GS
25H vv xx F7H
SYSEX F0H 41H 00H 42H 12H 40H 2nH CAF lfo1 tva depth (0-100%) (default = 0H) GS
26H vv xx F7H
SYSEX F0H 41H 00H 42H 12H 40H 2nH CC1 pitch control (-24,+24 semitone) (default = 40H) GS
40H vv xx F7H
SYSEX F0H 41H 00H 42H 12H 40H 2nH CC1 tvf cutoff control (default = 40H) GS
41H vv xx F7H
SYSEX F0H 41H 00H 42H 12H 40H 2nH CC1 Amplitude control (-100%-+100%) (default=40H) GS
42H vv xx F7H
SYSEX F0H 41H 00H 42H 12H 40H 2nH CC1 lfo1 pitch depth (0-600 cents) (default=0AH) GS
44H vv xx F7H
SYSEX F0H 41H 00H 42H 12H 40H 2nH CC1 lfo1 tvf depth (default = 0H) GS
45H vv xx F7H

DG 20 - DG 30
DG 20 - DG 30 71
MMIIDDIIMMEESSSSAAGGEEHHEEXXCCOODDEEDDEESSCCRRIIPPTTIIOONNCCOOMMPPAATTIIBBIILLIITTYY
SYSEX F0H 41H 00H 42H 12H 40H 2nH CC1 lfo1 tva depth (0-100%) (default = 0H) GS
46H vv xx F7H
SYSEX F0H 41H 00H 42H 12H 40H 2nH CC2 pitch control (-24,+24 semitone) (default = 40H) GS
50H vv xx F7H
SYSEX F0H 41H 00H 42H 12H 40H 2nH CC2 tvf cutoff control (default = 40H) GS
51H vv xx F7H
SYSEX F0H 41H 00H 42H 12H 40H 2nH CC2 Amplitude control (-100%-+100%) (default=40H) GS
52H vv xx F7H
SYSEX F0H 41H 00H 42H 12H 40H 2nH CC2 lfo1 pitch depth (0-600 cents) (default=0AH) GS
54H vv xx F7H
SYSEX F0H 41H 00H 42H 12H 40H 2nH CC2 lfo1 tvf depth (default = 0H) GS
55H vv xx F7H
SYSEX F0H 41H 00H 42H 12H 40H 2nH CC2 lfo1 tva depth (0-100%) (default = 0H) GS
56H vv xx F7H
notes :
NRPN sending method : CTRL#99=high byte, CTRL#98=low byte, CTRL#6=vv
Example : NRPN 0108H = 40H -> CTRL#99=1, CTRL#98=8, CTRL#6=64
x or xx means " don’t care "

Stampa: FLAMINI s.r.l. - Aspio di Osimo (AN) - Tel. 071.7108692 r.a.


This manual suits for next models
1
Table of contents
Other KETRON Musical Instrument manuals