Musicmakers BALLAD HARP KIT User manual

BALLAD HARP KIT
Assembly Instructions
Musicmakers
14525 61st ST CT N
Stillwater, MN 55082
Updated February 2021
WOOD PARTS
A. Soundboard, Aircraft Birch
B. Back Panel
C. (2) Sides
D. (4) Long Trim Strips, Sides
E. Short Trim Strip, Back
F. Short Trim Strip, Front (Drilled)
G. Inner Reinforcement Bar Arched
H. Pillar
I. Pre-drilled Neck
J. (2) Feet
K. Cap Block
L. Top Block
M. Inner Brace
N. Base Reinforcement
O. Base Block
HARDWARE
Scrap Soundboard Piece
(34) Threaded Harp Tuning Pins
Brass Driver for Tuning Pins
(10) Threaded Bridge Pins, Large
Allen wrench, 3/32”
(24) Threaded Bridge Pins, medium
Allen Wrench, 5/64”
(24) Medium Brass Eyelets, 1/8”
(10) Large Brass Eyelets, 5/32”
(2) #14 X 2” Wood Screws, Square Drive
#3 Square Drive Bit
(8) Wood Screws, 1-1/4”
(14) Wood Screws, 1-5/8”
(3) Wood Screw, 2”
Wood Dowel, 3/8” x 2”
(2) Maple Wood Plugs, 3/8” dia.
Maple Wood Plug, 1/2” dia.
Harp Medallion, 3/4” dia.
(3) Drill bits (1/8”, 7/64”, 5/32”)
(1 oz) Wire Nails, 17 guage, 3/4” long
(4) Rubber Bumpers
(4) Screws for Bumpers, #6 x 3/4” (black)
Tuning Wrench
Set of 34 Harp Strings, 19 wood dowels
Spacing Guide for Bridge Pins
Assembly Instructions
A
BCD
E
I
F
G
J
H
K
L
M
NO

651-439-91202
www.harpkit.com
BEFORE YOU BEGIN
Inventory and inspect all your parts carefully. If anything is missing
or defective, please call or email us right away.
_____A.
_____B. It is a good idea to read through the entire assembly instructions before you start, just to get an
overview of the project. This will also help give you an idea of what tools you will want handy to
complete the project. We highly recommend having an orbital sander to complete this project.
It will help cut down on a lot of sanding time.
We also recommend checking off each step in the directions as you finish it. You might be skip-
ping forward to another part of the assembly while waiting for something to dry, and it helps
to keep track of where you left off.
A NOTE ABOUT GLUE
We strongly recommend that you use a common woodworking glue like Elmer’s Carpenter’s
Wood Glue or Titebond because they hold the parts more securely than most other
adhesives, and they are inexpensive and easy to use. DO NOT assemble the wood parts
of this project with 5-minute epoxy or super-glue or hot melt glue. The yellow colored
Elmer’s or Titebond is best.
When gluing parts together, be sure to put enough glue on the joint to wet the entire
surfaces to be joined. A good sign of proper gluing is that a little excess will squeeze out
around the joint when clamping pressure is applied. Too little glue may cause the parts
to separate later, whereas too much glue makes things messy. Always keep a damp rag
handy for quick cleanup, as necessary. It is especially helpful to keep your fingers clean
while gluing, because gluey fingerprints have the embarrassing tendency to appear on the
finished product in prominent places.
NOTE: Please note that some of the pictures shown in these directions are taken from
other harp models. The wood may appear a little different, but the steps to complete will
work the exact same in both kits. If you have any questions, don’t hesitate to give us a call.
p
THE SOUNDCHAMBER FRAME
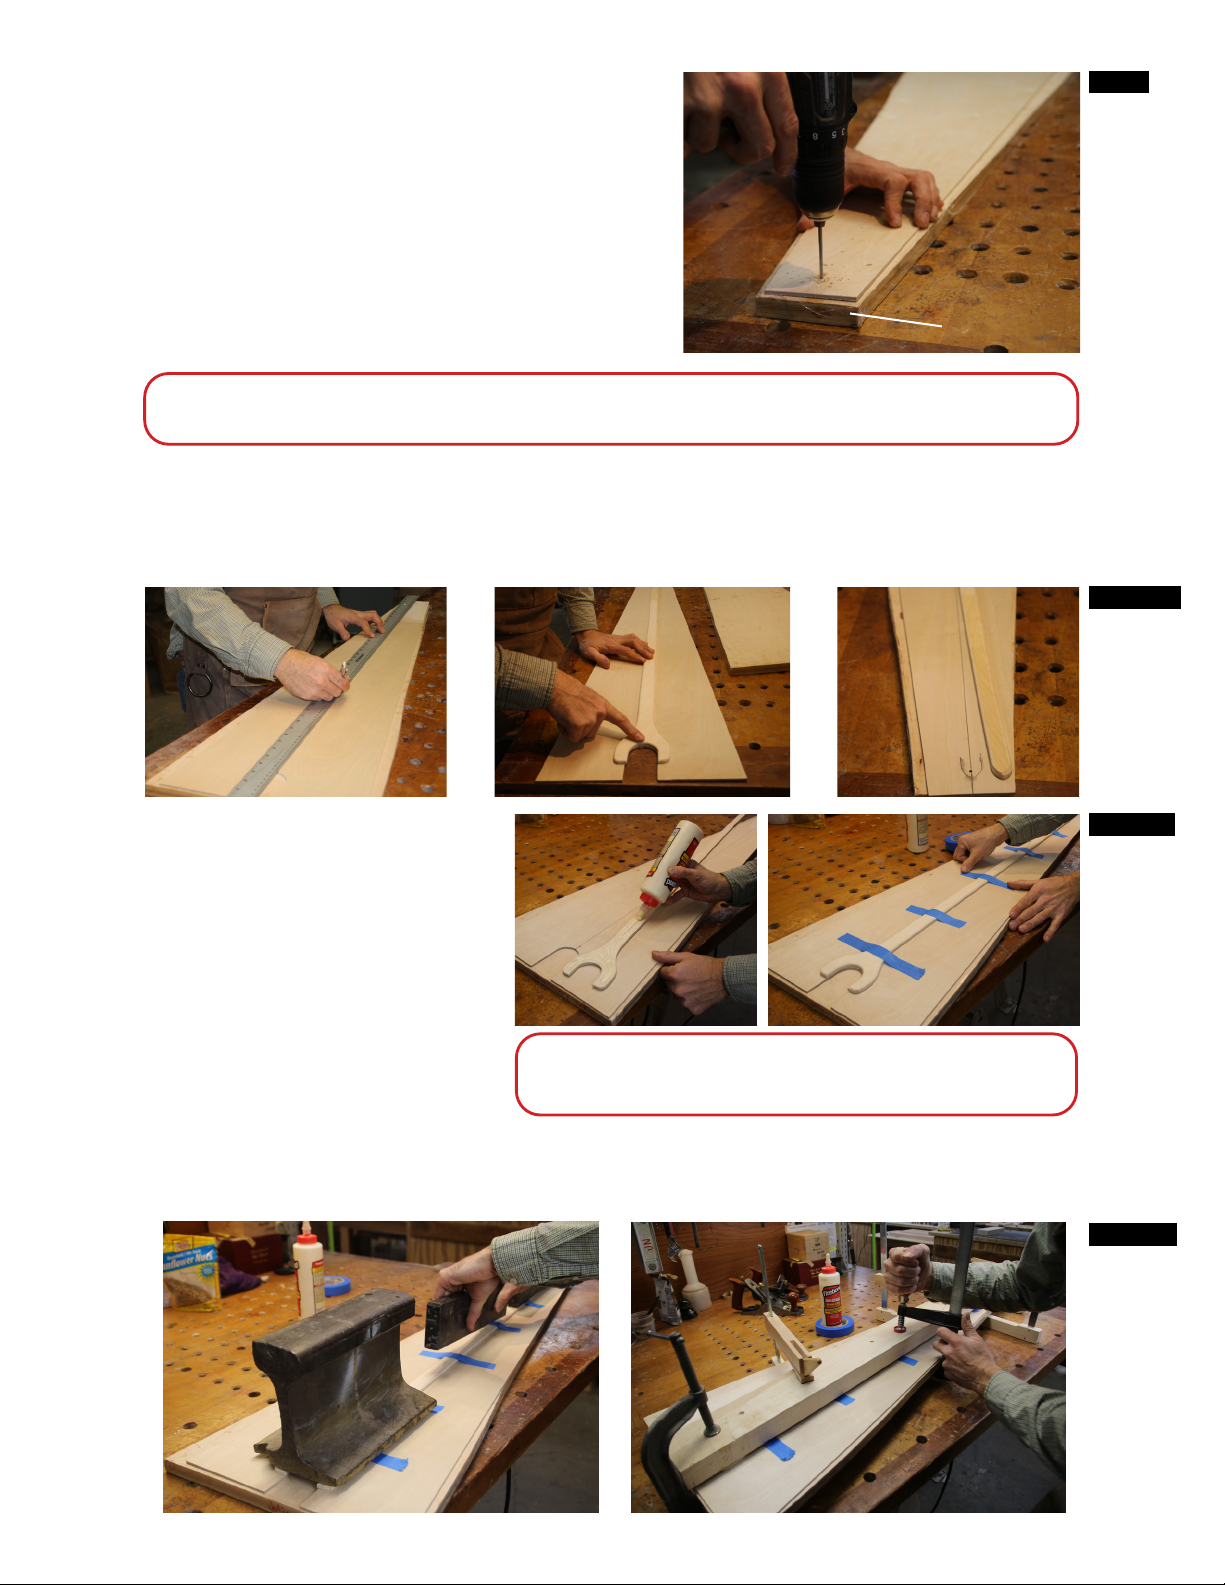
____1. Clamp the harp sides to your bench. This
will help prevent the sides from sliding
around during the assembly process. (Fig. 1)
(This may seem like an odd way to start, but
it really helps to hold both side pieces firmly
when drilling pilot holes for the screws. We
suggest reading through step 5 to under-
stand how the parts will go together.)
FIG. 1
____2. Dry fit the base block and inner top block to to each side ensure a good fit. (fig. 2a) You’ll need
to check the fit on one side and then flip the part over to check the other side.
If the pieces aren’t perfect, you can adjust them with a hand plane or sanding block. It’s easier
to remove the excess BEFORE the parts are glued in place. You can remove the excess by
using a sanding block, hand plane, or power sander. (fig. 2b, 2c)
651-439-9120
Info@harpkit.com

651-439-91203
www.harpkit.com
____3. Drill three, 7/64” pilot holes in both sides for the base block screws, as well as 2 pilot holes in
both sides for the top block screws. (fig. 3a, 3b, 3c) Be sure to tilt the drill bit to drill parallel to
the plane of the sides. If you drill the holes straight down, you might split the wood of the sides.
FIG. 2A,B,C
No
Gaps
FIG. 3A,B,C
____4. Apply glue to the sides where the base block connects, as well as where the top block connects.
(fig. 4a, 4b) Then insert 1-5/8” wood screws to connect one side to the base block. (fig. 4c)
Make sure to clean up the excess glue as you connect the sides to the both the top and bottom
blocks. (fig. 4d) Insert screws to connect the top block on the same side as you did the base
block. (fig. 4e)
FIG. 4A,B,C
FIG. 4D, E

651-439-91204
www.harpkit.com
NOTE: Sometimes the brace is not the correct length to fit between the sides. This can
be caused by poor cutting on our part, but more likely the sides have bowed a little from
humidity changes after we prepared them. You can check that with a straight-edge and
push or pull the sides into alignment as you glue the brace in place. If a brace is simply too
short, however, you can shim the space with a thin scrap of wood. If too long, use a disk
sander to remove a small amount without changing the angle or rounding the end. If the
brace is too thick to slide into the dado, you can sand it a little at a time with an orbital
sander.
This brace serves two purposes. 1.) to straighten the sides during assembly and 2.) to keep
the body of the harp from deforming later under string tension.
p
____5. Flip the harp over so that the glued side is
on top. Use the top block to help balance
the sides together. Align the base block, and
insert the screws for the remaining side. (fig.
5a) After the base block is attached, insert
the remaining screws for the top block.
Make sure to clean up any excess glue.
____6. Place the frame on your bench so that the front is facing up. (fig. 6a) The front is both longer
and wider than the back.
Find and check the fit of the inner brace. Orient the brace so that the taper matches the taper
of the sides. Be sure that the ends of the brace set flush with the edges of both the front and
back. (fig. 6b)
FIG. 5A
FIG. 6A, B
____7. Apply glue and clamps. Please note the various methods of clamping. Taping scrapwood to the
outside will make it easier to apply the bungee cord. Choose the method that works the best
for you. Orient the clamp where the brace is located. Be sure to clean up excess glue drips that
might interfere with installation of the front and back panels. Practice fitting pieces together
without glue. (fig. 7a, b)
Fig. 7a details how to
use f-clamps (aka. bar
or pipe clamps) and
scrap wood (e.g., 2x4s)
to help distribute pres-
sure along the length of
the sides. Fig. 7b shows
how to use elastic/bun-
gee cord, along with
2x4s.
FIG. 7A, B

651-439-91205
www.harpkit.com
PREPARING THE SOUNDBOARD
____8. Take note that the soundboard is punch marked on
the outside surface (front) of the board.
Using a hand drill or drill press, drill the lowest
and highest punch marks with a 1/8” drill bit. These
holes will act as a guide for the reinforcement strip.
Perform the drilling on a workboard to prevent the
wood from tearing out on the soundboard, and hold
the drill perpendicular. (fig. 8a)
FIG. 8A
Workboard
____9. Flip the soundboard so the inside faces up. Connect holes with a straight edge and mark with
a pencil. This line will act as a reference for gluing the reinforcement bar. (fig. 9a) Dry fit the
reinforcement bar and trace around each end with a pencil on the inside of the soundboard.
Be sure that the reinforcement bar covers the highest hole. (fig. 9b, c)
____10. Gather weights and clamps for
pressing the reinforcement bar
and dry fit the reinforcement bar
with the clamps as well.
Apply glue along the length of the
reinforcement bar and tape on
both ends to prevent slippage once
the weights or clamps are added.
(fig. 10a, b)
FIG. 9A,B,C
NOTE: You can sand the inside of the soundboard, but this is not neccessary. If you
choose to sand the inside, make sure you keep a level surface.
CAUTION: If the reinforcement bar is covering the
punch holes - you need to flip the soundboard over.
p
Then you can add the weights or clamps. Make sure that you are continuing to utilize your
workboard, as it helps keep the soundboard and reinforcement bar flat during the clamping
process. (fig. 10c, d)
FIG. 10A, B
FIG. 10C, D

651-439-91206
www.harpkit.com
NOTE: A go-bar deck is an optional clamping system
using flexible sticks/dowels and your work bench! You
can utilize this for clamping down the reinforcement
bar. If you do this, make sure to put a piece of
scrapwood over the length of the reinforcement bar
to help distribute equal pressure. (fig. 10e)
p
HINT: This is a great time to sign and date the inside of
the soundboard. Your name and skills as a luthier will
live on in infamy!
p
FIG. 10E
____11. Once the glue is dry, flip the panel over, and drill the
remaining holes. Drill through the front panel as well as
the reinforcement bar. The bottom ten holes will be drilled
with a 5/32” drill bit. The remaining holes will be drilled
with a 1/8” drill bit. Use the drill bits provided in your hard-
ware pack to complete this task. (fig. 11a)
FIG. 11A
REMINDER: Every time you do some gluing on your project, we advise having a clean
damp rag handy for cleaning up the excess glue that squeezes out of the joints. Keep your
fingers clean as well. Rinse the rag frequently to avoid spreading glue around as you wipe.
Make sure all glue residue is removed. This will save you a lot of time toward the end of the
project while you are prepping to apply finish.
p
INSTALLING THE BACK AND SOUNDBOARD
____12. While you are waiting for the glue to dry on the
soundboard reinforcement strip, you can work
on sanding the sides/frame of the soundbox.
Make a large sanding block to level the edges of
the sides. This will make for a better gluing sur-
face. Use double stick tape or spray adhesive to
apply 60-grit sandpaper to a flat block of wood for
a sanding block. Make sure that the block is flat
and not bowed.
Check to make sure the base block, braces, and
top block are all flush with the sides. Use a file,
chisel, or sanding block to remove any spots that
are too high. (fig. 12a, b) You will want to clamp
down your project so it doesn’t move around
while you are sanding. Make sure to sand both
the front and the back of the frame. This creates
a better glue surface as well as preventing gaps
from appearing under the soundboard.
FIG. 12B
FIG. 12A
NOTE: It is very important that you make sure there are no gaps. If there are places on the
soundboard that have gaps, there is the potential of the soundboard coming off the frame.
p

651-439-91207
www.harpkit.com
____13. Dry fit the back to the frame. The back and soundboard panels are cut slightly large to ensure
a bit of overhang that can be removed after gluing.
Once the back is fitting nicely, remove excess overhang from the top and bottom. This step can
be done after gluing, but you may find it easier to do before you glue it to the frame. You can do
this by using a pencil to mark along the underside of the back against both the top and bottom
block. Then use a saw to cut off the excess. Make sure to leave your line mark when making the
cuts, to ensure that you don’t take too much material off of the back. The rest can be cleaned
up with sanding later on.
____14. Mark where the back panel covers the center of the
side edges on both sides, top and bottom. This will
serve as a guideline for your staple or nail place-
ment. You don’t want staples punching through
the sides of your harp!
Mark the centerlines on the top of the frame, and
extend the lines to both the bottom and top blocks,
as well as the sides. (fig. 14a, b) Then put the back
panel back into place and extend the lines to the
side edge of the back panel. (fig. 14c)
FIG. 14B,C
____15. Use a straight edge to connect all of your centerlines on the back panel. These will be your
guidlines for where to put your nails/staples. (fig. 15a, b)
FIG. 15A, B
FIG. 14A

651-439-91208
www.harpkit.com
____17. Fit the soundboard using the same techniques as
you used to fit the back panel in steps 13 and 14.
There will be a couple slight differences that you will
need to pay attention to. There is a greater risk to
nail through the outside face when you are install-
ing the soundboard. There are two things you can
do to help avoid this from happening.
1) Make sure that you are paying attention to the
angle that you are installing the nails/staples. Make
sure to match the angle of the sides of the frame. (fig.
17a)
2) Instead of marking centerlines for the nail/staple
guidelines in step 14; mark your guidelines about 1/3
of the way from the inside edge. (fig. 17b)
It is very difficult to make a seamless repair when
you punch through the sides. If you pay attention to
these two steps, it should prevent any issues.
Angle of Nail/
Staple should
match the side
of frame
Mark your guidelines 1/3 of
the way from the inside edge
FIG. 17A
FIG. 17B
____18. Test the bottom front trim strip in place and mark holes where screws will be. Do NOT nail/
staple whithin 1/4” of where these holes will be. (fig. 18a)
You will also need to attach the soundboard scrap. It is best to avoid nailing/stapling in the
middle of the scrap as that is where the pillar screw will come in. Put a nail/staple on each side
of the soundboard scrap. (fig. 18b)
Don’t punch through the
sides of the frame!
____16. Apply a liberal amount of glue to the frame and proceed to nail/staple the back panel in place.
Make sure to match the angle of the nail/staple to the angle of the sides of the soundbox, so that
it does not go through the side. This will be more critical when installing the soundboard, as
it has the risk of punching through the ouside face of the side of the frame. Start by installing
one nail at each end of the panel to keep it aligned as you add more nails down each side and
across the bottom. Place your nails or staples about 1-1/2” to 2” apart. (fig. 16a, b, c)
This step will go eas-
ier with an extra set
of hands to speed
things up before the
glue dries. Do NOT
nail/staple along the
top block, as there is
no trim to cover this
area. (fig. 16d) You
will need to clamp
the back to the top
block to be sure that
it gets held down.
FIG. 16A, B
FIG. 16C, D
NO Staples
or Nails

651-439-91209
www.harpkit.com
Soundboard
Scrap
Soundboard Scrap
Mark where the
trim screws will be
____19. Apply glue to the front of the frame and nail/staple the soundboard to the frame using your
guidelines created in step 17. Remember to pay attention to the angle you are installing the
nails/staples. Space the nails about 1” apart on the soundboard because of the string tension
that will be applied on this panel. Remember, do NOT nail along the top block (same as the back
panel) as there will not be trim here.
____20. Use a hammer and nail
set or flat screwdriver to
sink the nails/staples just
below the surface. This
will keep them from
interfering with the
trim strips. Don’t drive
the nails too deep. High
humidity could cause
the wood to swell over
the heads of the nails in
the future. (fig. 20a, b)
FIG. 18A, B
FIG. 20A, B
Set the Nails/
Staples just
below the
Surface.
Points of Interest:
1) Clamps alone will not do the job. Nails/staples are necessary for the soundboard, because
all of the string tension pulls on the front. Wood glue is not sufficiant enough to hold the
soundboard to the string tension. This hardware helps prevent “cold creep.”
2) Many people ask why we use laminated wood instead of solid wood for the soundboard.
The reason is that we get much more strength from laminated material than from solid,
and virtually no breakage. The superior strength of this material allows us to use a thinner
soundboard than if we were to use solid wood, so we also get better sound with a laminated
front than we would with a solid front.
3) Some people ask if they can customize this project with a solid wood soundboard of
their own making, such as solid spruce. To do that successfully, you’d have to alter the
way the pillar attaches to the bottom of the harp, so as to avoid cutting a notch in the
soundboard. Any hole in a solid wood soundboard would weaken the front panel so that it
will break under the 1,000 pounds of string tension. We recommend consulting the book,
“Folk Harp Design and Construction,” by Jerry Brown; if you want to experiment with the
way this harp is built.

651-439-912010
www.harpkit.com
____23. Sand the access holes in the back panel first using 120
grit, and then again with 180 grit sandpaper. Be sure
to clean up the entire perimeter of each hole. This will
make for more comfortable handling once the harp is
finished. (fig. 23a) Then use an orbital sander to light-
ly sand the entirety of the back, soundboard, and sides
using 220 grit sandpaper. Make sure to take extra care
to hold the sander flat. (fig. 23b, c)
NOTE: Be careful
when you are sanding.
The back has a VERY
thin hardwood veneer,
and it is very easy to sand
through the veneer.
Also, there is no need
for heavy sanding.
p
FIG. 23A
FIG. 23B, C
INSTALLING THE TRIM
____21. If you haven’t already done so, this is the time to
remove the overhang from the top and bottom of the
back and soundboard. (fig. 21a)
Also use this time to double check that all the nails/
staples are driven down slightly below the surface of
the back and soundboard.
____22. Remove the excess overhang from along the sides of the frame as well. There are several options
for removing the excess. You can use a fine tooth hand saw, a hand plane, a palm belt sander,
or a sanding block. (fig. 22a, b, c, d)
FIG. 21A
FIG. 22A, B
FIG. 22C, D

651-439-912011
www.harpkit.com
____24. Test fit the trim strips to the soundbox. Be sure that
you know which strip is going where.
Then sand along the entire inside edge of the trim
strips. Do NOT sand the side of the trim that will be
glued down. It is easy to sand this inside edge now.
The inner corner of the trim strip will be harder to
access once it is glued down. Rounding the edge will
ensure that no one will get a splinter from handling
the finished harp near the trim. (fig. 24a)
FIG. 24A
____25. Test fit the bottom trim strip with the pre-drilled holes. Check that the mitered edges fit prop-
erly without leaving a gap anywhere. (fig. 25a)
If the miters on the bottom trim strip need to be adjusted, you can use a sanding block or disk
sander. (fig. 25b) The width of this strip should match the width of the harp’s soundboard at
the bottom. You may need to adjust one side more than the other to get the width and miters
to match. If you run out of wood to remove from the bottom trim. The long side trim strips can
also be adjusted for miter angle.
____26. When you are satisfied with the fit of the bottom trim, use a 7/64” drill bit to bore pilot holes
into the base block. (fig. 26a)
Apply glue and use 1-1/4” screws to attach the bottom trim strip to the frame. Be sure to clean
up any excess glue right away. (fig. 26b, c, d)
FIG. 25A, B
FIG. 26A, B
FIG. 26C,D

651-439-912012
www.harpkit.com
____29. Now use a pencil to mark the overhang of the trim strips at the top of the frame. (fig. 29a) Cut
the excess off with any type of saw. Be sure to keep this top surface flat so the arched cap will
fit well. (fig. 29b)
FIG. 29A, B
____27. Now that the bottom trim is installed, double check the miter angles. Sometimes a gap can
occur once the bottom trim has been attached. (fig. 27a) One more dry fit should correct any
problems. Make any adjustments to the trim to correct any gaps using a sanding block. (fig. 27b)
FIG. 27A, B
____28. Sometimes when you fix the angle of the trim to correct the gap, it will cause the inside cor-
ner of the miter to not line up correctly. Adjust the side trim with a sanding block to bring the
corner together. (fig. 28a, b, c)
FIG. 28A, B, C
NOTE: Once the bottom trim is installed, you will
want to make sure the top of the trim strip is flush with
the inside top of the base board. (fig. 26e)
Every once in awhile there will be a little overhang from
the trim strip. This needs be be flush with the base, as
the pillar will be screwed into the base. If you do not file
off the overhang, the pillar will then put pressure on the
trim strip, instead of the base. If all of the pressure is put
on the trim strip, it will cause it to break off of the frame.
p
FIG. 26E

651-439-912013
www.harpkit.com
____30. Apply a bead of glue to the side of the body where the trim will be. (fig. 30a) Then smooth
out the glue to ensure a nice even glue surface along the entire trim strip. (fig. 30b) You want
enough glue to make sure you have a solid bond, but not too much where you will have a lot of
excess squeeze out.
FIG. 30A, B
____31. Lay the trim on the body and use masking
tape to secure it down. Space the tape about
every inch. Use a scrap block to push the tape
against the inside edge of the trim strips.
When using the tape, think of applying each
piece like a bandage where you are pulling
tightly and ensuring the gap closes. Loose
tape holds nothing well. (fig. 31a, b) Repeat
steps 30 and 31 to install the second trim strip
on the opposite side of the body. You will also
want to put a piece of tape diagonally across
the bottom end of each side trim piece over to
the bottom trim piece. (fig. 31c) This will help
keep the corners together as the glue dries.
FIG. 31A
FIG. 31B, C
____32. Allow 30-60 minutes for the glue to dry.
Then remove all of the tape, and excess
glue with a purposefully dulled chisel.
(We’re trying to remove glue, not wood.)
(fig. 32a)
FIG. 32A

651-439-912014
www.harpkit.com
____36. Apply a liberal amount of glue and screw the arched cap block into the top block with the same
2” screws you used as punches. (fig. 36a, b) Be sure to clean off the excess glue. (fig. 36c)
FIG. 36A. B, C
____33. Repeat the trim process for the back of the
soundbox. (steps 24-32) Except you will be
using tape to secure the bottom trim. (fig. 33a)
FIG. 33A
____34. Use an 80 grit sanding block or disc sander to flatten the top of the assembled box. (fig. 34a, b)
Check the surface with a straight edge to make sure that it’s flat across the entire top. (fig. 34c)
This will eliminate any gaps when fitting/installing the arched cap.
FIG. 34A, B, C
____35. Orient the arched cap block
on the top block and check
for the best fit. Use two 2”
wood screws and a ham-
mer to make punch marks
into the top block for guid-
ing your pilot holes. (fig.
35a) Then use a 7/64” drill
to bore two pilot holes,
using the punch marks you
just made with the screws
as a guide. (fig. 35b)
FIG. 35A, B

651-439-912015
www.harpkit.com
____37. Now is a good time to cover the 2 screws on the front
bottom trim with 3/8” wood plugs. Start by putting a
small dollop of glue into the hole. (fig. 37a) Use a ham-
mer to tap the plug into the hole. The plugs are tapered
and will only fit one way. The plug will not sit flush with
the trim. (fig. 37b) Allow about 30 minutes for the glue
to dry, and then use a small hand saw to remove the
excess plug material. (fig. 37c) You can also use a hand
sander to remove the excess, just be careful to not make
a divot in the trim.
FIG. 37A
FIG. 37B, C
____38. Sand the top block to be flush with the sides of the
harp. Then sand the front and back of the top block
to be flush with the trim strips. You can use either a
portable belt sander, sanding block, or orbital sand-
er to do this. (fig. 38a,b,c) Do not sand the top of the
block where the screws are, as this is where the neck
will attach to the body of the harp.
FIG. 38B, C
____39. Sand the sides of the harp with a hand sander using 180 grit. Then create a 1/4” roundover along
the entire length of the body, on all 4 corner edges. (fig. 39a, b, c)
FIG. 39A, B, C
FIG. 38A

651-439-912016
www.harpkit.com
REINFORCE THE BASE
____39.5
____39.6
The tension from the strings causes the
pillar to exert a tremendous amount
of concentrated force on the base. The
base reinforcement piece is added to
the bottom of the base to provide extra
support.
Position the base reinforcement on
the bottom of the base lining up the
hole to allow access to the pre-drilled
hole where you will attach the pillar.
Fig. 39.5
Apply wood glue to the base reinforce-
ment and screw it to the base using six
1-1/4” screws. Fig. 39.6
FIG. 39.5
FIG. 39.6
Front of Harp
Base Reinforcement
Back of Harp
Hole to attach pillar
Base
Guess what? You are about half way through.
Congratulations!

651-439-912017
www.harpkit.com
Apply glue to the inside cavity of the pillar where the neck will be attached. (fig. 42a) Use the
provided #14 x 2” wood screws along with the #3 size square drive bit to draw the neck and pillar
together firmly. (fig. 42b) Make sure to clean up all the excess glue that squeezes out. (fig. 42c)
It will be very difficult to clean up the excess glue if you allow it to dry.
NECK AND PILLAR ASSEMBLY
____40. The neck and pillar have been pre-fitted at our shop, but you should test these parts without
glue to make sure the wood has not swollen from humidity. The neck should fit easily into the
large slot at the top of the pillar. Lightly sand the area if the joint is tight. Be sure to avoid sand-
ing too much in the area that fits into the pillar, as you want to keep a nice fit.
____41. Sand the neck and pillar. It is
much easier to sand the neck
and pillar before they have
been assembled. Start with
120 grit sandpaper, and work
up to 180 grit. Do the majori-
ty of your sanding before you
put these parts together. (fig.
41a, b, c, d)
Make sure that you sand off
all of the scratches in the
wood. Having good lighting
will help you see the scratch-
es. When you are sanding by
hand you want to make sure
you sand with the grain, so
you are not adding scratches.
Do NOT sand the top side of the pillar where it con-
nects to the neck. (fig. 41e) You will do this later once
the neck and pillar are assembled together.
HINT: Sanding scratches will be more visible once
you have applied finish. So taking time to do a
good job sanding, will leave you with a better final
product.
p
FIG. 41A, B
FIG. 41C, D
FIG. 41E
____42. It is crucial to be able to draw the neck and pillar firmly together when you glue them, so test
your screwdriver/drill to make sure it has enough torque to turn the large #14 screws all the
way in. Do a dry run before adding the glue. This will help you prepare for the task and give
one more opportunity to sand the parts if needed.
HINT: It helps to clamp the neck in a vise (with padding) or to your work surface so you
only need to hold the pillar in position as you install the screws.
p
Do Not
Sand

651-439-912018
www.harpkit.com
____43. Stand the harp up, leaning it against your work table, so you can check the fit of the back of the
neck on top of the soundchamber. Make a mark at about the center of the top block. (fig. 43a)
Then using a straight edge, make a long angled diagonal mark. (fig. 43b) This will serve as a
guide as you drill a hole for the dowel to connect the shoulder to the body of the harp. Match
this angle as you are drilling. It will also help you make sure the neck and pillar match up cor-
rectly once the dowel is installed. Make a mark on the opposite side as well. (fig. 43c)
FIG. 43A, B, C
Draw your hash line from each side of the arch
cap to the top. (fig. 43d) Connect the marks
across the arched cap using a straight edge. (fig.
43e) Then mark the center of the line you just
made. (fig. 43f)
FIG. 43D
Repeat this process on the under side of the neck. (fig.43g, h, i)
FIG. 42A, B, C
FIG. 43E, F

651-439-912019
www.harpkit.com
FIG. 43G, H, I
____44. Use masking tape to mark a depth stop on your 3/8”
drill bit, at a 1-1/4” depth. (fig. 44a) This drill bit is not
included in your hardware pack. However, it’s a com-
mon size in most drill bit sets.
HINT: The 3/8” drill bit will tend to wander as you are drilling. If you first drill the hole
with a 5/32” drill bit, it will help stop the bit from wandering.
p
____45. Using the guideline you just marked on the top of the arched
cap block and the under side of the neck; use an awl to tap a
starting hole at the centerpoint. This will act like a pilot hole
to help keep the drill bit from wandering. (fig. 45a, b)
Now drill a hole to the depth of your tape where you made
your awl mark on both the arched cap block and the neck.
Rock the drill front to back about 10 degrees to give the dow-
el potential for a little movement. (This movement will help
when attaching the bottom of the pillar.) DO NOT ROCK
THE DRILL BIT LEFT/RIGHT. (fig. 45c)
FIG. 44A
FIG. 45B, C
HINT: Secure the neck in a padded vise before drilling the hole for the dowel.
p
FIG. 45A

651-439-912020
www.harpkit.com
Next, you will put a dollop of glue in the top hole, and cover it with the medallion provided. (fig.
48c, d, e.) You can lightly sand the top of the medallion before installing to clean off the smoke
residue left by the laser machine. Once the plug and medallion have been installed, allow at
least 30 minutes for the glue to dry. Use a hand saw, power sander, or sanding block to remove
the excess plug material. Follow up with medium and fine sand paper to remove scratches left
by the coarse sander. Sand the rest of the pillar and soften the edges on the top of the pillar.
Make sure the joint where the pillar and neck come together are flush with eachother. (fig. 48f)
____48. Cover the screw holes in the
front of the pillar, from step
42. You can put the neck in a
padded vise to help keep the
pillar stable. First, put a dol-
lop of super glue in the bot-
tom hole. (fig. 48a) Then you
and to tap the 1/2” plug into
the hole with a hammer. (fig.
48b)
FIG. 48A, B
____47. Use a hand sander to take off the excess bulk on the arched cap block, as well as to soften the
edges. Do not sand inside the circle guideline you have made. (fig. 47a, b) Sand the top shoulder
of the harp, so there are soft edges. (fig. 47c)
FIG. 47A, B, C
____46. Insert the dowel in the arched top block (WITHOUT GLUE) and then fit the neck over the other
end of the dowel. (fig. 46a, b) The hash lines should match up.
Now draw a circle around the shoulder of the harp, onto the arched cap block. (fig. 46c) This
will serve as a sanding guideline. (Before you outline the shoulder, make sure that the bottom
of the pillar is in the right location where it will attach to the soundbox.
FIG. 46A, B, C
NOTE: This joint is not glued. The string tension will hold it tightly.
p
Other manuals for BALLAD HARP KIT
1
Table of contents
Other Musicmakers Musical Instrument manuals

Musicmakers
Musicmakers Reverie Harp Kit User manual

Musicmakers
Musicmakers 17/16 Hammered Dulcimer Kit User manual

Musicmakers
Musicmakers Reverie 2 User manual

Musicmakers
Musicmakers Mountain Dulcimer KIT User manual

Musicmakers
Musicmakers HARP WHEELS KIT User manual

Musicmakers
Musicmakers DELUXE THUMB PIANO KIT User manual

Musicmakers
Musicmakers STRUMBLY KIT User manual

Musicmakers
Musicmakers Hurdy Gurdy User manual

Musicmakers
Musicmakers Voyageur User manual

Musicmakers
Musicmakers Dakota Mandola KIT User manual