Key Digital FATCAT Series User manual

521 East 3rd Street, Mount Vernon, NY 10553
Phone :: 914.667.9700 Fax :: 914.668.8666
Web :: www.keydigital.com
Rev 1 – Nov. 2011
Key Digital
®
, led by digital video pioneer Mike Tsinberg,
develops and manufactures high quality, cutting-edge
technology solutions for virtually all applications where
high quality video imaging is important. Key Digital
®
is at the forefront of the video industry for Home
Theater Retailers, Custom Installers, System Integrators,
Broadcasters, Manufacturers, and Consumers. We
provide
total video system solutions because we know
and help drive the technology, the industry, the business,
and all the latest up-and-coming standards. But most
of all, we know exactly what you need for your unique
application - the right solution.
Operating Instructions
HDMI/DVI with Bi-Directional IR / Uni-Directional
RS-232 via dual CAT5e/6 Baluns (Tx/Rx)
KD-CATHDX is a master box that includes one (1) KD-CATHDXTx Transmitter Balun
and one (1) KD-CATHDXRx Receiver Balun. KD-CATHDX is capable of sending
1080P/60 to distances of up to 140 ft., and lower resolutions up to 270 ft. with
Bi-directional IR/Uni-Directional RS-232.
KD-CATHDX

Page 4 Page 1
HDMI/DVI*
CAT5e/6
IR
CAT5e/6
CAT5e/6
CAT5e/6
CAT5e/6
IR Rx
IR Tx
HDMI
HDMI
KD-IRKIT300
Display
Blu-Ray
IR Emitter
IR Receiver
(to control Blu-Ray)
Blu Ray Remote
KD-CATHDXRx
KD-CATHDXTx
Quick Set Up Guide
➔
Using an HDMI Cable, connect source device to HDMI Input port on KD-CATHDXTx.
➔
For IR, connect appropriate IR Emitter, Receiver, or Control System.
Table of Contents
HDMI
®
1.4 Features ...............................................3
Installation Instructions.............................................3
Mounting the KD-CATHDX units......................................3
DVI Applications for the KD-CATHDX ..................................4
Link Lights ......................................................4
Extending IR Signals with KD-CATHDX ................................4
Troubleshooting ..................................................5
Supported Resolutions ............................................5
Technical Specifications............................................7
Important Product Warnings ........................................8
Safety Instructions ................................................8
How to Contact Key Digital
®
.........................................9
Warranty .......................................................9
© 2011 Key Digital, Inc. All rights reserved.
➔
Connect the CAT5e/6 Outputs of the KD-CATHDXTx Balun to the corresponding Data
and Video/Audio RJ45 ports on the KD-CATHDXRx balun.
➔
For IR, connect appropriate IR Emitter, Receiver, or Control System connections.
➔
Finally, apply power to the KD-CATHDXTx and KD-CATHDXRx balun.
Please read all instructions to ensure safe operation of the product.

Page 2 Page 3
HDMI®1.4 Features
➔
3D – Capability to pass 3D stereoscopic signal
formats
➔
4K – 4096x2160/24 video resolution support for
commercial applications such as Digital Movie
Theaters, CAD, Post Production, Graphics and etc.
Installation Instructions
Find a safe and convenient location for the KD-CATHDX unit.
➔
Before permanently securing the unit or final installation of cabling
behind walls or ceilings, test for proper operation of the unit and the
cables in your system.
CAT5e/6 Cabling
➔
KD-CATHDX Baluns will work with CAT5e, or CAT6 unshielded (UTP) cabling.
For installations in hostile electrical environments, shielded (STP) CAT6 cabling is
recommended.
Connections
➔
Each KD-CATHDX Rx and Tx Balun has an HDMI, 2 x CAT5e/6, a 3.5mm mono
mini jack for IR, and a 5V 1A power connection.
➔
With all of your equipment and Baluns powered off, make your connections.
➔
Power the equipment and Baluns On.
➔
When powered on, the KD-CATHDX Balun will show a red LED for power, and a
blue LED when the Balun is “synced” between the source and display.
Power
➔
KD-CATHDRx and KD-CATHDTx units must be powered.
Mounting the KD-CATHDX units and
securing HDMI connections
Once you have verified operation of the unit with your cables, secure the mounting clip
to a convenient location. Carefully secure included mounting brackets onto the KD-
CATHDXRx or KD-CATHDXTx chassis by fastening screws until mounting clips are fixed
firmly against the units.
CAT5e/6 - Data
Power Jack
Power Jack
Power LED
Power LED
CAUTION: No other power supply adapter can be used with this unit!
Using a power supply other than the one provided by Key Digital
®
with
the unit VOIDS THE ENTIRE PRODUCT WARRANTY, may cause damage
to the unit and associated equipment, and is a potential safety hazard.
KD-CATHDXKD-CATHDX
HDMI Input
HDMI Output
IR Port
IR Port
HDMI Active LED
HDMI Active LED
CAT5e/6 - Video/Audio
HDMI Cable Clip
Power Suppply

Page 4 Page 5
Optional HDMI
Cable clip (included)
Troubleshooting
Most issues with the KD-CATHDX setup will involve resolution and distance
performance. If you experience problems (no image, video artifacts, picture dropout,
noise) here are a few things to try.
1. Use the shortest possible HDMI and CAT5e/6 cables between devices.
2. Lower the output resolution of the image source.
3. Use Key Digital
®
HDMI cables.
4. Re-terminate CAT5e/6 cabling.
DVI applications for the KD-CATHDX
➔
The KD-CATHDX can also be used to extend Digital DVI cable runs.
➔
For the applications, use appropriate Dual Link DVI to HDMI adapters.
Link Lights
To achieve solid Link Lights on the KD-CATHDXTx and KD-
CATHDTXRx baluns, all connections must be solid and properly
synced. This includes the HDMI connectivity between source and
KD-CATHDXTx balun, Data and Video/Audio CAT5e/6 connectivity
between KD-CATHDXTx and KD-CATHDXRx baluns, and HDMI
connectivity between KD-CATHDXRx balun and display.
Extending Control Signals with KD-CATHDX
KD-CATHDX baluns can be used to extend bi-directional IR signals or uni-directional
RS-232 control. Use the 3.5mm mono mini connection on the KD-CATHDXTx and
KD-CATHDRx.
Do not use patch panels, punch downs, keystones, wall plates, or
splicing of the CAT5e/6 cables at any time.
CAT5e/6 Splicing
Tip = SignalShell = Ground
An optional HDMI cable clip (included) enables a method for
securing HDMI cables the KD-CATHDX units and helps
defeat intermittent or complete signal loss due to poor
connection.
Supported Resolutions
Common Video Resolutions
Resolution Common Name Distance
720x480 (split into 2 fields) 480i 270’
720x480 480p 270’
1280x720 720p 270’
1980x1080 (split into 2 fields) 1080i 270’
1920x1080 1080p/24 270’
1920x1080 1080p/60 140’
3D @ 1080p 3D/1080p 140’
3D @ 1080i 3D/1080i 270’
3D @ 720p 3D/720p 270’

Page 6 Page 7
»
Link and Range: Single Link: (1080p/60) 12 bit color depth, 1920x1200 max.
up to 140 ft., STP 150 ft.; (1080i/60, 720p, 1080p/24) up to 270 ft.
»
Deep Color Support: Supports Digital Video Formats in Deep Color Mode at
up to 12 bits/color for 480p/720p/1080i resolutions
»
Lossless Compressed Digital Audio Support: Dolby®TrueHD, Dolby®Digital Plus
and DTS™-HD Master Audio
»
DDC Signal (Data): Input DDC Signal: 5 Volts p-p (TTL)
»
HDMI Video/Audio Signal: Input Video Signal: 1.2 Volts p-p
»
HDMI Connector: Type A, 19 Pin Female
»
RJ45 Connectors: Shielded Link Connector RJ45
»
DDC Communication: EDID and HDCP Transparency from Display to Source
»
Power: External Power Supply – 5V DC / 2A, 110-240 VAC, 50-60 Hz
General Specifications
»
Regulation: CE, FCC, RoHS, WEEE
»
Accessories: Mounting Bracket, Locking HDMI Cable Clip,
KD-PS5V2A UL Certified Power Supply
»
Product Dimensions: L = 3.5” W = 1.75” H = 1”
»
Shipping Carton Dimensions: L = 7.5” W = 8.5” H = 2”
»
Product Weight: 1 lb
»
Shipping Weight: 2 lbs
»
Enclosure: Black Metal
Technical Specifications
»
Inputs: KD-CATHDXTx - 1 HDMI/DVI connector; KD-CATHDXRx - 2 CAT5e/6 IN
on RJ45 connectors; Bi-directional IR / Uni-directional RS-232 on 3.5 mm mono
mini jack
»
Outputs: KD-CATHDXTx - 2 CAT5e/6 OUT on RJ45 connectors; KD-CATHDXRx
- 1 HDMI/DVI connector; Bi-directional IR / Uni-directional RS-232 on 3.5 mm
mono mini jack
»
Bandwidth: 10.2 Gb/s TMDS bandwidth
»
EQ Adjustments: Auto Adjust
»
HDMI®and HDCP Licensing: Fully licensed and compatible with all HDMI
and HDCP techologies
Common Computer Resolutions
Resolution Common Name Distance
800x600 SVGA 270’
1024x768 XGA 270’
1280x768 WXGA 270’
1280x1024 SXGA 270’
1366x768 WXGA+ 270’
1440x1080 SXGA+ 140’
1600x1200 UXGA 140’
Maximum distance specifications may vary based on UTP cable
and crimping connection quality. For optimum performance
at maximum distances, please use STP cabling with properly
soldered shielded RJ45 connectors.
DISCLAIMER

Page 8 Page 9
How to Contact Key Digital
®
Customer Support
For customer support questions please contact us at:
➔Phone: 914-667-9700
➔E-mail: customersupport@keydigital.com
Technical Support
For technical questions about using Key Digital
®
products, please contact us at:
➔Phone: 914-667-9700
➔E-mail: tech@keydigital.com
Repairs and Warranty Service
Should your product require warranty service or repair, please obtain a Key Digital
®
Return Material
Authorization (RMA) number by contacting us at:
➔
Phone: 914-667-9700
➔
E-mail: rma@keydigital.com
Feedback
Please email any comments/questions about the manual to:
➔
E-mail: customersupport@keydigital.com
Warranty
All Key Digital
®
products are built to high manufacturing standards and should provide
years of trouble-free operation. They are backed by a limited two-year parts and
labor warranty.
1. Read and follow all instructions.
2. Heed all warnings.
3. Do not use this device near water.
4. Clean only with dry cloth.
5. Do not install near any heat sources such as radiators, heat registers, stoves, or
other apparatus (including amplifiers) that produce heat.
6. Only use attachments/accessories specified by the manufacturer.
7. Refer all servicing to qualified service personnel. Servicing is required when the
device has been damaged in any way including:
➔
Damage to the power supply or power plug
➔
Liquid spills on the device
➔
Objects fallen into the device
➔
Exposure to rain or moisture
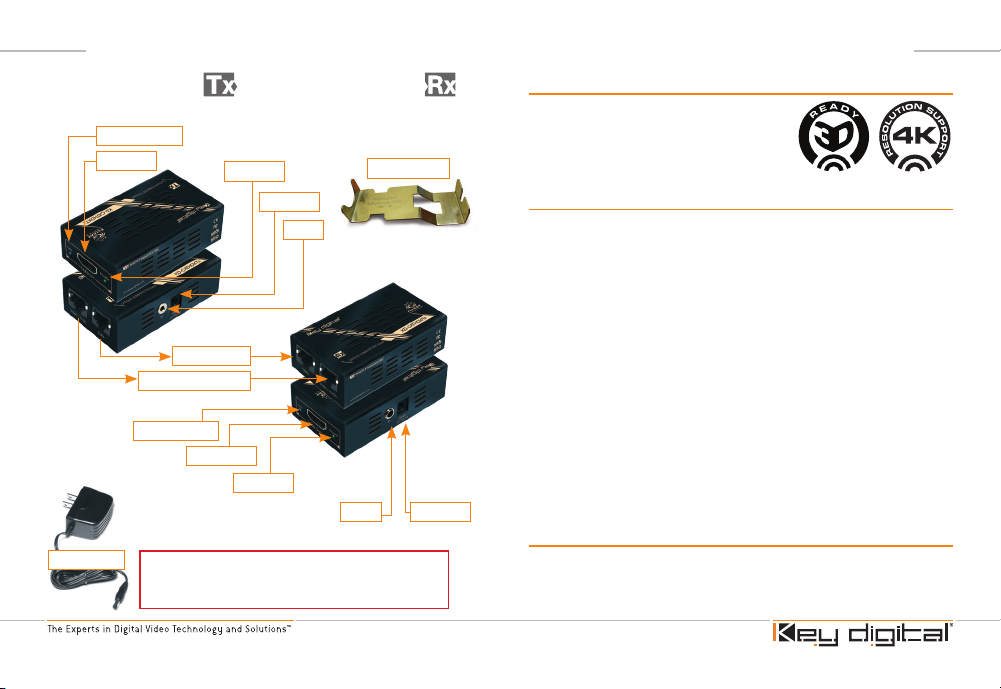
1. Connect CAT5e/6 cables before providing power to the unit.
2. Test for proper operation before securing unit behind walls or
in hard to access spaces.
3. If installing the KD-CATHDX into wall or mounting bracket into sheet-rock, provide
proper screw support with bolts or sheet-rock anchors.
Important Product Warnings:
Safety Instructions.
Please be sure to follow these instructions for safe operation
of your unit.
Other manuals for FATCAT Series
2
This manual suits for next models
1
Table of contents
Other Key Digital Projector Accessories manuals
Popular Projector Accessories manuals by other brands

CHIEF
CHIEF Cable Lock Kit LC-1 installation instructions

RTI
RTI VXP-82 Installation and operation guide

Mitsubishi Electric
Mitsubishi Electric OL-X500SZ Specifications

Manhattan
Manhattan 424851 install guide

Barco
Barco Z3472031K installation manual

Proxima
Proxima PROJECTIONLINK BNDL-001 User's installation guide