Keyestudio 4DOF User manual

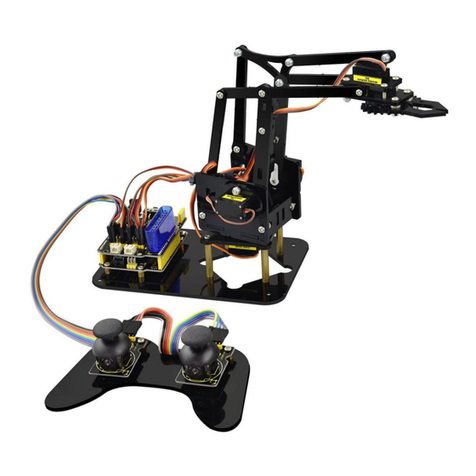
keyestudio 4DOF Robot Mechanical Arm Kit for Arduino DIY

CONTENT GUIDE
1. Kit Overview.............................................................................................................................................................................................................................................. 1
2. Kit Features................................................................................................................................................................................................................................................ 1
3. Part List.......................................................................................................................................................................................................................................................3
4. Assembly Guide....................................................................................................................................................................................................................................... 11
Step1: Begin with the Baseplate Assembly.....................................................................................................................................................................................11
Step2: Assemble Arm Middle Parts...................................................................................................................................................................................................28
Step3: Assemble the Claw Servo Plate............................................................................................................................................................................................ 65
Step4: Final Assembly.........................................................................................................................................................................................................................79
Step5: Assemble the Joystick Control Plate.................................................................................................................................................................................... 87
5. Robot Arm Projects..................................................................................................................................................................................................................................93
Project 1: Getting Started with ARDUINO.......................................................................................................................................................................................93
1) UNO Control Board.................................................................................................................................................................................................................93
2) Example Use of ARDUINO IDE...........................................................................................................................................................................................118
Project 2: Joint Rotation and Pin Control...................................................................................................................................................................................... 128
1) Joint Rotation and Servo Angle Settings.......................................................................................................................................................................... 128
2) Pin Control............................................................................................................................................................................................................................. 129
Project 3: JoyStick Controlled Robot Arm..................................................................................................................................................................................... 131
1) Servo Control.........................................................................................................................................................................................................................131
2) Read the JoyStick Value...................................................................................................................................................................................................... 140
3) Dual-JoyStick Controlling.....................................................................................................................................................................................................144
4) Add Memory Function..........................................................................................................................................................................................................154
Project 4: Bluetooth Controlled Robot Arm...................................................................................................................................................................................199
1) Principle of Bluetooth Control.............................................................................................................................................................................................199
2) Bluetooth Control Key Test................................................................................................................................................................................................. 201
3) Bluetooth Controlling Arm...................................................................................................................................................................................................206
Project 5: PS2 Controlled Robot Arm (Extension)........................................................................................................................................................................214
1) PS2 Joypad Key Test............................................................................................................................................................................................................ 214
2) PS2 Joypad Control.............................................................................................................................................................................................................. 223
3) PS2 Controlling Posture Memory....................................................................................................................................................................................... 235
4) PS2 Controlling Posture Memory And Loop..................................................................................................................................................................... 252
6. More Resources:....................................................................................................................................................................................................................................270

1
1.Kit Overview
How to DIY a robotic arm to complete multiple movements? Cool.With this keyestudio robotic arm kit,
you are able to DIY your own controllable mechanical arm using ARDUINO microcontroller. It uses UNO
R3 and 2 JoyStick modules to control the angle degree of 4 servos.
When DIY this 4DOF robot arm kit, you could get everything needed for arm installation and debugging.
There are 3 controlling methods are as follows:
1) Controlling through Wired JoyStick (included in the kit);
2) Phone Bluetooth Controlling (note: HC-06 Bluetooth module Not Included, only provide the test
code for Bluetooth and APP for Android phone);
3) Wireless PS2 JoyStick Control (PS2 JoyStick module Not Included, we only provide the test code.)
You are able to get all related information in the Arm kit.
Take your brain on an inspiring journey through the world of programming. Get started now!
2. Kit Features
You can check out these features:

2
Detailed installation instructions
Detailed debugging methods, starting Arduino from entry.
Three controlling methods: Wired JoyStick Control; Phone Bluetooth Control; Wireless PS2 JoyStick
Control.
The parameters of keyestudio TB6612FNG motor/servo drive expansion board are as follows:
VIN voltage: VIN = DC 7-15V
VIN current: 5A
Two-way 5V output: 5V/3A
TB6612FNG: VIN input DC 7-15V; average drive current
1.2A; peak current 3.2A
PS2 interface: compatible with Sony PS2 receiver, can
be plugged directly into the expansion board.
Dimensions: 73*53.34mm

3
3. Part List
You can see a pretty beautiful packaging box for the arm kit, and inside the packaging you will find all
the parts and screws listed below.
No.
Item
Quantity
Picture
1
Keyestudio UNO R3 Main Board
1
2
keyestudio TB6612FNG motor/servo drive
shield
1

4
3
MeArm T=3MM Black Acrylic panels
1
4
MeArm T=3MM Black Acrylic handle
1
5
MeArm Black ABS Cylindrical holder
Diameter 42mm
1

5
6
Black 180° Servo
4
7
Keyestudio Bluetooth Module-(HC-06)
1
8
Keyestudio Joystick Module
2
9
3D PS2 Joystick cap
2

6
10
Yellow-black handle 3*40MM Phillips
Screwdriver
1
11
Galvanized M2+M3 2mm thin double-headed
small wrench
1
12
M3*6MM round-head cross screw
12
13
M3*10MM round-head cross screw
22
14
M3*16MM round-head screw
2

7
15
M3*14MM flat-head screw
2
16
M3*12MM round-head cross screw
12
17
M3*24+6MM copper pillar
4
18
M3*6mm+6mm copper pillar
10
19
M3 Stainless steel Hex Nut
22

8
20
M3 hexagon Lock Nut
24
21
M1.2x5MM Phillips tapping screw
8
22
M2x5MM Phillips tapping screw
10
23
M3 304 Stainless steel flat washer
3*7*0.5MM
10

9
24
M2x8MM Phillips tapping screw
2
25
M3*16MM flat-head screw
2
26
Male to female 10CM jumper wire
4
27
female to female 50CM jumper wire
10

10
28
Black 3*100MM cable ties
7
29
18650 dual-cell battery case with plug lead
15CM
1

11
4. Assembly Guide
Follow the assembly steps below to build your own robot arm, believe you will be full of delight to
experience the robot arm DIY. If still confused, you can refer to the assembly video.
Step1: Begin with the Baseplate Assembly
(1) Firstly, you should prepare the components as follows:
M3*30+5MM single-pass copper pillar *4
M3*6mm+6mm single-pass copper pillar *4
M3 Hex Nut *8
Black Acrylic plate *1

12
Then, screw the copper pillars with M3 hex nuts on the black Acrylic baseplate.
Rear
Front

13
(2) Then install the control board, and prepare the components as follows:
M3*6MM round-head screw *3
Keyestudio UNO R3 board *1
keyestudio TB6612FNG motor shield *1

14
Firstly, screw the UNO R3 board on the pillar using three M3*6MM round-head screws.

15
Then stack the motor drive shield onto the UNO R3 board.

16
(3) Completed the above assembly, let's mount the Pivot Servo Plate onto the base.
M3*12MM round-head screw *2
M3 hex lock Nut *2
Black 180°servo *1
Acrylic plate * 4

17
Note: before install the servo, should set the servo angle to 80 degrees.
To set the servo angle, first connect the servo to A0 of motor shield, upload the code below to UNO R3
board, powered on, press the reset button, servo will rotate to 80°.
Other manuals for 4DOF
1
Table of contents
Other Keyestudio Robotics manuals

Keyestudio
Keyestudio Ks0428 User manual

Keyestudio
Keyestudio KS0358 User manual

Keyestudio
Keyestudio Smart Little Turtle Robot V3 User manual

Keyestudio
Keyestudio 4WD Bluetooth Multi-functional Car User manual

Keyestudio
Keyestudio 4DOF User manual

Keyestudio
Keyestudio Micro:bit Mini Smart Robot Car User manual