A
B
B
C
DEF
1
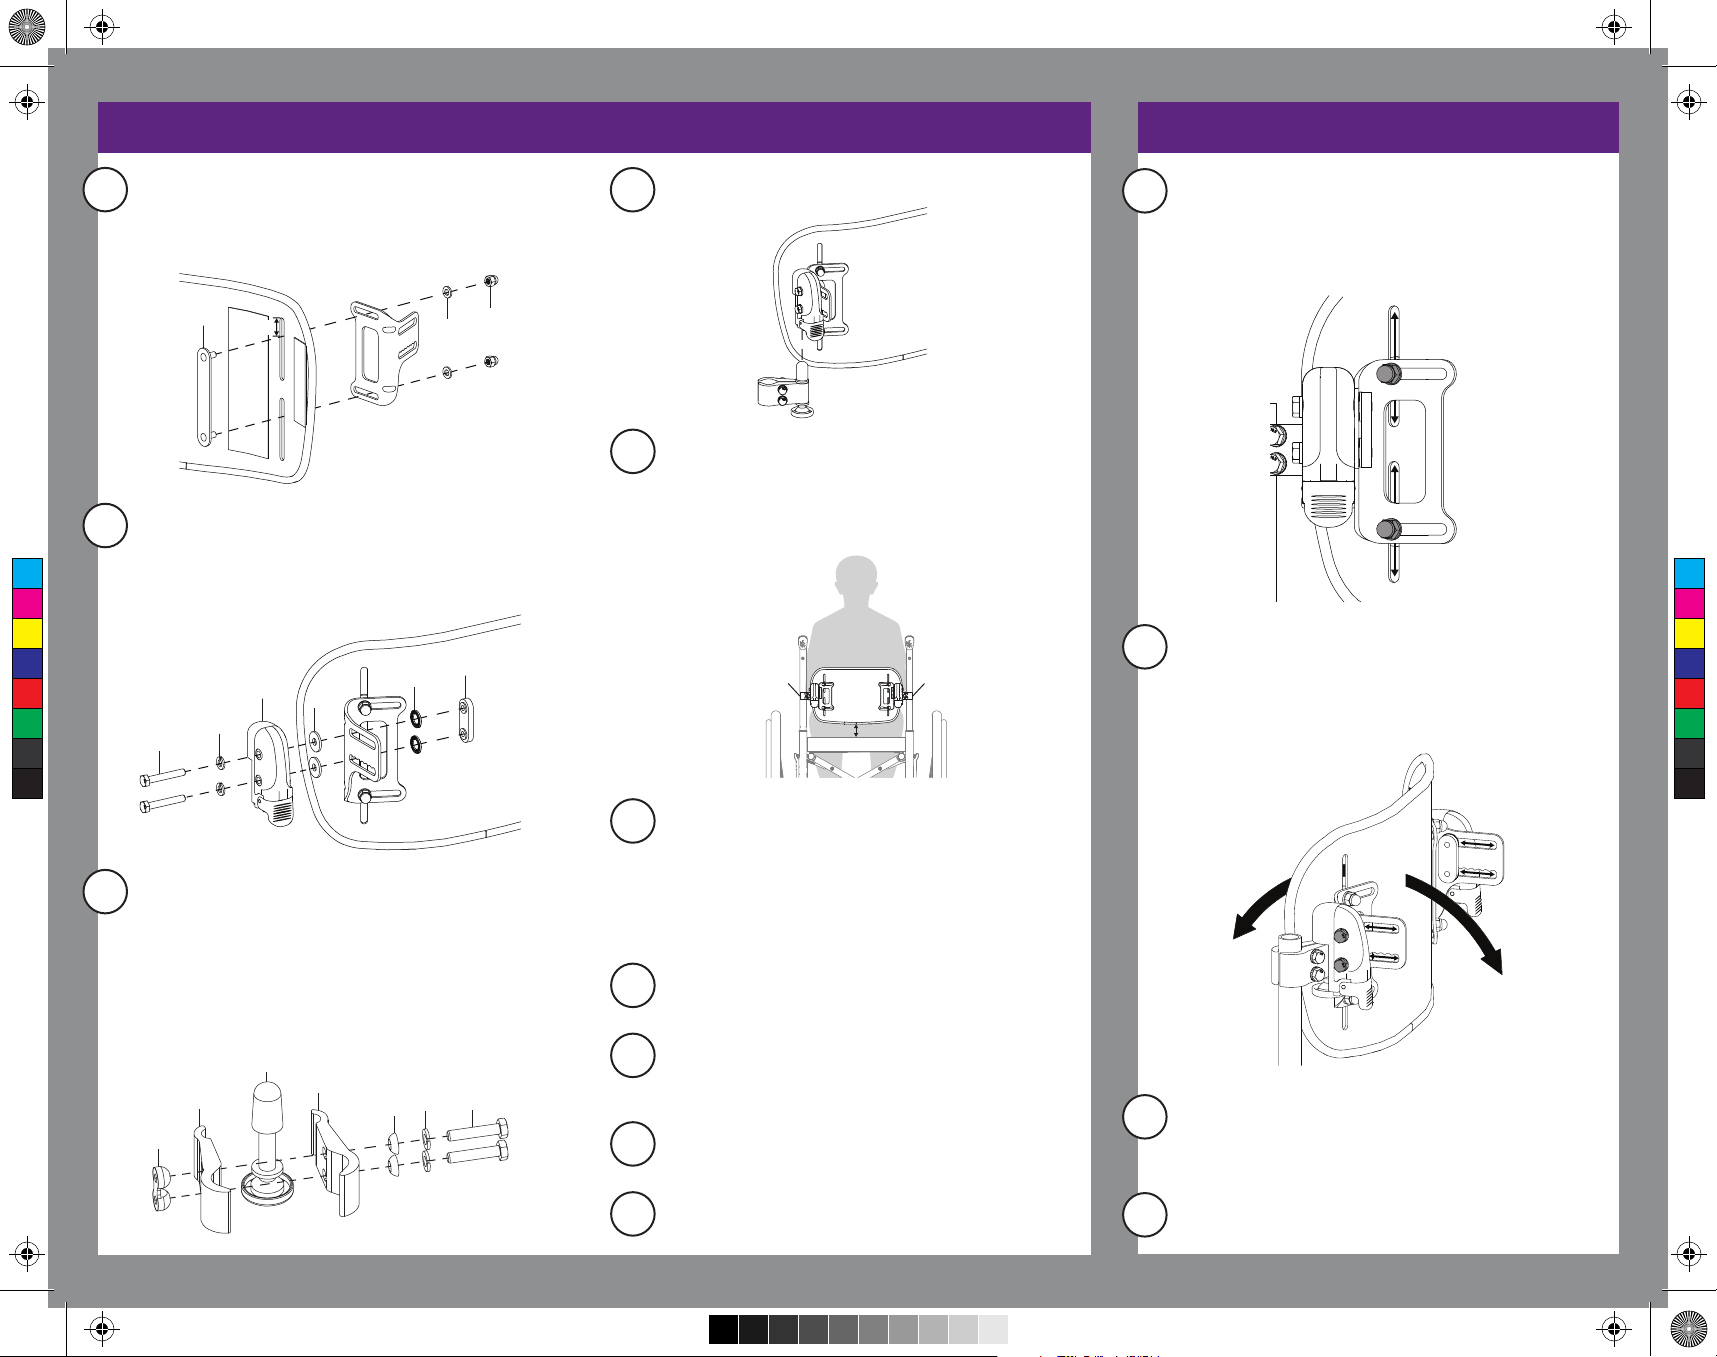
General Setup (Before Delivery)
2Install housing (C) to bracket with two bolts (A), two lock
washers (B), two washers (D), two spring discs (E) and a
nut plate (F). Place as midline and low on the shell as
possible and repeat on opposite side. Loosely tighten
hardware (all 4 capped nylon nuts).
5
6
Custom Adjustments (User Present)
1Adjust the height of the backrest, if needed, by
loosening the two nuts on the backrest bracket.
Slide shell up or down to achieve desired height and
retighten hardware. Ensure both sides are set the
same.
9
Tighten all hardware enough so pieces are secured during
travel. Overtightening the back post clamp hardware may
cause damage to backrest canes.
10
Reinstall backrest cover. Remove and reinstall backrest
multiple times to ensure alignment is correct and all pieces
are secured in place.
2The angle and the depth of the backrest are adjust-
ed, if needed, at the same time. Loosen the two
bolts on the bracket and adjust the angle and depth
of the backrest in one movement. Retighten
hardware once desired configuration is achieved.
4With no user in chair, remove and reinstall backrest
multiple times to ensure alignment is correct and all
pieces are secured in place.
3Tighten all hardware to 110 in-lbs except the acorn
nuts which are tightened to 80 in-lbs. Overtightening
the back post clamp hardware may cause damage
to backrest canes.
Adjust backrest so it appears centered between the two
back canes and both clamps are set at the same height on
both sides. Using a tape measure is recommended to
ensure both sides are set up equally.Once final position is
achieved with only bolt tightened on each hardware
surface, then release and test hardware latch and release.
Tip: Only loosen and snug up one bolt at a time until
desired position is achieved.
Visualize the user seated on the chair with a cushion and
where the clamps will mount on the backrest canes.
Ensure there will be no interference with the backrest
canes. The bottom edge of backrest will typically fall
between an 1” to 2” above the top of the cushion. Loosen
the mount clamps and install onto backrest canes.
CEF
B
A
ABC
1”
Remove backrest shell from cover. Install backrest bracket
to shell with stud plate (A), two washers (B) and two dome
nuts (C). Install so stud plate studs are 1” from the top of
each bracket slot. Loosely tighten hardware. Repeat on
opposite side.
3Install backrest mount clamp (B) to mount plate (C) using
two lock washers (E), two spherical washers (D) and a dual
nut (A). Bolts should thread inwards from the outside of the
chair. Choose bolts, from the two sizes provided, that
adequately thread through dual nut without coming up
short or sticking out excessively. Loosely tighten hardware
inward and rearward at a 45 degree angle, snugging just
one bolt. Repeat with second set of backrest mount
clamps.
1” - 2”
No interference at
clamp locations
No interference at
clamp locations
y) - If ordered with installation on chair, skip to Step 4
D
7
Once final position is achieved with only one bolt
tightened on each hardware surface, then release and
test hardware latch and release mechanism.
8
Final latch should activate when pulling rearward on the
very top part of the back. If latch doesn’t click into place
loosen the side that isn’t engaging and manually
manipulate latch to engage. Repeat step 7 if necessary.
Install the backrest assembly onto the backrest mounts.
Ensure you hear an audible click of the mating parts.
4
C
M
Y
CM
MY
CY
CMY
K
DCN0478.1 - Axiom Back Inside.pdf 1 4/10/2020 10:50:18 AM


