Kia SOUL 2021 Parts list manual


WELCOME TO THE KIA FAMILY!
Your new Kia vehicle has been designed, engineered and manufactured to provide you with years of comfortable and dependable driving. Kia is committed
to quality, innovation, safety and – above all – your satisfaction.
USING THIS FEATURES & FUNCTIONS GUIDE
The information contained in this guide is a brief overview of the operation and features of your new Kia vehicle.
This Features & Functions Guide and the specific operational and safety information it provides are not a substitute for your Owner’s Manual. In the interest
of your safety and that of the vehicle’s occupants, and to help you avoid risks that may result in death or serious injury, Kia reminds you to carefully read the
Owner’s Manual in order to fully familiarize yourself with the important information and safety warnings it contains.
While Kia endeavors to ensure that the information contained in this guide is accurate at the time of printing, Kia may change vehicle specifications without
notice in advance of or after the fact and assumes no liability in connection with such changes.
1. If you’re having trouble scanning codes, check the following:
§The code should be centered and focused in your mobile device’s
camera screen
§Consider moving your device closer to or farther away from the code
§The code should be well lit, without significant shadow
§Avoid scanning from a significant angle
§Confirm that the device’s app supports 2D QR Code scanning
§Try another QR Code Reader app; not all apps are created equal
2. After scanning, you may experience a “connection error” message or a “connecting” message with no subsequent response. These messages typically
indicate that your device is having trouble connecting to the Internet
QUICK TIPS
VIDEOS AND QR CODES
Kia provides a number of video resources to assist you with becoming familiar with the features and functions found in your Kia
vehicle. You can access these resources by snapping the QR Codes with your mobile device using the built-in QR Code Reader
or a downloaded QR Code Reader App.
After opening the QR Code Reader App on your mobile device, the app will utilize your device’s camera. Center the code in the
camera viewing area - With some apps, as soon as the app recognizes the code, it will launch the corresponding video.
With other apps, you will have to snap or “take a picture” of the code. The app will then launch the corresponding video.
For operation specifics, refer to the instructions that come with the QR Code Reader app. You can also view the videos by
visiting the following website: www.youtube.com/KiaFeatureVideos.
One-Click Fuel
Cap Video
To view a video on your
mobile device, snap this
QR Code or visit the listed
website. Refer to this page
for more information.
www.youtube.com/KiaFeatureVideos
QR CODE

GETTING STARTED
As you get to know your new Kia, you can explore this booklet to better understand how to operate its many features and systems.
You can find the complete Table of Contents on the next two pages, but first, be sure to review the following to better understand
some of your Kia’s most used features:
1Air Conditioning / Climate Control* . . . . . . . . . . . . . . . . . . . . . . 22-23
2Audio Systems – UVO link Activation / UVO Assistance* . . . . . . . . . . . . . . 34
3Android Auto™/ Apple CarPlay®Setup . . . . . . . . . . . . . . . . . . . . . . 32
4Audio Systems – Standard Audio System* . . . . . . . . . . . . . . . . . . . . 33
5Audio Systems – UVO link with Navigation* . . . . . . . . . . . . . . . . . . . . 36
6Multimedia USB Port, Power Outlets & USB Charger Ports* . . . . . . . . . . . . 19
7Bluetooth®Wireless Technology . . . . . . . . . . . . . . . . . . . . . . . . . . 30
8Cruise Control (CC)*. . . . . . . . . . . . . . . . . . . . . . . . . . . . . . . . 29
9Digital Clock . . . . . . . . . . . . . . . . . . . . . . . . . . . . . . . . . . . 19
10 Folding Rear Seats . . . . . . . . . . . . . . . . . . . . . . . . . . . . . . . . 39
11 Manual Gear Shift* . . . . . . . . . . . . . . . . . . . . . . . . . . . . . . . . 25
12 Passenger Airbag Off Indicator . . . . . . . . . . . . . . . . . . . . . . . . . . 46
13 Smart Cruise Control (SCC)* . . . . . . . . . . . . . . . . . . . . . . . . . . . 28
14 Tire Pressure Monitoring System (TPMS) . . . . . . . . . . . . . . . . . . . . . 05
15 Unfastening Center Seat Belt . . . . . . . . . . . . . . . . . . . . . . . . . . . 39
16 Windshield/Rear Wipers & Washers . . . . . . . . . . . . . . . . . . . . . . . . 29
Driving while distracted can result in a loss of vehicle
control that may lead to an accident, severe personal
injury and death. The driver’s primary responsibility
is in the safe and legal operation of a vehicle, and
handheld devices, other equipment or vehicle
systems which take the driver’s eyes, attention and
focus away from the safe operation of a vehicle or
that are not permissible by law should never be used
during operation of the vehicle.
www.kia.com
Consumer Affairs - Roadside Assistance†18:
1-800-333-4KIA (800-333-4542)
Always check the Owner’s Manual for complete
operating information and safety warnings. *IF EQUIPPED
SOUL FEATURES & FUNCTIONS GUIDE

TABLE OF CONTENTS
VIDEOS & QR CODES ......Inside Front Cover
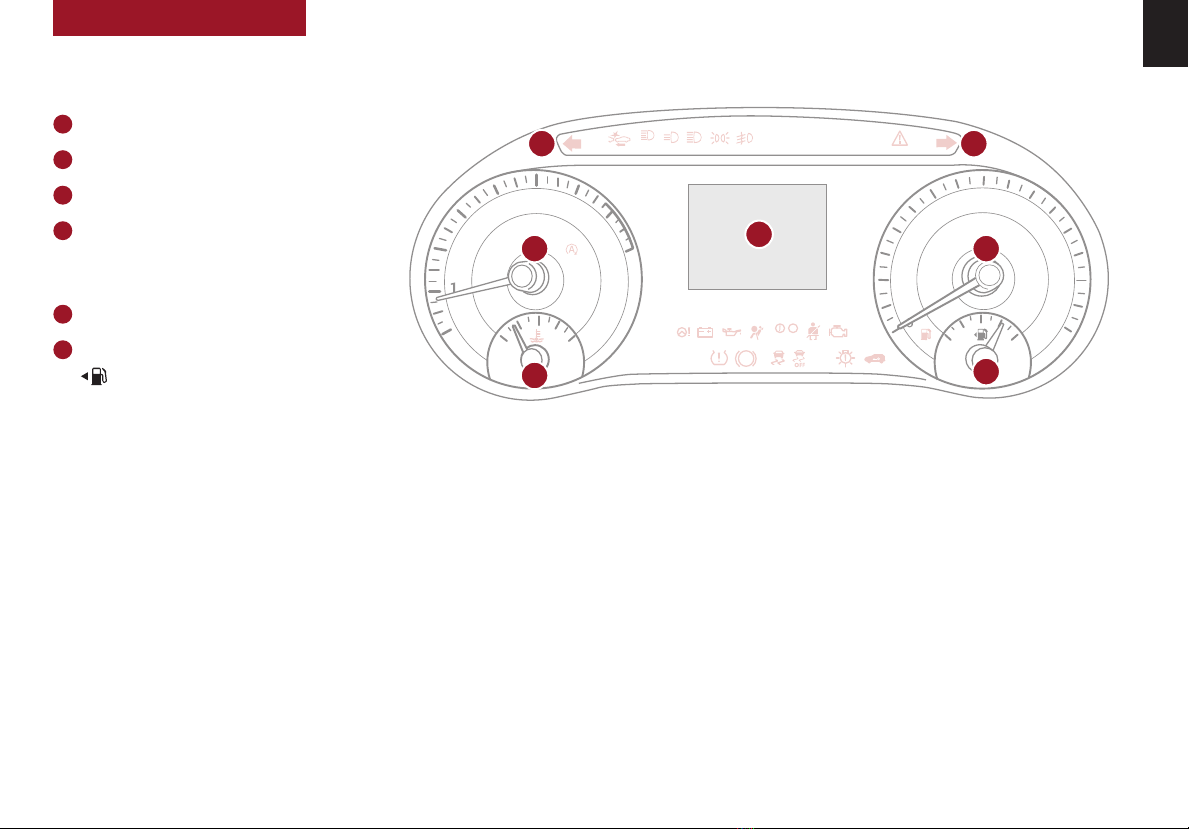
INSTRUMENT CLUSTER
Instrument Cluster Overview................03
Indicators & Warning Lights ................04
Tire Pressure Monitoring System (TPMS) ......05
Fuel Economy ...........................05
Drive Mode Integrated Control System* .......06
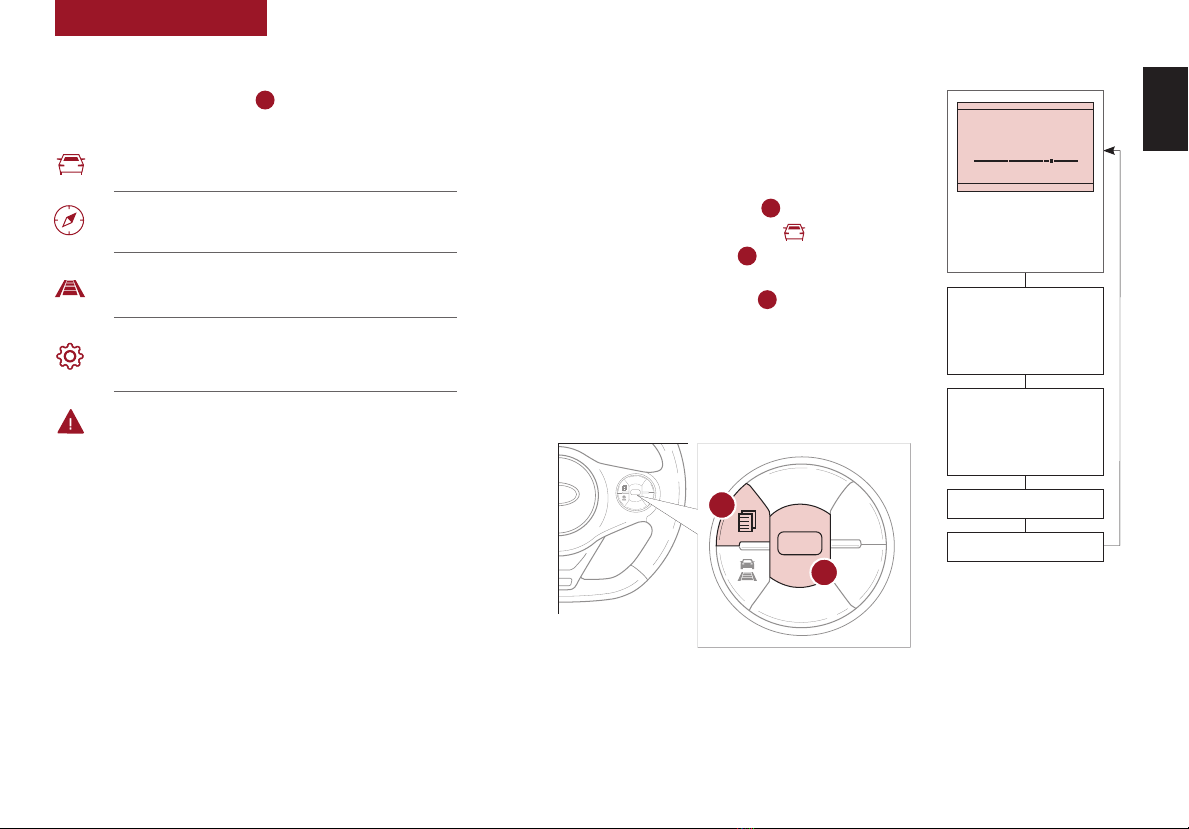
VEHICLE SETTINGS
LCD Instrument Cluster Modes* .............07
Trip Modes / Trip Computer.................07
User Settings Mode* ......................08
Sound-Reactive Mood Light* ...............09
Service Interval Mode* ....................09
ADVANCED DRIVER ASSISTANCE
SYSTEMS (ADAS)
Head-Up Display (HUD)* ................... 10
Lane Keeping Assist (LKA)*................. 11
Forward Collision-Avoidance Assist (FCA)* ..... 12
Blind-Spot Collision Warning (BCW)*.......... 13
Rear Cross-Traffic Collision-Avoidance Assist
(RCCA)* .............................. 14
Rear Occupant Alert (ROA) System ...........14
Driver Attention Warning (DAW)*............. 15
DRIVER’S PANEL
Electronic Stability Control (ESC) ............ 16
Hill-Start Assist Control (HAC)............... 16
Instrument Panel Dimmer ..................16
Engine Start/Stop Button*.................. 17
Power Windows, Window Lock
& Central Door Lock ....................18
Rear Door Locks .........................18
DRIVER’S PANEL (continued)
Power / Heated Outside Mirrors ............. 18
Automatic Door Lock/Unlock. . . . . . . . . . . . . . . . 18
CENTER PANEL
Multimedia USB Port, Power Outlets
& USB Charger Ports* ................... 19
Digital Clock ............................19
Wireless Smartphone Charging System*.......20
Idle, Stop & Go (ISG) System ................21
Automatic Climate Control* .................22
Manual Climate Control* ...................23
Automatic Gear Shift with Sportmatic®Shifting* 24
Dual Clutch Transmission (DCT)* ............24
Manual Gear Shift* .......................25
STEERING WHEEL CONTROLS
Heated Steering Wheel* ...................26
Tilt/Telescoping Steering Wheel .............26
Headlights & High Beams ..................27
Turn Signals & Fog Lights* .................27
Smart Cruise Control (SCC)* ................28
Cruise Control (CC)* ......................29
Windshield Wipers & Washers...............29
Rear Wiper & Washer*. . . . . . . . . . . . . . . . . . . . . 29
Bluetooth®Wireless Technology .............30
Audio Controls...........................31
AUDIO SYSTEMS
Android Auto™/ Apple CarPlay®Setup ........32
Standard Audio System* ...................33
UVO link Activation* ......................34
UVO Assistance* .........................34
Kia Access with UVO link App Download .......35
Kia Access with UVO link App Features Guide...35
UVO link with Navigation* ..................36
SEATING
Power Adjustable Driver’s Seat* .............37
Seat Warmers* ..........................37
6-Way Manual Adjustable Driver’s Seat*.......38
Front Seat Headrest Adjustment .............38
Unfastening Center Seat Belt ...............39
Folding Rear Seats .......................39
OTHER KEY FEATURES
Map/Room Lamps........................40
Sunvisor ...............................40
Smart Key* .............................41
Remote Keyless Entry* (Folding Key)..........42
Double-Turn Lock/Unlock All................42
Fuel Cap Open Warning Indicator*............42
Fuel Door Release Lever ...................42
Sunroof Operation with Sunshade* ...........43
Rear View Monitor (RVM) ..................44
Hood Release Lever and Latch ..............45
Liftgate Release Button....................45
SAFETY FEATURES
Child-Protector Rear Door Locks.............46
Occupant Detection System (ODS) /
Passenger Airbag Off Indicator ............46
Seat Belts ..............................47
NORMAL MAINTENANCE - TURBO ......48
NORMAL MAINTENANCE -
NON-TURBO .................. Back Cover
LEGAL DISCLAIMERS .......Inside Back Cover
2SOUL FEATURES & FUNCTIONS GUIDE *IF EQUIPPED

INSTRUMENT CLUSTER
INSTRUMENT
CLUSTER
0
2
3
456
7
8
x1000rpm
HC
BRAKE
P
ABS
EF
20
40
60
80
100
120
140
160
MPH
AUTO
Instrument Cluster Overview
(Type A)
ATachometer
BSpeedometer
CTurn Signal Indicators
DLCD - Gear Shift Position, Odometer,
Trip Modes / Trip Computer,
Exterior Temperature
EEngine Coolant Temperature
FFuel Gauge
Arrow direction indicates the side
of the vehicle the fuel door is located
This illustration is for demonstration purposes only. Some indicators and warning
lights may not appear in illustration. On the vehicle, they may appear in the LCD.
Your vehicle’s instrument cluster & indicator light locations may differ from those
in the illustrations. For more information on the instrument cluster, the LCD
Warning Messages and the function of all indicator and warning lights, please
refer to section 2 in the Owner’s Manual.
(Type A cluster)
A
C C
D
EF
B
ALWAYS CHECK THE OWNER’S MANUAL FOR COMPLETE OPERATING INFORMATION AND SAFETY WARNINGS. *IF EQUIPPED 3

INSTRUMENT
CLUSTER
INSTRUMENT CLUSTER
4SOUL FEATURES & FUNCTIONS GUIDE *IF EQUIPPED
0
2
3
456
7
8
x1000rpm
HC
BRAKE
P
ABS
EF
20
40
60
80
100
120
140
160
MPH
AUTO
(Type B cluster)
Forward Collision-Avoidance Assist*
Warning Light*
High Beam Assist Indicator*
High Beam Indicator Light
Low Beam Indicator Light*
Light ON Indicator Light
Front Fog Light Indicator*
Master Warning Light
Idle, Stop & Go (ISG) Indicator*
SPORT SPORT Mode Indicator Light*
ECO ECO Mode Indicator Light*
Electronic Power Steering (EPS) Warning Light*
Charging System Warning Light
Engine Oil Pressure Warning Light
Airbag Warning Light
Parking Brake & Brake Fluid Warning Light
Seat Belt Warning Light
Fuel Cap / Malfunction Indicator
(Check Engine Light)
Low Tire Pressure Light / Tire Pressure Monitoring
System (TPMS) Malfunction Indicator
Electronic Brakeforce Distribution (EBD)
System Warning Light (Two separate indicators on
Instrument Cluster lit at same time)
Electronic Stability Control (ESC) Indicator
Electronic Stability Control (ESC) OFF Indicator
LED Headlamp Warning Light*
Immobilizer Indicator Light*
Low Fuel Level Warning Light
Door Ajar Warning Light*
Cruise Indicator Light*
Lane Keeping Assistant Indicator Light*
Low Windshield Washer Fluid
Liftgate Open Warning Light*
This illustration is for demonstration purposes only.
Some indicators and warning lights may not appear in
illustration. On the vehicle, they may appear in the LCD.
Your vehicle’s instrument cluster & indicator light
locations may differ from those in the illustrations.
For more information on the instrument cluster, the
LCD Warning Messages and the function of all indicator
and warning lights, please refer to section 2 in the
Owner’s Manual.
Indicators & Warning Lights

INSTRUMENT
CLUSTER
INSTRUMENT CLUSTER
ALWAYS CHECK THE OWNER’S MANUAL FOR COMPLETE OPERATING INFORMATION AND SAFETY WARNINGS. *IF EQUIPPED †LEGAL DISCLAIMERS ON BACK INSIDE COVER 5
To view these videos on
your mobile device, snap
these QR Codes or visit the
listed website.
Refer to the inside cover for
more information.
Tire Pressure Monitoring
System
Fuel Economy Video
www.youtube.com/KiaFeatureVideos
QR CODE
Tire Pressure Monitoring System (TPMS)†24
The indicator functions as both Low Tire Pressure Light
and TPMS Malfunction Indicator.
The TPMS indicator illuminates if it detects
one or more tires is significantly under
inflated, the vehicle has a spare tire installed
without TPMS or the outside temperature
becomes significantly lower.
• The LCD screen in the instrument cluster will display the Low Tire
Pressure indicator Ashowing which tire(s) is underinflated
• Inflate tire(s) to specifications using an accurate tire pressure gauge to
turn off Low Tire Pressure Light . See front driver’s door jamb for PSI
specification
• When there is a problem with the TPMS, the TPMS Malfunction
Indicator will blink for approximately one minute and then illuminate
– See dealer for service
•Even with TPMS, tire pressure should be checked manually at least once a
month. Only adjust tire pressure on “cold tires” that have been sitting for at least
20 minutes tires and are not hot in temperature from direct sunlight or heat
•For proper maintenance and optimal fuel economy, maintain recommended
tire inflation pressures and stay within the load limits and weight distribution
recommended for your vehicle
•In winter or cold weather, the TPMS light may illuminate if the tire pressure was
adjusted to the recommended tire inflation pressure during warm weather
QUICK TIPS
Fuel Economy
There are several factors that contribute to your
vehicle’s fuel economy, such as maintenance
of your vehicle, driving style, environmental
conditions, vehicle weight and vehicle
aerodynamics. Below are some tips on how to
help improve fuel economy:
• Keep your vehicle in good condition with
regular maintenance
• Don’t let the engine idle longer than necessary
• Drive at a moderate speed, accelerating
smoothly and at a moderate rate
• Keep tires inflated to the recommended
pressure
• Travel lightly, without carrying unnecessary
weight in your vehicle
• Avoid placing large or heavy items on roof
racks
• Avoid hilly, winding or poorly maintained roads
Refer to section 4 in the Owner’s Manual for more information
or snap the QR Code above to view a video.
Images are for illustrative purposes only. Actual image or
feature may vary.
REMINDERS:
• Check the recommended tire pressure label located on the left side of driver’s door jamb, visible when the door is opened
• Consult your dealer for service if Low Tire Pressure Light remains illuminated after inflating your tire(s)
• Personal electronic devices (such as laptops, wireless chargers, remote start systems, etc.) may interfere with the
TPMS system, which may cause the Malfunction Warning Indicator (Check Engine Light) to illuminate
Refer to section 6 in the Owner’s Manual for more information.
Low Tire Pressure
24
33
33
33
A

INSTRUMENT
CLUSTER
INSTRUMENT CLUSTER
6SOUL FEATURES & FUNCTIONS GUIDE *IF EQUIPPED
Drive Mode Integrated
Control System Video
To view a video on your
mobile device, snap this
QR Code or visit the listed
website.
Refer to the inside cover for
more information.
www.youtube.com/KiaFeatureVideos
QR CODE
Drive Mode Integrated Control System*
The Drive Mode may be selected based on the driver’s preferences
and road conditions.
To cycle through the different Drive Modes A, press the DRIVE
MODE button B. The instrument cluster will display SPORT
when selected. When in NORMAL mode, it will not display in the
instrument cluster.
(Button located in center console below gear shift)
NORMAL SPORT
DRIVE
MODE
B
A
•
•In SPORT mode, when engine is turned off, the system will default to
NORMAL mode and SPORT mode will need to be selected again when the
vehicle restarts.
•To help improve your fuel economy:
– Drive at a moderate speed, accelerating smoothly and at a moderate rate
– Keep tires inflated to the recommended pressure
– Be sure the wheels are properly aligned
QUICK TIPS
REMINDERS:
•The system is turned ON and in NORMAL mode when ignition is in the ON position
•Steering effort may be slightly increased in Sport mode
•When SPORT mode is selected, fuel economy may decrease
For illustrative purposes only. Your actual display, buttons and/or features may vary.
Refer to section 5 in the Owner’s Manual for more information.

VEHICLE
SETTINGS
VEHICLE SETTINGS
ALWAYS CHECK THE OWNER’S MANUAL FOR COMPLETE OPERATING INFORMATION AND SAFETY WARNINGS. *IF EQUIPPED 7
The Trip Computer is a driver information system
that displays information related to driving on
the display when the ignition switch or the Engine
Start/Stop button* is in the ON position.
To cycle through the LCD Instrument Cluster modes,
press the Mode/Select button A.
When in the Trip Computer mode , press the OK/
Move/Select/Reset button Bup or down to cycle
through the screens. When displaying the Tripmeter,
press and hold the OK button Bto reset the
Tripmeter to zero.
REMINDERS:
•Appearance of Tripmeter display may differ as equipped
•All stored driving information (except Odometer and Range) is
reset if the battery is disconnected
CANCEL
RES
SET
+
_
CRUISE
RES
SET
+
_
<
<
+
>
>
-
MODE
+
>
>
-
MODE
CRUISE
CANCEL
OK
<
<
OK
(For Type B cluster; Buttons located
on steering wheel)
Fuel Economy
Average
16.8
MPG
0 10 20 30
(Type B Cluster)
TRIP:
• Average Fuel Economy
• Instant Fuel Economy
Digital Speedometer
Transmission Temperature*
ACCUMULATED INFO
• Tripmeter
• Fuel Economy
• Timer
DRIVE INFO
• Tripmeter
• Fuel Economy
• Timer
Trip Computer Mode: Displays driving information
for fuel economy, accumulated info, etc.
Turn-by-Turn Mode*: Displays the route guidance
and destination info
User Settings Mode: Change settings of the Head-Up
Display*, doors, lights, sound, driving assistance*,
convenience, service interval and other features
Master Warning Mode: Displays warning messages
related to the vehicle when one or more systems is not
operating normally
Driving Assist: Displays the Lane Safety*, Driver
Attention Warning*, Smart Cruise Control* and TPMS info
LCD Instrument Cluster Modes*
Press the Mode/Select button Ato cycle through different
LCD Instrument Cluster Modes:
Trip Modes / Trip Computer
Driving while distracted is dangerous and should be avoided. Drivers should
remain attentive to driving and always exercise caution when using the
steering-wheel-mounted controls while driving.
Refer to section 4 in the Owner’s Manual for more information.
Your vehicle’s steering wheel buttons may differ from those in the illustrations.
Refer to section 4 in the Owner’s Manual for more information.
CANCEL
RES
SET
+
_
CRUISE
RES
SET
+
_
<
<
+
>
>
-
MODE
+
>
>
-
MODE
CRUISE
CANCEL
OK
<
<
OK
A
B

VEHICLE
SETTINGS
VEHICLE SETTINGS
8SOUL FEATURES & FUNCTIONS GUIDE *IF EQUIPPED
CANCEL
RES
SET
+
_
CRUISE
RES
SET
+
_
<
<
+
>
>
-
MODE
+
>
>
-
MODE
CRUISE
CANCEL
OK
<
<
OK
CANCEL
RES
SET
+
_
CRUISE
RES
SET
+
_
<
<
+
>
>
-
MODE
+
>
>
-
MODE
CRUISE
CANCEL
OK
<
<
OK
(For Type B cluster; Buttons located
on steering wheel)
User Settings Mode*
To enter the User Settings mode in the LCD Instrument Cluster Modes, press the
Mode/Select button Awhen the vehicle is at a standstill and with the Engine
Start/Stop* button in the ON position and select User Settings .
You can navigate the selections on the display by pressing the Move/Reset
button B, and then selecting the item by pressing the Mode/Select button A.
Head-Up Display*:
•Display Height
•Rotation
•Brightness
•Contents Selection
•Speedometer Size
•Speedometer Color
Driver Assistance*:
•Smart Cruise Control Response
•Driver Attention Warning
•Warning Timing
•Warning Volume
•Forward Safety
•Lane Safety
•Blind-Spot Safety
Door/Liftgate:
•Automatically Lock
•Automatically Unlock
Lights:
•One-Touch Turn Signal
•Headlamp Delay
Sound:
•Welcome Sound
Convenience*:
•Welcome Mirror
•Wipers/Lights Display
•Auto Rear Wiper
•Gear Position Pop-Up
•Icy-Road Warning
Service Interval:
•Enable Service Interval
•Adjust Interval
•Reset
Other Features*:
•Fuel Economy Auto Reset
•Fuel Economy Unit
•Temperature Unit
•Tire Pressure Unit
•Torque Unit
•Turbo Boost Pressure Unit
Reset:
•Reset menus to factory settings
(except language & service interval)
A
B
Refer to section 4 in the Owner’s Manual
for more information.

To view these videos on
your mobile device, snap
these QR Codes or visit the
listed website.
Refer to the inside cover for
more information.
LCD Display Video
LCD Display:
Maintenance Video
www.youtube.com/KiaFeatureVideos
QR CODE
Service Interval Mode*
To enter Service Interval Mode, press the
Mode/Select button Aand select User
Settings , then scroll to Service Interval
by pressing Move/Reset button B. Press
the Mode/Select button Ato enter. System
will display number of miles remaining until
next service is due, and type of service.
When service is required, the following will
be displayed: Service Required.
To reset the Service Interval Mode system,
press and hold the Move/Reset button B
for more than 1 second.
To turn Service In OFF, go to User Settings.
Service Interval Setting
To set the service interval when in User
Settings mode:
•Press the Move/Reset button Band
scroll to Service Interval. Press the Mode/
Select button Ato enter
•Press the Move/Reset button Band
toggle to ON, then press the Move/Select
button A. Then press the Move/Reset
button Bto scroll and select the desired
miles or months for your next service
•Press the Mode/Select button Ato enter
36 days1,100 mi
VEHICLE
SETTINGS
VEHICLE SETTINGS
ALWAYS CHECK THE OWNER’S MANUAL FOR COMPLETE OPERATING INFORMATION AND SAFETY WARNINGS. *IF EQUIPPED 9
CANCEL
RES
SET
+
_
CRUISE
RES
SET
+
_
<
<
+
>
>
-
MODE
+
>
>
-
MODE
CRUISE
CANCEL
OK
<
<
OK
(For Type B cluster; Buttons located
on steering wheel)
•
To reset back to the default settings, press the Reset
button on the audio head unit screen.
QUICK TIP
REMINDERS:
• Mood Lights cannot be changed while vehicle is moving
• Park vehicle in a safe location before changing the settings
• When any door is opened, the lighting turns off
Sound-Reactive Mood Light*
The vehicle’s speaker lights can be customized,
including setting the lights to change according to
the mood of the music playing.
To change the settings, go to All Menus in the
audio head unit. Select Sound Mood Lamp and
adjust the different settings.
(Instrument cluster LCD screen
shown)
12:00 AM Jan. 1
Menu
Sound Mood Lamp
Color Theme
Sound Mood
Mood Lamp responds according to
the theme selected.
Glow Only
Music +
Midnight City Cafe
A
B
Refer to the Car Multimedia System User’s Manual for more
information.
Refer to section 4 in the Owner’s Manual for more information. For illustrative purposes only.
Your actual display, buttons and/or features may vary.

Head-Up Display (HUD)*†11
The Head-Up Display (HUD) is a semi-transparent display that projects a snippet of information from
the instrument cluster and navigation system* onto the popup glass. To turn HUD ON or OFF, and press
the HUD button A.
The HUD displays:
•Turn By Turn (TBT) navigation information
•Road signs
•Speedometer
•Cruise setting speed
•Smart Cruise Control information*
•Lane Safety information
•Blind-Spot Safety information
•Warning lights (low fuel)
•AV mode information
Head-Up Display (HUD) User Settings
Drivers can adjust the HUD settings from the LCD Instrument Cluster modes in User Settings.
HUD settings include:
•Display Height: Adjust the height of the HUD image on the windshield glass
•Rotation: Adjust the degree of HUD rotation
•Brightness: Adjust the intensity of the HUD brightness
•Contents Selection: Activate or deactivate HUD content (Audio/video,
Driving Assist, Lane Safety and Blind-Spot, Turn-by-Turn and Traffic Safety info)
•Speedometer Size: Choose the size of the HUD speedometer (Small, Medium, Large)
•Speedometer Color: Choose the color of the HUD speedometer (White, Orange, Green)
ADAS
ADVANCED DRIVER ASSISTANCE SYSTEMS (ADAS)
10 SOUL FEATURES & FUNCTIONS GUIDE *IF EQUIPPED †LEGAL DISCLAIMERS ON BACK INSIDE COVER
For illustrative purposes only. Your actual display
may vary.
The Head-Up Display is a supplemental system. Do
not solely rely on the system, always drive safely, and
pay attention to the driving conditions on the road.
Refer to section 4 in the Owner’s Manual for more
information.
REMINDERS:
• The HUD image on the windshield glass may not be visible when:
– The driver has poor sitting posture
– The driver is wearing polarized sunglasses
– There is an object covering the HUD
– Driving on a wet road
– Excessive lighting inside or outside the vehicle
• If Turn By Turn (TBT) navigation information is selected as
HUD content, TBT information will not be displayed on the LCD
• Modifications made to the windshield, such as tinting or other
aftermarket treatments, could affect the HUD. When replacing
the front windshield glass of vehicles equipped with the
HUD, owners must replace it with windshield glass designed
for HUD operation. Otherwise, duplicated images may be
displayed on the windshield glass
(Button located in panel to the
left of steering wheel)
HUD
i...
P
A

ADVANCED DRIVER ASSISTANCE SYSTEMS (ADAS)
ADAS
ALWAYS CHECK THE OWNER’S MANUAL FOR COMPLETE OPERATING INFORMATION AND SAFETY WARNINGS. *IF EQUIPPED †LEGAL DISCLAIMERS ON BACK INSIDE COVER 11
Lane Keeping Assist (LKA)*†6
With the Engine Start/Stop button in the ON position, press the Lane Safety button Ato turn the
system ON. The instrument cluster indicator will illuminate white. It will remain white when
vehicle is traveling less than 40 mph and the system does not detect the lane markers. When LKA
detects the lane markers and can assist the steering, the LKA icon will illuminate green.
If LKA detects that you are moving outside of your lane, the system may give an audible warning
and display a Lane Departure Warning alert on the instrument cluster. If the vehicle continues to
move outside of the lane, LKA can provide steering inputs, trying to prevent the vehicle from moving
outside its lane.
LKA is the operating mode by default when the Lane Safety button is depressed to ON.
To switch between LKA modes (Active LKA, LKA and Lane Departure Warning), go to
Vehicle Settings* in the audio control unit or the User Settings* in the Instrument Cluster.
All systems will operate under the following conditions:
•The vehicle exceeds approximately 40 mph
•The vehicle is between the lane markers
•LKA recognizes the lane the vehicle is traveling in
Lane Keeping Assist* is not a substitute for
safe and proper driving. Always drive safely
and use caution. LKA may not always alert the
driver if the vehicle is driven outside of its lane.
Refer to section 5 in the Owner’s Manual for
more information.
When the front view camera detects
the lanes traveling in, the indicators are
illuminated
When the front view camera does not detect
the lanes traveling in, the indicator will not
illuminate
When the front view camera detects the vehicle moving outside of the lane the vehicle’s
traveling in, a yellow indicator will illuminate, either on the left or right lane
Lane Keeping Assist Lane Keeping Assist Lane Keeping Assist
REMINDERS:
• When the vehicle changes lanes without
a turn signal, LKA may sound an audible
warning. The warning sound can be adjusted
in the User Settings.
• LKA/LDW will not issue a warning if the turn
signal or hazard signal is activated
• LKA/LDW will return to its previous state
when the ignition is cycled
Lane Keeping Assist
Video
To view a video on your
mobile device, snap this
QR Code or visit the listed
website.
Refer to the inside cover for
more information.
www.youtube.com/KiaFeatureVideos
QR CODE
HUD
i...
P
(Button located in panel to the
left of steering wheel)
Lane Keeping Assist
A

ADAS
ADVANCED DRIVER ASSISTANCE SYSTEMS (ADAS)
12 SOUL FEATURES & FUNCTIONS GUIDE *IF EQUIPPED †LEGAL DISCLAIMERS ON BACK INSIDE COVER
Forward Collision-Avoidance Assist (FCA)*†6
FCA is designed to detect and monitor a vehicle ahead or detect a pedestrian in the roadway through front view
camera recognition and front radar signals to warn the driver that a collision is imminent, and if necessary, apply
emergency braking. Initially, FCA provides Forward Collision Warning when it detects a potential collision with a
vehicle in front, emitting an audible warning and visual alert on the Instrument Cluster LCD A. Adjust the Warning
Time (Early, Normal, Late) in the User Settings menu on the Instrument Cluster display. FCA is ON by default and can
be turned OFF in the User Settings, selecting Driving Assist, then Forward Collision-Avoidance Assist.
If the system detects that the collision risk has increased, the FCA automatically applies the brakes to reduce your
speed, potentially helping to avoid or reduce the effects of a possible collision.
FCA will become active when the:
•Engine Start/Stop button is ON
•Vehicle is traveling more than 6 mph
•Electronic Stability Control (ESC) is ON
Forward Collision-Avoidance Assist* is not a substitute for safe
and proper driving. Always drive safely and use caution. FCA
may not always alert the driver when the vehicle is approaching
another vehicle.
For illustrative purposes only. Your actual display, buttons and/or
features may vary.
Refer to section 5 in the Owner’s Manual for more information.
REMINDERS:
• FCA will be activated by default when vehicle power is cycled on,
even when previous setting is off
• If FCA is operating and the ESC (Electronic Stability Control) is
turned off, FCA is automatically turned off
• When FCA is off, FCA warning indicator is on in the instrument
cluster
• The warning sound can be adjusted in the User Settings
Forward Collision-
Avoidance Assist (FCA)
Video
To view a video on your
mobile device, snap this
QR Code or visit the listed
website.
Refer to the inside cover for
more information.
www.youtube.com/KiaFeatureVideos
QR CODE
Collision Warning
A

ADVANCED DRIVER ASSISTANCE SYSTEMS (ADAS)
ADAS
ALWAYS CHECK THE OWNER’S MANUAL FOR COMPLETE OPERATING INFORMATION AND SAFETY WARNINGS. *IF EQUIPPED †LEGAL DISCLAIMERS ON BACK INSIDE COVER 13
Blind-Spot Collision
Warning Video
To view a video on your
mobile device, snap this
QR Code or visit the listed
website.
Refer to the inside cover for
more information.
www.youtube.com/KiaFeatureVideos
QR CODE
Blind-Spot Collision Warning (BCW)*†6
BCW uses rear corner radar sensors in the rear bumper to monitor
and warn the driver, in certain situations, if it detects an approaching
vehicle in the driver’s blind spot area. The BCW System is ON when
the button Ais pressed – the button light will illuminate. The outside
rearview mirror warning lights will also illuminate for 3 seconds.
To activate BCW, go to User Settings by pressing the Mode button on
the Steering Wheel. Select Driver Assistance > Blind-Spot Safety and
then press the OK button. Select Warning Only or Off.
The system will become active when the vehicle is traveling more
than 20 mph and will warn the driver if another vehicle is detected by
the radar sensor.
1st-stage warning: When another vehicle is detected within the
blind-spot area B, or when a vehicle is detected closing at high
speed, a yellow indicator will illuminate on the outside rearview
mirrors.
2nd-stage warning: When 1st-stage warning is on and the driver
activates a turn signal, a flashing yellow indicator will illuminate on
the outside rearview mirrors and the system will sound a warning.
REMINDERS:
•BCW will not issue a warning if the vehicle speed is 6 mph or more than the
speed of the surrounding vehicles
•When BCW is ON and the ignition is cycled, BCW returns to its previous state
•The BCW warning sound can be adjusted in User Settings
•See the Owner’s Manual for more detailed information, limitations and conditions
HUD
i...
P
(Button located in panel to
the left of steering wheel)
BCW is a supplemental system. Do not solely rely on this system and always pay attention to the road and its
conditions.
Images are for illustrative purposes only and may not reflect actual operation.
Refer to section 5 in the Owner’s Manual for more information.
A
B

ADAS
ADVANCED DRIVER ASSISTANCE SYSTEMS (ADAS)
14 SOUL FEATURES & FUNCTIONS GUIDE *IF EQUIPPED †LEGAL DISCLAIMERS ON BACK INSIDE COVER
Images are for illustrative purposes only and may not reflect actual operation.
Refer to section 5 in the Owner’s Manual for more information.
Rear Cross-Traffic Collision-Avoidance Assist (RCCA)*†6
REMINDERS:
•The RCCA Warning sound can be adjusted in the User Settings* or the Vehicle Settings* on the audio head unit
•When vehicle power is cycled, RCCA will remain in the previous state
•RCCA can be turned OFF/ON in User Settings
•RCCA will show a warning if the approaching vehicle speed is between 2.5-22 mph within sensing range.
See owner’s manual for other conditions
•RCCA is a supplemental system. Do not solely rely on this system and always pay attention to the road and
its conditions
A
B
If RCCA detects approaching vehicles from the rear left or rear right side of the
vehicle A, the system will sound an audible warning, the warning indicators on the
outside rearview mirror will illuminate and a message will appear on the Instrument
Cluster LCD B. RCCA may activate the Electronic Stability Control (ESC) to help avoid
an imminent collision. RCCA may temporarily apply braking power when an approaching
vehicle is detected within a certain distance next to or behind the vehicle.
RCCA is designed to operate under the following conditions:
•When the gear shift is in Reverse
•When the vehicle is moving slower than 6 mph
Check rear seats
:Alarm Off
OK
Rear Occupant Alert (ROA) System
The Rear Occupant Alert (ROA) system can help alert
the driver when a rear passenger may be left in the
vehicle. The alert will be a message on the Instrument
Cluster stating to “Check rear seats” Cand a chime
will sound.
To turn the system OFF or ON, go to Vehicle Settings*,
select Convenience, then Rear Occupant Alert and
check/uncheck the box to enable/disable by pressing
the OK button on the Steering Wheel.
The Rear Occupant Alert system is not a substitute for one’s
attention. Always check the vehicle’s interior before exiting.
Image is for illustrative purposes only and may not reflect actual
feature or operation.
Refer to section 4 in the Owner’s Manual for more information.
REMINDER: Always be sure to check the passenger areas before
leaving the vehicle.
C

ADVANCED DRIVER ASSISTANCE SYSTEMS (ADAS)
ADAS
ALWAYS CHECK THE OWNER’S MANUAL FOR COMPLETE OPERATING INFORMATION AND SAFETY WARNINGS. *IF EQUIPPED †LEGAL DISCLAIMERS ON BACK INSIDE COVER 15
Driver Attention Warning (DAW)*†6
REMINDERS:
•The setup of DAW will be maintained, as selected, when the ignition is cycled
•When activated, DAW does not display “Consider taking a break” message when the total trip driving time is less than 10 minutes
•The DAW System will enter a standby mode if the front-view camera does not detect the lanes and/or the driving speed remains under 40 mph
Driver Attention Warning
System Off
Level Time ——:——
Attention Level
LOW HIGH
Level Time 00:27
Attention Level
LOW HIGH
Level Time 05:27
Consider taking a break
22.4 °C 4025km
Driver Attention Warning
System Off
Level Time ——:——
Attention Level
LOW HIGH
Level Time 00:27
Attention Level
LOW HIGH
Level Time 05:27
Consider taking a break
22.4 °C 4025km
Driver Attention Warning
System Off
Level Time ——:——
Attention Level
LOW HIGH
Level Time 00:27
Attention Level
LOW HIGH
Level Time 05:27
Consider taking a break
22.4 °C 4025km
Driver Attention Warning is not a substitute for safe driving and may not detect all instances of inattentive driving practices.
Failure to pay attention to travel conditions and vehicle operation could result in loss of vehicle control. Always drive safely and use caution.
Refer to section 5 in the Owner’s Manual for more information
A CB
DAW is designed to alert the driver if it detects certain inattentive driving and, in certain situations, can give a
warning signal to take a break from driving.
DAW is set to OFF by default. To turn DAW ON, turn the ignition on and then select User Settings in the LCD
Display on the Instrument Cluster. Then go to Driver Assistance and select Driver Attention Warning. Set DAW to
Normal or High Sensitivity.
Driver Attention Warning modes:
OFF: The Driver Attention Warning system is deactivated A
Normal Sensitivity: Driver Attention Warning warns the driver of inattentive driving practices
High Sensitivity: Driver Attention Warning warns the driver of inattentive driving practices
faster than Normal mode
If DAW System is activated, DAW information will appear on the LCD Display Bwhen you select
the ASSIST mode .
A message, “Consider taking a break,” appears on the LCD display and a warning sounds to suggest the
driver to take a break when the driver’s attention level is below one bar C.

DRIVER'S PANEL
16 SOUL FEATURES & FUNCTIONS GUIDE *IF EQUIPPED †LEGAL DISCLAIMERS ON BACK INSIDE COVER
DRIVER’S
PANEL
Hill-Start Assist Control (HAC)†7
HAC is designed to prevent the vehicle from rolling backward when
accelerating from a stop while on a steep incline. The HAC automatically
activates whether the ESC is OFF or ON, but does NOT activate when the ESC
has malfunctioned.
•
•HAC provides a two-second delay before the vehicle may start rolling backwards
•When HAC is active (e.g., accelerating from a stop on an incline), you may notice that
the brakes will momentarily remain engaged after you depress the accelerator
QUICK TIPS
Instrument Panel Dimmer
With parking lights / headlights ON, press the button B+ or – to adjust
display brightness of the instrument panel illumination.
Illumination
Max
Max Min
HUD
i...
P
(Button located in panel to the
left of steering wheel)
REMINDERS:
•Door Mood Lamp is a fixed
brightness and cannot be adjusted
(not to be confused with Advanced
Mood Lighting Speaker)
•If the brightness reaches to the
maximum or minimum level, an
alarm will sound
REMINDERS:
•The HAC does not operate when the gear shift is in the P (Park) or the N (Neutral) position
•In the event of HAC system malfunction, see an Authorized Kia Dealer for service
•HAC does not replace the need to apply brakes while the vehicle is stopped on an incline
B
Refer to section 5 in the Owner’s Manual for more information.
Refer to section 4 in the Owner’s Manual for more information.
HUD
i...
P
OFF
Electronic Stability Control (ESC)*†7
(Button located in panel to
the left of steering wheel)
A
The ESC system is designed to help stabilize the vehicle during certain
cornering maneuvers. It is a good idea to keep the ESC turned ON for daily
driving whenever possible.
Press ESC button Ato turn ESC OFF/ON.
REMINDERS:
•ESC is ON by default at vehicle startup. When ignition is cycled, ESC will turn ON again
•The ESC Indicator Light in the instrument cluster will be lit momentarily whenever the ESC
is active

DRIVER'S PANEL
ALWAYS CHECK THE OWNER’S MANUAL FOR COMPLETE OPERATING INFORMATION AND SAFETY WARNINGS. *IF EQUIPPED †LEGAL DISCLAIMERS ON BACK INSIDE COVER 17
DRIVER’S
PANEL
Refer to section 5 in the Owner’s Manual for more information.
ENGINE
START
STOP
(Button located above Gear Shift)
Engine Start/Stop Button*†8
To start the engine:
1. Depress the brake pedal
2. Press the ENGINE START/STOP button while gear shift is in
P (Park) (light Awill not illuminate when starting)
To turn the engine OFF – Press the ENGINE START/STOP button
again.
To use the ENGINE START/STOP button, the Smart Key fob must be
in the vehicle.
•
To use electrical accessories:
ACC position
• When in the OFF position (no light) and without depressing the brake
pedal, press the ENGINE START/STOP button once (amber light A)
On position
• When already in the ACC position (amber light A) and without
depressing the brake pedal, press the ENGINE START/STOP button
again (reddish-orange light A)
• When in the OFF position (no light) and without depressing the brake
pedal, press the ENGINE START/STOP button twice (reddish-orange
light A)
Keeping the vehicle in ACC or the ON position without engine
running may discharge the vehicle’s battery.
QUICK TIPS
REMINDERS:
• In an emergency situation while the vehicle is in motion, you are able to turn the
engine off and to the ACC position by pressing the ENGINE START/STOP button for
more than 2 seconds or 3 times successively within 3 seconds
• If Smart Key fob battery is dead, with the lock button facing the ENGINE START/STOP
button, hold the fob up against the ENGINE START/STOP button and press
To view videos on your
mobile device, snap these
QR Codes or visit the listed
website. Refer to the inside
cover for more information.
Engine Start/Stop Button &
Smart Key Video
Kia Key Fob Video
www.youtube.com/KiaFeatureVideos
QR CODE
A

DRIVER’S
PANEL
DRIVER'S PANEL
18 SOUL FEATURES & FUNCTIONS GUIDE *IF EQUIPPED
Power Windows, Window Lock & Central Door Lock
APull/Press to operate Driver’s and Front Passenger’s window Auto Up/Down*
BPress to Unlock/Lock All Doors
CPress to disable Rear Passenger Windows
REMINDER: When button Cis pressed,
window controls for the Rear Passenger
Windows are disabled.
•
Press button again to stop Auto Up/Down function.
QUICK TIP
Rear Door Locks
If the inner door handle is pulled once when the door is
locked, the door will unlock. If the inner door handle is pulled
once more, the door will open.
Refer to section 4 in the Owner’s Manual for more information.
Power/Heated Outside Mirrors*
Use mirrors heaters to defrost/defog mirrors. Mirror heaters
are controlled with the Rear Defroster.
Toggle switch Dleft or right to select mirror. Then press
arrows Eto adjust mirror position.
Refer to section 4 in the Owner’s Manual for more information.
Automatic Door Lock/Unlock
Auto Door Lock/Unlock will engage when the gear shift is
moved into or out of the P (Park) position. Refer to the User
Settings in the LCD Instrument Cluster modes on how to turn
Auto Door Lock/Unlock ON/OFF.
Refer to section 4 in the Owner’s Manual for more information.
R
L
R
L
Button configuration
may vary depending
on vehicle model.
A
C
D
E
B
•
While driving with the rear windows down or with the sunroof* in an open or partially open
position, a wind buffeting or pulsation noise may be heard. This noise is a normal occurrence
and can be reduced or eliminated by the following:
• If the noise occurs with one or both of the rear windows down, partially lower both front
windows approximately 1 inch
• If the noise occurs with the sunroof open, slightly reduce the size of the sunroof opening
QUICK TIPS
Refer to section 4 in the Owner’s Manual for more information.
Table of contents
Other Kia Automobile manuals